


Table of Contents Show
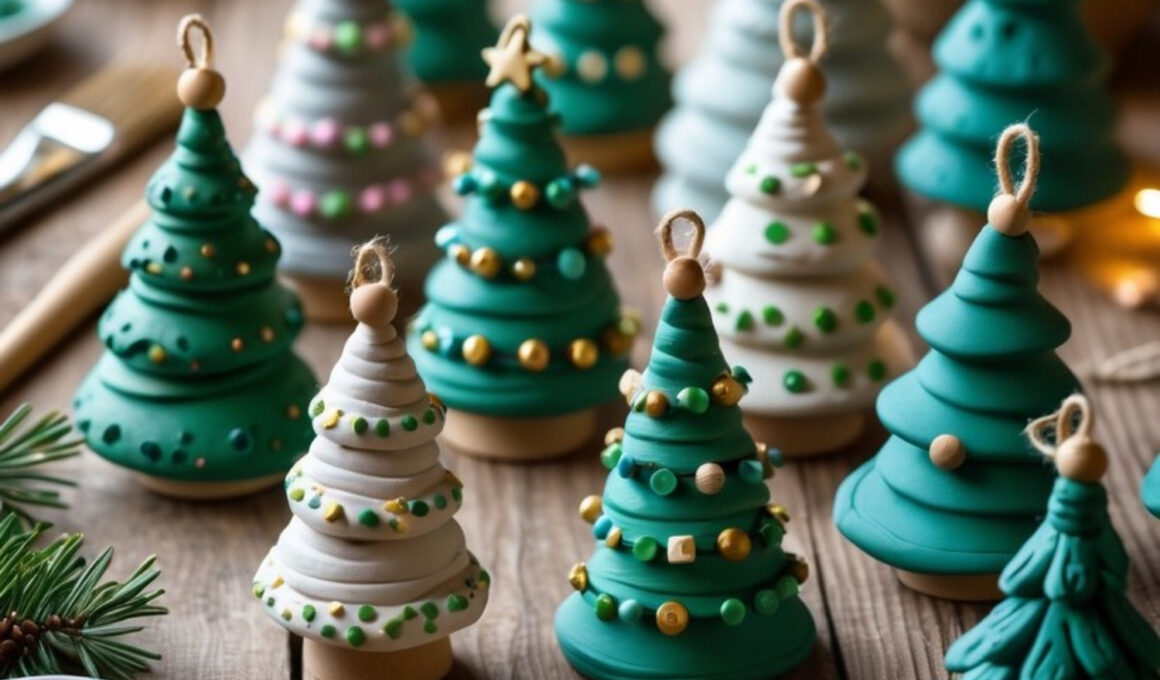
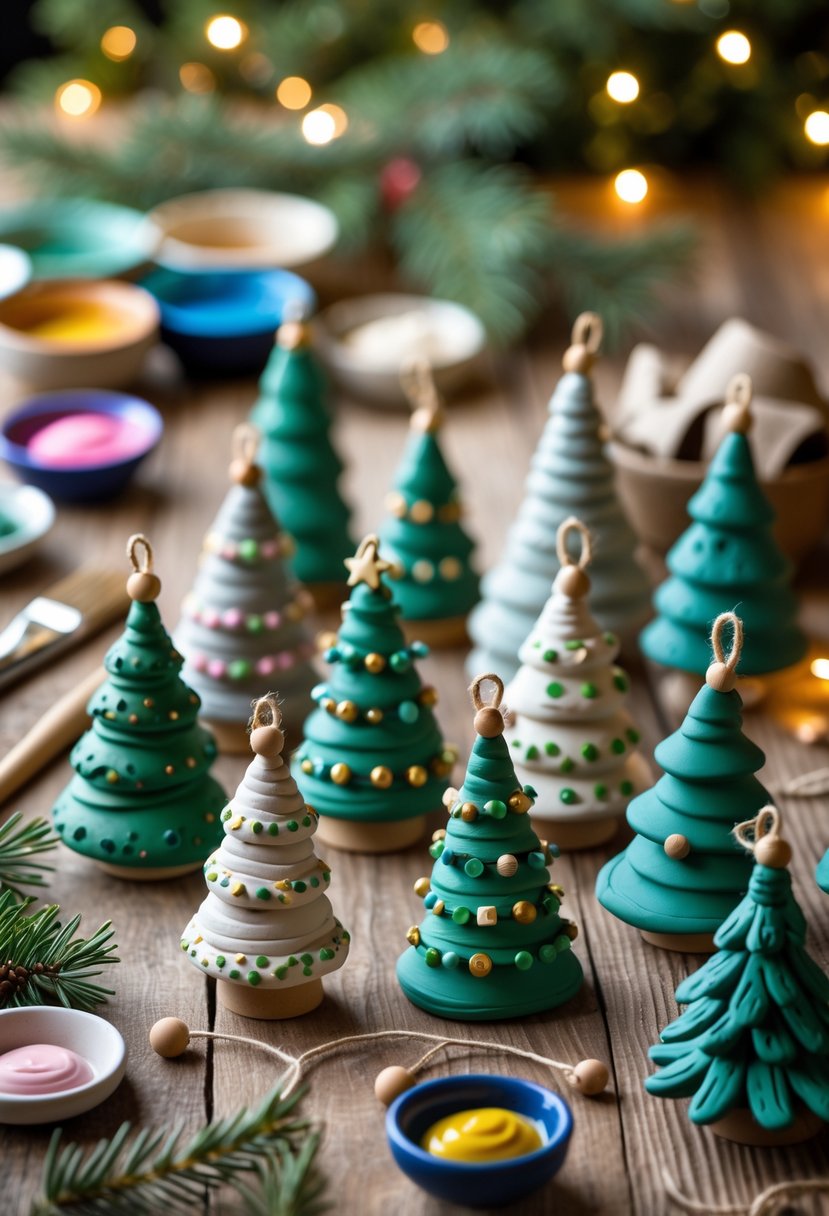
Air-dry clay Christmas trees are a cozy, hands-on holiday craft that looks delightfully boutique but is totally doable at your kitchen table. With just clay, a few simple tools, and imagination, you can sculpt little evergreens that stand on a mantel, top presents, or hang as keepsake ornaments.

This project is forgiving—clay smooths out with a damp fingertip, layers can be added as you go, and every “branch” has its own charm.
Kids love the tactile squish; adults love the polished, ceramic-like finish once painted and sealed.
How to Make Air-Dry Clay Christmas Trees
Make a forest of minis in varying heights, add garlands and “baubles,” or personalize with initials and dates so they become heirloom pieces you pull out every year.
For People Who Love to Make Things ✂️
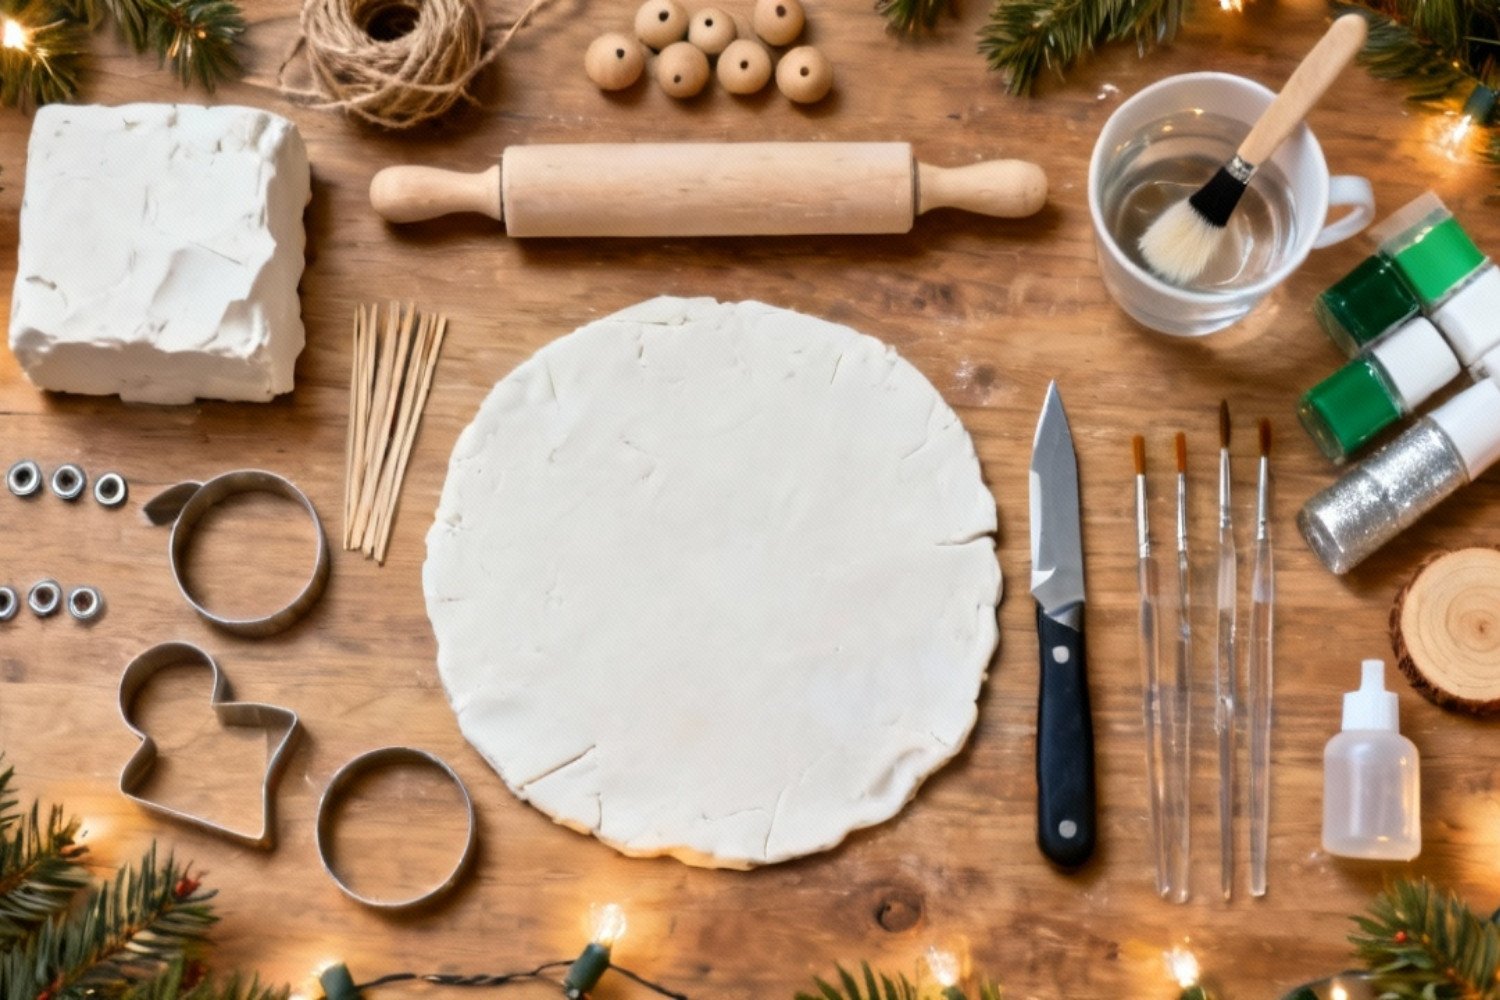
Materials
- Air-dry clay (white or colored)
- Small rolling pin (or smooth glass jar)
- Craft knife or clay blade; toothpicks/skewer for details
- Circle cutters or bottle caps (for tiered layers)
- Water cup + soft brush (for smoothing seams)
- Craft mat or parchment paper (non-stick surface)
- Wooden beads or small clay balls (as toppers/ornaments)
- Acrylic paints (greens, whites, metallic gold/silver)
- Fine paintbrushes + dotting tool (or the end of a brush)
- Clear acrylic sealer or Mod Podge (matte or gloss)
- Optional: twine/eye screws for hanging, mini wooden disks/corks as bases, mica powder or glitter for shimmer
Shop the materials


The steps
Step 1: Condition and Portion the Clay
Break off golf-ball sized pieces and knead each until the clay feels smooth and pliable—this warms it up, reduces cracking, and makes shaping easier.
If the clay crumbles, work in a drop of water; if it sticks, dust your hands lightly with cornstarch.
Decide on sizes: marble (tiny ornaments), walnut (small trees), or egg-sized (tabletop trees). Keep unused clay wrapped to prevent drying.
Step 2: Choose a Tree Style
Pick a style before you start so your “forest” feels cohesive:
- Cone + Carved Branches: a simple cone with shallow knife or toothpick cuts to mimic needles.
- Stacked Disks (Tiered): multiple clay circles stacked largest to smallest for a “layered skirt” look.
- Coiled Ribbon: a thin clay snake spiraled upward—playful and modern.
- Textured Pine: small teardrop “scales” layered around a cone for a realistic pine effect. Sketch a quick reference or line up inspiration on your phone to keep proportions consistent.
Step 3: Form the Core Shape
Roll each portion into a smooth ball, then into a cone by rolling one side more than the other. For stability, gently press the base on the table to flatten.
If you’re making tiered trees, roll clay to ~⅛–¼ in (3–6 mm) thick and cut circles with cutters/caps; gently dome each circle with your thumb so layers sit neatly and cast shadows like real boughs.
Step 4: Add Texture and Details
This is where the trees come alive:
- Carved Needles: Hold a toothpick at a slight angle and make short, downward strokes in overlapping rows. Vary the length so it looks organic.
- Tiered Edge Ruffles: Lightly pinch or lift the rims of each disk to create soft “fronds.”
- Coiled Garlands: Roll a very thin snake and wind it around the cone, tacking with a dab of water.
- Pine Scales: Pinch pea-size bits into teardrops, press the fat end into the cone in rings from bottom to top, overlapping like shingles. Smooth any seams with a damp brush. If cracks appear, rub a paste of clay + a drop of water (“slip”) into them and retexture.
Step 5: Secure Bases and Hangers
For standing pieces, press the tree onto a mini wood disk or a short cork while the clay is soft; this ensures a perfectly flat, sturdy base.
For ornaments, twist a small eye screw into the clay tip or embed a loop of twine: make a pilot hole with a skewer, add a dab of slip, and seat the finding/loop firmly.
Step 6: Add Ornaments and Toppers
Roll tiny beads from clay (or use wooden beads) and attach with a pin-head of water. Keep scale in mind—smaller “baubles” toward the top.
For a star topper, flatten a pea of clay and cut with a mini star cutter or carve by hand; secure with a toothpick nub sunk into the cone for support. Press lightly so details don’t distort.
Step 7: Dry Slowly and Evenly
Place trees on parchment in a draft-free area. Air-dry clay shrinks as it cures; slow drying prevents warping.
Flip pieces every few hours the first day so bases stay flat; total dry time is typically 24–48 hours, depending on size and humidity. Don’t paint until they feel cool, hard, and chalky all over (no soft spots).
Step 8: Sand & Prime (Optional but Polished)
Lightly sand rough edges with fine sandpaper (320–400 grit). Dust off. If you want ultra-smooth, brush on a thin layer of diluted Mod Podge or gesso as a primer—this reduces paint soak-in and yields richer color.
Step 9: Paint the Forest
Base coat in shades of green, icy white, or a gradient ombré from dark base to light tip. Let dry between thin coats to avoid brush marks.
Use a fine brush or dotting tool to add garlands (thin gold lines), ornaments (tiny metallic dots), snow tips (dry-brushed white on edges), or icing drips on tiered layers. Metallic highlights on high points make the texture pop under lights.
Step 10: Seal for Durability
Once fully dry, apply a clear acrylic sealer (matte for ceramic look, gloss for glazed look). Two light coats beat one heavy coat. Sealing protects paint, strengthens small add-ons, and makes pieces wipe-clean—handy if they’re used as table décor.
Step 11: Display, Gift, or Hang
Cluster trees of varying heights on a tray with fairy lights, nestle singles atop wrapped gifts, or hang the smaller ones from twine as ornaments. Don’t forget to inscribe initials and the year on the base with a fine marker before sealing—future-you will love the timestamp