


Table of Contents Show
Summer crafts for teens should feel a little more grown, more stylish, and more worth keeping when they are done. The best projects are not just cute for the moment, they can be worn, displayed, gifted, or used to decorate a bedroom, tote bag, journal, or desk. That is what makes teen crafts so fun during the summer.
These ideas are bright, creative, and still easy enough to make at home with simple supplies. From beaded phone charms and painted tote bags to clay trinket dishes and DIY room decor, each project feels fresh without being too hard.
They are also great for sleepovers, summer camps, weekend craft days, or quiet afternoons when teens want something fun to make with their hands.
1. Beaded Phone Charm
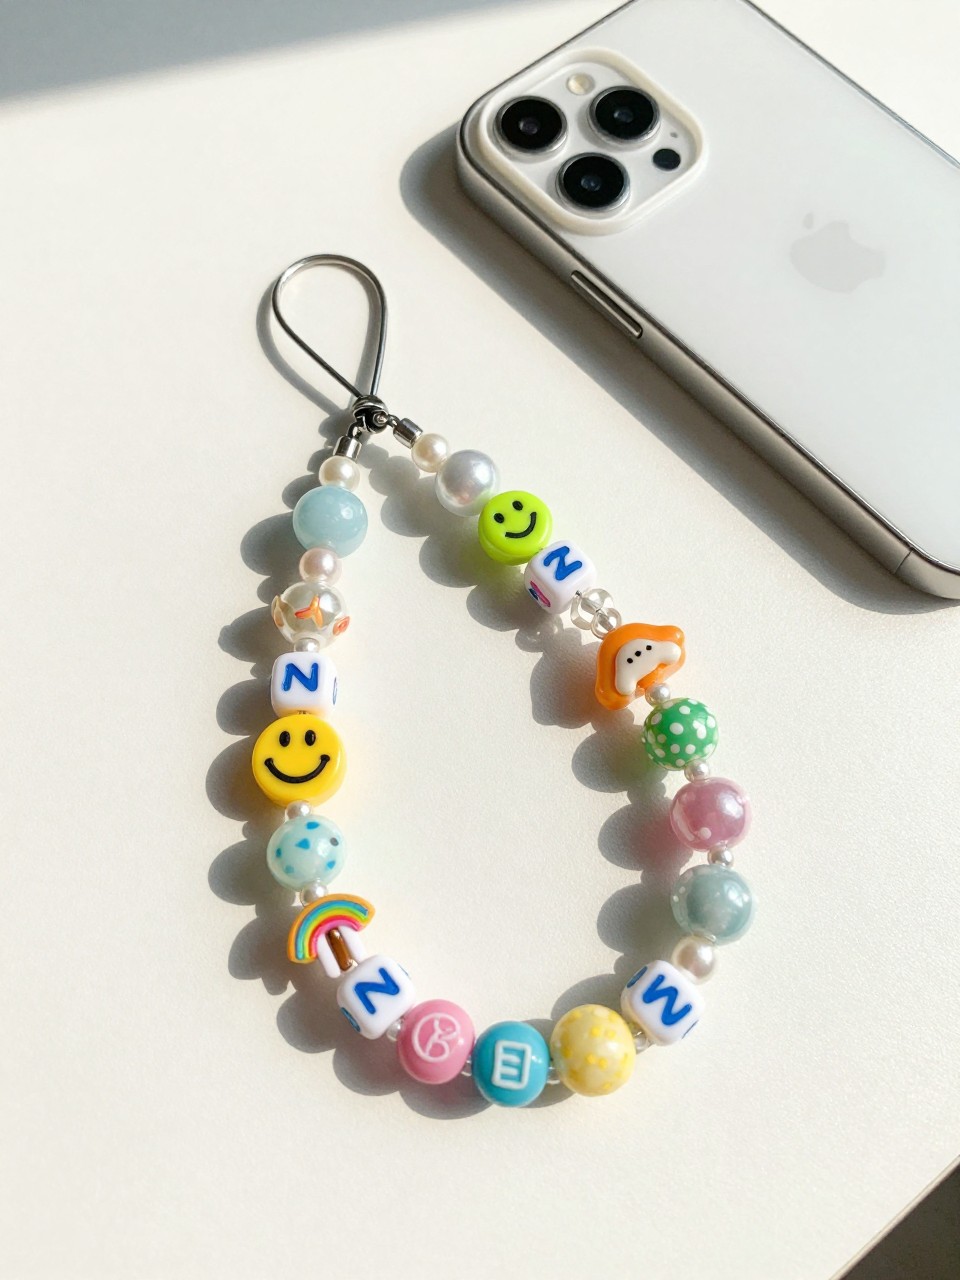
Beaded phone charms are cute, useful, and very easy to make personal. Teens can choose colors, initials, fruit beads, shells, hearts, or smiley charms to match their phone case or summer outfits.
Materials Needed:
For People Who Love to Make Things ✂️
- Beads in different colors and shapes
- Letter beads
- Stretch cord or nylon cord
- Phone charm loop or small keyring
- Small charms
- Scissors
- Clear nail polish or jewelry glue for sealing knots
Steps To Make:
- Cut a piece of cord long enough for the charm.
- Tie one end to the phone charm loop.
- Add beads in a pattern, mixing colors, letters, and small charms.
- Leave enough cord at the end to tie a strong knot.
- Tie the knot tightly.
- Add a tiny bit of clear nail polish or jewelry glue to secure it.
- Let it dry before attaching it to a phone case.
2. Painted Canvas Tote Bag
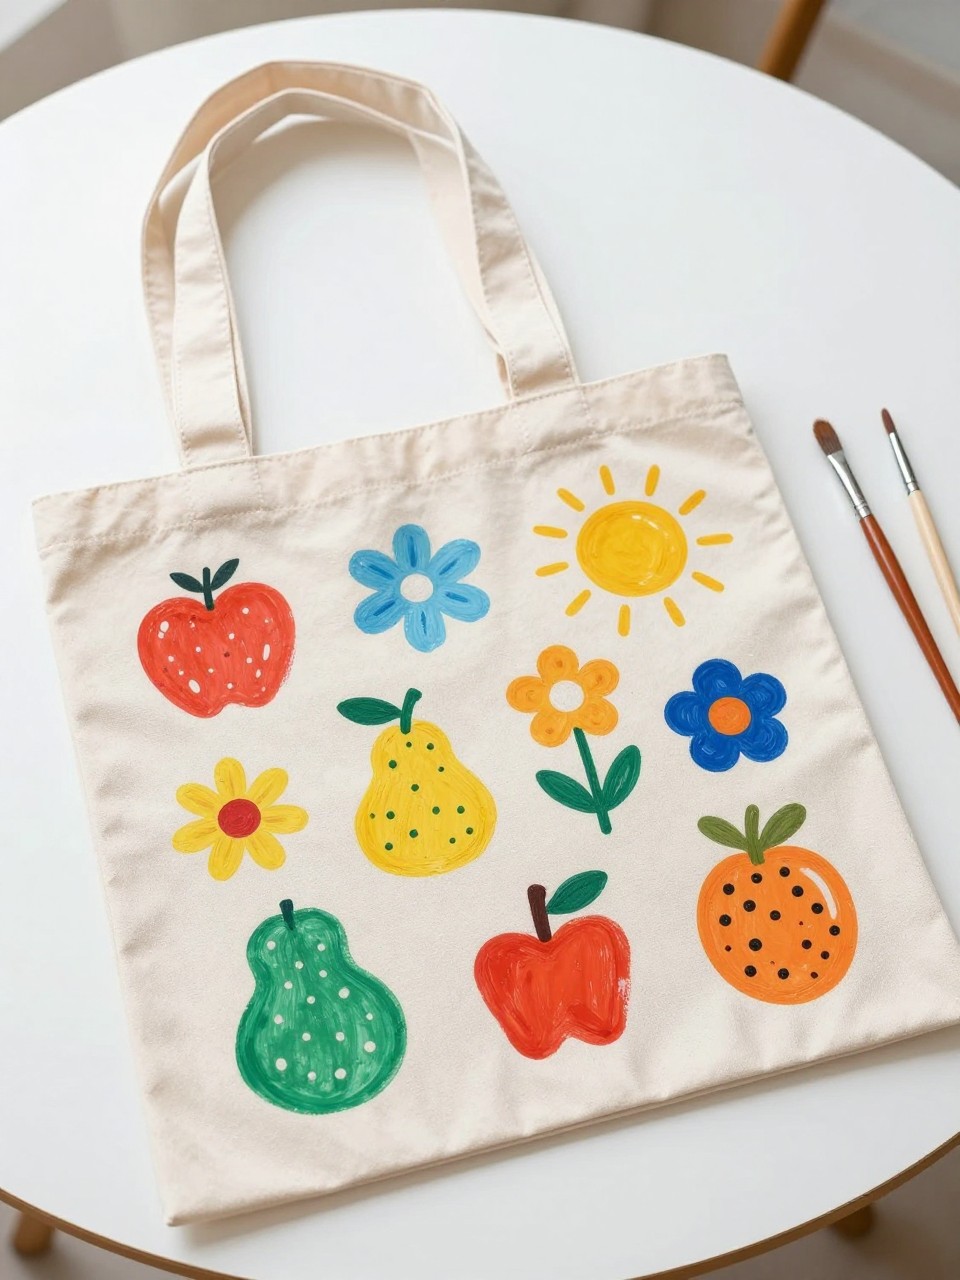
A painted tote bag is a fun summer craft because teens can actually use it afterward. It can become a beach bag, library bag, sleepover bag, or everyday carryall with a design that feels personal.
Materials Needed:
- Plain canvas tote bag
- Fabric paint
- Paintbrushes
- Pencil
- Cardboard insert
- Painter’s tape
- Paper plate for paint
Steps To Make:
- Place cardboard inside the tote so paint does not bleed through.
- Lightly sketch the design with pencil.
- Use painter’s tape for stripes, borders, or clean edges.
- Paint the design in thin layers.
- Let each color dry before adding details.
- Add small accents like flowers, fruit, stars, or checkerboard patterns.
- Let the tote dry fully before using it.
3. Air-Dry Clay Trinket Dish
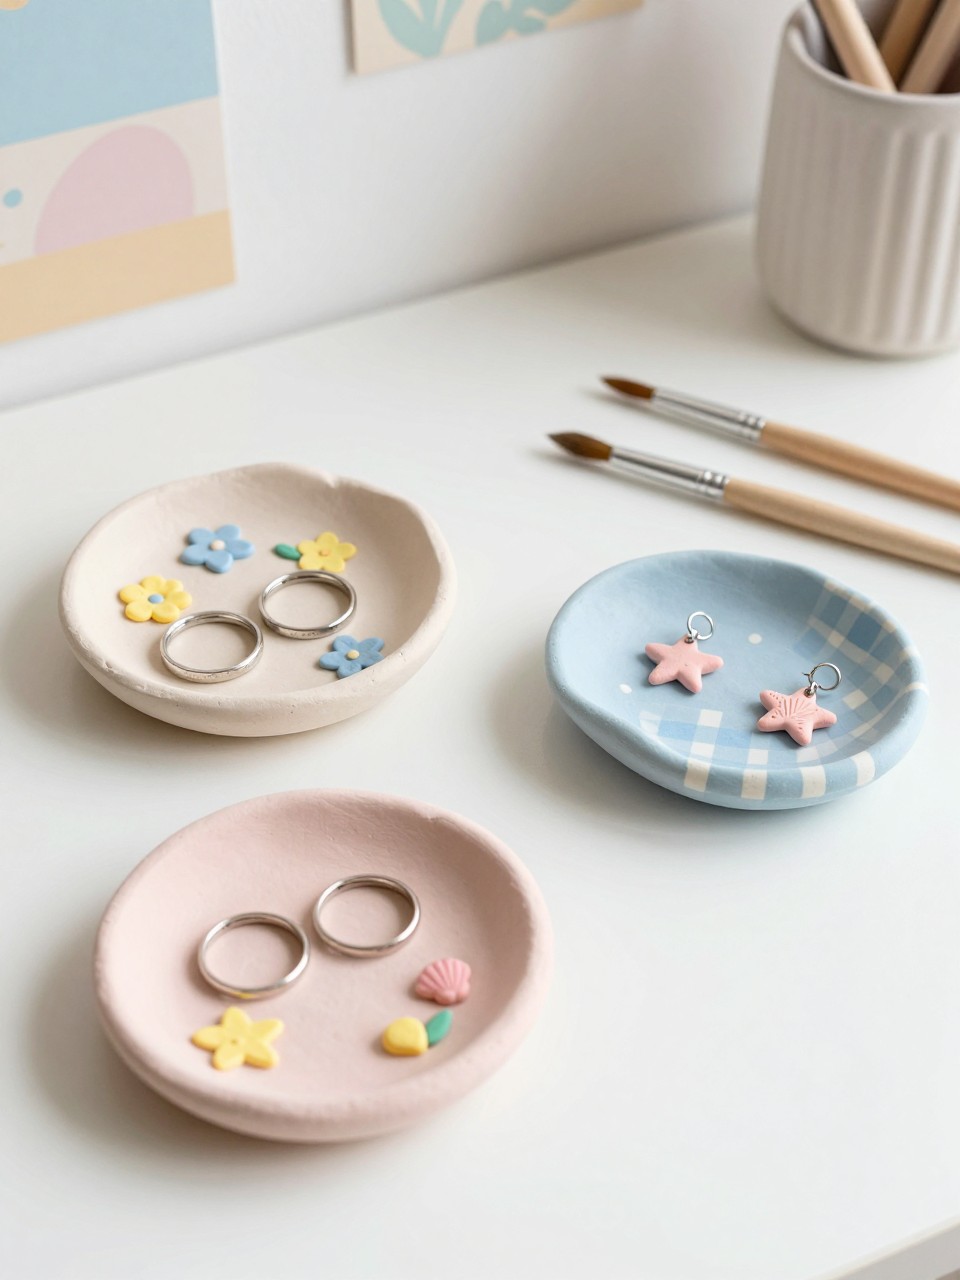
Air-dry clay dishes are simple but feel very grown and useful. Teens can use them for rings, lip balm, hair clips, small jewelry, or desk items, which makes the finished craft easy to keep.
Materials Needed:
- Air-dry clay
- Rolling pin or smooth bottle
- Small bowl for shaping
- Acrylic paint
- Paintbrushes
- Clear sealer, optional
- Clay knife or plastic knife
Steps To Make:
- Roll out a piece of air-dry clay.
- Cut it into a circle, oval, heart, or wavy shape.
- Place it gently inside a small bowl to curve the edges.
- Let the clay dry according to the package directions.
- Paint the dish with a base color.
- Add designs like flowers, stars, shells, or tiny checks.
- Seal it once dry if you want a smoother finish.
4. Summer Memory Shadow Box
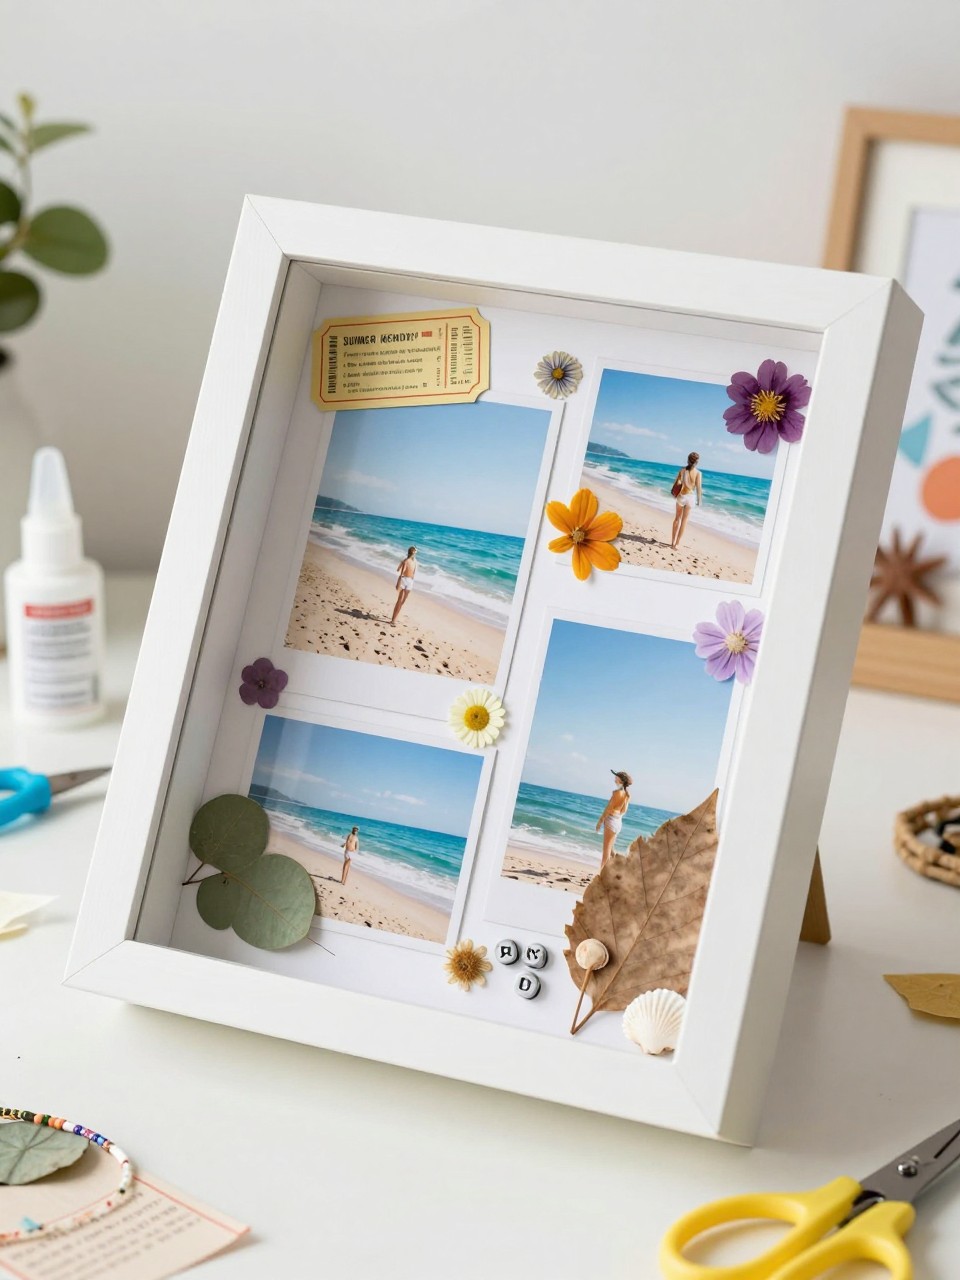
This craft is perfect for teens who like keeping memories from summer trips, hangouts, concerts, camp, or beach days. It turns small keepsakes into room decor instead of letting them sit in a drawer.
Materials Needed:
- Shadow box frame
- Printed photos
- Small keepsakes
- Scrapbook paper
- Stickers
- Glue dots or craft glue
- Scissors
- Washi tape
Steps To Make:
- Choose a theme, such as beach day, summer friends, camp, or vacation.
- Place scrapbook paper in the back of the shadow box.
- Arrange photos and keepsakes before gluing anything.
- Add small shells, dried flowers, ticket stubs, bracelets, or notes.
- Use washi tape and stickers to add color.
- Glue everything in place carefully.
- Close the shadow box and display it on a shelf or wall.
5. Friendship Bracelet Stack
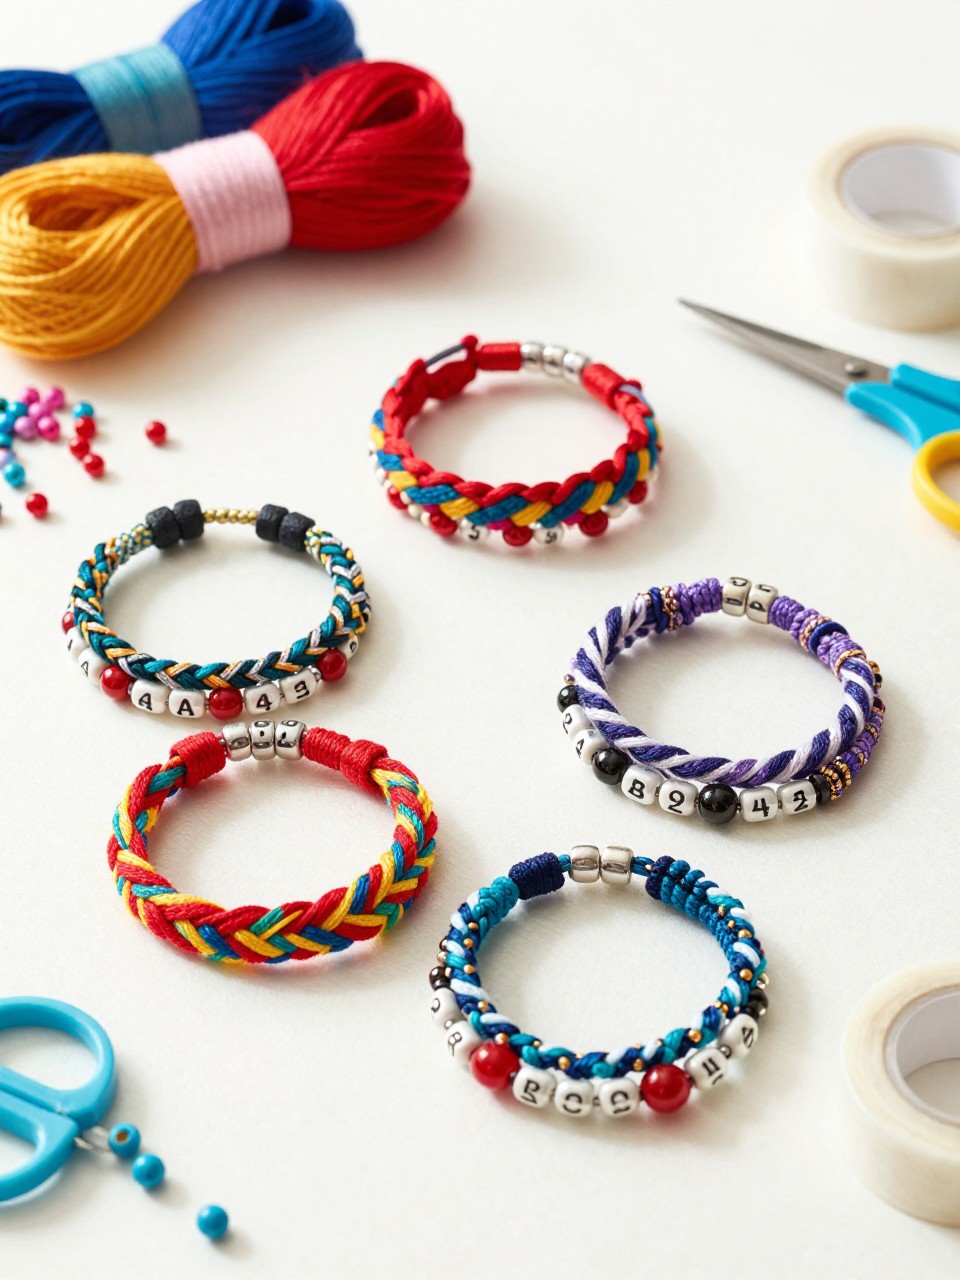
Friendship bracelets are always a good summer craft, but making a full stack makes them feel more stylish. Teens can mix patterns, colors, and beads to create bracelets for themselves or friends.
Materials Needed:
- Embroidery floss
- Small beads, optional
- Tape or clipboard
- Scissors
- Charms, optional
Steps To Make:
- Pick three to six colors of embroidery floss.
- Cut equal lengths of each color.
- Tie the strands together at the top.
- Tape the knot to a table or clip it onto a clipboard.
- Make a braid, twist, chevron, or simple knot pattern.
- Add beads or charms if desired.
- Tie the ends together once the bracelet fits.
6. DIY Seashell Hair Clips
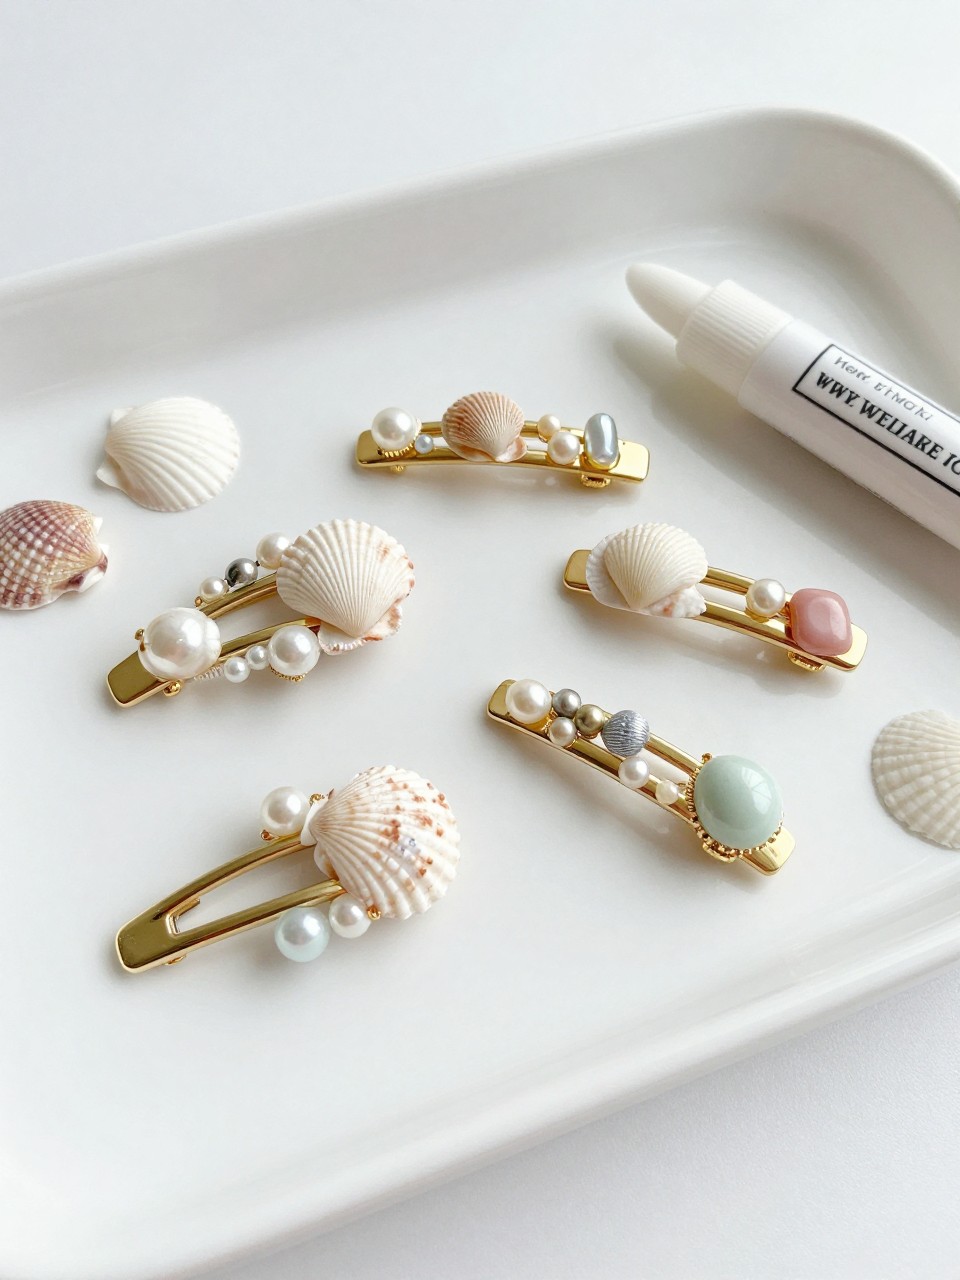
Seashell hair clips feel very summer and are great for beach outfits, vacation photos, or casual hairstyles. They look boutique-inspired but are simple to make with the right glue and small decorations.
Materials Needed:
- Plain hair clips
- Small flat seashells
- Pearl beads
- Strong craft glue or jewelry glue
- Tweezers
- Wax paper
- Optional tiny charms
Steps To Make:
- Place the clips on wax paper.
- Arrange shells and beads on the clips before gluing.
- Add a small amount of strong glue to each decoration.
- Press the shells and beads into place.
- Use tweezers for tiny pieces.
- Let the clips dry fully.
- Wear them once the glue is completely set.
7. Painted CD Sun Catchers

Old CDs can become beautiful window decor with just paint and string. This craft works well for teens because the reflective surface gives the finished piece a cool, artistic look.
Materials Needed:
- Old CDs
- Acrylic paint or glass paint
- Paintbrushes
- String or fishing line
- Hole punch or strong tape
- Stickers or rhinestones, optional
Steps To Make:
- Clean the CD surface gently.
- Paint simple designs like suns, flowers, waves, stars, or butterflies.
- Let the paint dry fully.
- Add small rhinestones or stickers if desired.
- Attach string through the center hole or tape it to the back.
- Hang the CD near a sunny window.
- Watch the light reflect across the room.
8. Custom Summer Journal Cover
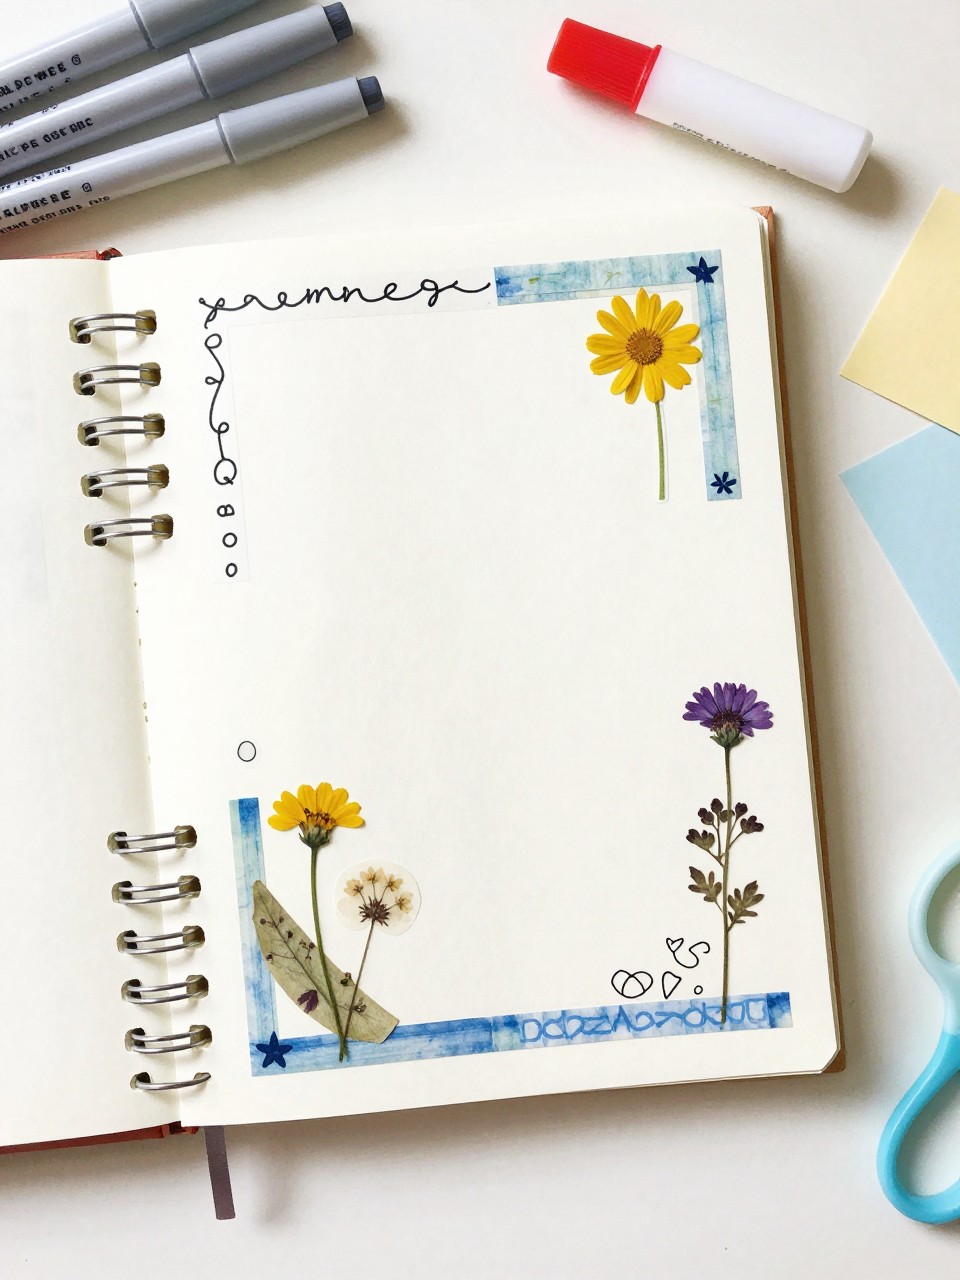
A custom journal cover is a lovely craft for teens who like writing, planning, sketching, or saving summer memories. It can be soft and pretty, bold and bright, or full of scrapbook-style layers.
Materials Needed:
- Plain notebook or journal
- Scrapbook paper
- Stickers
- Washi tape
- Glue stick
- Markers
- Pressed flowers, optional
- Clear contact paper, optional
Steps To Make:
- Choose a color theme for the cover.
- Cut scrapbook paper into shapes or strips.
- Glue the paper onto the journal cover.
- Add washi tape borders or corner details.
- Place stickers, pressed flowers, or doodles around the cover.
- Cover with clear contact paper if you want extra protection.
- Let it dry before using the journal.
9. Denim Pocket Wall Organizer

This is a smart upcycled craft that looks cool and helps keep small items organized. Teens can use old jeans and turn the pockets into a useful wall piece for their room.
Materials Needed:
- Old denim jeans
- Fabric backing or thick felt
- Fabric glue or needle and thread
- Scissors
- Patches
- Embroidery floss
- Ribbon or string for hanging
Steps To Make:
- Cut pockets from old jeans, leaving extra fabric around each pocket.
- Arrange the pockets on a fabric backing.
- Glue or sew the pockets into place.
- Add patches, embroidery, beads, or painted details.
- Attach ribbon or string to the top for hanging.
- Let glue dry completely if using fabric glue.
- Hang it near a desk or closet area.
10. Mini Painted Plant Pots
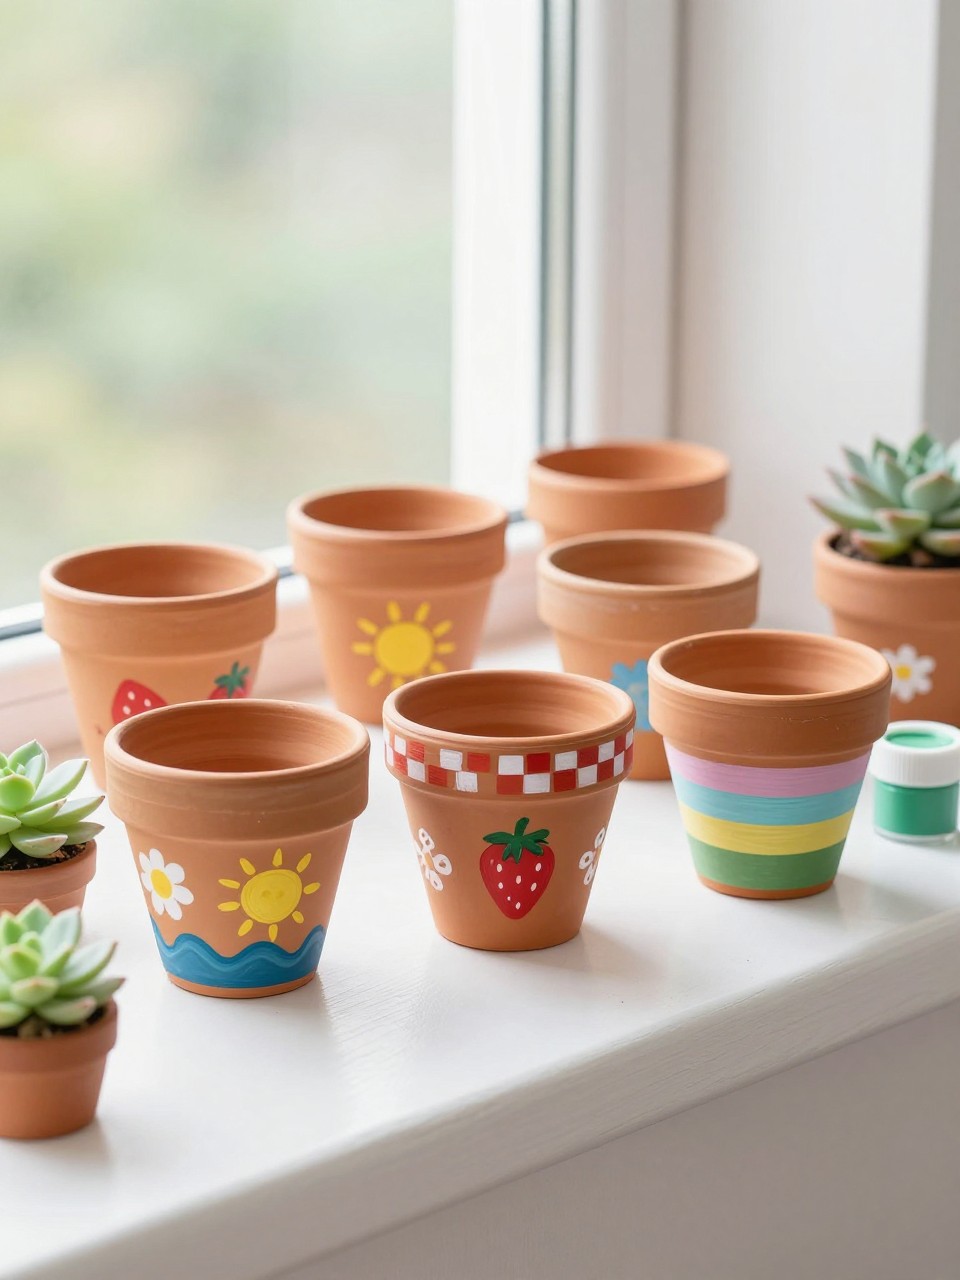
Painting mini plant pots is easy, relaxing, and perfect for summer. Teens can use them for succulents, herbs, small flowers, or even as desk holders for pens and makeup brushes.
Materials Needed:
- Mini terracotta pots
- Acrylic paint
- Paintbrushes
- Painter’s tape
- Small plants or faux plants
- Clear sealer, optional
Steps To Make:
- Wipe the pot clean.
- Paint a base color and let it dry.
- Add designs like flowers, suns, waves, checks, or fruit.
- Use painter’s tape for neat stripes or blocks of color.
- Let all paint dry fully.
- Seal the pot if desired.
- Add a small plant or use it as a holder.
11. DIY Charm Anklet
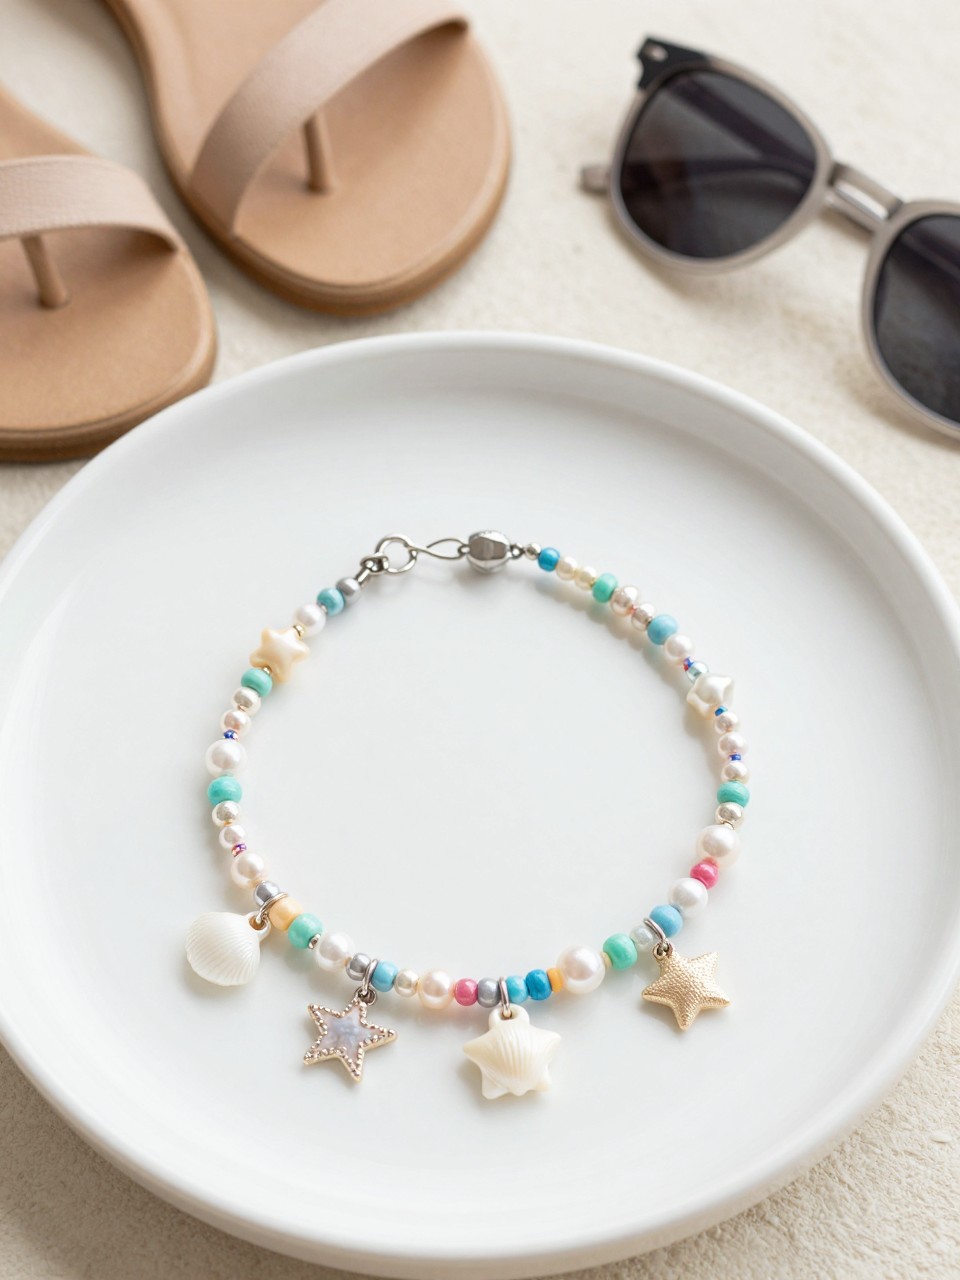
A charm anklet feels perfect for summer because it is light, cute, and easy to style with sandals or beach outfits. Teens can make one with shells, beads, initials, or tiny charms.
Materials Needed:
- Jewelry cord or chain
- Small beads
- Shell charms or star charms
- Jewelry clasp
- Jump rings
- Scissors
- Jewelry pliers, optional
Steps To Make:
- Measure the cord or chain around the ankle with a little extra room.
- Add beads or charms in a simple pattern.
- Attach charms with jump rings if using chain.
- Tie the cord securely or add a clasp.
- Trim extra cord if needed.
- Check that the anklet feels comfortable.
- Make a matching bracelet if desired.
12. Mirror Tile Photo Frame
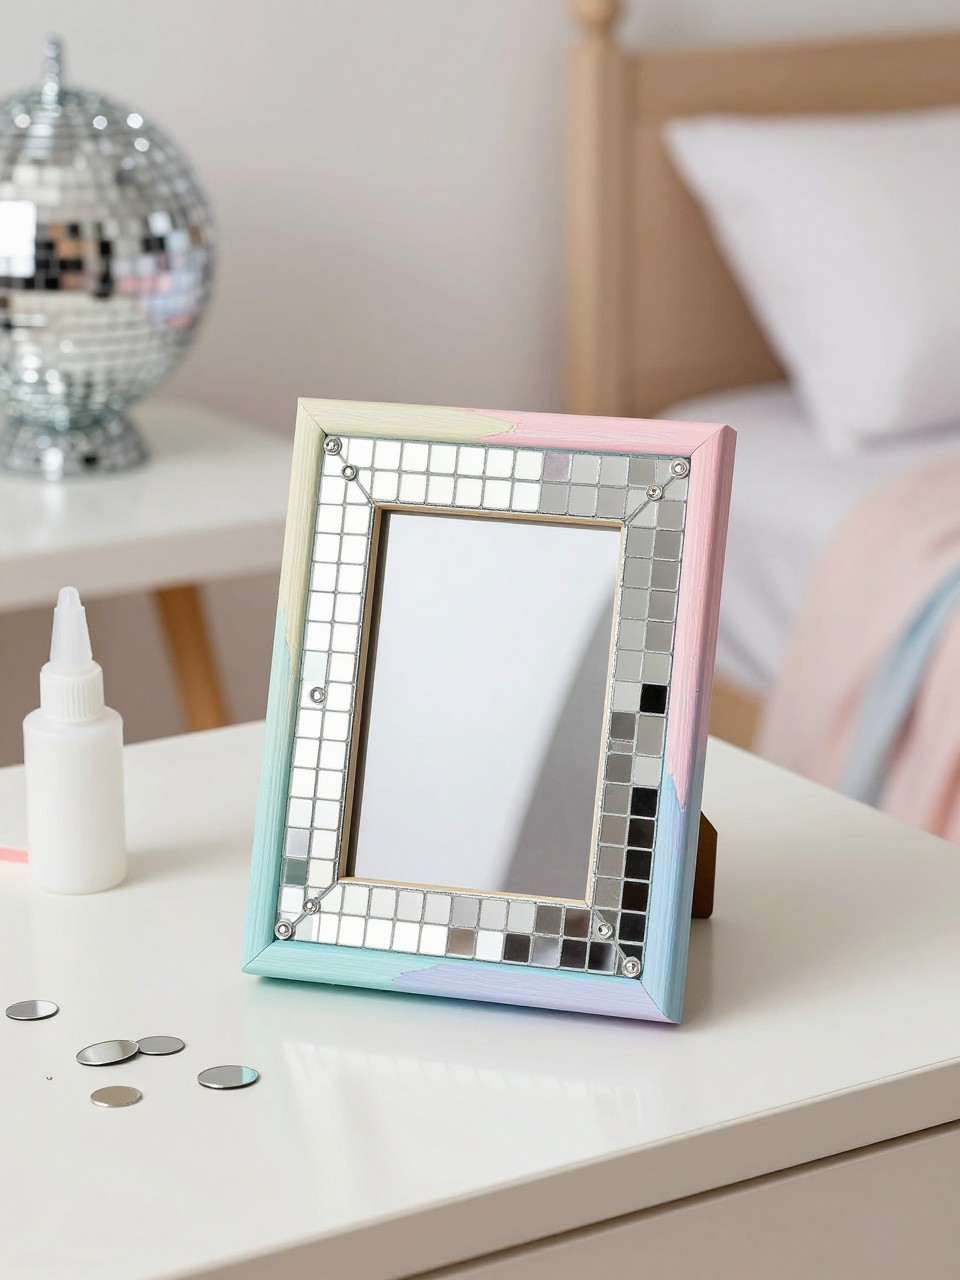
A mirror tile frame gives a regular photo frame a cool disco-style look. It is perfect for summer photos, bedroom shelves, or a gift for a friend.
Materials Needed:
- Plain photo frame
- Small mirror tiles
- Strong craft glue
- Acrylic paint, optional
- Rhinestones, optional
- Wax paper
- Printed photo
Steps To Make:
- Remove the glass from the frame while decorating.
- Paint the frame edge if desired.
- Arrange mirror tiles around the frame before gluing.
- Glue each tile carefully into place.
- Add rhinestones or small accents between tiles.
- Let the frame dry fully.
- Add a favorite summer photo.
13. Tie-Dye Scrunchies
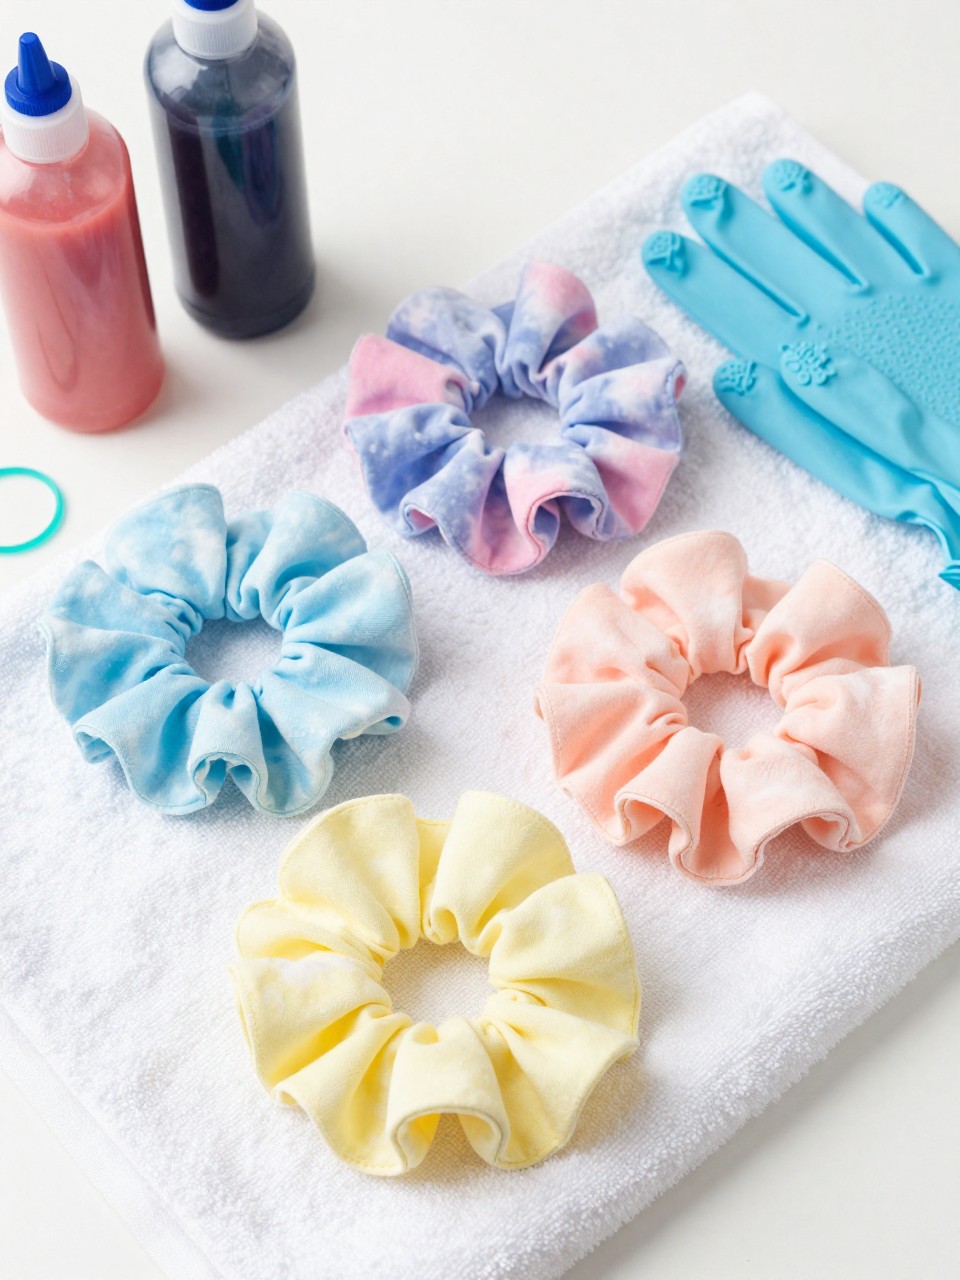
Tie-dye scrunchies are smaller and easier than tie-dye shirts, but they still give that fun summer look. They are great for hair, wrists, gift bags, or matching friend sets.
Materials Needed:
- Plain white cotton scrunchies
- Fabric dye or tie-dye kit
- Rubber bands
- Gloves
- Plastic tray
- Zip bags
- Water
Steps To Make:
- Wet the scrunchies and squeeze out extra water.
- Twist or bunch each scrunchie.
- Wrap rubber bands around them.
- Add dye in small sections.
- Place each scrunchie in a zip bag to set.
- Rinse according to the dye kit directions.
- Wash and dry before wearing.
14. Summer Mood Board Canvas
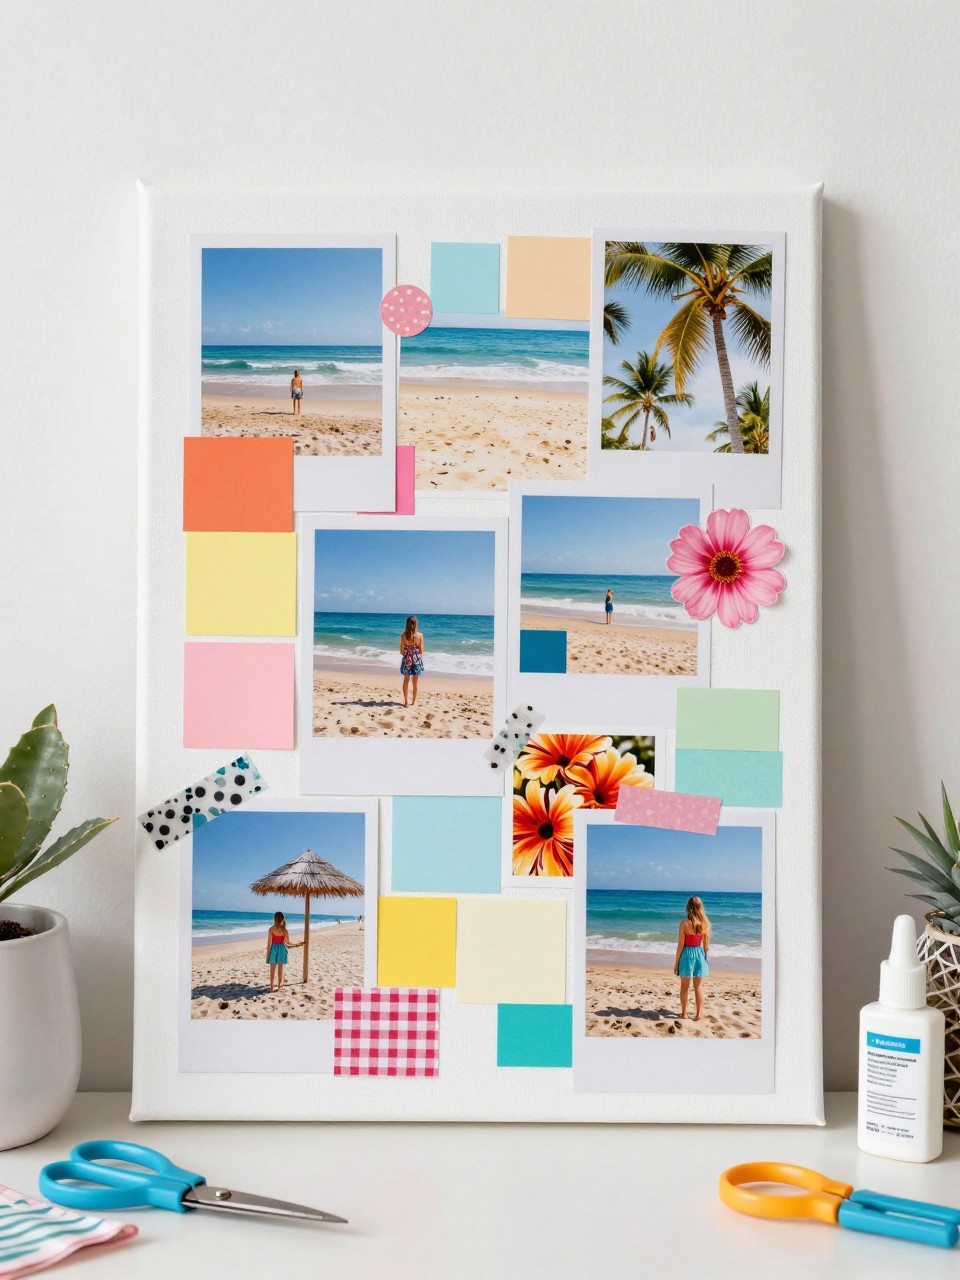
A summer mood board canvas lets teens turn their favorite colors, photos, and ideas into wall decor. It is creative, personal, and perfect for bedrooms, dorm-style corners, or a desk setup.
Materials Needed:
- Small canvas or thick cardboard
- Magazine cutouts or printed images
- Scrapbook paper
- Stickers
- Washi tape
- Glue stick
- Scissors
- Fabric scraps, optional
Steps To Make:
- Choose a summer theme, such as beach, travel, flowers, friends, or bright colors.
- Cut out images, shapes, and paper pieces.
- Arrange everything on the canvas before gluing.
- Layer paper, stickers, tape, and fabric scraps.
- Glue each piece in place.
- Add final details around the edges.
- Let it dry, then hang or display it on a shelf.