


Table of Contents Show
If you’ve got a little one who loves helping in the kitchen or pointing out apples at the grocery store, you’re probably looking for ways to channel that interest into something hands-on. Maybe you’re a teacher planning a fall unit, or just a parent trying to keep a busy toddler entertained while you unpack the farmers market haul.

Either way, apple crafts are a perfect fit for this age—they’re simple, use basic supplies, and usually end up pretty cute even when little hands do most of the work.
Here are fifteen ideas that let kids explore colors, textures, and a little bit of pretend play along the way.
1. Paper Plate Apple

This is a classic for a reason. It gives kids a chance to practice tearing and gluing while creating a bright, recognizable apple they can hang on the fridge.
Materials Needed:
- Small paper plate
- Red, green, or yellow paint
- Green construction paper (for leaf)
- Brown construction paper (for stem)
- Glue
How to make it:
- Step 1: Have your child paint the entire paper plate their chosen apple color. Set aside to dry.
- Step 2: While waiting, cut a small leaf shape from green paper and a small stem from brown paper.
- Step 3: Once the plate is dry, glue the stem and leaf onto the top edge.
- Step 4: For extra fun, cut the plate in a slight apple shape by curving the sides inward before painting.
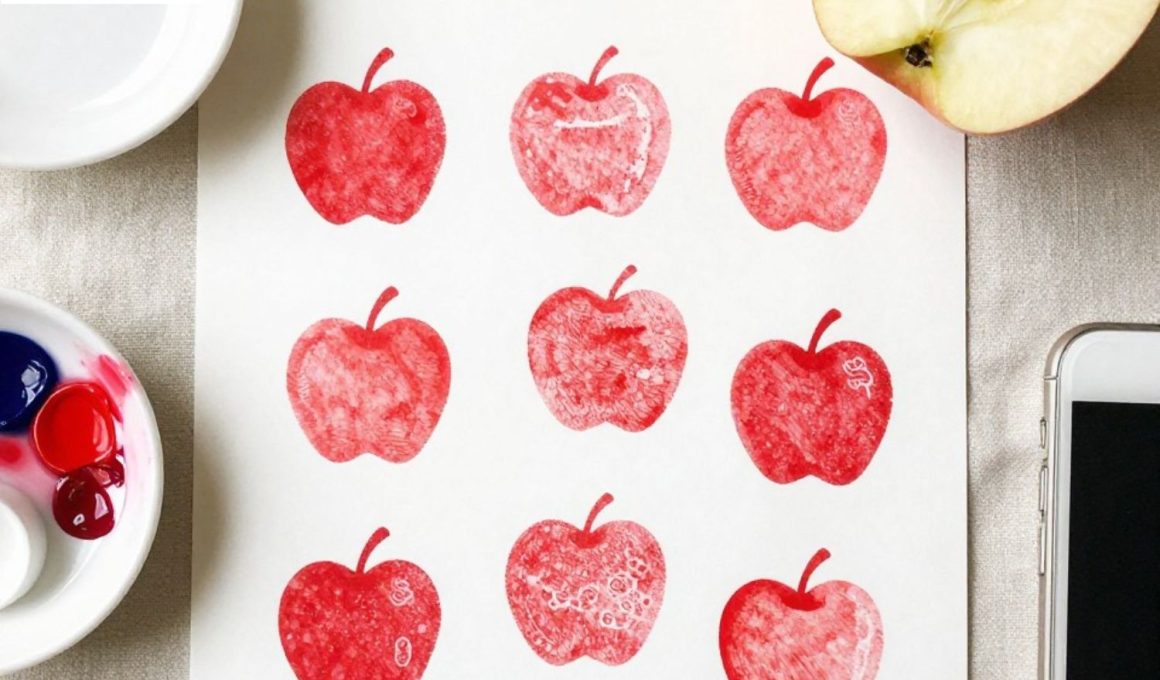
2. Apple Stamping
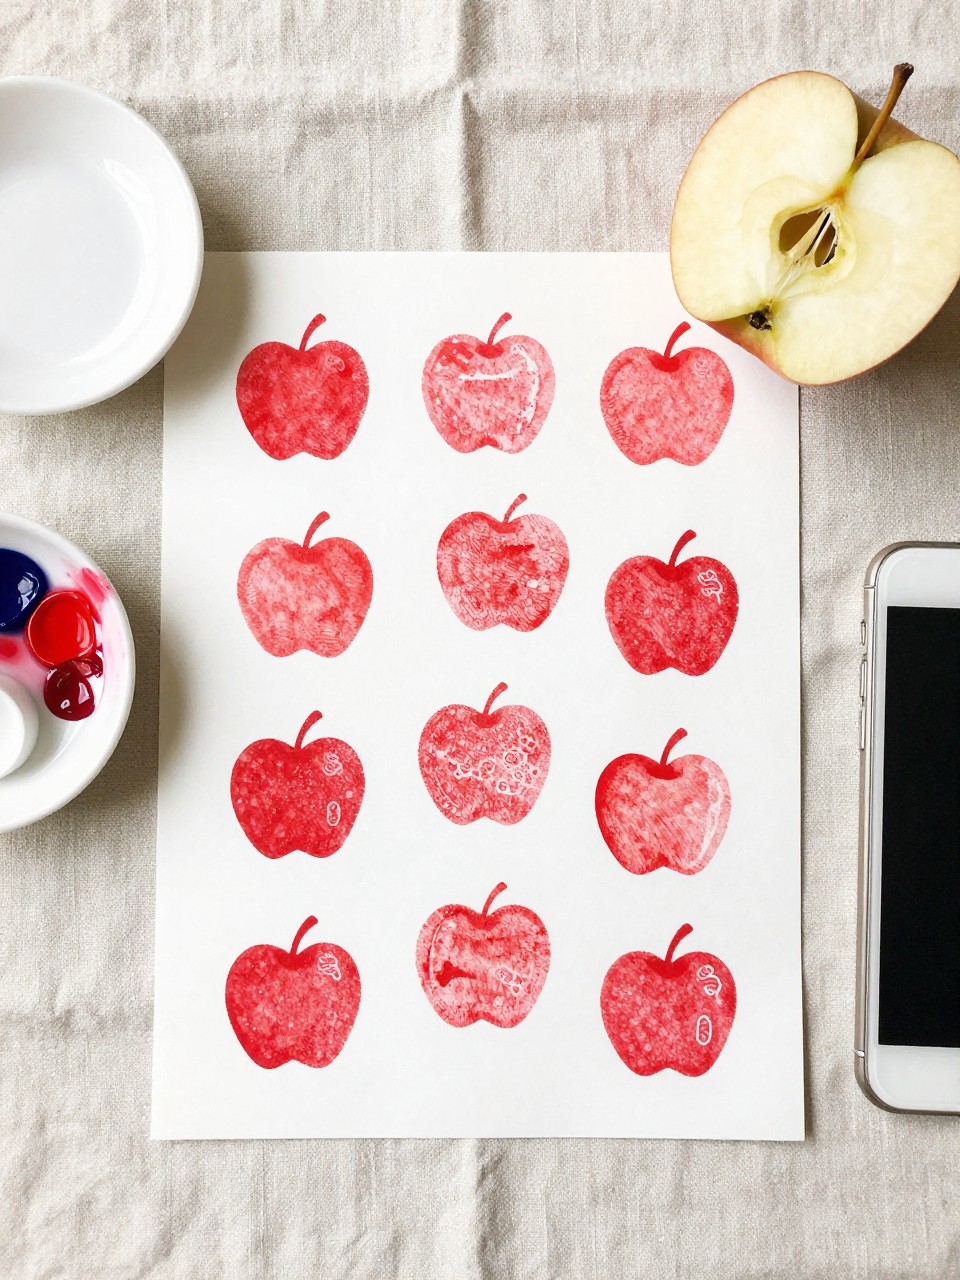
This craft is all about process over product. Kids love seeing the shape appear every time they press a halved apple onto paper.
Materials Needed:
- Apple (halved)
- Washable paint (red, green, yellow)
- Paper
- Paper plate (for paint)
- Knife (for adult prep)
How to make it:
- Step 1: Adult cuts an apple in half horizontally to reveal the star shape inside, or vertically for a classic apple silhouette.
- Step 2: Pour small amounts of paint onto a paper plate.
- Step 3: Show your child how to dip the apple half into the paint and press it onto the paper.
- Step 4: Let them stamp away, making patterns or a whole apple tree scene.
3. Coffee Filter Apple Craft

Watching colors bleed together on a coffee filter feels like magic to preschoolers. This one combines a mini science lesson with art.
Materials Needed:
- Coffee filters
- Washable markers (red, green, yellow)
- Spray bottle with water
- Brown and green construction paper
- Scissors
How to make it:
- Step 1: Have your child color the coffee filter with markers. Encourage them to cover most of it.
- Step 2: Lay the filter on a tray and spray lightly with water. Watch the colors blend.
- Step 3: Let the filter dry completely. It will have a stained-glass effect.
- Step 4: Cut a stem and leaf from construction paper and glue them onto the filter to complete the apple shape.
4. Paper Roll Apple Stamping

Save those toilet paper rolls—bending them into apple shapes makes the perfect stamp for little hands to grip.
Materials Needed:
- Empty toilet paper roll
- Paint
- Paper plate
- Paper
- Clothespin (optional, for grip)
- Step 1: Gently pinch one end of the toilet paper roll to shape it into an apple silhouette. Secure the pinched shape with a clothespin if needed.
- Step 2: Pour paint onto a paper plate.
- Step 3: Dip the shaped end of the roll into paint and stamp onto paper.
- Step 4: Once dry, kids can add a small stem and leaf with markers or crayons.
5. Yarn Apple

This craft is great for fine motor practice. Wrapping yarn around a cardboard shape helps little fingers build coordination.
Materials Needed:
- Cardboard (cut into apple shapes)
- Red, green, or yellow yarn
- Glue
- Small green pipe cleaner (for leaf)
- Scissors
How to make it:
- Step 1: Adult cuts an apple shape from cardboard. Cut a small slit at the top to start the yarn.
- Step 2: Tape or glue one end of the yarn to the back of the apple.
- Step 3: Show your child how to wrap the yarn around the cardboard, covering as much as they can.
- Step 4: When covered, tuck the end under a wrapped strand. Glue a small green pipe cleaner loop at the top for the leaf.
6. Handprint Apple Tree

This craft turns your child’s hand into a tree, making a sweet keepsake that shows just how little they were.
Materials Needed:
- White paper
- Brown paint
- Green, red, and yellow paint
- Paintbrush
- Wet wipes (for cleanup)
How to make it:
- Step 1: Paint your child’s forearm and hand brown. Press it onto the paper—fingers spread out become the branches.
- Step 2: Wash off the brown paint immediately.
- Step 3: Once the tree is dry, let kids dip their fingertips into red, green, or yellow paint.
- Step 4: Press fingerprint “apples” all over the branches.
7. Suncatcher Apple

These translucent apples look beautiful hanging in a window. They’re simple to make and let kids explore color mixing.
Materials Needed:
- Clear contact paper
- Tissue paper (red, green, yellow)
- Black construction paper
- Scissors
- Tape
How to make it:
- Step 1: Cut an apple shape from black construction paper. Cut out the center, leaving just the outline.
- Step 2: Cut a piece of contact paper slightly larger than the apple. Peel off the backing.
- Step 3: Stick the black apple outline onto the contact paper. Let kids fill the inside with small torn pieces of tissue paper.
- Step 4: Cover with another piece of contact paper, sticky sides together, and trim the edges. Tape to a window.
8. Apple Seed Counting Craft

This craft sneaks in a little early math practice. Kids count and glue seeds onto their paper apples.
Materials Needed:
- Construction paper (red, green, or yellow for apple)
- Black construction paper (for seeds)
- Green construction paper (for leaf)
- Glue
- Marker
How to make it:
- Step 1: Cut out an apple shape from colored paper.
- Step 2: Cut out small oval shapes from black paper for seeds, or use real dried apple seeds.
- Step 3: Glue the apple onto a background paper. Glue the stem and leaf on top.
- Step 4: Write a number on the apple (1-5 for beginners). Have your child count and glue that many seeds onto the apple.
9. Paper Bag Apple Puppet

These simple puppets are perfect for putting on a little apple-themed show or just for imaginary play.
Materials Needed:
- Brown paper lunch sack
- Red, green, or yellow paint
- Construction paper (green and brown)
- Googly eyes
- Glue
How to make it:
- Step 1: Paint the entire paper bag your chosen apple color. Let dry.
- Step 2: Cut a leaf from green paper and a stem from brown paper.
- Step 3: Glue the stem and leaf to the bottom of the bag (the flap part is the mouth).
- Step 4: Glue on googly eyes above the flap. When kids put their hand inside, the puppet can “talk.”
10. Apple Stained Glass Window

This is another take on a suncatcher, but using crayon shavings for a different effect. Adult supervision needed for the ironing step.
Materials Needed:
- Wax paper
- Crayon shavings (red, green, yellow)
- Black construction paper
- Iron (adult use only)
- Scissors
How to make it:
- Step 1: Adult cuts an apple frame from black construction paper (an outline with the center cut out).
- Step 2: Place one sheet of wax paper down. Sprinkle crayon shavings in the center.
- Step 3: Adult places another sheet of wax paper on top and runs a warm iron over it to melt the shavings between the sheets.
- Step 4: Glue or tape the black apple frame over the melted wax paper. Trim edges and hang in a window.
11. Apple Playdough Mats

This is more of a setup than a craft, but it keeps kids busy for a long time. They get to “fill” the apple however they want.
Materials Needed:
- Laminated apple outline (printed or drawn)
- Homemade or store-bought playdough (red, green, yellow)
- Small rolling pin
- Apple-themed cookie cutters (optional)
How to make it:
- Step 1: Print or draw a simple apple outline on paper and laminate it, or slip it into a page protector.
- Step 2: Give your child playdough in apple colors.
- Step 3: Show them how to roll small balls of dough to place inside the apple outline, or flatten dough to “color” the apple.
- Step 4: Let them use cookie cutters to make more apples alongside the mat.
12. Puffy Paint Apple

This craft adds a sensory element. The puffy paint expands in the microwave, giving the apple a fun, textured look.
Materials Needed:
- Shaving cream
- White glue
- Red, green, or yellow food coloring
- Cardstock
- Paintbrush
- Bowl and spoon
How to make it:
- Step 1: Mix equal parts shaving cream and white glue in a bowl. Add food coloring and stir.
- Step 2: Have your child paint an apple shape onto cardstock with the mixture.
- Step 3: Once painted, microwave the paper for about 20-30 seconds. Watch closely.
- Step 4: Let it cool. The paint will have puffed up and will dry soft to the touch.
13. Button Apple Tree

This is a great fine motor activity for kids who are past the mouthing-everything stage. Sorting and placing buttons is surprisingly absorbing.
Materials Needed:
- White paper or cardstock
- Brown marker or paint
- Green construction paper (for tree top)
- Red, green, and yellow buttons
- Glue
How to make it:
- Step 1: Draw or paint a brown tree trunk on the paper.
- Step 2: Cut out a tree top shape from green paper and glue it above the trunk.
- Step 3: Pour a selection of colored buttons onto the table.
- Step 4: Have your child glue buttons onto the tree top as “apples.” Let them sort by color if they want.
14. Apple Basket Weaving

This is a simple introduction to weaving for little ones. It builds patience and hand-eye coordination.
Materials Needed:
- Paper plate
- Red, green, or yellow paint
- Yarn or ribbon (assorted colors)
- Hole punch
- Scissors
How to make it:
- Step 1: Paint the back of a paper plate and let dry. This will be the basket.
- Step 2: Adult cuts the plate in half. Then cut slits about an inch apart along the curved edge, or use a hole punch around the edge.
- Step 3: Cut a long piece of yarn and tape one end to the back of the plate.
- Step 4: Show your child how to weave the yarn in and out of the slits or holes. Tie off the ends when done.
15. Apple Core Snack Craft

This one is edible, which makes it an instant hit. Kids can build their own apple core snack and eat it right after.
Materials Needed:
- Apple (sliced into thin wedges)
- Peanut butter or sunflower seed butter
- Mini marshmallows (or small yogurt drops)
- Plate
- Knife (for adult prep)
How to make it:
- Step 1: Adult slices the apple into thin wedges. Give each child two wedges.
- Step 2: Spread a thin layer of peanut butter on the cut side of one apple wedge.
- Step 3: Place mini marshmallows in a row on the peanut butter to look like teeth or seeds.
- Step 4: Press the other apple wedge on top to make a sandwich. Eat immediately.
16. Stained-Glass Tissue Paper Apple Suncatcher

A bright window cling that glows like real stained glass when sunlight hits it. Kids love choosing colors and seeing the layers blend. It looks fancy, but it’s basically paper, glue, and scissors.
Materials Needed:
- Red, green, and yellow tissue paper
- Clear contact paper (or sheet protector) and black construction paper
- Scissors
How to make it:
- 1. Cut a thick apple outline (with a leaf) from black paper, leaving a hollow center like a picture frame.
- 2. Stick the outline onto clear contact paper, sticky side up.
- 3. Tear tissue into small squares and press inside the apple frame, overlapping colors.
- 4. Seal with a second sheet of contact paper and trim the edges. Hang on a sunny window.
17. Puffy Paint Apple Pie Slice Magnet

This cute fridge magnet looks like a tiny bakery slice with “bubbly” filling and a crust edge you can almost smell. The puffy paint dries 3D, making it look pro—without any baking.
Materials Needed:
- Cardboard (cereal box) and scissors
- Brown, red, and white puffy paint
- Magnet strip or dot
How to make it:
- 1. Cut a cardboard triangle for the pie slice and a thin strip for the crust edge.
- 2. Glue the crust strip along the long edge of the triangle.
- 3. Squeeze red puffy paint for “apple filling,” add white dots for “sugar,” and brown lines for crust detail.
- 4. Let dry fully, then stick the magnet on the back and pop it on the fridge.
18. Apple Core Bookmark With Peekaboo Seeds
Slip this slim apple core between pages; the seeds peek out like a secret. It’s fast to make, and the simple shapes look surprisingly polished once assembled.
Materials Needed:
- Red, cream (or white), and green paper
- Black marker and glue stick
- Scissors
How to make it:
- 1. Cut two matching red apple shapes and a smaller cream “core” shape with curved bites on each side.
- 2. Glue the cream core centered on one red apple, draw three cute teardrop seeds with the marker, and add a small green leaf at the top.
- 3. Glue the second red apple on the back, aligning edges, to make it sturdy.
- 4. Trim cleanly; laminate with clear tape if you want extra durability.
19. Spiral Apple Garland That Twirls
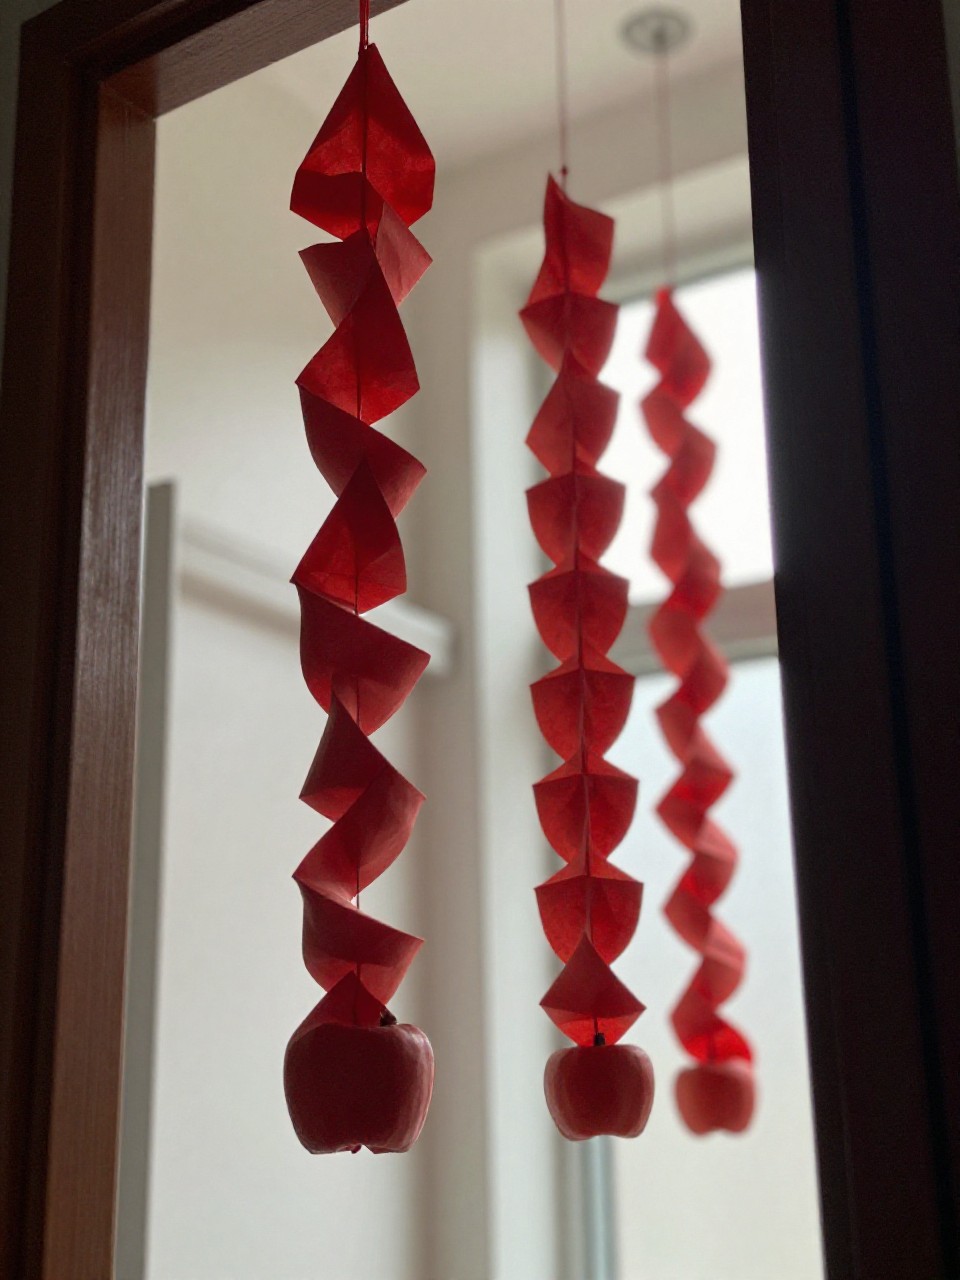
When you hang these, the spirals gently spin like falling leaves. The bold red curves and little green leaves make it party-ready decor with almost zero effort.
Materials Needed:
- Red and green cardstock
- Pencil, scissors
- Tape or string
How to make it:
- 1. Draw a large spiral on red cardstock (start from the center and circle out), then cut along the line.
- 2. Cut small green leaves and a tiny brown stem; tape them to the spiral’s center.
- 3. Add a small piece of tape or a hole at the outer tip to att