


Table of Contents Show
Fall crafts are a great way to add a cozy, handmade touch to your home as the season changes. I enjoy using yarn because it is easy to work with and comes in colors that fit the autumn mood perfectly.
Whether you are new to crafting or have some experience, working with yarn lets you bring simple projects to life.

I put together 15 easy fall yarn craft ideas that are fun and quick to make, perfect for anyone wanting to create something seasonal without a lot of hassle.
These projects don’t require special tools, so you can start crafting right away. You’ll find ideas suited for different skill levels and age groups.
1. DIY Yarn Ball Pumpkins
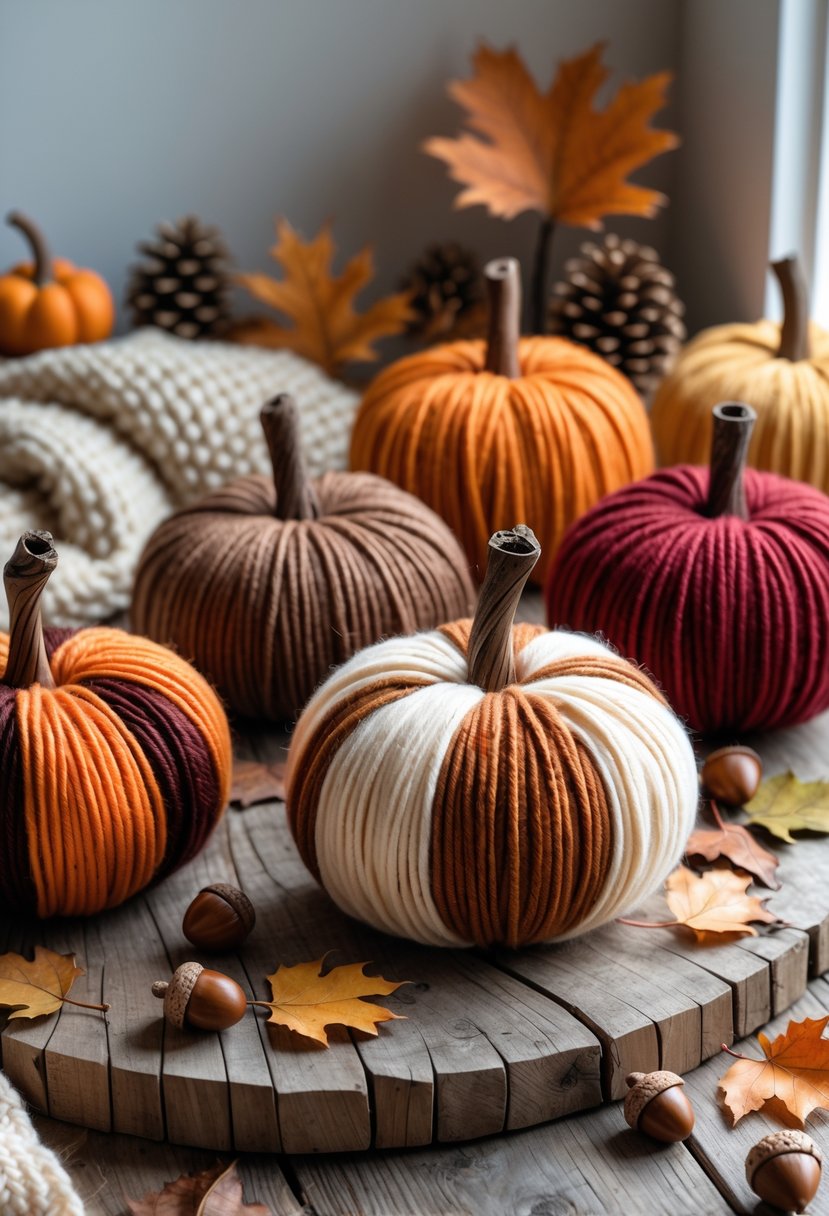
I like making yarn ball pumpkins because they are simple and use materials I already have. You only need yarn, twine, or string and a little creativity. These pumpkins make great fall decorations without much effort.
For People Who Love to Make Things ✂️
Browse The Items


How to Make DIY Yarn Ball Pumpkins
Materials Needed:
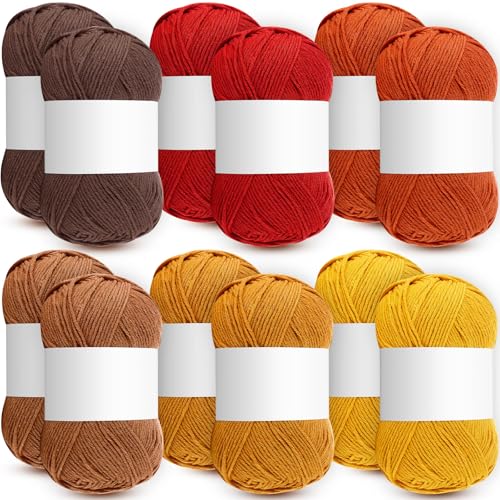
- Yarn in fall colors (orange, cream, brown, burgundy)
- Balloons or foam balls
- Scissors
- Twigs or cinnamon sticks (for stems)
- Hot glue gun or craft glue
The Steps:
- Step 1: Create the Base
Inflate a balloon to the size you want your pumpkin or use a foam ball as a base. - Step 2: Wrap the Yarn
Wrap the yarn tightly around the balloon or foam ball until it’s completely covered. Mix and match yarn colors for a striped or layered effect. - Step 3: Shape the Pumpkin
Once wrapped, tie off the end of the yarn securely. You can gently press the top and bottom to shape it more like a pumpkin. - Step 4: Add the Stem
Glue a small twig or cinnamon stick to the top as the pumpkin’s stem. - Step 5: Display and Enjoy
Let the glue dry completely, then arrange your yarn pumpkins as part of your fall centerpiece or on a cozy shelf.
2. Yarn Fall Leaves Decoration

I enjoy making yarn fall leaves because they are simple and colorful. You only need yarn, glue, and leaf shapes to start. These decorations add a cozy, autumn feel to any room.
Browse The Items


How to Make Yarn Fall Leaves Decoration
Materials Needed:
- Yarn in fall colors (orange, yellow, brown, red)
- Craft wire or pipe cleaners
- Scissors
- Glue (optional for extra hold)
The Steps:
- Step 1: Shape the Leaf
Bend a piece of craft wire into a simple leaf outline. Make sure to include a stem at the bottom. - Step 2: Wrap the Yarn
Starting at the base of the leaf, wrap yarn around the wire frame, covering it completely. Continue until the entire leaf shape is filled in with yarn loops. - Step 3: Secure the Ends
Tuck the loose end of the yarn under the wrapped sections or secure it with a small dab of glue. - Step 4: Add Texture
You can twist or layer yarn colors for a multitone effect. - Step 5: Display
Hang your finished yarn leaves from twine as a garland, or scatter them across your table for a cozy fall look. This craft adds warmth, color, and a handmade charm — a perfect weekend project for both kids and adults!
3. Wrapped Yarn Acorns
I like making wrapped yarn acorns because they are simple and festive. You just wrap yarn around plastic eggs or small shapes. Using fall colors like brown, orange, and yellow makes them feel seasonal and cozy.
Browse The Items


How to Make Wrapped Yarn Acorns
Materials Needed:
- Yarn in fall colors (brown, orange, yellow, and burgundy)
- Foam eggs or small round ornaments
- Twine or jute rope
- Hot glue gun and glue sticks
- Scissors
The Steps:
- Step 1: Prepare the Base
Start with a foam egg or small ornament as your acorn base. You can trim the bottom slightly if you want it to sit flat. - Step 2: Wrap the Bottom
Apply a bit of glue to the bottom of the acorn and begin wrapping it tightly with jute or twine. Continue gluing and wrapping until the bottom half is covered. - Step 3: Add the Yarn Cap
Switch to your fall-colored yarn and glue it around the top half of the acorn, coiling it neatly to mimic an acorn cap. - Step 4: Create the Stem
Cut a short piece of twine, roll it into a small cylinder, and glue it to the top as the acorn’s stem. - Step 5: Display
Once dry, display your wrapped yarn acorns in a rustic wooden bowl, scatter them across a fall table, or use them in wreaths and centerpieces.
4. Yarn-Wrapped Mini Pumpkins

I like making yarn-wrapped mini pumpkins because they are quick and easy. You just wrap yarn around small foam pumpkins or shapes. It adds a cozy fall touch to any space.
Browse The Items


How to Make Yarn-Wrapped Mini Pumpkins
Materials Needed:
- Mini foam pumpkins or plastic pumpkins
- Yarn in fall colors (orange, brown, cream, yellow)
- Scissors
- Hot glue gun
The Steps:
- Step 1: Prepare Your Pumpkin
Remove any existing stems from your foam or plastic pumpkins. You can replace them later for a more natural look. - Step 2: Wrap with Yarn
Apply a small dab of hot glue at the base, then begin wrapping yarn tightly around the pumpkin, following the grooves. Continue wrapping until the pumpkin is fully covered. - Step 3: Mix and Match Colors
For added depth, alternate between different yarn colors or layer them for a striped effect. - Step 4: Add a Stem
Glue a short wooden stem, cinnamon stick, or even a twig to the top. - Step 5: Display Your Pumpkins
Arrange your yarn-wrapped mini pumpkins on your mantel, dining table, or entryway for a cozy, handmade autumn touch. These pumpkins are soft, stylish, and reusable — the perfect fall craft for anyone who loves simple, no-mess decor!
5. Pom-Pom Garland with Fall Colors

I enjoy making pom-pom garlands using yarn in fall colors like orange, brown, and yellow. They add a cozy feel to any room. The process is simple—just wrap yarn, cut, and string the pom-poms together for easy seasonal decor.
Browse The Items
Materials Needed:
- Yarn in fall colors (orange, red, yellow, cream, and brown)
- Scissors
- Twine or string for hanging
- Large needle or crochet hook
The Steps:
- Step 1: Make the Pom-Poms
Wrap yarn around your fingers or a small piece of cardboard about 40–50 times. The more wraps, the fuller your pom-pom will be. - Step 2: Tie and Cut
Slide the wrapped yarn off and tie a tight knot around the center with another piece of yarn. Cut the loops on both ends to create your pom-pom shape. - Step 3: Fluff and Trim
Use scissors to trim and shape your pom-poms until they’re even and round. - Step 4: String Them Together
Thread the pom-poms onto twine or string using a large needle or crochet hook, spacing them evenly. - Step 5: Hang Your Garland
Once all pom-poms are strung, hang the garland across your fireplace, window, or entryway for a pop of cozy autumn charm. This cheerful garland is the perfect handmade touch to bring fall warmth into your home!
6. Yarn Tassel Garland
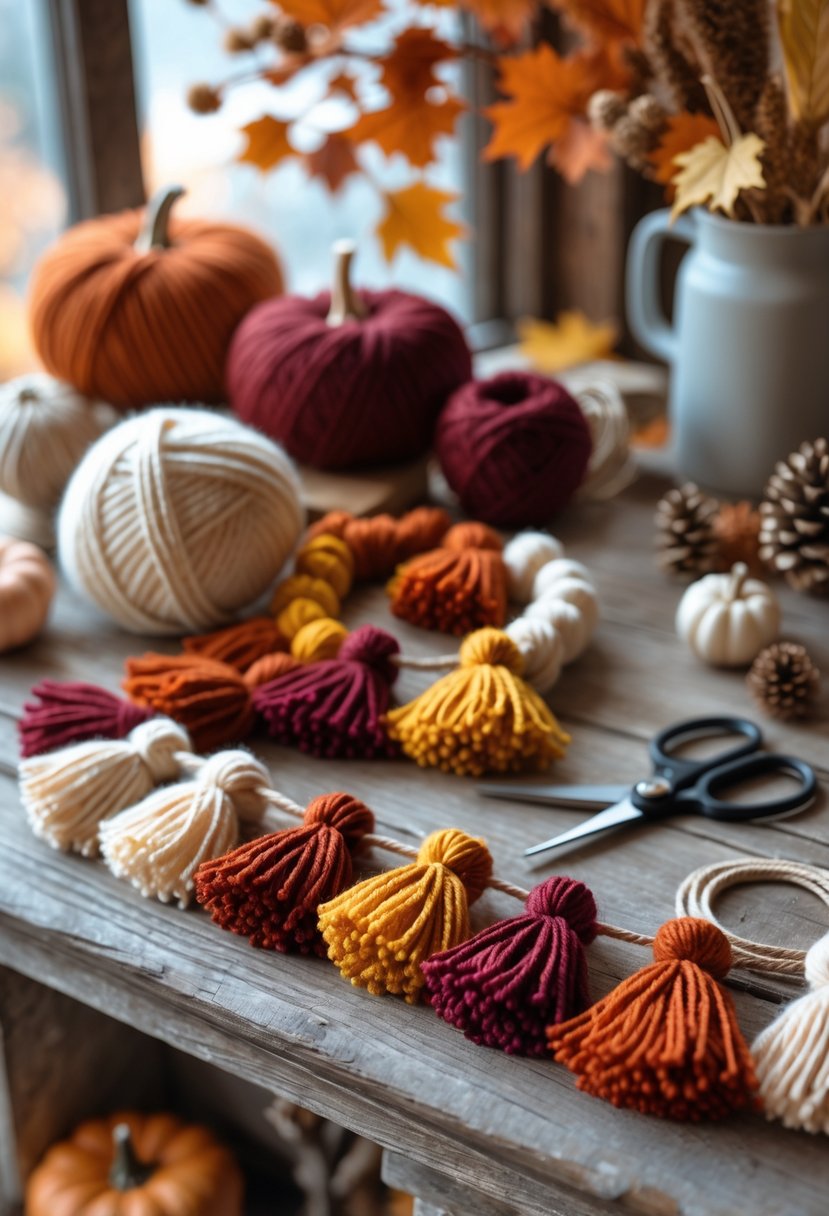
I enjoy making yarn tassel garlands because they are simple and quick. You only need yarn, scissors, and twine to create a cozy fall decoration. Using fall colors like orange, brown, and gold makes my home feel warm and inviting.
Browse The Items


How to Make a Yarn Tassel Garland
Materials Needed:
- Yarn in fall shades (cream, orange, mustard, brown, and burgundy)
- Scissors
- Twine or string for hanging
- Small piece of cardboard (about 4 inches wide)
The Steps:
- Step 1: Wrap the Yarn
Take your yarn and wrap it around the cardboard about 30–40 times. The more you wrap, the fuller the tassel will be. - Step 2: Tie the Top
Cut a small piece of yarn and slide it through the top loop of the wrapped yarn. Tie it tightly to create the tassel’s hanging loop. - Step 3: Cut the Bottom
Carefully slide the yarn off the cardboard and cut the loops at the bottom to form the tassel ends. - Step 4: Shape the Tassel
Wrap another short piece of yarn about 1 inch below the top loop and tie it snugly to create the tassel’s “neck.” Trim the ends evenly. - Step 5: String the Tassels
Thread each tassel onto twine, spacing them evenly along the length.
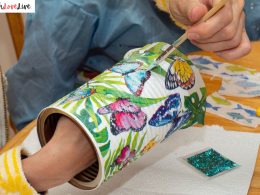
7. Yarn-Wrapped Twig Vases

I enjoy making yarn-wrapped twig vases because they look natural and simple. Wrapping yarn around twigs adds color and texture. These vases are easy to create and fit well with fall decor. They bring a cozy, handmade touch to any room.
Browse The Items


How to Make Yarn-Wrapped Twig Vases
Materials Needed:
- Empty glass bottles or jars
- Yarn in fall colors (orange, brown, mustard, olive green)
- Scissors
- Hot glue gun
- Small twigs and artificial or real fall leaves
The Steps:
- Step 1: Prepare the Bottles
Clean and dry your bottles or jars thoroughly to make sure the yarn sticks well. - Step 2: Apply the Yarn
Start at the base of the bottle. Apply a small dab of hot glue and begin wrapping the yarn tightly around the bottle, adding more glue as you go. Mix colors for a striped or layered effect. - Step 3: Secure the End
When you reach the top, cut the yarn and glue the end neatly to the bottle’s neck. - Step 4: Add Twigs and Leaves
Arrange twigs and a few colorful fall leaves inside each vase for a natural look. - Step 5: Style Your Display
Group several vases together on a wooden tray or table runner for an eye-catching fall display.
8. Cozy Yarn Pumpkin Centerpiece
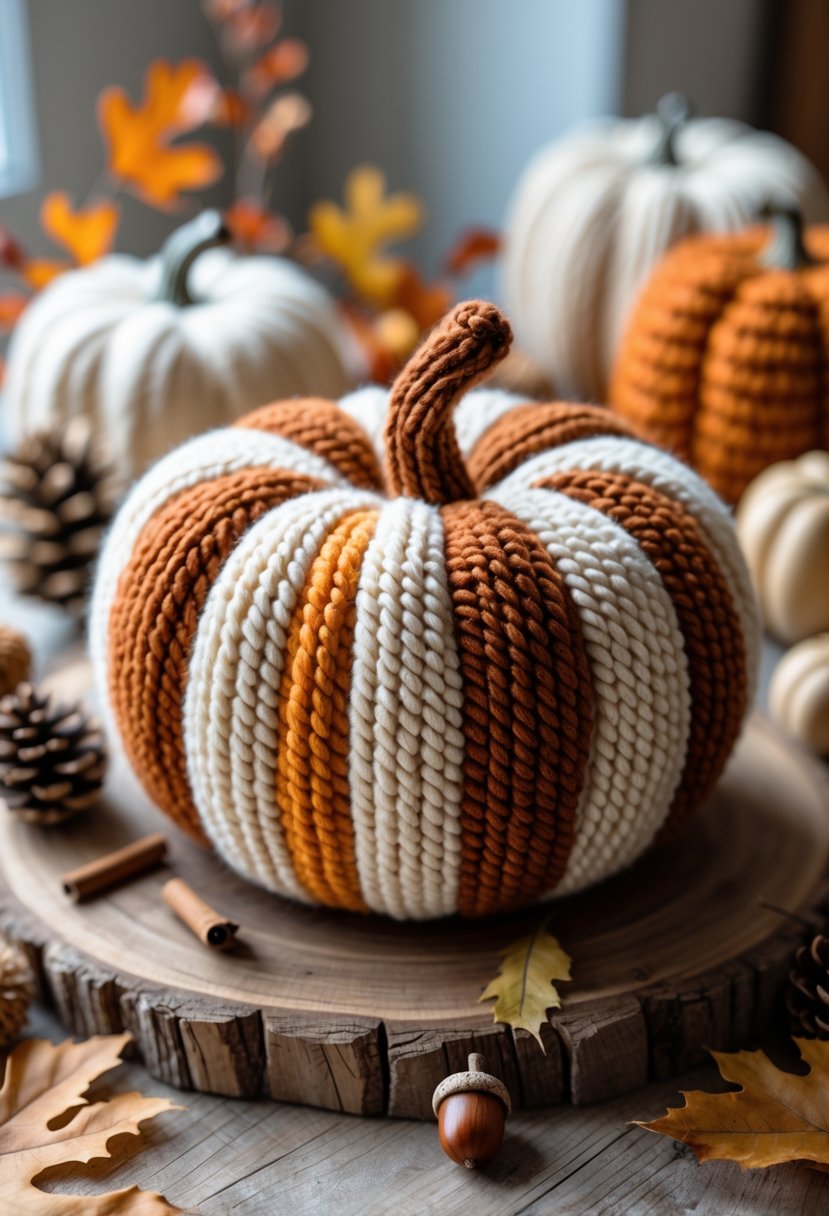
I enjoy making yarn pumpkins for fall decor. Wrapping yarn around foam or other shapes creates a soft, warm look. Adding small stems and natural accents makes a simple centerpiece feel inviting and seasonal. It’s easy to customize with colors you like.
Browse The Items


How to Make a Cozy Yarn Pumpkin Centerpiece
Materials Needed:
- Step 1: Prepare the Pumpkin
Clean the surface of your faux pumpkin and make sure it’s dry. If using a foam pumpkin, remove the existing stem. - Step 2: Attach the Yarn
Apply a dab of hot glue at the top of the pumpkin and press the end of your yarn into it. Begin wrapping the yarn vertically down and around the pumpkin, securing it with glue at the bottom. - Step 3: Alternate Colors
Switch between different yarn colors as you go to create cozy fall stripes. Continue wrapping until the entire pumpkin is covered. - Step 4: Add the Stem
Insert a small wooden stick or cinnamon stick at the top to act as the pumpkin stem, securing it with a bit of glue if needed. - Step 5: Display Your Centerpiece
Set your finished yarn pumpkin on a wooden tray, and surround it with pinecones, leaves, and acorns for a warm, rustic centerpiece.
9. Yarn-Wrapped Mason Jars
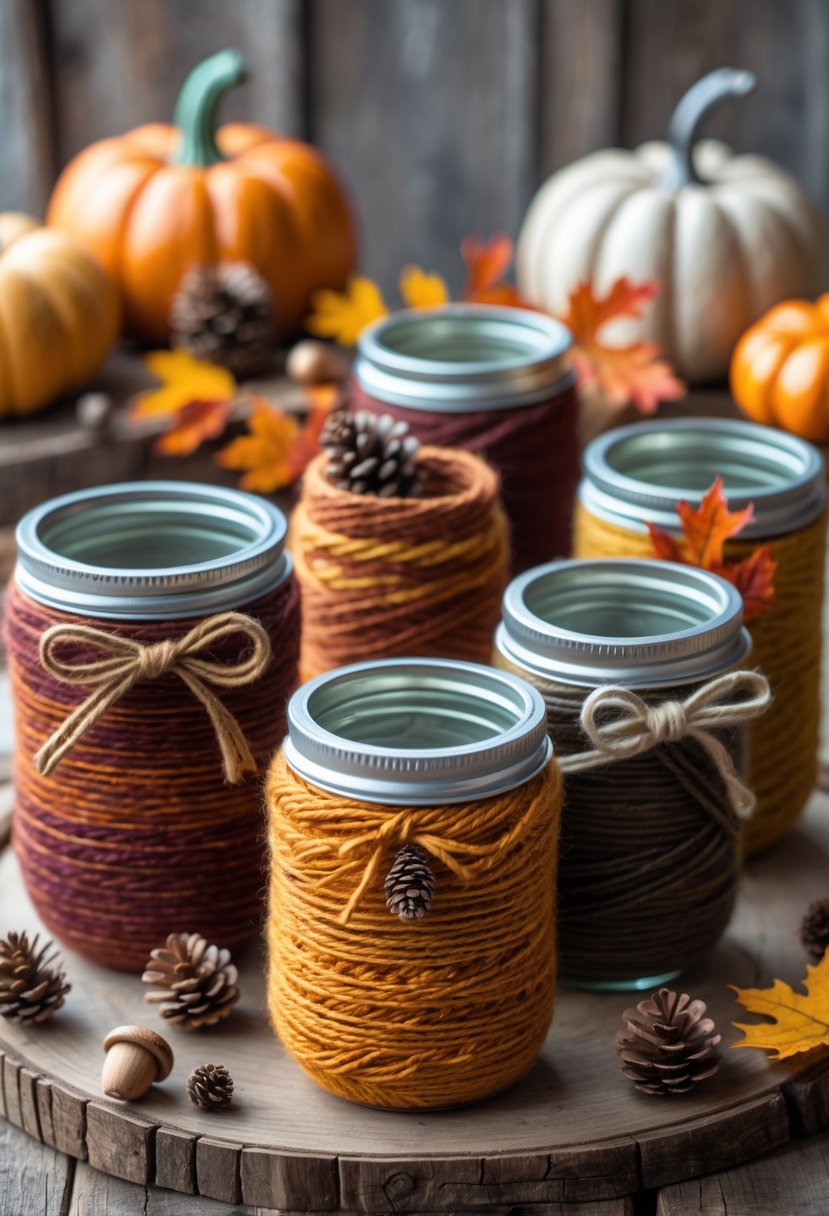
I like wrapping yarn around mason jars to create simple fall decor. It changes the look of plain jars quickly. You can use different colors to match your autumn theme.
Browse The Items
How to Make Yarn-Wrapped Mason Jars
Materials Needed:
- Mason jars (any size)
- Yarn in fall colors (mustard, brown, orange, burgundy)
- Scissors
- Hot glue gun
- Optional: pinecones, acorns, or small bows for accents
The Steps:
- Step 1: Prepare the Jars
Clean and dry your mason jars thoroughly so the yarn adheres properly. - Step 2: Start Wrapping the Yarn
Add a small dab of hot glue near the jar’s bottom edge. Press the end of your yarn into the glue and begin wrapping tightly around the jar. Keep the layers close together for a neat, full look. - Step 3: Change Colors (Optional)
For a striped design, switch to a new yarn color halfway through. Secure each color change with a small dot of glue. - Step 4: Finish and Decorate
When you reach the top, cut the yarn and glue the end down neatly. Add a small bow, pinecone, or acorn as a finishing touch. - Step 5: Display Your Jars
Use your finished jars as candle holders, vases, or centerpieces. They look especially lovely arranged with pumpkins and leaves on a fall table.
10. Yarn Leaf Wall Art
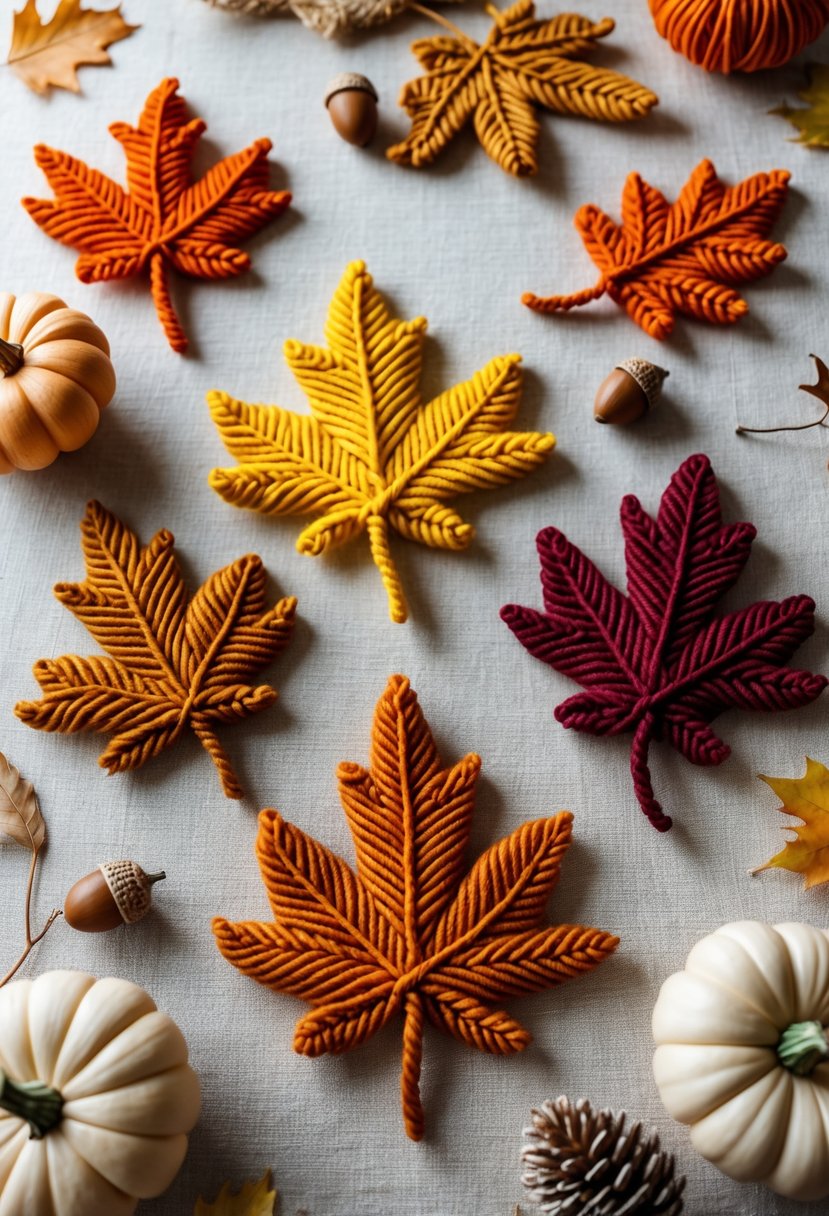
I like making yarn leaf wall art because it’s simple and looks nice. You just wrap colorful yarn around a leaf shape or a cardboard cutout. It adds a cozy, handmade touch to a room with very little effort.
Browse The Items


How to Make Yarn Leaf Wall Art
Materials Needed:
- Yarn in fall shades (burnt orange, mustard yellow, burgundy, and brown)
- Thick wire or pipe cleaners
- Scissors
- Hot glue gun
- Leaf templates or real leaves for tracing
The Steps:
- Step 1: Create the Leaf Frame
Use a wire or pipe cleaner to shape an outline of a leaf. You can follow a printed leaf template or trace a real leaf for accuracy. - Step 2: Wrap with Yarn
Start by gluing the end of your yarn at the base of the leaf. Wrap the yarn tightly along the wire frame, following the leaf’s natural veins. Add small dabs of glue to secure it in place. - Step 3: Add Details
To create vein lines, cut shorter yarn pieces and glue them diagonally across the leaf shape. This adds depth and texture. - Step 4: Finish and Arrange
Trim any loose ends, then let the glue dry completely. - Step 5: Display
Hang the leaves on your wall using clear string, create a garland, or scatter them across a table for a cozy fall display.
11. Simple Yarn Wrapped Candle Holders
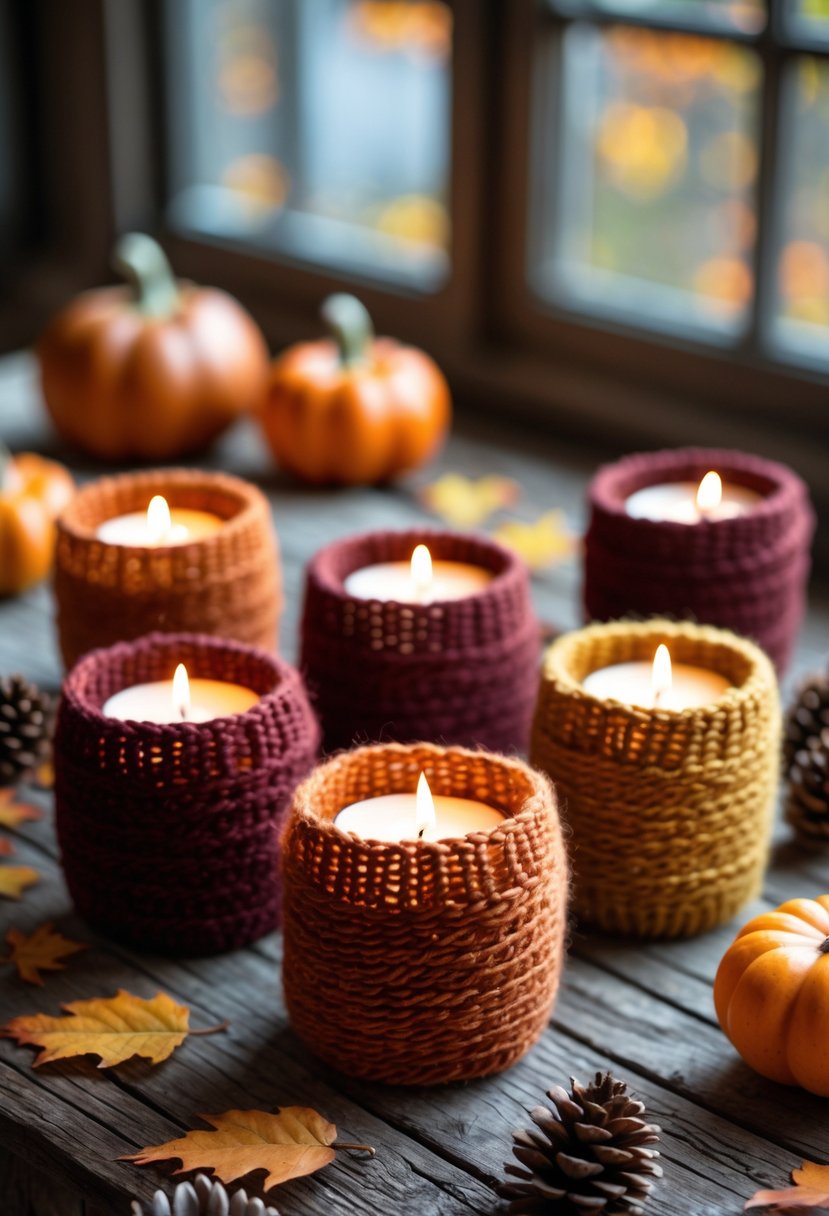
I like wrapping yarn around battery-operated candles to add a warm fall touch. It’s a quick project that uses yarn, glue, and candles. I always make sure the yarn stays below the candle’s top for safety. This keeps the look neat and protects the yarn from heat.
Browse The Items


How to Make Simple Yarn Wrapped Candle Holders
Materials Needed:
- Pinecones (clean and dry)
- Yarn in fall shades (mustard, orange, red, brown)
- Scissors
- Optional: hot glue gun for extra hold
The Steps:
- Step 1: Prepare the Pinecones
Shake off any dust or debris. If needed, bake them at a low temperature (around 200°F for 20 minutes) to remove bugs and sap. - Step 2: Start Wrapping
Cut a long piece of yarn and tuck one end between the pinecone scales to hold it in place. Wrap the yarn around the bottom or middle section of the pinecone, depending on your desired look. - Step 3: Add Color Variations
Switch yarn colors to create a layered or striped effect. Secure each transition with a dab of glue or by tucking the ends under existing wraps. - Step 4: Finish the Design
Once you’ve wrapped enough, trim any loose ends and tuck them neatly into the pinecone. - Step 5: Display
Arrange the pinecones in a basket, along a mantel, or scatter them on your table with fall leaves and acorns for a natural, handmade centerpiece.
12. Yarn-Wrapped Pinecones
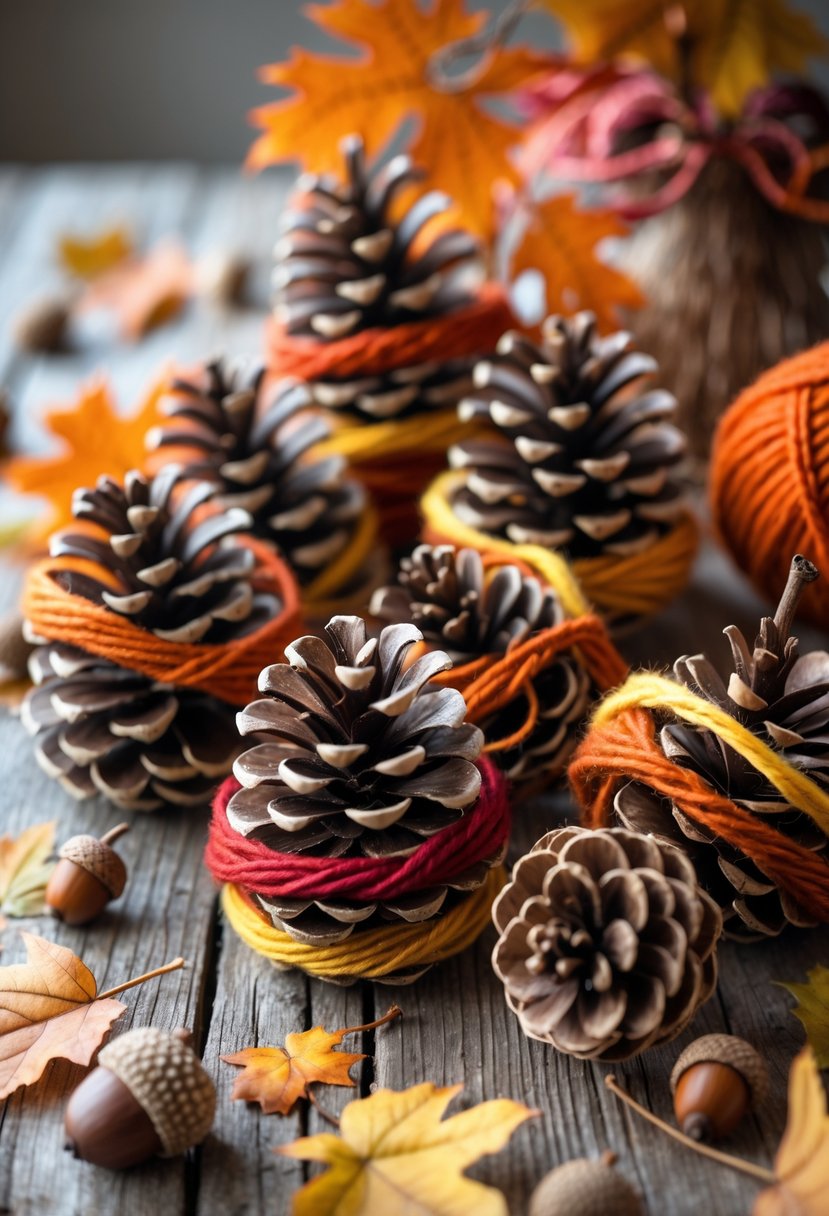
I like making yarn-wrapped pinecones because they are simple and add color to fall decor. You just wrap yarn around the pinecone, moving up and down between the scales. It’s an easy craft that can brighten up any room.
Browse The Items
How to Make Yarn-Wrapped Pinecones
Materials Needed:
- Foam or wire wreath form
- Yarn in fall colors (mustard, burgundy, burnt orange, brown)
- Hot glue gun
- Scissors
- Faux mini pumpkins, leaves, and berries (optional for accents)
The Steps:
- Step 1: Prepare the Wreath Base
Start by gathering all your yarn colors. Cut long strands and loosely roll them into small bundles. - Step 2: Attach the Yarn Bundles
Use hot glue to attach each yarn bundle to the wreath form. Vary the colors as you go to create a full, layered look. You can twist and overlap the yarn for a more natural texture. - Step 3: Add Decorative Touches
Once the base is covered, tuck in small faux pumpkins, acorns, or fall leaves between the yarn bundles. Secure them with hot glue. - Step 4: Finish the Back
Check the wreath from all angles and fill any gaps with more yarn or accents. - Step 5: Hang and Enjoy
Attach a sturdy ribbon or hook to the back and hang it on your door or wall.
13. Fall-Inspired Yarn Wreath
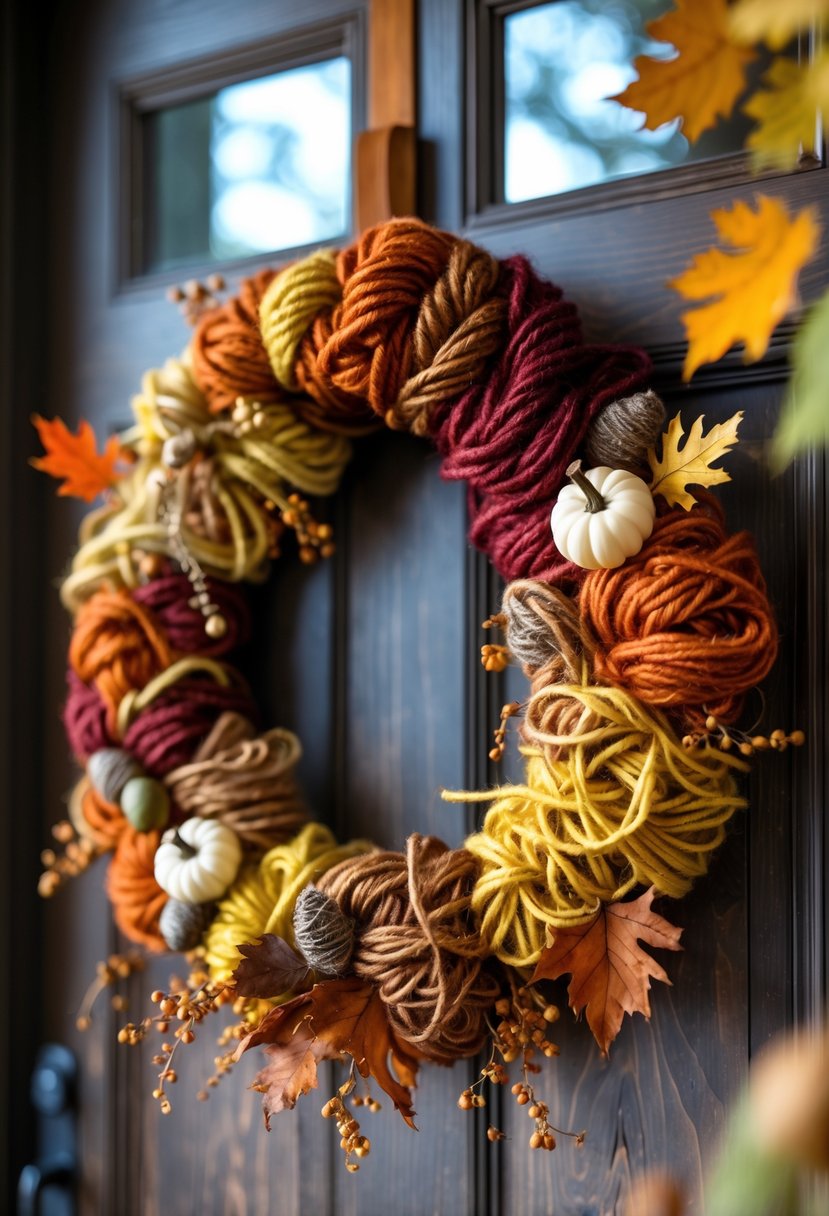
I like making fall yarn wreaths because they are simple and look nice on any door. You just wrap yarn around a form and add small decorations like leaves or berries. It’s a fun project that brings a cozy feel to my home.
Browse The Items
How to Make Fall-Inspired Yarn Wreath
Materials Needed:
- Foam or wire wreath form
- Yarn in fall colors (mustard, burgundy, burnt orange, brown)
- Hot glue gun
- Scissors
- Faux mini pumpkins, leaves, and berries (optional for accents)
The Steps:
- Step 1: Prepare the Wreath Base
Start by gathering all your yarn colors. Cut long strands and loosely roll them into small bundles. - Step 2: Attach the Yarn Bundles
Use hot glue to attach each yarn bundle to the wreath form. Vary the colors as you go to create a full, layered look. You can twist and overlap the yarn for a more natural texture. - Step 3: Add Decorative Touches
Once the base is covered, tuck in small faux pumpkins, acorns, or fall leaves between the yarn bundles. Secure them with hot glue. - Step 4: Finish the Back
Check the wreath from all angles and fill any gaps with more yarn or accents. - Step 5: Hang and Enjoy
Attach a sturdy ribbon or hook to the back and hang it on your door or wall.
14. Yarn-Bound Harvest Corn Decor
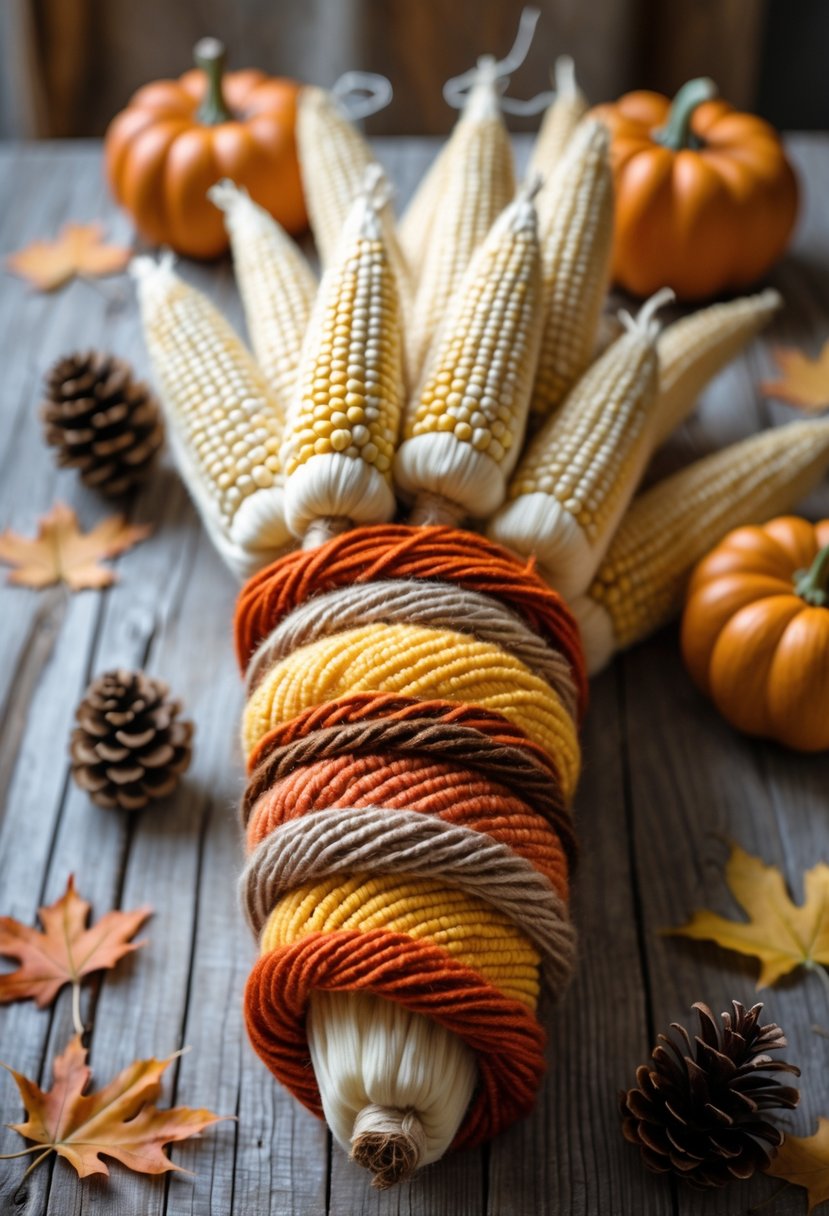
I love making yarn-bound harvest corn decor because it is simple and looks great. All you need is yarn, wire, and some sticks. Wrapping yarn around the shapes creates a cozy fall look for any room.
Browse The Items
Materials Needed:
- Dried corn cobs (with husks)
- Yarn in fall shades (orange, mustard yellow, cream, brown)
- Scissors
- Hot glue gun
The Steps:
- Step 1: Prepare the Corn
Gently clean the dried corn and make sure the husks are secured at the top. If they’re loose, tie them with a bit of yarn or twine. - Step 2: Start Wrapping the Yarn
Apply a dab of hot glue at the base of the husks. Attach the end of your yarn and begin wrapping it tightly around the bottom of the corn cob, layering the colors as you go. - Step 3: Add Color Transitions
Switch between yarn colors for a striped harvest look. When changing colors, secure each new yarn end with a small dab of glue before continuing. - Step 4: Secure the End
Once the cob is covered to your liking, trim the yarn and glue the end neatly underneath the last layer. - Step 5: Display Your Decor
Arrange the finished corn decor on a wooden tray, in a fall basket, or as part of your Thanksgiving table display.
15. Colorful Yarn Leaf Mobile
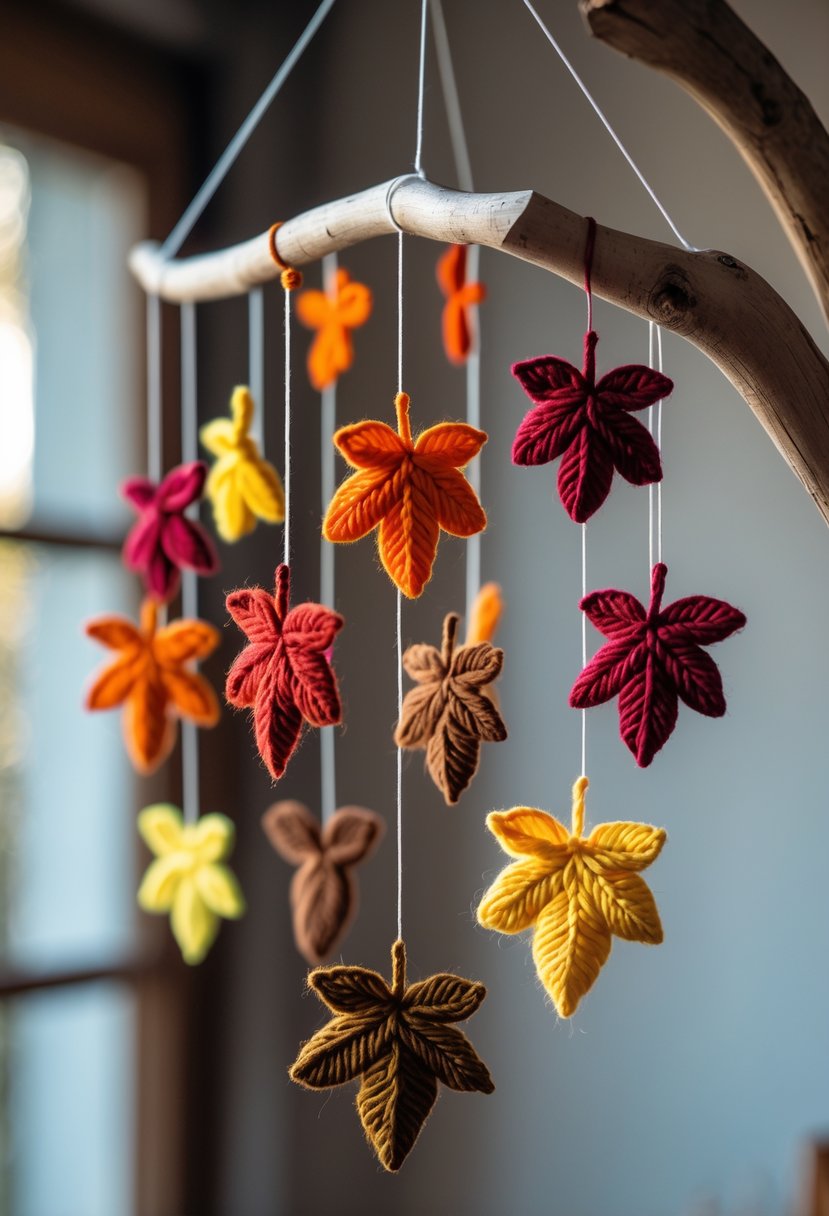
I made a yarn leaf mobile using colorful yarn and a wooden hoop. I tied yarn-wrapped leaves on strings and hung them at different lengths. This simple craft adds a nice fall touch to any room.
Browse The Items
How to Make a Colorful Yarn Leaf Mobile
Materials Needed:
- Yarn in fall colors (red, orange, yellow, and brown)
- White string or thin yarn for hanging
- Hot glue gun
- Scissors
- Small branch or dowel rod
The Steps:
- Step 1: Make the Yarn Leaves
Create your leaves by wrapping yarn into leaf shapes using cardboard templates or small wire frames. Choose a mix of fall colors for variety. - Step 2: Cut Hanging Strings
Cut several lengths of white string or thin yarn. The lengths can vary to give your mobile a layered look when hanging. - Step 3: Attach the Leaves
Glue or tie the top of each yarn leaf to the end of the hanging strings. Make sure they’re secure and spaced nicely apart. - Step 4: Tie to the Branch
Attach each string to your branch or dowel rod, arranging the leaves at different heights for a balanced look. - Step 5: Hang the Mobile
Tie two pieces of string to each end of the branch to create a hanger. Find a cozy spot and hang it up!