

Table of Contents Show
Keeping kids busy can be tough, especially on rainy days or during quiet classroom time. If you’re hunting for simple, fun activities that also sneak in a bit of letter learning, this list will help. These cute Letter U crafts are easy to set up and don’t need fancy supplies.
You’ll find ideas that turn the letter U into umbrellas, unicorns, and more—perfect for teaching sounds while making art.
Let’s jump into the crafts!
1. Umbrella Letter U Collage
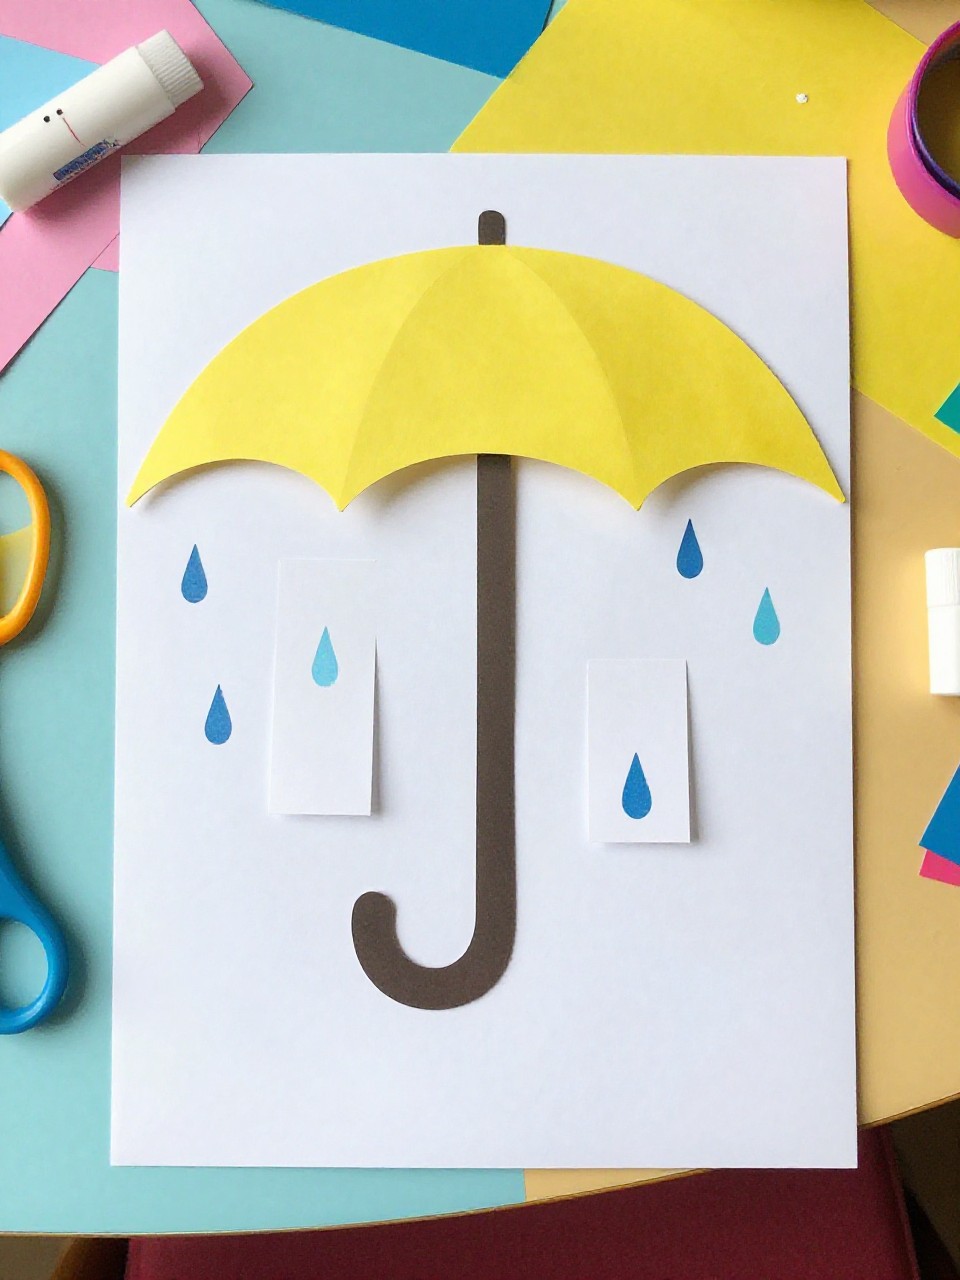
This craft turns a big letter U into a colorful umbrella with paper raindrops. Kids love choosing bright patterns for the umbrella top and sticking on shiny “raindrops,” making it a cheerful, low-mess project.
Materials Needed:
For People Who Love to Make Things ✂️
- Construction paper (one sheet for background, scraps for umbrella)
- Scissors (child-safe)
- Glue stick
- Markers or crayons
- Sequins or foil bits for raindrops (optional)
How to make it:
- 1. Draw and cut a large letter U from colored paper; glue it onto the background as the umbrella’s handle.
- 2. Cut a half-circle for the umbrella top and glue it across the top of the U.
- 3. Add paper raindrops and decorate the umbrella with stripes or dots.
- 4. Let glue dry and display on a wall or window.
2. U Is for Unicorn Paper Puppet

The letter U becomes a cute unicorn with a paper horn, yarn mane, and friendly face. Kids enjoy adding sparkly details and then using the puppet for pretend play.
Materials Needed:
- Cardstock or construction paper
- Yarn or ribbon for mane
- Glue stick and tape
- Markers
- Glitter stickers (optional)
How to make it:
- 1. Cut a large U from cardstock; this is the unicorn’s body.
- 2. Glue on a small triangle horn at the top and add oval paper ears to the U’s sides.
- 3. Tape or glue yarn strands along the top curve for the mane, then draw eyes and nostrils.
- 4. Add glitter stickers, let dry, and hold the U to gallop and neigh.
3. Underwater U Aquarium Bag
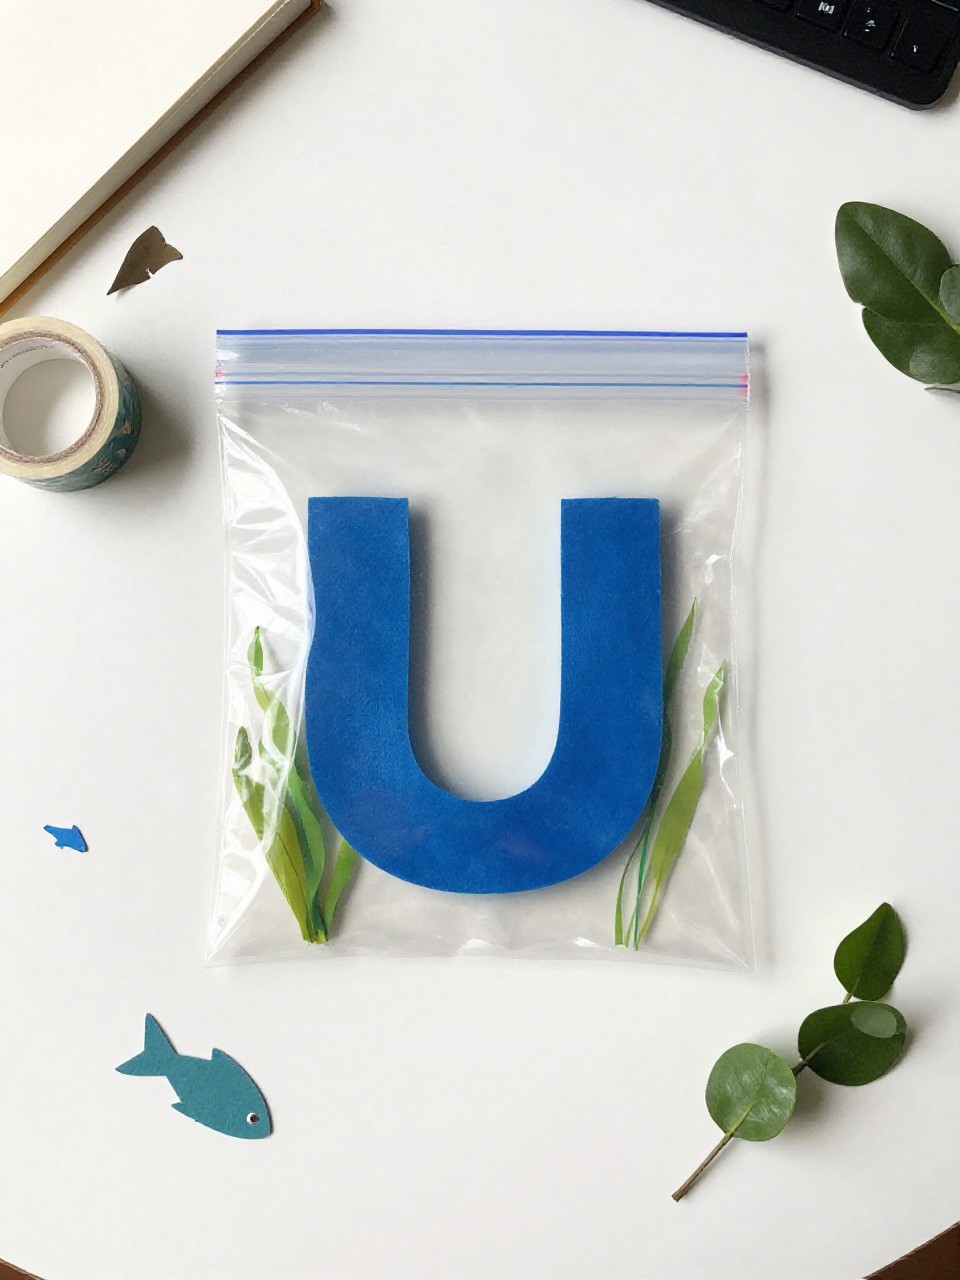
This project makes a mini “aquarium” where the letter U holds tiny sea creatures and bubbly details inside a zip bag. Kids like squishing the bag and moving the little fish around.
Materials Needed:
- Blue construction paper
- Clear zip-top bag (quart size)
- Paper fish and seaweed cutouts
- Hair gel or clear dish soap
- Tape
How to make it:
- 1. Cut a big U from blue paper and slide it into the zip bag as a background.
- 2. Add a spoonful of hair gel and place paper fish/seaweed inside the bag.
- 3. Gently press to spread the gel; arrange the creatures around the U.
- 4. Seal and tape the top closed; kids can squish and admire their underwater U.
4. U-Shaped Unicorn Headband

Make a wearable unicorn headband where the front piece forms a bold U that sits like a crown. Kids love choosing mane colors and prancing around when it’s done.
Materials Needed:
- Cardstock (white or pastel)
- Elastic string or paper strip for band
- Glue or stapler
- Markers and stickers
- Yarn or tissue paper for mane
How to make it:
- 1. Cut a U from cardstock and a long strip for the headband.
- 2. Attach the U to the front center of the strip; add a small triangle horn at the top.
- 3. Glue yarn or tissue fringes behind the horn for a mane; draw eyes and stars.
- 4. Fit the band around the head and staple or tie the ends to size.
5. U Is for Up! Hot-Air Balloon Art
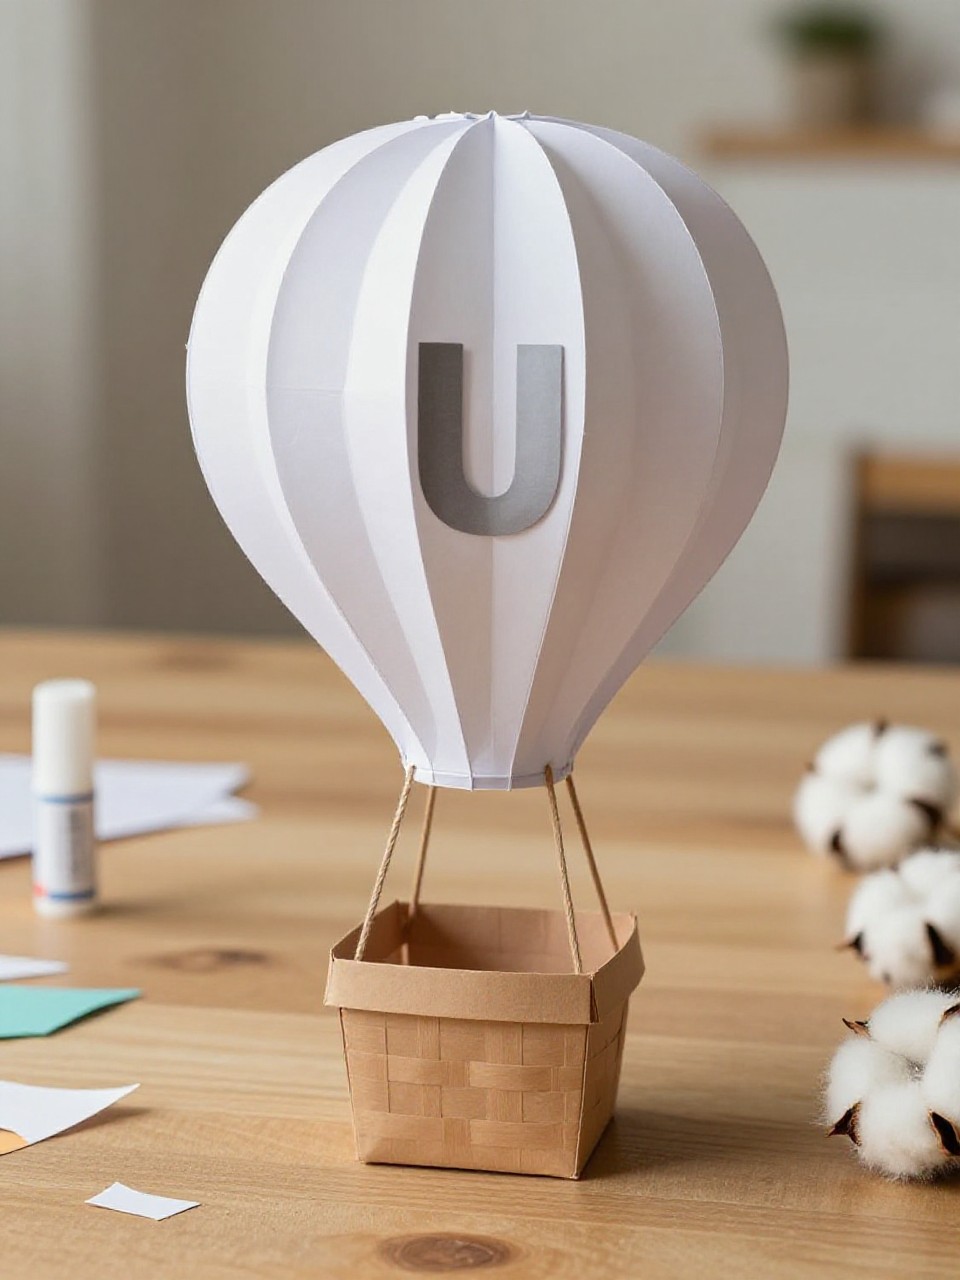
Turn the U into the basket of a hot-air balloon scene that spells “Up!” above it. Kids enjoy the 3D balloon made from folded paper circles.
Materials Needed:
- Construction paper (sky and colors)
- Glue stick
- Scissors
- Cotton balls for clouds (optional)
- Marker
How to make it:
- 1. Glue a large U at the bottom of a sky-colored paper; this is the basket.
- 2. Cut 3–4 paper circles, fold in half, and glue halves together to form a puffy balloon; attach above the U with “strings” drawn in marker.
- 3. Add cotton clouds and write “Up!” in the sky.
- 4. Let dry and hang for a cheerful wall display.
6. U-Shaped Ukelele (Ukulele) Cutout Craft
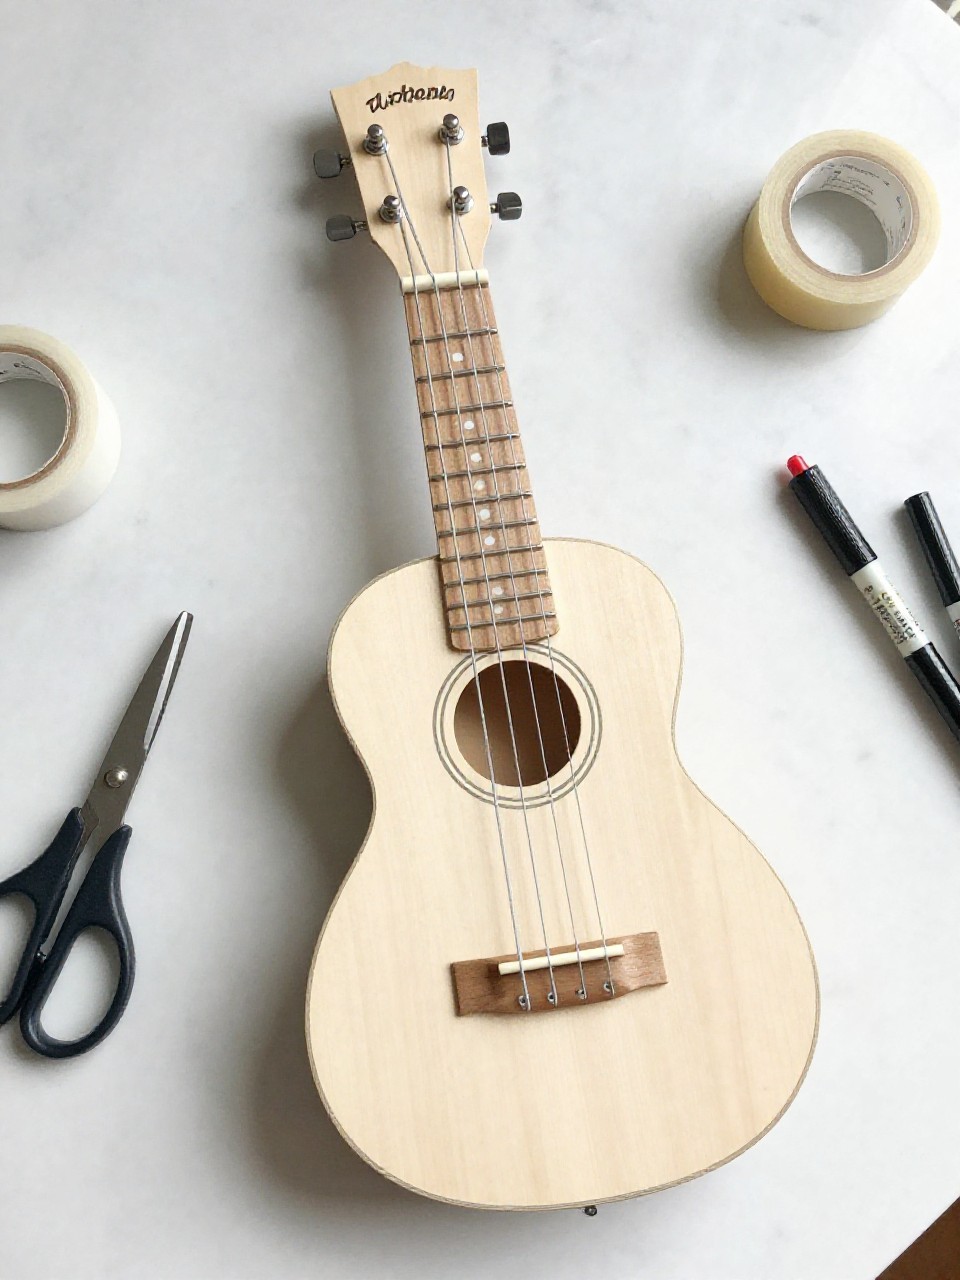
A simple U base becomes a tiny paper ukulele with a neck, strings, and sound hole. Kids enjoy “strumming” the strings and decorating it with patterns.
Materials Needed:
- Cardboard or thick cardstock
- Rubber bands or string
- Paper strip for neck
- Glue or tape
- Marker and stickers
How to make it:
- 1. Cut a large U from cardboard for the body and a narrow strip for the neck.
- 2. Tape or glue the neck to the top center; draw a sound hole on the U.
- 3. Stretch 2–3 rubber bands or string pieces across the U and tape at back for strings.
- 4. Decorate, then pretend to play your U-kelele.
7. U-Shaped Unicorn Horn Wand
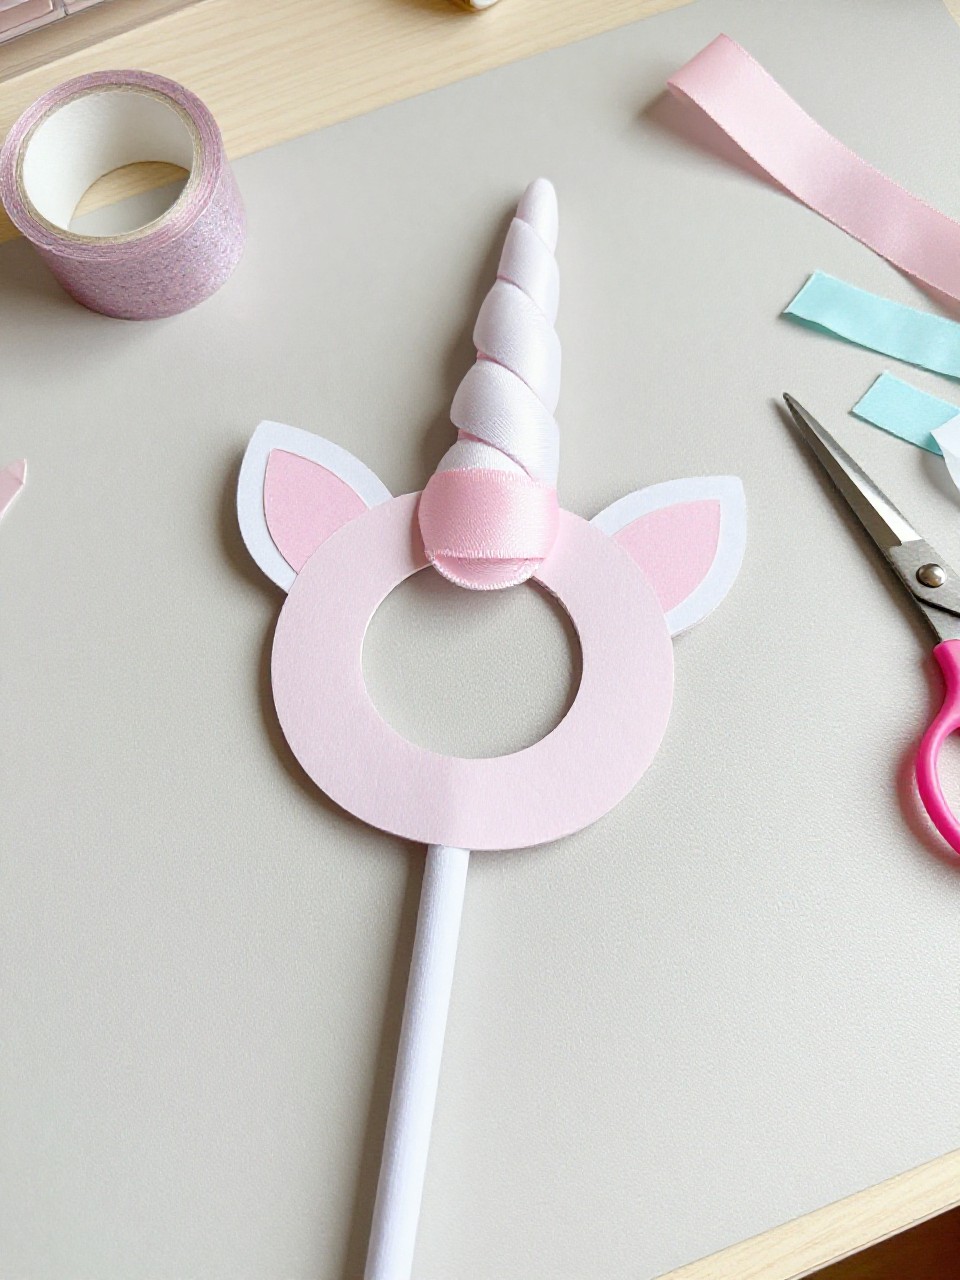
Create a playful wand with a U handle and a swirled horn topper, perfect for imaginative play. Kids love waving the wand and watching ribbons stream.
Materials Needed:
- Craft stick or paper straw
- Cardstock (for U handle and horn)
- Ribbon or curling ribbon
- Glue
- Glitter tape (optional)
How to make it:
- 1. Cut a sturdy U and glue it around the lower end of the craft stick as a decorative handle.
- 2. Cut and roll a cone horn from cardstock; glue to the top of the stick.
- 3. Tie or glue ribbons beneath the horn and wrap the handle with glitter tape.
- 4. Let dry, then swish and twirl your wand.
8. U Is for Under the Bed Monster
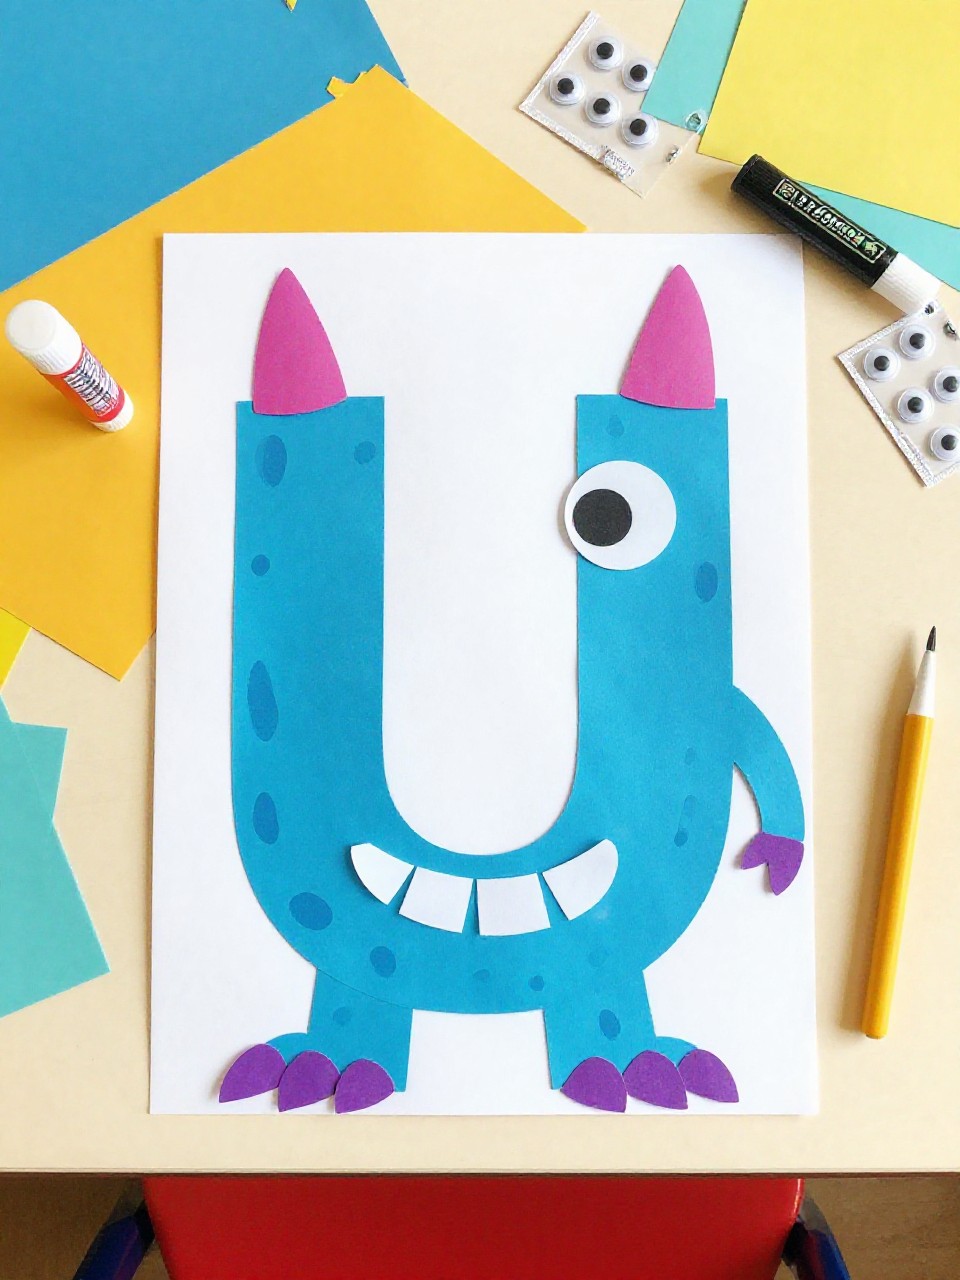
This friendly U-shaped “under the bed” monster peeks out with googly eyes and silly teeth. Kids enjoy choosing colors and making a monster that’s more goofy than scary.
Materials Needed:
- Construction paper
- Googly eyes
- Glue stick
- Scissors
- White paper for teeth
How to make it:
- 1. Cut a big U from bright paper; glue it onto a background.
- 2. Add googly eyes near the top ends and glue a strip of white paper behind the lower curve; cut small triangles to peek as teeth.
- 3. Draw spots, stripes, or fur.
- 4. Let dry and show off your friendly monster.
9. Upward Arrows U Collage
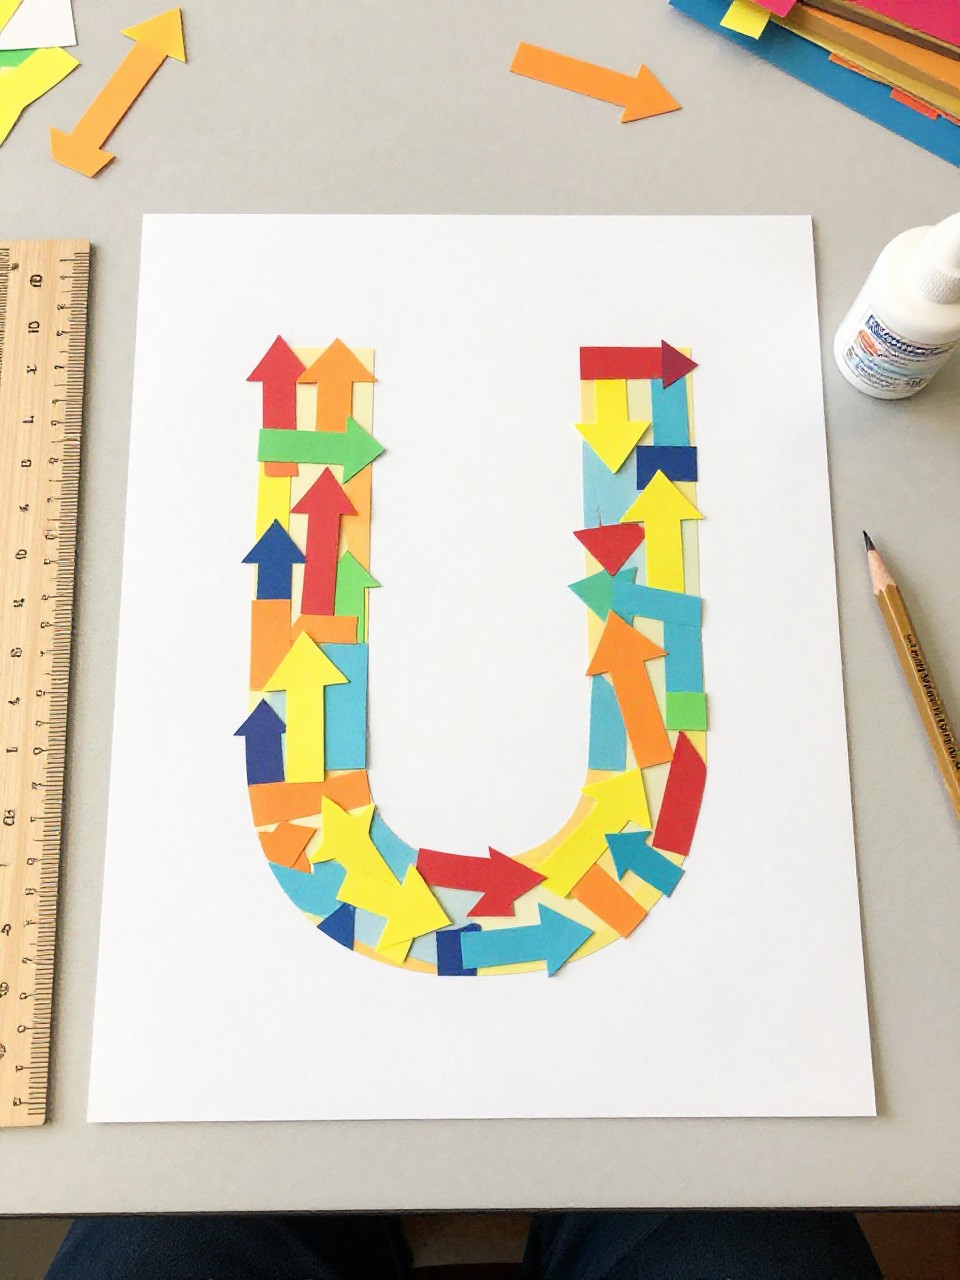
Make a bold poster where a giant U is filled with upward arrow cutouts to reinforce the “up” sound. Kids enjoy arranging arrows in patterns and gradients.
Materials Needed:
- Poster paper
- Colored paper scraps
- Glue stick
- Ruler and pencil
- Stickers (optional)
How to make it:
- 1. Draw and cut a large U; glue it centered on the poster.
- 2. Cut many small arrow shapes; fill the inside of the U by gluing arrows pointing upward.
- 3. Add stickers or words like “Up We Go!”
- 4. Smooth everything flat and hang as a classroom anchor chart.
10. U-Shaped Underwater Crown

A wearable crown shaped like a U and decorated with shells, fish, and bubbles brings the ocean to life. Kids enjoy choosing sea colors and pretending to be underwater royalty.
Materials Needed:
- Blue cardstock strip (headband)
- U-shaped front piece
- Sea-themed stickers or cutouts
- Glue
- Aluminum foil dots for bubbles (optional)
How to make it:
- 1. Cut a U and glue it to the center of the cardstock strip.
- 2. Add fish, shells, and seaweed cutouts along the U.
- 3. Glue small foil dots as shiny bubbles.
- 4. Fit the crown to head size and tape or staple the ends.
11. U-Shaped Utensil Holder Caddy
Turn a cardboard tube and paper U into a simple holder for kids’ plastic utensils or markers. Kids like customizing it with their name and patterns.
Materials Needed:
- Cardboard tube (paper towel half)
- Construction paper wrap
- Large paper U
- Glue or tape
- Markers and stickers
How to make it:
- 1. Wrap the tube with colored paper and secure with tape.
- 2. Glue a large U on the front as a label shape.
- 3. Write your name inside the U and add stickers or doodles.
- 4. Fill with utensils, crayons, or brushes.
12. U for USA Flag Streamer
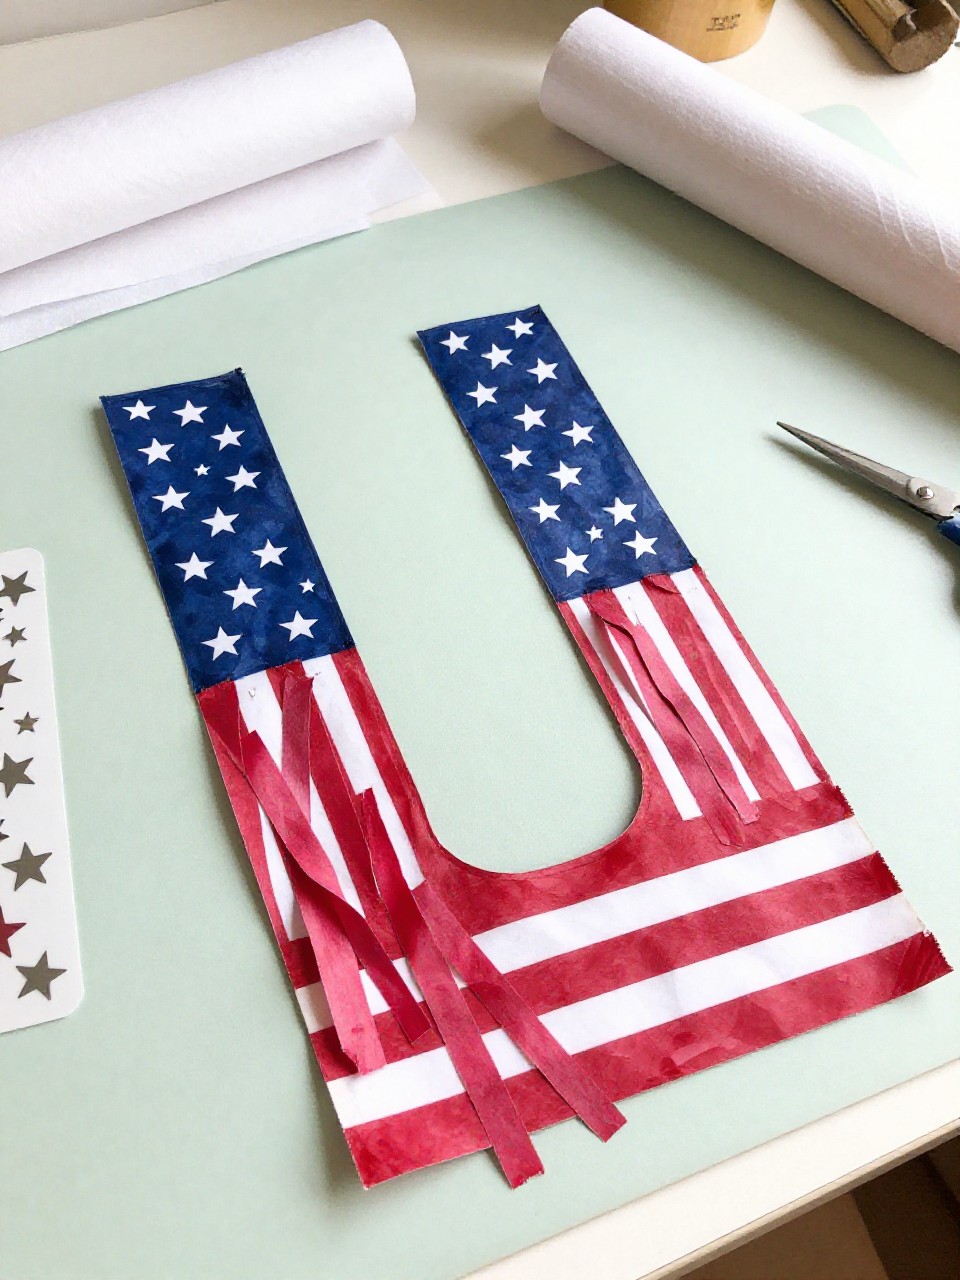
Celebrate the letter U with a patriotic twist: a big U topped with starry blue and red-and-white streamers. Kids enjoy waving it and watching the ribbons flutter.
Materials Needed:
- Cardstock U (white)
- Blue paper square and star stickers
- Red and white crepe paper streamers
- Glue or tape
- Craft stick (optional handle)
How to make it:
- 1. Cut a bold U and glue a small blue square to one top side with star stickers.
- 2. Tape red and white streamers along the bottom curve of the U.
- 3. Attach a craft stick to the back as a handle if desired.
- 4. Wave your U for USA and cheer!
13. U-Shaped Underline Bookmark
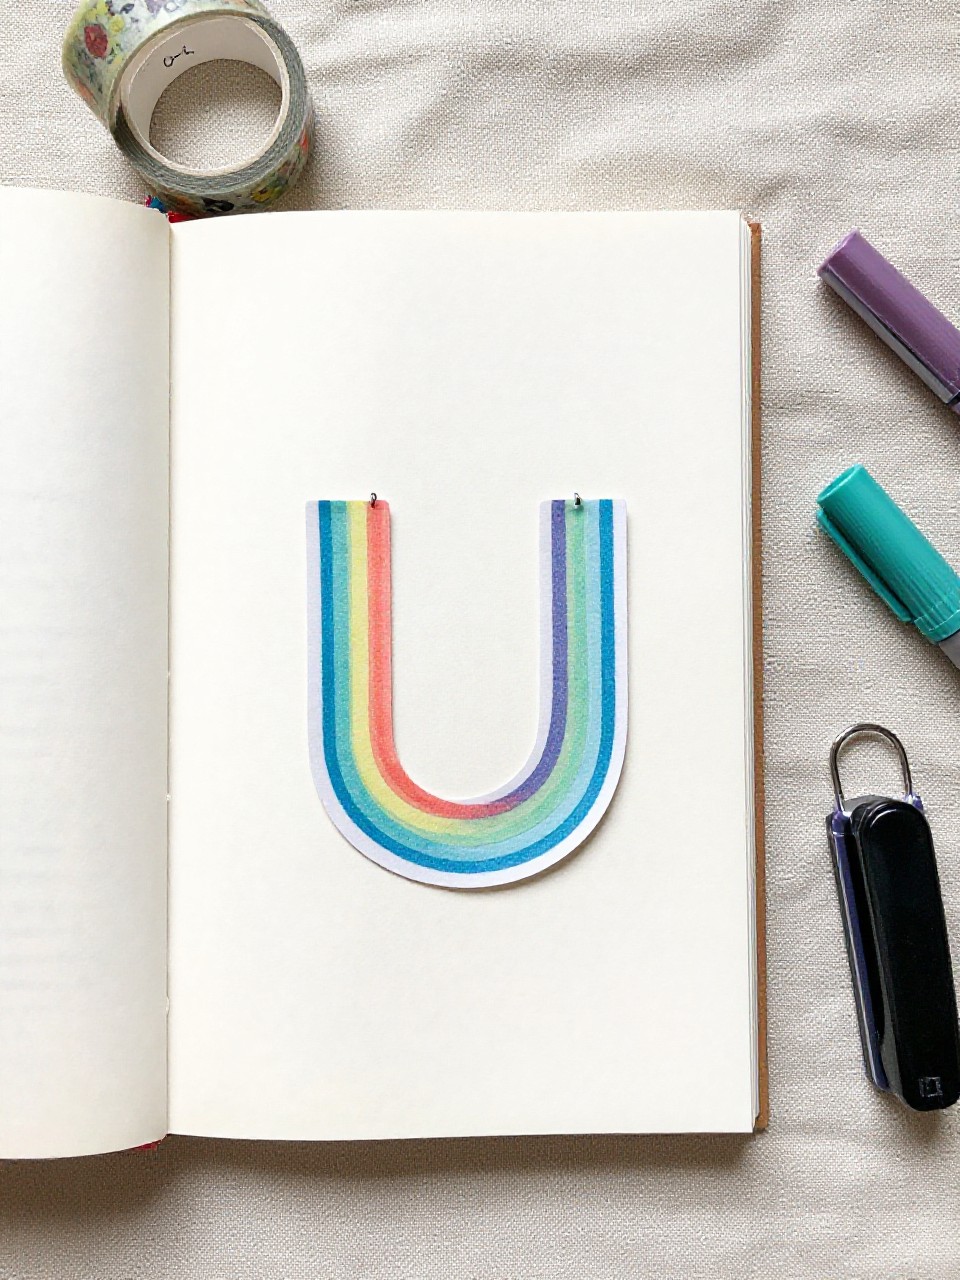
Make a sturdy U that hooks over a page to “underline” the line you stopped on. Kids like choosing colors and seeing the U peeking out of their book.
Materials Needed:
- Laminated cardstock or index cards
- Scissors
- Markers
- Washi tape (optional)
- Hole punch and ribbon (optional)
How to make it:
- 1. Cut a thick U from laminated cardstock so it’s strong.
- 2. Decorate with washi tape and doodles; write “U Read It!”
- 3. Punch a hole and add ribbon if you like.
- 4. Slide the U over a page to mark your spot.
14. U Is for Upcycle Robot
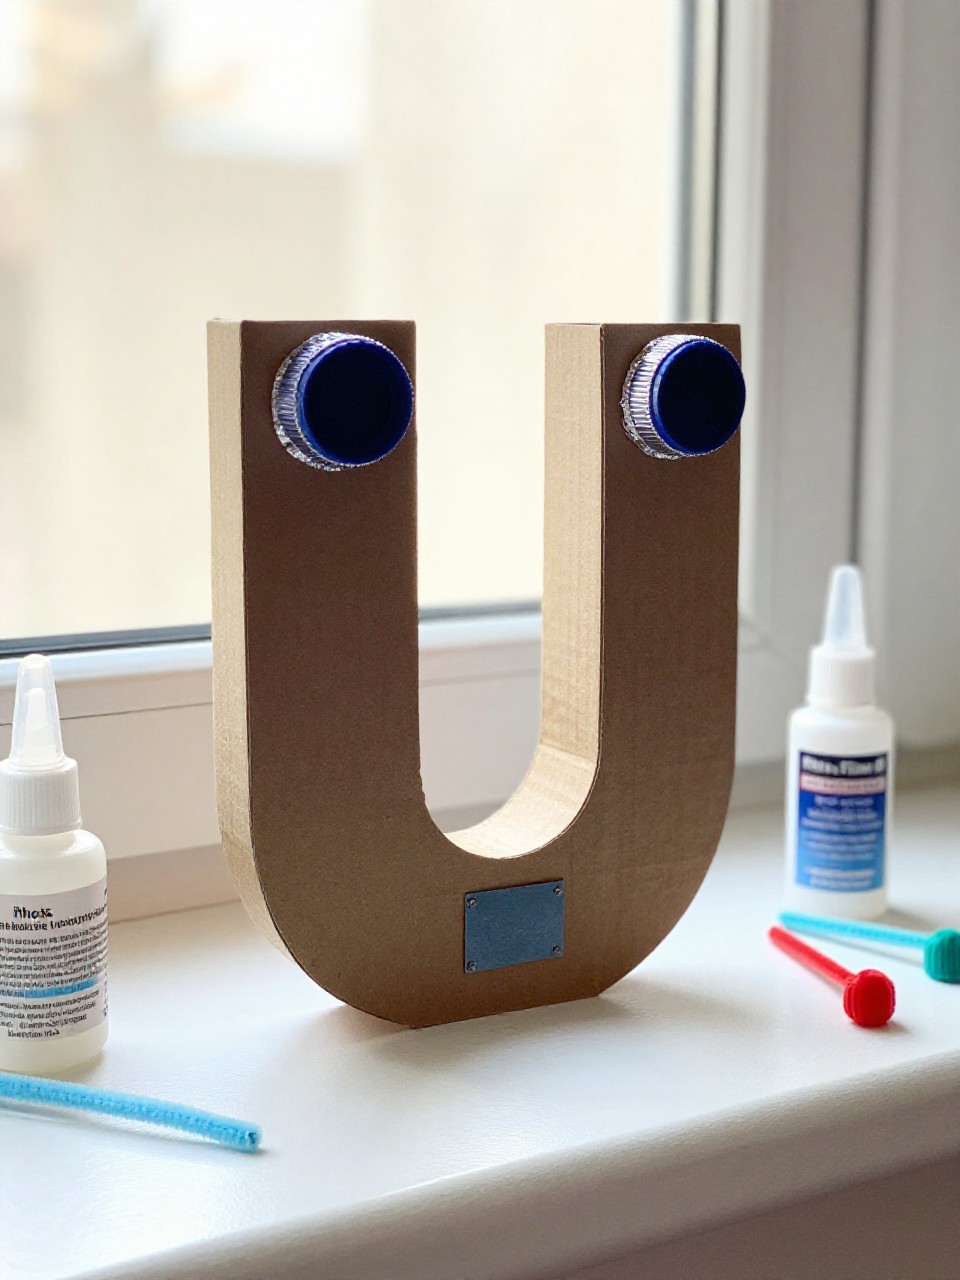
Build a cute robot body from a U base and add bottle-cap eyes, straw arms, and cardboard feet. Kids enjoy the open-ended decorating and the idea of reusing materials.
Materials Needed:
- Cardboard U
- Bottle caps
- Straws or pipe cleaners
- Glue (tacky glue works best)
- Foil or metallic paper scraps
How to make it:
- 1. Cut a sturdy U from cardboard for the robot body.
- 2. Glue bottle caps as eyes near the top; add straw/pipe cleaner arms on the sides.
- 3. Cover parts with foil pieces for a metal look and draw buttons.
- 4. Let it dry standing against a wall or display shelf.
15. U-Shaped Unicorn Foam Sticker Scene
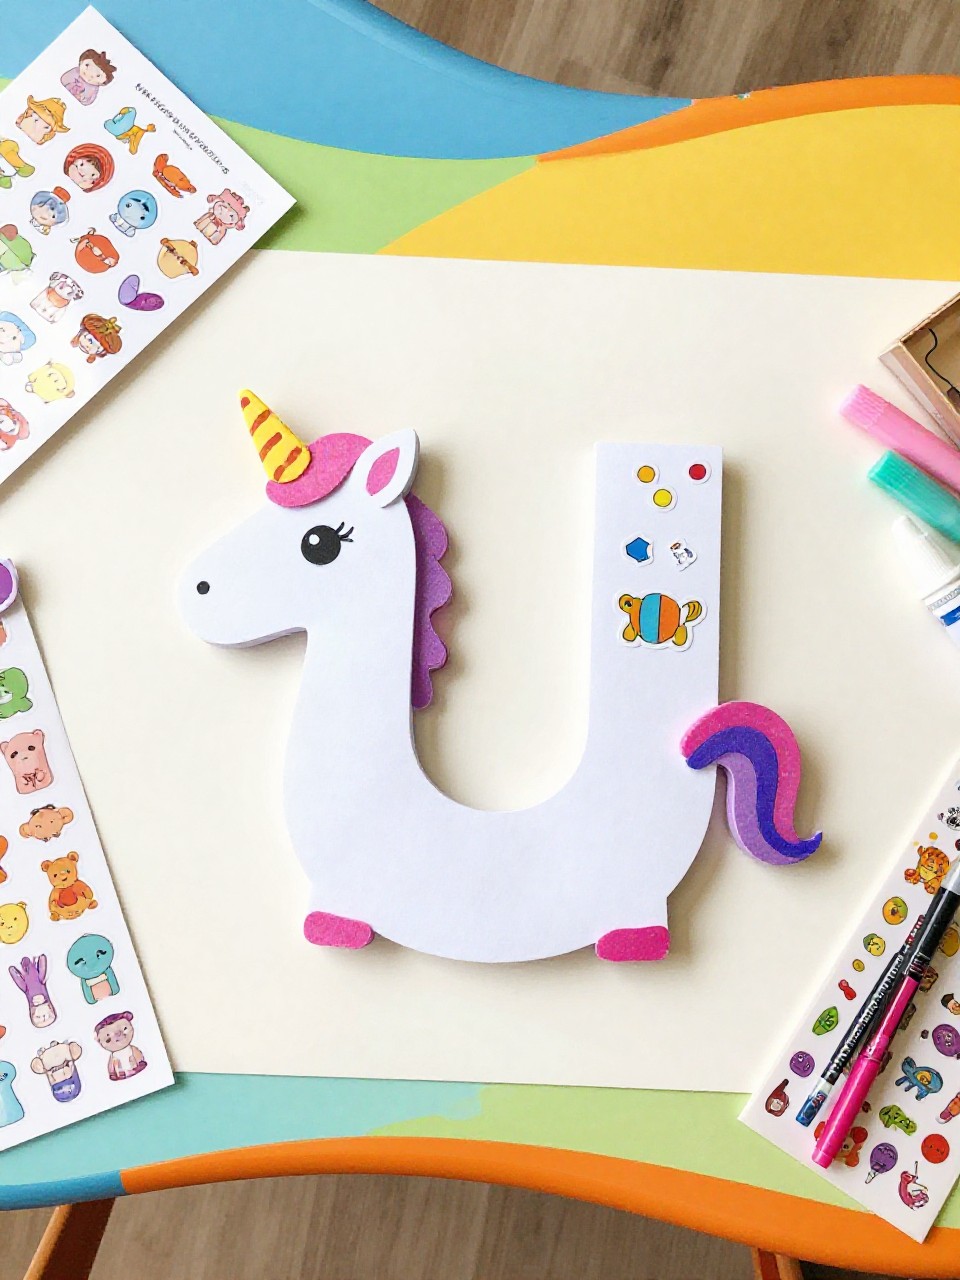
Create a quick scene where a foam U turns into a unicorn in a meadow with clouds and a rainbow. Kids love the easy peel-and-stick process and bright colors.
Materials Needed:
- Foam sheet or large foam U sticker
- Background cardstock
- Foam stickers (rainbow, stars, flowers)
- Marker
- Glue (if using non-adhesive foam)
How to make it:
- 1. Place the foam U on the background; add a small triangle horn and ear stickers.
- 2. Draw eyes and a smile, then build a meadow with flower and cloud stickers.
- 3. Add a rainbow and stars for sparkle.
- 4. Press everything firmly and display the scene.