


Table of Contents Show
We all get stuck in a rut sometimes. You sit down to make a card, and you end up folding the paper in half just like you always do. It works, but it’s not exciting. You’ve probably seen those amazing, complicated-looking cards online and thought, “I want to make that.” But then you click the link, and the photos are blurry, or the instructions don’t make sense.
It is frustrating to waste good paper on a bad tutorial. I wanted to fix that. I have put together a list of 15 fancy fold card designs that actually work. Whether you are brand new to paper crafting or you have been doing this for years, there is something here for you.
We are focusing on Spring and Easter themes to help you welcome the new season. Here are 15 creative card ideas with clear steps you can actually follow.
1. The “Hatching Chick” Double-Slider Card (Professional)
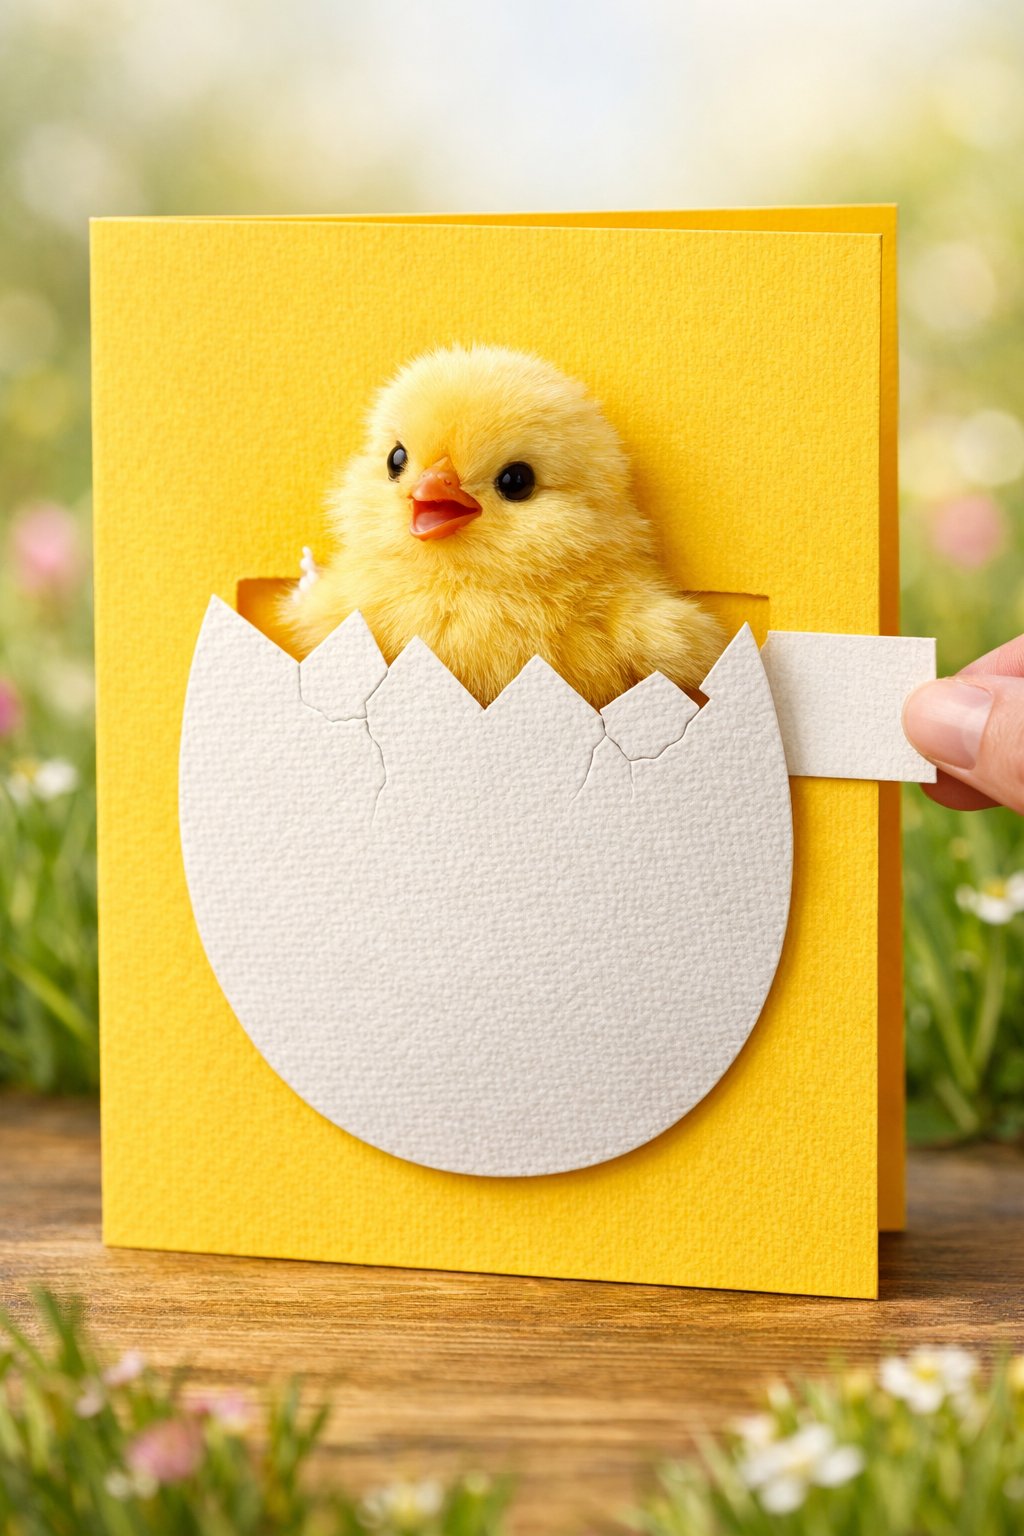
This interactive slider card is a delight for all ages. It uses a hidden internal track to “launch” a character (like a chick or a bunny) from behind a decorative element.
It’s a “mechanical” card that feels like a toy, making it a high-value item for craft fairs or premium gift-giving.
For People Who Love to Make Things ✂️
Materials needed
- 110lb White cardstock (Base)
- 65lb Yellow and Orange cardstock (Chick)
- 1/4″ Foam adhesive strips (depth is crucial)
- Clear acetate strips (for the invisible slider)
- 1-inch Circle punch
- Strong double-sided “Red Line” tape.
Shop the materials


Steps to make
- Assembly: Attach the track panel to the main card base. When the tab is pulled, the chick will “hatch” and rise from behind the bottom eggshell.
- Prepare the Base: Cut a standard 5.5″ x 4.25″ card base. On the front panel, use your circle punch to create a “thumb notch” on the right-hand edge.
- Create the Track: Cut a secondary piece of cardstock (5″ x 4″). Cut a vertical slit 1/2″ wide down the center, stopping 1 inch from the top and bottom.
- The Slider Mechanism: Cut a strip of acetate (1″ x 3″). Thread it through the slit. Attach your “chick” to the top of the acetate on the front side, and a “pull tab” to the acetate on the back side.
- Build the “Housing”: Apply foam adhesive strips to the back of the track panel, ensuring the foam does not touch the moving acetate strip. This “lifts” the panel so the chick can slide freely.
- The Reveal: Die-cut a large egg shape and “crack” it horizontally. Glue the bottom half of the egg over the bottom of your track.
2. The Easter Lily Cross-Fold (Professional)

This is a sophisticated, reverent design perfect for Easter Sunday. It combines a unique “plus-sign” card base with an internal origami-inspired fold. The result is a card that feels like a gift and an ornament in one.
It’s highly sought after for religious milestones and sophisticated spring greetings.
Materials needed
- Pearlescent or Linen cardstock
- Gold embossing powder and heat tool
- Precision scoring board
- Vellum (for the lily petals)
- Small pearl adhesive gems.
Shop the materials


Steps to make
- The Cross Base: Start with a 12″ x 12″ sheet. Trim it into a “plus” shape by removing four 4″ x 4″ squares from the corners, leaving you with five 4″ squares in a cross.
- Scoring the Petals: On the center square, score diagonally from corner to corner both ways. This creates an “X” that allows the center to collapse inward.
- Vellum Layering: Cut 4 petal shapes from vellum. Adhere them to the diagonal score lines in the center square so they overlap.
- Creating the “Pop”: Fold the four outer arms of the cross toward the center. As you do, push the diagonal center scores inward. The vellum petals will naturally “bloom” upward as the card opens.
- The Closure: Create a “Belly Band” (a strip of paper that slides over the card) to keep the cross arms folded flat for mailing.
- Detailing: Heat-emboss “He is Risen” or a floral border on the outer arms so the card looks decorated even when closed.
3. The Spring Garden Fence Step-Fold (Professional)

The Garden Fence card uses an asymmetrical side-step fold to create a 3D diorama. By using white strips of paper as “fencing” across the steps, you create a deep stage for floral elements. It stands perfectly on a desk and acts as a miniature piece of spring decor.
Materials needed
- Leaf Green cardstock (Base)
- White cardstock (for fence pickets)
- Floral die-cuts or stickers
- Paper trimmer with a sharp blade
- Precision liquid glue
Shop the materials


Steps to make
- The Master Cut: Position your 5.5″ x 8.5″ cardstock vertically. On the right side, measure 2 inches in. Cut from the 1-inch mark down to the 6.5-inch mark.
- Left Side Scoring: On the left (wider) side of the cut, make one single score at 4.25″. This is your main “spine.”
- The Steps: On the right (narrower) side, score at 1″, 2″, 3.25″, 4.5″, and 6.5″.
- The Fold: Fold the left side in half like a normal card. Accordion-fold the right side (Mountain, Valley, Mountain, Valley) to create three distinct “steps.”
- Building the Fence: Cut 1/4″ strips of white cardstock. Glue them vertically across the steps to mimic a picket fence.
- Planting the Garden: Glue your flowers behind the “fence” pickets on each step. This creates a sense of foreground, middle ground, and background.
4. The “Hidden Egg” Shutter Card (Professional)
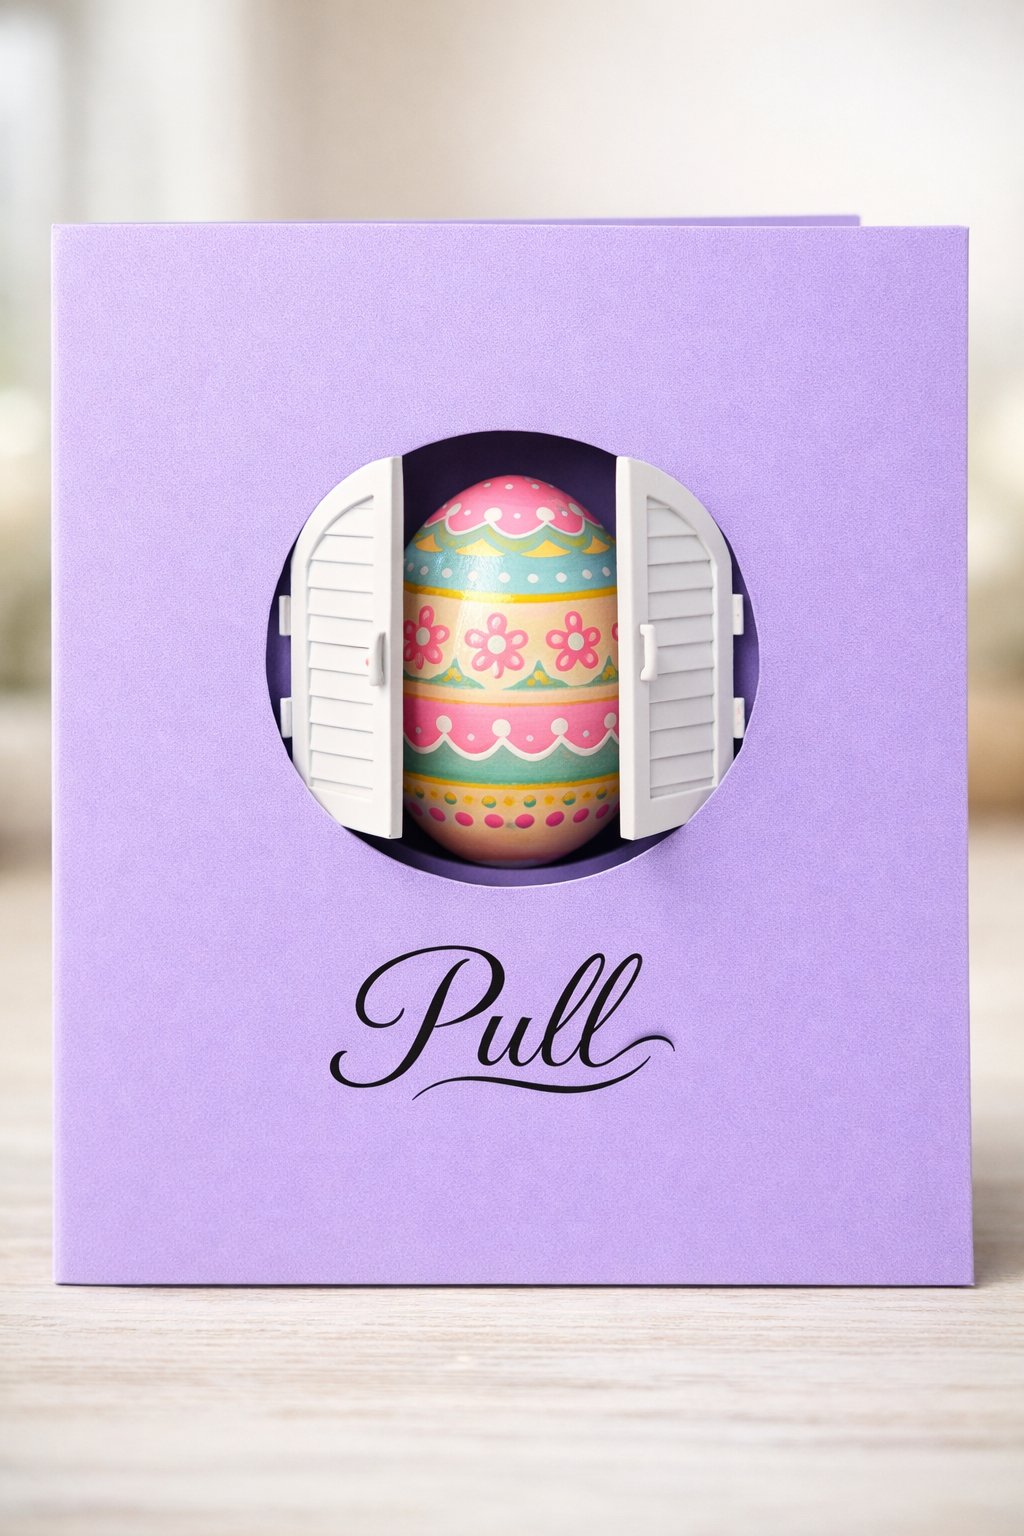
This mechanical card mimics the shutter of a camera. When the recipient pulls the sides, the circular window “opens” from the center to reveal a hidden Easter egg. It’s a high-impact “wow” card that showcases technical skill and is perfect for “Easter Hunt” themed invites.
Materials needed
- Two coordinating colors of cardstock
- 2.5-inch Circle die or punch
- Compass or ruler for precise center-marking
- Pencil for light guide-marks
- Very thin double-sided tape (to prevent bulk)
Shop the materials


Steps to make
- Outer Frame: Create a 5.5″ x 4.25″ gatefold card (flaps meet in the middle). Punch a 2.5″ circle directly in the center of the closed flaps.
- The Shutters: Cut two rectangles of cardstock (3″ x 4″). On the short side, score at 1/2″ to create a hinge.
- The Curve Cut: This is the secret—cut a slight “S” curve or a semi-circle on the edge opposite the hinge. This allows the two shutters to “interlock” when closed.
- Mounting: Glue the 1/2″ hinges to the inside of the gatefold flaps. Position them so that when the flaps are closed, the “S” curves meet and cover the circular hole completely.
- The Hidden Element: Glue a flat, decorated Easter egg to the inside back of the card, centered behind the window.
- Testing: As you pull the gatefold flaps open, the hinges will pull the shutters apart, revealing the egg in a sweeping motion.
5. The Butterfly “Swing” Fold (Professional)

The Swing fold (or Flip card) uses a partial cut-out that stays attached at two points, allowing it to pivot. For Spring, we use a butterfly or bird shape. As the card opens, the butterfly “twirls,” showing its decorated wings on both sides. It’s elegant, airy, and surprisingly easy to batch-produce.
Materials needed
- Medium-weight cardstock (too heavy and it won’t “swing” easily)
- Butterfly die or template
- Swivel craft knife (for smooth curves)
- Glitter glue or Wink of Stella pen
- Bone folder
Shop the materials


Steps to make
- The “Float”: For extra flair, use a tiny piece of foam tape to attach a second, smaller butterfly onto the “swing” piece to give it a 3D layered look.
- The Partial Cut: Fold your card base in half. Place your butterfly die or template in the center. Cut the top and bottom of the butterfly, but stop 1/2 inch before you reach the side “wing-tips.”
- The Score Lines: Use a ruler to score a vertical line from the top of your cut to the top of the card, and from the bottom of the cut to the bottom of the card.
- The Maneuver: Open the card. Push the butterfly toward you while pushing the card base away from you. The butterfly should now “pivot” on those two un-cut points.
- Reinforcing: Use a bone folder to crease the vertical score lines very sharply. This ensures the “swing” happens automatically when the card is handled.
- Two-Sided Decor: Remember that both sides of the butterfly will be visible! Decorate the “back” of the wings so the card looks finished when it pivots.
6. Spring Meadow Tent Fold (Beginner Friendly)
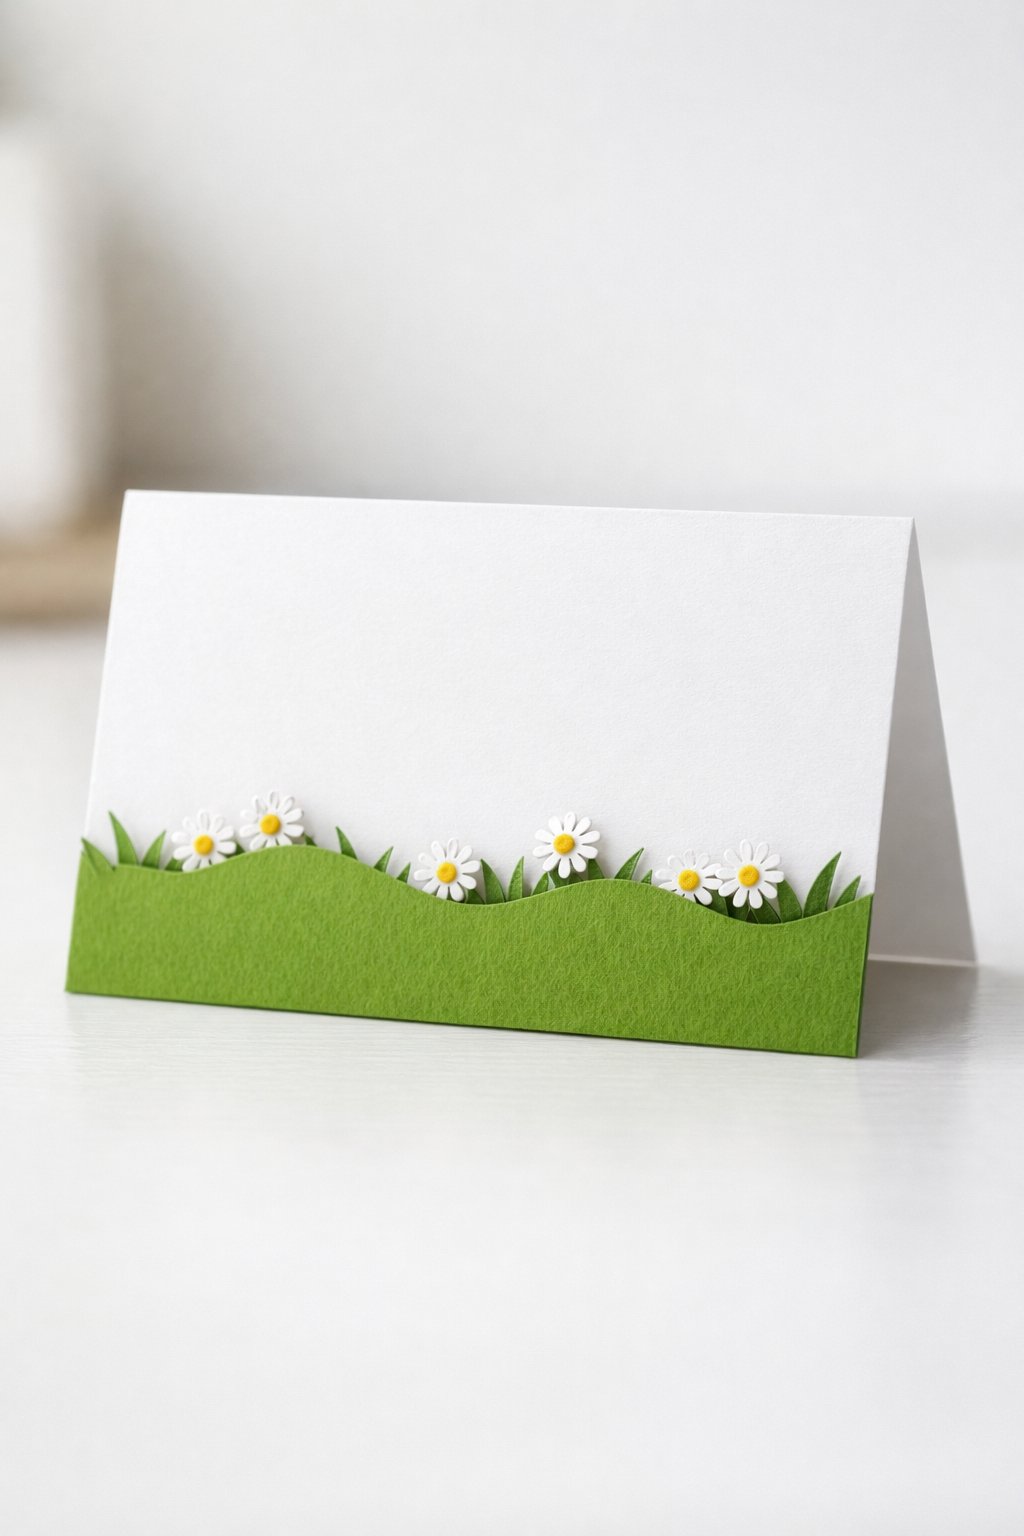
This is the perfect entry point for a fancy fold. Instead of a standard vertical fold, this card uses a “tent” structure with a decorative bottom edge. It’s incredibly easy to produce in bulk for craft fairs but offers a much more professional silhouette than a basic rectangle.
Materials needed
- 4.25″ x 11″ Cardstock (Long strip)
- Grass-edge border punch or decorative scissors
- Flower stickers or small die-cuts
- Glue pen
Shop the materials


Steps to make
- The Base Fold: Fold your long strip of cardstock exactly in half to create a 4.25″ x 5.5″ top-folding card.
- The Decorative Edge: Use your border punch or scissors to trim only the front bottom edge of the card into a grass or wave pattern.
- The “Kickstand”: Score a line 1 inch from the bottom of the back panel and fold it slightly inward. This helps the tent stand securely without sliding flat.
- Layering: Cut a 1-inch strip of contrasting green paper and glue it to the inside back panel so it shows through the grass cut-outs on the front.
- Finishing: Dot the “grass” with flower accents. This creates an instant 3D meadow effect with just one cut and one extra score line.
7. The “Triple Tier” Spring Triptych (Professional)
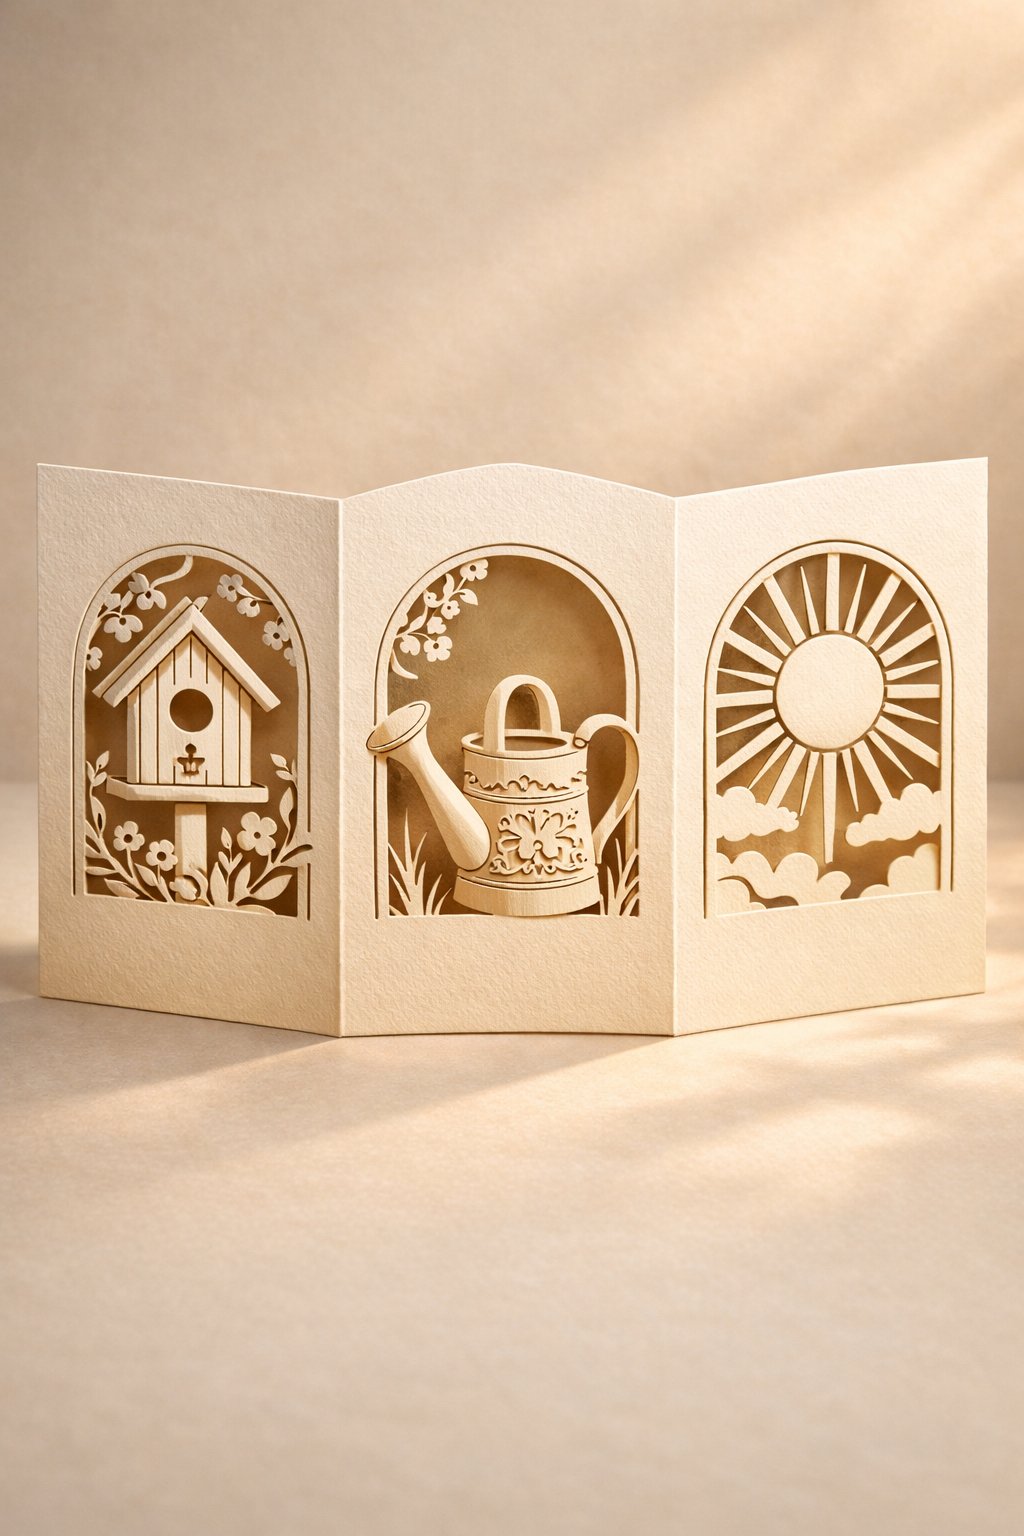
This is a professional-grade display piece. It uses a series of interlocking windows and “bridge” folds to create a panoramic view. It requires precision measuring, but the result is a card that recipients will keep on their mantel for months.
Materials needed
- 12″ x 5.5″ Heavyweight cardstock
- Nesting window dies (Square or Arch)
- Transparent acetate (for window panes)
- High-tack adhesive tape
- Scoring board and bone folder
Shop the materials


Steps to make
- The Triptych Base: Score your long cardstock at 4″ and 8″. This creates three equal 4-inch panels.
- The Windows: Use your nesting dies to cut a window out of the center of each of the three panels. Ensure they are perfectly aligned horizontally.
- The Bridge Folds: Cut two small strips of cardstock (1″ x 4″). Score them in the middle. Glue these to the bottom of the panels to act as “hinges” that allow the card to stand in a “Z” formation without falling over.
- Scene Building: Adhere different die-cut elements (like a bird or a flower) to the inside of each window.
- Depth Tip: Place some elements on the front of the window and some behind the acetate to create a “shadowbox” effect.
- The Reveal: When the card is folded flat, the windows stack on top of each other. When opened, they stretch out into a beautiful 3D story.
8. The “Carrot Top” Scalloped Tag Fold (Beginner Friendly)
Shapes are a great way for beginners to dive into “fancy” cards without complex measuring. This card uses basic geometric shapes (a triangle and a circle) to create a recognizable Easter icon. It’s playful, high-energy, and great for kids’ Easter baskets.
Materials needed
- Orange cardstock
- Green cardstock
- Scalloped circle punch or die
- Black fine-liner pen
- Ribbon or twine
Shop the materials


Steps to make
- The Body: Cut a long, narrow triangle out of orange cardstock (approx. 6 inches tall).
- Texturing: Use your black pen to draw short, horizontal “v” lines down the triangle to give it that “earthy” carrot look.
- The Leafy Top: Punch two scalloped circles out of green cardstock.
- The Hinge: Fold one circle in half. Glue one half to the back of the carrot top and the other half to your second green circle.
- The Secret Message: This creates a “flip-top” lid. Your Easter greeting goes inside the green circle “leaves.”
- Finishing: Tie a piece of twine around the neck where the orange and green meet for a rustic, farmhouse-style finish.
9. The “Bursting Bloom” Twist-and-Pop (Professional)

This is a “mechanical” marvel. The “Twist-and-Pop” is a classic professional fold because it looks impossible to the recipient. When the card opens, an internal arm rotates 90 degrees and extends a hidden panel. It’s the ultimate “surprise” card for a Spring reveal.
Materials needed
- Two sheets of coordinating 12×12 cardstock
- Strong “Red Line” or construction tape
- Scoring board (essential for accuracy)
- 4 small square floral illustrations
Shop the materials


Steps to make
- The Mechanism: Cut a strip of paper (3.5″ x 10″). Score it horizontally at 2.5″, 5″, and 7.5″. Then, score a “large X” across the center 5-inch square.
- The “Twist” Fold: This is the pro step: fold the “X” marks into a waterbomb base (a triangle shape). This is the motor of your card.
- The Pop-Out Panel: Cut a strip (3.5″ x 10″) and score it into four equal 2.5″ squares. This is where your flowers go.
- Assembly: Glue the “waterbomb” triangle into the center fold of your main card base.
- The Connection: Attach the pop-out panel to the “points” of the triangle mechanism.
- Calibration: Slowy close the card. The mechanism should fold the panel into a neat stack and “tuck” it inside. When opened, it will twist 180 degrees and snap into a straight line.
10. The “Easter Basket” Interlocking Gatefold (Intermediate/Beginner)

This design takes a standard gatefold and adds a “functional” element. By shaping the flaps, the card itself becomes a visual representation of an Easter basket. It’s a fantastic way to bridge the gap between a beginner fold and a professional “shaped” card.
Materials needed
- 5.5″ x 8.5″ Kraft (brown) cardstock for a “wicker” look
- Small floral die-cuts
- Ribbon or a “Belly Band”
- Brown marker for “weaving” details
Shop the materials


Steps to make
- Pro Tip: For a professional look, ink the edges of the “wicker” with a darker brown ink to give it 3D depth.
- The Base: Score your kraft cardstock at 2 1/8″ from each side. Fold the flaps to meet in the middle.
- The Handle Cut: On the top half of the flaps, use a large circle die or a jar lid to trace a semi-circle. Cut this out so that when the flaps are closed, they form a “handle” loop.
- Woven Texture: Use a brown marker to draw simple “criss-cross” lines on the bottom half of the card to mimic a woven basket.
- The “Filling”: Glue your paper eggs and flowers so they are “sitting” inside the basket (on the flaps).
- The Latch: Cut a small paper bow or use a real ribbon. Attach one side to the left flap and use a small piece of low-tack Velcro or a “tuck” slot on the right flap.
11. The Umbrella “Rainy Day” Pop-Up (Professional)
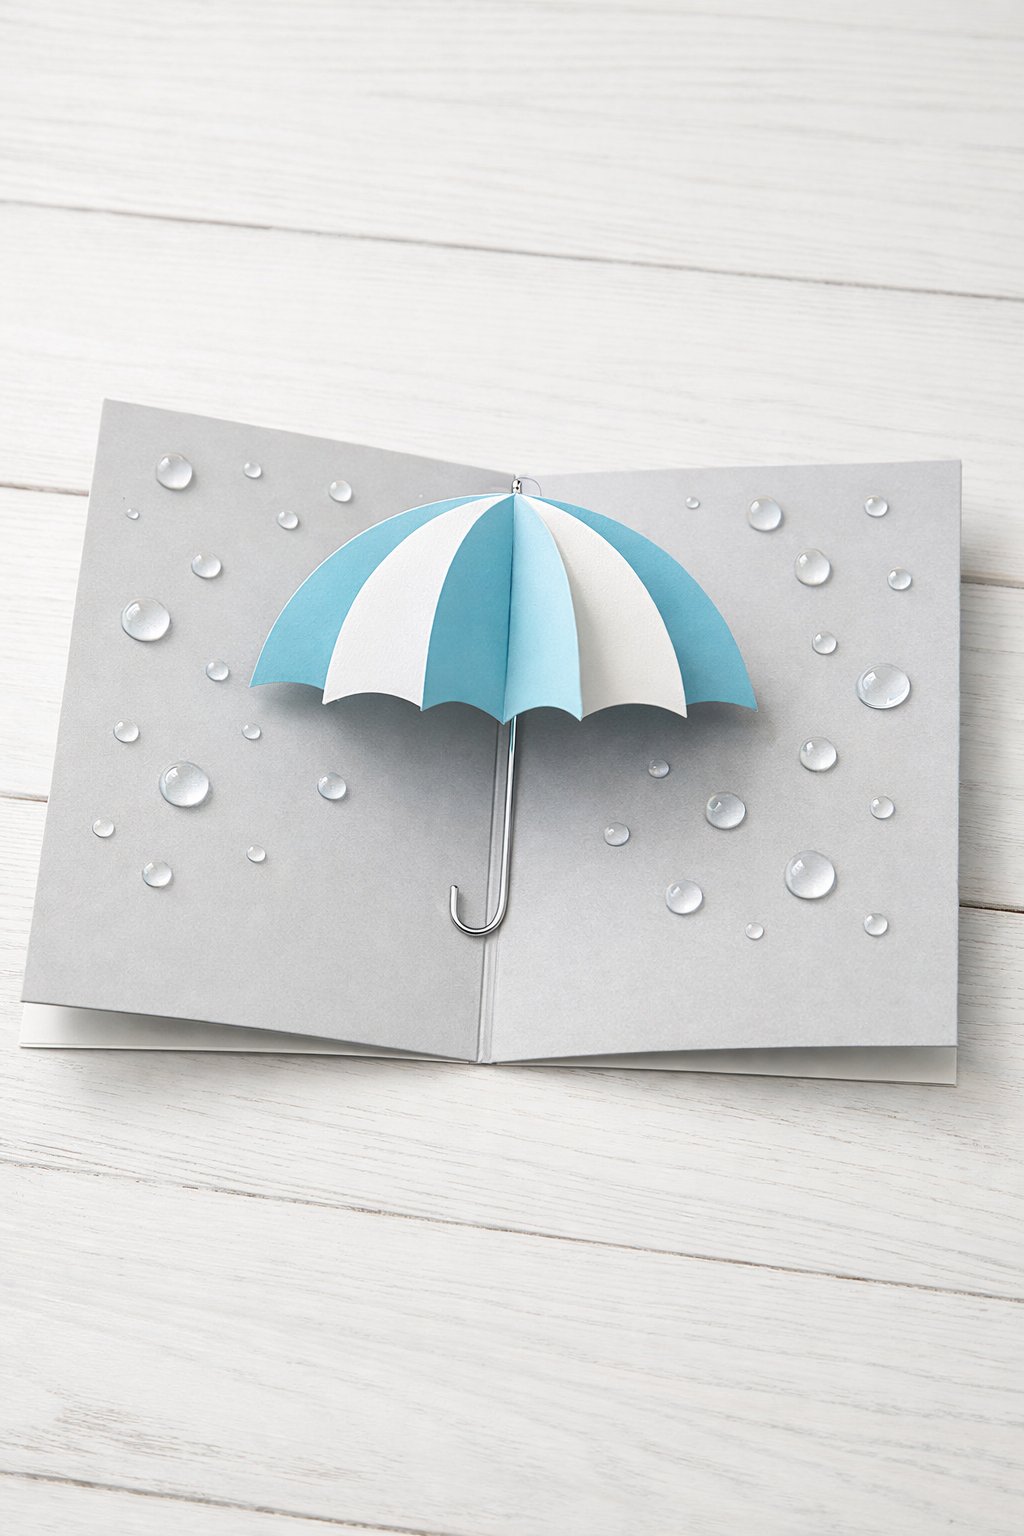
This card is a structural marvel that celebrates the “April Showers” theme without needing a single word. The magic lies in the honeycomb-style pop-up mechanism. When the recipient opens the card, the flat stack of paper semicircles fans out instantly into a 3D dome. It creates a delightful sculptural moment that feels like a pop-up book. It is perfect for “Get Well Soon” cards or Spring greetings where the design speaks for itself.
Materials needed
- 6 circles of lightweight patterned paper (3-inch diameter)
- 1 piece of heavy cardstock for the base
- A thin wooden cocktail stick or stiff wire (for the handle)
- Strong liquid bookbinding glue
- Clear “Nuvo Crystal Drops” or clear beads (for rain effect)
- Scissors and scoring board
Shop the materials


Steps to make
- Create the Ribs: Cut six identical circles from your patterned paper. Fold each circle in half, then in half again to create quarter-circle wedges.
- The Assembly Stack: Glue the wedges back-to-back. Apply glue to one face of a folded wedge and press it against the face of the next, ensuring the curved edges align perfectly. Repeat until all six are stacked.
- The Handle Placement: Before gluing the final two faces together to close the circle, insert your wire or wooden stick into the center “spine” of the stack. Secure it with a generous amount of strong glue.
- Mounting to Card: Apply strong adhesive to the two flat “outer” faces of your umbrella stack.
- The Deployment: Place the umbrella stack in the center fold (gutter) of your open card base. Close the card firmly to press the glued sides against the left and right interior panels.
- Finishing Details: Add clear glossy drops on the background cardstock to mimic rain, keeping the area around the umbrella mechanism clear so it opens smoothly.
12. The Woven Paper Lattice Front (Beginner Friendly)

The Lattice Front card transforms a pile of paper scraps into a high-end textile look. By cutting simple strips and weaving them in a traditional basket pattern, beginners can create a front panel that looks incredibly complex and tactile. It feels heavy and expensive in the hand. This design is “scrap-busting” at its finest and allows for endless color combinations—perfect for making Easter “basket” themes without needing a specific basket die.
Materials needed
- A standard card base (folded)
- 10-12 strips of cardstock (1/2 inch wide, various spring colors)
- A rectangular frame die or a craft knife
- Tape runner or double-sided tape
- Post-it notes (low tack tape) to hold strips in place
- Ruler
Shop the materials


Steps to make
- Prepare the Frame: Cut a large rectangular window out of the front panel of your card base, leaving a 3/4-inch border all around.
- Set the Warp (Verticals): Flip the front panel open. Apply adhesive to the top and bottom edges of the inside of the frame. Lay your vertical strips side-by-side, spanning the window from top to bottom.
- The Weave (Horizontals): Take a horizontal strip and weave it perpendicularly through the vertical strips (over, under, over, under).
- Tighten the Mesh: Slide the horizontal strip all the way to the top of the frame. Repeat with the next strip, alternating the pattern (under, over, under, over).
- Locking it Down: Once the window is filled, glue the ends of the horizontal strips to the side edges of the frame.
- Hiding the Mechanics: Cut a second rectangular frame of cardstock and glue it over the inside of the window to sandwich the messy strip ends and create a clean interior finish.
13. The “Easter Egg” Surprise Swing (Intermediate)
The Swing Fold (or Flip-Flop card) is an engineering classic. As you pull the card open, the central shape flips 180 degrees. For this Spring edition, we use an oval “egg” shape. It’s a dynamic, kinetic card that people can’t stop playing with. The beauty of this design is that it creates a “window” when the card is closed, and fills that window when the card is open, but with the reverse side of the design.
Materials needed
- 80lb+ Cardstock (needs stiffness for the swing)
- Oval metal die or a stiff cardboard oval template
- Craft knife and a metal ruler
- Self-healing cutting mat
- Scoring board/stylus
- Washi tape (for holding dies in place)
Shop the materials


Steps to make
- Positioning: Lay your card base flat (unfolded). Place your oval die (or template) centered on the right-hand side of the front panel.
- The Partial Cut: This is the critical step. You must cut the top curve and the bottom curve of the oval, but leave a 1-inch gap uncut on the left and right sides of the oval. (If using a die cutting machine, do not put the plates over the side gaps).
- Scoring the Axle: Score a horizontal line from the left uncut gap of the oval to the left edge of the card. Score another line from the right uncut gap to the fold line of the card.
- The Fold: Fold the main card in half. Now, manually flip the oval panel so it rotates on its “axles.”
- Training the Paper: Open and close the card repeatedly. The oval should flip over automatically as the card opens.
- Decoration: Decorate the “front” of the egg with stripes and the “back” of the egg with foil, as both sides will be visible at different times.
14. The “Spring Shed” House Fold (Professional)
This project blurs the line between a greeting card and a gift box. It is a “House” shaped card where the roof acts as the lid. It is sturdy enough to hold small treats (like chocolate eggs) or simply stand as a 3D decoration. The “Shiplap” siding and shingled roof offer a high level of detail that appeals to advanced crafters who love architectural miniatures.
Materials needed
- 12×12 Kraft or White Cardstock
- Scallop edge punch (for roof shingles)
- Scoring board
- Strong red-line tape (essential for 3D boxes)
- Small magnets (optional for closure)
- Bone folder
Shop the materials


Steps to make
- The Box Base: Cut a piece of cardstock 10″ x 6″. Score on the long side at 2.5″, 5″, 7.5″, and 10″ (tab). Score on the short side at 2.5″ (bottom). Cut the bottom score lines to create flaps and assemble into an open-top box.
- The Gables: Cut two triangles that match the width of your box sides. Glue these to the top of two opposing sides of the box to form the roof peaks.
- The Roof Panel: Cut a piece of cardstock 6″ x 4″. Score it down the center. Cover it with rows of punched scalloped paper strips to mimic shingles.
- The Hinge: Adhere one side of the folded roof to one of the triangular gables and the side wall. Leave the other side unglued so it can lift up like a lid.
- The Closure: Attach a small magnet or a Velcro dot to the unglued side of the roof and the corresponding gable to keep the “shed” closed.
- Siding Details: Score horizontal lines every 1/2 inch around the white walls of the house to create a realistic “wood plank” siding effect.
15. The “Bouncing Bunny” Wobbler (Beginner Friendly)
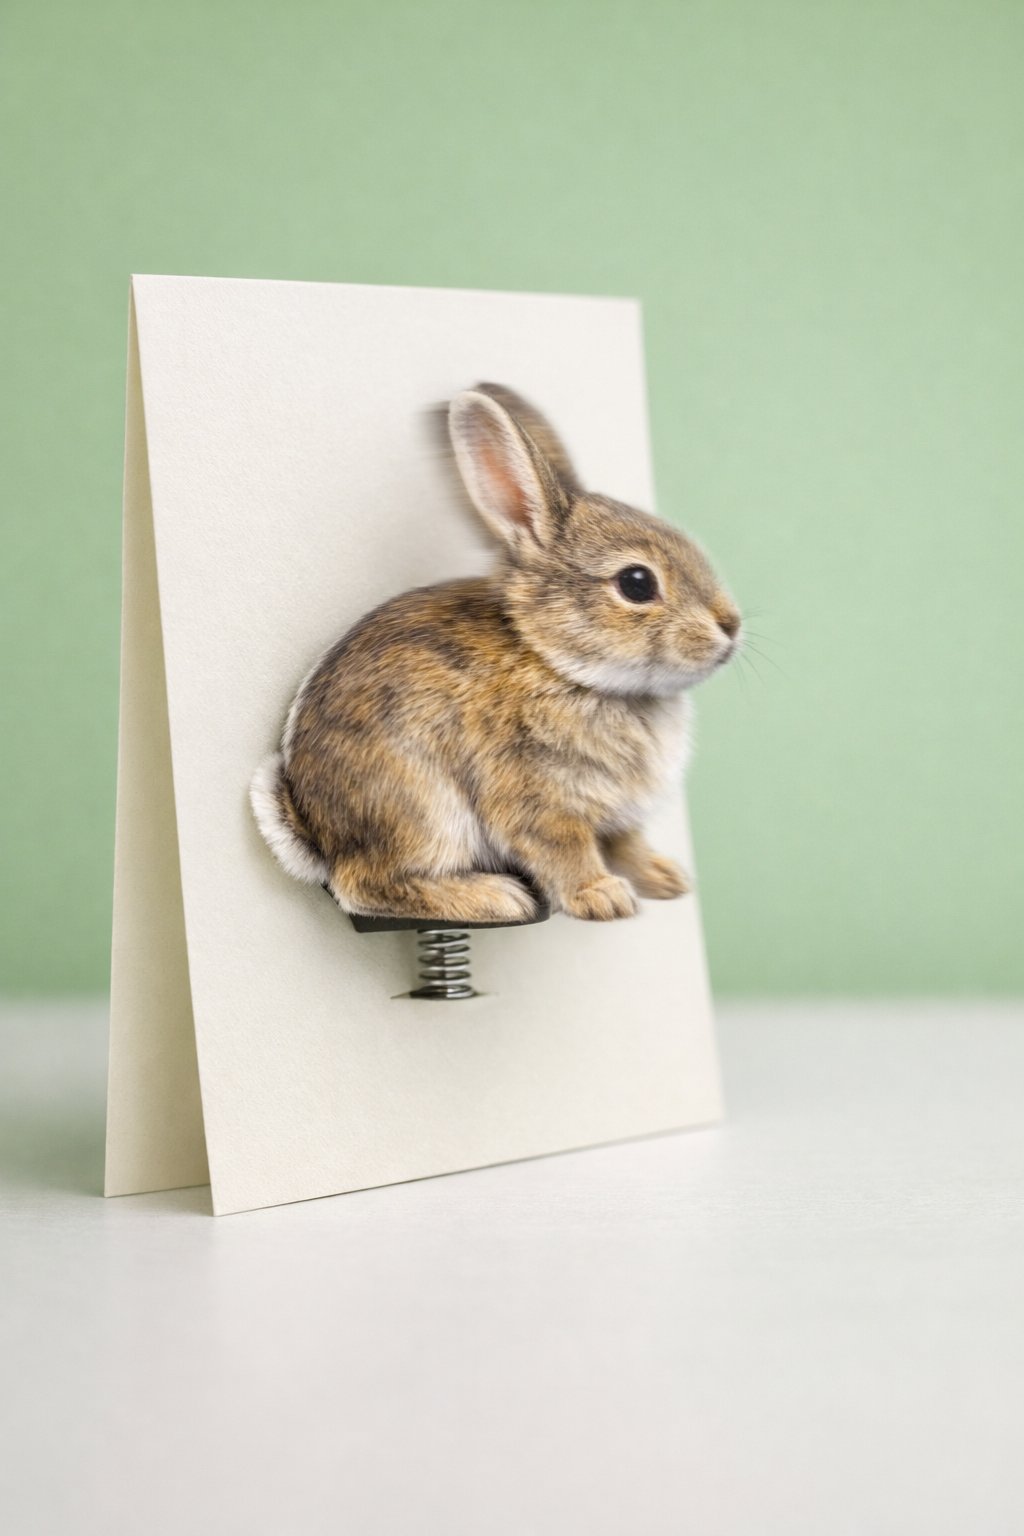
The “Wobbler” is a crowd-pleaser that adds kinetic energy without complex folding. By mounting a focal image (like a bunny) on a small spring or coiled wire, the image literally bounces and jiggles when the card is taken out of the envelope. It brings a flat image to life and is surprisingly easy to construct with household materials if you don’t have store-bought “action wobblers.”
Materials needed
- Heavy cardstock for the rabbit cut-out
- Thin craft wire (24 gauge) OR a store-bought plastic “Action Wobbler”
- A pencil (to wrap the wire)
- Strong adhesive dots or hot glue
- A standard flat card base
Shop the materials


Steps to make
- The Test: Tap the rabbit. It should bobble and sway for several seconds. If it sags, trim the spring to be shorter and stiffer.
- The Focal Point: Cut out your rabbit shape. It must be on heavy cardstock; if the paper is too light, it will droop rather than bounce.
- DIY Spring: Wrap your thin wire tightly around a pencil about 5-6 times to create a coil. Trim the ends.
- Flattening the Mounts: Bend the top loop of the coil flat to the left, and the bottom loop of the coil flat to the right. This creates surface area for the glue.
- Assembly: Glue the bottom loop of the wire directly to the center of your card front. Let it dry completely.
- Attaching the Image: Apply glue to the top loop of the wire and press your rabbit cut-out onto it.


