


Table of Contents Show
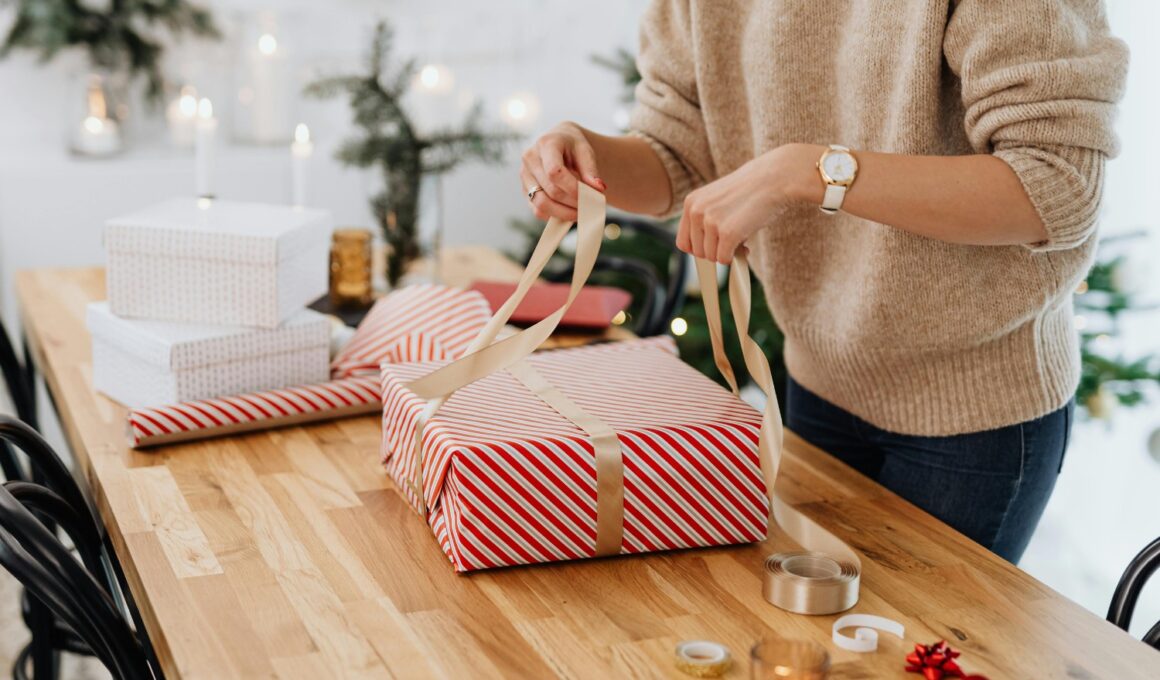
Gift wrapping can make even a simple present feel more thoughtful. You do not need expensive supplies or complicated folds to make a gift look beautiful, because small details like ribbon, layered paper, tags, twine, greenery, and neat corners can make a big difference.
These gift wrapping techniques are easy enough for beginners but still look polished.
They work for birthdays, holidays, bridal showers, baby showers, hostess gifts, handmade presents, and small business packaging. These ideas are perfect for people who love giving gifts and are looking for better ways to present them.
1. Classic Box Wrap With Crisp Folded Corners
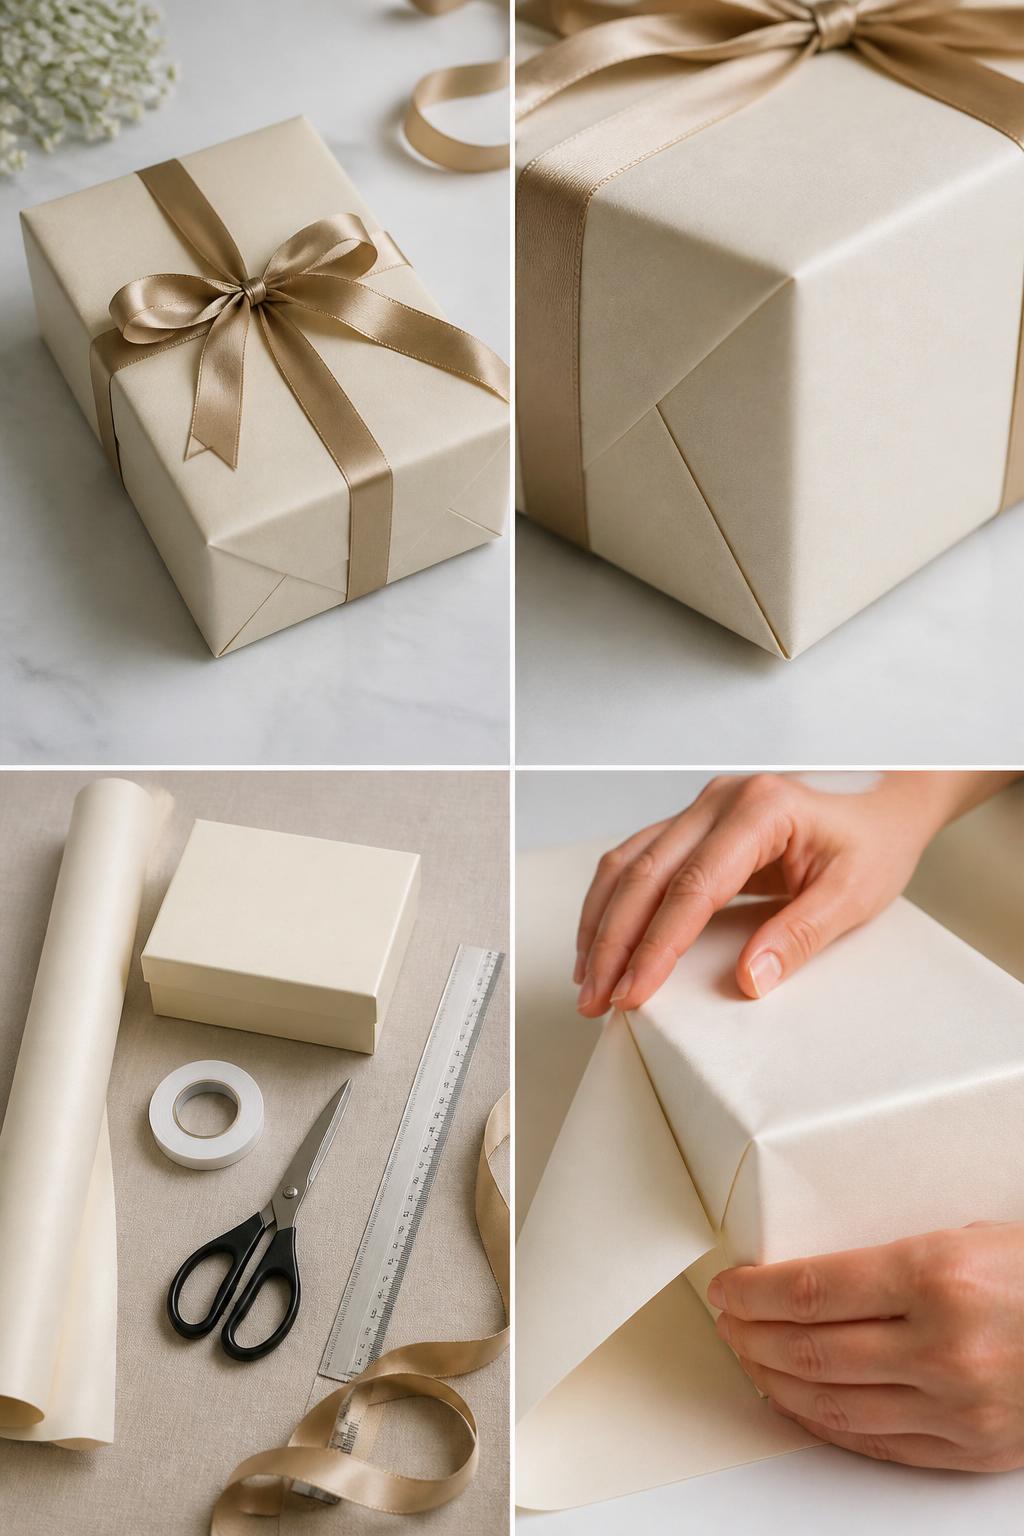
A classic box wrap is the foundation of good gift wrapping. When the corners are sharp and the paper is smooth, even plain wrapping paper can look expensive and neat.
This technique is perfect for birthdays, holidays, and formal gifts. Use double-sided tape if you want the finished gift to look cleaner with no visible tape lines.
For People Who Love to Make Things ✂️
Materials Needed:
- Wrapping paper
- Gift box
- Scissors
- Double-sided tape
- Ribbon
- Ruler, optional
Steps To Make:
- Place the box upside down on the wrong side of the wrapping paper.
- Cut enough paper to cover the box with a small overlap.
- Wrap the paper around the box and secure the seam with double-sided tape.
- Fold the side flaps neatly into triangles and tape them down.
- Add ribbon around the box for a polished finish.
2. Pleated Paper Gift Wrap
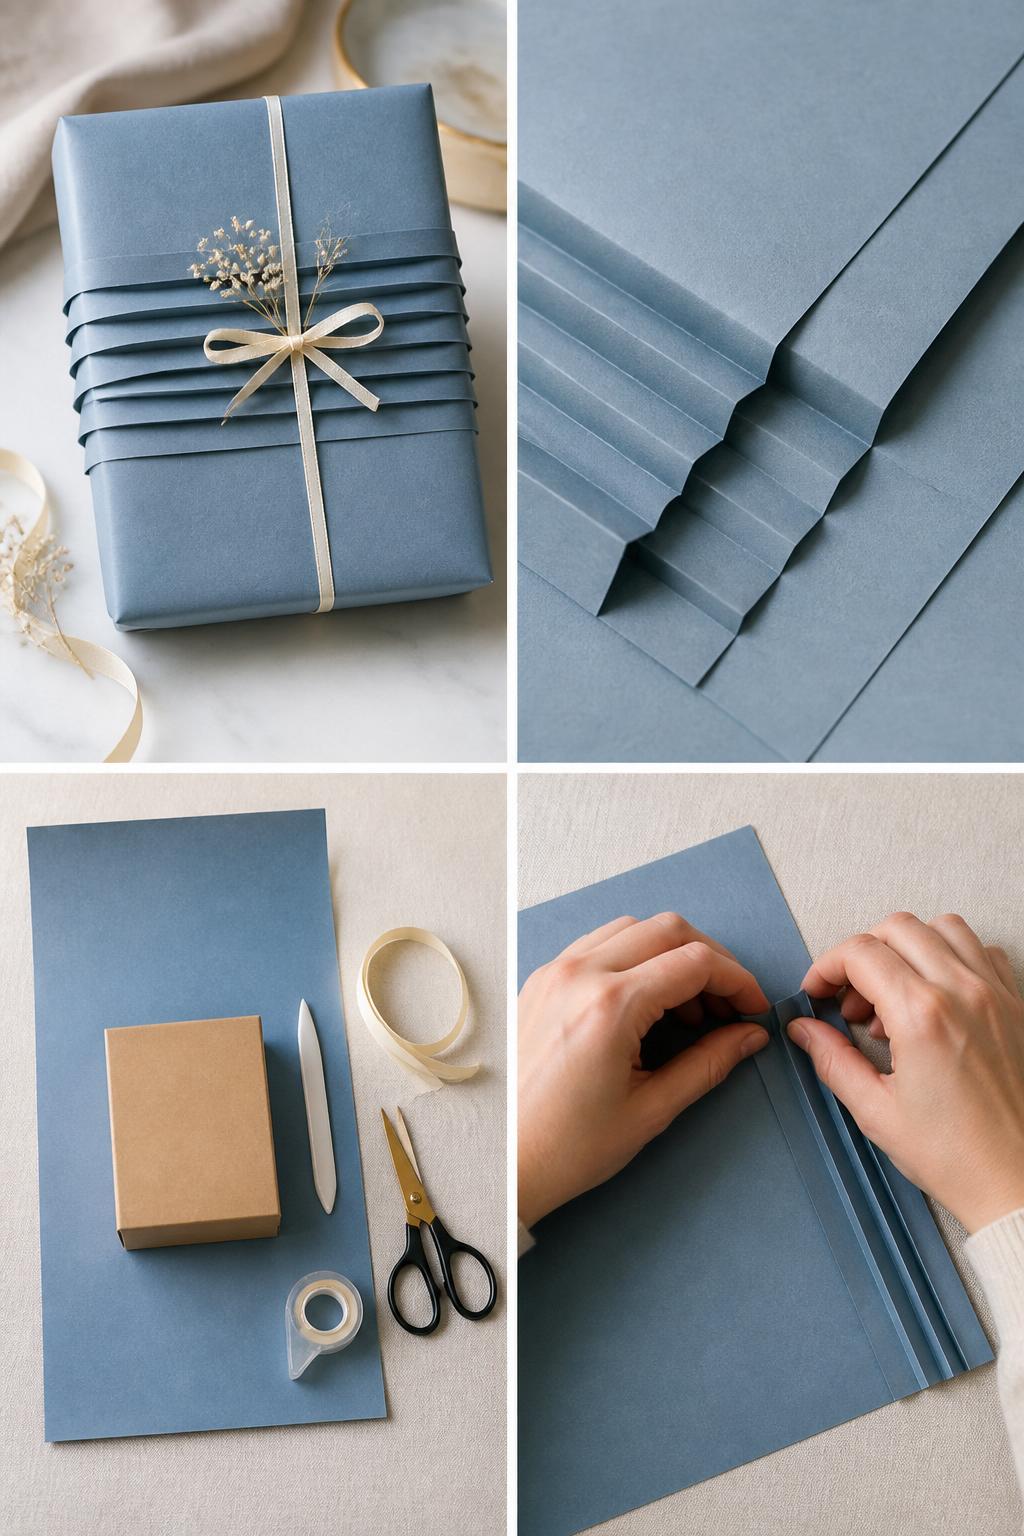
Pleated paper wrapping looks impressive, but it is much easier than it seems. The folded paper panel adds texture and makes a simple box look more special without extra decorations.
This is a great technique for weddings, birthdays, bridal showers, and holiday gifts. Choose solid wrapping paper so the pleats stand out clearly.
Materials Needed:
- Wrapping paper
- Gift box
- Scissors
- Tape
- Bone folder or ruler
- Ribbon, optional
Steps To Make:
- Cut a piece of wrapping paper large enough for your box.
- Fold several narrow pleats into the paper before wrapping.
- Press each pleat firmly with a bone folder or ruler.
- Wrap the box as usual, keeping the pleated section on the front.
- Secure the paper and add a simple ribbon if desired.
3. Diagonal Gift Wrap Method
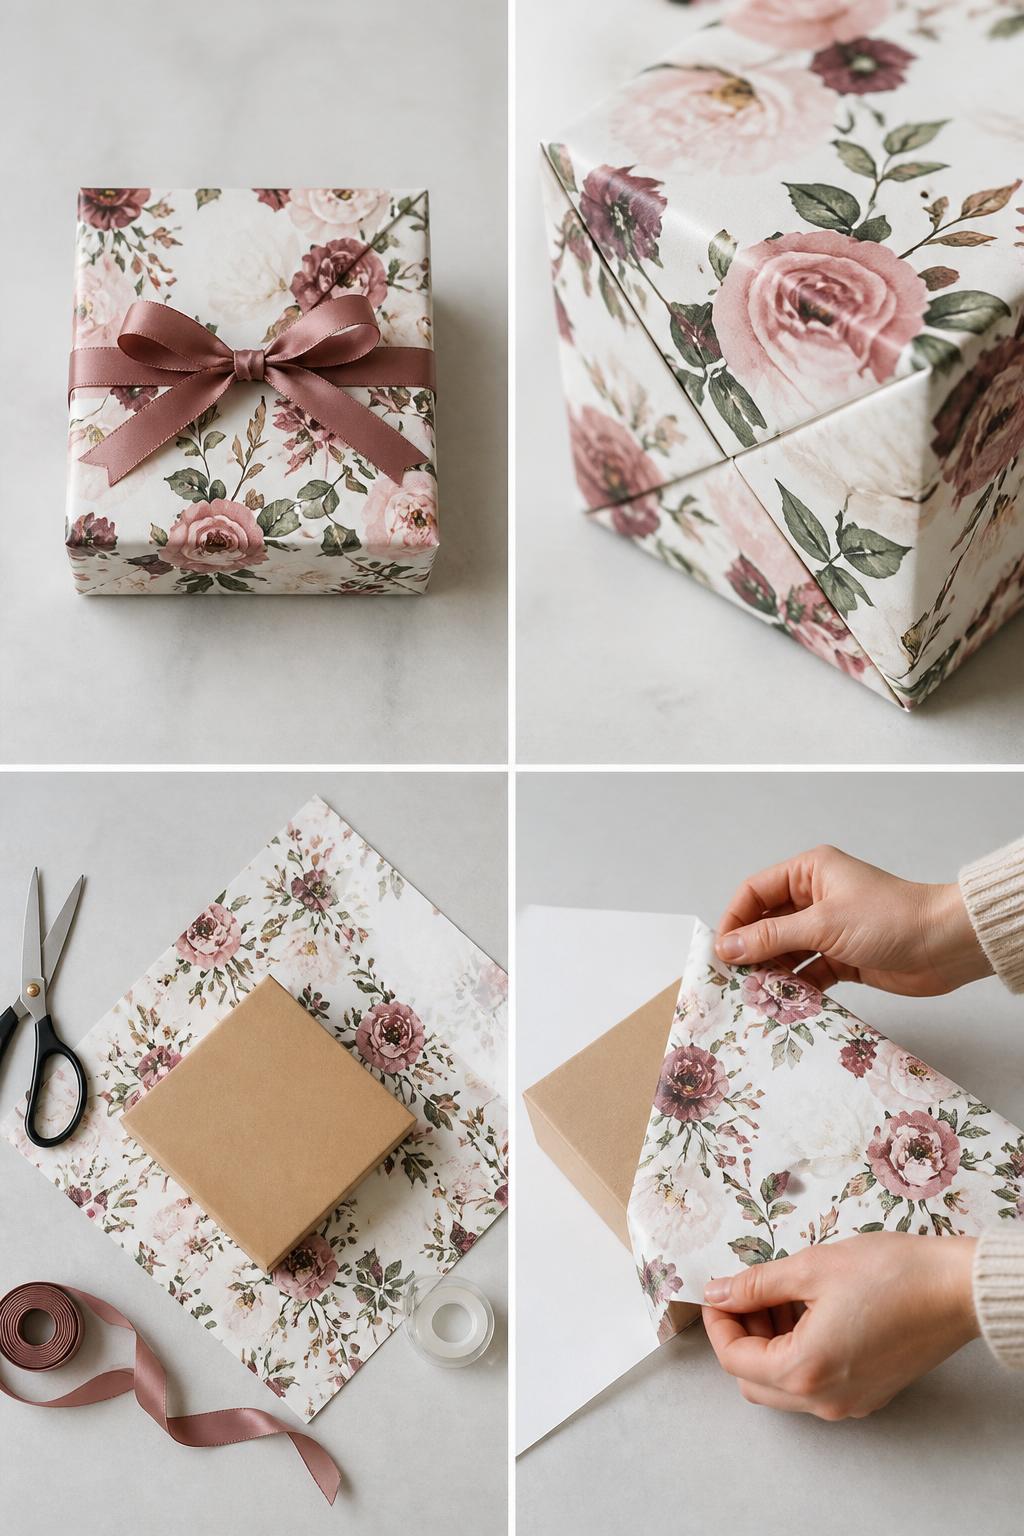
The diagonal wrap method is useful when your paper is slightly too small or when you want a cleaner folded look. It works especially well for square and rectangular boxes.
This technique can save wrapping paper and still make the gift look neat. Once you learn the angle, it becomes a quick method for many box sizes.
Materials Needed:
- Wrapping paper
- Gift box
- Scissors
- Tape
- Ribbon or tag, optional
Steps To Make:
- Place the box diagonally in the center of the paper.
- Pull one corner of paper over the box and tape it in place.
- Fold in the side corners tightly against the box.
- Pull the final paper corner over the top and secure it.
- Smooth the edges and add a ribbon or gift tag.
4. Brown Paper and Twine Wrap
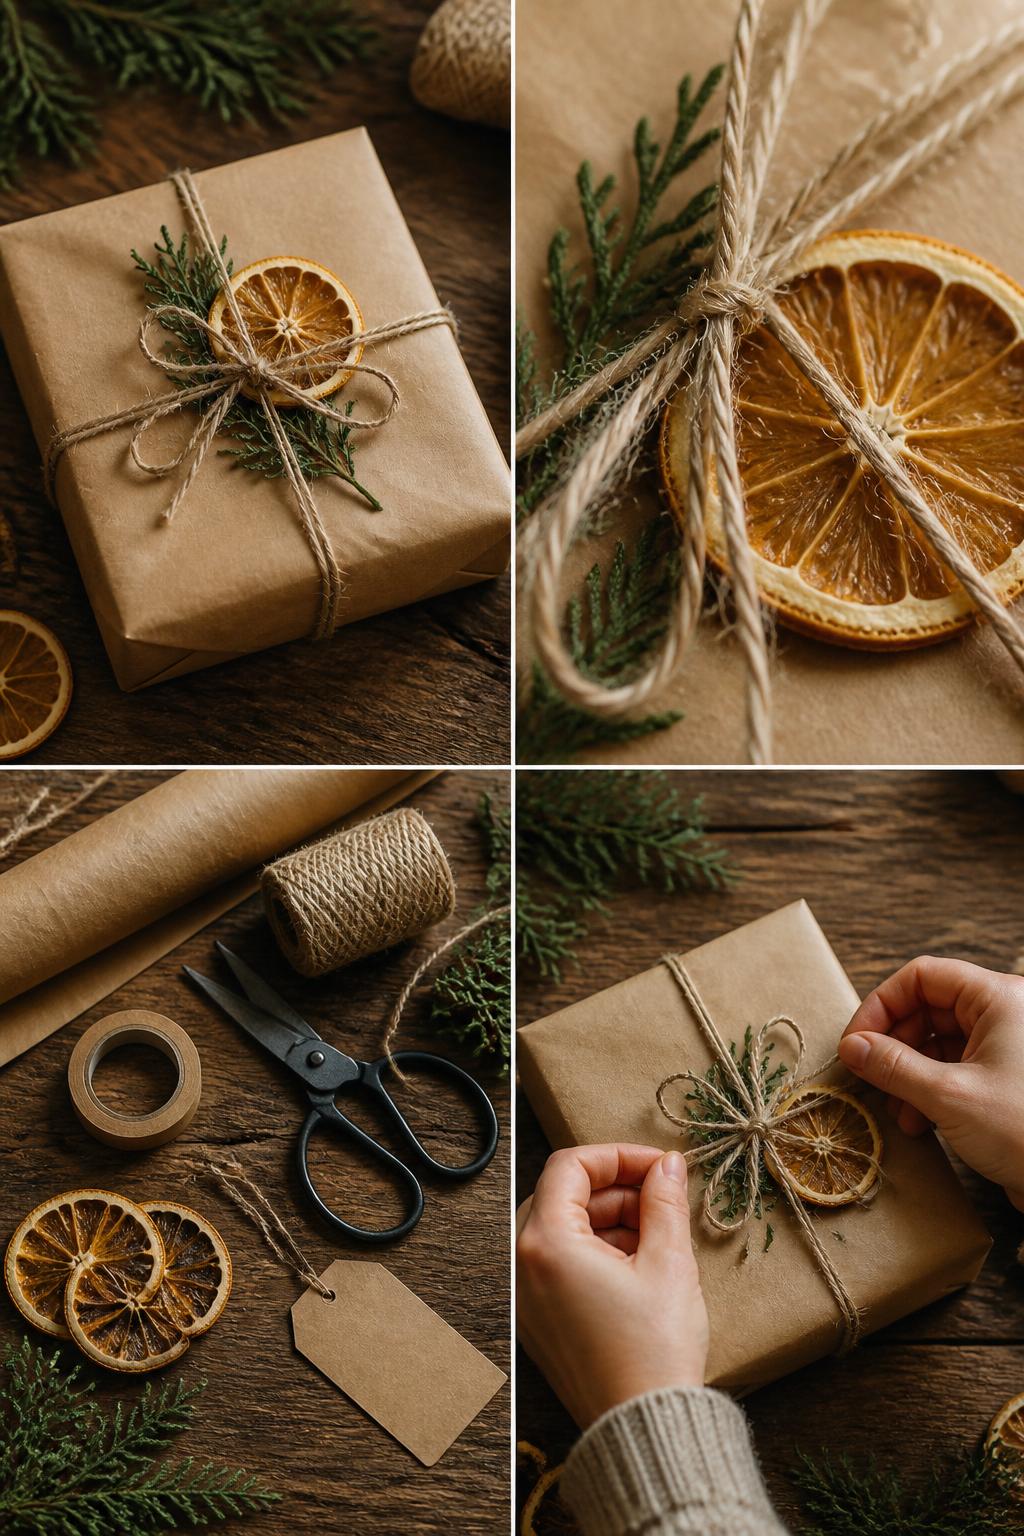
Brown paper and twine wrapping is simple, affordable, and always looks thoughtful. The plain paper gives you a clean base, while twine, greenery, dried fruit, or tags add charm.
This style works for holidays, birthdays, handmade gifts, and small business packaging. It is also easy to customize for different seasons.
Materials Needed:
- Kraft paper
- Twine
- Scissors
- Tape
- Dried orange slice, greenery, or small tag
- Gift box
Steps To Make:
- Wrap the gift neatly with kraft paper.
- Tie twine around the box in a cross shape.
- Knot the twine on the front of the gift.
- Tuck in a dried orange slice, greenery sprig, or small charm.
- Add a gift tag if needed.
5. Fabric Furoshiki Wrap
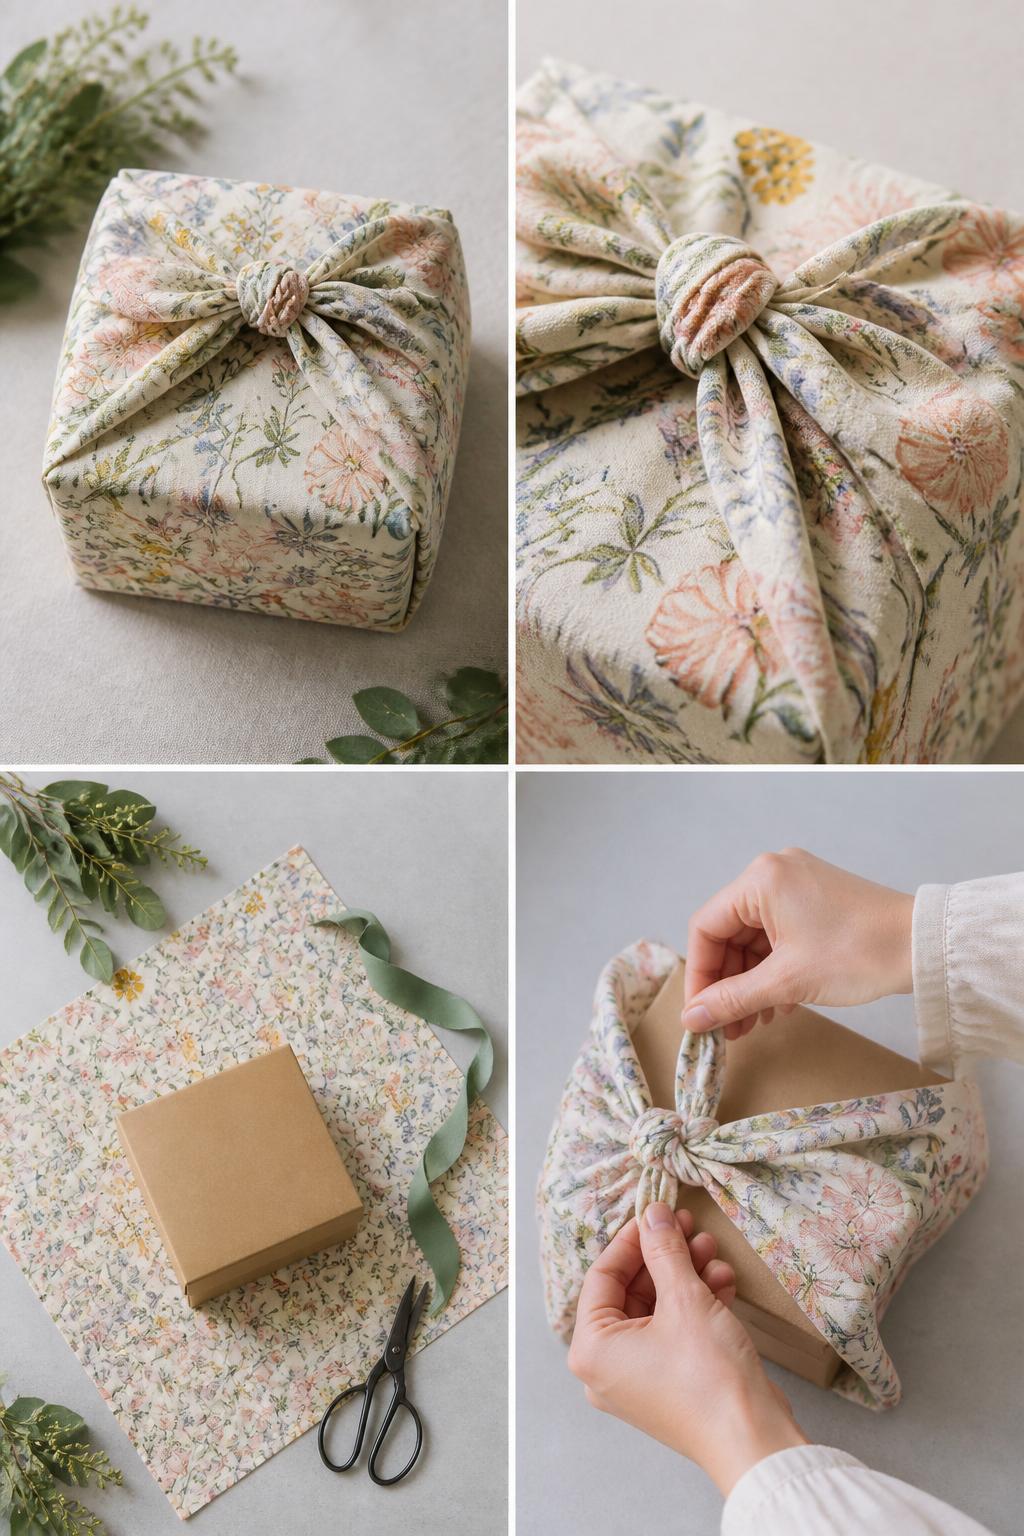
Furoshiki wrapping uses fabric instead of paper, which makes the wrap reusable and beautiful. It is great for gifts that need a soft, stylish presentation.
This technique works well with scarves, cotton squares, tea towels, or fabric scraps. It is especially nice for books, candles, boxes, and small handmade gifts.
Materials Needed:
- Square fabric piece
- Gift box or item
- Ribbon or tag, optional
- Greenery or charm, optional
Steps To Make:
- Place the gift in the center of the fabric.
- Pull two opposite corners over the gift and tuck them neatly.
- Bring the remaining two corners together above the gift.
- Tie them into a secure knot.
- Adjust the fabric folds so the gift looks neat and balanced.
6. Ribbon Weave Gift Wrap
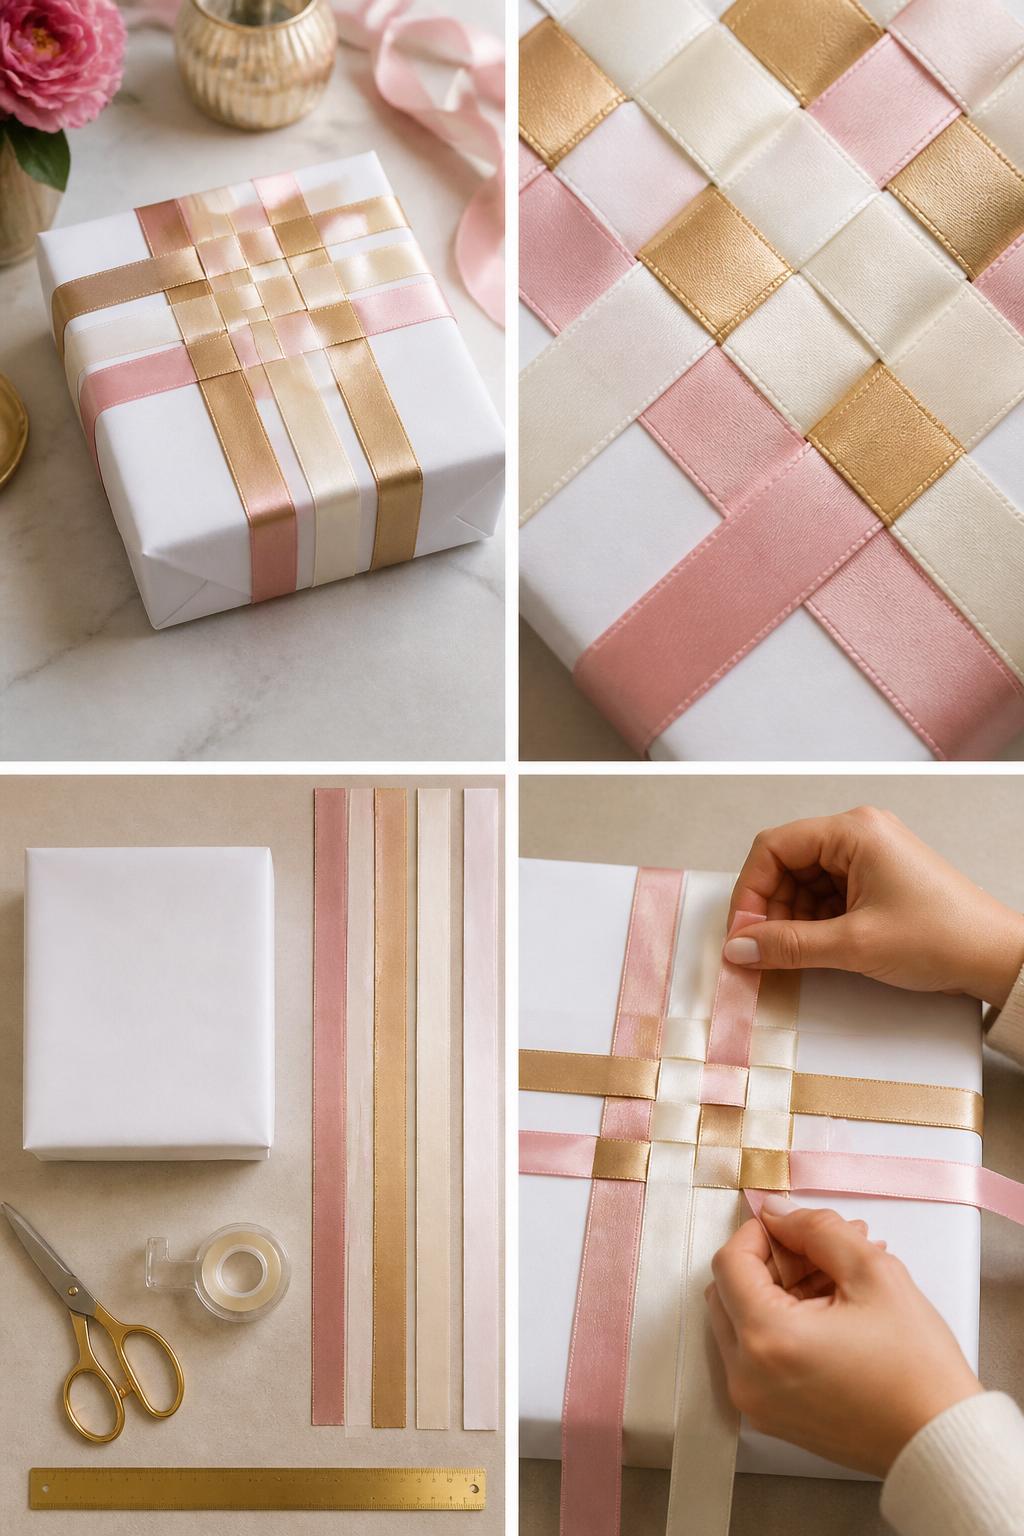
A ribbon weave makes a wrapped gift look detailed and luxurious without using complicated folds. The woven ribbons create a pretty pattern on top of a simple wrapped box.
This is a great technique for wedding gifts, bridal showers, birthdays, and special occasion presents. Use two or three ribbon colors for the best effect.
Materials Needed:
- Wrapped gift box
- Thin ribbons
- Scissors
- Tape
- Ruler, optional
Steps To Make:
- Wrap the gift box in plain paper first.
- Cut several ribbon strips long enough to cross the gift.
- Tape some ribbons vertically on the back of the gift.
- Weave horizontal ribbons over and under the vertical strips.
- Secure all ribbon ends on the back with tape.
7. Gift Wrap With Layered Paper Band
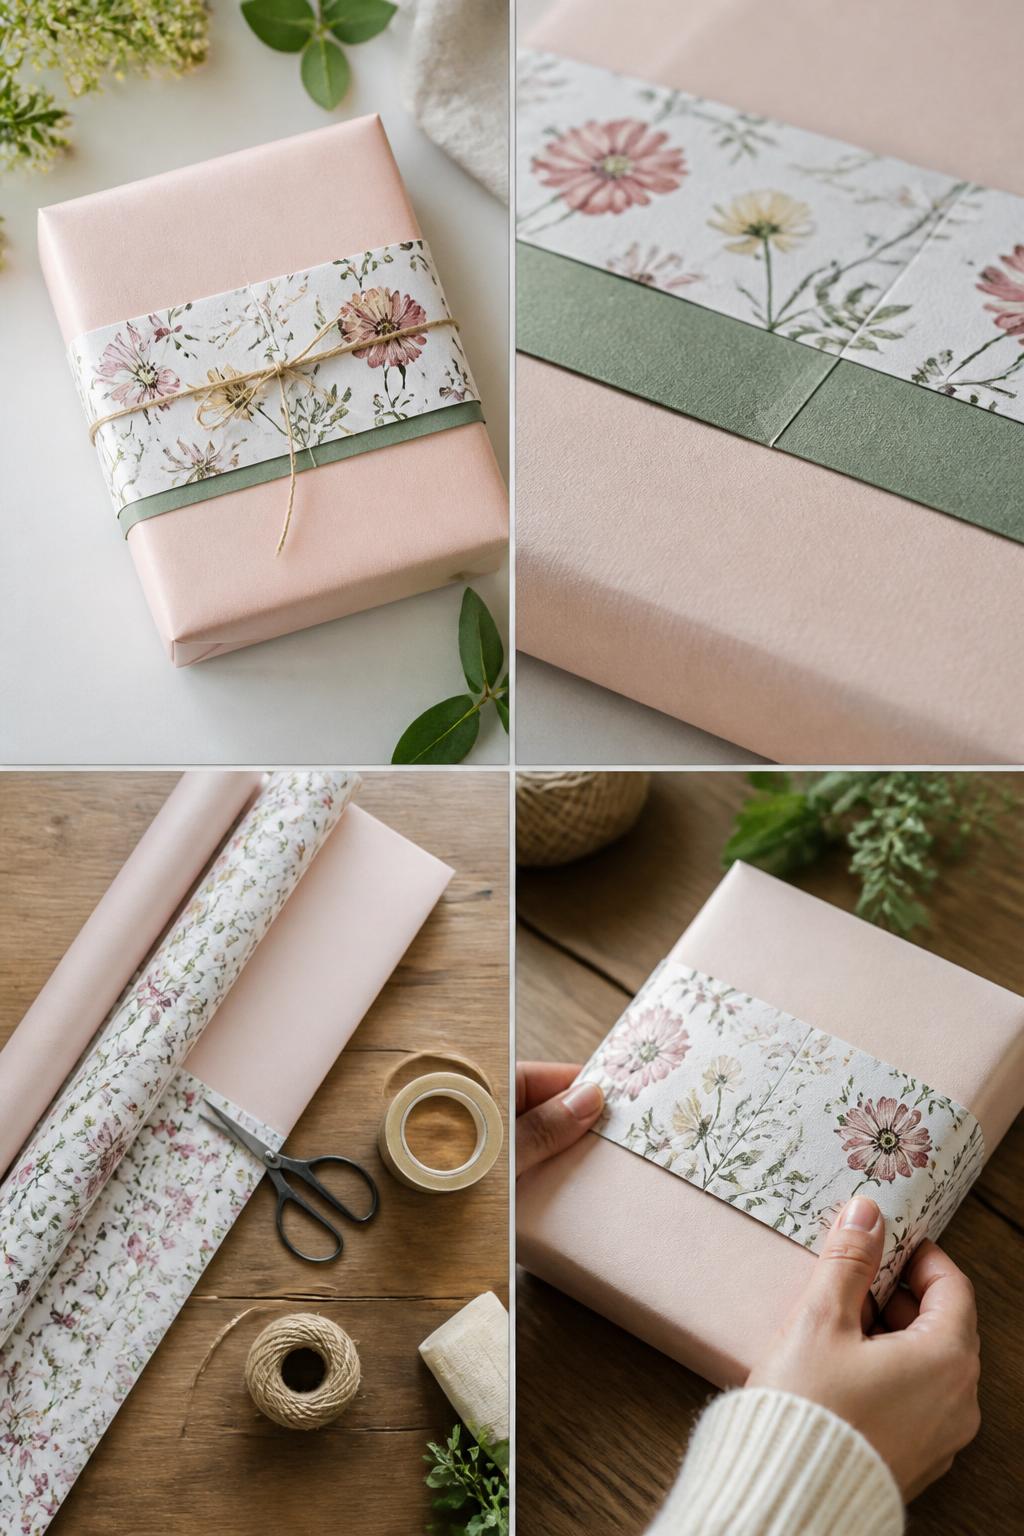
A layered paper band is one of the easiest ways to make a plain wrapped gift look more designed. You wrap the gift in one paper, then add a strip of contrasting paper around the middle.
This technique is perfect when you want to use up leftover wrapping paper. It also works well with kraft paper, solid paper, floral paper, or metallic paper.
Materials Needed:
- Plain wrapping paper
- Patterned wrapping paper
- Gift box
- Scissors
- Tape
- Twine or ribbon, optional
Steps To Make:
- Wrap the gift in your main wrapping paper.
- Cut a strip of contrasting paper for the band.
- Wrap the strip around the center of the gift.
- Tape the paper band at the back.
- Add twine, ribbon, or a tag over the band.
8. Gift Bag From Wrapping Paper
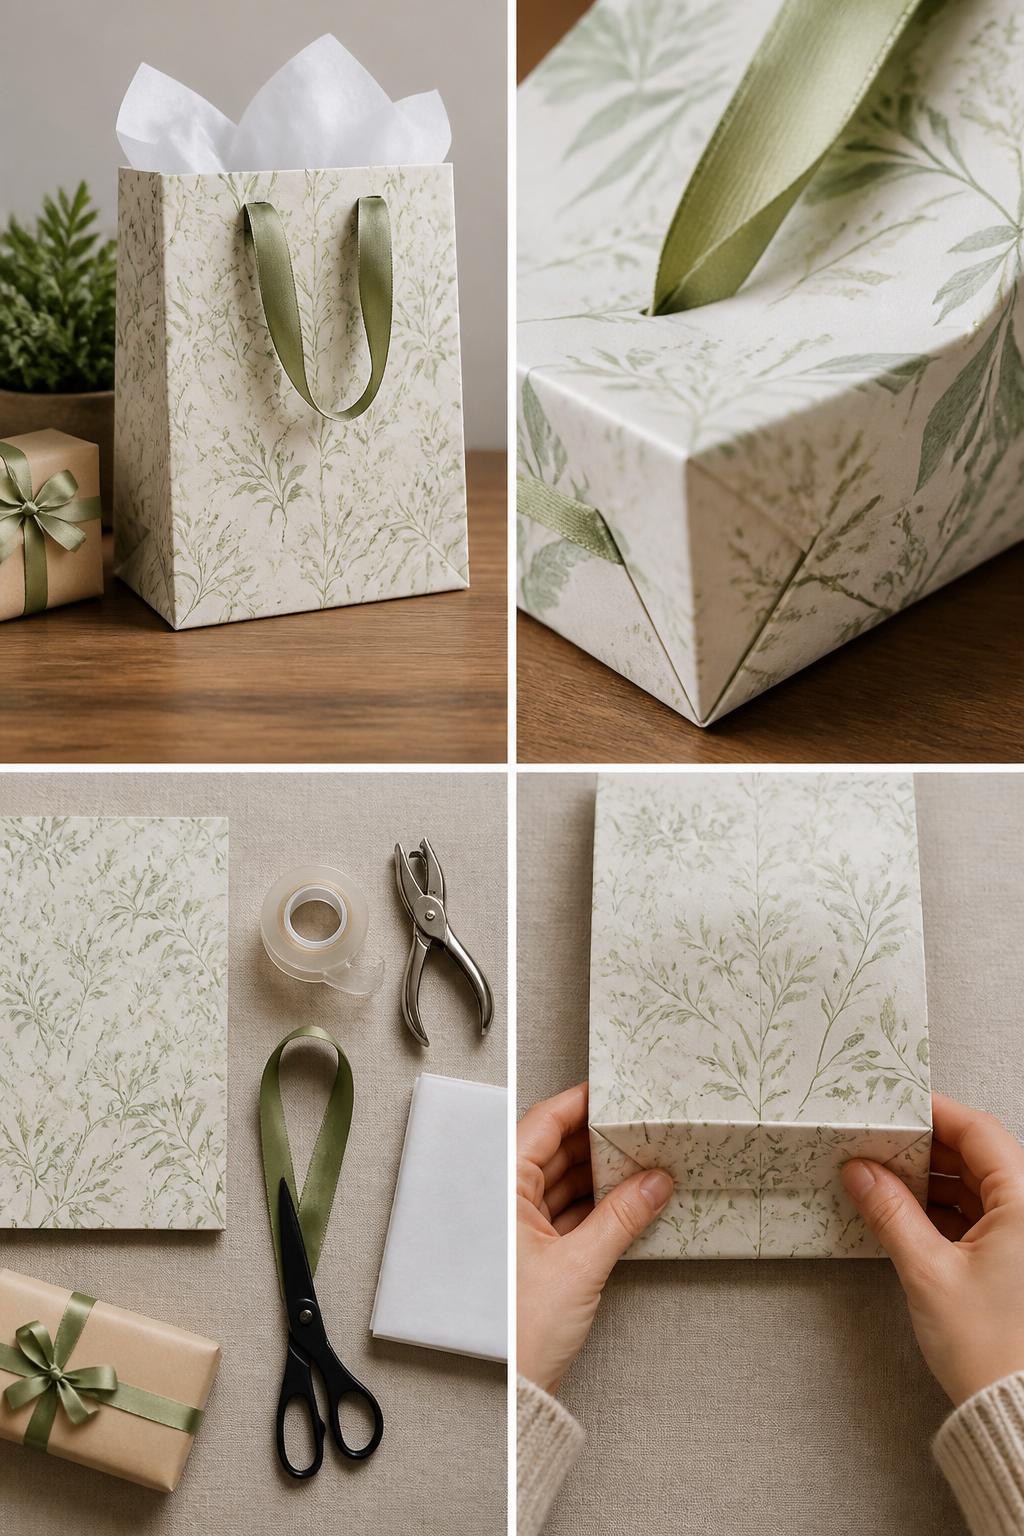
A handmade gift bag is perfect when you have an oddly shaped present or no store-bought bag nearby. You can make one from wrapping paper in just a few folds.
This technique works best with medium-weight paper. Add ribbon handles and tissue paper to make it look like a real gift bag.
Materials Needed:
- Wrapping paper
- Tape
- Scissors
- Hole punch
- Ribbon
- Tissue paper
- Gift item
Steps To Make:
- Cut a large rectangle of wrapping paper.
- Fold the sides toward the center and tape the seam.
- Fold the bottom up and shape it into a flat bag base.
- Tape the base securely.
- Punch holes at the top and add ribbon handles.
9. Tissue Paper Flower Topper
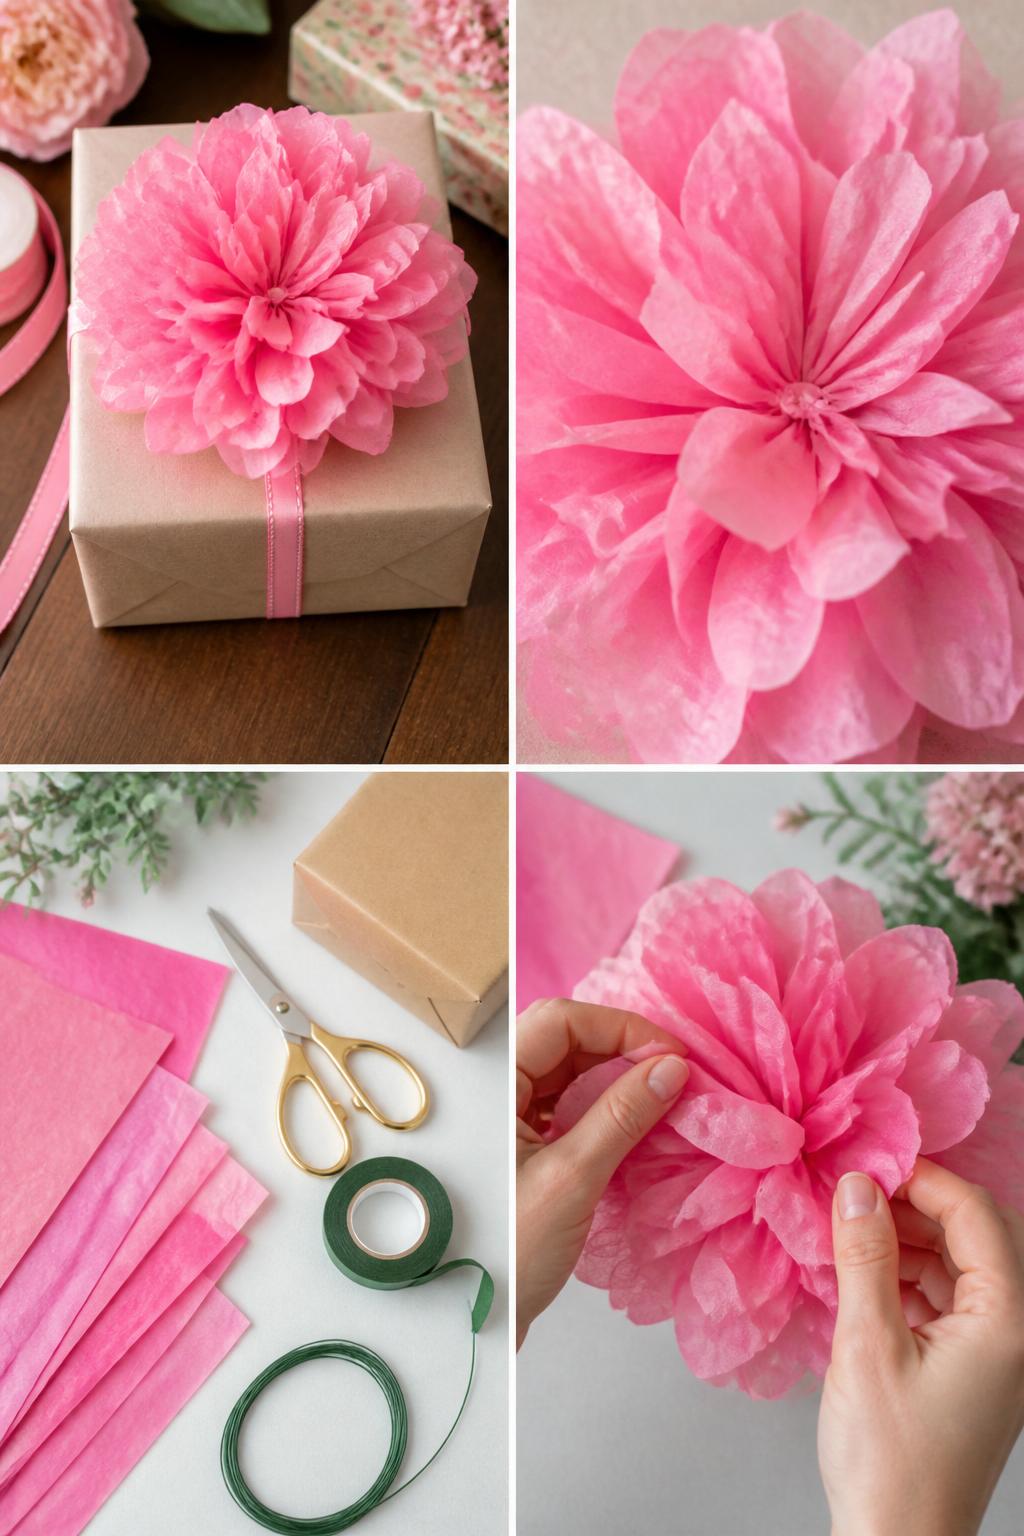
A tissue paper flower topper can make a simple wrapped gift look bright and impressive. It is also a good way to add volume without buying fancy bows.
This technique works for birthdays, baby showers, bridal showers, and spring or summer gifts. Use one color for a clean look or layer two shades for extra depth.
Materials Needed:
- Tissue paper
- Scissors
- Floral wire or string
- Tape
- Wrapped gift box
Steps To Make:
- Stack several tissue paper sheets together.
- Fold them accordion-style from one short edge to the other.
- Tie the center with floral wire or string.
- Round the ends with scissors if desired.
- Gently pull each tissue layer upward to form a flower.
10. Pocket Fold Gift Wrap
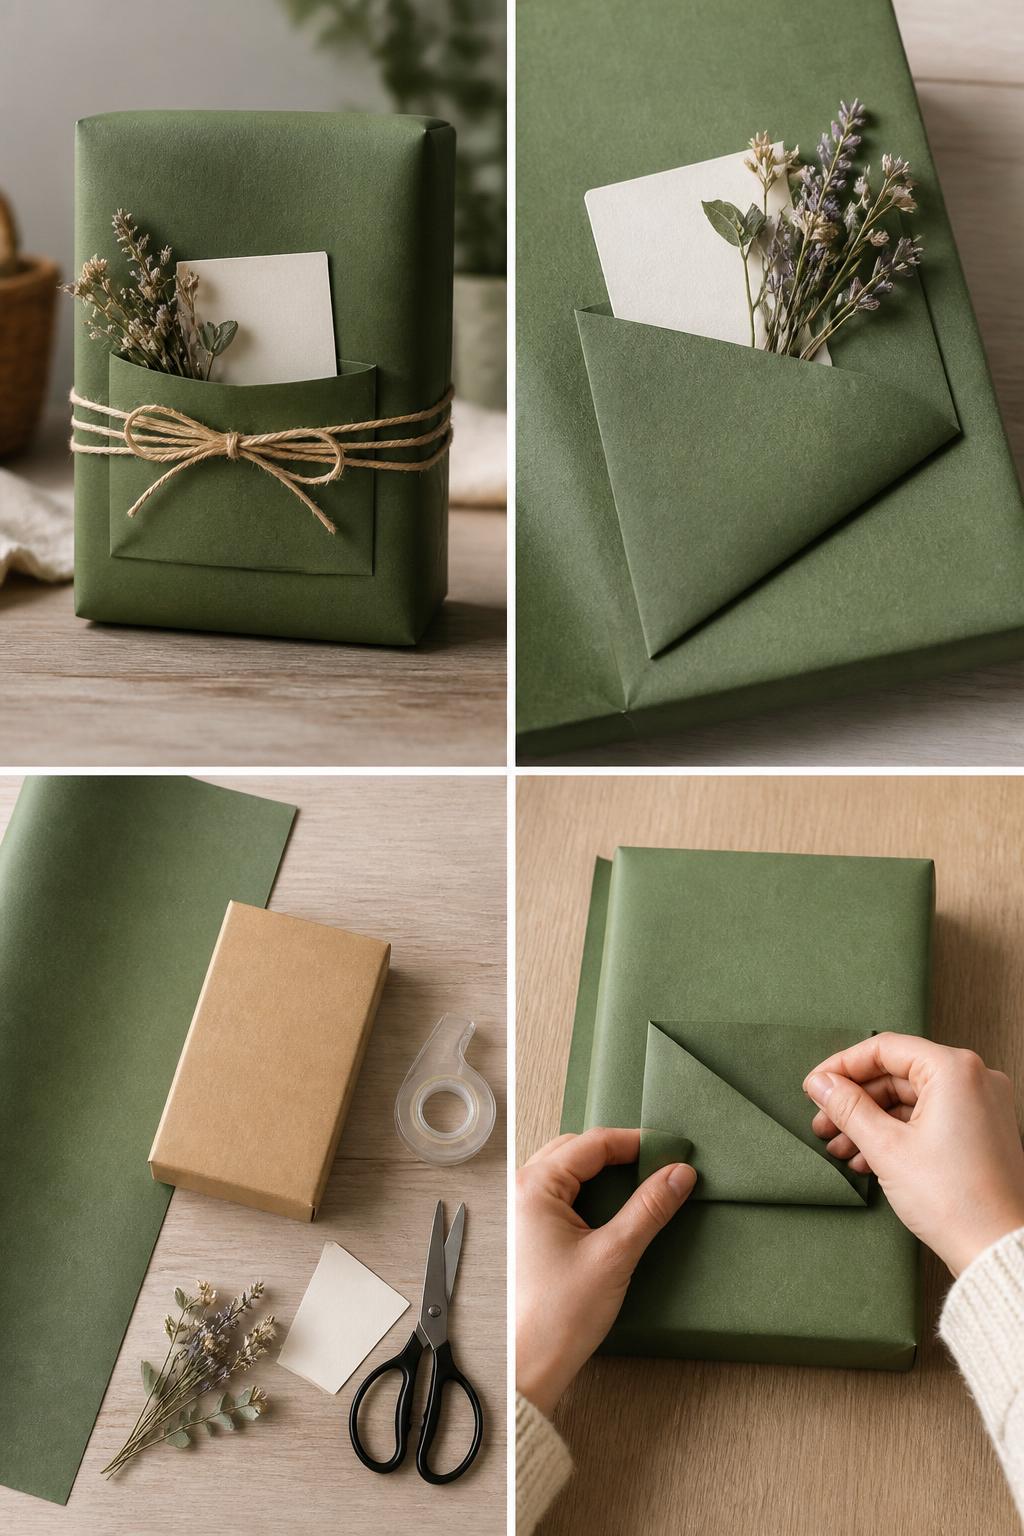
A pocket fold adds a little built-in space for a card, note, flower, or small photo. It makes the gift look thoughtful without needing many extra supplies.
This technique works best on rectangular boxes. Use solid paper or subtle patterned paper so the pocket detail is easy to see.
Materials Needed:
- Wrapping paper
- Gift box
- Scissors
- Tape
- Small card, flower, or tag
Steps To Make:
- Cut wrapping paper large enough to cover the box.
- Create a fold in the paper where you want the front pocket to sit.
- Wrap the gift while keeping the pocket fold on the front.
- Secure the paper at the back and sides.
- Tuck a card, note, or small flower into the pocket.
11. Washi Tape Pattern Wrap
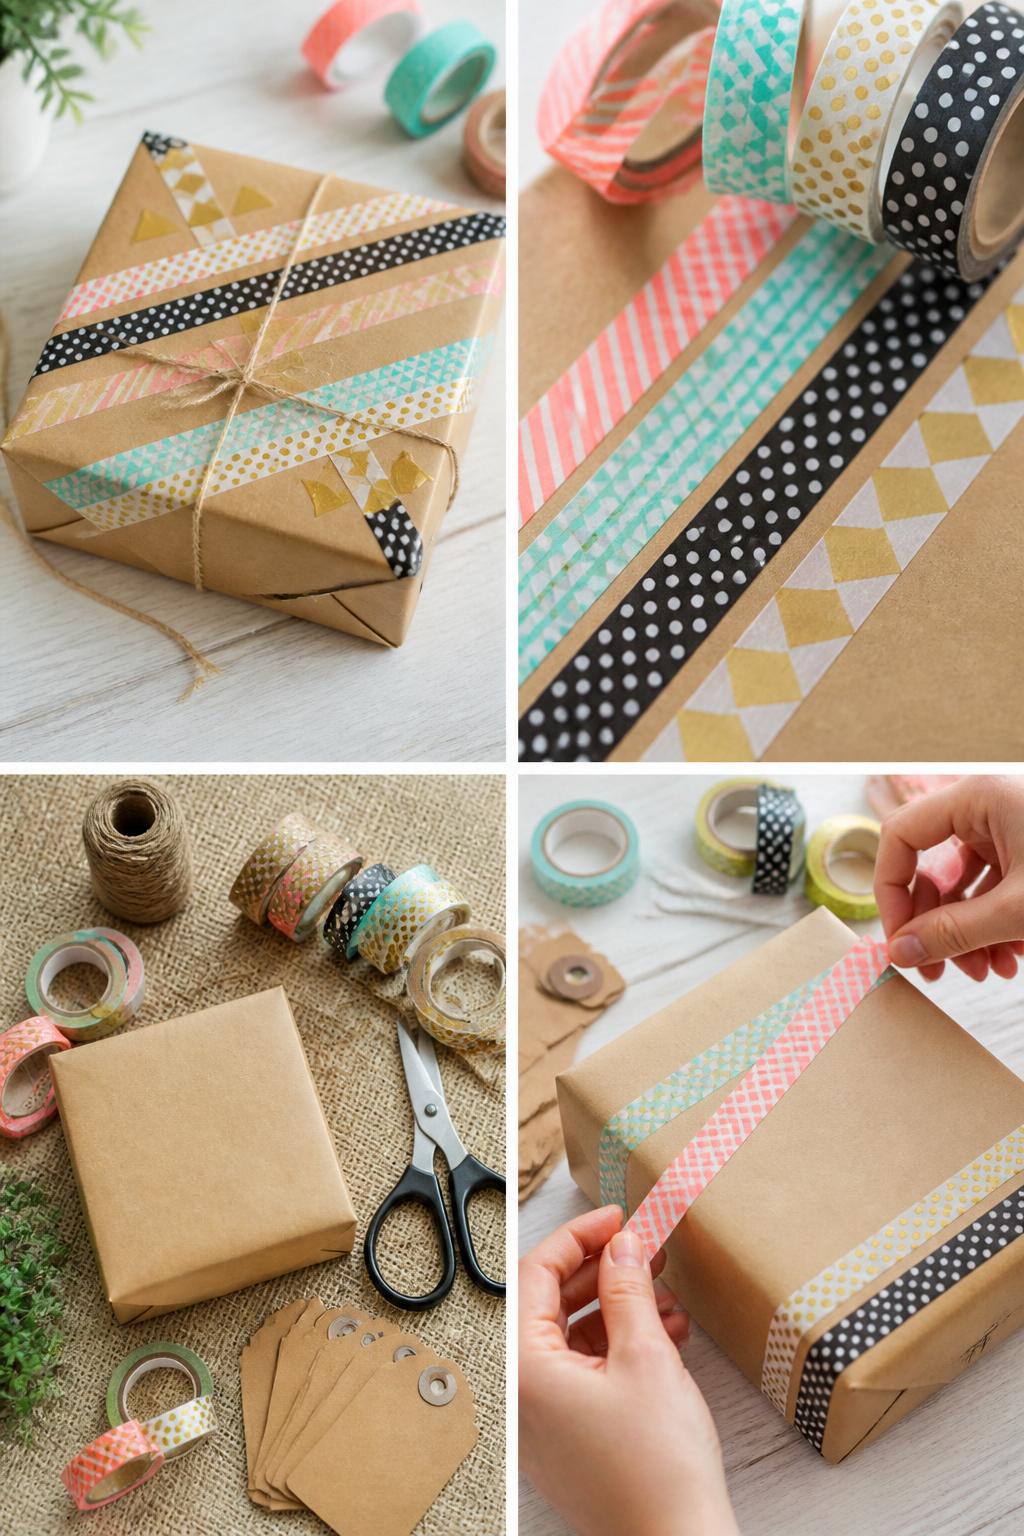
Washi tape is an easy way to decorate plain wrapping paper. You can make stripes, corners, grids, frames, or small patterns without needing ribbon.
This technique is great for kids’ gifts, casual birthdays, teacher gifts, and small packages. It works especially well on kraft paper or plain white paper.
Materials Needed:
- Plain wrapped gift
- Washi tape
- Scissors
- Twine or tag, optional
Steps To Make:
- Wrap the gift in plain paper first.
- Choose two or three washi tape colors or patterns.
- Place tape in stripes, corners, or diagonal lines.
- Trim the tape edges neatly with scissors.
- Add a tag or twine if you want a finished look.
12. Dried Flower Gift Wrap
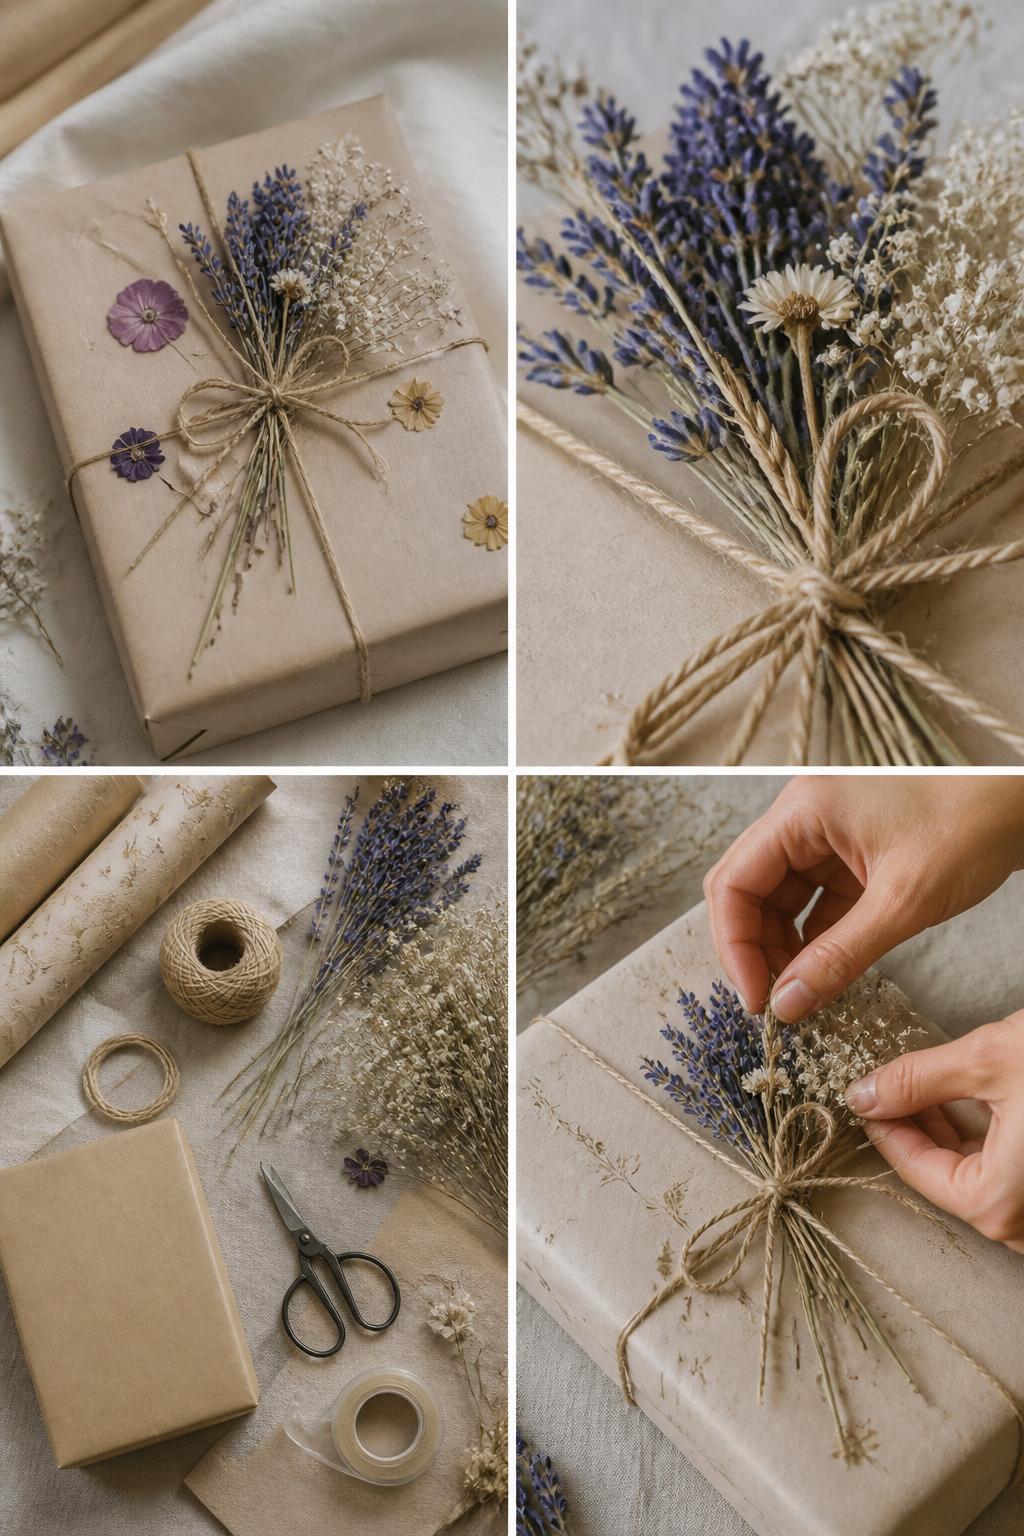
Dried flowers make gift wrapping feel soft, pretty, and personal. You only need a small bundle tucked under ribbon or twine to make the package feel special.
This technique is beautiful for bridal showers, birthdays, Mother’s Day, hostess gifts, and handmade presents. Choose sturdy dried flowers that will not crumble too easily.
Materials Needed:
- Wrapping paper
- Twine or ribbon
- Dried flowers
- Scissors
- Tape
- Gift box
Steps To Make:
- Wrap the gift neatly with paper.
- Tie twine or ribbon around the box.
- Create a small dried flower bundle.
- Tuck the stems under the twine or ribbon.
- Trim any long stems so the bundle sits neatly.
13. Stamped Kraft Paper Wrap
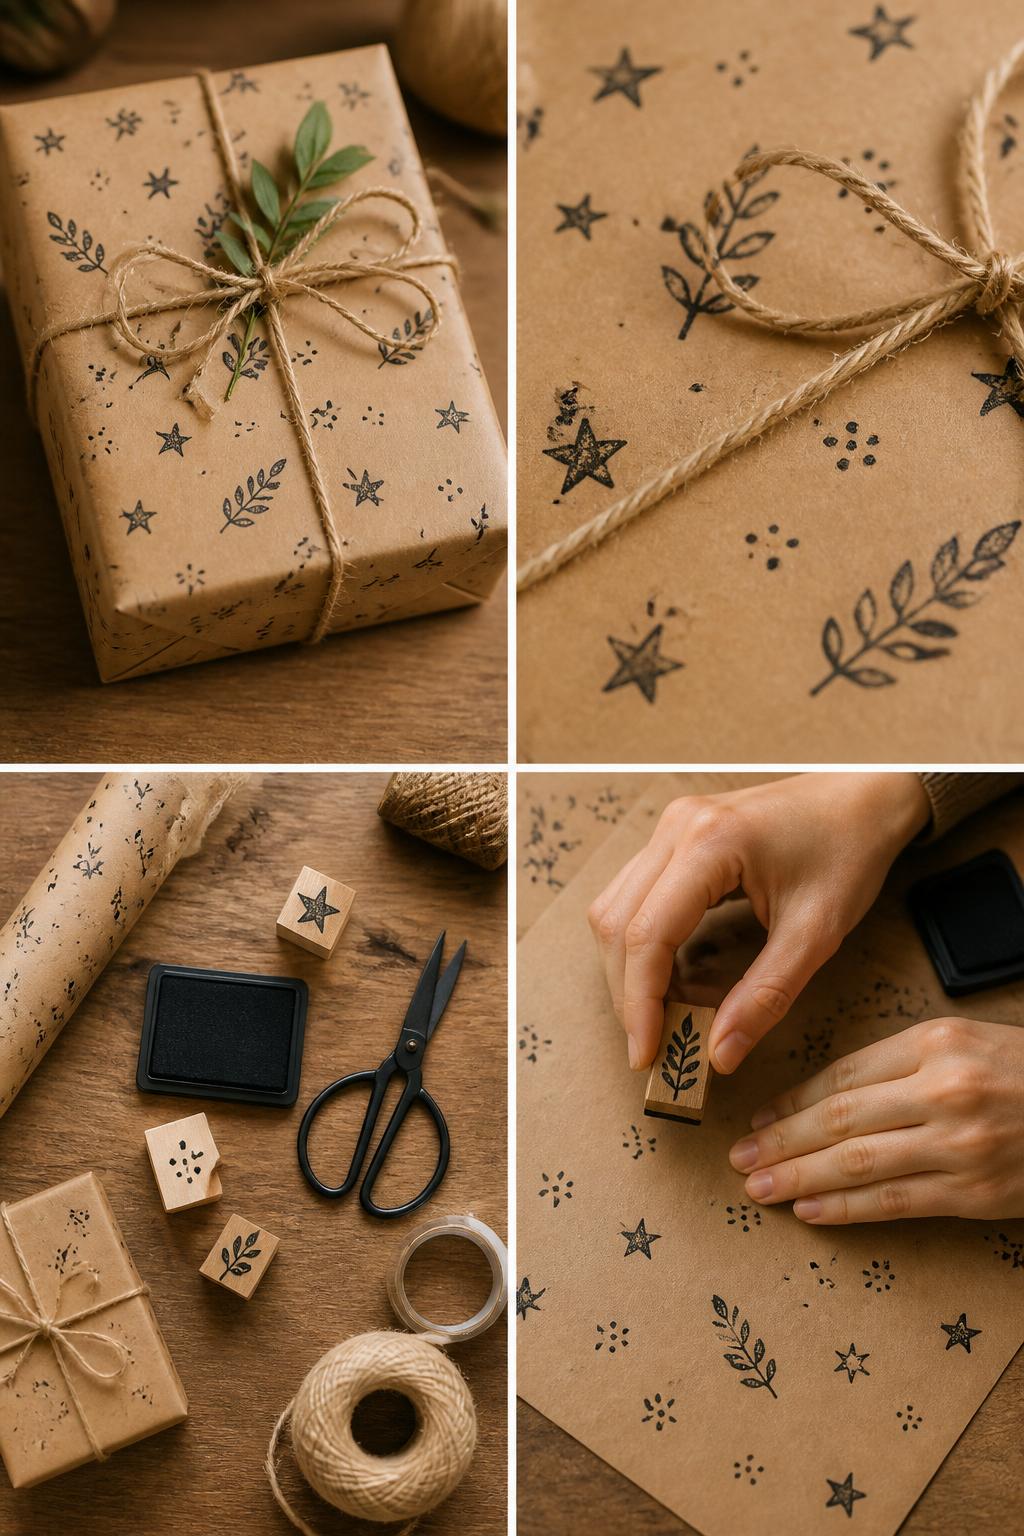
Stamped kraft paper is a great way to create your own wrapping paper. It feels handmade, but it still looks neat when you repeat a simple pattern.
This technique works for holidays, birthdays, small business packaging, and handmade gifts. Use one stamp style for a clean look or mix two simple shapes.
Materials Needed:
- Kraft paper
- Rubber stamps
- Ink pad
- Gift box
- Scissors
- Tape
- Twine, optional
Steps To Make:
- Roll out kraft paper on a flat surface.
- Stamp a repeated pattern across the paper.
- Let the ink dry fully before wrapping.
- Wrap the gift as usual.
- Add twine or a tag to finish.
14. Hidden Tape Wrap
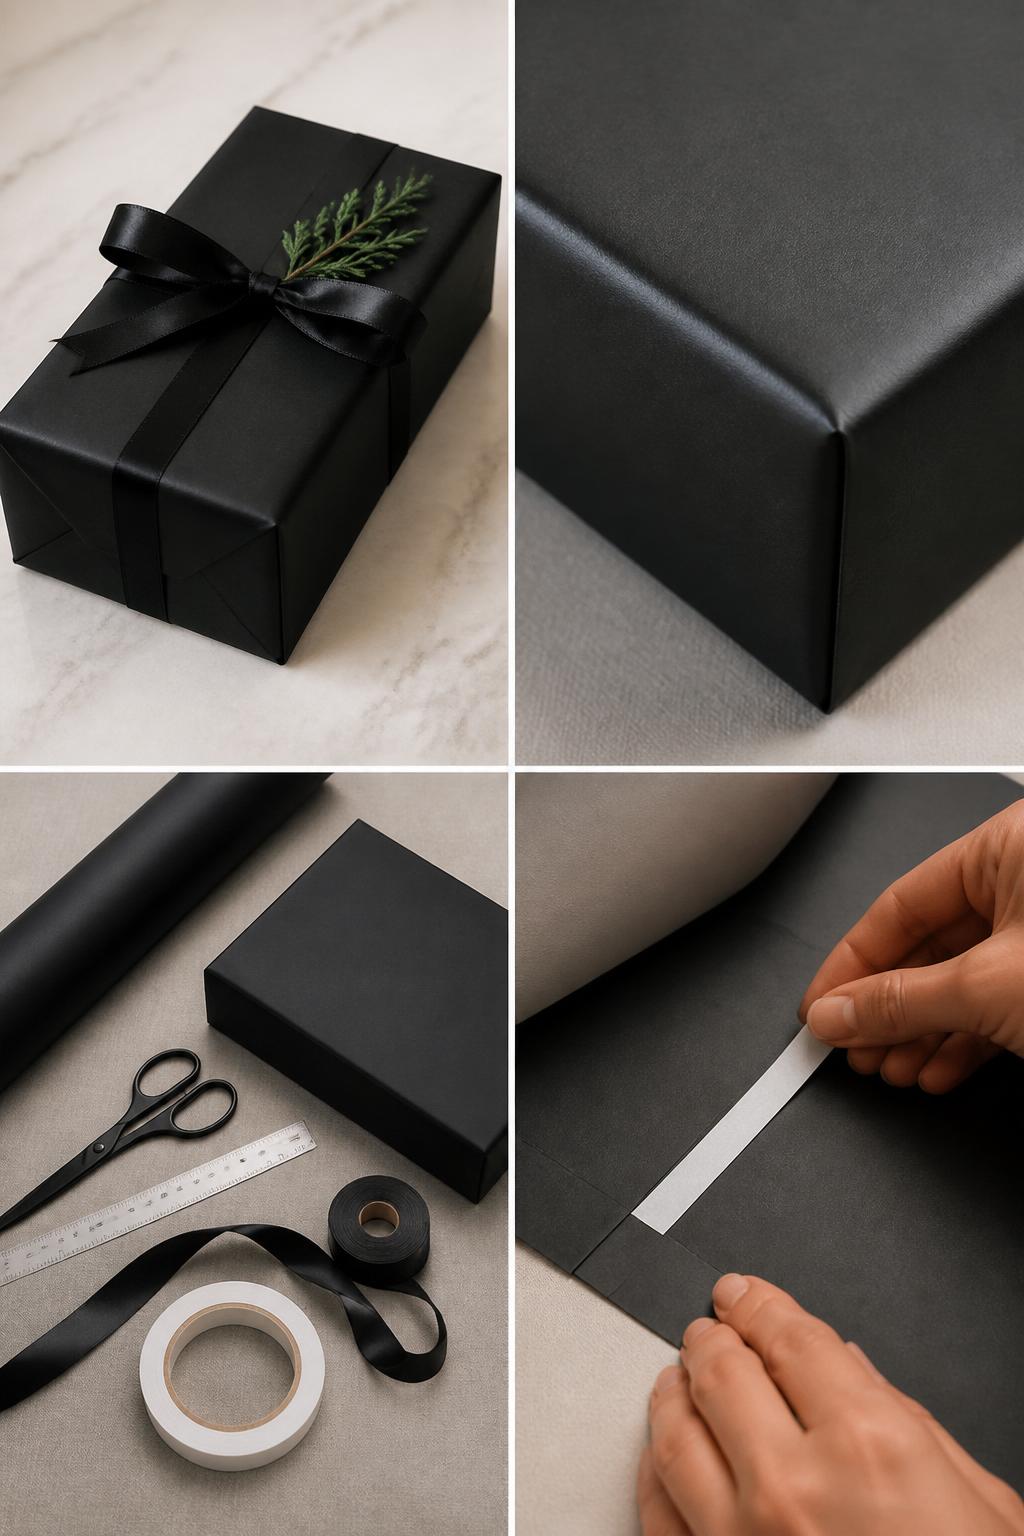
The hidden tape technique is simple, but it makes a gift look much more polished. Instead of taping on top of the paper, you place tape under the folded seams.
This is a great method for elegant gifts, formal events, and solid wrapping paper. It also helps the ribbon and paper look cleaner in photos.
Materials Needed:
- Wrapping paper
- Double-sided tape
- Scissors
- Gift box
- Ribbon
- Ruler, optional
Steps To Make:
- Cut the wrapping paper to fit the box neatly.
- Fold one paper edge under to create a clean seam.
- Place double-sided tape under the folded edge.
- Press the seam down firmly so no tape shows.
- Finish the sides and add ribbon if desired.
15. Layered Ribbon Bow Wrap
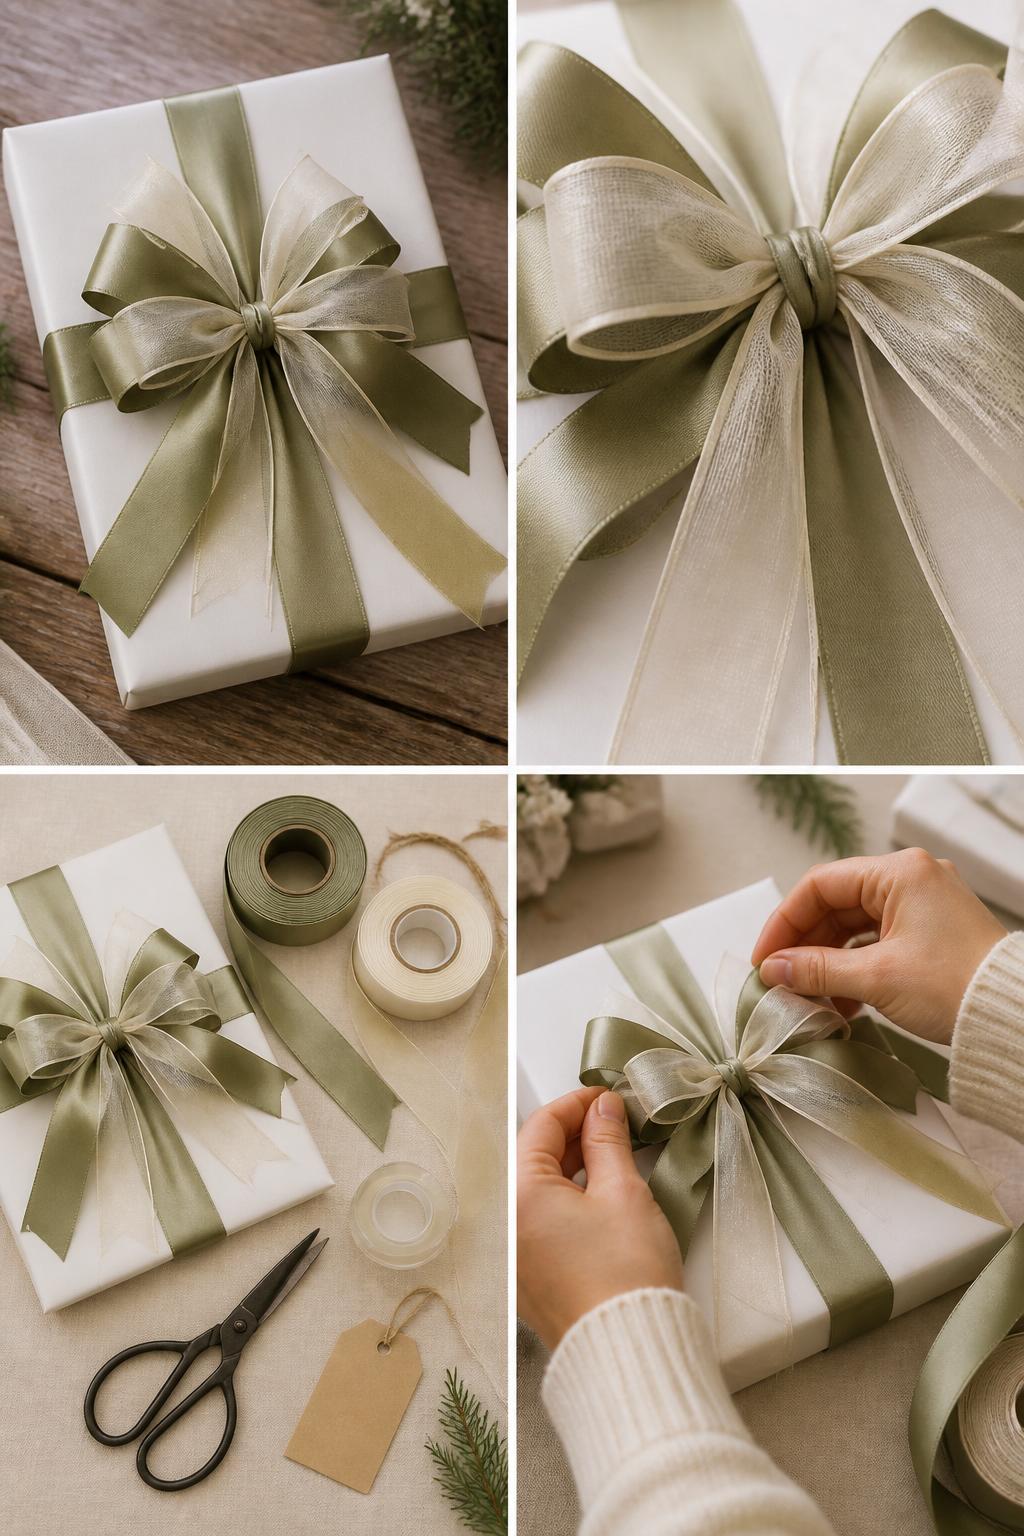
A layered ribbon bow makes a gift look full and impressive without changing the wrap itself. Using two ribbon textures, such as satin and sheer ribbon, adds depth.
This technique is perfect for wedding gifts, birthdays, Christmas presents, and special occasion packages. Keep the paper simple so the ribbon can be the main detail.
Materials Needed:
- Wrapped gift box
- Satin ribbon
- Sheer ribbon or thin ribbon
- Scissors
- Tape, optional
- Gift tag, optional
Steps To Make:
- Wrap the gift box in simple paper.
- Tie the wider ribbon around the box first.
- Layer the thinner or sheer ribbon over the first ribbon.
- Tie both ribbons into one full bow.
- Trim the ribbon ends at an angle for a neat finish.
16. Gift Wrap With Ornament or Keepsake Topper

A keepsake topper makes the gift wrap feel like part of the present. Small ornaments, keychains, wooden charms, mini frames, or handmade tags can all work.
This technique is great for holiday gifts, baby showers, wedding gifts, and personalized presents. Choose a topper that matches the person or the theme of the gift.
Materials Needed:
- Wrapped gift
- Ribbon or twine
- Small ornament or keepsake
- Scissors
- Gift tag, optional
Steps To Make:
- Wrap the gift in paper of your choice.
- Tie ribbon or twine around the box.
- Place the keepsake topper near the bow or knot.
- Tie it securely to the ribbon.
- Adjust the topper so it sits flat and visible.
17. Layered Gift Tag Wrap
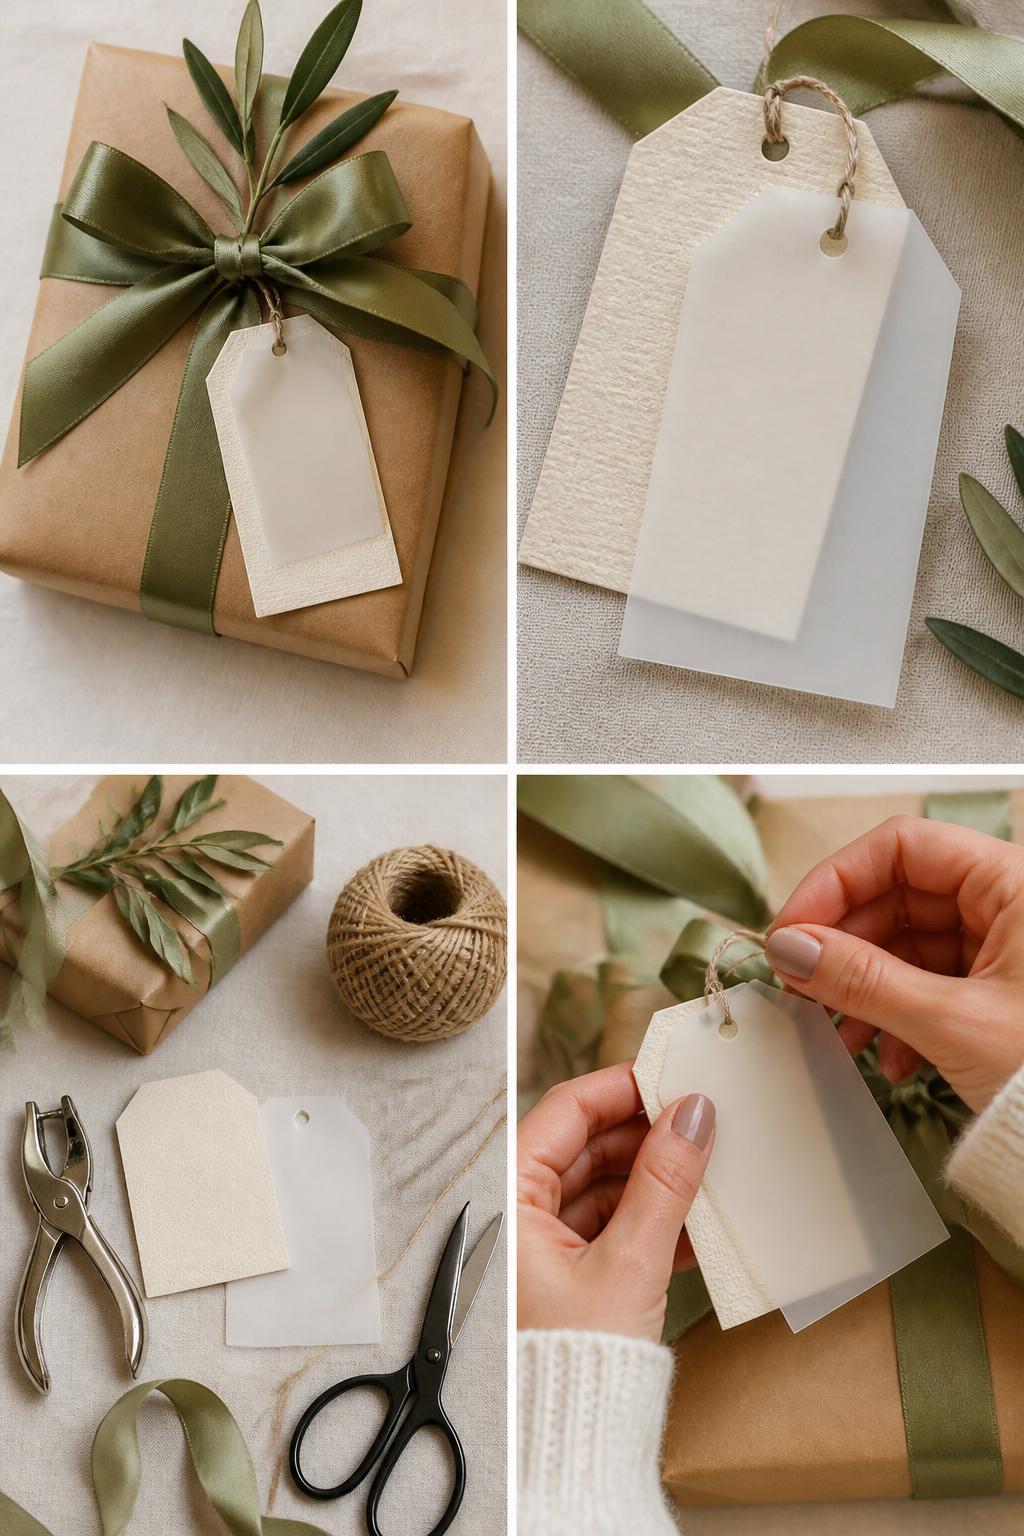
Layered gift tags are an easy way to make a wrapped gift feel more styled. You can combine cardstock, vellum, kraft paper, handmade paper, or small printed paper scraps.
This technique works for almost any occasion. It is also a smart way to use leftover paper pieces from other wrapping projects.
Materials Needed:
- Wrapped gift
- Cardstock or gift tags
- Vellum or patterned paper
- Hole punch
- Ribbon or twine
- Scissors
Steps To Make:
- Tie the tags onto the wrapped gift.
- Cut two or three tag shapes in different sizes.
- Punch a hole at the top of each tag.
- Layer the tags from largest to smallest.
- Thread ribbon or twine through the holes.


