


Table of Contents Show
Keeping preschoolers busy and happy can be a real challenge, especially on rainy days or when you need quick classroom ideas. Fruit crafts are perfect: they are bright, familiar, and easy to turn into hands-on projects.
Below, you’ll find simple, colorful activities that spark creativity and build fine motor skills.
Grab some paper, glue, and paint—let’s make cheerful fruit crafts together!
1. Paper Plate Watermelon Slice

This craft looks like a big watermelon wedge with pink-red “fruit,” a green rind, and black seed dots. Kids love the bold colors and simple painting steps, and they can proudly “slice” summer any time of year.
Materials Needed:
For People Who Love to Make Things ✂️
- Sturdy paper plate (cut in half)
- Red and green paint
- Black marker or black paper dots
- Glue stick
- Paintbrush
How to make it:
- Cut a paper plate in half to make a slice base.
- Paint the curved edge green for rind and the center red or pink.
- Add black seeds with a marker or glue on small black paper dots.
- Let dry, then display on a bulletin board or fridge.
2. Sponge-Stamped Grapes Bunch

This project creates a plump bunch of purple grapes using sponge circles clustered together with a green stem and leaf. Kids enjoy the stamping motion and seeing the bunch grow as they press more “grapes.”
Materials Needed:
- White cardstock
- Purple paint
- Small round sponge or foam dabber
- Green construction paper (leaf and stem)
- Glue stick
How to make it:
- Place cardstock on the table and set out purple paint in a shallow dish.
- Dip the sponge into paint and stamp circles close together to form a grape bunch.
- Cut a leaf and stem from green paper and glue at the top.
- Let dry flat and hang as fruity wall art.
3. Handprint Pineapple Art
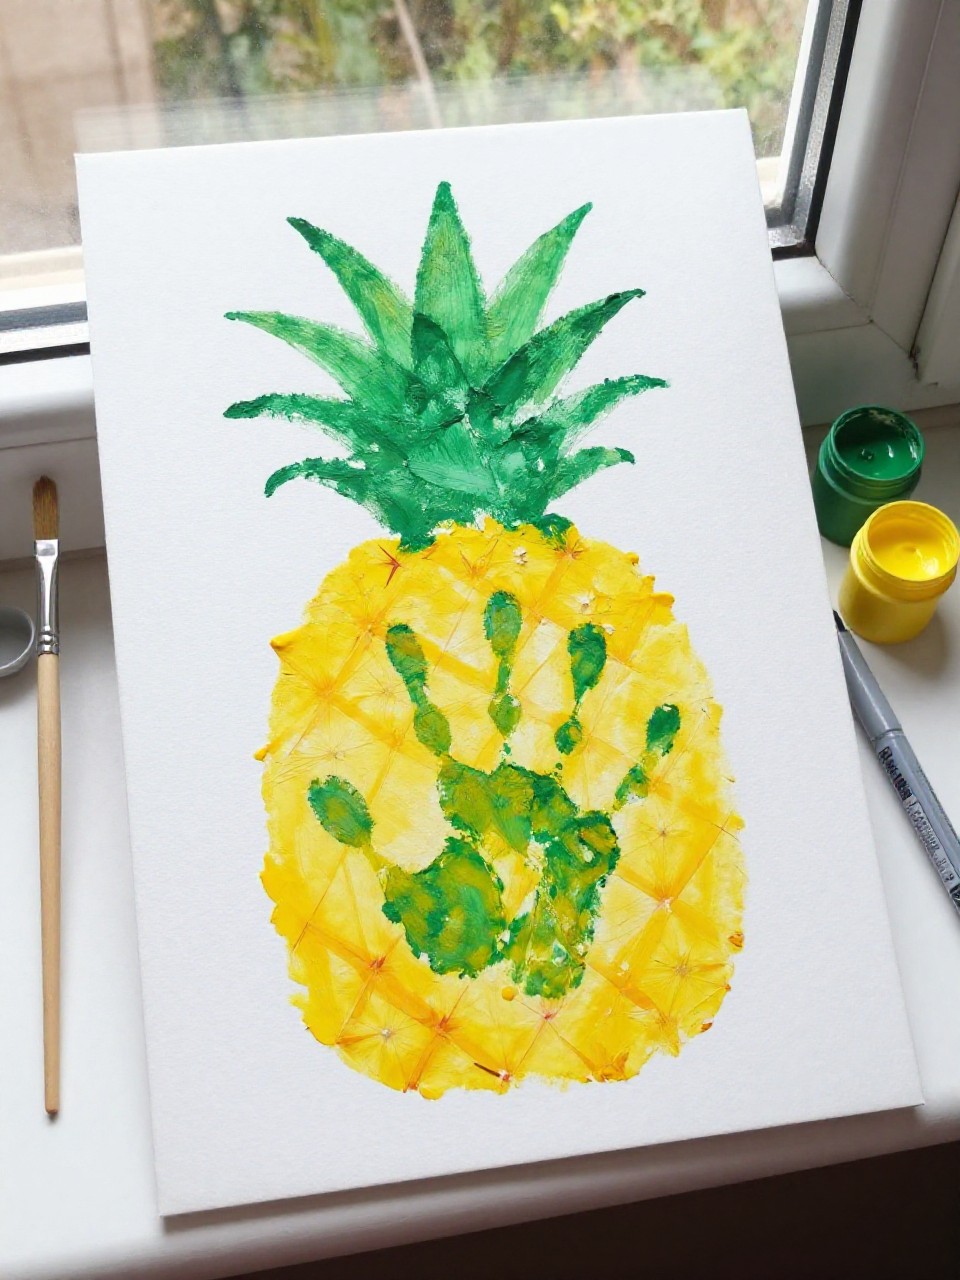
This artwork looks like a sunny yellow pineapple body with kids’ green handprints as the spiky leaves on top. Children love seeing their handprints become part of the fruit, and it makes a sweet keepsake.
Materials Needed:
- White or light blue cardstock
- Yellow paint
- Green paint
- Paintbrush
- Black marker (optional for texture)
How to make it:
- Paint a large yellow oval for the pineapple base on cardstock.
- Paint a child’s hand with green paint and press above the oval 2–3 times for leaves.
- Add crisscross lines or small dots with a marker for texture.
- Allow to dry and sign the bottom with the child’s name and date.
4. Tissue Paper Mosaic Orange

This looks like a round, bright orange made from tiny tissue squares glued close together, with a small green leaf. Kids enjoy the simple tear-and-glue motion and the bumpy mosaic texture.
Materials Needed:
- White cardstock (orange outline drawn)
- Orange tissue paper squares
- Green construction paper (leaf)
- Glue stick
- Child-safe scissors
How to make it:
- Draw a circle on cardstock as an orange shape.
- Crumple or flatten orange tissue squares and glue them inside the circle.
- Cut and glue a small green leaf at the top.
- Let dry and display as a sunny fruit mosaic.
5. Egg Carton Strawberry Patch

This craft becomes a mini patch of red strawberries made from cut egg carton cups, with green paper tops and painted seeds. Kids love turning a common box into a tiny 3D fruit garden.
Materials Needed:
- Cardboard egg carton (cut into individual cups)
- Red and green paint
- Green construction paper (leaf tops)
- White paint or marker (seeds)
- Glue
How to make it:
- Cut egg cups apart and trim edges to look berry-shaped.
- Paint the cups red; paint leaf tops on green paper and cut out.
- Add tiny white seed dots to the red cups and glue on green tops.
- Let dry and arrange your strawberry patch in a tray.
6. Popsicle Stick Banana

This piece looks like a curved yellow banana made from painted popsicle sticks glued side by side with a brown tip. Kids enjoy building the shape and painting it a sunny color.
Materials Needed:
- Popsicle sticks (6–8)
- Yellow paint
- Brown marker or paint
- Cardstock base (for gluing curve)
- Glue
How to make it:
- Arrange and glue sticks onto cardstock in a gentle curve to form a banana.
- Paint the sticks yellow and let the curve show.
- Add a brown tip and a line along one edge with marker.
- Dry and cut around the shape to display the banana.
7. Paper Cup Blueberry Basket

This looks like a small paper “basket” filled with big, painted blue paper cup blueberries. Kids love pretending to pick and count the berries when they’re done.
Materials Needed:
- Small paper cups (blueberries)
- Blue paint
- Brown construction paper (basket)
- Black marker (berry dots)
- Glue stick
How to make it:
- Paint paper cups blue and let them dry.
- Cut a basket shape from brown paper and glue it onto a cardstock background.
- Glue the painted cups upside down inside the basket and add tiny black dots.
- Display as a textured blueberry harvest scene.
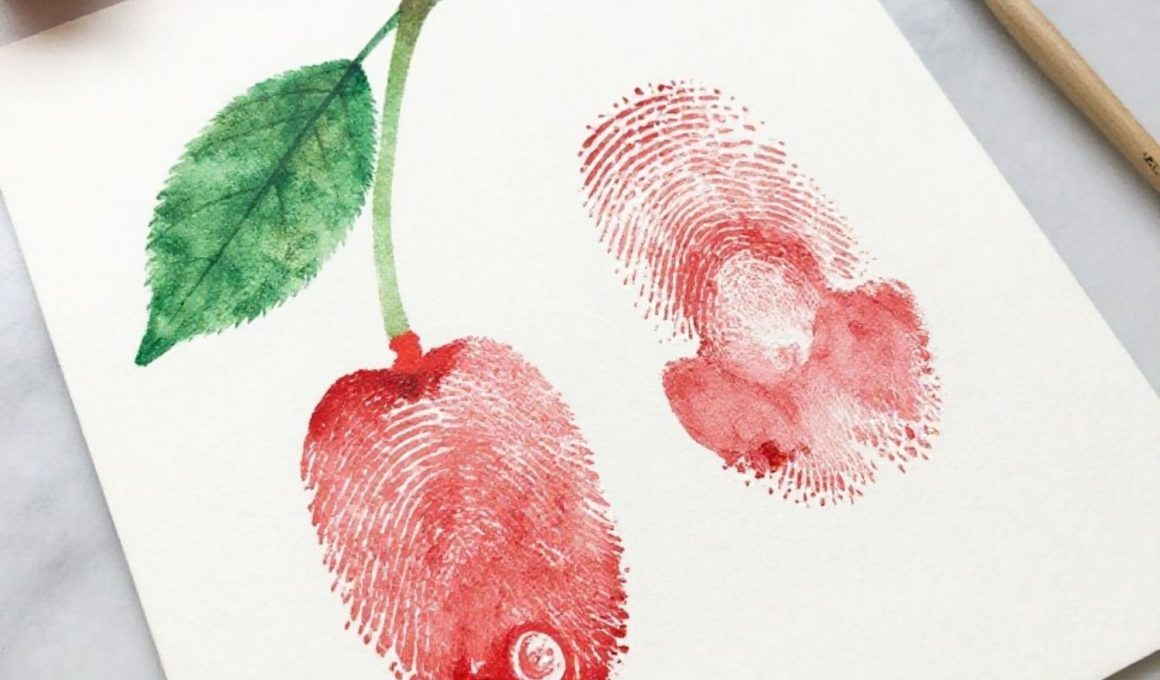
8. Fingerprint Cherry Pair

This is a cute picture of two bright red cherry fingerprints connected by a green stem and a leaf. Kids love pressing their fingers in paint and seeing fruit appear with just a few touches.
Materials Needed:
- White cardstock
- Red and green washable paint
- Fine paintbrush
- Paper towel or wipes
How to make it:
- Press two red fingerprints close together on the paper.
- Use green paint and a fine brush to connect them with a stem and add a leaf.
- Optionally add a smiling face with a tiny brush.
- Let dry and frame as a mini print.
9. Paper Plate Kiwi Slice

This craft looks like a fresh kiwi slice with a light green center, white ring, and black seeds, all on a brown “skin.” Kids enjoy painting the soft gradients and dotting lots of tiny seeds.
Materials Needed:
- Small paper plate
- Light green, white, and brown paint
- Black marker or paint for seeds
- Paintbrush
- Cotton swab (optional for seeds)
How to make it:
- Paint the rim of the plate brown for skin.
- Paint the center light green with a small white circle in the very middle.
- Add a ring of tiny black seeds around the white circle using a marker or swab.
- Dry and hang as a tasty-looking wall slice.
10. Bubble Wrap Pineapple Print

This print shows a textured yellow pineapple body made by stamping bubble wrap, with simple green paper leaves on top. Kids love the pop-dot texture and the surprise pattern when they lift the stamp.
Materials Needed:
- Bubble wrap (small bubbles)
- Yellow paint
- White cardstock
- Green construction paper (leaves)
- Glue stick
How to make it:
- Brush yellow paint on a piece of bubble wrap cut into an oval shape.
- Press the painted side onto cardstock to print the pineapple body.
- Cut and glue green paper leaves above the print.
- Let dry, then add a simple face if desired.
11. Yarn-Wrapped Apple Core

This looks like a funny apple core with red yarn wrapped at the top and bottom, a white middle, and two black “seeds.” Kids enjoy wrapping yarn to build fine motor skills and seeing the apple shape appear.
Materials Needed:
- Cardboard apple core shape (cut ahead)
- Red yarn
- White paper (middle)
- Black marker or paper seeds
- Glue or tape
How to make it:
- Cut a simple apple core shape from cardboard and glue a white paper middle on it.
- Tape yarn ends to the back and wrap red yarn around top and bottom sections.
- Draw or glue two black seeds in the white middle.
- Add a loop of yarn on top for hanging.
12. Felt Citrus Coasters

These are soft, round felt coasters that look like lemon, lime, and orange slices with white segment lines. Kids enjoy choosing colors and sticking simple shapes, and the coasters make pretend play tea parties extra fun.
Materials Needed:
- Colored felt sheets (yellow, green, orange, white)
- Child-safe scissors
- Fabric glue or tacky glue
- Marker (for tracing)
- Cup to trace circles
How to make it:
- Trace and cut felt circles for fruit bases.
- Cut small white triangles or arcs for citrus segments.
- Glue segments onto each colored circle to make slices.
- Let dry and use for pretend snacks or display.
13. Paper Chain Fruit Garland

This is a cheerful garland where each loop turns into a fruit: red loops with green tops for apples, yellow with brown tips for bananas, and purple clusters for grapes. Kids love making long chains and decorating a room or bulletin board.
Materials Needed:
- Construction paper strips (red, green, yellow, brown, purple)
- Glue stick or tape
- Child-safe scissors
- String (optional for hanging)
- Marker (optional)
How to make it:
- Make paper chains in fruit colors: red, yellow, and purple loops.
- Add small cut paper leaves, stems, or tips to each loop to suggest apples, bananas, and grapes.
- Connect clusters (like several purple loops) to form grape bunches.
- Hang the garland across a wall or window.
14. Collage Fruit Salad Placemat

This looks like a busy placemat covered with cut-out paper fruits—slices of kiwi, banana coins, strawberries, blueberries, and orange wedges. Kids enjoy choosing colors, cutting simple shapes, and “building” a yummy fruit salad.
Materials Needed:
- Large sheet of cardstock (placemat base)
- Colored paper scraps (various fruit colors)
- Glue stick
- Markers (details like seeds or rinds)
- Clear contact paper (optional to laminate)
How to make it:
- Cut simple fruit shapes: circles, wedges, hearts for strawberries.
- Arrange and glue fruits all over the placemat base.
- Add seeds, lines, and peels with markers.
- Cover with clear contact paper to protect and reuse.
15. Cotton Ball Coconut Half

This craft looks like a coconut half with a brown paper shell and fluffy white “coconut meat” made from cotton balls. Kids enjoy the soft texture and the simple glue-and-stick steps.
Materials Needed:
- Brown construction paper (shell)
- White cardstock (backing)
- Cotton balls
- Glue
- Black marker (optional rim lines)
How to make it:
- Cut a large brown oval shell with a flat top edge and glue it onto white cardstock.
- Pull apart cotton balls slightly and glue inside the shell to fill the “coconut.”
- Add small black lines around the rim if desired.
- Let dry and hang the tropical coconut on a display wall.