Table of Contents Show
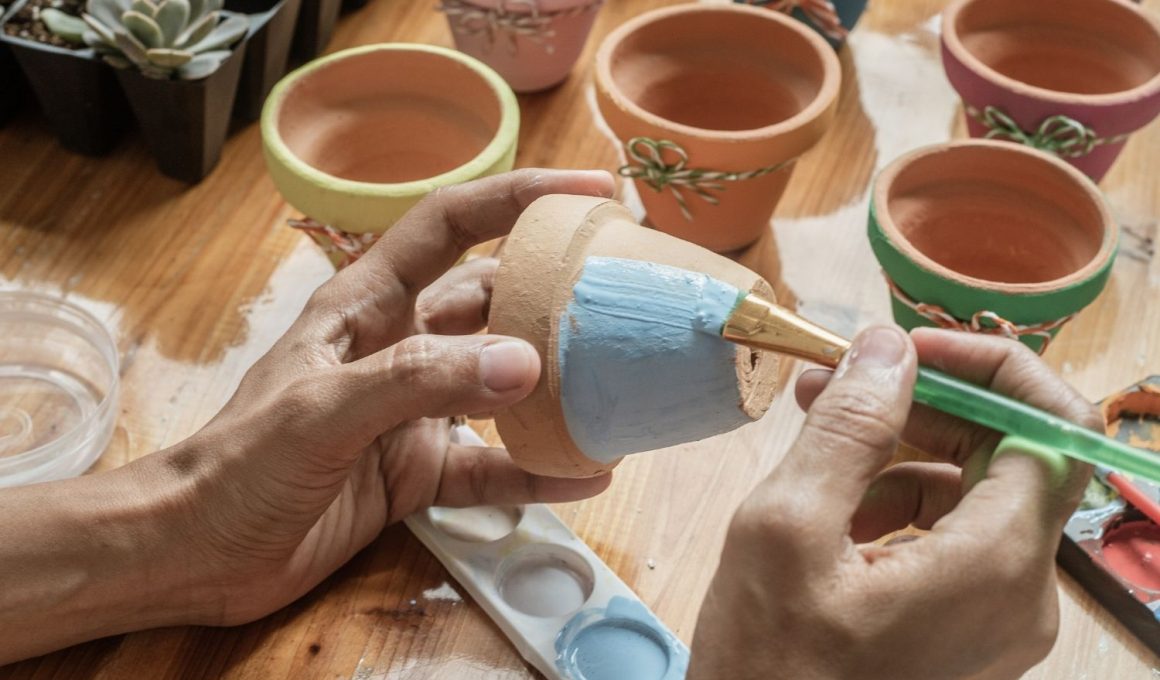
When I want a relaxing hobby, I often end up staring at a plain pot and not knowing what to paint. If you’ve ever felt stuck like that, earthen pot painting is a simple way to start creating without pressure. These ideas are beginner-friendly, but they still look natural and beautiful when finished.
Let’s move into 15 earthen pot painting ideas you can try at your own pace.
1. Clay-and-Cream Botanical Bands Pot
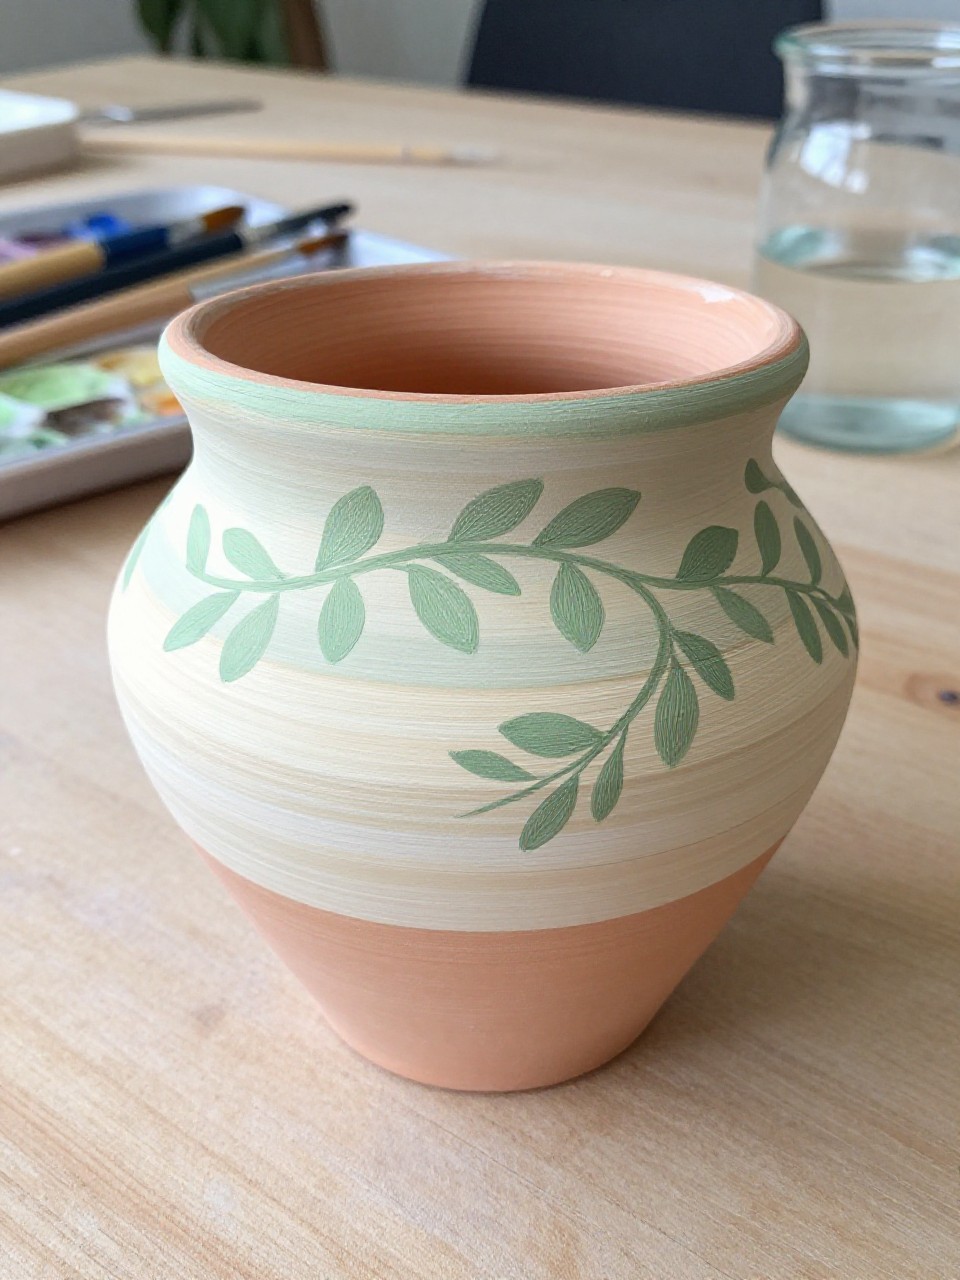
This finished earthen pot has soft cream bands with simple leafy vines wrapping around the rounded sides. It’s satisfying because you can paint slow, repeating shapes, and the natural colors look calm in any room. Beginners like it since the leaves don’t need to be perfect to look charming.
Materials Needed:
- Earthen terracotta pot
- Acrylic paint (cream, sage green)
- Paintbrushes in multiple sizes
- Palette or paint tray
- Optional matte sealer
Steps to Make:
For People Who Love to Make Things ✂️
- Wipe the pot clean and let it dry fully before painting.
- Paint two wide cream bands around the pot, following the curve evenly.
- Add a thin green vine line through the center of each band.
- Paint small leaves branching off the vine, letting brush strokes show.
- Let dry, then seal with matte sealer for a soft, natural finish.
2. Speckled Stoneware Look Terracotta Pot
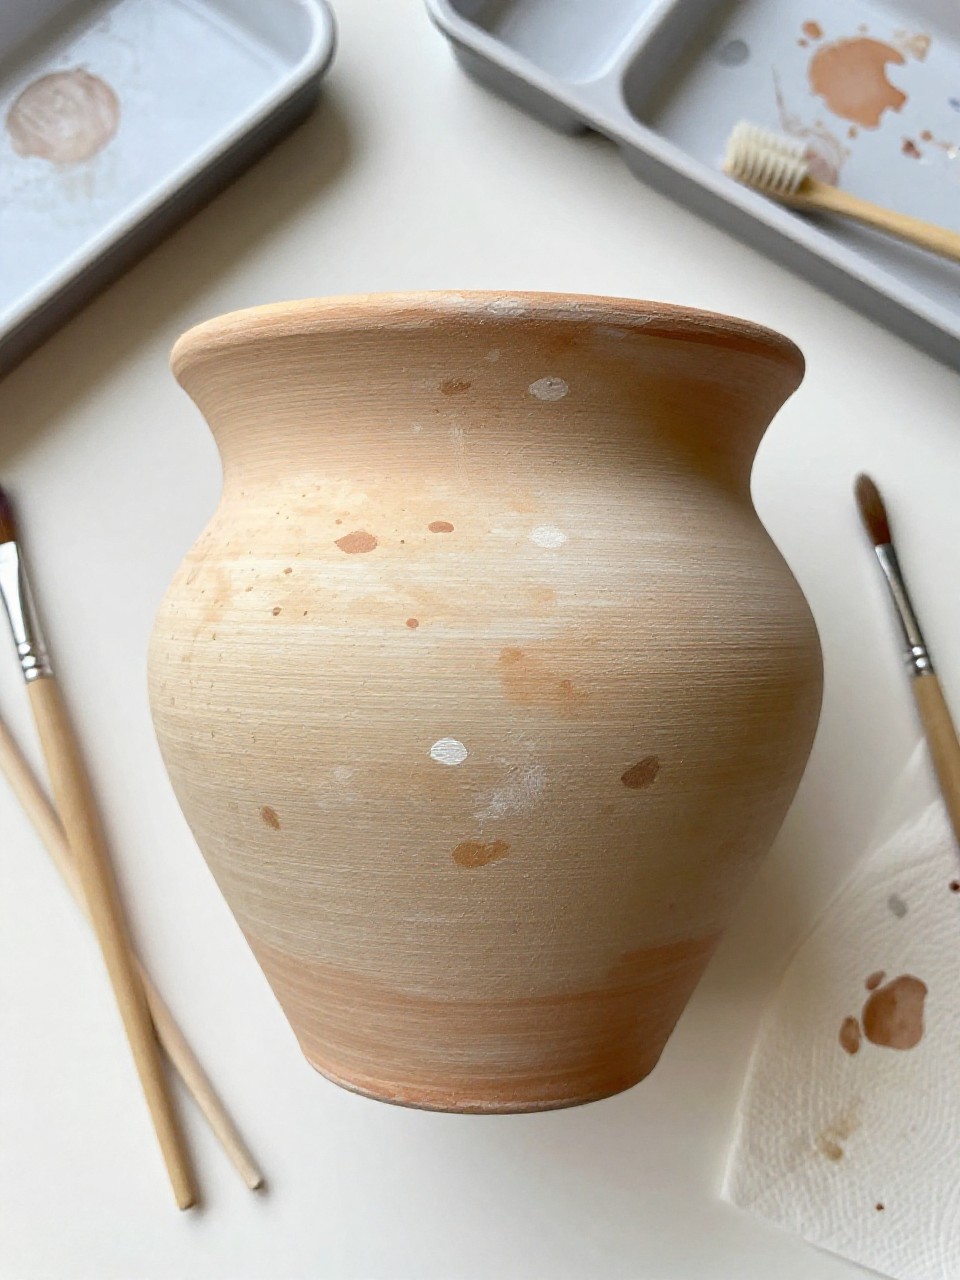
This pot looks like warm sandstone, with tiny speckles and gentle color variation across the surface. It’s a relaxing project because you dab and flick paint instead of worrying about perfect lines. It’s great for beginners and looks pretty next to real plants and natural wood decor.
Materials Needed:
- Earthen terracotta pot
- Acrylic paint (warm beige, brown, white)
- Paintbrushes in multiple sizes
- Palette or paint tray
- Old toothbrush (for speckles)
- Optional matte sealer
Steps to Make:
- Dust off the pot and paint a thin beige base coat.
- Mix a slightly darker tan and dry-brush it lightly to create soft patches.
- Dip a toothbrush in brown paint and flick tiny speckles onto the pot.
- Add a few white speckles for depth, keeping it uneven and natural.
- Let dry completely, then seal with a matte finish if desired.
3. Simple Wildflower Meadow Pot
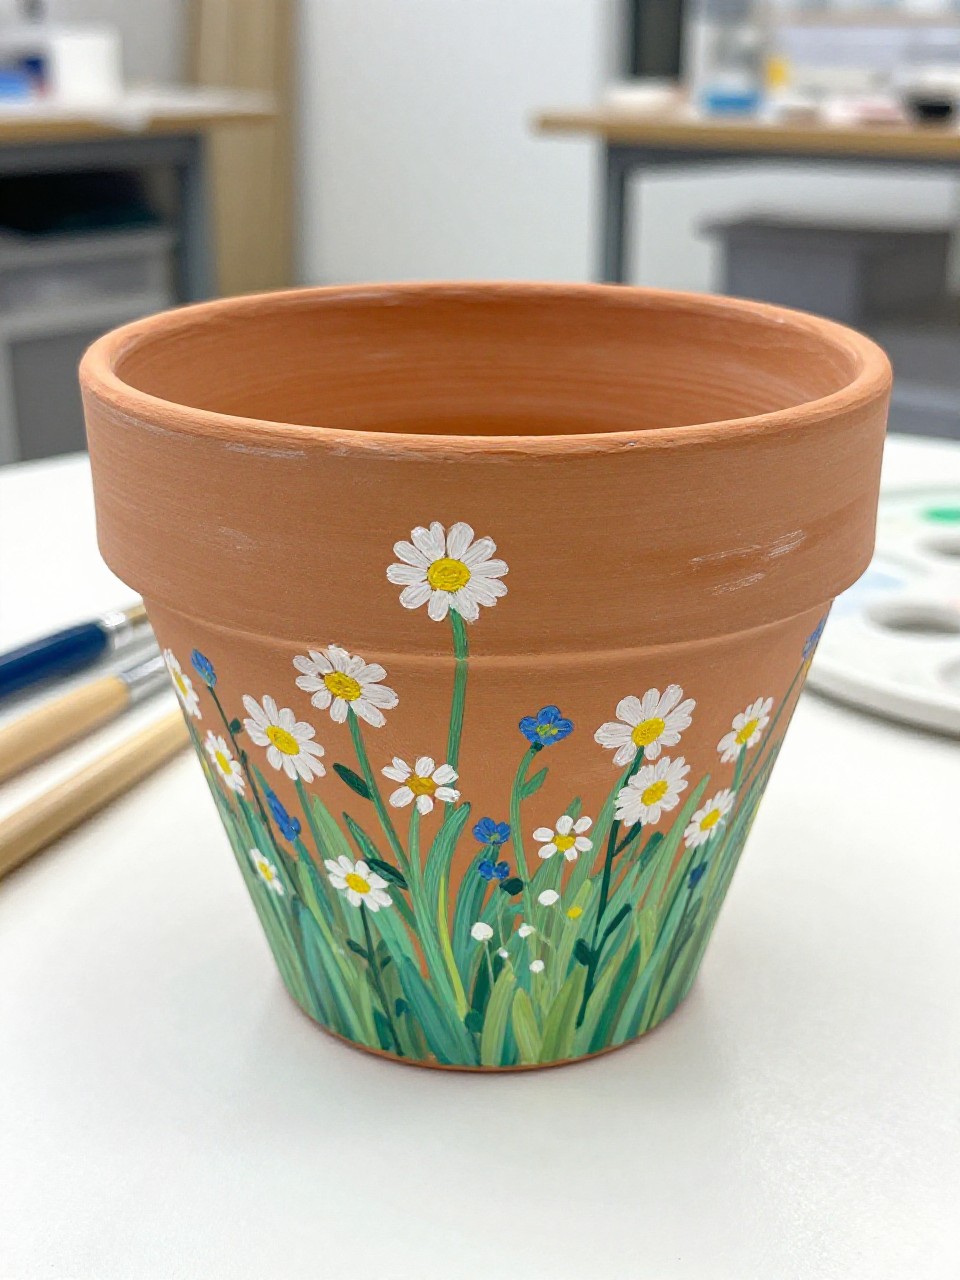
The finished pot shows small wildflowers—daisies, dots, and tiny stems—circling the pot like a mini meadow. It feels calming because you build the flowers one by one, and every little mark adds charm. It’s perfect for beginners who want something cute but not complicated.
Materials Needed:
- Earthen terracotta pot
- Acrylic paint (white, yellow, green, light blue)
- Paintbrushes in multiple sizes
- Palette or paint tray
- Optional clear sealer
Steps to Make:
- Clean the pot and decide if you want to leave some terracotta showing.
- Paint thin green stems that curve around the pot’s surface.
- Add small flower heads with white petals and yellow centers.
- Dot in tiny blue buds and extra leaves to fill empty spaces.
- Let dry, then seal lightly to protect the design.
4. Earthy Ombre Sunset Pot
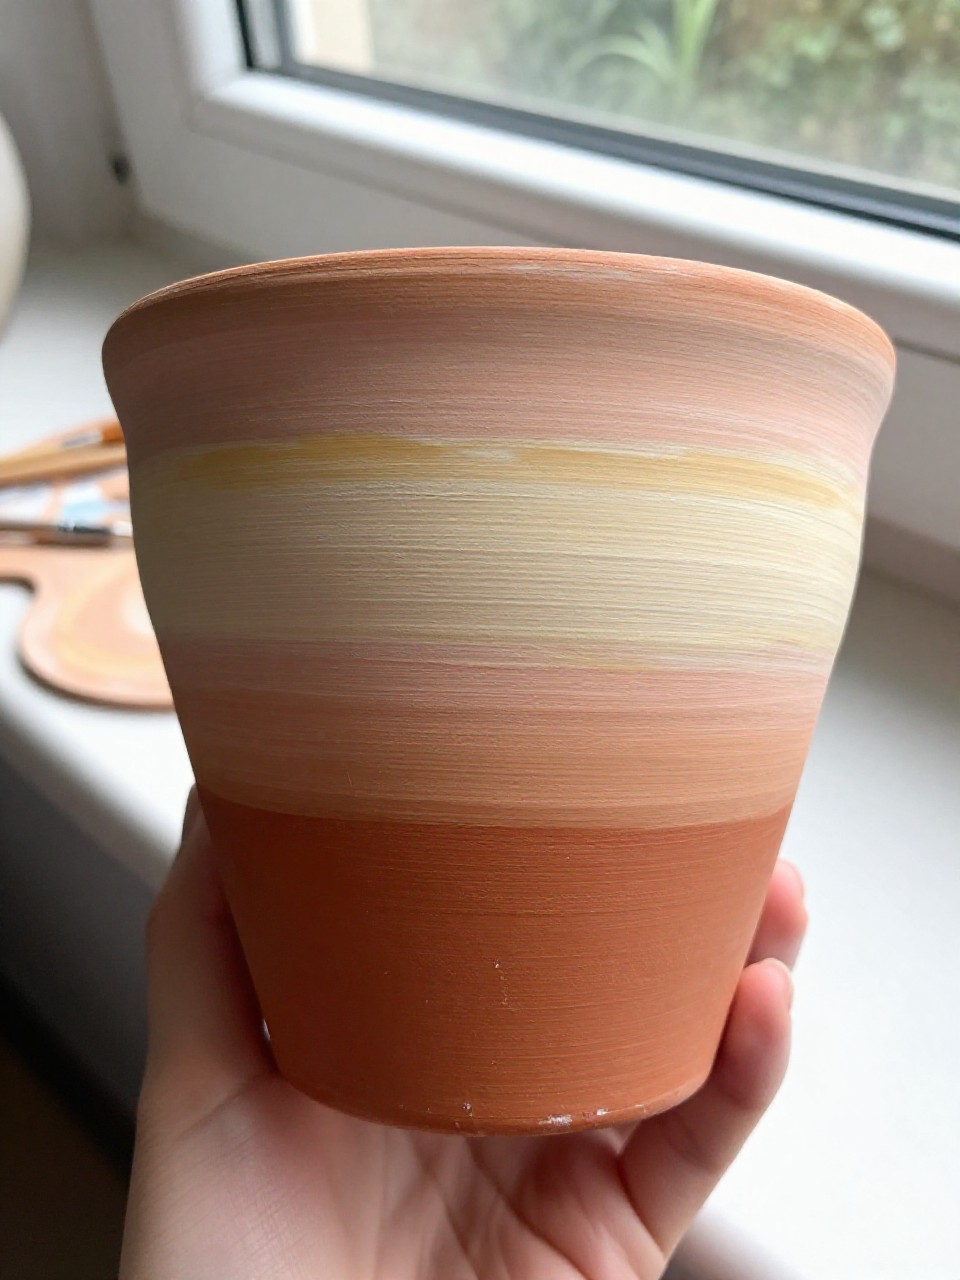
This earthen pot fades from clay red to soft peach and then to warm cream near the rim, like a quiet sunset. It’s satisfying because blending paint on a curved pot feels smooth and slow, almost like meditation. Beginners can do it easily with a sponge or a wide brush.
Materials Needed:
- Earthen terracotta pot
- Acrylic paint (rust, peach, cream)
- Paintbrushes in multiple sizes
- Palette or paint tray
- Sponge (optional for blending)
- Optional sealer or varnish
Steps to Make:
- Wipe the pot clean and lightly dampen a sponge if using one.
- Paint the bottom third in rust, keeping the coat thin.
- Add peach in the middle and blend where the colors meet.
- Paint the top in cream and blend down into the peach softly.
- Let dry fully and seal to keep the gradient looking smooth.
5. Minimal Line Mountain Range Pot
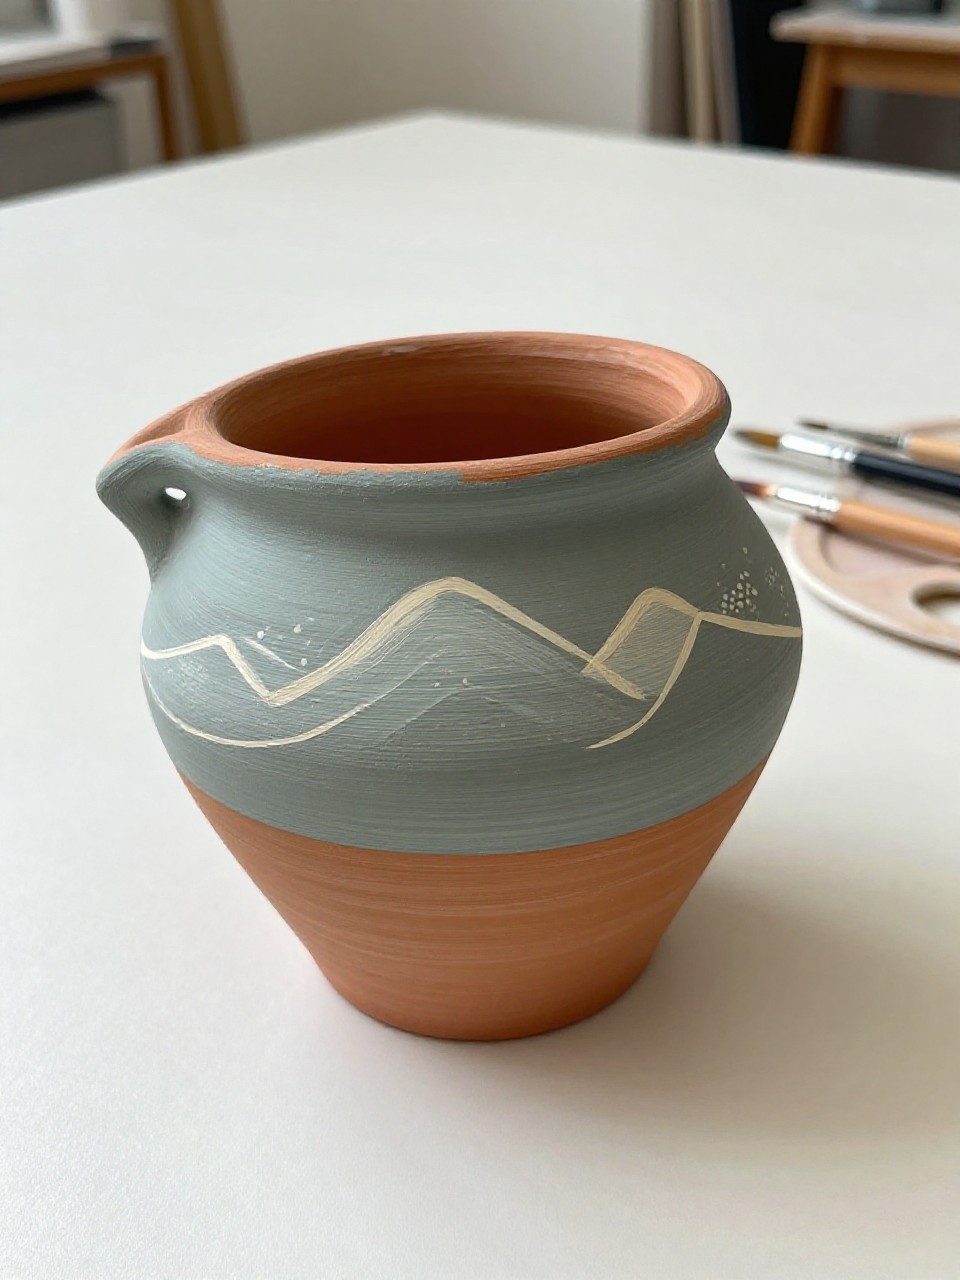
This pot has a simple mountain line wrapping around it in muted gray-green, with tiny dot “stones” scattered below. It’s great for a calm, modern look without needing lots of detail. Beginners love it because it uses slow, steady lines and small repeating dots.
Materials Needed:
- Earthen terracotta pot
- Acrylic paint (gray-green, off-white)
- Paintbrushes in multiple sizes
- Palette or paint tray
- Optional matte sealer
Steps to Make:
- Clean the pot and lightly pencil a horizon line if you want guidance.
- Paint a single mountain range line around the pot, following the curve.
- Fill a few mountain peaks with thin off-white patches for contrast.
- Add small dot clusters underneath like pebbles or gravel.
- Dry fully and seal with matte sealer for a natural finish.
6. Pressed-Leaf Silhouette Pot
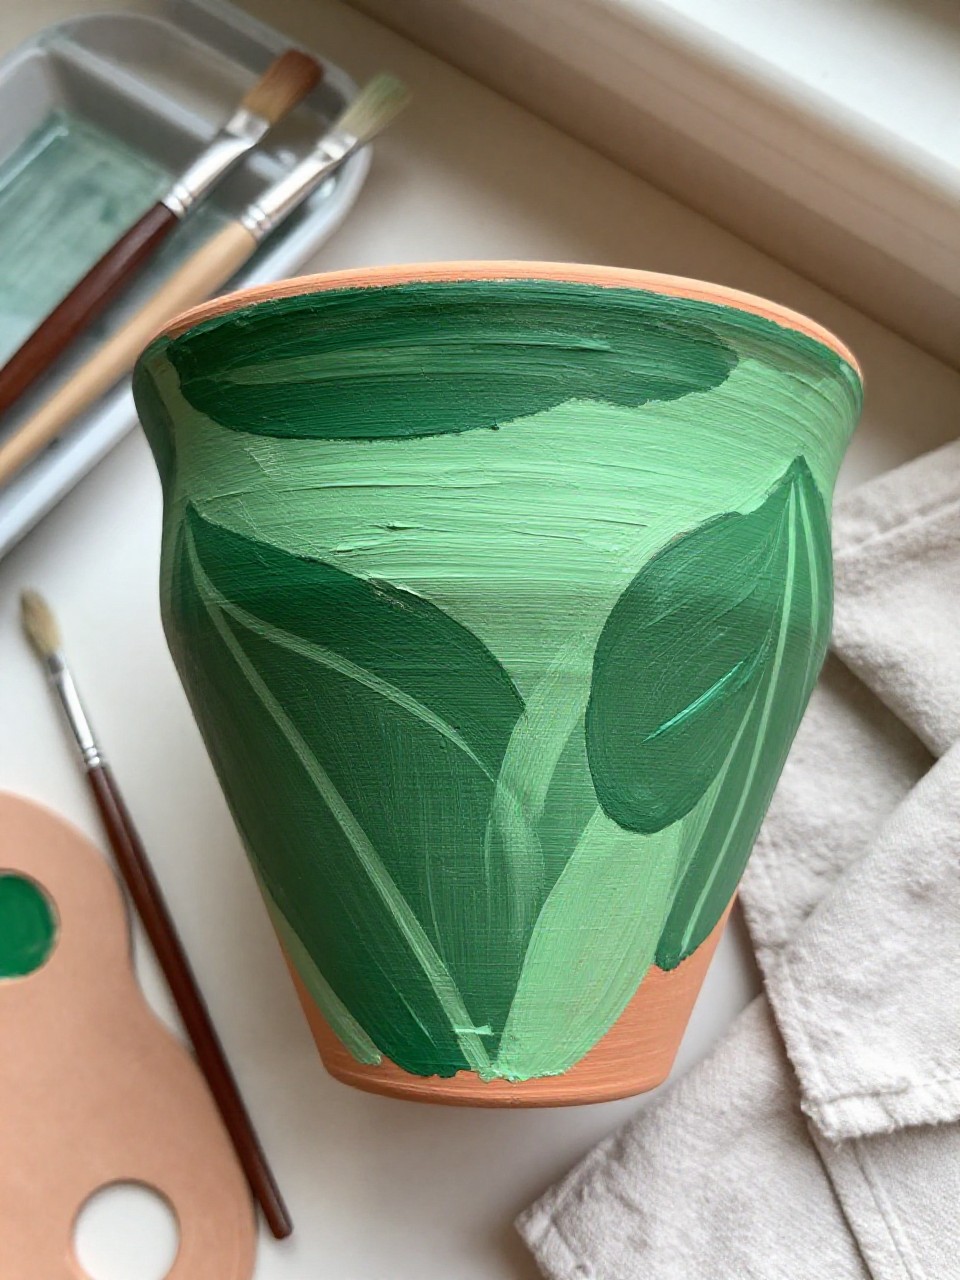
The finished pot has leafy silhouettes painted in deep green, spaced like real leaves you might press in a book. This project feels peaceful because you can work slowly and focus on simple shapes. It’s beginner-friendly since leaf outlines look good even with a few imperfect edges.
Materials Needed:
- Earthen terracotta pot
- Acrylic paint (deep green, light green)
- Paintbrushes in multiple sizes
- Palette or paint tray
- Optional sealer or varnish
Steps to Make:
- Wipe the pot clean and choose a few leaf shapes to repeat.
- Paint leaf silhouettes around the pot, leaving terracotta as the background.
- Add a lighter green vein line through the center of each leaf.
- Layer a second coat on a few leaves for deeper, textured color.
- Let dry, then seal to protect the painted silhouettes.
7. Natural Clay Dip-Dye Rim Pot
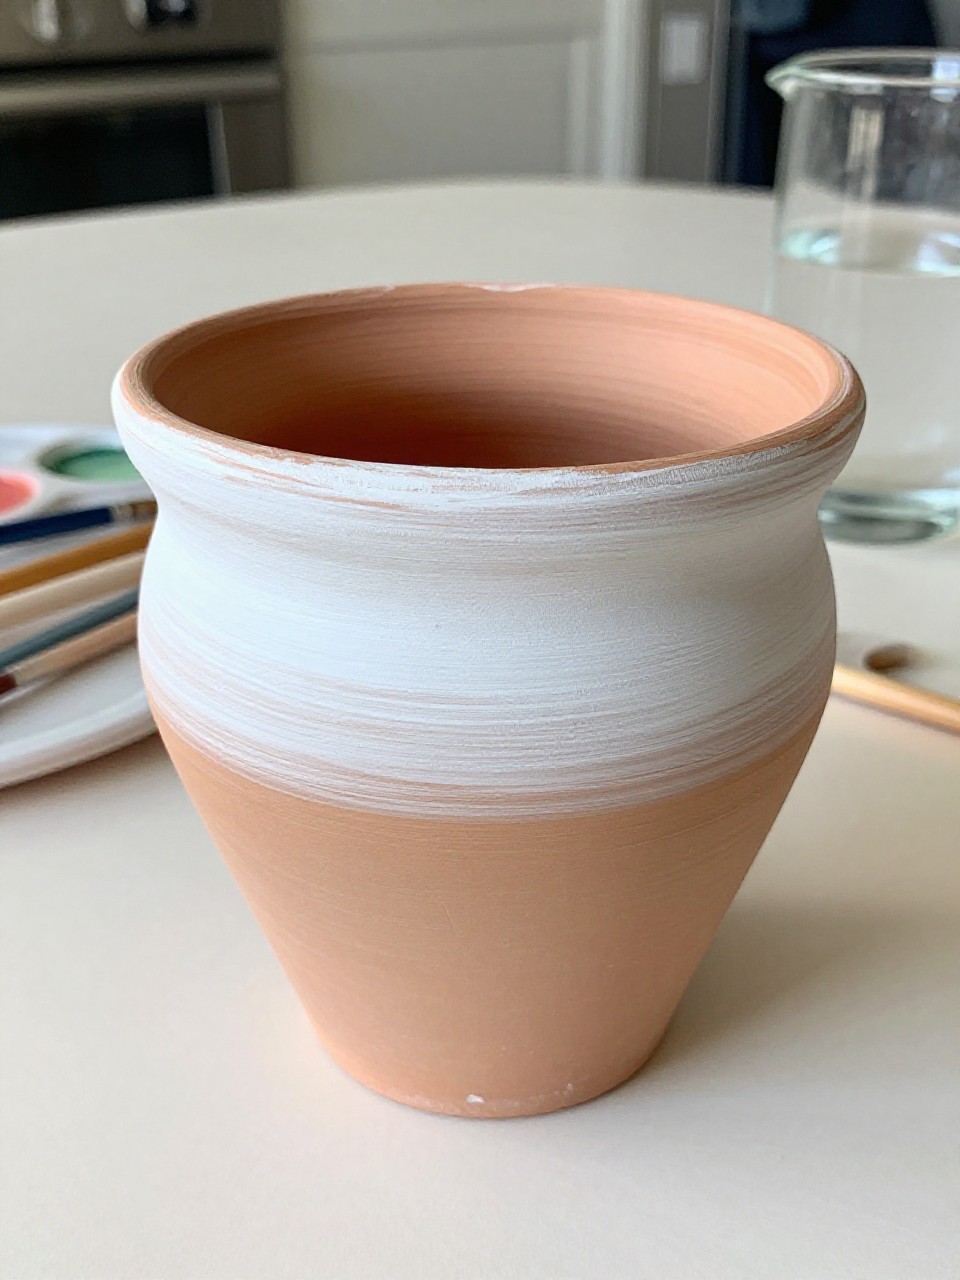
This pot looks mostly raw and earthy, with just the top portion “dip-dyed” in a soft whitewash that fades downward. It’s satisfying because it’s quick, simple, and still looks stylish. Beginners can do it easily, and the raw terracotta texture stays the star.
Materials Needed:
- Earthen terracotta pot
- Acrylic paint (white, a touch of beige)
- Paintbrushes in multiple sizes
- Palette or paint tray
- Optional matte sealer
Steps to Make:
- Clean the pot and decide how far down you want the dip line.
- Mix white paint with a small amount of water for a whitewash look.
- Paint the rim area and drag the brush downward in uneven strokes.
- Lightly dry-brush a few areas to help the fade look natural.
- Let dry and seal lightly, keeping the finish matte.
8. Pebble Path Dot Mandala Pot
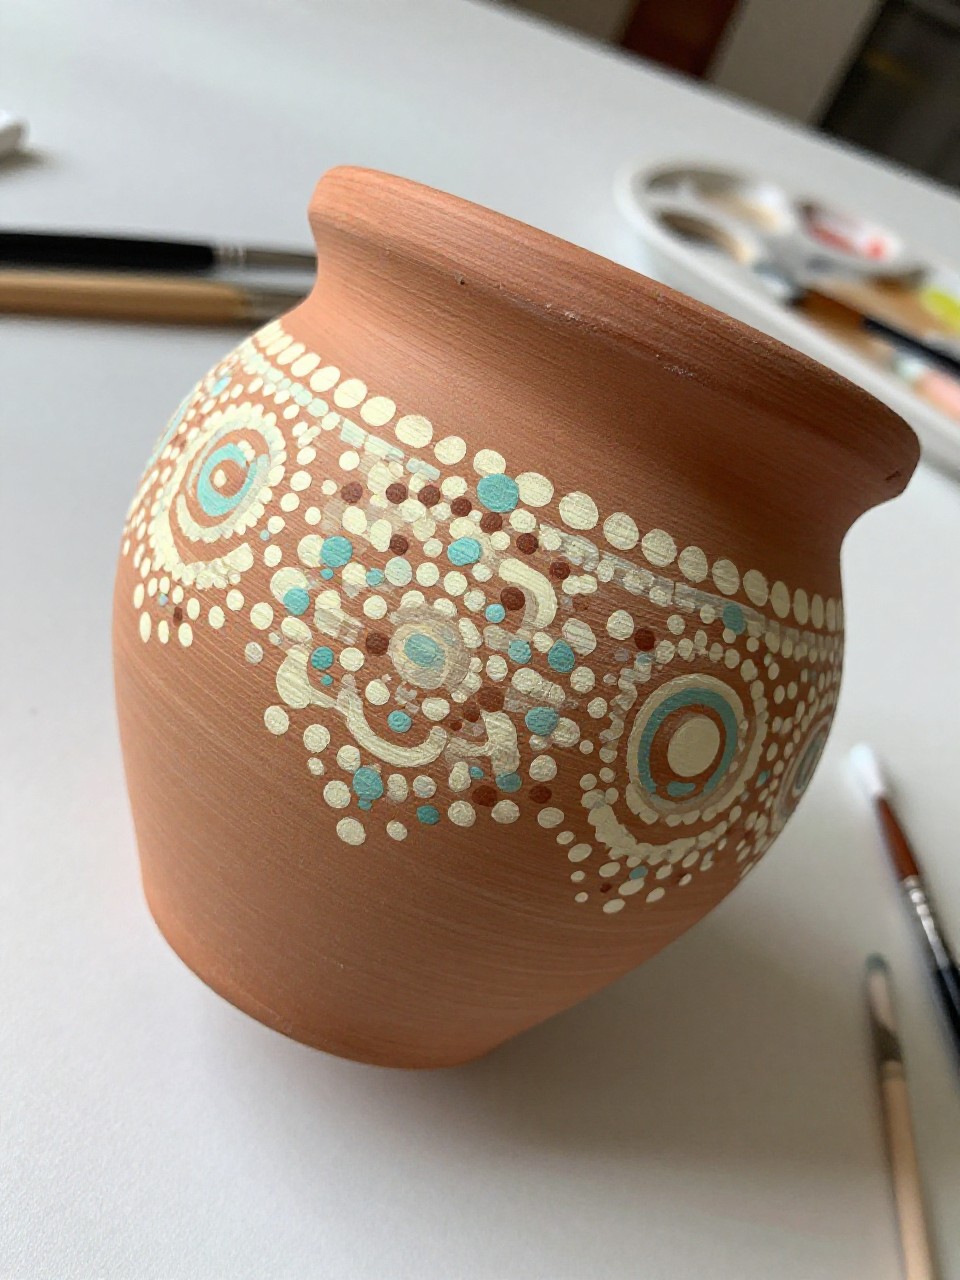
The finished pot has a simple mandala-style dot pattern that looks like tiny pebbles arranged in rings around the pot. It’s a relaxing project because you repeat dots slowly, and the pattern grows step by step. Beginners can keep it easy by using only two or three earthy colors.
Materials Needed:
- Earthen terracotta pot
- Acrylic paint (brown, cream, muted teal)
- Paintbrushes in multiple sizes
- Palette or paint tray
- Cotton swabs or dotting tool
- Optional sealer or varnish
Steps to Make:
- Wipe the pot clean and mark a center point on one side.
- Dot a small circle of cream dots, keeping spacing loose and natural.
- Build outward with larger brown and teal dots in simple rings.
- Add a few tiny filler dots between rings to balance the pattern.
- Dry fully and seal so the raised dots stay protected.
9. Soft Sage Geometric Blocks Pot
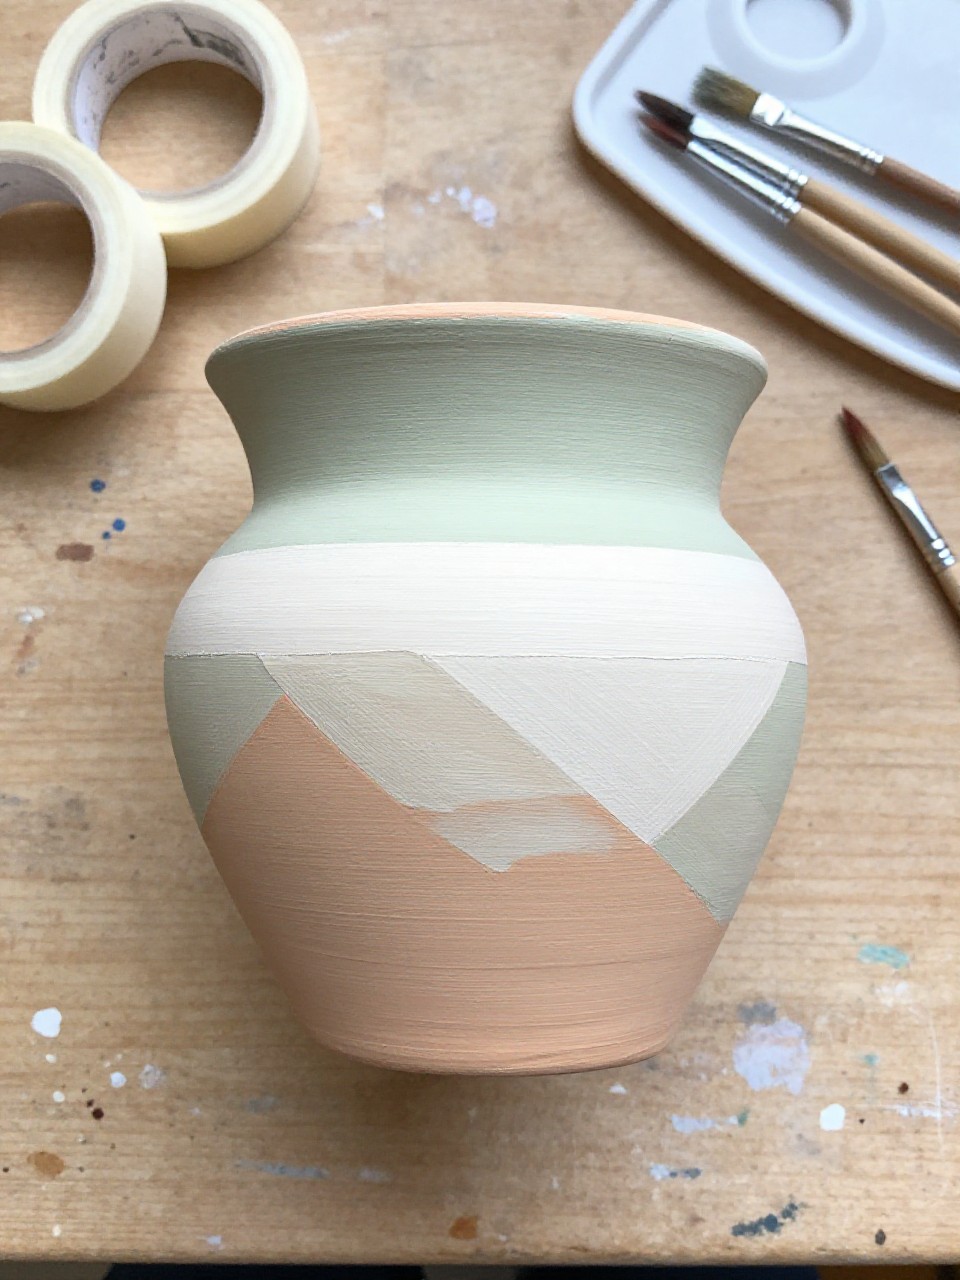
This pot features calm geometric blocks—rectangles and triangles—in sage, sand, and off-white, painted to fit the pot’s curve. It’s satisfying because you can tape off shapes and reveal crisp edges at the end. Beginners enjoy it since the design is simple, but it still looks modern and clean.
Materials Needed:
- Earthen terracotta pot
- Acrylic paint (sage, sand, off-white)
- Paintbrushes in multiple sizes
- Palette or paint tray
- Painter’s tape
- Optional matte sealer
Steps to Make:
- Clean the pot and apply painter’s tape to form a few large shapes.
- Paint each taped section with a different earthy color.
- Let the paint set for a few minutes, then carefully peel the tape.
- Touch up edges with a small brush where needed.
- Dry completely and seal with a matte coat for a soft finish.
10. Tiny Mushrooms and Moss Pot
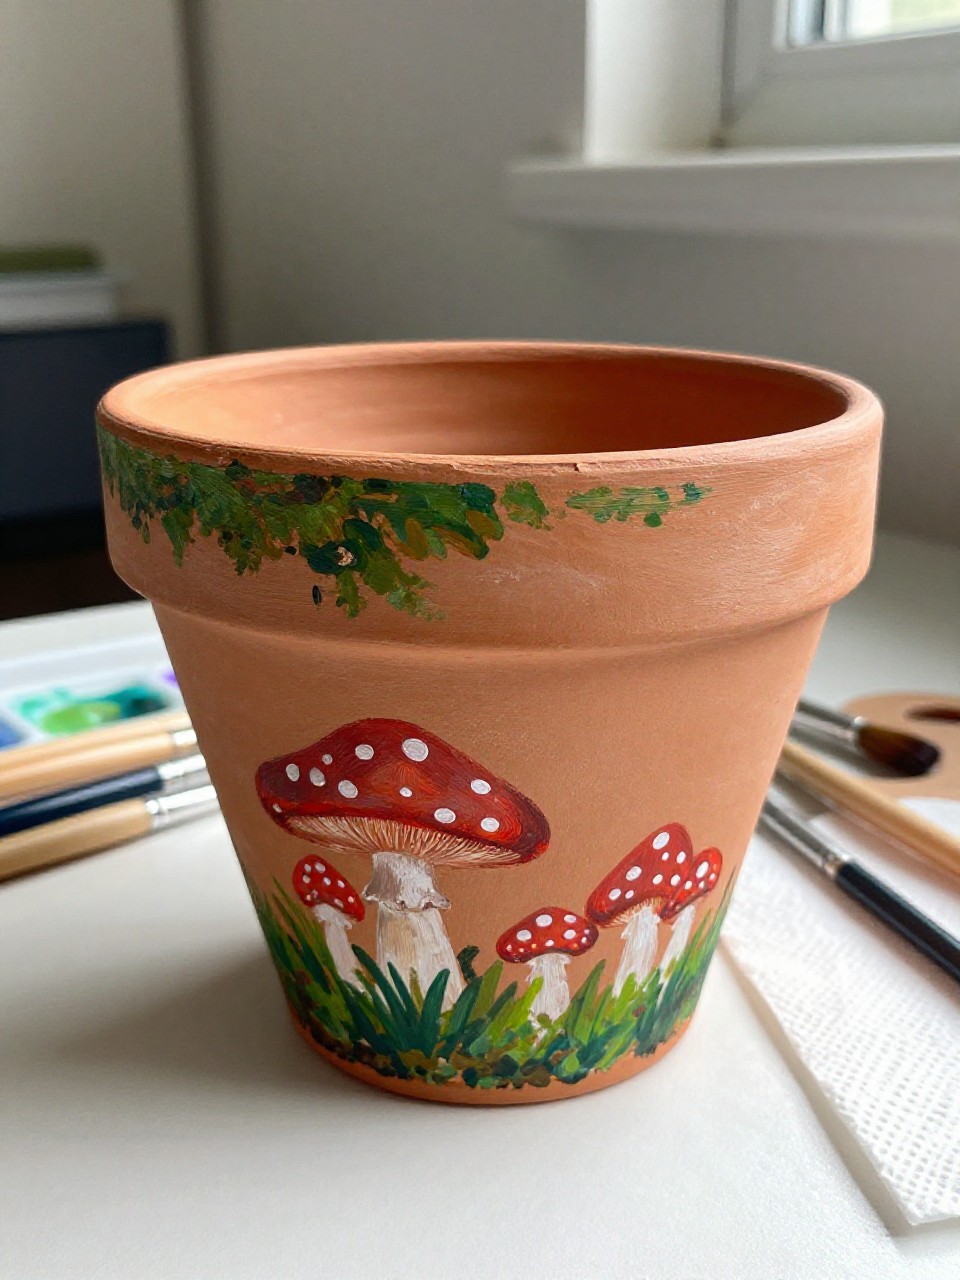
The finished pot shows small red-capped mushrooms and soft green moss patches wrapping around the base like a forest floor. It’s a cozy, storybook-style project that still feels natural because the colors are earthy. Beginners can keep it simple by painting basic mushroom shapes and adding dots for charm.
Materials Needed:
- Earthen terracotta pot
- Acrylic paint (rust red, white, dark brown, moss green)
- Paintbrushes in multiple sizes
- Palette or paint tray
- Optional sealer or varnish
Steps to Make:
- Wipe the pot clean and paint a few mossy green patches near the bottom.
- Add rounded mushroom caps in rust red on top of thin brown stems.
- Dot white spots on the caps and add a few darker shadows under them.
- Dry-brush a little green over the moss patches for texture.
- Let dry fully and seal to protect the woodland details.
11. Eucalyptus Stem Wraparound Pot
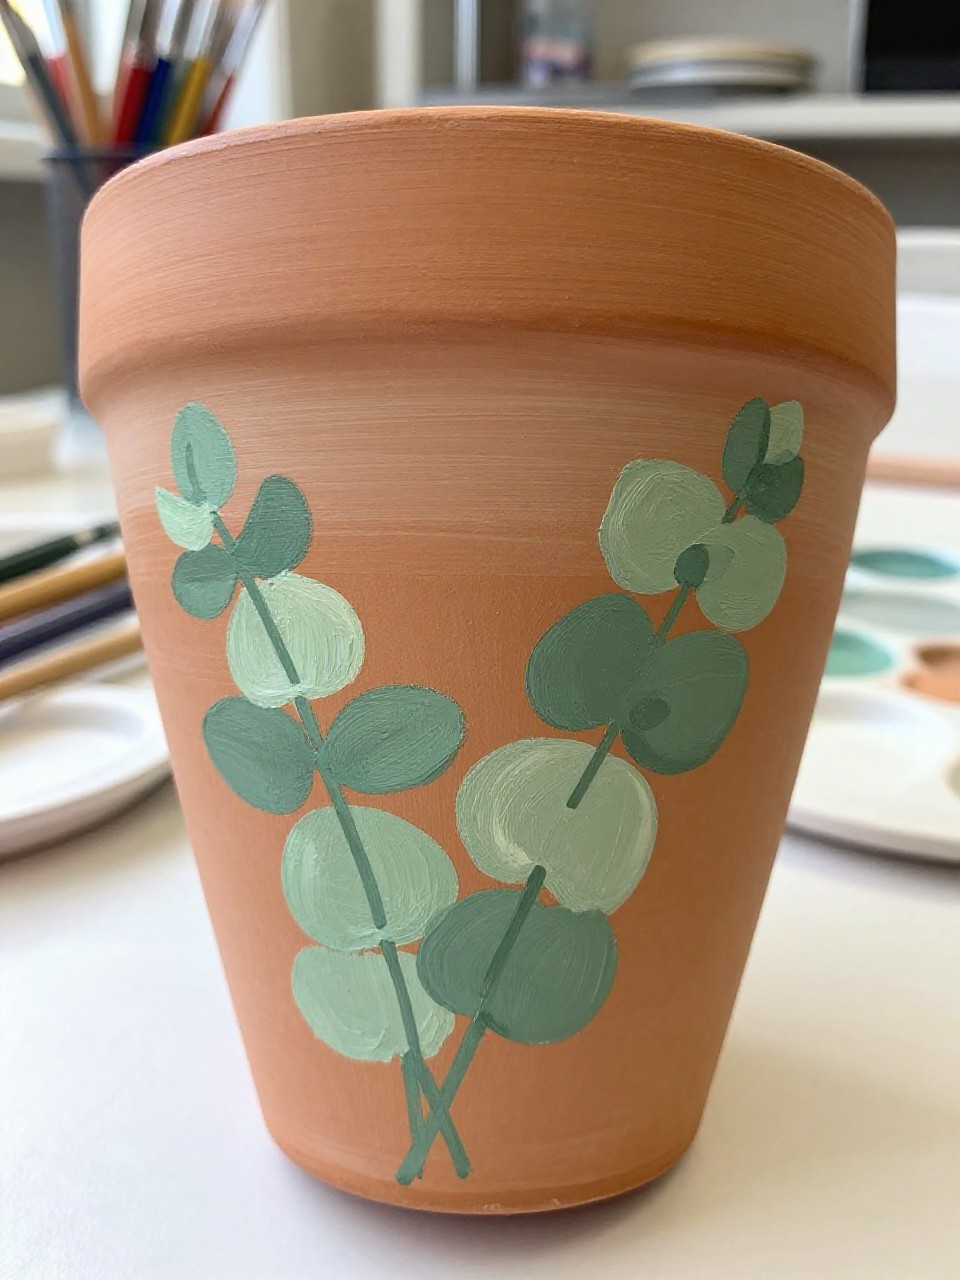
This pot has long eucalyptus stems painted in dusty green, curving gently around the pot with small rounded leaves. It’s soothing to make because the brush strokes can stay loose and natural, like watercolor but with acrylic paint. Beginners will like it since each leaf is just a simple oval shape.
Materials Needed:
- Earthen terracotta pot
- Acrylic paint (dusty green, gray, off-white)
- Paintbrushes in multiple sizes
- Palette or paint tray
- Optional matte sealer
Steps to Make:
- Clean the pot and lightly sketch a few curved stem lines.
- Paint the stems in a gray-green tone, following the pot’s curve.
- Add oval leaves along the stems, turning them at different angles.
- Layer a lighter off-white highlight on a few leaves for depth.
- Let dry and seal with matte sealer for a soft, natural look.
12. Desert Cactus Outline Pot
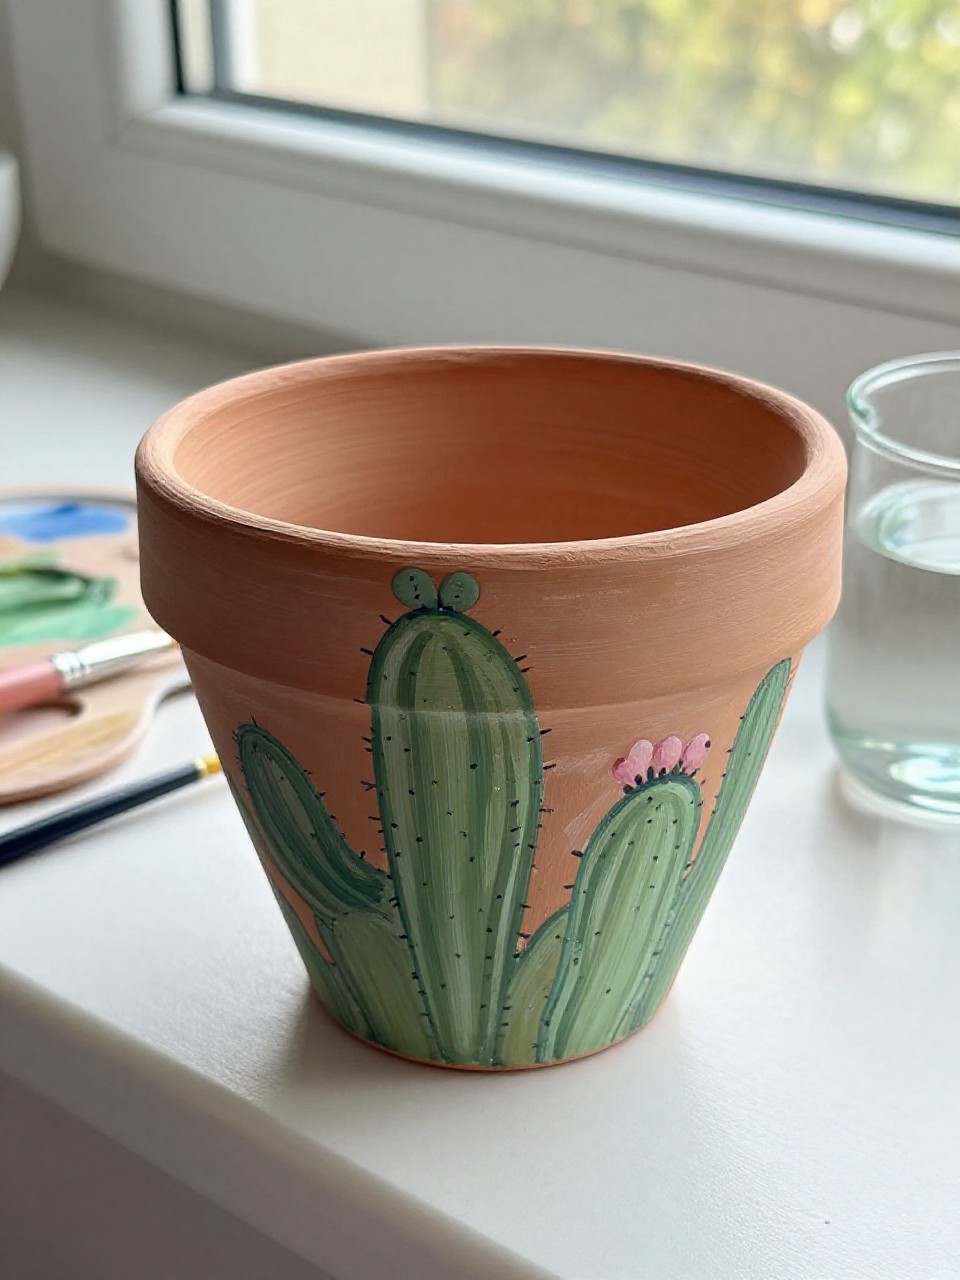
The finished pot shows simple cactus outlines in muted green, with tiny hatch marks for texture and a few small blooms. It’s a great beginner project because outlines are forgiving, and you can keep the design minimal. It also makes cute decor for a windowsill with real succulents.
Materials Needed:
- Earthen terracotta pot
- Acrylic paint (muted green, pink, white)
- Paintbrushes in multiple sizes
- Palette or paint tray
- Optional sealer or varnish
Steps to Make:
- Wipe the pot clean and choose 3–5 cactus shapes to repeat around it.
- Paint simple cactus outlines, letting the terracotta show inside.
- Add small hatch marks or dots along one side for texture.
- Paint tiny pink blooms on a couple of cactus tops.
- Dry fully and seal so the outlines don’t scuff over time.
13. River Rock Stripes Pot
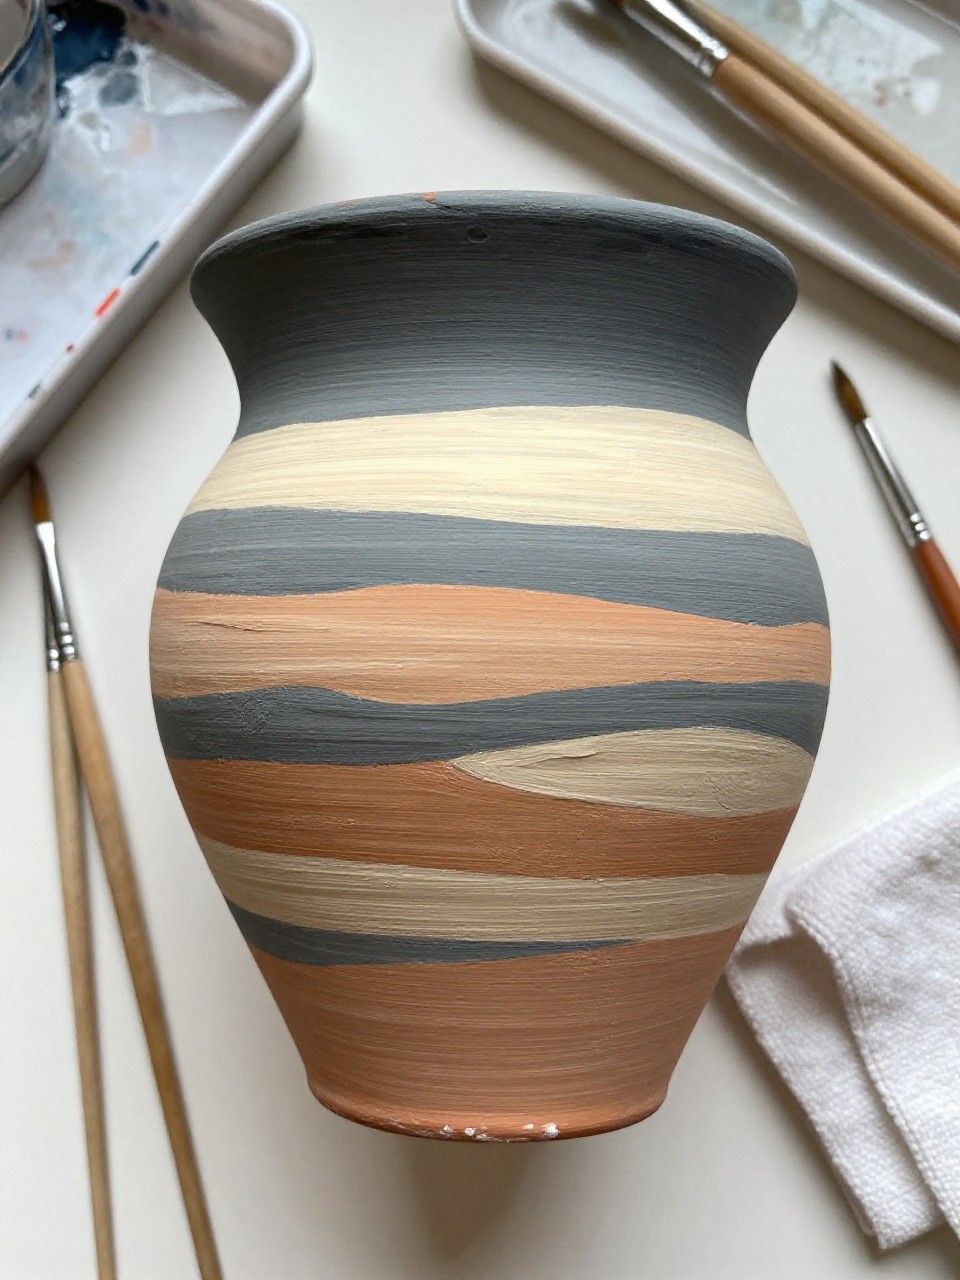
This earthen pot has uneven horizontal stripes in rock-like colors—charcoal, warm gray, sand, and cream—stacked like layers of river stones. It’s satisfying because you don’t have to make the stripes perfect; wobbly lines feel more natural. Beginners can practice steady brush control without complex drawing.
Materials Needed:
- Earthen terracotta pot
- Acrylic paint (charcoal, warm gray, sand, cream)
- Paintbrushes in multiple sizes
- Palette or paint tray
- Optional matte sealer
Steps to Make:
- Clean the pot and pick 3–4 stripe colors that feel earthy.
- Paint a thick stripe around the bottom, letting edges stay slightly uneven.
- Add more stripes above it, varying widths as you go.
- Dry-brush a little lighter color on some stripes for stone-like texture.
- Let dry and seal with matte sealer to keep the look natural.
14. Pine Tree Silhouette Pot
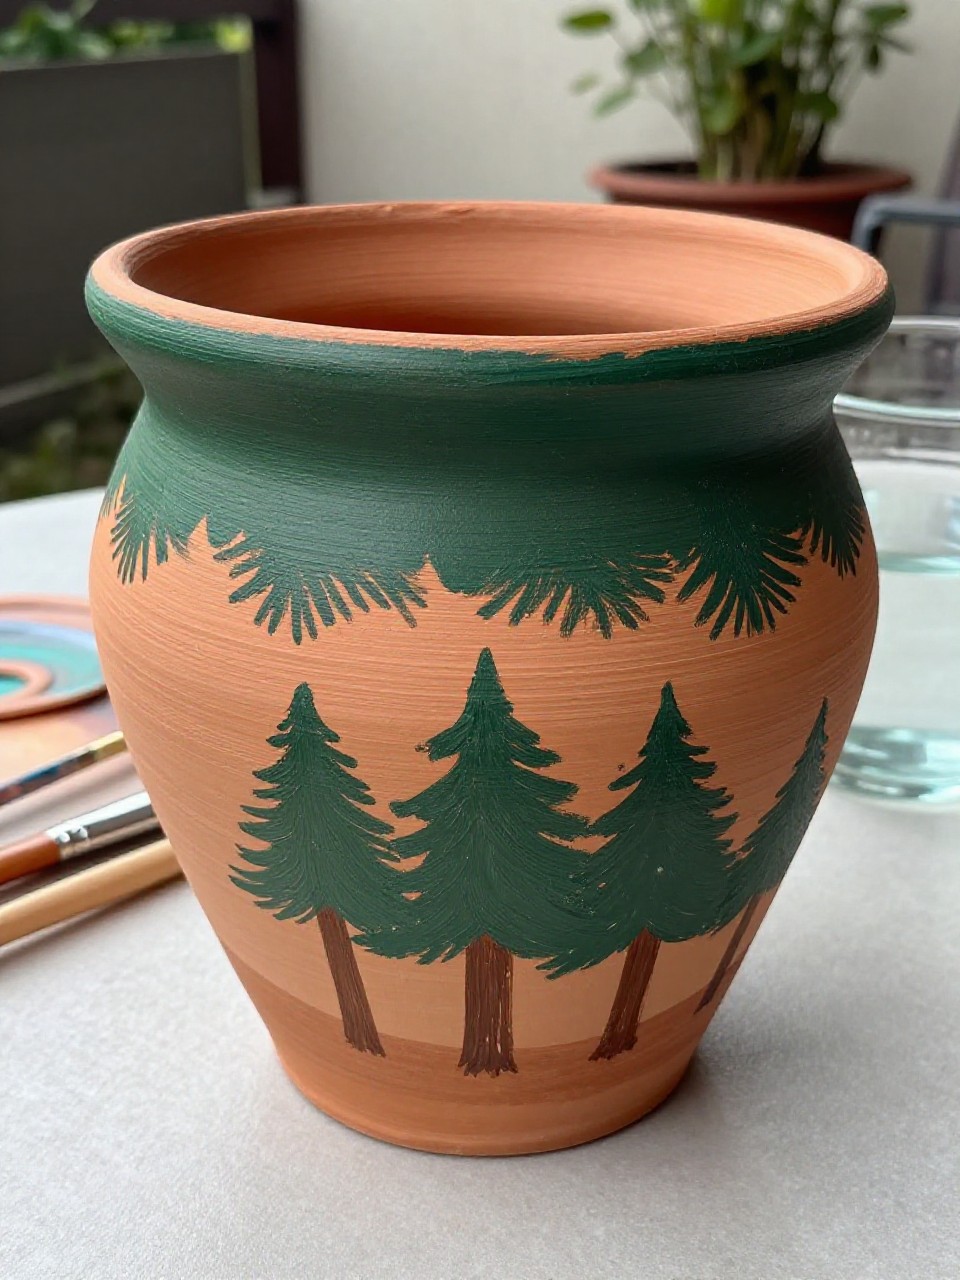
The finished pot shows a row of simple pine tree silhouettes around the base, like a quiet forest line. It’s a calming project because you repeat the same tree shape and watch the scene grow around the pot. Beginners can keep the trees basic, and the natural terracotta background does most of the work.
Materials Needed:
- Earthen terracotta pot
- Acrylic paint (dark green, brown)
- Paintbrushes in multiple sizes
- Palette or paint tray
- Optional sealer or varnish
Steps to Make:
- Wipe the pot clean and decide where the tree line will sit.
- Paint thin brown trunks spaced around the pot’s base.
- Add triangle-like pine branches with quick downward strokes.
- Layer a second dark-green coat on a few trees for depth and texture.
- Let dry fully and seal to protect the silhouettes.
15. Honeycomb Bees and Pollen Pot
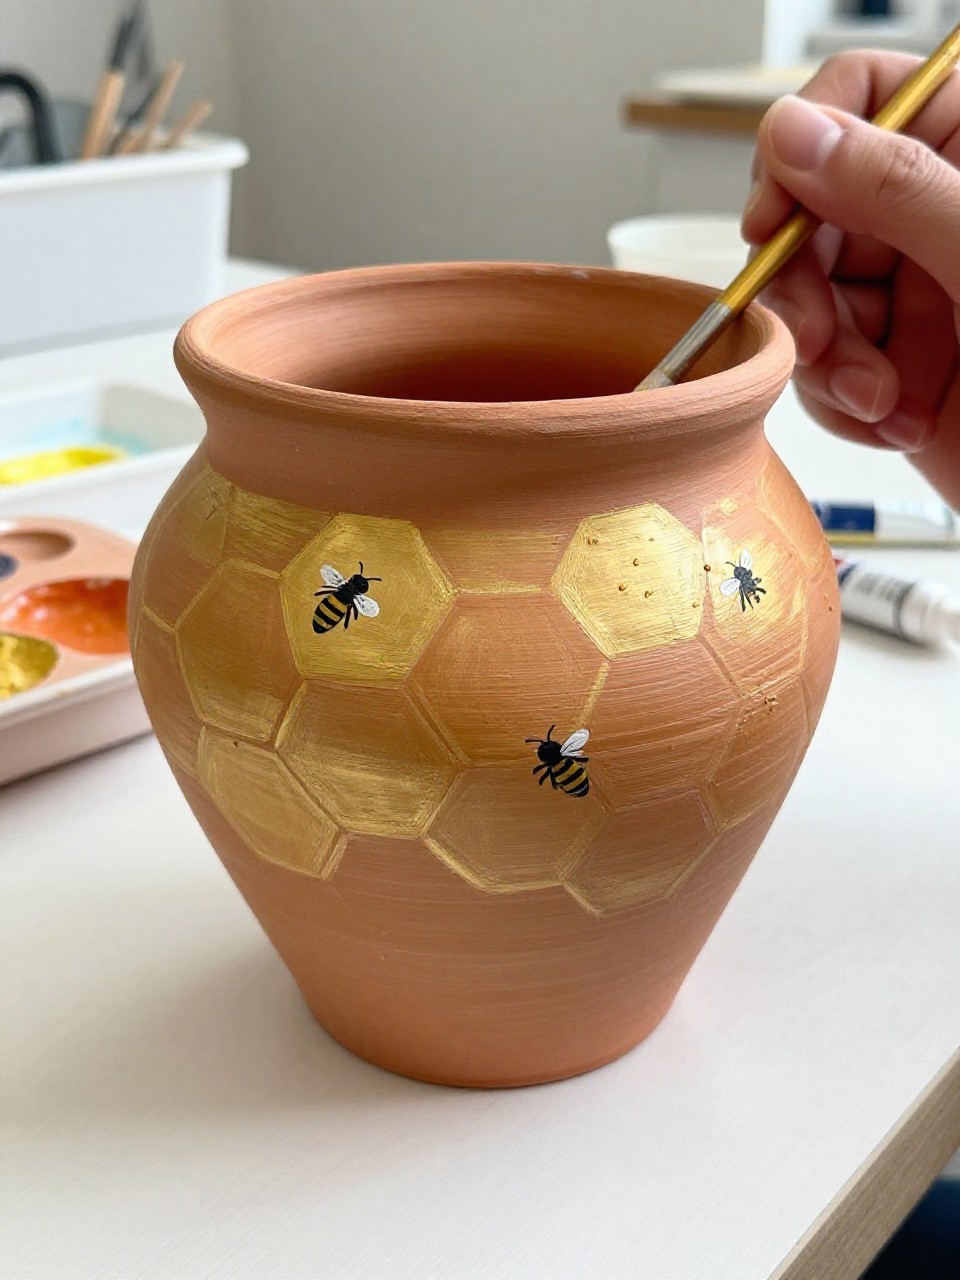
This finished pot has soft honeycomb shapes in warm gold, with a few tiny bees flying around and little pollen dots. It’s fun and relaxing because you paint simple hexagons and add small details when you feel ready. Beginners can make it as minimal as they want while still getting a cheerful, natural look.
Materials Needed:
- Earthen terracotta pot
- Acrylic paint (warm gold, black, white)
- Paintbrushes in multiple sizes
- Palette or paint tray
- Optional sealer or varnish
Steps to Make:
- Clean the pot and lightly pencil a few connected hexagons on one side.
- Paint the honeycomb cells in warm gold, leaving small gaps between lines.
- Add tiny bees with simple oval bodies and quick wing strokes.
- Dot small pollen specks around the honeycomb to fill empty space.
- Let dry and seal so the small details stay crisp.