Table of Contents Show
Painting bottles is one of those calm DIY projects that feels easy to start, but it can still look really beautiful when you’re done. If you’ve ever saved glass bottles “just in case” and then didn’t know what to do with them, this list is for you.

These ideas are beginner-friendly, relaxing to paint, and perfect for adding handmade decor to shelves, windowsills, and gift baskets.
Let’s turn those empty bottles into something you actually want to display.
1. Frosted Ombré Glass Bottle Vase

The finished bottle fades from one soft color to another, with a cloudy “sea-glass” look that still shows a little light through. It’s satisfying because you don’t need perfect lines—blending is the whole point—so it’s great for beginners and makes simple flowers look extra pretty.
Materials Needed:
For People Who Love to Make Things ✂️
- Glass bottle (clean and dry)
- Frosted glass paint or acrylic paint mixed with a frosted medium
- Paintbrushes in multiple sizes
- Palette or paint tray
- Optional spray sealer or varnish
Steps to Make:
- Wash the bottle and wipe it with rubbing alcohol so paint sticks well.
- Choose two or three colors and pour small amounts onto a palette.
- Paint the lightest color near the top, then add the next color below it while the paint is still wet.
- Blend where the colors meet using light, overlapping brush strokes that follow the bottle’s curve.
- Let it dry fully, then seal lightly if you want a more durable finish.
2. Wildflower Meadow Bottle Centerpiece

This bottle looks like a tiny wildflower field wrapping all the way around—small daisies, dots, and leafy stems on a soft background. It’s relaxing because you can build the flowers slowly, and it’s perfect for anyone who wants cheerful handmade decor without needing advanced drawing skills.
Materials Needed:
- Glass bottle (clean and dry)
- Acrylic paint (multi-color)
- Paintbrushes in multiple sizes
- Palette or paint tray
- Optional clear varnish
Steps to Make:
- Clean the bottle well and let it dry completely.
- Paint a light base color (like cream or pale sky blue) and let it dry.
- Use a small brush to add thin green stems that curve with the bottle shape.
- Dot in simple flower heads with the end of a brush handle, then add tiny centers.
- Dry fully and seal if the bottle will be handled often.
3. Bold Color-Blocked Bottle Trio

These bottles have clean blocks of color—like terracotta, mustard, and white—stacked in simple bands that follow the curve. It’s great for beginners because you can tape the sections and focus on smooth painting, and it looks modern on a shelf as a matching set.
Materials Needed:
- 3 glass bottles (similar size)
- Acrylic paint
- Paintbrushes in multiple sizes
- Palette or paint tray
- Optional sealer or varnish
- Painter’s tape
Steps to Make:
- Wash the bottles and remove any label glue with warm soapy water.
- Use painter’s tape to mark off wide bands around each bottle.
- Paint each section with two coats, letting the first coat dry in between.
- Peel the tape off slowly to reveal crisp edges, then touch up small spots by hand.
- Let the bottles cure overnight, then seal for extra protection.
4. Starry Night Speckled Wine Bottle

The bottle looks like a night sky with deep navy paint, tiny white speckles, and a few brighter “stars” scattered around the curve. This is a relaxing project because splattering and dotting are forgiving, and it makes a pretty piece for cozy corners or a bedside table.
Materials Needed:
- Glass wine bottle
- Acrylic paint (navy, black, white)
- Paintbrushes in multiple sizes
- Palette or paint tray
- Optional glossy varnish
Steps to Make:
- Clean and dry the bottle, then paint the whole bottle dark navy as your base.
- While the base dries, mix a slightly lighter blue and add soft patches for depth.
- Dip a stiff brush in thinned white paint and flick tiny speckles onto the bottle.
- Add a few larger stars with a small brush tip, varying sizes for a natural look.
- Dry completely and seal with a glossy topcoat if you want it to shine.
5. Lemon Branch Kitchen Bottle Decor

This bottle has bright lemons and dark green leaves painted in a simple, bold style that feels fresh and sunny. It’s especially satisfying if you like kitchen crafts, because the shapes are easy to repeat, and the finished bottle looks great near a fruit bowl or open shelving.
Materials Needed:
- Glass bottle
- Acrylic paint (yellow, green, white)
- Paintbrushes in multiple sizes
- Palette or paint tray
- Optional sealer or varnish
Steps to Make:
- Clean the bottle and wipe it down so the surface is squeaky clean.
- Paint a thin white or pale cream base coat and let it dry.
- Add oval lemon shapes that wrap naturally around the bottle, leaving space between them.
- Paint leaves and thin branches, then add highlights and little dimples on each lemon.
- Let dry fully, then seal so the design stays bright.
6. Soft Pastel Polka Dot Bottle Set

These bottles are covered in hand-painted pastel dots—some perfect, some slightly uneven—in a way that looks playful and handmade. It’s perfect for beginners because dots are easy, and it’s a calming project you can do while listening to music or a podcast.
Materials Needed:
- Glass bottles (2–4)
- Acrylic paint (pastels)
- Paintbrushes in multiple sizes
- Palette or paint tray
- Optional clear varnish
Steps to Make:
- Wash and dry the bottles, then choose a light base color if you want.
- Use the end of a brush handle or a round brush tip to stamp dots around the bottle.
- Vary dot sizes and spacing so it feels natural and wraps with the curve.
- Layer a second color of dots after the first dots dry to avoid smearing.
- Dry overnight and seal for a smoother, wipeable finish.
7. Minimal White Line Art Bottle

This bottle features simple white line art—like a face, a leaf, or a continuous abstract shape—over a solid muted background. It feels satisfying because it’s slow and focused, and the finished bottle looks clean and modern even if your lines are a little wobbly.
Materials Needed:
- Glass bottle
- Acrylic paint (one background color + white)
- Paintbrushes in multiple sizes
- Palette or paint tray
- Optional sealer or varnish
Steps to Make:
- Clean the bottle and paint a solid base color, following the bottle’s curve with long strokes.
- Lightly sketch your line design with a pencil or a very thin brush.
- Paint the line art with white using a small liner brush, working slowly around the bottle.
- Add small thick-and-thin line changes to make it feel hand-drawn and organic.
- Let dry fully and seal if you plan to dust or wipe it often.
8. Boho Rainbow Arch Bottle Vase

The bottle shows stacked rainbow arches in warm earthy colors, painted in slightly uneven bands that make it feel handmade. This is a great beginner project because the shapes are simple, and it’s a happy, relaxing design that works in kids’ rooms, craft corners, or a sunny windowsill.
Materials Needed:
- Glass bottle
- Acrylic paint (earth tones + white)
- Paintbrushes in multiple sizes
- Palette or paint tray
- Optional clear varnish
Steps to Make:
- Clean and dry the bottle, then decide where the rainbow arches will sit.
- Paint the largest arch first, curving it to match the bottle’s rounded surface.
- Add smaller arches inside, leaving thin gaps so the layers stand out.
- Outline a few areas with a slightly darker shade for depth and a hand-painted look.
- Let it dry fully, then seal and style it with dried stems.
9. Undersea Coral Bottle Scene

This bottle looks like a little ocean world, with coral shapes climbing upward and tiny fish swimming around the curve. It’s fun and relaxing because you can make the sea life as simple as you want, and it’s a great decor piece for bathrooms or beach-themed rooms.
Materials Needed:
- Glass bottle
- Acrylic paint (teal, coral, white, navy)
- Paintbrushes in multiple sizes
- Palette or paint tray
- Optional sealer or varnish
Steps to Make:
- Clean the bottle and paint a teal-to-blue background, blending as you go.
- Sketch simple coral branches near the bottom and paint them in warm coral tones.
- Add small fish shapes that curve around the bottle so they look like they’re swimming.
- Dot in bubbles and tiny highlights with white for contrast and depth.
- Dry completely and seal to keep the colors crisp.
10. Sunflower Wraparound Bottle Vase
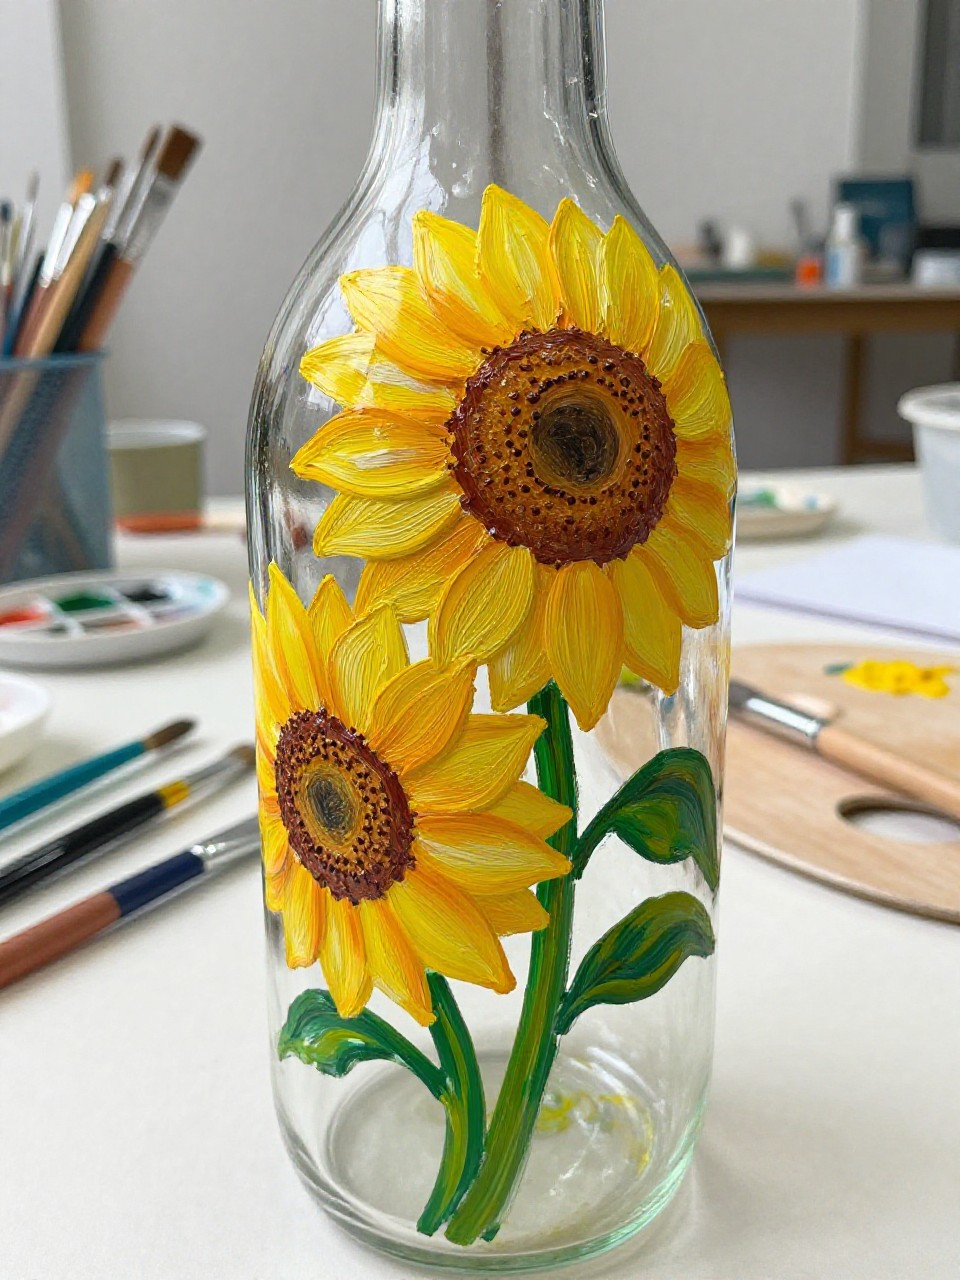
The bottle features big sunflowers with layered petals and dark centers, painted so the blooms wrap naturally around the glass. It’s satisfying because you build petals in layers, and the bright result feels cheerful even if your brushwork is simple and a little rustic.
Materials Needed:
- Glass bottle
- Acrylic paint (yellow, brown, green)
- Paintbrushes in multiple sizes
- Palette or paint tray
- Optional sealer or varnish
Steps to Make:
- Clean the bottle and paint a light background color if you want the flowers to pop.
- Block in round brown centers first, placing them around the bottle at different heights.
- Add sunflower petals with short brush strokes, layering lighter yellow on top.
- Paint green leaves and stems that connect the blooms around the curve.
- Let dry fully, then seal and display with fresh or faux flowers.
11. Rustic “Milk Bottle” Painted Glass Look

This bottle looks like an old farmhouse milk bottle with a soft white painted body and slightly distressed edges where hints of glass show through. It’s perfect for beginners because it’s mostly one color, and the imperfect, worn finish actually makes it look better.
Materials Needed:
- Glass bottle
- Chalk paint or matte acrylic paint (white)
- Paintbrushes in multiple sizes
- Palette or paint tray
- Optional matte sealer
Steps to Make:
- Clean the bottle and lightly scuff it with a scrubby sponge if it’s very glossy.
- Paint the bottle with white chalk paint using long strokes that follow the shape.
- When dry, add a second coat, leaving a few thin spots for a rustic look.
- Lightly dry-brush the edges and raised areas to create gentle distressing.
- Let cure and seal with a matte topcoat for a soft farmhouse finish.
12. Mandala Dot Art Bottle Lantern

The bottle is covered in dotted mandala rings that wrap around the glass, creating a slow, pretty pattern that looks amazing near a candle or fairy lights (used safely beside it). This project is soothing because dotting is repetitive and gentle, and beginners can keep it simple with just a few colors.
Materials Needed:
- Glass bottle
- Acrylic paint (2–4 colors)
- Paintbrushes in multiple sizes
- Palette or paint tray
- Optional clear varnish
- Dotting tools or the ends of brushes
Steps to Make:
- Clean the bottle and choose a base color, or leave the glass clear for a lighter look.
- Plan a center point on one side, then dot outward in curved rows that follow the bottle.
- Build the mandala with larger dots first, then fill gaps with smaller dots.
- Add a second mandala on the back or continue the pattern around the bottle.
- Dry fully and seal, then place it on a shelf near soft lighting.
13. Holiday Pine and Berries Bottle Decor

This bottle shows pine sprigs, red berries, and small white snow dots wrapping around the glass for a cozy winter look. It’s great for beginners because the pine needles can be quick flicked strokes, and it makes an easy handmade decoration for gift baskets or a holiday table.
Materials Needed:
- Glass bottle
- Acrylic paint (green, red, white)
- Paintbrushes in multiple sizes
- Palette or paint tray
- Optional sealer or varnish
Steps to Make:
- Clean the bottle and paint a dark green or deep navy background if you want a richer look.
- Use a small brush to paint pine branches with quick angled strokes for needles.
- Dot on red berries in clusters, then add tiny white highlights to make them pop.
- Add white snow speckles lightly around the design, following the bottle curve.
- Let dry fully, seal, and display with a simple ribbon around the neck.
14. Vintage Apothecary Label Bottle (Hand-Painted)

The bottle looks like an old apothecary jar with a hand-painted label panel and simple border details, all painted directly onto the glass. It’s satisfying because you can personalize the words, and the slightly uneven lettering makes it feel charming and truly handmade.
Materials Needed:
- Glass bottle
- Acrylic paint (cream, black, optional accent color)
- Paintbrushes in multiple sizes
- Palette or paint tray
- Optional matte sealer
Steps to Make:
- Clean the bottle, then paint a cream rectangle or oval panel where the label will go.
- Add a thin border around the panel using a small brush and slow strokes.
- Paint your label text (like “Lavender” or “Bath Salts”) with simple block letters.
- Add tiny corner flourishes or dots to finish the vintage look.
- Let it dry fully and seal with matte sealer for a soft, old-time finish.
15. Abstract Brushstroke Bottle Art

This bottle features loose, confident brushstrokes—swipes, curves, and layered patches—so every bottle turns out one-of-a-kind. It’s perfect if you want a relaxing, no-rules painting session, and it looks like artsy decor even though it’s very beginner-friendly.
Materials Needed:
- Glass bottle
- Acrylic paint (3–5 colors)
- Paintbrushes in multiple sizes
- Palette or paint tray
- Optional glossy varnish
Steps to Make:
- Clean the bottle and choose a simple color palette you like together.
- Paint broad strokes around the bottle, letting colors overlap and blend slightly.
- Add a few contrasting marks—thin lines, dots, or short dashes—for movement.
- Layer a second round of strokes once the first layer is dry to create depth and texture.
- Dry fully and seal with gloss if you want a shiny, gallery-like finish.
16. Simple Coastal Stripe Bottle with Rope Neck
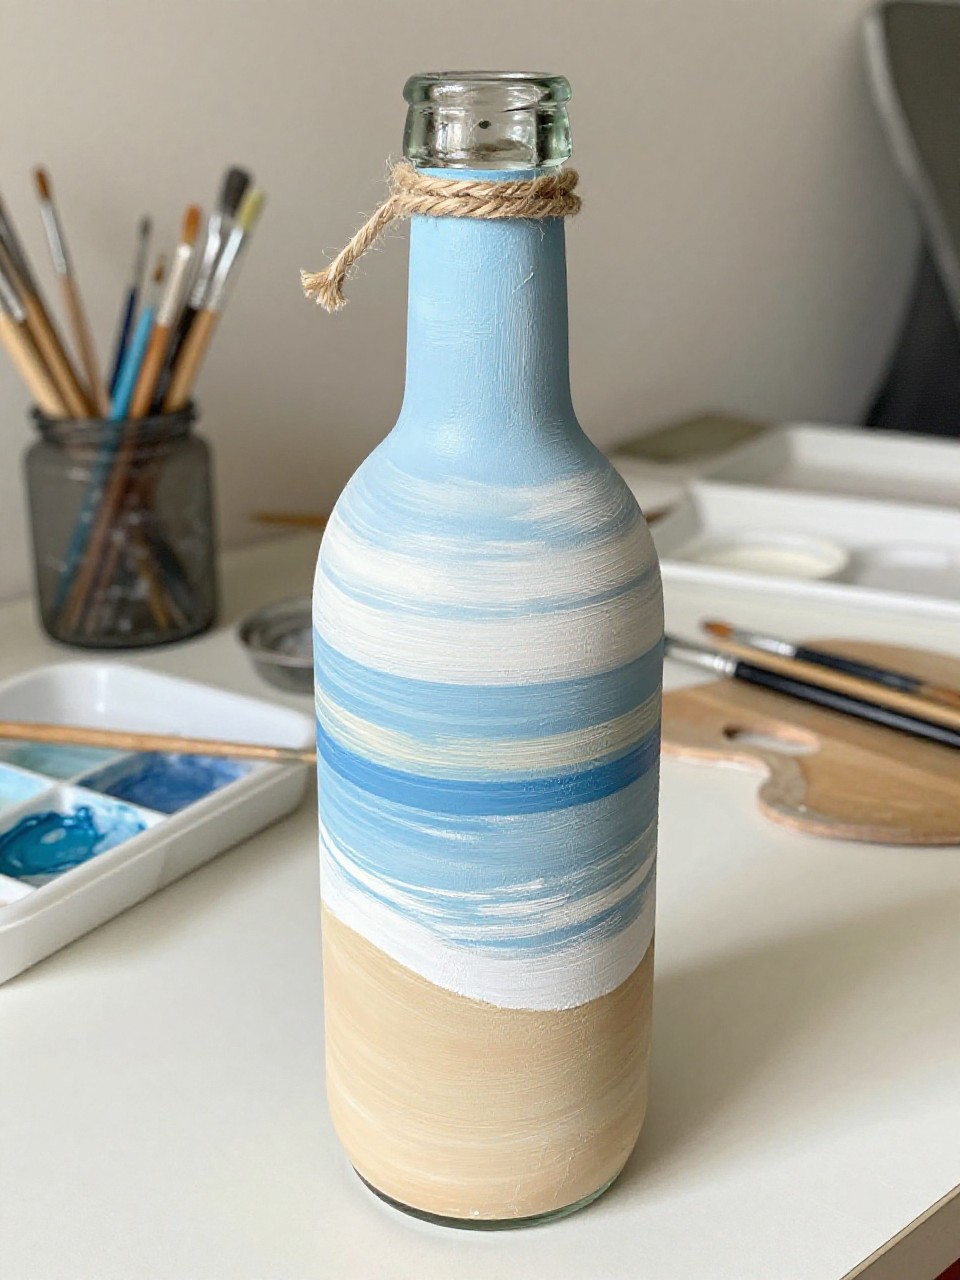
The bottle has hand-painted coastal stripes—soft blue, white, and sandy beige—that wrap evenly around the glass, finished with a rope tie near the neck. It’s calming to paint because stripes are steady and repetitive, and it makes easy beachy decor for bathrooms, patios, or summer tables.
Materials Needed:
- Glass bottle
- Acrylic paint (blue, white, beige)
- Paintbrushes in multiple sizes
- Palette or paint tray
- Optional sealer or varnish
- Jute rope or twine
Steps to Make:
- Clean the bottle and lightly mark stripe spacing with a pencil or thin tape guides.
- Paint the stripes around the bottle, turning it as you go so the lines follow the curve.
- Add a second coat to make colors solid, leaving visible brush texture for a handmade look.
- Touch up edges with a small brush, keeping the stripes slightly imperfect and charming.
- Let dry, seal, then wrap jute rope around the neck and tie a simple knot.