


Table of Contents Show
Keeping kids busy, planning a simple classroom project, or just wanting a calm rainy-day activity can be tough. These DIY journal cover ideas are cute, quick, and beginner-friendly, so you can jump in without stress. Each project uses easy materials and adds personality to any notebook.

Let’s dive into fun, simple covers that look adorable and make writing feel special.
1. Washi Tape Rainbow Stripes Cover
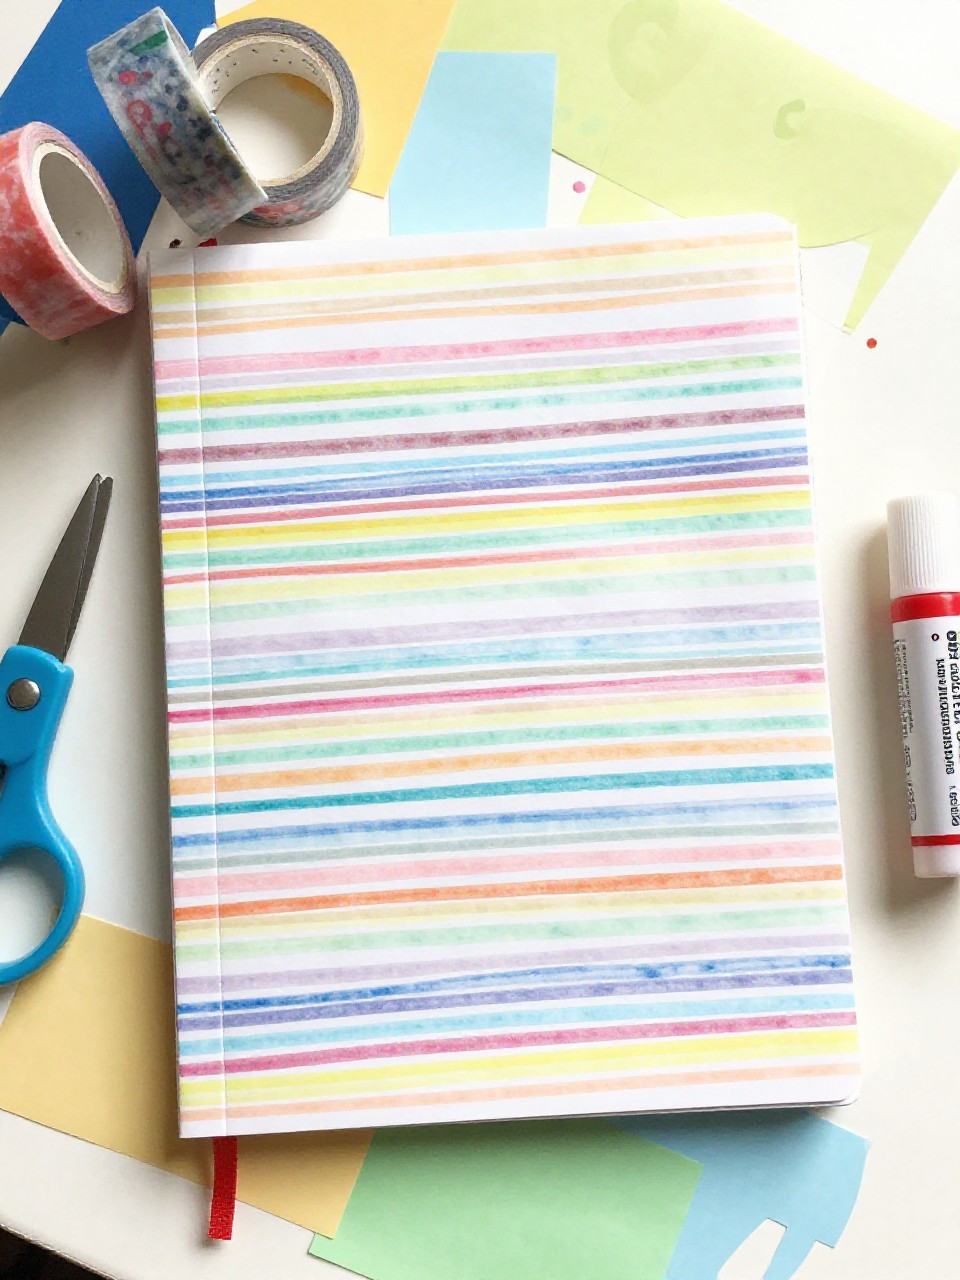
This cover features bright washi tape stripes running across the journal, creating a cheerful rainbow pattern with crisp lines. Kids love choosing colors and building patterns, and it’s a low-mess project that looks neat fast.
Materials Needed:
- Plain notebook or composition book
- Assorted washi tapes (thin and wide)
- Scissors
- Clear contact paper or clear packing tape (optional for sealing)
How to make it:
For People Who Love to Make Things ✂️
- Wipe the notebook cover clean and decide the stripe direction.
- Lay washi tape in straight lines, trimming edges flush with scissors.
- Mix widths and colors for a playful look; add a name label if you like.
- Seal with clear contact paper for durability and smooth out bubbles.
2. Fabric Scrap Patchwork Cover
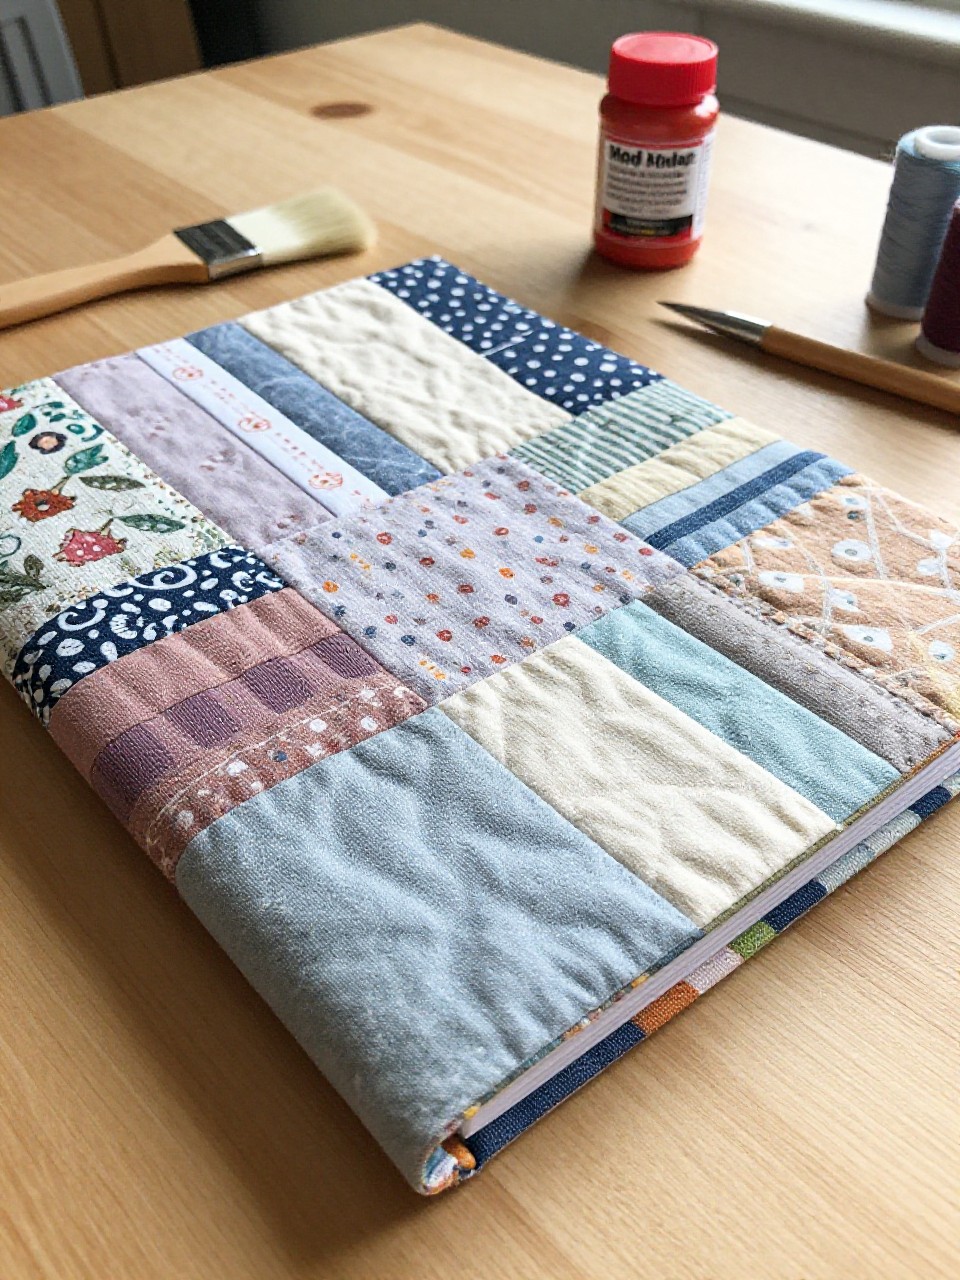
This cover looks like a cozy quilt, made from small fabric squares or rectangles arranged in a patchwork grid. Kids love mixing prints and textures, and it feels satisfying to see the pattern come together.
Materials Needed:
- Plain notebook
- Fabric scraps (cotton works best)
- Mod Podge or white glue thinned with water
- Foam brush
- Clear contact paper (optional)
How to make it:
- Cut fabric into simple shapes and plan the layout on the cover.
- Brush glue onto the cover and press pieces down, edge to edge.
- Smooth wrinkles, then add a thin top coat of glue to seal the fabric.
- Let dry, trim edges, and cover with contact paper for a smooth finish.
3. Doodle Collage Marker Cover
This cover is filled with hand-drawn doodles—stars, hearts, squiggles, and tiny icons—layered into a black-and-white or colorful collage. It’s fun because kids can draw freely and personalize with their favorite symbols.
Materials Needed:
- Plain notebook (preferably white or light-colored)
- Permanent markers or paint pens (various colors)
- Pencil and eraser (optional)
- Ruler (optional for borders)
- Clear spray sealer or contact paper (optional)
How to make it:
- Sketch a light border or sections if desired.
- Fill the cover with small doodles and patterns, leaving little blank space.
- Add color pops or outline in black for a crisp look.
- Let ink dry fully, then seal for smudge protection.
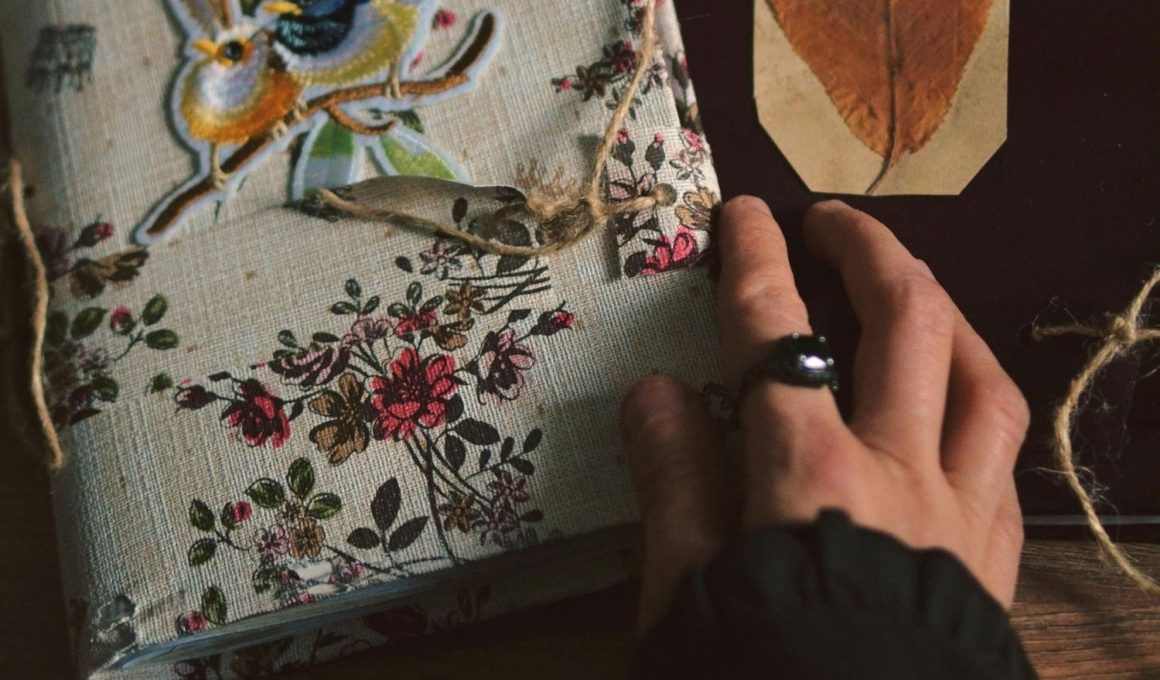
4. Pressed Flower Clear Cover
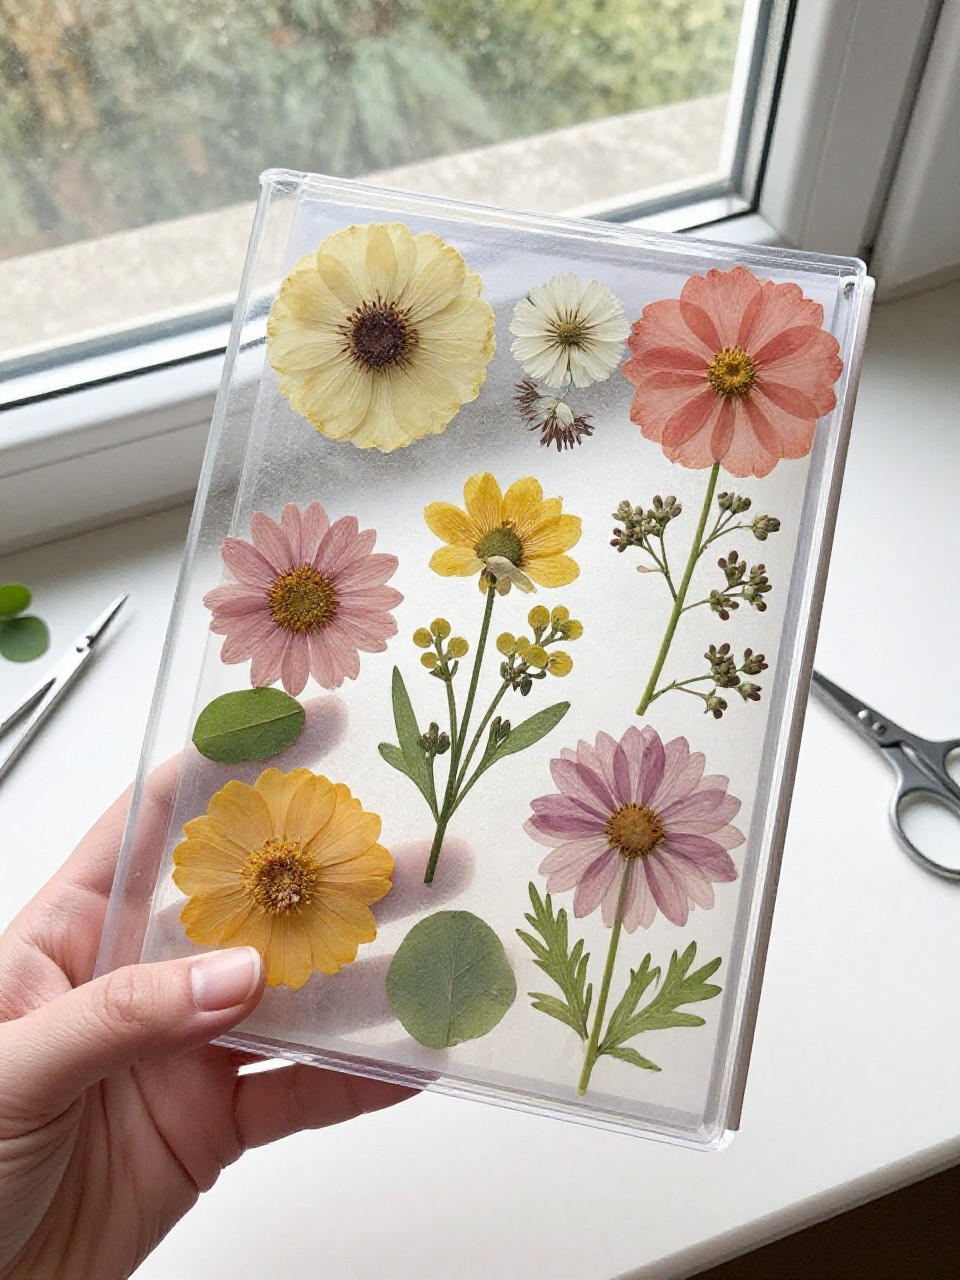
This cover shows delicate pressed flowers and leaves under a smooth clear layer, like a tiny garden preserved on the journal. Kids enjoy arranging nature finds and seeing them turn into a pretty design.
Materials Needed:
- Plain notebook
- Pressed flowers and leaves (store-bought or home-pressed)
- Clear contact paper or self-adhesive laminating sheets
- Tweezers (optional)
- Scissors
How to make it:
- Arrange pressed flowers on the notebook until you like the layout.
- Carefully place clear contact paper over the design, smoothing as you go.
- Trim excess around the edges and round the corners.
- Press firmly to seal and protect the flowers.
5. Painted Pastel Ombre Cover
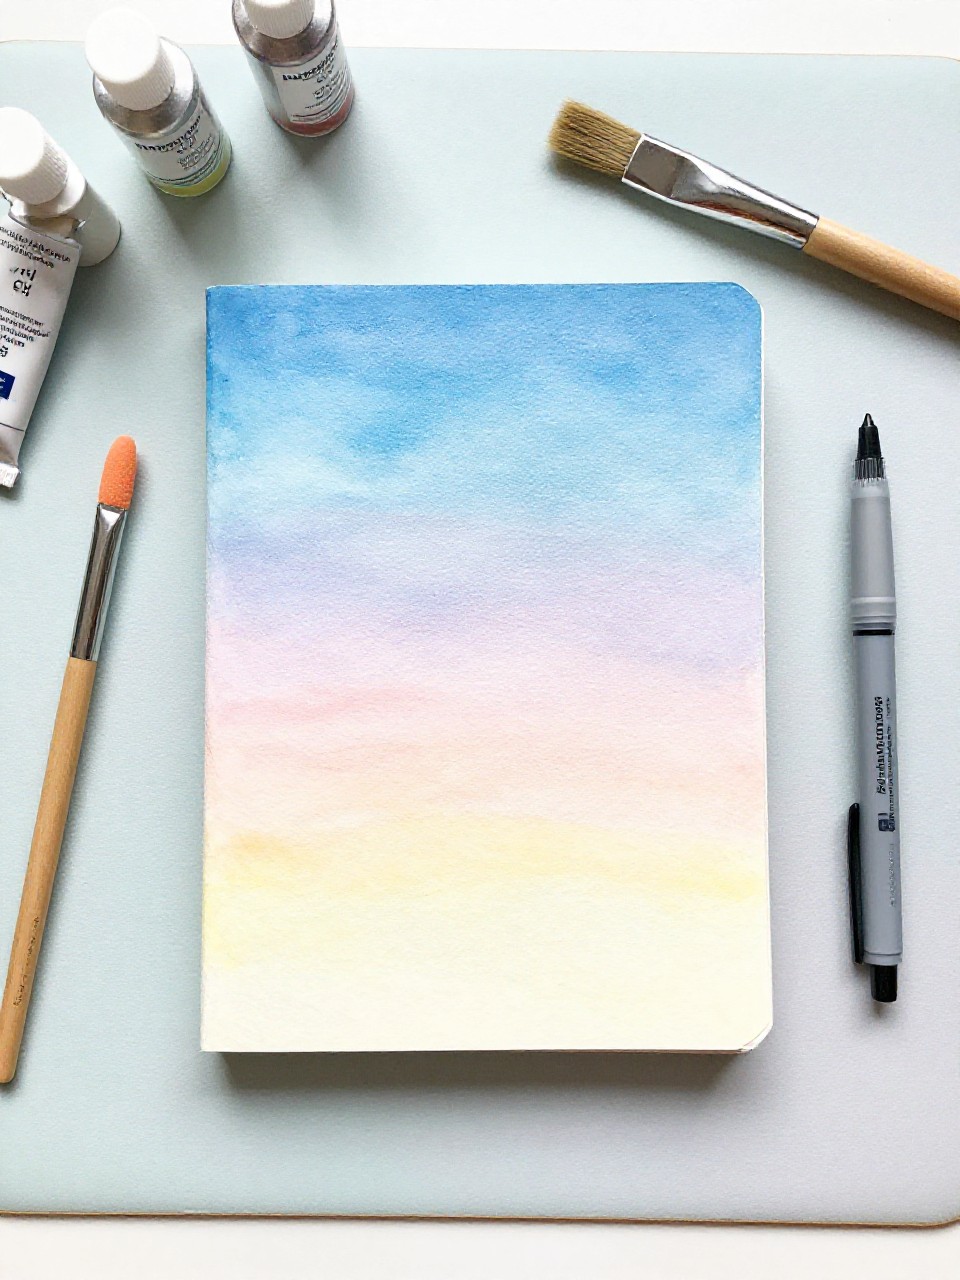
This cover blends two or three pastel shades into a soft ombre fade, with a smooth, dreamy look. Kids like mixing colors and watching them blend, and it feels artsy without being hard.
Materials Needed:
- Plain notebook (matte cover)
- Acrylic paint in 2–3 pastel colors
- Foam brush or soft paintbrush
- Painter’s tape (optional for clean edges)
- Clear matte sealer (optional)
How to make it:
- Tape off the spine or edges if you want crisp borders.
- Paint stripes of each color, then blend where they meet using a damp brush.
- Add a simple word or name with a paint pen if desired.
- Let dry completely and seal to protect the finish.
6. Paper Cutout Sticker Cover
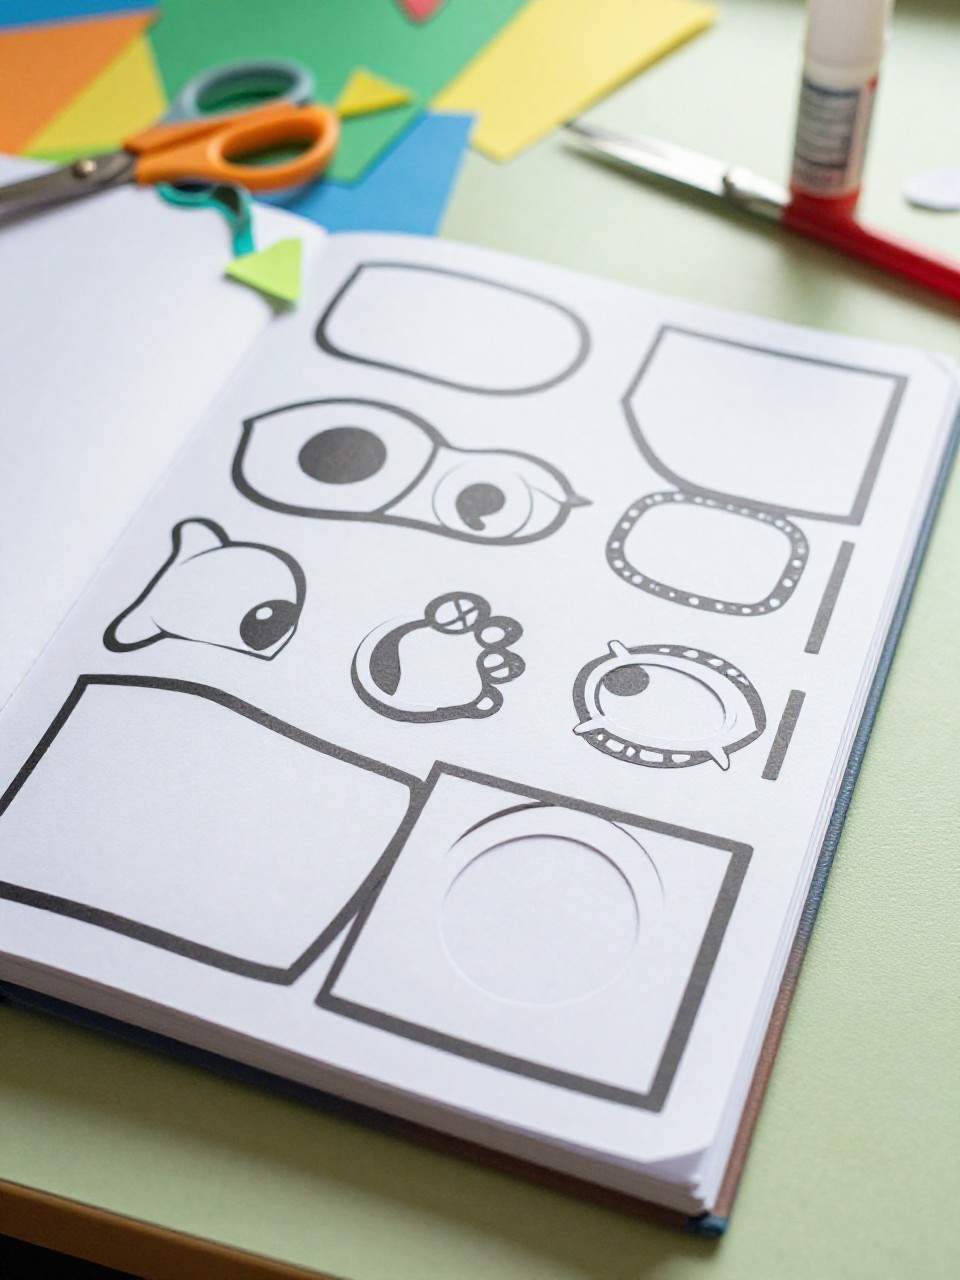
This cover looks like it’s covered in cute stickers—stars, fruit, mini animals—made from colored paper and outlined with a bold edge. Kids love choosing themes and placing “stickers” in clusters or a neat grid.
Materials Needed:
- Plain notebook
- Colored cardstock or construction paper
- Black marker or black gel pen
- Glue stick
- Scissors and optional shape punch
How to make it:
- Cut small shapes from colored paper (or use punches for circles and stars).
- Outline each shape with a thick black line to mimic sticker edges.
- Glue shapes onto the cover in a pattern or scattered style.
- Press flat under a book for a few minutes to set.
7. Yarn Wrapped Color Blocks Cover
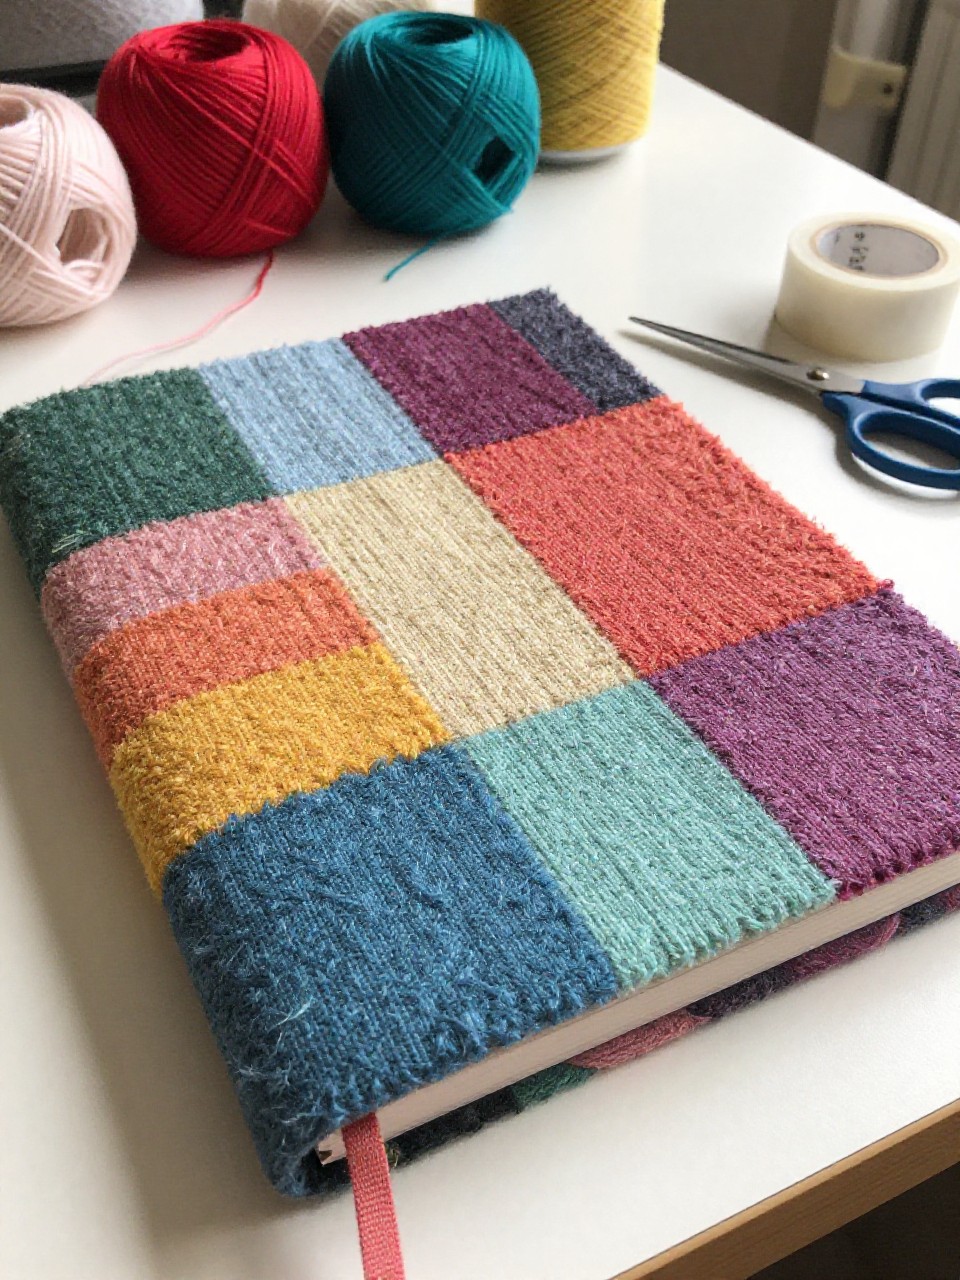
This cover features chunky color blocks made from wrapped yarn bands across the front, giving a cozy, tactile feel. Kids enjoy the hands-on wrapping and the soft texture.
Materials Needed:
- Plain notebook (sturdy cover)
- Assorted yarn colors
- Double-sided tape or strong glue
- Scissors
- Clear tape for inside edges (optional)
How to make it:
- Add a strip of double-sided tape where each yarn band will go.
- Wrap yarn snugly around the cover for each color block, tucking ends inside.
- Alternate colors and widths for a playful pattern.
- Secure the inside edges with clear tape and trim any loose fibers.
8. Magazine Mood Board Cover
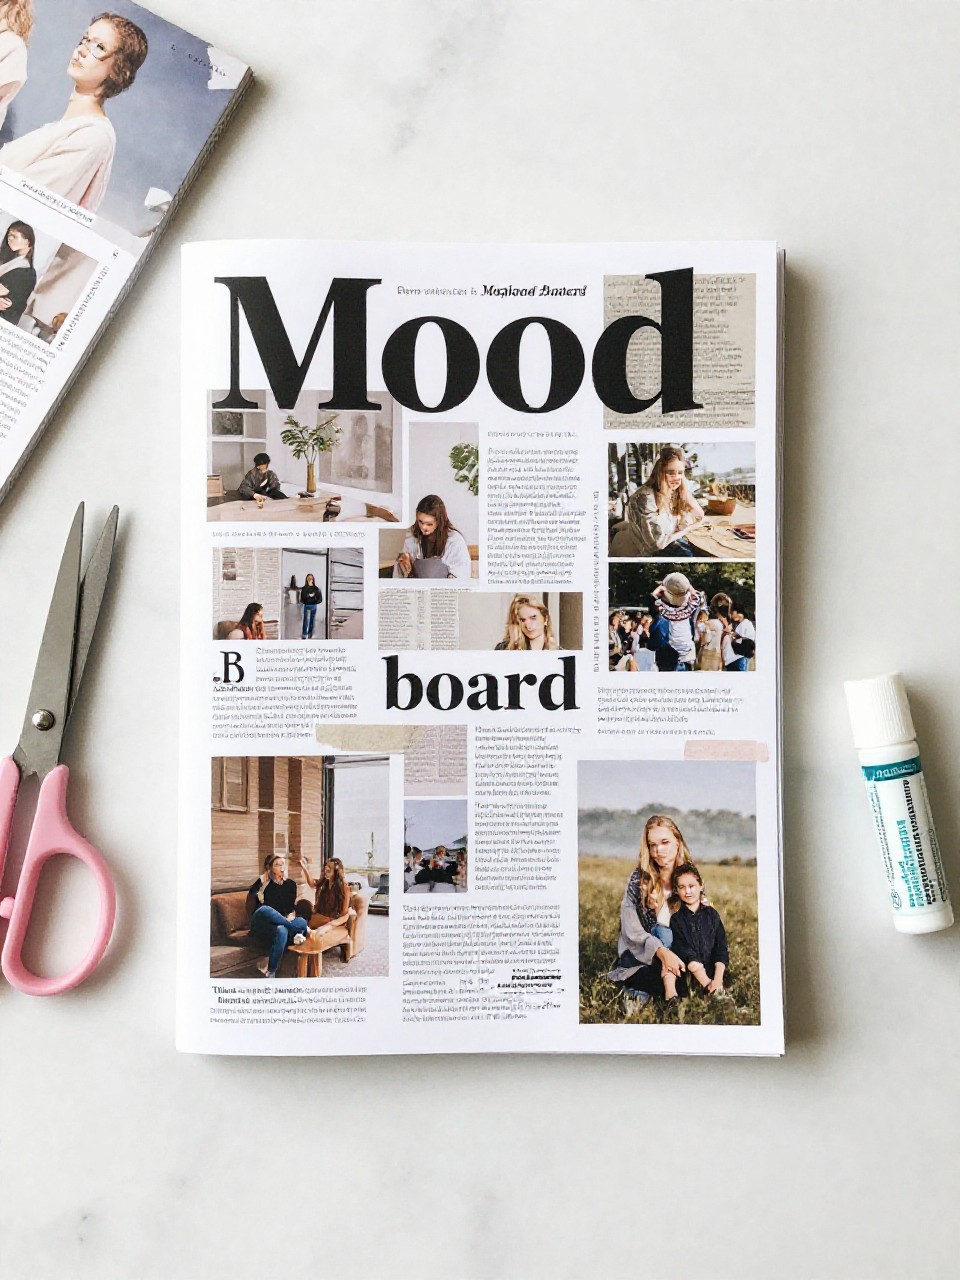
This cover looks like a mini vision board with cut-out words, patterns, and photos arranged in a collage. Kids love hunting for pictures that match their vibe and making a cover that tells a story.
Materials Needed:
- Plain notebook
- Old magazines or catalogs
- Glue stick
- Scissors
- Clear contact paper or Mod Podge (optional seal)
How to make it:
- Cut out favorite images, textures, and short words or letters.
- Arrange pieces on the cover, overlapping for a layered look.
- Glue everything down smoothly, pressing out wrinkles.
- Seal with contact paper for durability and trim edges.
9. Felt Applique Name Cover
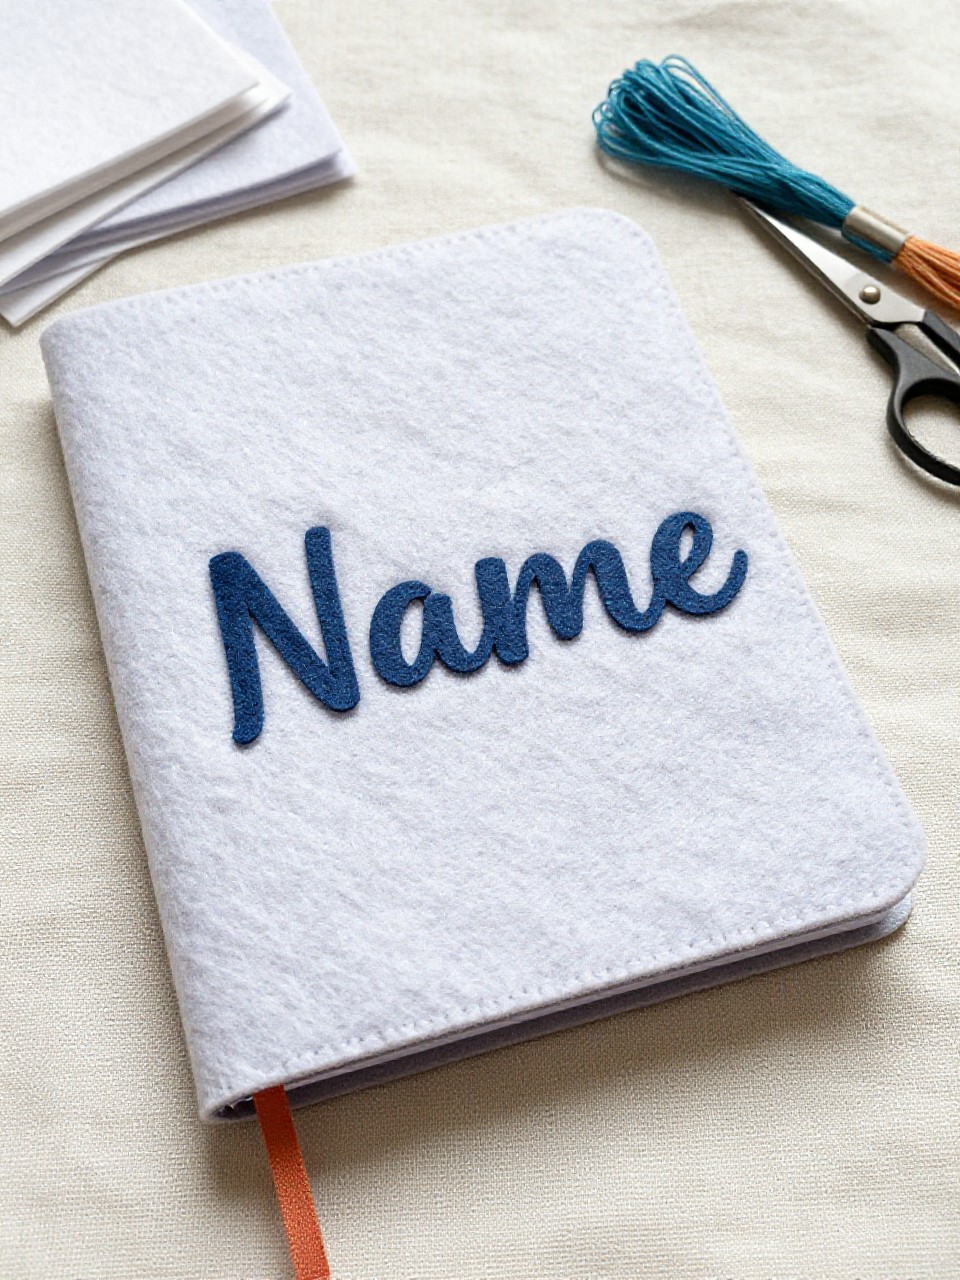
This cover features a big felt name or initials with simple felt icons, like stars or hearts, sewn or glued on. Kids enjoy picking colors and seeing their name pop in a soft, bold style.
Materials Needed:
- Plain notebook
- Felt sheets in 2–3 colors
- Fabric glue or hot glue (with adult help)
- Scissors
- Optional embroidery floss and needle for decorative stitches
How to make it:
- Cut out large letters and small shapes from felt.
- Arrange on the cover and glue in place, pressing firmly.
- Add simple stitches around the letters if desired for detail.
- Let dry, then check edges and re-glue any loose spots.
10. Stamped Shapes Paint Cover
This cover is covered with repeating shapes—hearts, circles, leaves—stamped with foam shapes or potato stamps in cheerful colors. Kids love the easy, rhythmic printing and seeing a pattern appear quickly.
Materials Needed:
- Plain notebook
- Acrylic paint
- Foam shape stamps or halved potato carved with simple shapes
- Paper plate palette
- Baby wipes or damp cloth
How to make it:
- Pour small paint puddles on a paper plate.
- Dip stamps lightly and press onto the cover in rows or random scatter.
- Layer a second color for depth and add tiny dots with a brush handle.
- Let dry flat and wipe stamps clean between colors.
11. Pocket and Label Kraft Cover
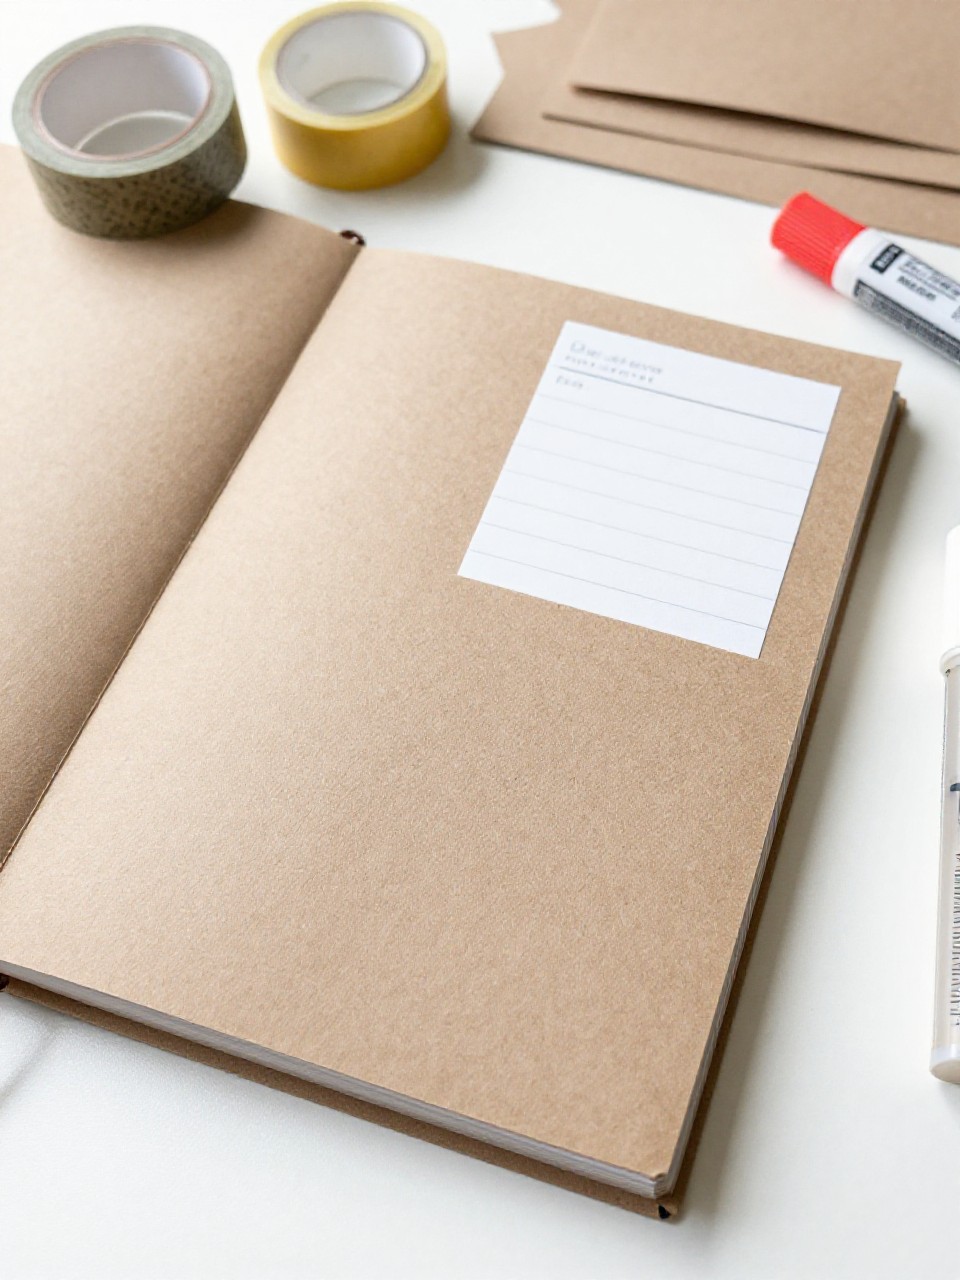
This cover has a neat library-style look with a kraft paper wrap, a front pocket for notes or stickers, and a bold label box. Kids enjoy tucking treasures into the pocket and giving their journal a “real book” feel.
Materials Needed:
- Plain notebook
- Kraft paper or brown paper bag
- Glue stick or double-sided tape
- White label sticker or cardstock for title
- Washi tape (optional trim)
How to make it:
- Wrap the cover with kraft paper like a book jacket and secure edges.
- Fold and glue a small kraft rectangle into a front pocket.
- Add a white label at the top and write the journal title or name.
- Trim edges, add washi tape borders, and press flat to set.