

Table of Contents Show
Keeping kids busy on a rainy afternoon or filling a quiet classroom center can be tough, and store-bought cards don’t always feel personal. These DIY greeting card ideas are simple, fun, and use supplies you likely have at home. You’ll find quick wins for birthdays, thank-yous, and just-because notes.
Let’s dive into easy projects that spark creativity and make someone’s day with handmade cheer.
1. Confetti Window Card
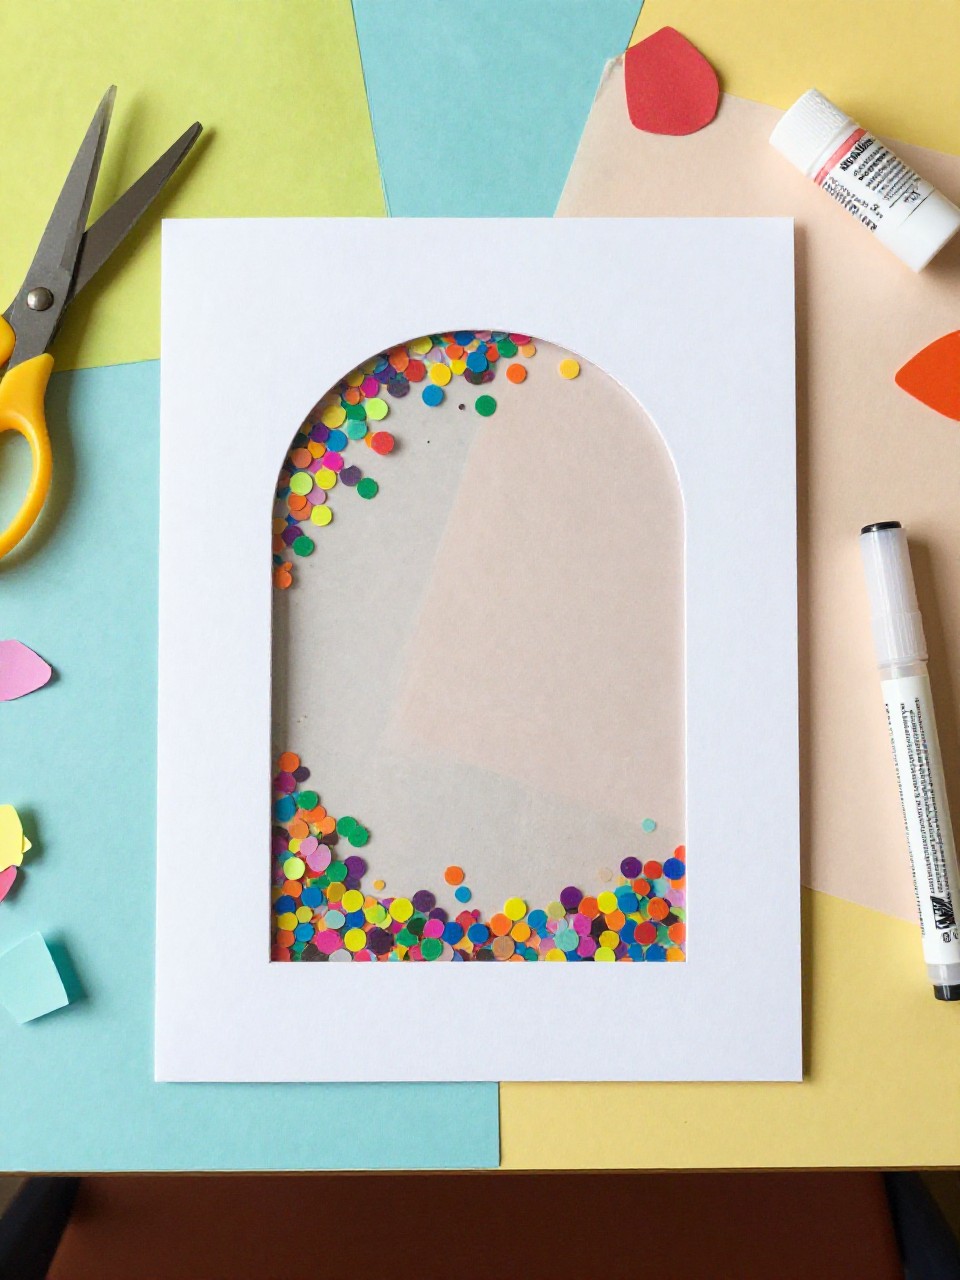
This card has a clear shaker window filled with bright paper confetti that wiggles when you tilt it. Kids love the surprise movement and the happy colors, and it feels magical but is still beginner-friendly.
Materials Needed:
- Blank cardstock card or folded construction paper
- Clear plastic from packaging or a sheet protector
- Colorful paper scraps (for confetti)
- Glue stick or double-sided tape
- Scissors and a marker
How to make it:
For People Who Love to Make Things ✂️
- Fold cardstock in half; cut a simple window shape (heart, circle) on the front.
- Tape or glue clear plastic behind the window to make a pocket.
- Sprinkle confetti between plastic and another paper layer; seal the edges.
- Draw a simple message and outline; let dry and shake to test.
2. Handprint Bouquet Card
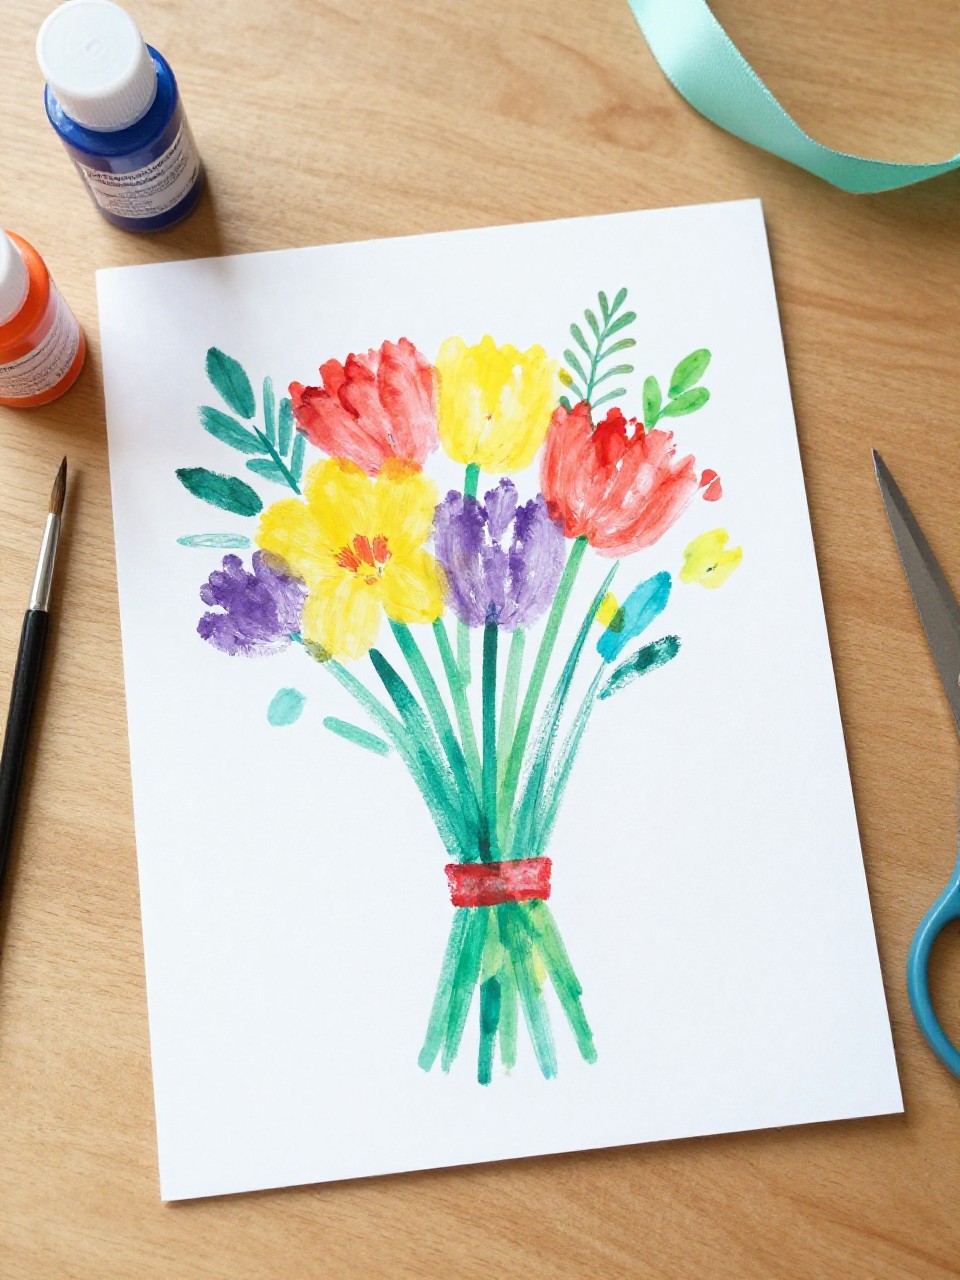
This card opens to a “bouquet” made from cut-out painted handprints tied with a paper bow. Kids enjoy tracing and seeing their own hands turned into flowers, and it makes a keepsake for parents or grandparents.
Materials Needed:
- Cardstock card base
- Washable paint or colored paper for handprints
- Ribbon or paper strip for a bow
- Glue stick
- Marker
How to make it:
- Fold cardstock to make the card base.
- Trace and cut 3–5 handprints (painted or from colored paper).
- Arrange handprints like flower petals and glue; add a paper bow “tie.”
- Write a short message and let any paint dry before closing.
3. Washi Tape Candle Birthday Card
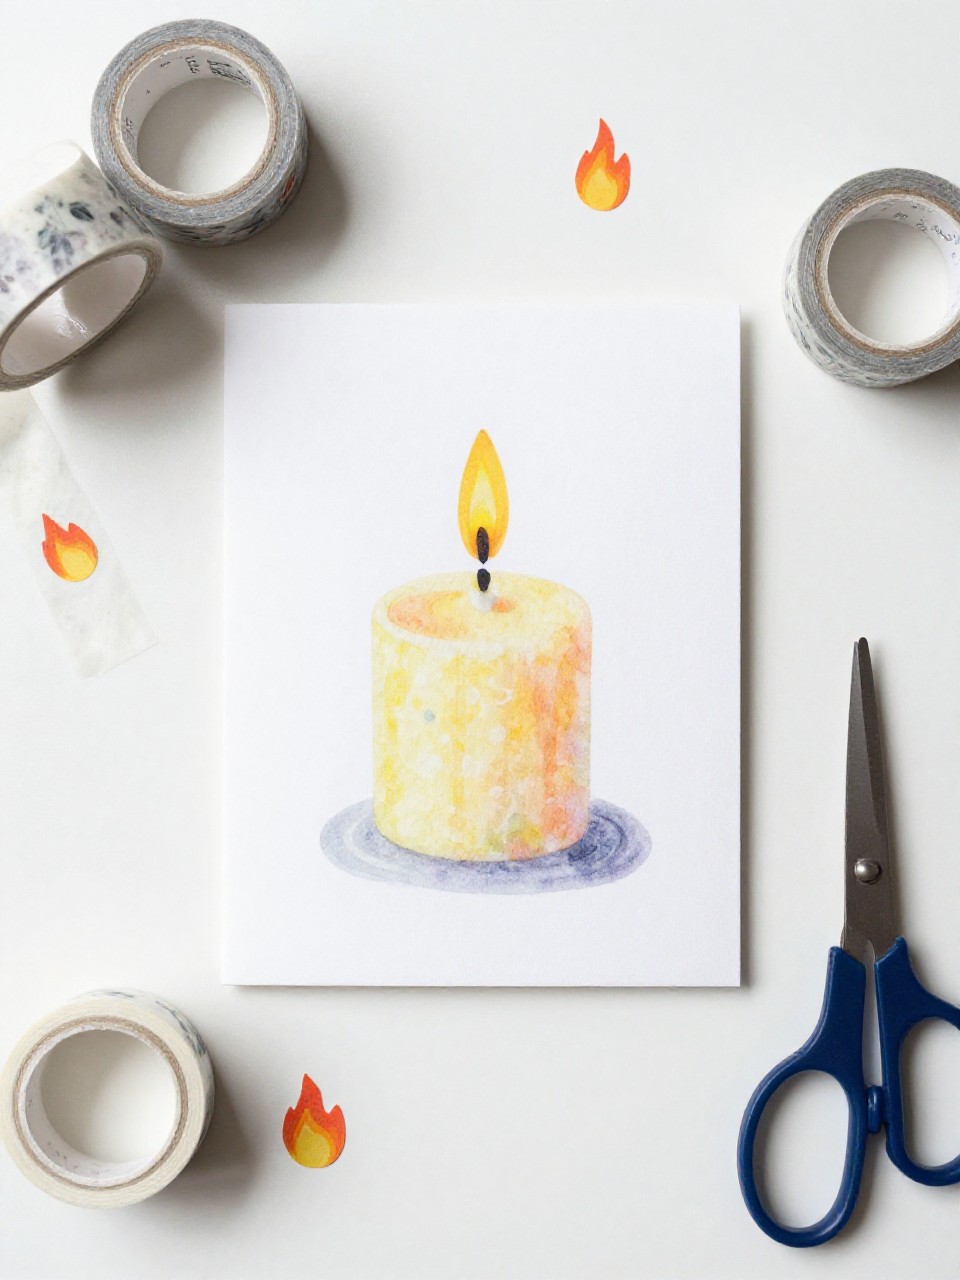
This card features a row of colorful “candles” made from strips of washi tape with tiny paper flames. It’s fast, tidy, and satisfying for kids who like patterns and neat lines.
Materials Needed:
- Blank card or folded cardstock
- Assorted washi tapes
- Yellow/orange paper for flames
- Glue stick
- Black pen for a simple “Make a Wish” note
How to make it:
- Stick 5–8 vertical washi strips on the card front as candles.
- Cut small teardrop flames from yellow/orange paper and glue above each strip.
- Add a short birthday message beneath the candles.
- Press everything flat and let glue set.
4. Pressed Flower Window Card
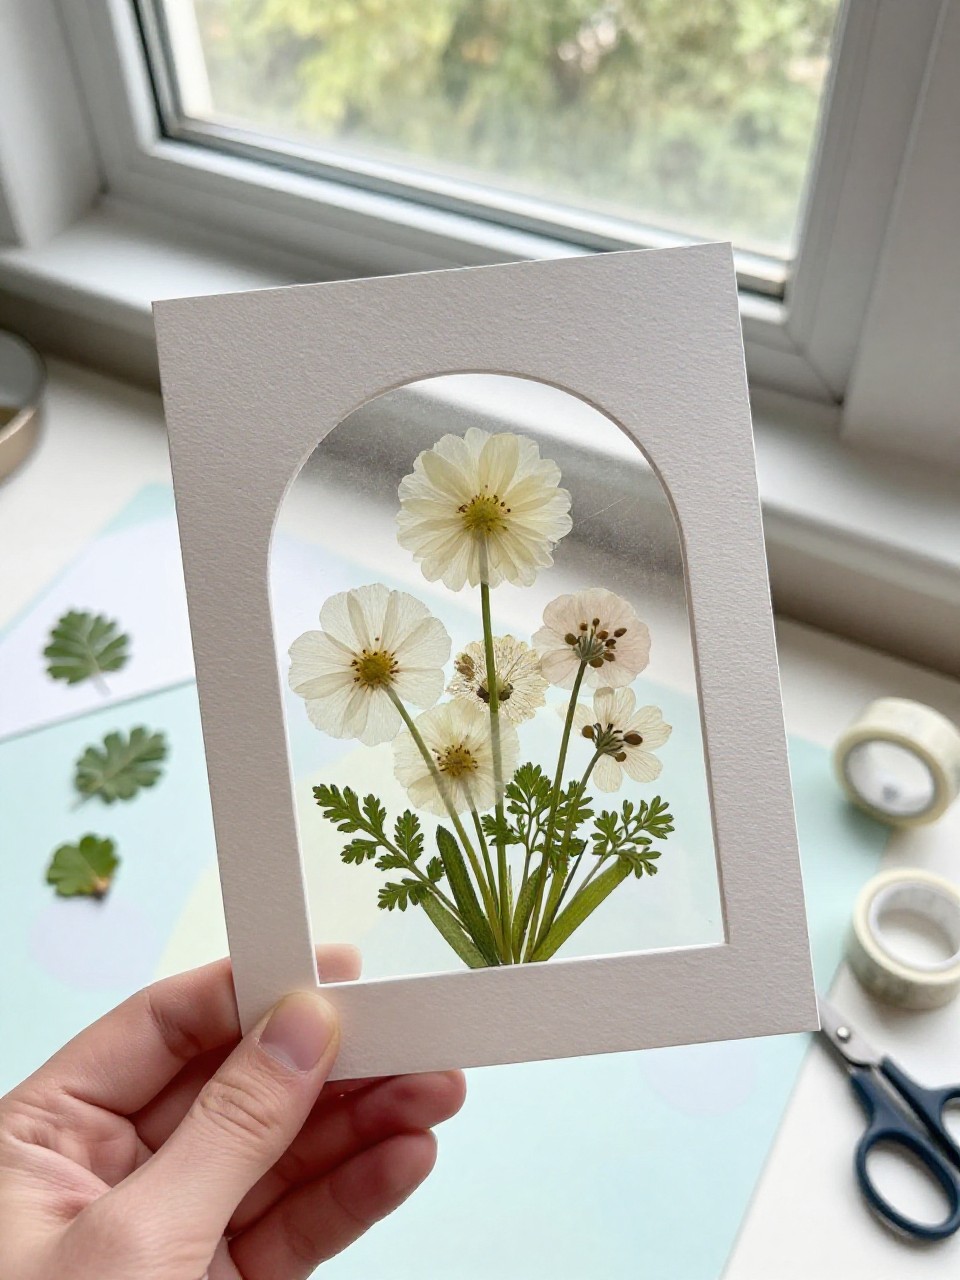
A simple cut-out window frames delicate pressed flowers arranged inside like a tiny garden. Kids enjoy choosing petals and seeing nature turned into art; it feels calm and elegant.
Materials Needed:
- Folded cardstock
- Dried/pressed flowers or leaves
- Clear packing tape or self-adhesive laminating sheet
- Scissors/craft knife (adult help)
- Glue stick
How to make it:
- Cut a window shape from the card front.
- Place pressed flowers on a piece of clear tape; seal with another layer.
- Trim and glue the flower panel behind the window.
- Add a short message and let the card rest under a book to flatten.
5. Pop-Up Heart Surprise Card
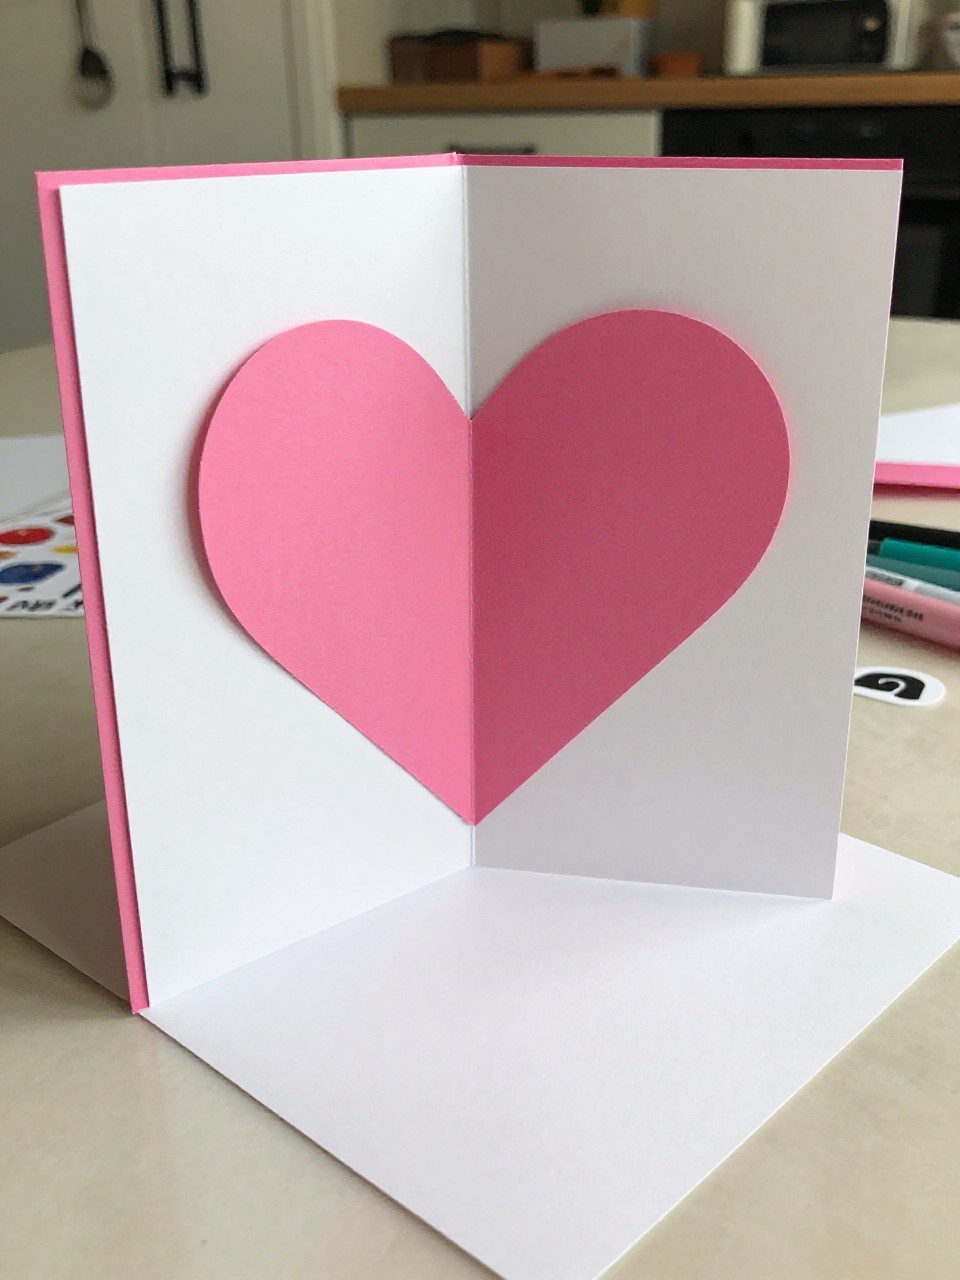
Open the card and a 3D heart pops up from the center fold. Kids love the “wow” moment, and the folding steps are simple enough for beginners.
Materials Needed:
- Two pieces of cardstock (card base + pop-up)
- Scissors
- Glue stick
- Markers or crayons
- Optional stickers
How to make it:
- Fold both pieces in half; one is the outer card.
- Cut a heart from the second piece, fold it, and make two small tabs at the fold.
- Glue tabs inside the base’s center fold so the heart pops when opened.
- Decorate the front and inside with a sweet message and stickers.
6. Button Balloon Card
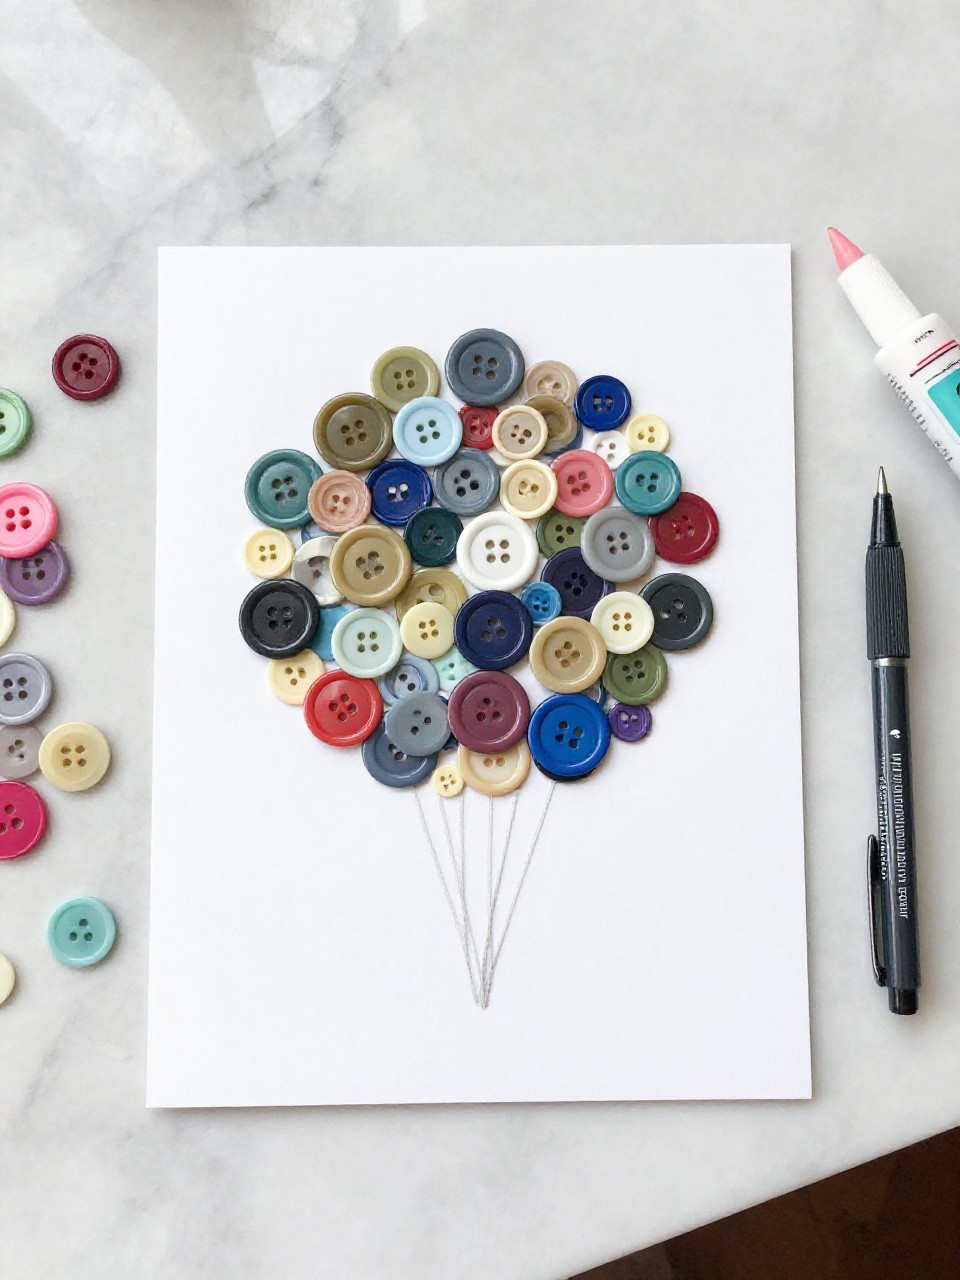
A cluster of colorful buttons becomes floating balloons tied with drawn strings. Kids enjoy sorting sizes and colors and seeing an instant 3D effect.
Materials Needed:
- Blank card
- Assorted buttons
- Strong glue or glue dots
- Black fine-tip pen
- Small ribbon bow (optional)
How to make it:
- Arrange buttons in a bunch on the card front; glue them down.
- Draw thin strings from each button to a single point.
- Add a tiny ribbon bow where the strings meet.
- Let glue dry flat before standing the card up.
7. Fingerprint Fireworks Card
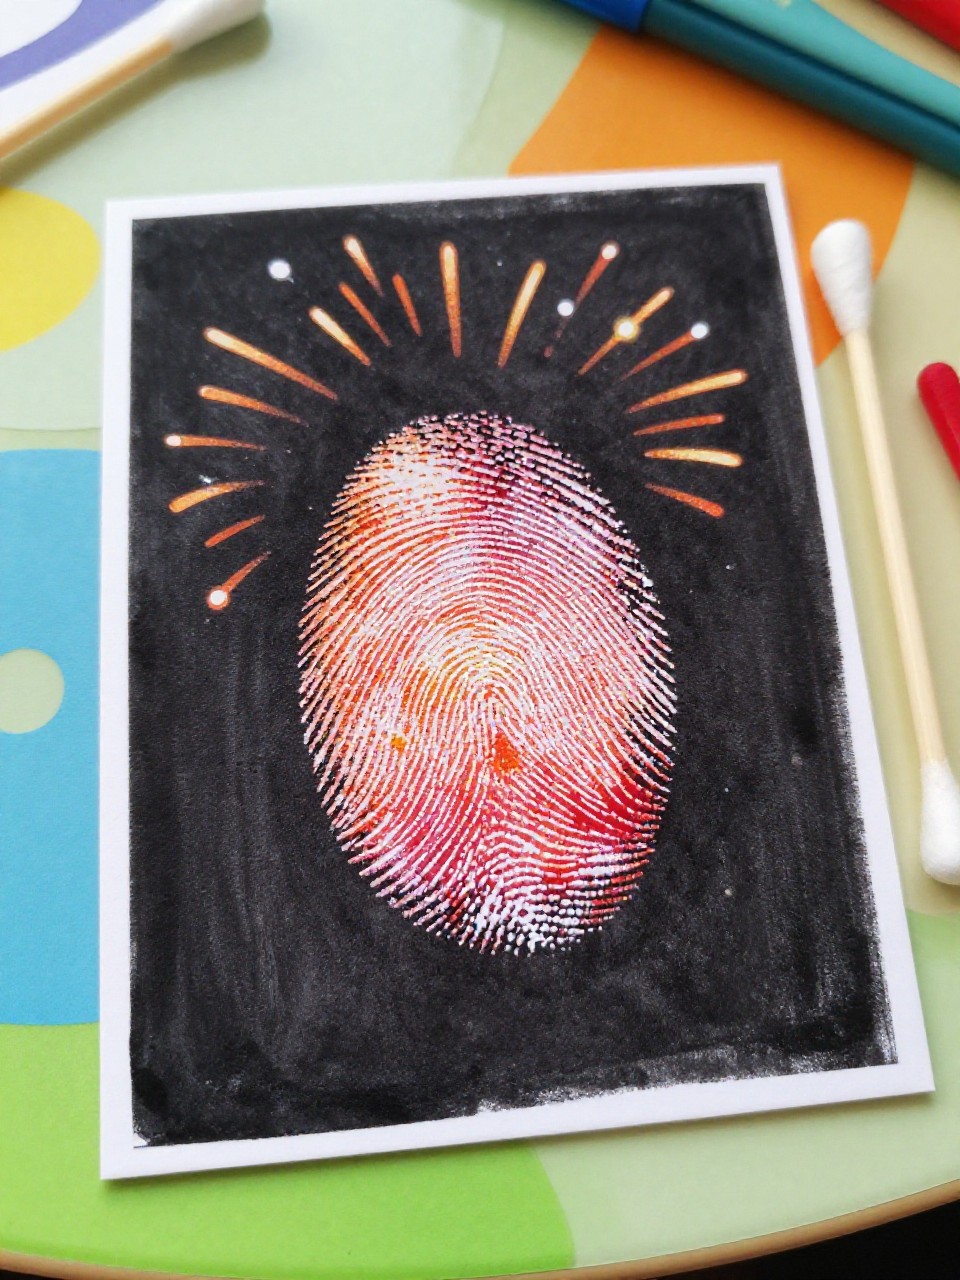
Bright fingerprint bursts form cheerful “fireworks” across a dark card front. Kids love stamping their fingers in paint to make tiny exploding patterns.
Materials Needed:
- Dark cardstock (navy or black)
- Washable paint in bright colors
- Cotton swabs or a fine brush
- Paper towel
- White gel pen (optional)
How to make it:
- Fold dark cardstock into a card.
- Dip fingertips in paint and stamp small circles outward to build bursts.
- Add fine lines or sparkles with a cotton swab or gel pen.
- Dry completely before adding a short message inside.
8. Fabric Scrap Patchwork Card

Small fabric squares create a cozy quilt pattern on the front of the card. Kids enjoy choosing textures and prints, and it feels warm and handmade.
Materials Needed:
- Blank card
- Fabric scraps cut into small squares/rectangles
- Glue stick or fabric glue
- Ruler and pencil
- Sticker label or paper tag for message
How to make it:
- Lightly draw a grid on the card front.
- Glue fabric pieces in rows to fill the grid like a quilt.
- Add a small label with a greeting in one corner.
- Press under a book to set flat.
9. Watercolor Resist Rainbow Card

A soft rainbow appears where crayon lines resist the watercolor paint. Kids love the reveal and the dreamy look.
Materials Needed:
- Watercolor paper card or thick cardstock
- White crayon or oil pastel
- Watercolor paints and brush
- Cup of water and paper towel
- Black pen for message
How to make it:
- Draw simple rainbow arcs with the white crayon on the card front.
- Brush watercolor over the surface; the crayon lines will resist.
- Add small clouds or stars if desired.
- Let dry flat and write a short note.
10. Cut-Paper Animal Peekaboo Card
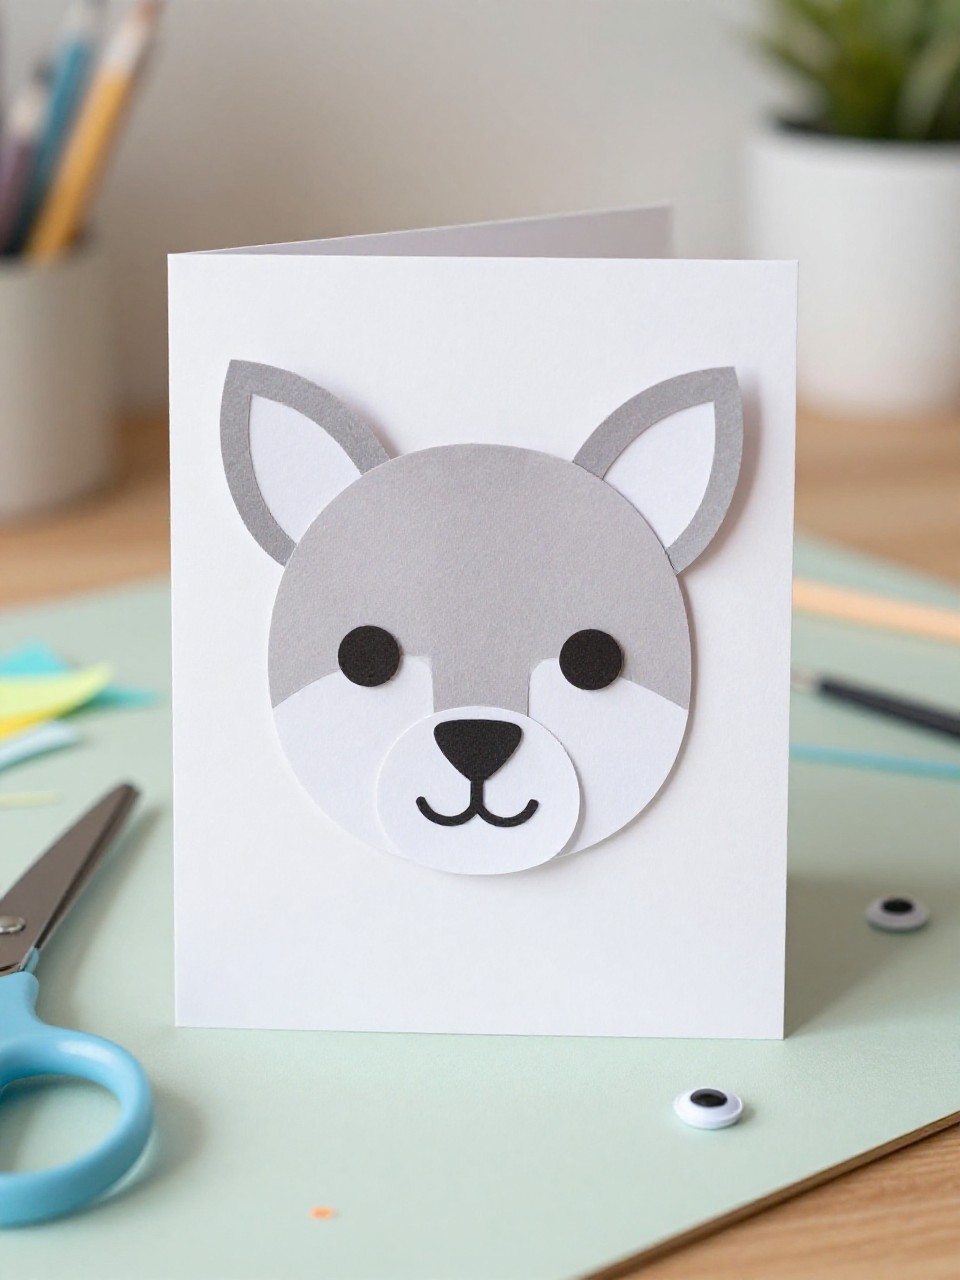
A simple animal face peeks through a cut-out shape—like a cat in a circle or a bear in a heart. Kids enjoy choosing colors and adding funny expressions.
Materials Needed:
- Two colors of cardstock
- Scissors
- Glue stick
- Black marker
- Googly eyes (optional)
How to make it:
- Cut a window shape on the card front.
- From a second color, cut a simple animal head and glue inside the card behind the window.
- Add ears, nose, whiskers, and eyes (drawn or googly).
- Write a cute pun inside and let glue set.
11. Nature Rubbing Forest Card
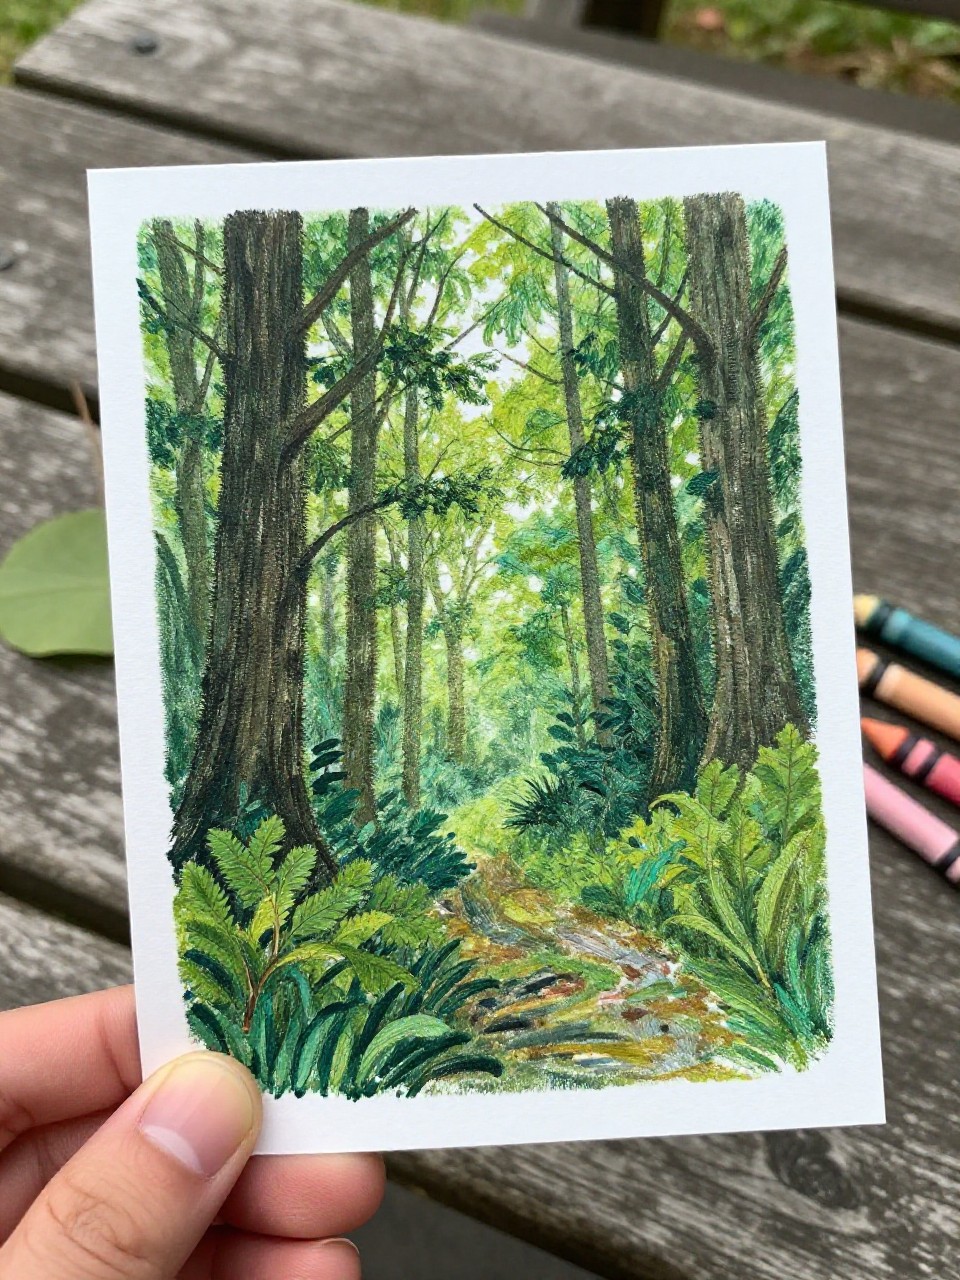
Leaf rubbings in green and brown make a calm forest scene on the card front. Kids enjoy the surprise textures that appear under the paper.
Materials Needed:
- Folded cardstock
- Leaves with strong veins
- Crayons with paper removed
- Tape (optional)
- Fine-tip pen for message
How to make it:
- Place leaves under the card front; hold steady or tape.
- Rub crayons sideways over the surface to reveal leaf patterns.
- Layer a few leaves for a full forest look.
- Add a small greeting and let the wax set.
12. Stitched Heart Outline Card
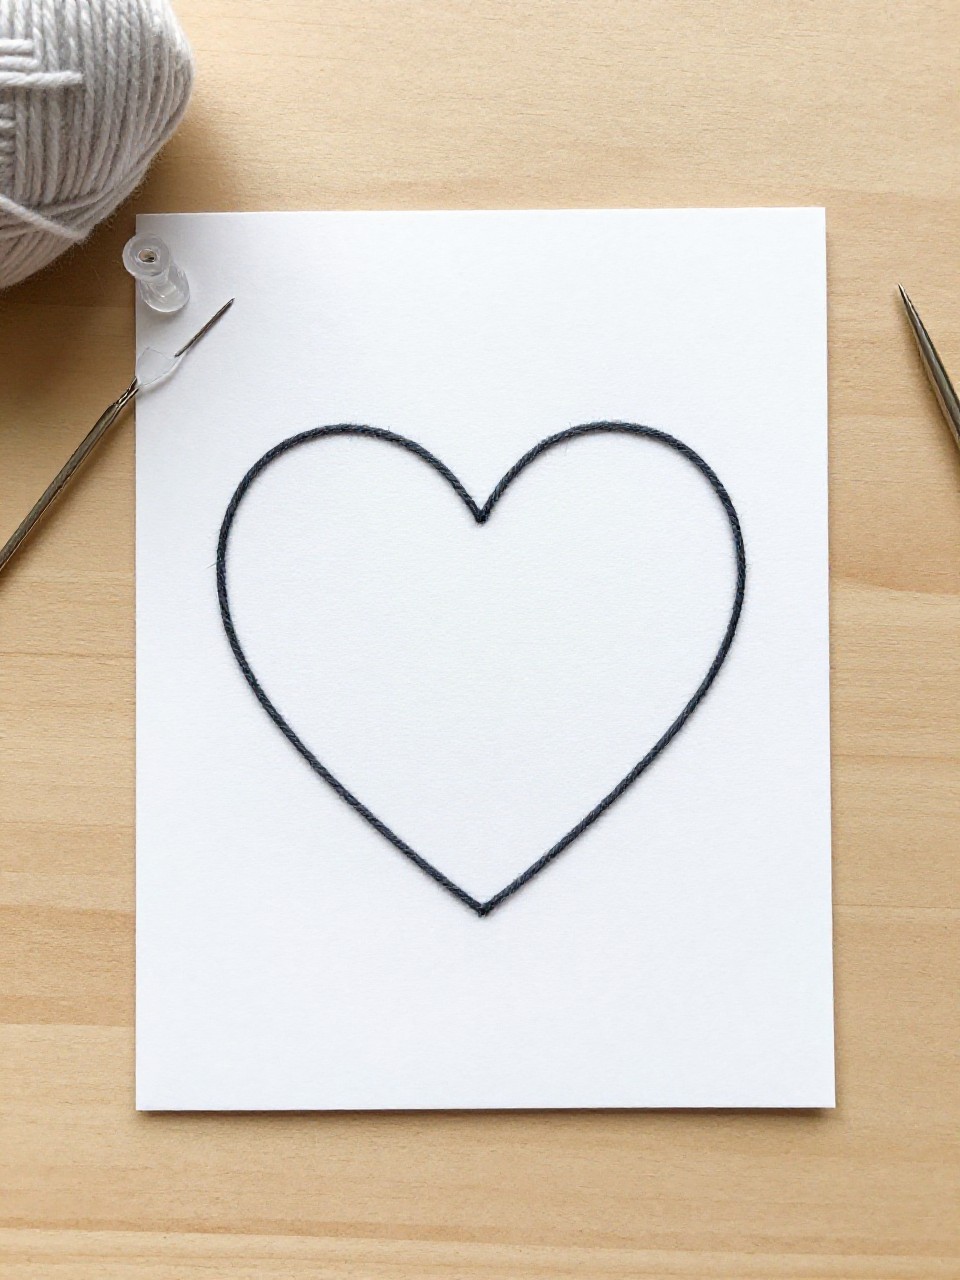
A dotted line of simple stitches forms a sweet heart on the front. Kids enjoy the tactile feel and learning basic stitching with yarn.
Materials Needed:
- Cardstock card
- Yarn or embroidery thread
- Needle with a large eye (plastic needle for kids)
- Pencil and pushpin
- Tape
How to make it:
- Lightly draw a heart; poke holes along the line with a pushpin.
- Thread the needle and tape the yarn end inside the card.
- Stitch in and out through the holes to outline the heart.
- Tie off inside and add a short message.
13. Collage Cupcake Card
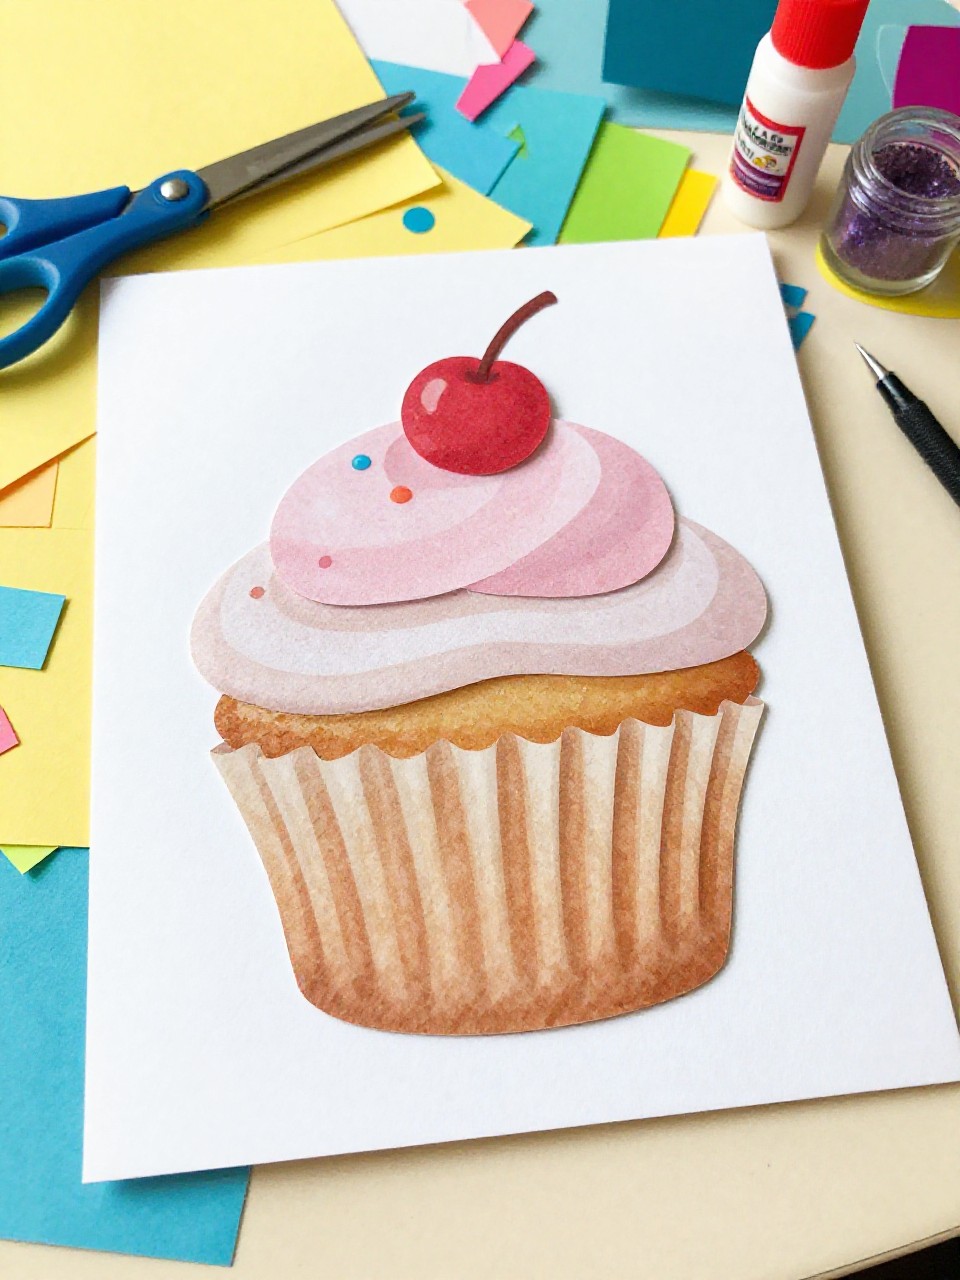
A layered paper cupcake with a cherry on top pops off the card in bright colors. Kids love choosing “frosting” papers and adding sprinkles.
Materials Needed:
- Blank card
- Colored paper scraps
- Glue stick and foam dots (optional for 3D lift)
- Scissors
- Markers or sequins for sprinkles
How to make it:
- Cut a cupcake wrapper, frosting top, and small cherry from paper.
- Glue the wrapper; use foam dots to lift the frosting piece.
- Add sprinkles with markers or sequins.
- Write a sweet message and let everything dry.