

Table of Contents Show
Here’s the thing about butterfly crafts: kids love the bright colors and fluttery wings, but many projects online take forever or need fancy supplies. If you’re juggling snack time, short attention spans, and a cluttered craft drawer, you need quick wins that still look magical on the fridge.

This list gives you creative, unique, and beginner-friendly butterfly crafts that feel “wow” without stress. Most use recyclables and basics you probably already have.
Pick one, set out a simple tray of supplies, and watch the butterflies take flight—no perfection required, just play.
1. Rainbow Coffee-Filter Flutter

Soft, watercolor wings with gentle color blends make this an instant crowd-pleaser. Kids love misting the filters and watching the colors swirl—pure process art with a beautiful result.
Materials Needed:
- White coffee filters
- Washable markers
- Clothespins
How to make it:
- 1. Flatten a coffee filter and color it with washable markers in rainbow patches.
- 2. Lightly mist with water and let the colors blend; dry completely.
- 3. Pinch the center like a bow and clip with a clothespin to form the body.
- 4. Add two tiny marker dots for eyes on the clothespin.
2. Bubble Wrap Wing-Print Butterflies

This printmaking trick makes perfect dotted wings with zero fuss. The bumpy texture looks fancy, but preschoolers can stamp it in seconds.
Materials Needed:
- Bubble wrap scrap
- Washable paint
- Cardstock
How to make it:
- 1. Paint the bumpy side of bubble wrap with 2–3 bright colors.
- 2. Press cardstock onto the painted bubble wrap, then lift to reveal dots.
- 3. Cut two wing shapes from the print (or leave as one butterfly shape).
- 4. Glue a paper strip down the center as the body; draw eyes and antennae.
3. Paper Plate Peekaboo Butterfly Mask

Turn a simple plate into a butterfly mask with peek-through eyes. The big wing shape frames little faces for instant pretend play.
Materials Needed:
- Paper plate
- Crayons or paint
- Elastic string
How to make it:
- 1. Fold the plate in half and sketch a big butterfly outline; cut it out.
- 2. Cut two eye holes near the center.
- 3. Color or paint the wings with bold patterns and dots.
- 4. Punch small holes on the sides and tie on elastic to wear.
4. Nature Wing Collage Butterfly

Collect tiny treasures outside and turn them into wings. The mix of leaves, petals, and twigs looks earthy and elegant.
Materials Needed:
- Cardboard scrap
- White glue
- Leaves/flower petals
How to make it:
- 1. Draw a simple butterfly outline on cardboard and cut it out.
- 2. Brush glue onto each wing section.
- 3. Press on leaves and petals to fill the wings like a mosaic.
- 4. Add a small twig down the center for the body.
5. Stained-Glass Contact Paper Butterfly

Sunshine turns this window craft into glowing color. Kids love sticking tissue pieces—no mess, just peel and place.
Materials Needed:
- Clear contact paper
- Tissue paper squares
- Black construction paper
How to make it:
- 1. Cut a thick black butterfly outline (like a window frame).
- 2. Stick it onto a sheet of contact paper, sticky side up.
- 3. Fill the open spaces with tissue squares, overlapping colors.
- 4. Seal with another contact sheet, trim, and tape to a window.
6. Pom-Pom Caterpillar-to-Butterfly Flip

It’s a tiny metamorphosis toy: flip the strip and the caterpillar “becomes” a butterfly. Simple, clever, and very cute.
Materials Needed:
- Craft stick
- Mini pom-poms
- Foam sheet or cardstock
How to make it:
- 1. Glue a row of mini pom-poms along one side of a craft stick for the caterpillar.
- 2. Cut two small foam/cardstock wings and decorate with dots.
- 3. Glue wings to the back of the stick so they peek when flipped.
- 4. Add tiny eyes and a smile to the front pom-pom.
7. Fork-Print Butterfly Garden

Fork tines make magical textures without any special tools. The ridged paint looks like feathery wings in a bright garden.
Materials Needed:
- Plastic fork
- Washable paint
- Construction paper
How to make it:
- 1. Dip the fork in paint and press two prints on each side for wings.
- 2. Repeat with different colors to layer textures.
- 3. Paint or draw a simple body and antennae in the center.
- 4. Add grass or flowers at the bottom with marker swishes.
8. Spiral “Flying” Mobile Butterfly

A spiral cut gives the illusion of fluttering when it spins. Hang it by a window and watch it dance in the breeze.
Materials Needed:
- Colored paper
- String
- Marker
How to make it:
- 1. Draw a large spiral on paper and cut along the line.
- 2. Draw and cut a small butterfly to hang at the bottom.
- 3. Tape the butterfly to the spiral’s end.
- 4. Punch a hole at the top and tie string for hanging.
9. Paint-Squish Symmetry Butterflies

The classic squish trick creates jaw-dropping symmetry with no drawing skills needed. Opening the paper feels like a magic reveal.
Materials Needed:
- White cardstock
- Washable paint
- Craft stick or spoon
How to make it:
- 1. Fold the cardstock in half.
- 2. Add little blobs of paint on one side only.
- 3. Fold and press gently with a craft stick; open to reveal mirrored wings.
- 4. Draw a center body and antennae with marker once dry.
10. Clothespin and Pipe-Cleaner Flutter Friends

Chunky wings and bendy antennae make these great for little hands. Clip them on backpacks, curtains, or plants for instant cheer.
Materials Needed:
- Wooden clothespins
- Pipe cleaners
- Stickers or washi tape
How to make it:
- 1. Wrap a pipe cleaner into two looped wings and twist in the middle.
- 2. Clip the twist inside the clothespin to hold the wings.
- 3. Wrap a short pipe cleaner at the top for antennae.
- 4. Decorate the pin with stickers or tape.
11. Salt-Paint Sparkle Wings

Salt turns watery paint into crystal patterns that shimmer. The texture makes simple wing shapes feel extra special.
Materials Needed:
- White glue
- Table salt
- Liquid watercolors
How to make it:
- 1. Draw thick wing lines with white glue on cardstock.
- 2. Sprinkle salt over the glue; shake off excess and let set briefly.
- 3. Touch the salt lines with drops of watercolor and watch colors spread.
- 4. Add a painted body in the middle once dry.
12. Magazine Mosaic Butterfly

Upcycle colorful pages into tiny tiles. The mosaic look is bold and artsy without any tricky cutting.
Materials Needed:
- Old magazines
- Glue stick
- Cardstock
How to make it:
- 1. Draw a simple butterfly outline on cardstock.
- 2. Tear magazine pages into small squares or strips.
- 3. Glue the pieces inside the wings, mixing patterns and colors.
- 4. Outline the body and antennae with a dark marker.
13. Pasta Bowtie Butterfly Garden

Bowtie pasta becomes tiny butterflies in seconds. Paint them and plant them on a paper stem—adorable and tactile.
Materials Needed:
- Bowtie pasta (farfalle)
- Acrylic or tempera paint
- Green pipe cleaners
How to make it:
- 1. Paint bowtie pasta in bright colors; let dry.
- 2. Glue each pasta to paper or a pipe cleaner “stem.”
- 3. Add dots or stripes with a paint pen or marker.
- 4. Draw leaves or clouds around your garden.
14. Handprint Wing Keepsake Butterfly

Turn little hands into wings for a sweet memory craft. The layered prints feel playful and personal.
Materials Needed:
- Washable paint
- White cardstock
- Marker
How to make it:
- 1. Paint a child’s hand and press two prints on each side for wings.
- 2. Repeat with a second color slightly offset for a shadow effect.
- 3. Paint or draw a simple oval body in the center.
- 4. Add the child’s name and date at the bottom.
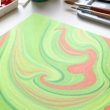
15. Zipper-Bag Marble Ink Butterflies

Swirly, marbled wings with zero mess inside a zip bag. Peel-and-reveal paper pieces come out looking like boutique art.
Materials Needed:
- Zip-top plastic bag
- Acrylic paint (2–3 colors)
- White paper
How to make it:
- 1. Add small paint puddles inside the zip bag and seal.
- 2. Press and swirl with fingers to marble the colors.
- 3. Slide a paper rectangle into the bag, press gently, then remove.
- 4. Cut the dried print into butterfly wings and glue to a paper body.