


Table of Contents Show
Summer crafts are a sweet way to keep kids busy without making the day feel too planned. The best ones are colorful, simple to set up, and fun enough that kids actually want to finish them. These ideas are made for sunny afternoons, playdates, backyard tables, camp-style activities, or quiet indoor time when it is too hot outside.
This list keeps things creative but still easy for parents, teachers, and caregivers to manage. Each craft uses simple supplies, but the finished projects feel playful and worth displaying.
From fruit fans and paper plate suns to ocean jars and pressed flower bookmarks, these summer craft ideas give kids something hands-on, cheerful, and memorable to make.
1. Watermelon Paper Fan Craft
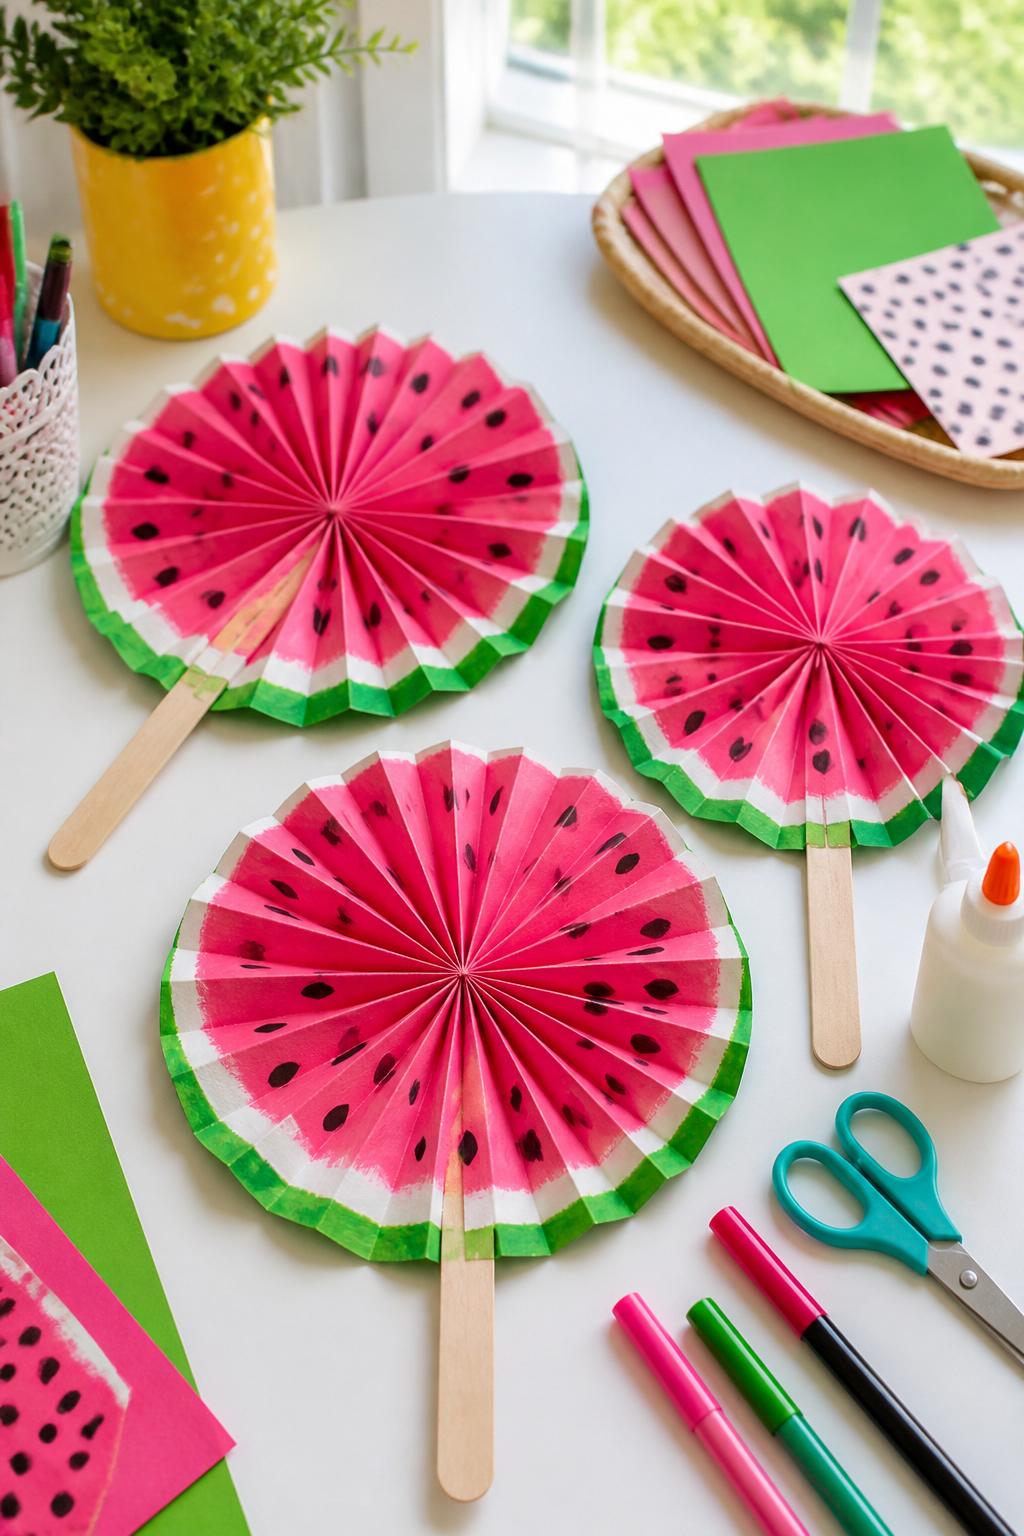
This watermelon fan craft feels perfect for summer because it is cute, useful, and easy for kids to personalize. The folding part also makes it feel more interactive than a flat paper craft, and kids can use the fan afterward during warm outdoor play.
Materials Needed:
For People Who Love to Make Things ✂️
- Pink or red construction paper
- Green construction paper
- Black marker
- Wooden craft sticks
- Glue stick or craft glue
- Child-safe scissors
- Tape
Steps To Make:
- Cut a large circle from pink or red paper.
- Cut a slightly larger green circle, then glue the pink circle on top.
- Use a black marker to draw watermelon seeds across the pink section.
- Fold the circle back and forth like an accordion.
- Pinch the bottom together and tape it firmly.
- Glue or tape a wooden craft stick to the bottom as the handle.
- Let it dry, then open it gently into a fan shape.
2. Sun Catcher Ice Cream Cones
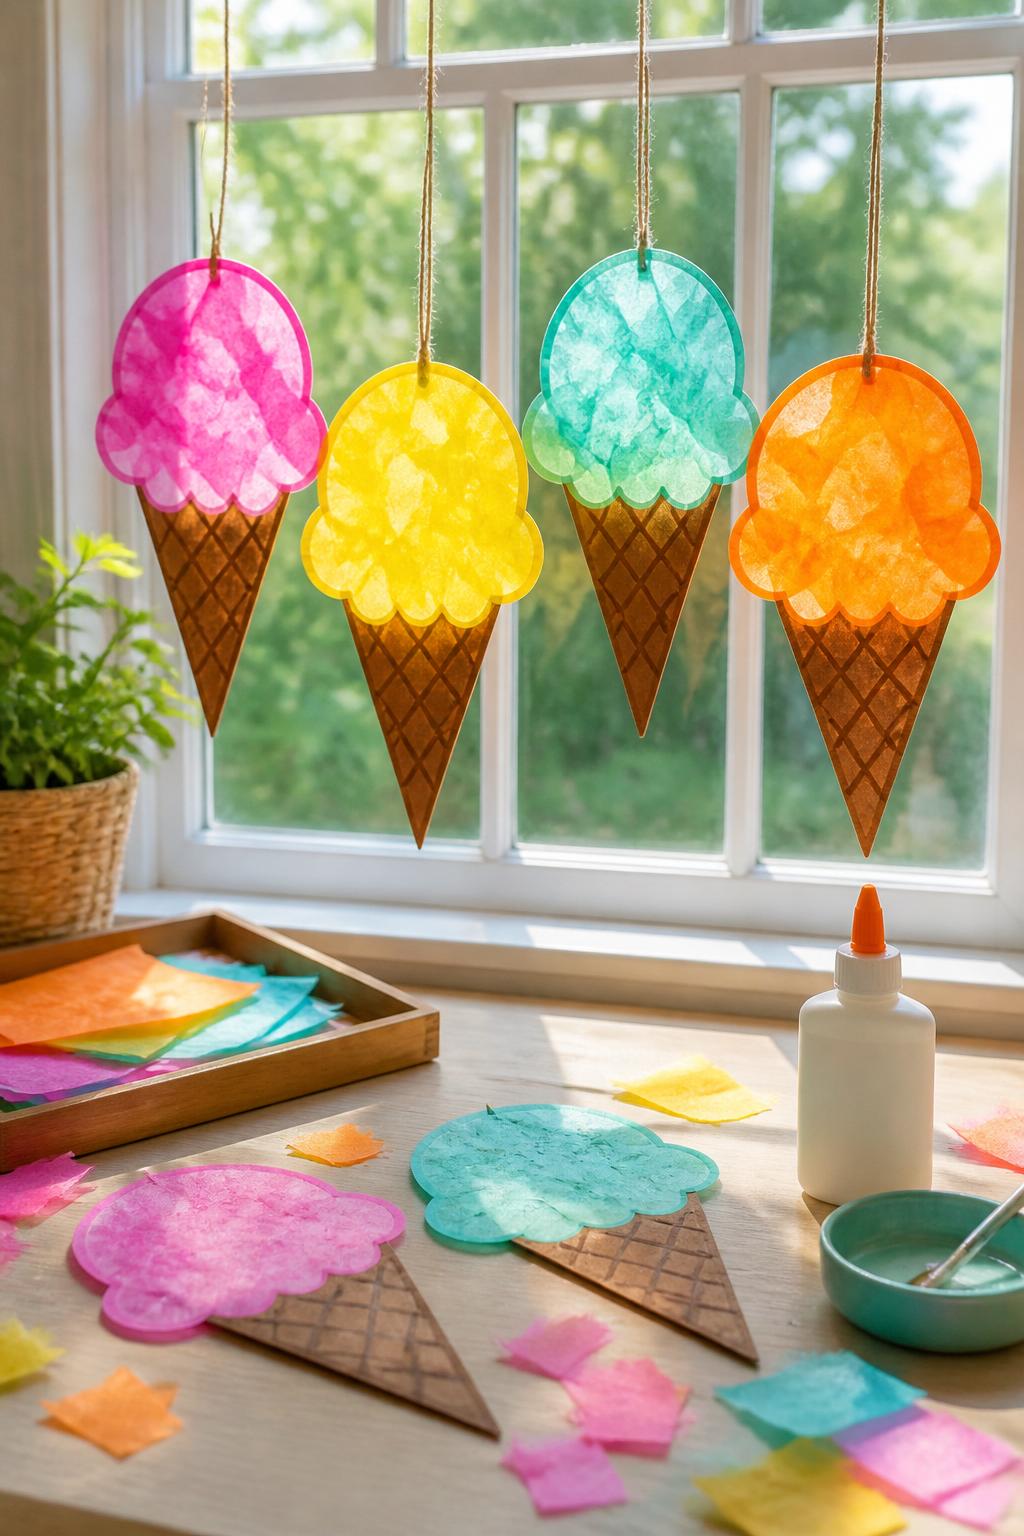
These ice cream sun catchers are simple but look so pretty when light shines through them. Kids can mix colors for different “flavors,” making each cone feel special and full of summer charm.
Materials Needed:
- Clear contact paper
- Tissue paper in different colors
- Brown construction paper
- Child-safe scissors
- Glue stick
- Pencil
- String or tape for hanging
Steps To Make:
- Cut a cone shape from brown construction paper.
- Cut a large scoop shape from clear contact paper.
- Tear tissue paper into small pieces.
- Stick the tissue paper pieces onto the sticky side of the contact paper.
- Seal with another piece of contact paper on top.
- Trim the scoop shape neatly.
- Glue or tape the scoop to the cone.
- Hang it on a sunny window with tape or string.
3. Paper Plate Sunshine Faces
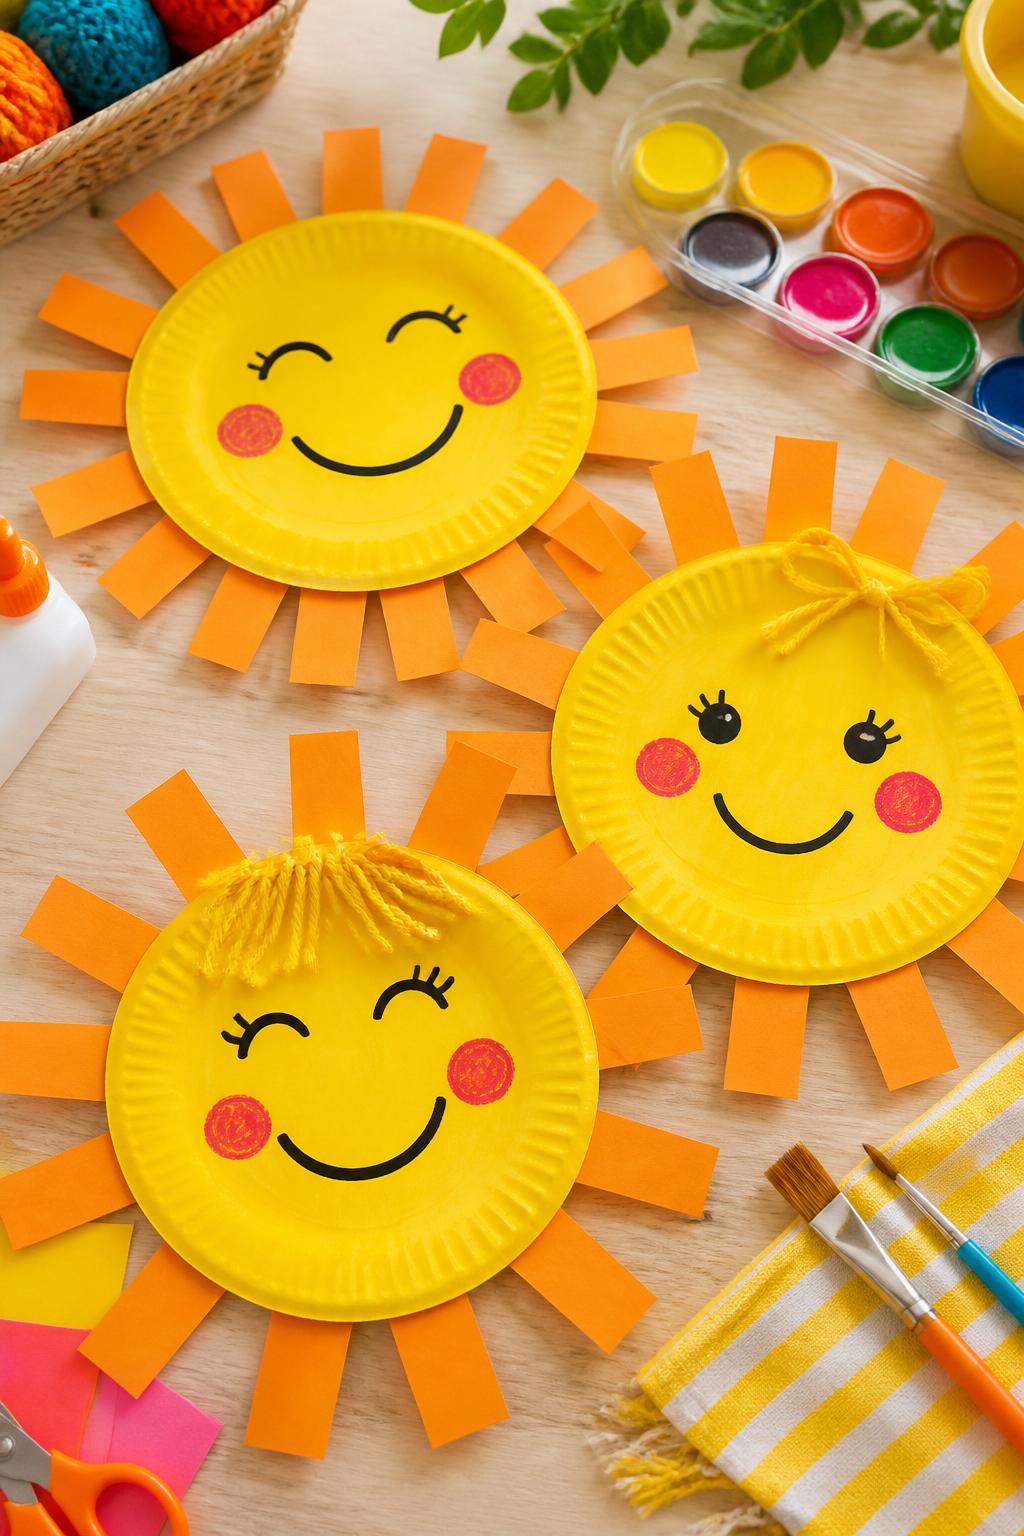
This is a classic summer craft with a more cheerful handmade twist. Kids can make their sunshine silly, sleepy, happy, or extra bright, so the project works well for different ages and personalities.
Materials Needed:
- Paper plates
- Yellow washable paint
- Orange and yellow construction paper
- Markers
- Glue stick
- Paintbrush
- Child-safe scissors
- Optional yarn or sticker decorations
Steps To Make:
- Paint the paper plate yellow and let it dry.
- Cut triangle rays from orange and yellow paper.
- Glue the rays around the back edge of the plate.
- Draw a fun sun face with markers.
- Add cheeks, eyelashes, sunglasses, or yarn hair if desired.
- Let everything dry before hanging it on a wall or fridge.
4. Popsicle Stick Lemonade Stand Sign
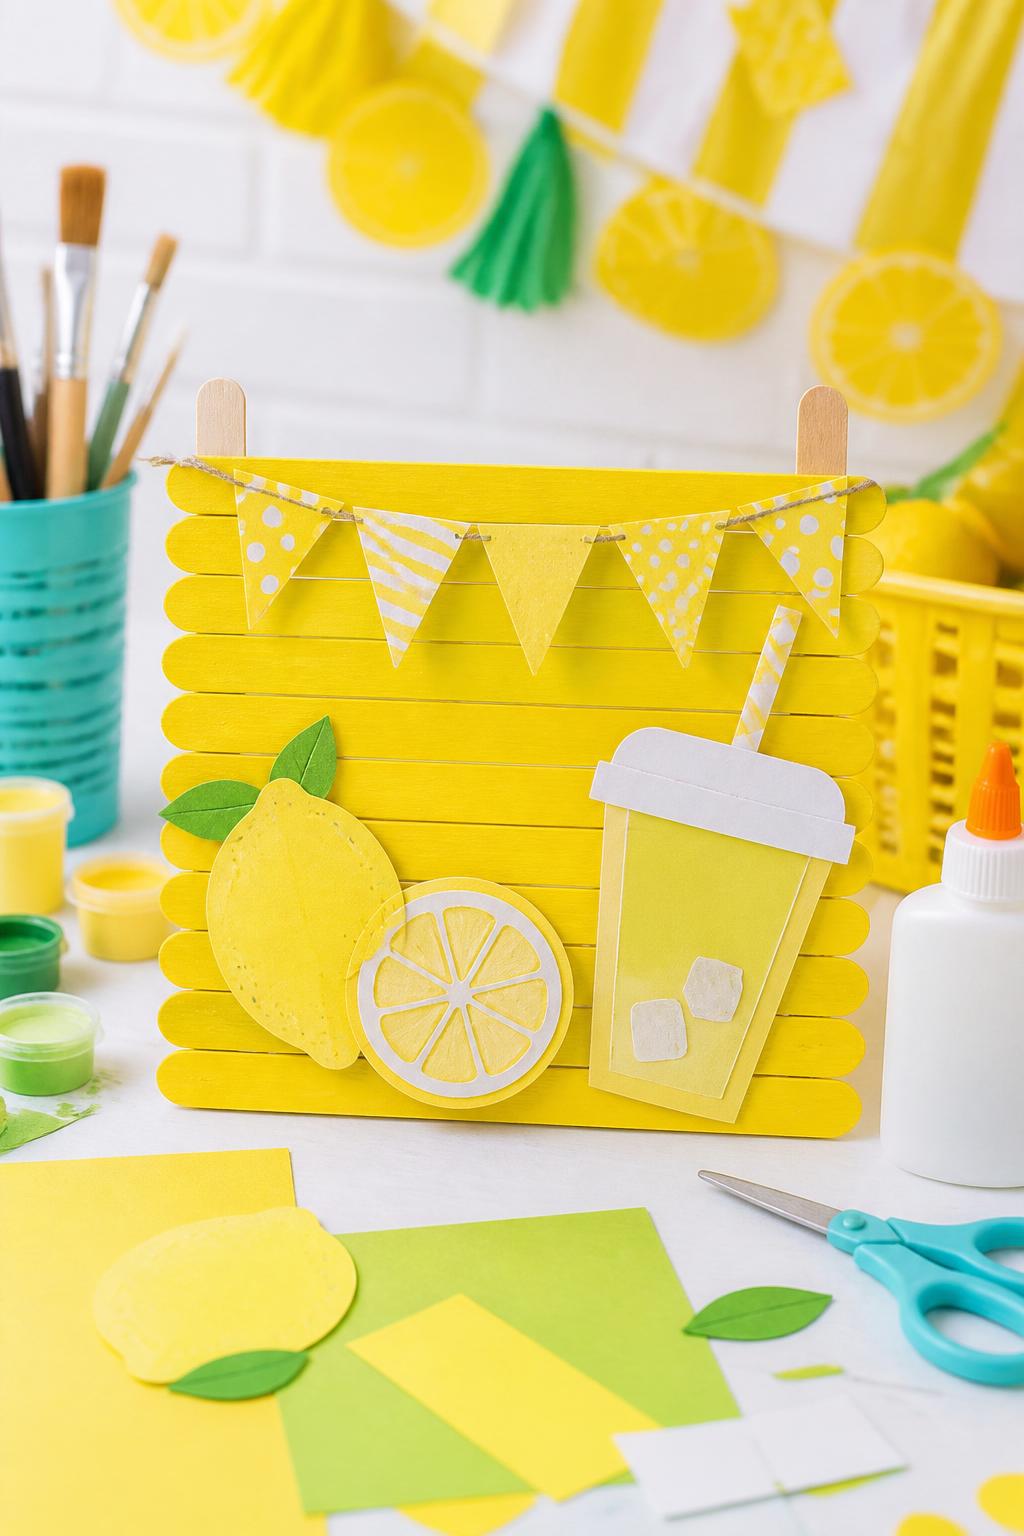
This mini lemonade stand sign is a fun pretend-play craft kids can use after making it. It works especially well for backyard days, play kitchens, summer parties, or a real lemonade stand setup.
Materials Needed:
- Popsicle sticks
- Yellow and white washable paint
- Glue
- Yellow construction paper
- Markers
- String or ribbon
- Child-safe scissors
- Cardboard backing
Steps To Make:
- Glue popsicle sticks side by side onto a cardboard backing.
- Paint the sticks yellow or leave some natural for a wood look.
- Cut small lemon shapes from yellow paper.
- Glue the lemons around the sign.
- Add paper cups, bunting, or straw shapes for decoration.
- Attach string to the back if you want to hang it.
- Let it dry fully before using it for pretend play.
5. Ocean Animal Paper Bag Puppets

Paper bag puppets are great because kids can craft first and then play with them afterward. These ocean animals make the project feel very summer-ready, especially for beach, pool, or sea-life themes.
Materials Needed:
- Brown or white paper lunch bags
- Construction paper
- Googly eyes
- Markers
- Glue stick
- Yarn or ribbon
- Child-safe scissors
Steps To Make:
- Choose an ocean animal, such as a crab, turtle, shark, fish, or jellyfish.
- Cut fins, claws, shells, tentacles, or tails from construction paper.
- Glue the pieces onto the paper bag.
- Add googly eyes near the flap of the bag.
- Draw extra details with markers.
- Let the puppet dry.
- Use the puppet for a simple summer story or pretend ocean show.
6. Painted Rock Strawberry Patch
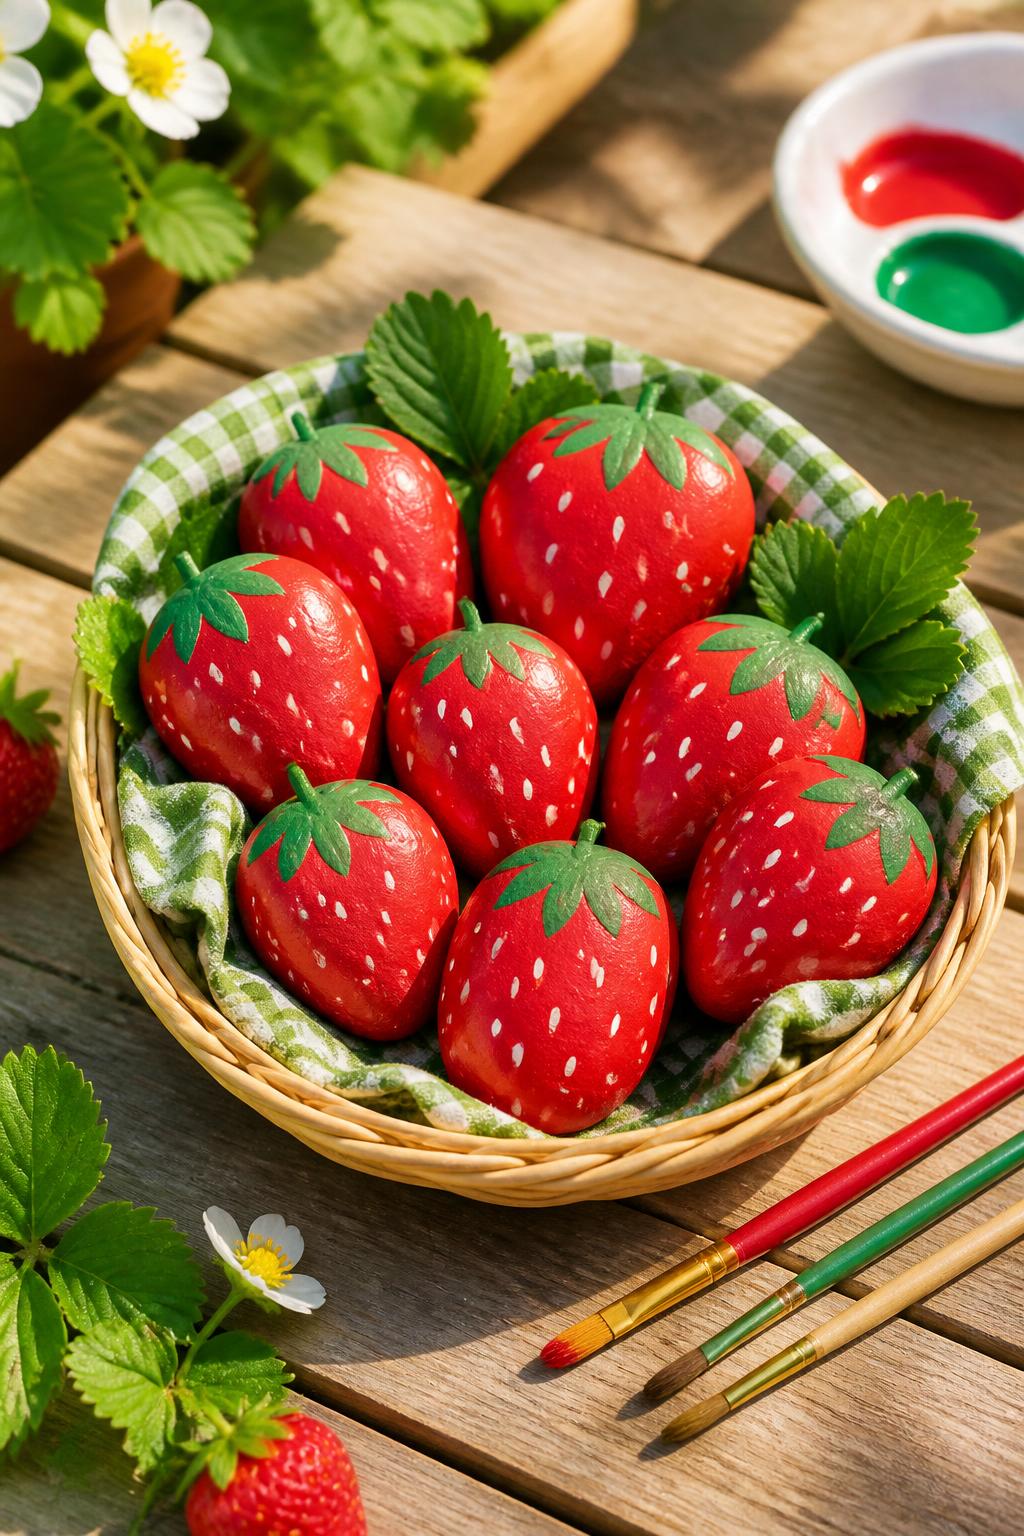
Painted strawberry rocks are adorable for summer and can be used in garden pots, fairy gardens, or pretend market play. Kids get to paint something simple, but the final result looks cute enough to keep.
Materials Needed:
- Smooth small rocks
- Red, green, and white acrylic or washable craft paint
- Paintbrushes
- Paper plate for paint
- Optional clear craft sealer, adult-applied
Steps To Make:
- Wash and dry the rocks.
- Paint each rock red and let it dry.
- Paint green leaves at the top of each rock.
- Use the end of a paintbrush to dot tiny white seeds.
- Let the rocks dry fully.
- Ask an adult to seal them if they will be used outside.
- Place them in a basket, garden pot, or play food setup.
7. Pool Noodle Boat Craft

This craft is great because kids can test their boats after making them. It brings a little science into craft time as they see what floats, what tips over, and how the sail changes the look of each boat.
Materials Needed:
- Pool noodle slices, pre-cut by an adult
- Paper straws or wooden craft sticks
- Construction paper
- Stickers
- Tape
- Child-safe scissors
- Shallow tray or tub of water
Steps To Make:
- Have an adult cut the pool noodle into thick slices.
- Cut triangle sails from construction paper.
- Decorate the sails with markers or stickers.
- Tape each sail to a straw or craft stick.
- Push the straw gently into the pool noodle base.
- Place the boat in a shallow tray of water.
- Let kids test and adjust their boats.
8. Summer Fruit Paper Garland
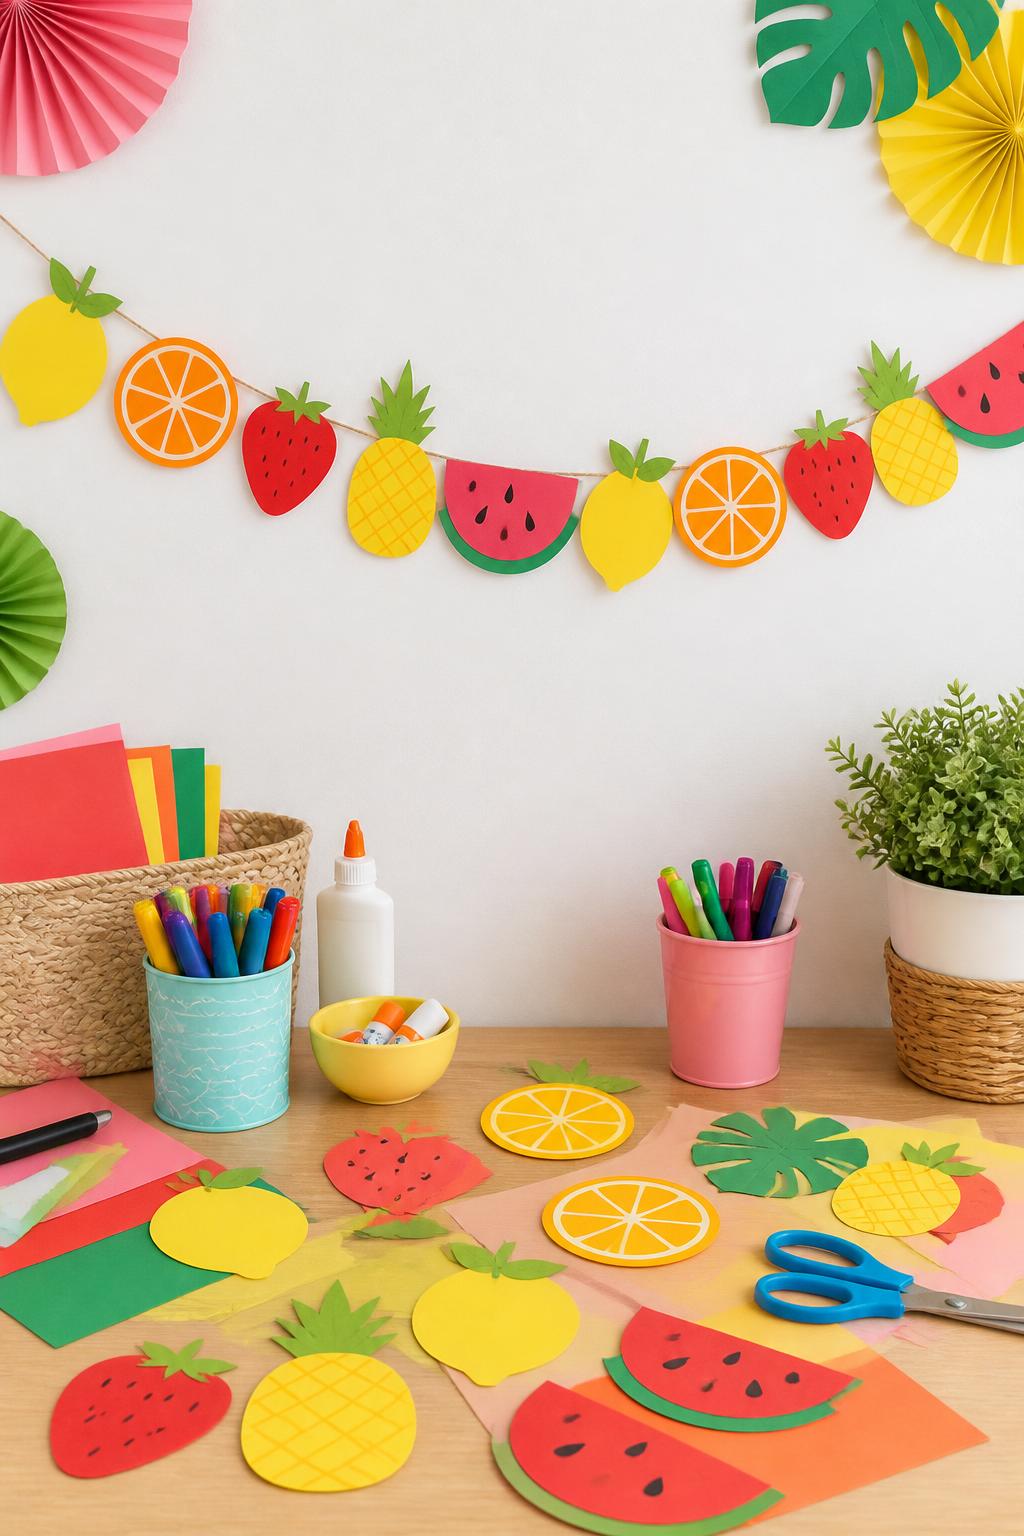
This fruit garland makes a lovely summer decoration for a bedroom, classroom, picnic table, or party corner. Kids can work on one fruit at a time, which makes it a good group craft too.
Materials Needed:
- Construction paper in fruit colors
- Markers
- Glue stick
- String or yarn
- Hole punch
- Child-safe scissors
- Tape
Steps To Make:
- Choose fruits to make, such as lemons, strawberries, pineapples, and watermelon slices.
- Cut the basic fruit shapes from paper.
- Add seeds, leaves, lines, and details with markers.
- Punch a small hole near the top of each fruit.
- Thread the fruit shapes onto string or yarn.
- Space them out evenly.
- Hang the garland across a wall, shelf, or party table.
9. Seashell Memory Frame

This seashell frame is a lovely way to turn beach finds into something special. Even if you do not have real shells, craft shells work well and still give kids a keepsake-style project.
Materials Needed:
- Plain cardboard or wooden frame
- Small seashells
- Craft glue
- Blue and tan paper
- Stickers or foam shapes
- Optional printed summer photo
- Adult supervision for stronger glue
Steps To Make:
- Start with a plain frame.
- Cut blue or tan paper pieces to decorate the corners.
- Arrange seashells around the frame before gluing.
- Glue each shell carefully in place.
- Add paper starfish, waves, or small foam shapes.
- Let the frame dry flat.
- Add a summer photo or drawing inside.
10. Bubble Wrap Jellyfish Craft
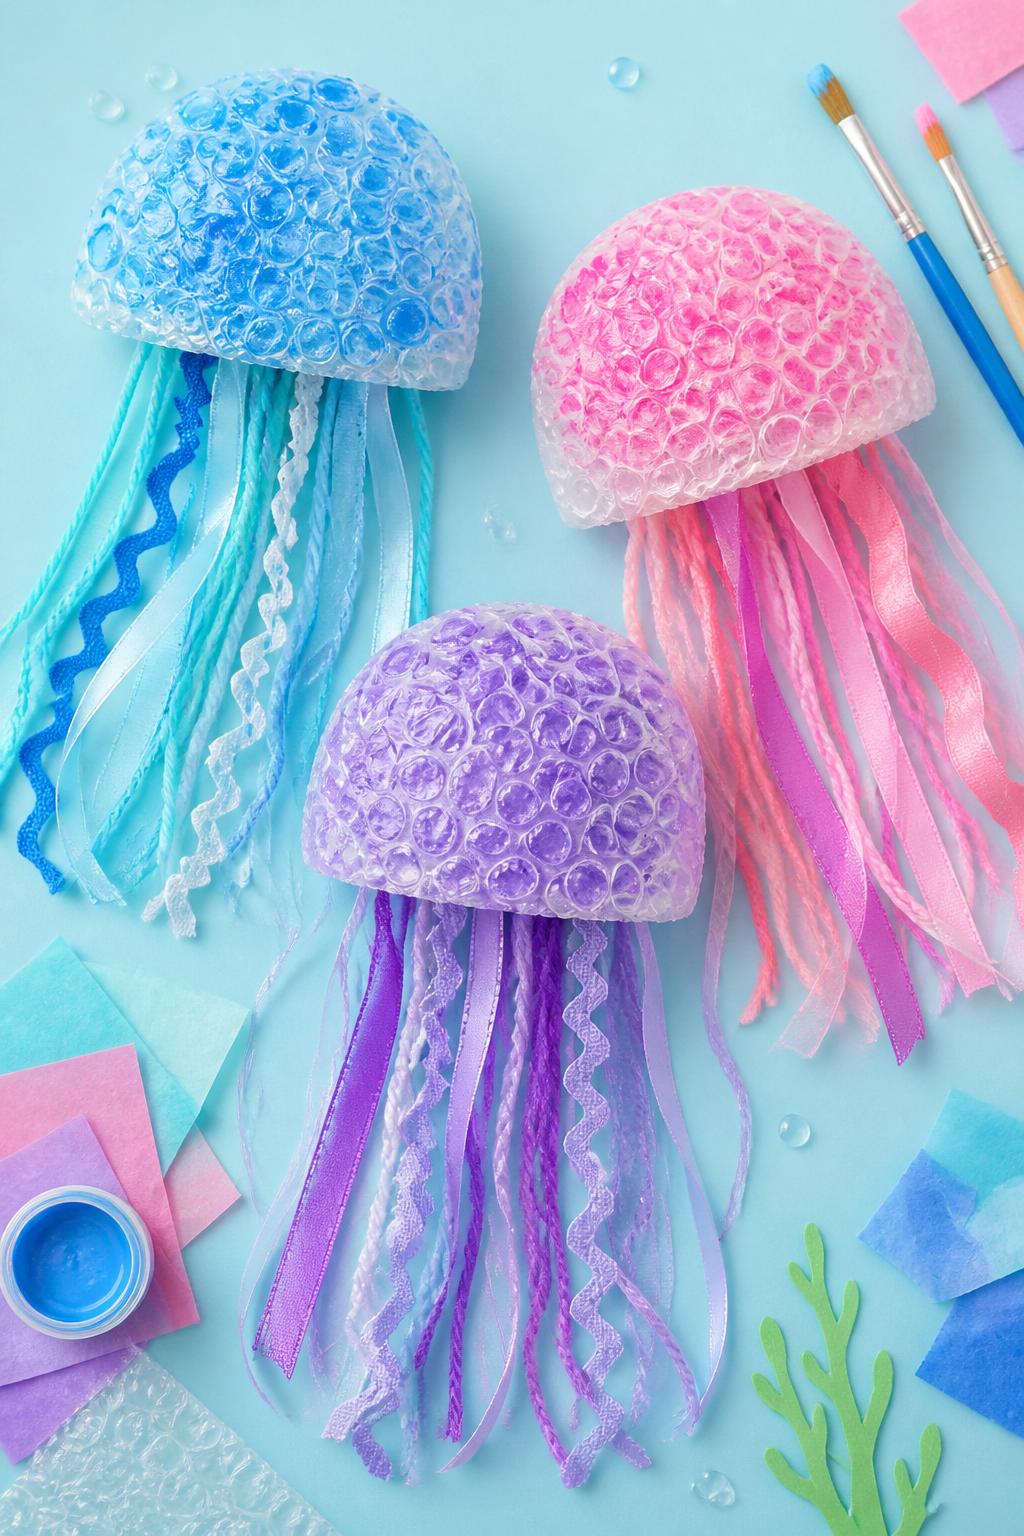
Bubble wrap gives this jellyfish craft a fun texture that kids will enjoy painting. The hanging ribbons make it feel more playful, especially when displayed near a window or on a classroom wall.
Materials Needed:
- Bubble wrap
- Washable paint
- Ribbon, yarn, or crepe paper strips
- Glue
- Googly eyes
- Child-safe scissors
- Hole punch
- String for hanging
Steps To Make:
- Cut a half-circle jellyfish top from bubble wrap.
- Paint the bubble wrap and let it dry.
- Cut ribbon or yarn into long tentacle pieces.
- Glue the tentacles to the back bottom edge.
- Add googly eyes to the front.
- Punch a hole at the top.
- Add string and hang the jellyfish craft.
11. Paper Cup Pineapple Pots
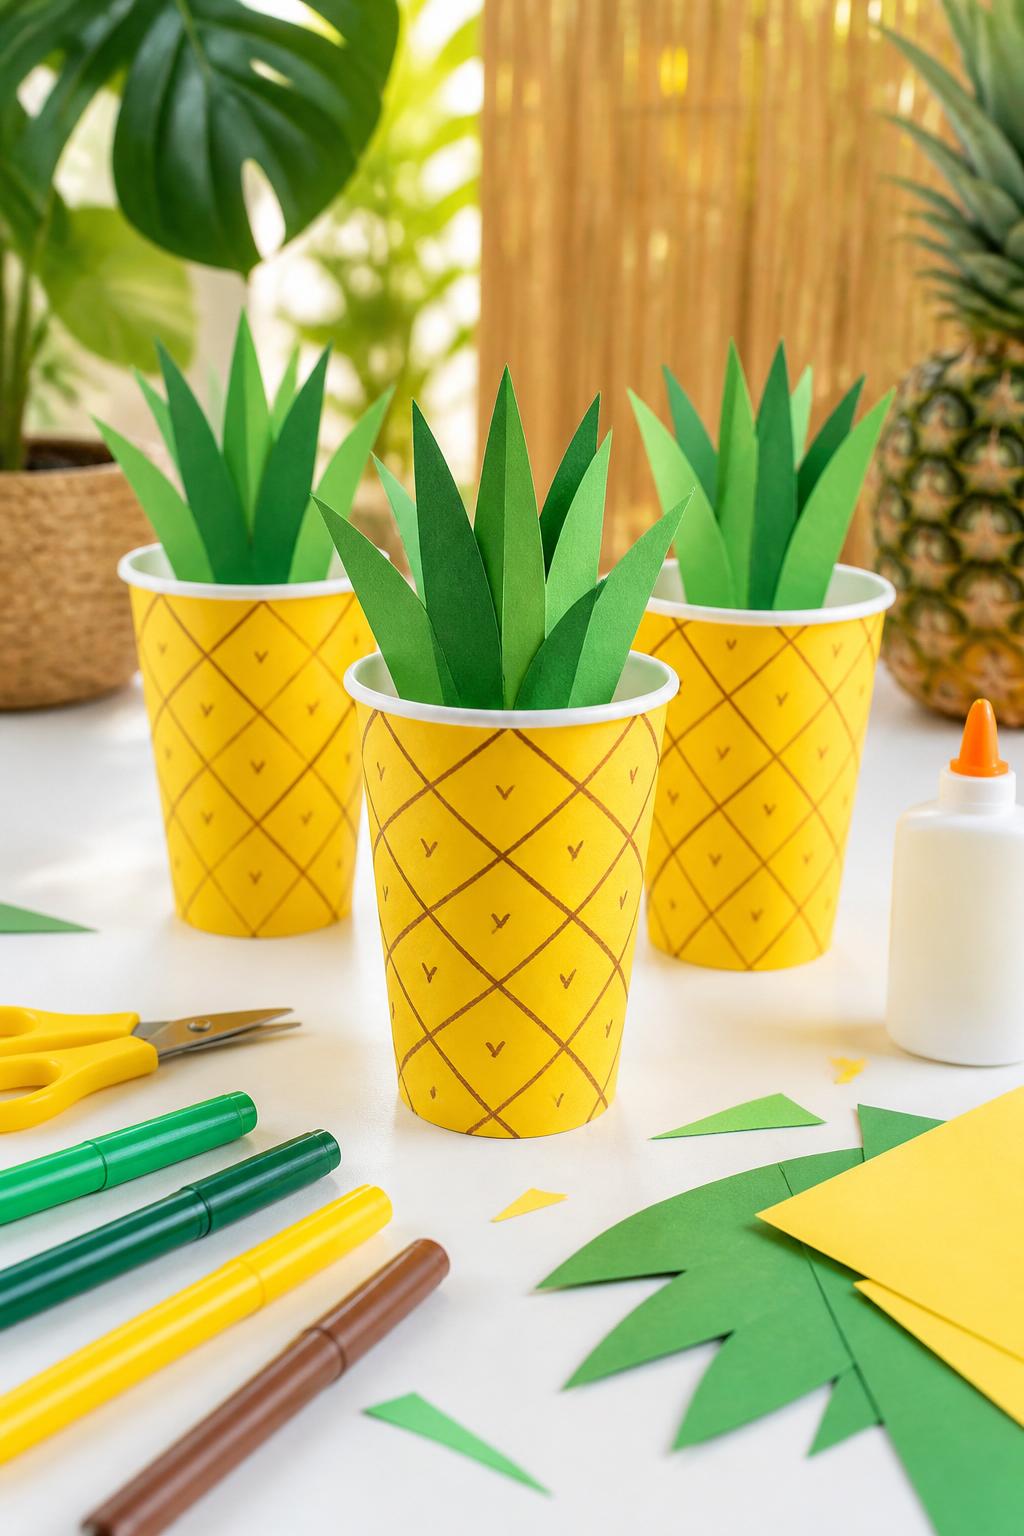
These paper cup pineapples are cute, simple, and great for party tables or summer room decor. Kids can also use them as pencil holders, treat cups, or little pretend fruit stands.
Materials Needed:
- Yellow paper cups
- Green construction paper
- Black or brown marker
- Glue
- Child-safe scissors
- Optional small pom-poms or stickers
Steps To Make:
- Draw crisscross lines on the yellow paper cup.
- Add small dots or marks to make it look like pineapple skin.
- Cut long leaf shapes from green paper.
- Glue the leaves inside the top edge of the cup.
- Add stickers or pom-poms if desired.
- Let the cup dry.
- Use it as a pencil cup, treat holder, or table craft.
12. Rainbow Wind Ribbon Wands
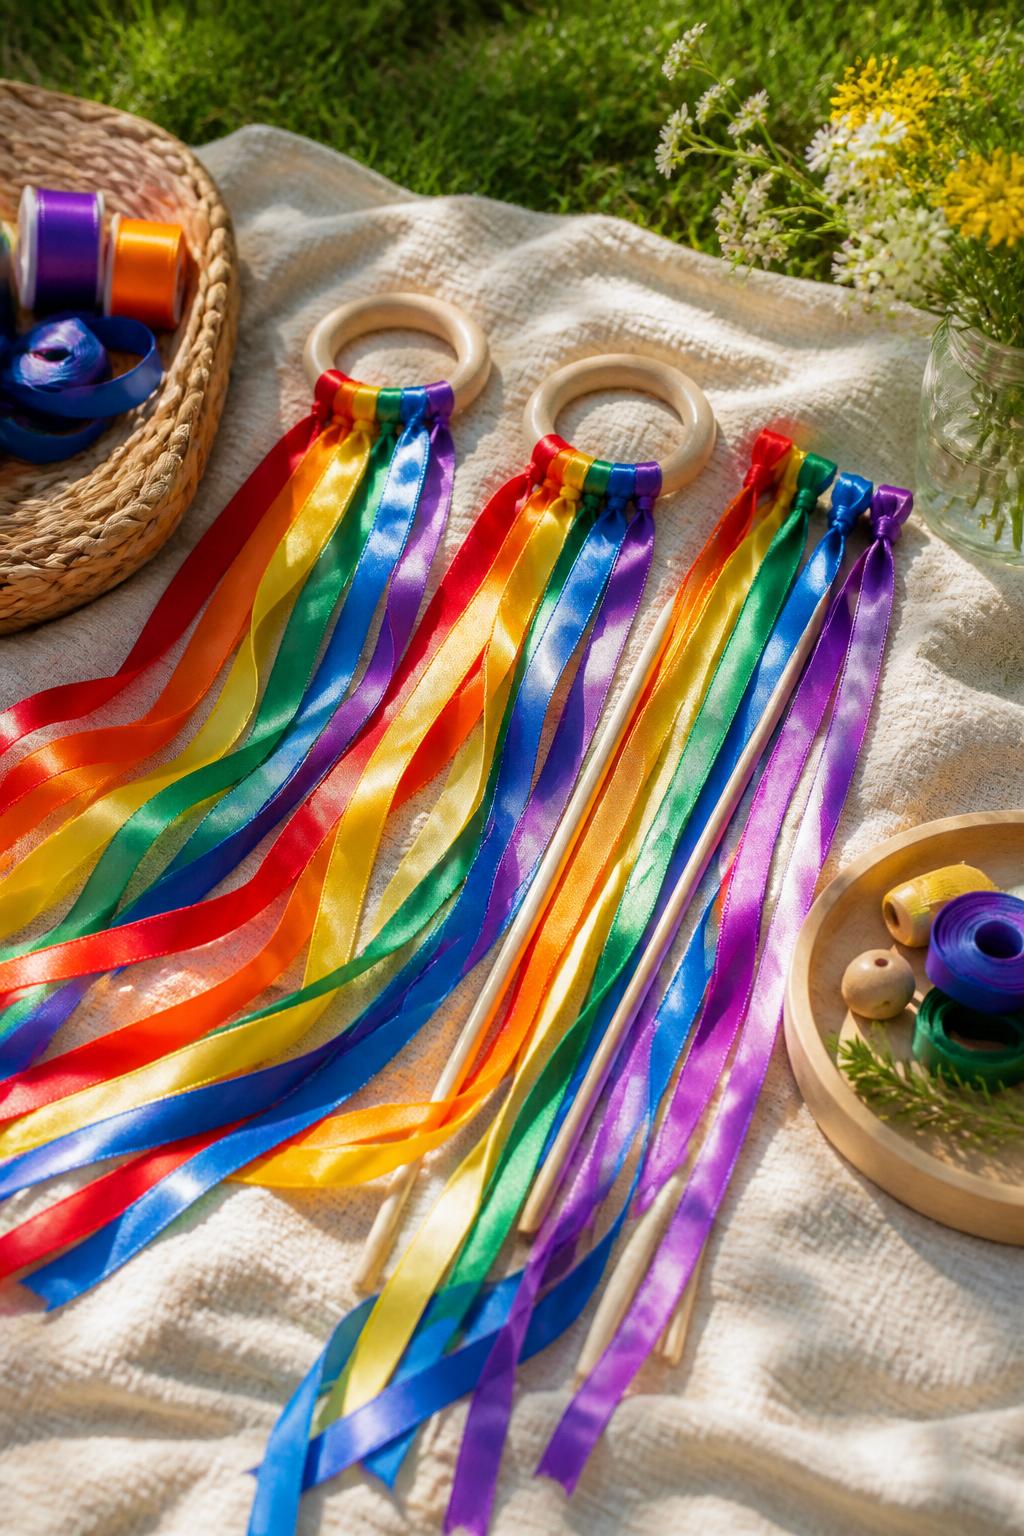
Ribbon wands are great for outdoor play after craft time. Kids can wave them in the yard, use them for pretend dancing, or bring them to summer parties and picnics.
Materials Needed:
- Wooden rings or craft sticks
- Ribbon in several colors
- Washi tape
- Child-safe scissors
- Glue or strong tape
- Optional bells, adult-approved
Steps To Make:
- Cut ribbon into long strips.
- Tie the ribbons onto a wooden ring or tape them to a craft stick.
- Wrap washi tape around the handle for decoration.
- Add more ribbon until the wand looks full.
- Trim the ends if needed.
- Let kids test the wand outside.
- Store it in a cup or basket when not in use.
13. Cardboard Flip-Flop Craft
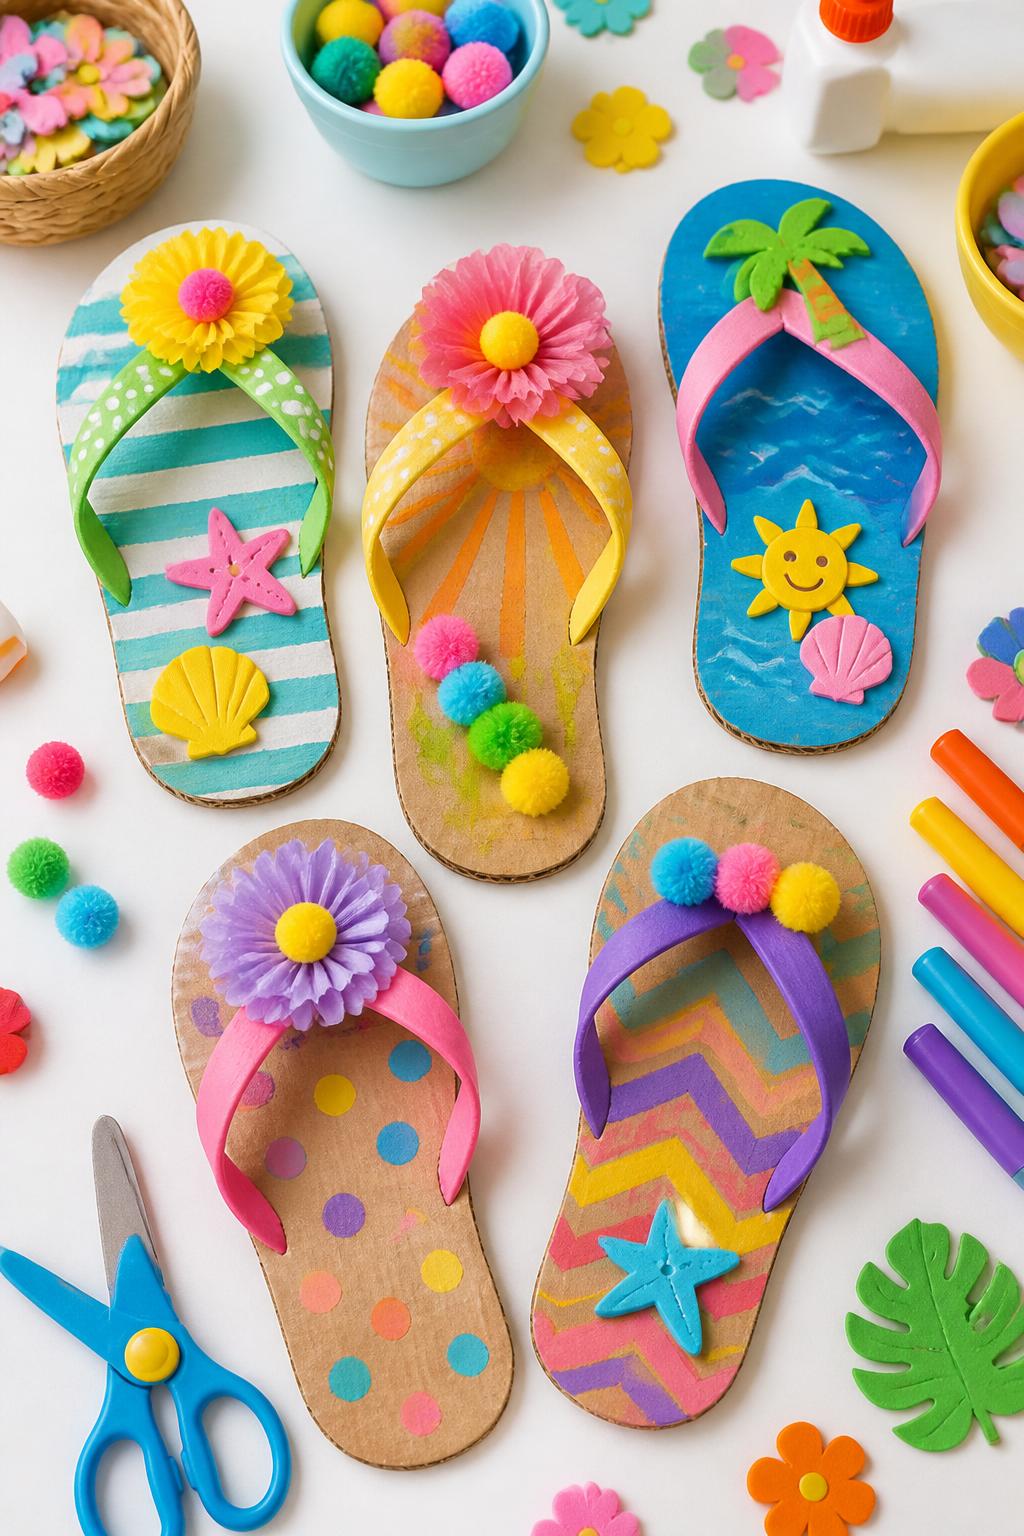
This craft is playful because kids get to design their own dream summer sandals without needing real shoes. It is perfect for beach-themed lessons, summer camp crafts, or party activities.
Materials Needed:
- Cardboard
- Pencil
- Child-safe scissors
- Paint or markers
- Pipe cleaners or paper strips
- Pom-poms
- Foam stickers
- Glue
Steps To Make:
- Draw a flip-flop shape onto cardboard.
- Cut out the shape with adult help if needed.
- Decorate the base with paint, markers, or stickers.
- Bend a pipe cleaner or paper strip into a sandal strap shape.
- Glue the strap onto the flip-flop.
- Add pom-poms, paper flowers, or foam shapes.
- Let it dry flat before displaying.
14. Firefly Glow Jar Craft
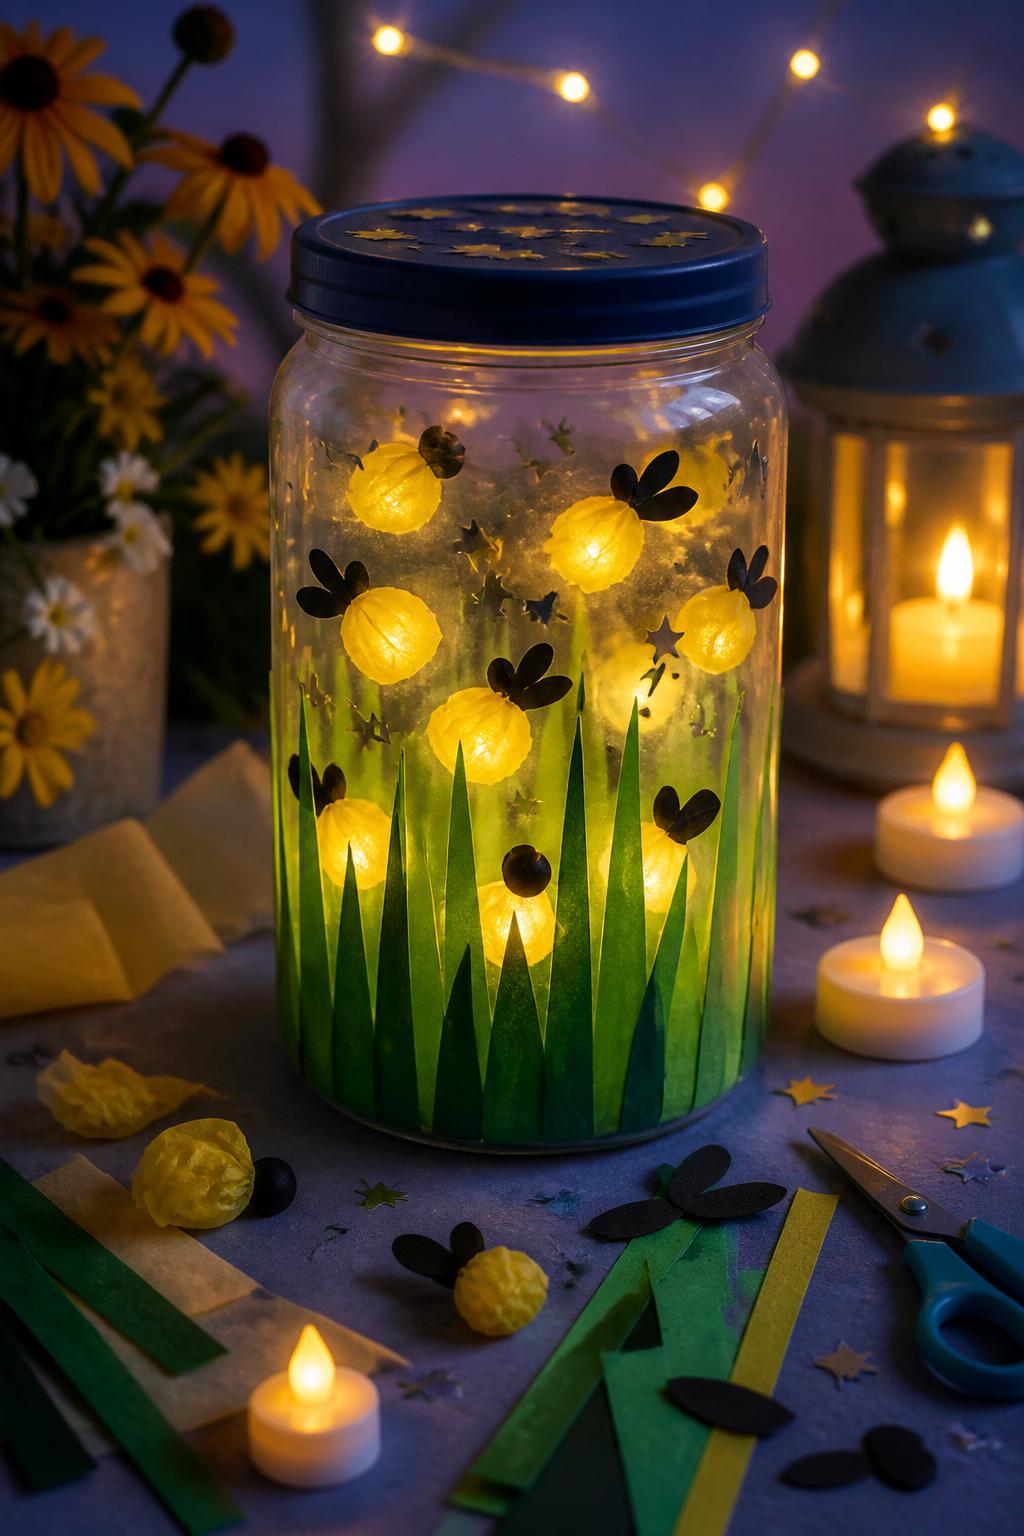
This firefly jar feels special for summer evenings, but it stays safe and simple with paper details and battery lights. It works well as a craft for kids who love bugs, camping, backyard nights, or nature themes.
Materials Needed:
- Clear plastic jar
- Yellow tissue paper
- Black construction paper
- Green paper
- Star stickers
- Battery tea light
- Glue stick
- Child-safe scissors
Steps To Make:
- Cut tiny firefly wing and body shapes from black paper.
- Add small yellow tissue paper pieces for the glowing part.
- Cut green paper grass and place it inside the jar.
- Stick or place the fireflies around the inside or outside of the jar.
- Add star stickers to the outside.
- Place a battery tea light inside.
- Close the jar and enjoy the soft glow.
15. Pressed Flower Summer Bookmarks
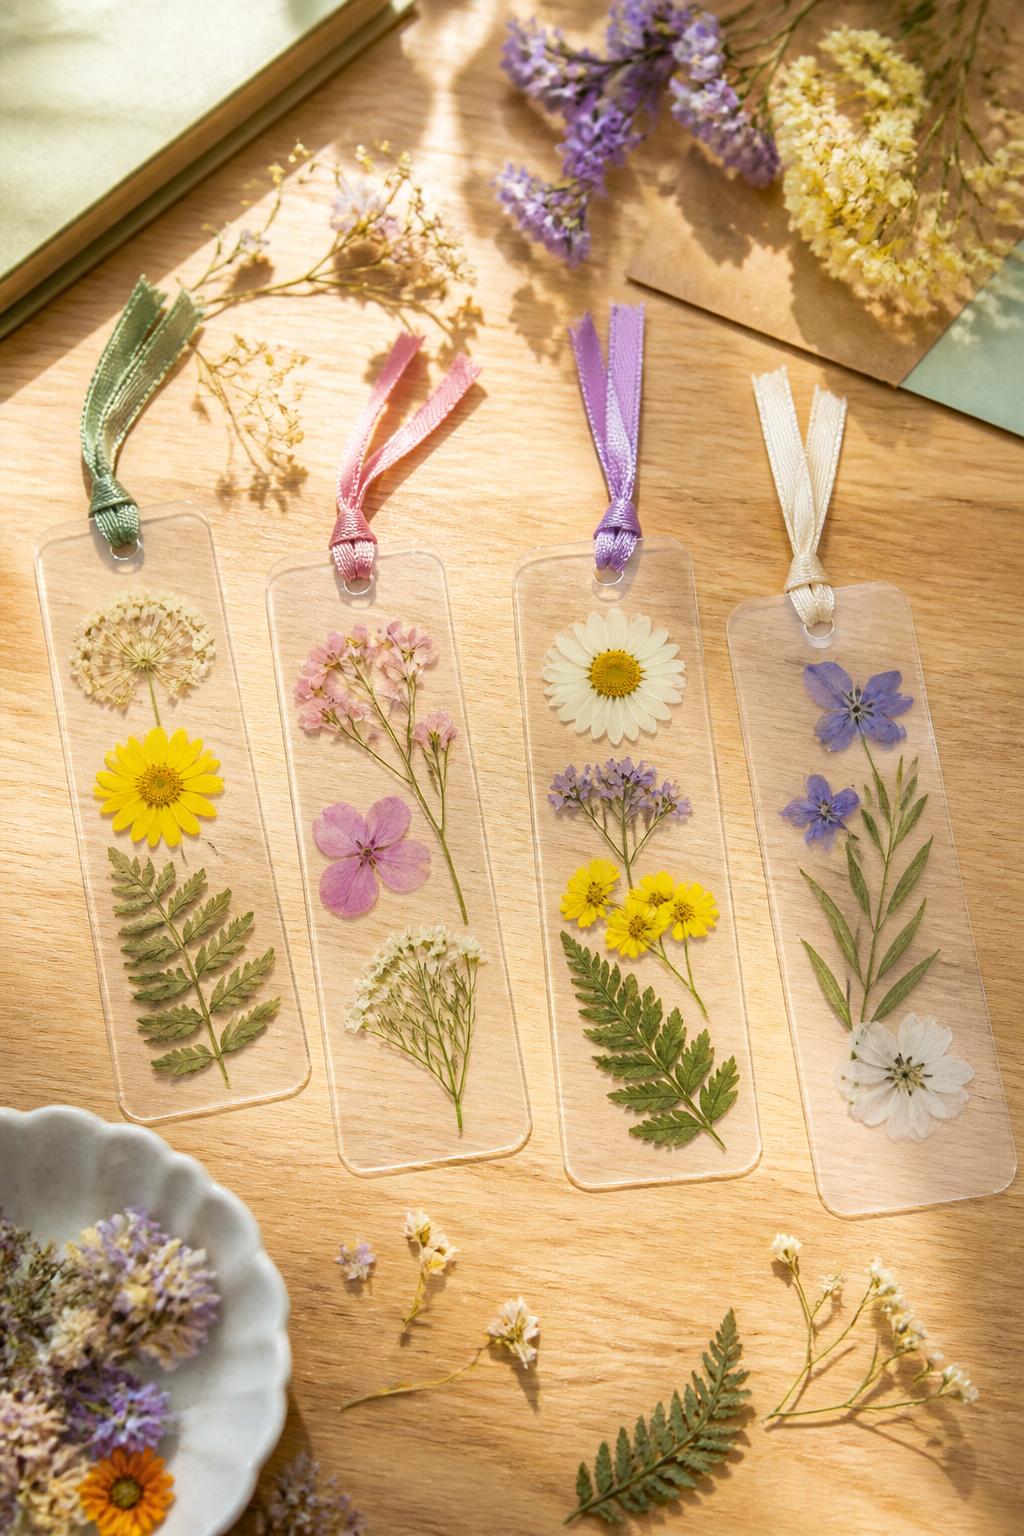
Pressed flower bookmarks are gentle, pretty, and useful after the craft is done. Kids can collect small flowers or leaves during a walk, then turn them into keepsakes for summer reading.
Materials Needed:
- Small pressed flowers or leaves
- Clear contact paper
- Cardstock
- Hole punch
- Ribbon
- Child-safe scissors
- Optional stickers
Steps To Make:
- Press small flowers or leaves ahead of time inside a heavy book.
- Cut bookmark shapes from cardstock or clear contact paper.
- Arrange the pressed flowers on the bookmark.
- Cover with clear contact paper to seal.
- Trim the edges neatly.
- Punch a hole at the top.
- Tie ribbon through the hole to finish the bookmark.


