
Table of Contents Show
Painting a plain white shirt is one of those simple hobbies that feels calm, but it can be hard to know what to paint that you’ll actually want to wear. If you’re new to fabric paint, you might worry about messy lines or designs that look “too crafty.”

This list is here to help with easy, good-looking ideas that work on real shirts.
Grab a white tee and let’s get into 15 wearable painting ideas.
1. Tiny Wildflower Collar Scatter
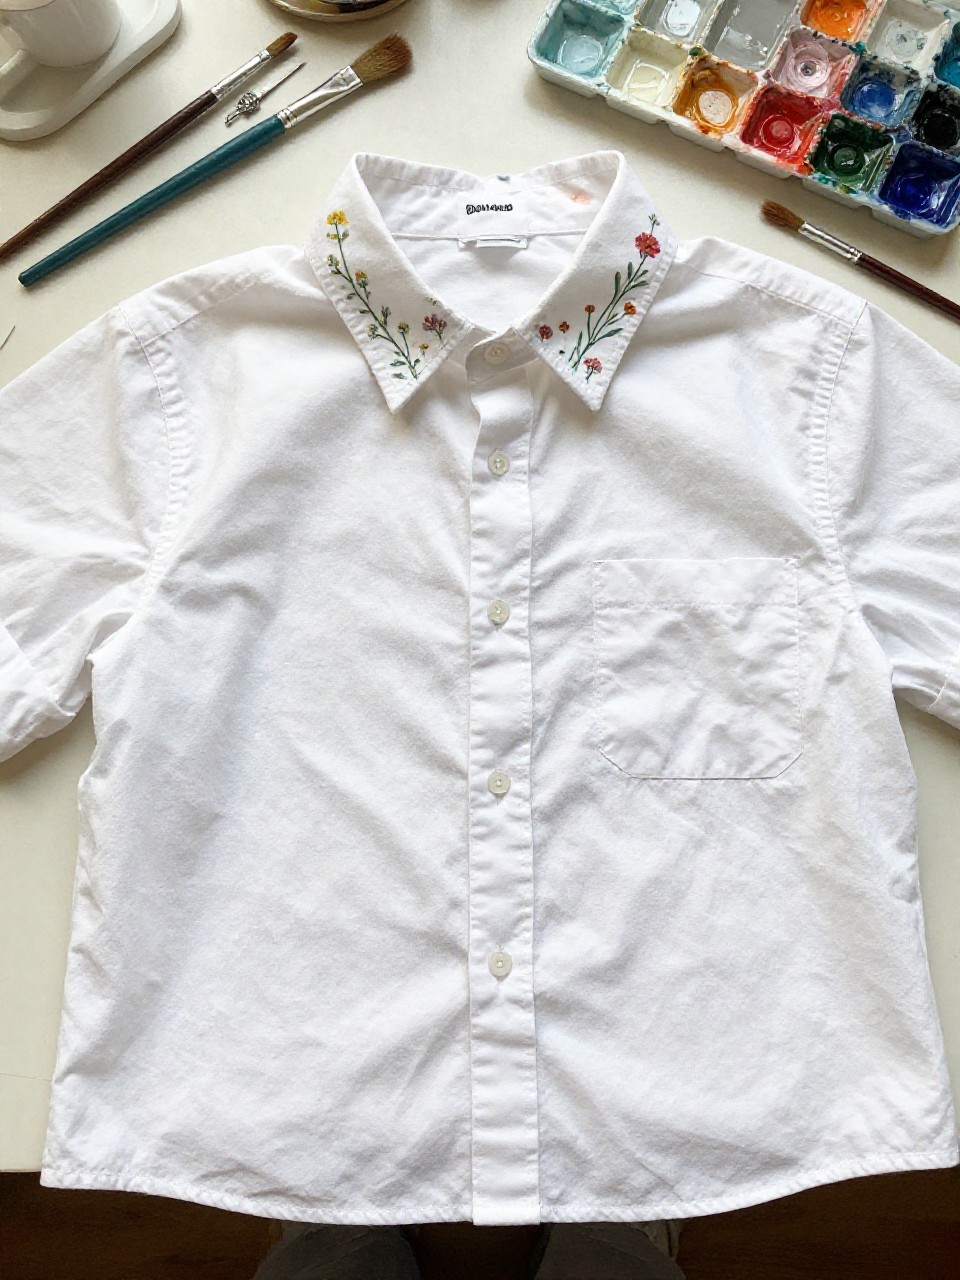
A white shirt dotted with tiny wildflowers around the collar looks soft, sweet, and handmade in the best way. This is relaxing for beginners because each flower is small, so there’s no pressure to make one big perfect painting. It also pairs well with jeans or skirts.
Materials Needed:
For People Who Love to Make Things ✂️
- White cotton shirt
- Fabric paint (green, pink, yellow, blue)
- Paintbrushes in multiple sizes
- Palette or paint tray
- Cardboard insert (inside shirt)
Steps to Make:
- Wash and dry the shirt, then slide cardboard inside to stop bleed-through.
- Lightly sketch a loose “necklace” line of where flowers will go.
- Paint simple flower dots and petals, spacing them naturally around the neckline.
- Add thin green stems and tiny leaf strokes between flowers.
- Let dry fully, then heat-set according to your fabric paint directions.
2. Minimalist Black Line Face Outline
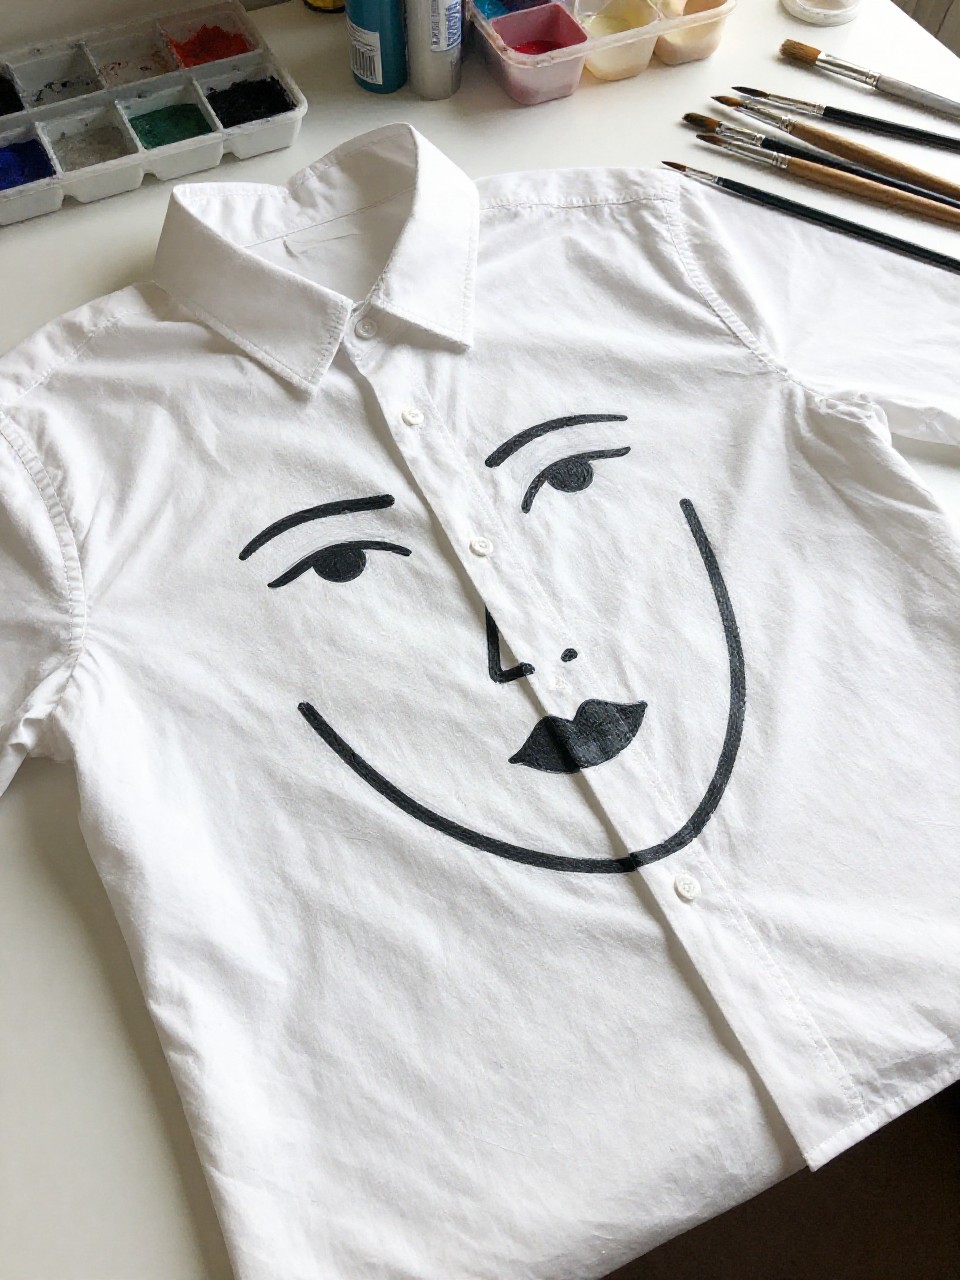
This shirt has a simple one-line face drawing across the chest, like modern art you can wear. It’s satisfying because you can keep it loose and imperfect, and it still looks stylish. Great for anyone who wants an easy design with a big impact.
Materials Needed:
- White shirt
- Black fabric paint (or fabric paint pen)
- Paintbrushes in multiple sizes
- Palette or paint tray
- Cardboard insert (inside shirt)
Steps to Make:
- Press the shirt flat and add cardboard inside the front panel.
- With a pencil, lightly sketch one continuous line for a face profile.
- Paint over the line slowly, letting some thickness changes show brush pressure.
- Add one or two simple details like a closed eye line or a small lip curve.
- Dry completely and heat-set so the black line stays crisp after washing.
3. Watercolor Sunset Ombre Hem
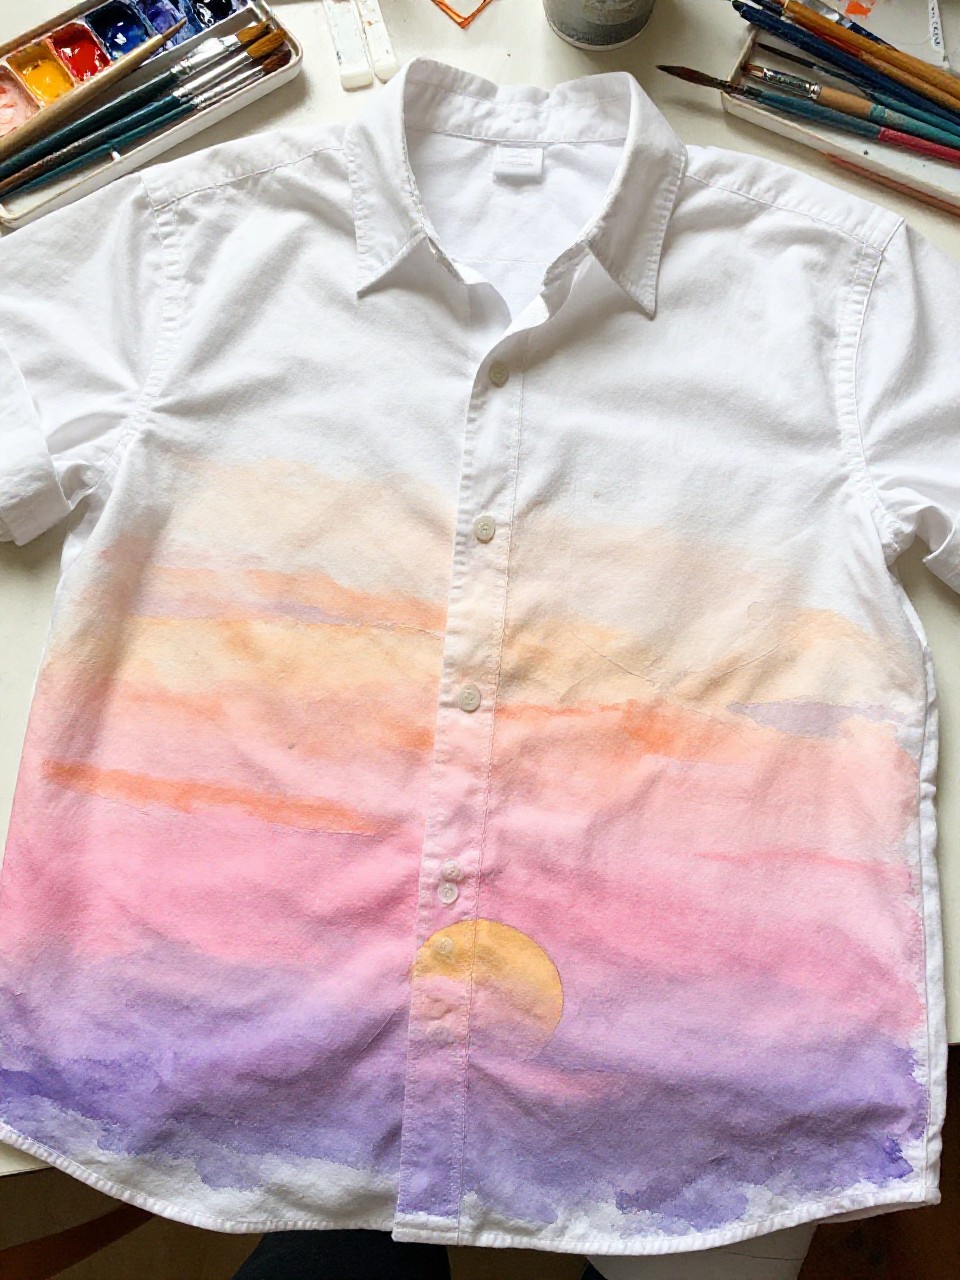
The bottom of the shirt fades from warm pink to orange to soft purple, like a sunset glow. It feels calming to paint because blending is the whole point, so streaks and soft edges look natural. This is a fun way to upgrade a basic tee without drawing anything complex.
Materials Needed:
- White shirt
- Fabric paint (pink, orange, purple)
- Paintbrushes in multiple sizes
- Palette or paint tray
- Spray bottle with water (optional)
- Cardboard insert (inside shirt)
Steps to Make:
- Place cardboard inside and slightly dampen the hem area if you want softer blends.
- Paint a pink band along the bottom edge, working in long horizontal strokes.
- Add orange above it and blend where the colors meet while still wet.
- Add purple higher up and blend down into the orange for a smooth fade.
- Let dry flat, then heat-set to lock in the ombre color.
4. Daisy Pocket Peek (Real or Painted Pocket)

A small cluster of daisies looks like it’s popping out of the pocket area, giving a cute, everyday look. This is beginner-friendly because you’re painting in a small space, and daisies are just simple petals around a center. It’s perfect for gifts too.
Materials Needed:
- White shirt
- Fabric paint (white, yellow, green)
- Paintbrushes in multiple sizes
- Palette or paint tray
- Cardboard insert (inside shirt)
Steps to Make:
- Insert cardboard and smooth the pocket area (or where a pocket would be).
- Lightly mark 3–5 flower centers near the top edge of the pocket zone.
- Paint yellow circles for centers, then add white petals around each circle.
- Add green stems and a few leaves angled downward like they sit inside the pocket.
- Dry and heat-set so the pocket design stays bright and wearable.
5. Soft Rainbow Sleeve Bands

Both sleeves have hand-painted rainbow bands that wrap around like gentle stripes. It’s satisfying because you can keep the lines a little wavy and it still looks intentional and fun. This is a great first fabric painting project since it’s mostly simple color blocks.
Materials Needed:
- White shirt
- Fabric paint (red, orange, yellow, green, blue)
- Paintbrushes in multiple sizes
- Palette or paint tray
- Masking tape (optional)
- Cardboard insert (inside shirt)
Steps to Make:
- Slide cardboard into one sleeve and flatten it so the fabric is tight.
- Mark two band areas around the sleeve so the stripes wrap evenly.
- Paint the rainbow colors in order, letting each band follow the sleeve curve.
- Add a second coat where needed so colors look solid but still brushy.
- Dry, remove cardboard, and heat-set before painting the other sleeve.
6. Lavender Sprig Shoulder Trail
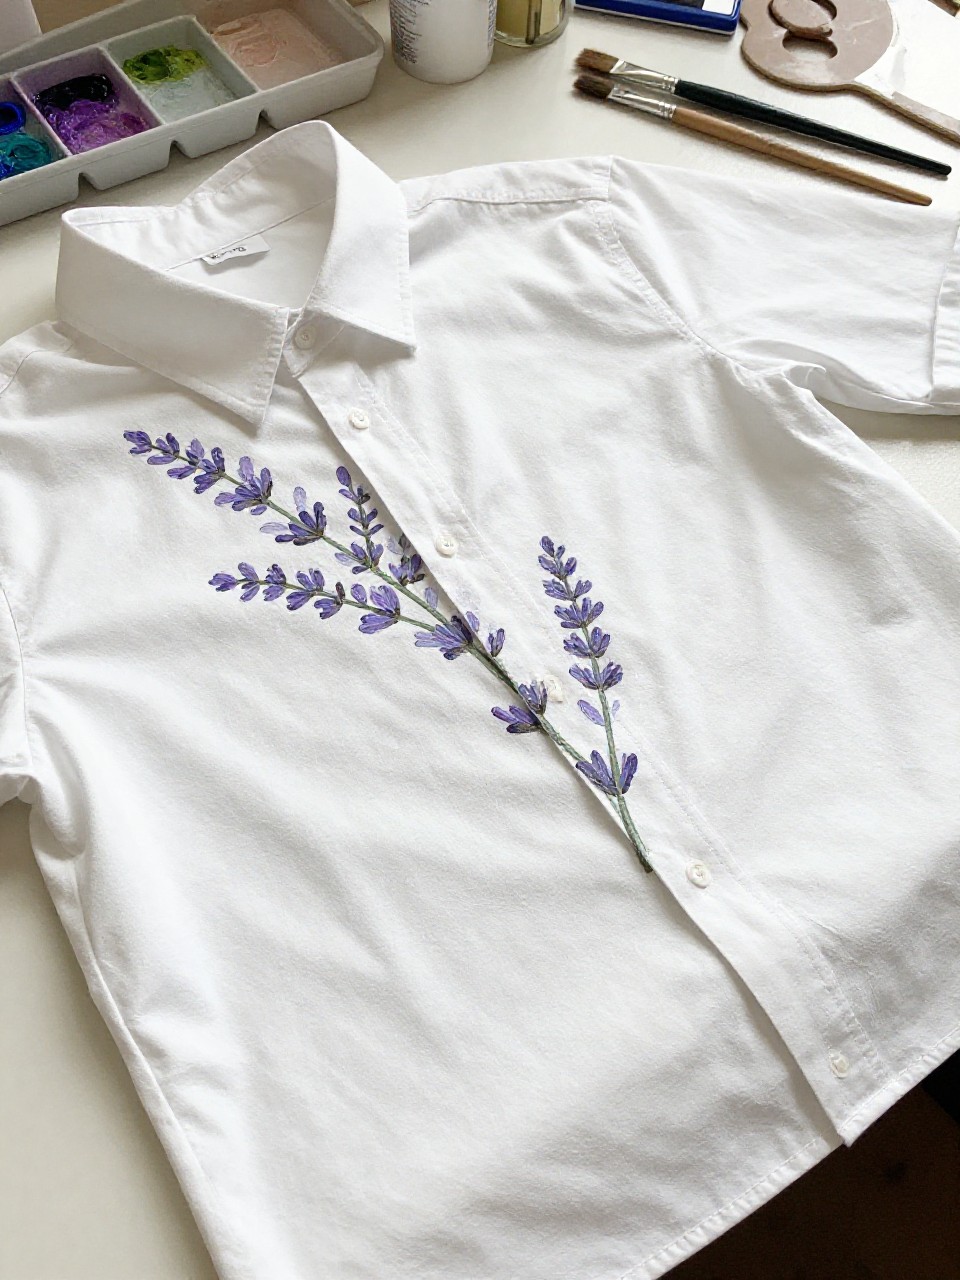
This design shows a thin lavender sprig trail starting at the shoulder and flowing diagonally down the front. It feels peaceful to paint because it’s just repeated small leaf and petal strokes. The finished look is delicate and easy to wear with neutral outfits.
Materials Needed:
- White shirt
- Fabric paint (purple and green)
- Paintbrushes in multiple sizes
- Palette or paint tray
- Cardboard insert (inside shirt)
Steps to Make:
- Insert cardboard and choose one shoulder as the starting point.
- Paint a thin green stem line that curves gently across the shirt front.
- Add small green leaf strokes along the stem, varying sizes as you go.
- Dot and drag tiny purple strokes for lavender buds in clustered sections.
- Let it dry flat, then heat-set so the sprigs don’t crack in the wash.
7. Bold Abstract Color Block Chest Patch
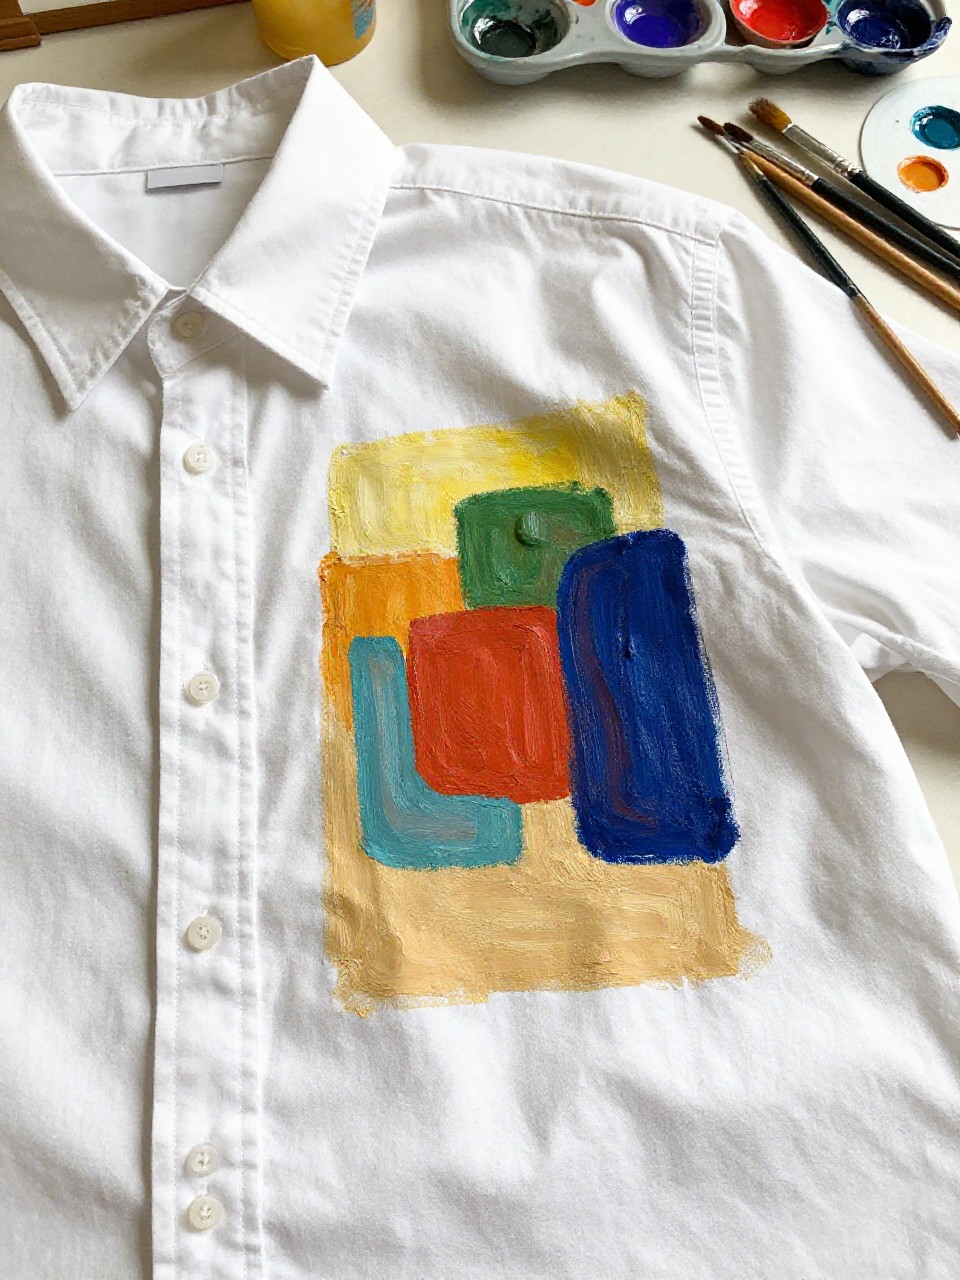
A chunky, painterly patch of overlapping shapes sits on the chest like a modern art swatch. This one is great for beginners because there’s no “right” shape—just layers and color choices. It’s also a smart way to cover a tiny stain or old logo.
Materials Needed:
- White shirt
- Fabric paint (3–5 colors)
- Paintbrushes in multiple sizes
- Palette or paint tray
- Cardboard insert (inside shirt)
Steps to Make:
- Place cardboard inside and mark a rough rectangle or organic patch area.
- Paint the first large shape in one color, leaving uneven brush edges visible.
- Layer two or three more shapes that overlap slightly, letting colors meet and mix.
- Add small accent strokes or dots to balance the patch visually.
- Dry fully and heat-set so the layered paint stays flexible.
8. Hand-Painted Starry Night Cuff Details
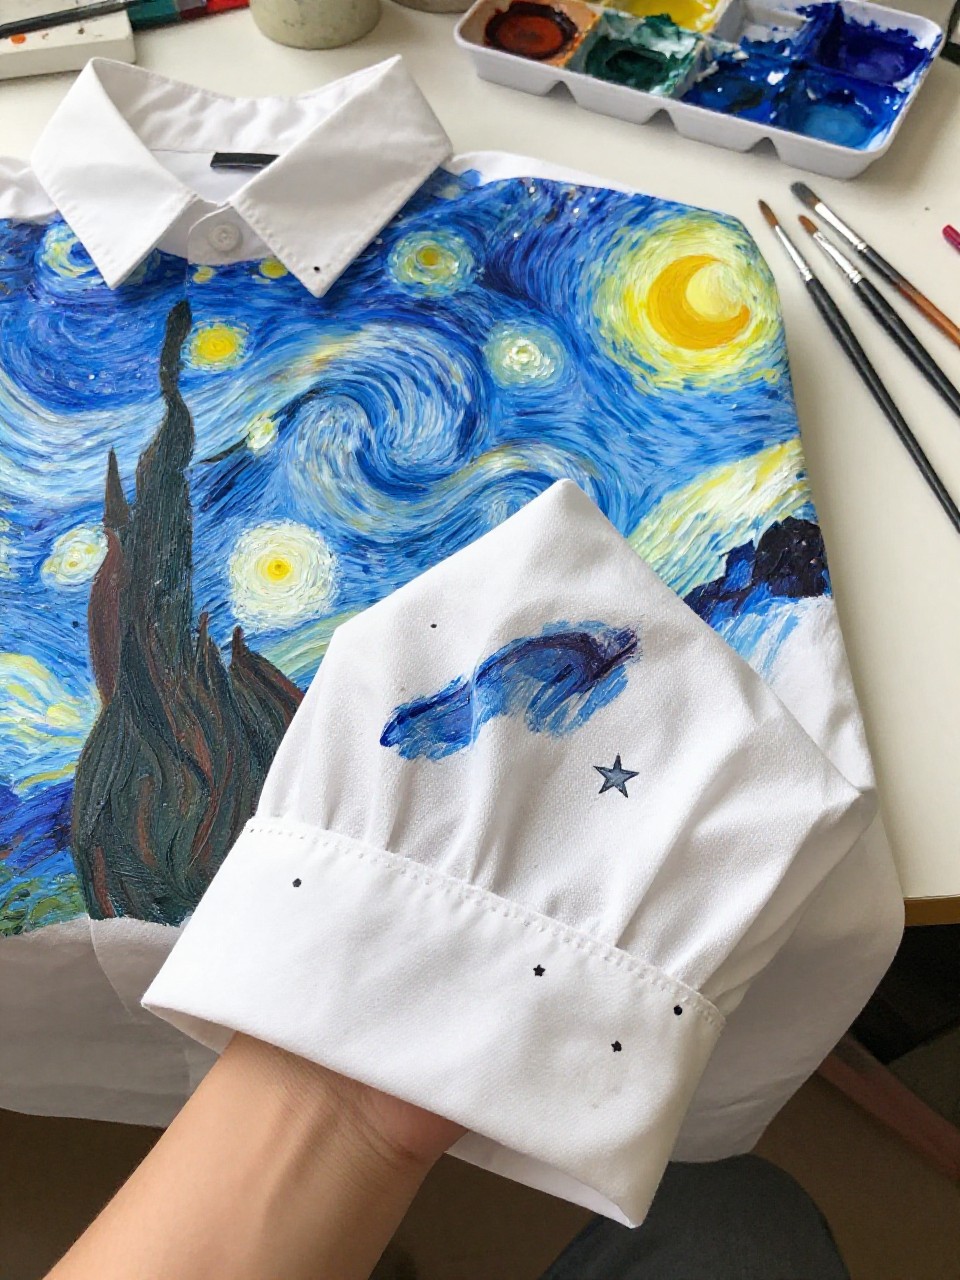
Tiny stars and dots wrap around the sleeve cuffs like a little night sky border. It’s satisfying because you can do it fast, and the small details look impressive without being hard. Perfect if you want something subtle that still feels special.
Materials Needed:
- White shirt
- Fabric paint (navy, black, white, metallic gold optional)
- Paintbrushes in multiple sizes
- Palette or paint tray
- Cardboard insert (inside shirt)
Steps to Make:
- Insert cardboard into the sleeve and lay the cuff flat.
- Paint a thin dark band near the cuff edge, following the sleeve curve.
- Dot white and gold “stars” above the band, mixing tiny dots and a few larger ones.
- Add a couple of simple star shapes with short brush strokes for sparkle.
- Dry flat and heat-set so the cuff border stays crisp after washing.
9. Monochrome Botanical Back Panel
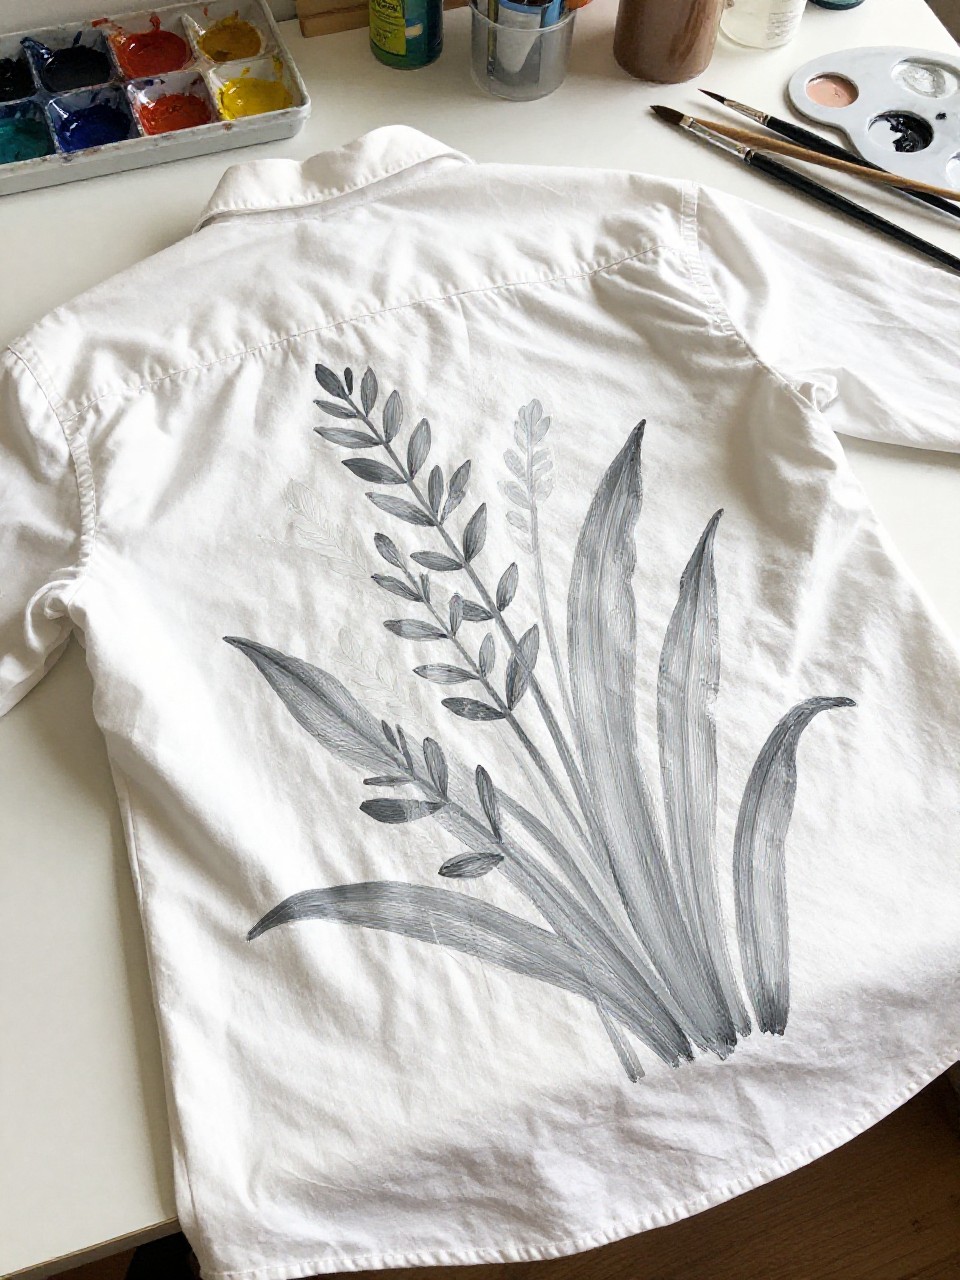
The back of the shirt features large leafy stems in one color, like a simple mural you can wear. This is relaxing because you can repeat the same leaf shape over and over and let it flow naturally. It’s great for anyone who likes calm designs with a clean look.
Materials Needed:
- White shirt
- Fabric paint (one color, like black or deep green)
- Paintbrushes in multiple sizes
- Palette or paint tray
- Cardboard insert (inside shirt)
Steps to Make:
- Insert a large piece of cardboard into the back so the fabric stays smooth.
- Sketch a few tall stems starting near the lower back and reaching upward.
- Paint the stems first, then add leaves that angle in different directions.
- Thicken a few lines and add small leaf veins with a fine brush for depth.
- Let dry completely and heat-set before wearing or washing.
10. Cherry Duo Near the Hem

A pair of bright red cherries with a green stem sits near the lower side hem, like a small surprise detail. This is beginner-friendly because the shapes are simple circles and curved lines. It adds a playful touch without covering the whole shirt in paint.
Materials Needed:
- White shirt
- Fabric paint (red, green, brown optional)
- Paintbrushes in multiple sizes
- Palette or paint tray
- Cardboard insert (inside shirt)
Steps to Make:
- Place cardboard inside and choose a spot near the hem on one side.
- Paint two red circles that slightly overlap in height, leaving soft brush texture.
- Add a curved green stem that connects the cherries and a small leaf on top.
- Add tiny white highlight dots or short strokes to make the cherries look shiny.
- Dry flat and heat-set so the cherries stay bold after washing.
11. Loose Brushstroke Heart Center

A big heart made from loose, visible brushstrokes sits in the center of the shirt and looks artsy instead of perfect. It’s satisfying because you can paint quickly and let the bristles show, which makes it feel real and handmade. Great for a cozy, casual look.
Materials Needed:
- White shirt
- Fabric paint (one main color, plus white optional)
- Paintbrushes in multiple sizes
- Palette or paint tray
- Cardboard insert (inside shirt)
Steps to Make:
- Insert cardboard and mark a light heart shape with a pencil.
- Paint the left half with broad strokes that curve with the heart outline.
- Paint the right half, letting a few strokes overlap in the middle.
- Add a second layer in spots for darker texture and a few uneven edges.
- Dry completely and heat-set so the thick brushstrokes stay flexible.
12. Coastal Wave Line Border
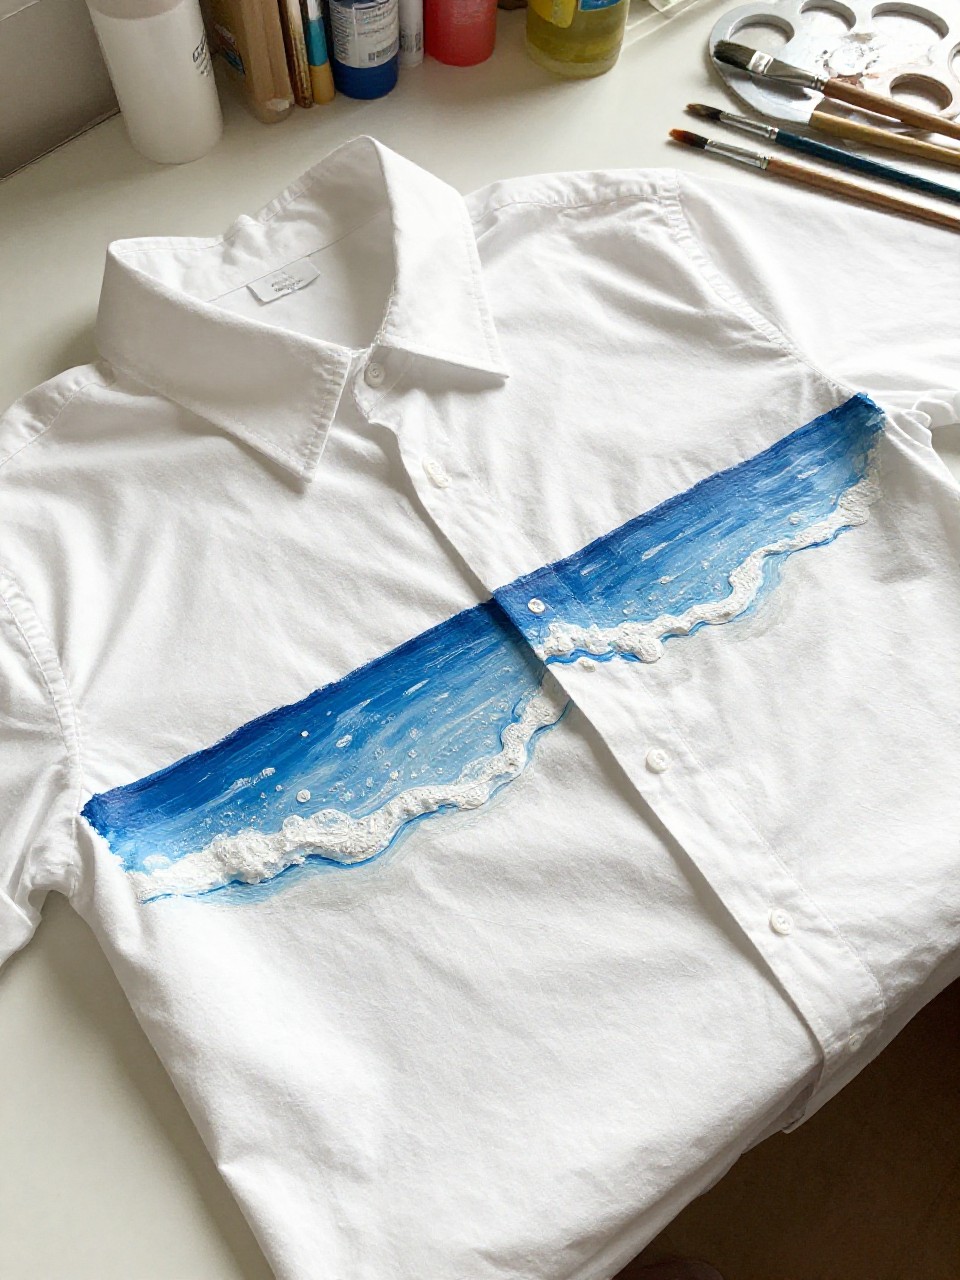
This shirt has a thin, wavy blue border that runs across the chest like a calm ocean line. It’s great for beginners because it’s mostly one flowing line and a few simple foam details. The finished look is clean, wearable, and easy to match.
Materials Needed:
- White shirt
- Fabric paint (two blues and white)
- Paintbrushes in multiple sizes
- Palette or paint tray
- Cardboard insert (inside shirt)
Steps to Make:
- Slide cardboard inside the shirt front and choose the height for the wave line.
- Paint a wavy horizontal line in medium blue, letting it rise and dip gently.
- Add a second darker blue line under parts of it for shadow and depth.
- Tap small white dots and short strokes along the top for “foam” texture.
- Dry flat and heat-set so the border doesn’t fade or crack.
13. Paint-Splatter Galaxy Corner

A cluster of paint splatters and tiny dots sits in one corner near the shoulder, like a small galaxy burst. This is fun because splattering is playful and forgiving, and you don’t have to draw anything exact. It’s also a good stress-relief project after a long day.
Materials Needed:
- White shirt
- Fabric paint (purple, blue, black, white)
- Paintbrushes in multiple sizes
- Palette or paint tray
- Old toothbrush (for splatter)
- Cardboard insert (inside shirt)
Steps to Make:
- Insert cardboard and cover areas you want to keep clean with scrap paper.
- Paint a soft dark patch in the corner as the base “space” area.
- Flick watered-down paint with a toothbrush to create splatters that fade outward.
- Add brighter white dots and a few starbursts with a fine brush tip.
- Let dry fully and heat-set so splatters don’t flake in the wash.
14. Hand-Painted Fruit Stripe Down the Side

A vertical stripe of simple fruit icons—like lemons, strawberries, and oranges—runs down one side of the shirt. It’s satisfying because each fruit is its own tiny project, so you can pause and come back anytime. The finished look is cheerful but still wearable.
Materials Needed:
- White shirt
- Fabric paint (yellow, red, orange, green)
- Paintbrushes in multiple sizes
- Palette or paint tray
- Cardboard insert (inside shirt)
Steps to Make:
- Insert cardboard and lightly mark a straight guideline down one side of the front.
- Sketch small fruit shapes spaced out along the line, leaving room between icons.
- Paint each fruit with simple color blocks, following the shirt’s drape naturally.
- Add tiny details like seeds, leaf tops, and thin outlines for definition.
- Dry flat and heat-set so the side stripe stays bright and washable.
15. Cloudy Blue Sky Chest Pocket Block
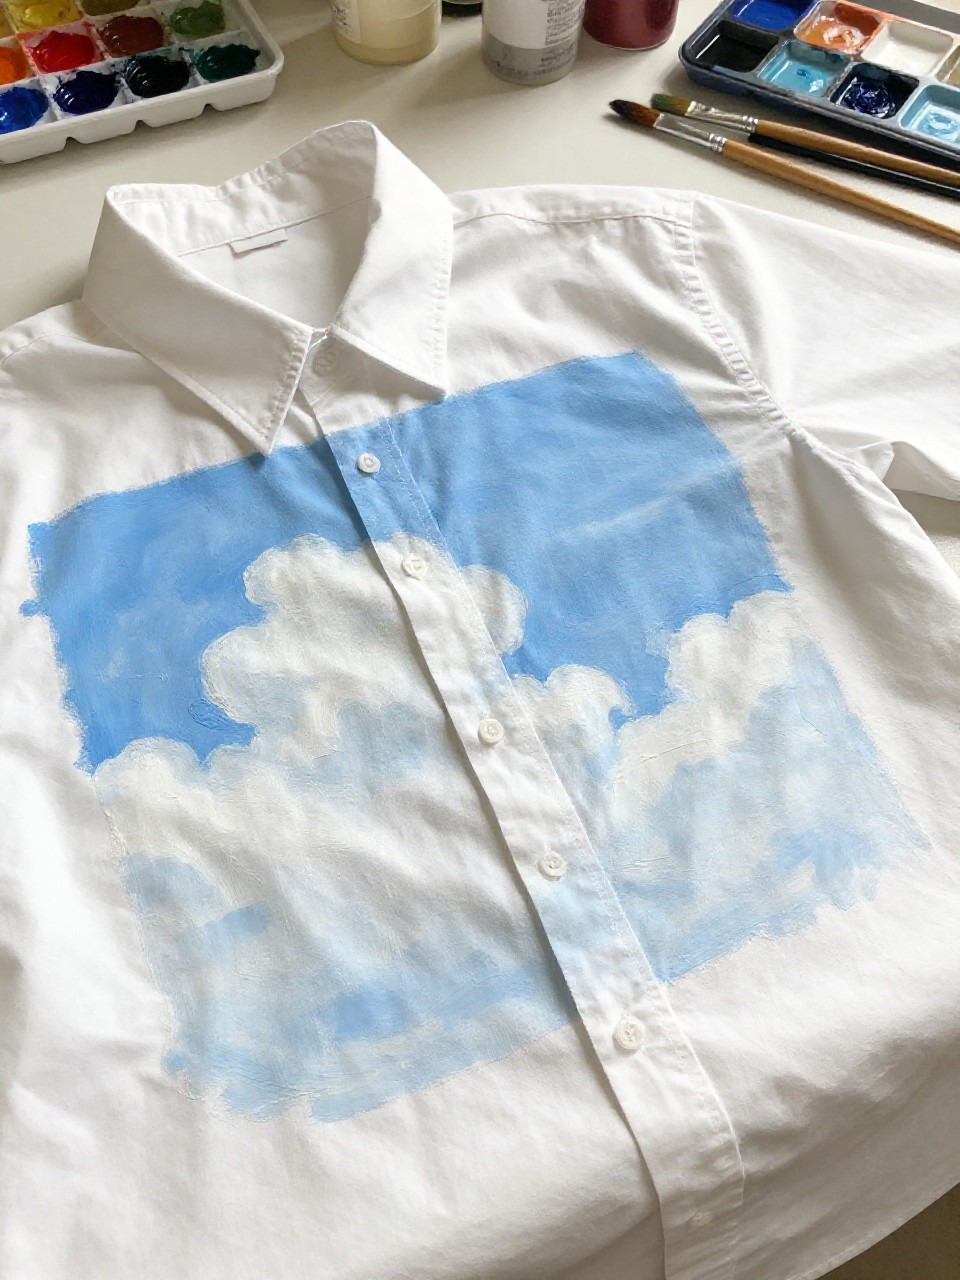
A painted sky block sits on the chest, with soft blue and puffy white clouds that look lightly brushed on. This is calming to make because clouds are meant to be uneven and fluffy. It gives a simple white shirt a dreamy, relaxed vibe you can wear any day.
Materials Needed:
- White shirt
- Fabric paint (light blue and white)
- Paintbrushes in multiple sizes
- Palette or paint tray
- Sponge (optional for clouds)
- Cardboard insert (inside shirt)
Steps to Make:
- Insert cardboard and tape off a square or rectangle where you want the sky block.
- Paint the block light blue, leaving visible strokes for a breezy sky texture.
- While blue is slightly wet, dab white cloud shapes with a sponge or dry brush.
- Add small gray-blue shadows under a few clouds for depth and softness.
- Peel tape carefully, dry flat, and heat-set to finish the wearable design.