


Table of Contents Show
Keeping kids busy at school can be tough, especially on rainy days or during quiet time when you still want something fun and calming. These wall hanging crafts are simple, colorful, and perfect for classrooms, hallways, or a school art show.

Each idea uses easy supplies and helps kids practice cutting, gluing, and arranging shapes.
Below you’ll find 15 beginner-friendly projects that look great on walls and bring a cheerful touch to any school space—let’s get crafting!
1. Paper Plate Rainbow Hanger
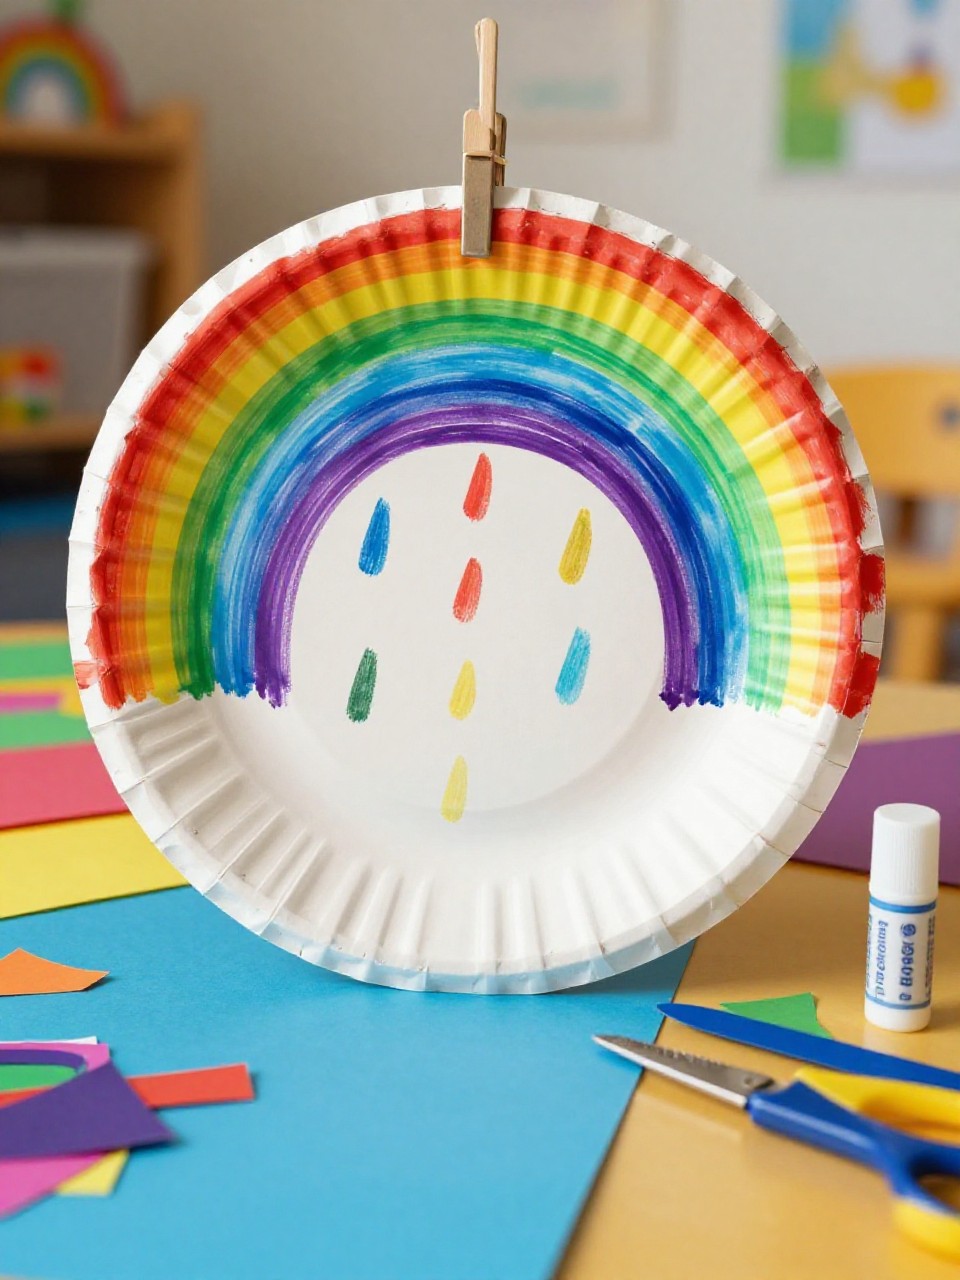
This wall hanging shows a bright rainbow arcing over fluffy paper clouds with ribbons dangling like rain. Kids love choosing ribbon colors and watching the rainbow come together quickly—perfect for beginners.
Materials Needed:
For People Who Love to Make Things ✂️
- Paper plate (cut in half)
- Paint or markers (rainbow colors)
- White paper or cotton balls (clouds)
- Ribbons or yarn (for rain)
- Glue stick and tape
How to make it:
- Cut a paper plate in half to form the rainbow base.
- Paint or color arched rainbow stripes across the plate.
- Glue cotton balls or paper clouds along the bottom edge.
- Tape ribbons or yarn to the back for rain strands and hang when dry.
2. Classroom Kindness Banner
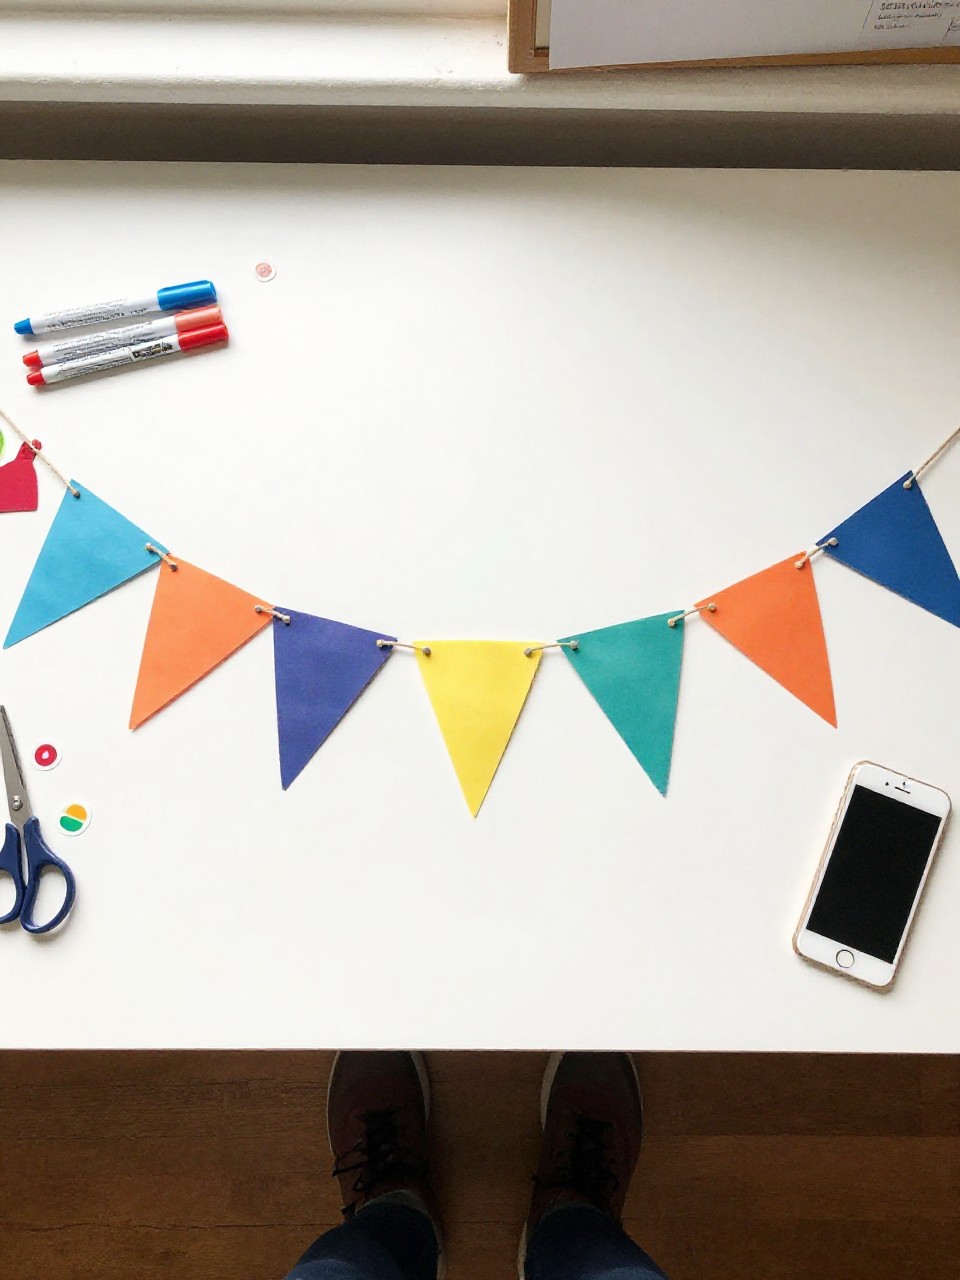
This wall hanging is a simple pennant banner with triangle flags that spell “KIND” or a class motto. Kids enjoy choosing colors and adding small drawings on each flag, making it a collaborative and uplifting display.
Materials Needed:
- Colored cardstock or construction paper (cut into triangles)
- String or twine
- Markers or paint pens
- Hole punch
- Stickers (optional)
How to make it:
- Cut triangle flags and punch two holes at the top of each.
- Write one letter per flag to spell your word.
- Add small drawings, stickers, or borders around letters.
- Thread onto twine, space flags evenly, knot ends, and hang across the wall.
3. Popsicle Stick Weaving Wall Hanging
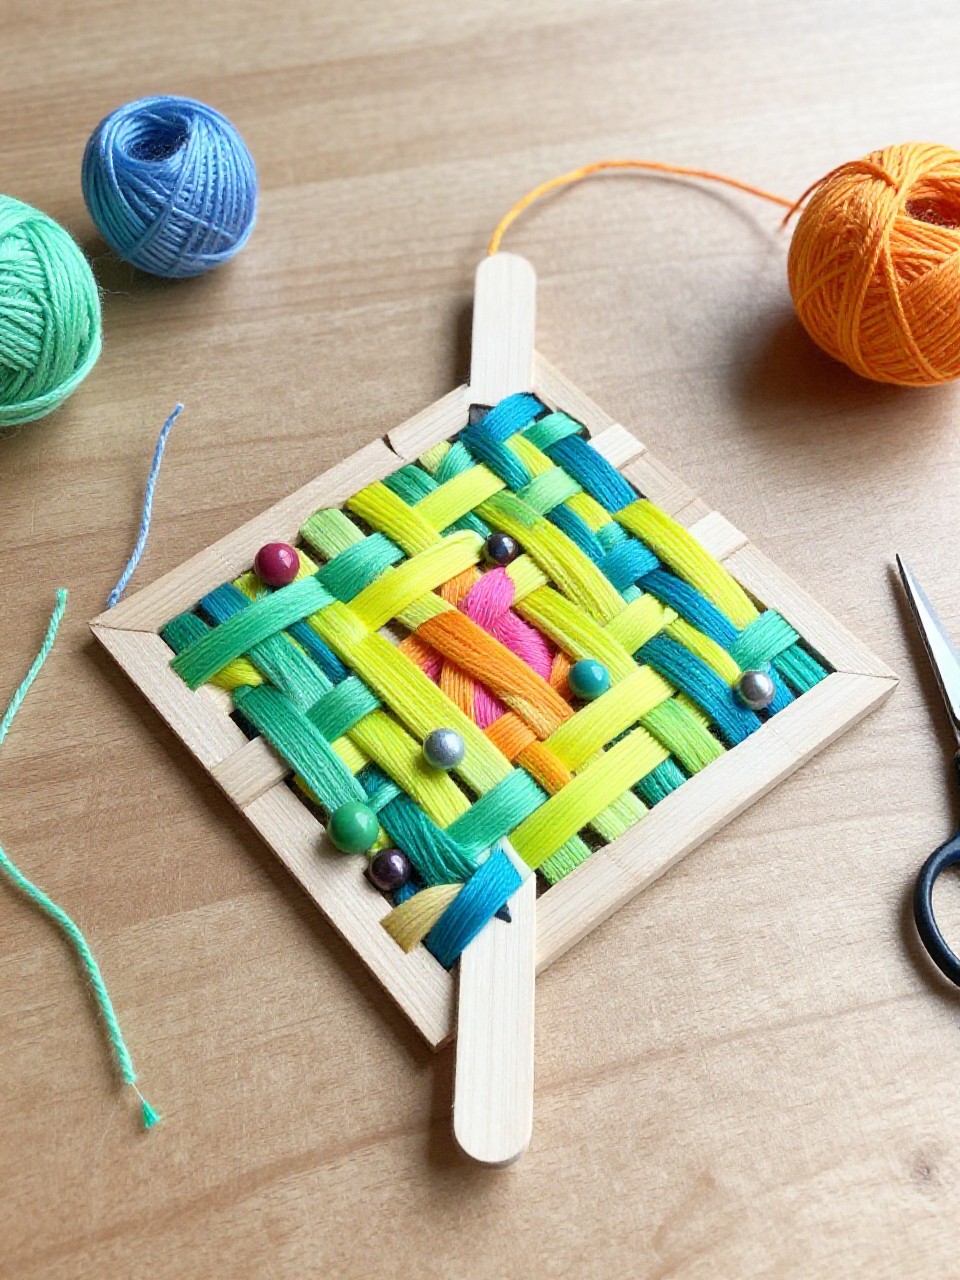
This wall hanging uses a popsicle stick frame with yarn woven back and forth in bright patterns. Kids enjoy the relaxing rhythm of weaving and watching colors stack into stripes.
Materials Needed:
- 4 jumbo popsicle sticks
- Yarn in 2–3 colors
- Glue
- Tape
- Beads (optional)
How to make it:
- Glue four sticks into a square frame and let it dry.
- Tape one end of yarn to the back, then wrap vertical “warp” strands around the frame.
- Weave a second color over-under across the warp, switching colors for stripes and adding beads if you like.
- Tie off the yarn ends, add a hanging loop, and trim any loose threads.
4. Paper Strip Heart Wall Garland
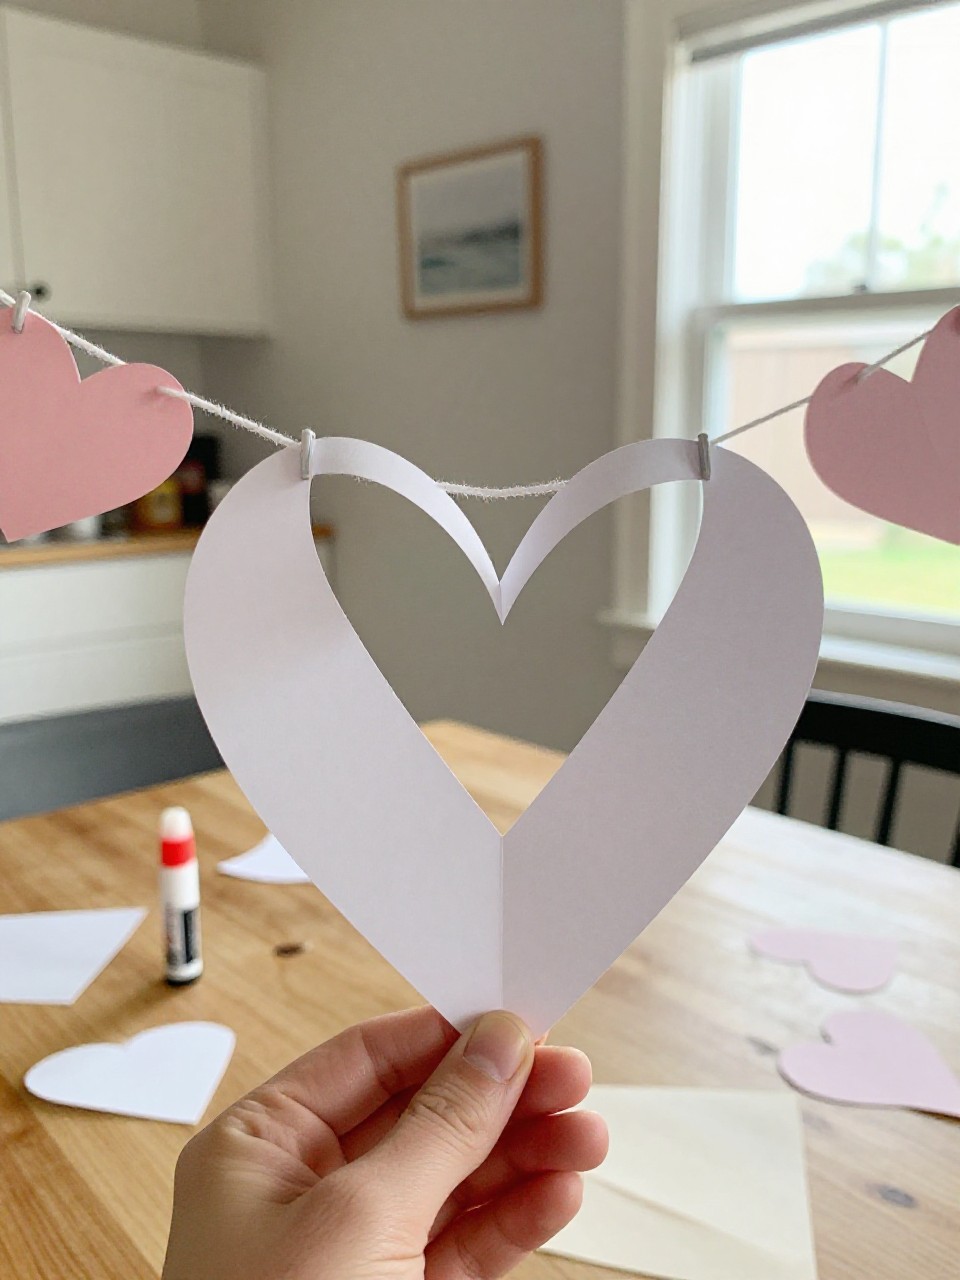
This hanging shows puffy paper hearts linked on a string, made from folded strips that curve into heart shapes. Kids like seeing flat paper turn into 3D hearts with just a staple or glue.
Materials Needed:
- Colored paper (cut into equal strips)
- Stapler or glue
- String or twine
- Hole punch
- Ruler and pencil (optional)
How to make it:
- Cut even strips and fold pairs to meet at the bottom point of a heart.
- Curve the top ends inward and staple or glue to form each heart.
- Punch a small hole at the top of each heart.
- Thread onto twine, space evenly, knot ends, and hang.
5. Tissue Paper Stained-Glass Window Hanger
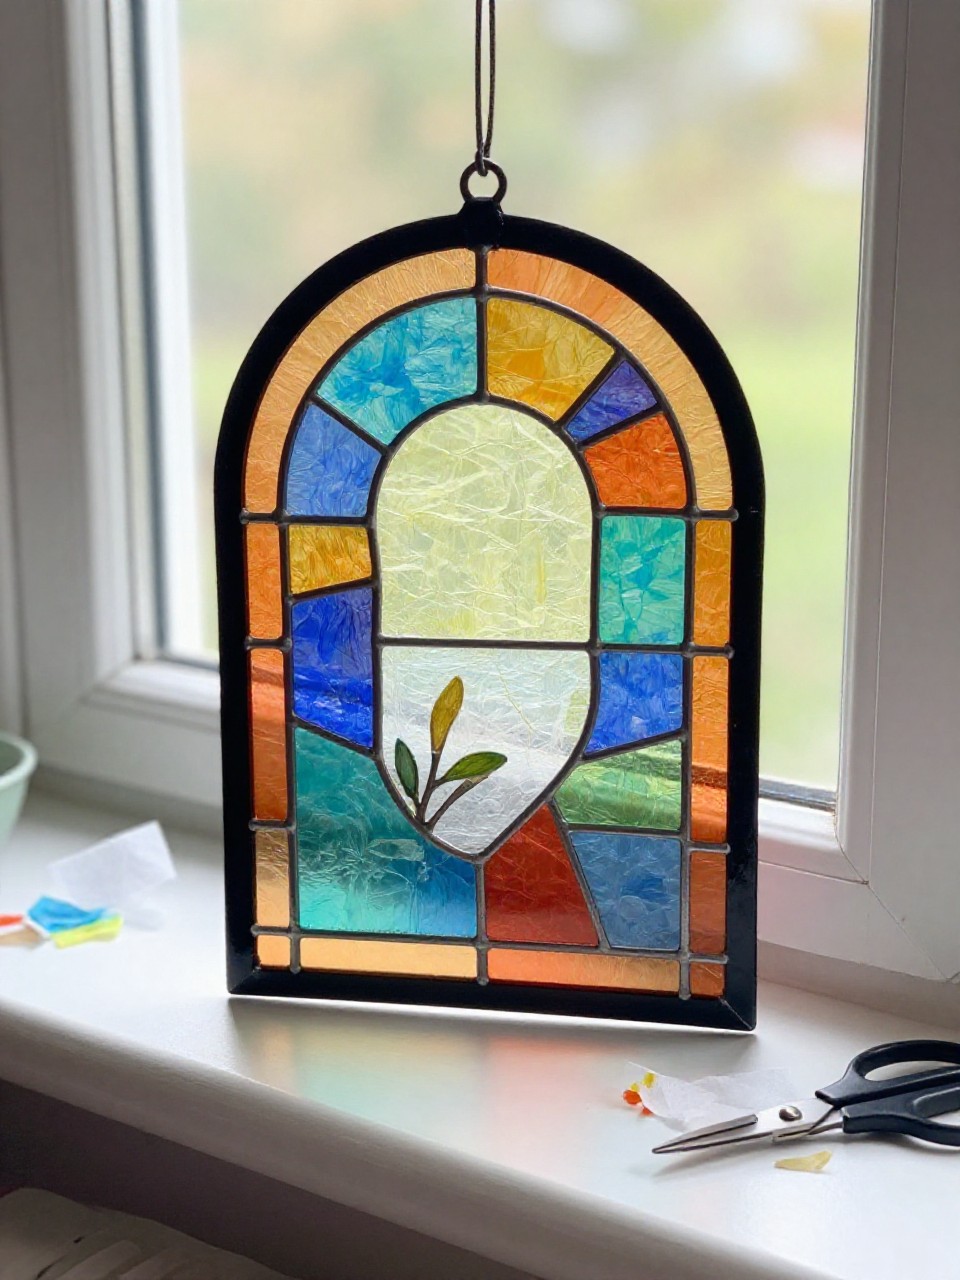
This craft looks like a colorful stained-glass panel made from tissue paper squares framed by black paper. Kids enjoy layering colors and seeing light shine through the finished design.
Materials Needed:
- Black construction paper (for frame)
- Clear contact paper or laminating sheet
- Tissue paper squares
- Scissors
- Ribbon for hanging
How to make it:
- Cut a window frame from black paper by removing a rectangle from the center.
- Stick the frame onto contact paper, sticky side up.
- Fill the open area with overlapping tissue pieces to make a mosaic.
- Seal with another contact sheet, trim edges, add a ribbon loop, and hang near light.
6. Nature Leaf Rubbing Banner
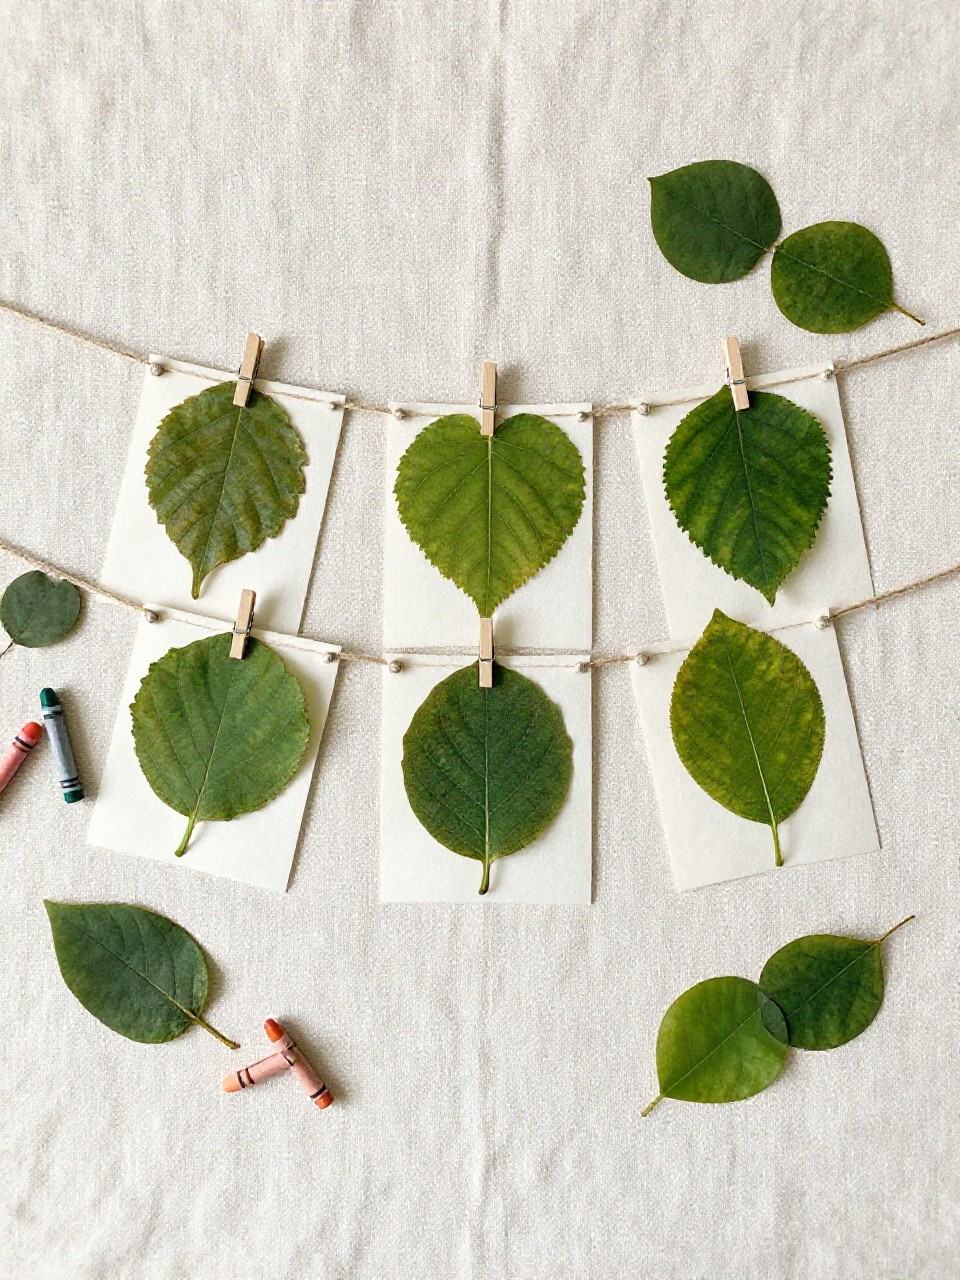
This wall hanging is a banner of leaf rubbings clipped along a string, showing different leaf shapes and veins. Kids enjoy hunting for leaves and watching the patterns appear like magic under their crayons.
Materials Needed:
- Leaves (variety of shapes)
- White paper cut into rectangles or flags
- Crayons with paper peeled
- String or twine
- Clothespins or paper clips
How to make it:
- Place a leaf under a paper flag, veiny side up.
- Rub a crayon sideways to reveal the leaf pattern.
- Repeat with several flags in different colors and leaves.
- Clip flags onto twine, space evenly, and hang across a wall.
7. Paper Plate Owl Wall Hanging
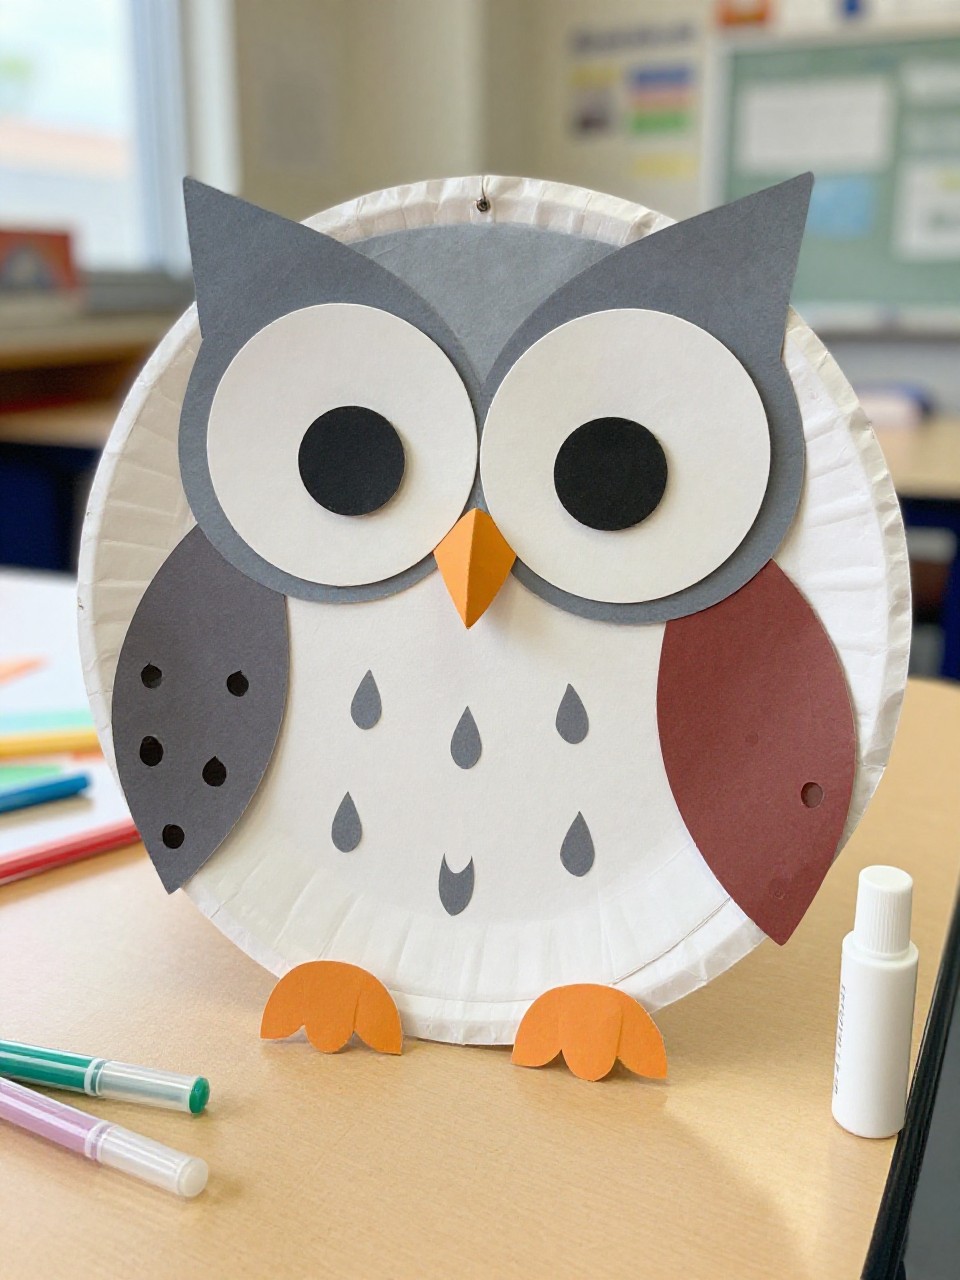
This hanging features a round owl with big eyes, layered wings, and a small beak, ready to perch on the classroom wall. Kids love choosing feather colors and arranging shapes to give their owl personality.
Materials Needed:
- Paper plate
- Colored paper (eyes, wings, beak, feathers)
- Markers
- Glue stick
- String or ribbon for hanging
How to make it:
- Color or paint the plate as the owl body.
- Cut and glue large eyes, a triangle beak, and two wing shapes.
- Add paper feathers or draw feather patterns and details.
- Punch a top hole, tie on ribbon, and hang.
8. Button and Yarn Initial Wall Plaque
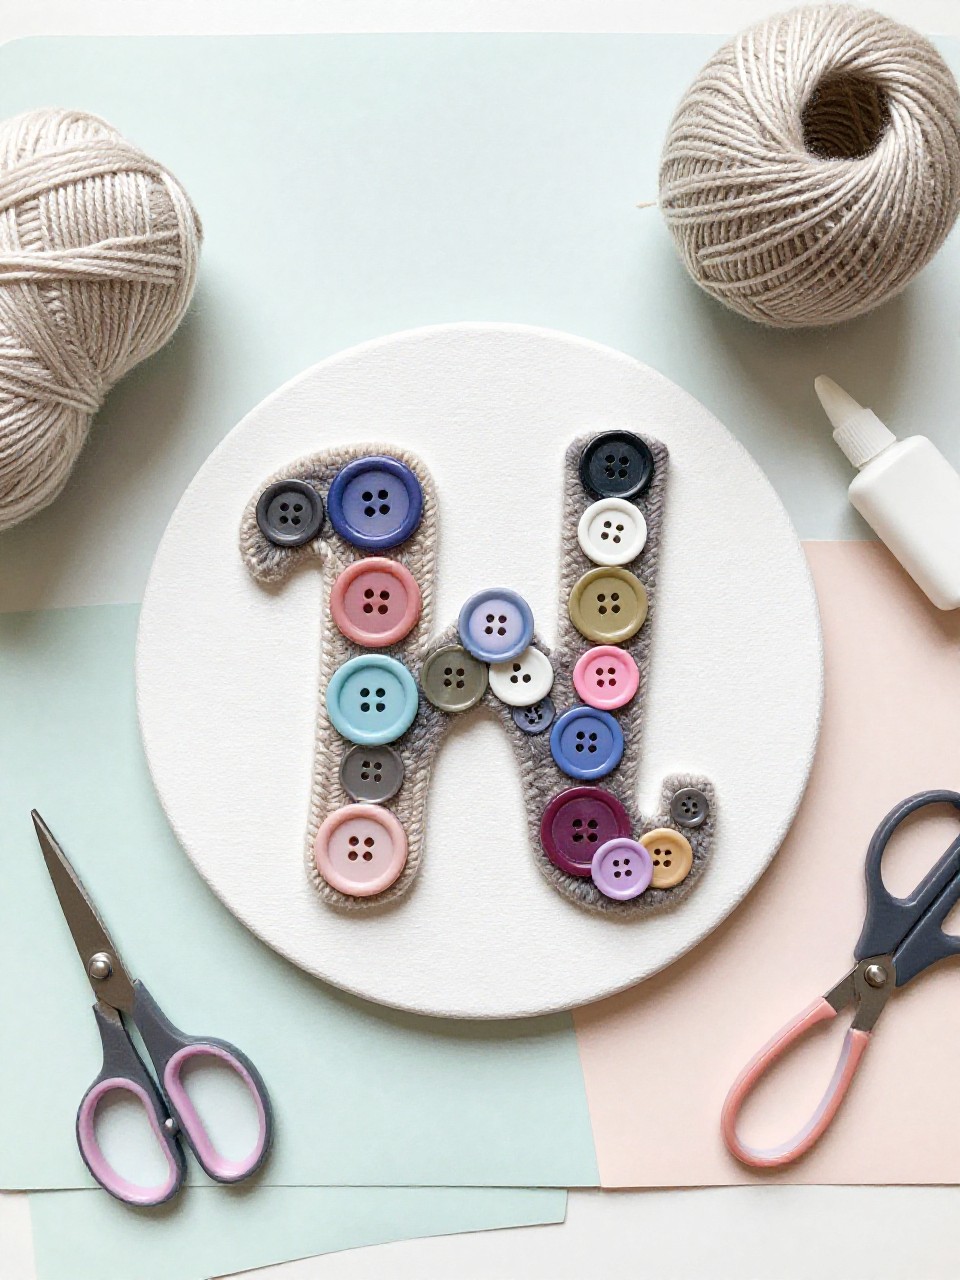
This wall piece shows a large first initial wrapped in yarn and decorated with bright buttons. Kids enjoy picking colors that match their style and seeing their letter pop.
Materials Needed:
- Cardboard letter (cut from a box) or store-bought letter
- Yarn
- Assorted buttons
- White glue
- Ribbon for hanging
How to make it:
- Cut a sturdy letter from cardboard if needed.
- Wrap yarn tightly around the letter, securing ends with glue.
- Glue buttons in a cluster or border for texture and color.
- Add a ribbon loop to the back and hang.
9. Classroom Rules Hanging Mobile
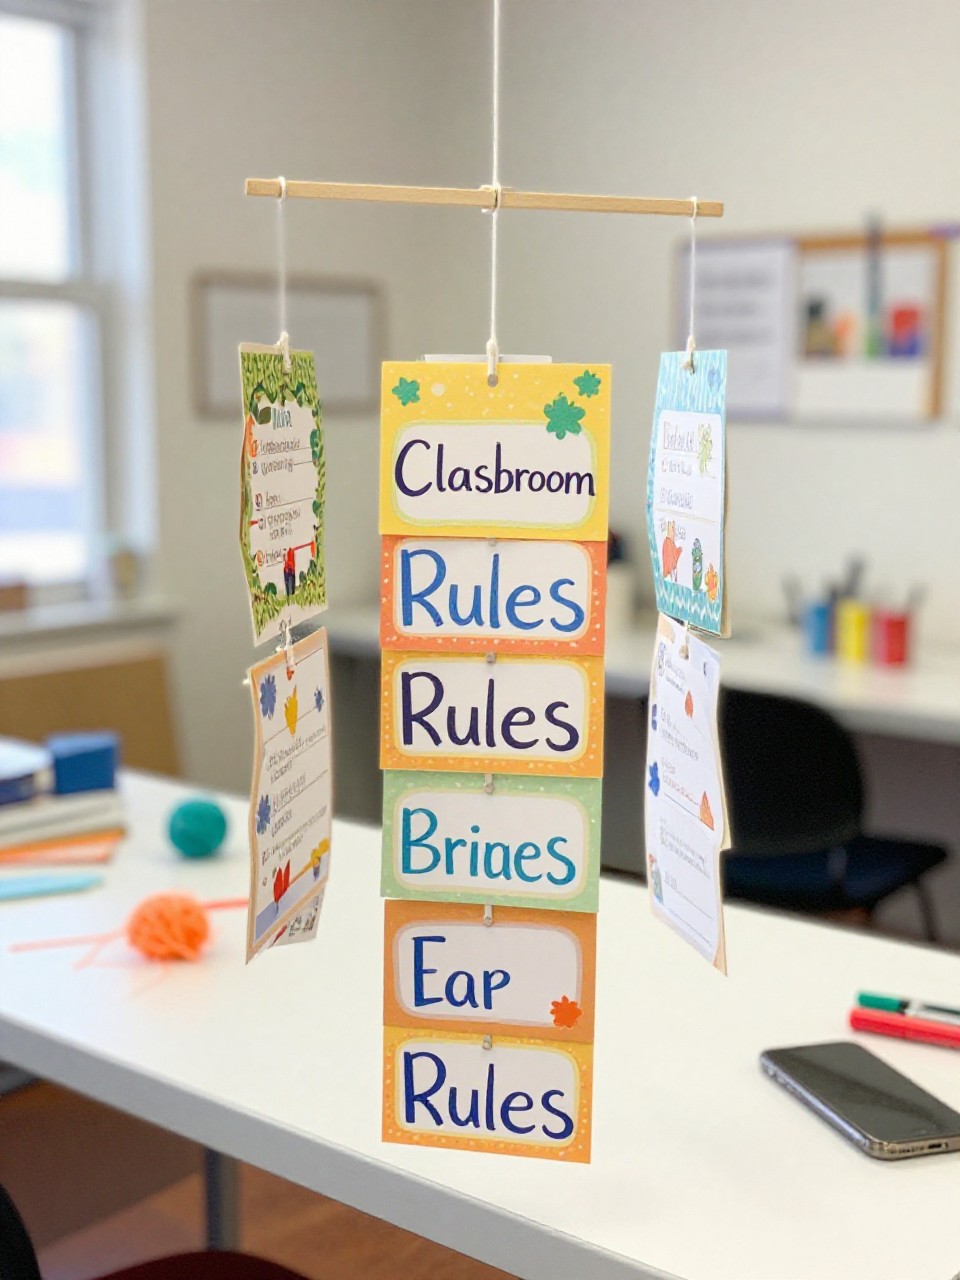
This craft is a vertical mobile with small cards listing simple class rules or goals, hanging from a stick or dowel. Kids like helping write or decorate each card, which makes the rules feel positive and shared.
Materials Needed:
- Cardstock rectangles
- Markers
- Hole punch
- Yarn or string
- Stick, dowel, or ruler as the topper
How to make it:
- Write one short rule or goal on each card and add small drawings.
- Punch a hole at the top and bottom of cards to link them.
- Tie cards in a vertical line with yarn and attach to the stick.
- Add a top hanging string and display.
10. Watercolor Drip Wall Banner
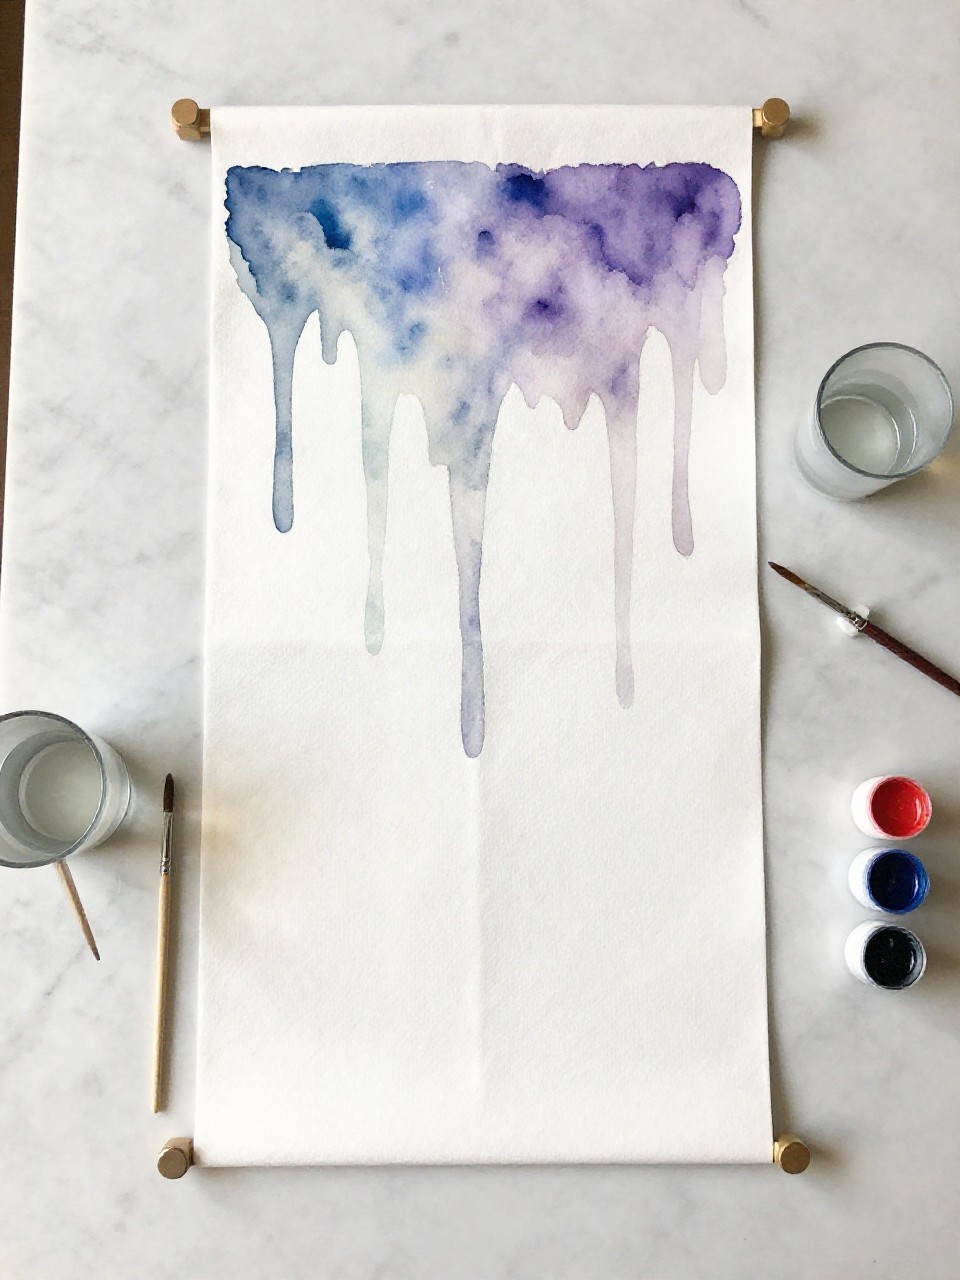
This wall hanging shows a long strip of watercolor paper with soft color drips blending down. Kids love tilting the paper and watching the colors run together to make soothing patterns.
Materials Needed:
- Watercolor paper (cut into a long banner)
- Watercolor paints
- Paintbrush
- Water cup and paper towels
- Hole punch and ribbon
How to make it:
- Wet the top half of the banner with clean water.
- Paint bold color lines at the top and tilt the paper to let colors drip.
- Add layers, sprinkle salt for texture if desired, and let dry.
- Punch two holes, tie ribbon, and hang.
11. Paper Chain Seasons Wall Display
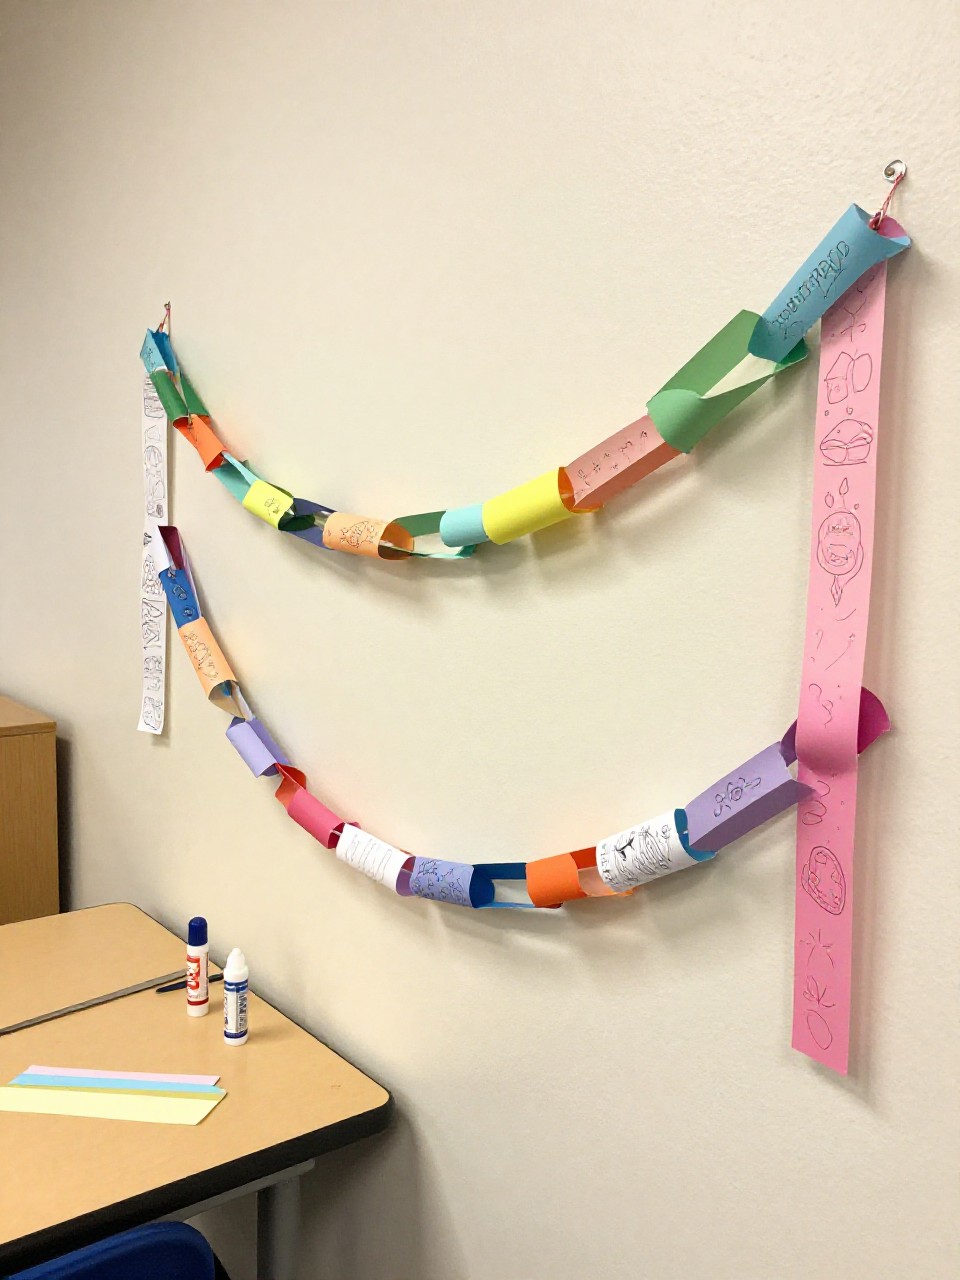
This wall hanging is a long paper chain where each season has its own color group and tiny drawings on the links. Kids enjoy building the chain together and seeing it grow across the wall.
Materials Needed:
- Construction paper strips (seasonal colors)
- Glue stick or stapler
- Markers or crayons
- Stickers (optional)
- Tape for hanging
How to make it:
- Choose colors for each season and draw small icons on strips (snowflakes, flowers, suns, leaves).
- Loop and glue or staple each strip through the last to form a chain.
- Group seasonal sections together in order.
- Tape the chain along the wall or drape it in waves.
12. Shape City Skyline Wall Hanging
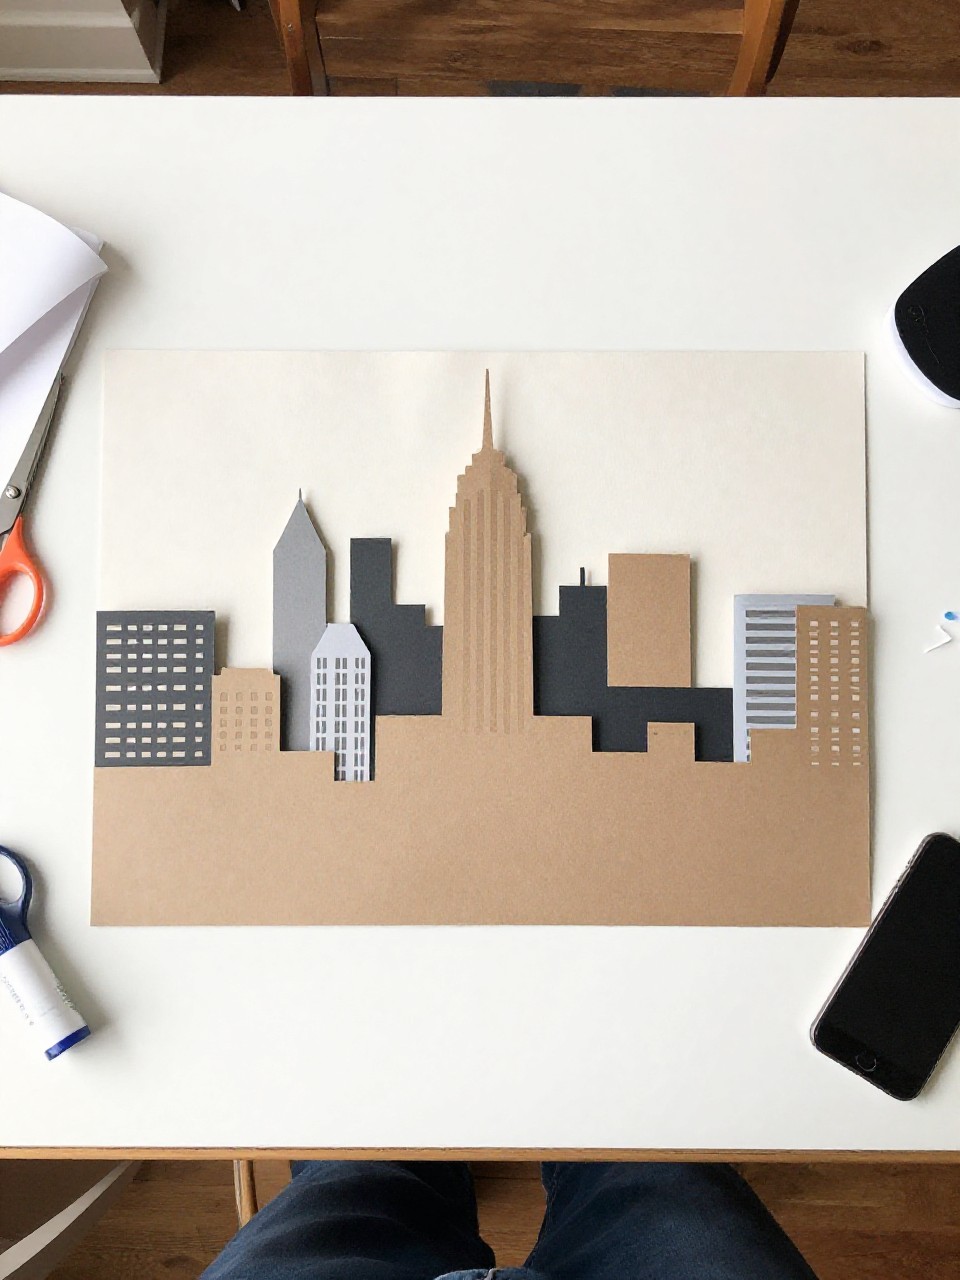
This hanging shows a bold city skyline made from layered rectangles and triangles against a night or sunset sky. Kids enjoy arranging shapes like building blocks and adding tiny window dots.
Materials Needed:
- Black and colored construction paper
- Background cardstock
- Glue stick
- Yellow marker or stickers (for windows)
- Ribbon for hanging
How to make it:
- Glue a colored background to sturdy cardstock.
- Cut rectangles and triangles from black paper to form buildings and roofs.
- Arrange and glue the skyline, then add window dots or sticker squares.
- Punch holes at the top, tie ribbon, and hang.
13. Felt Pocket Garden Wall Hanger
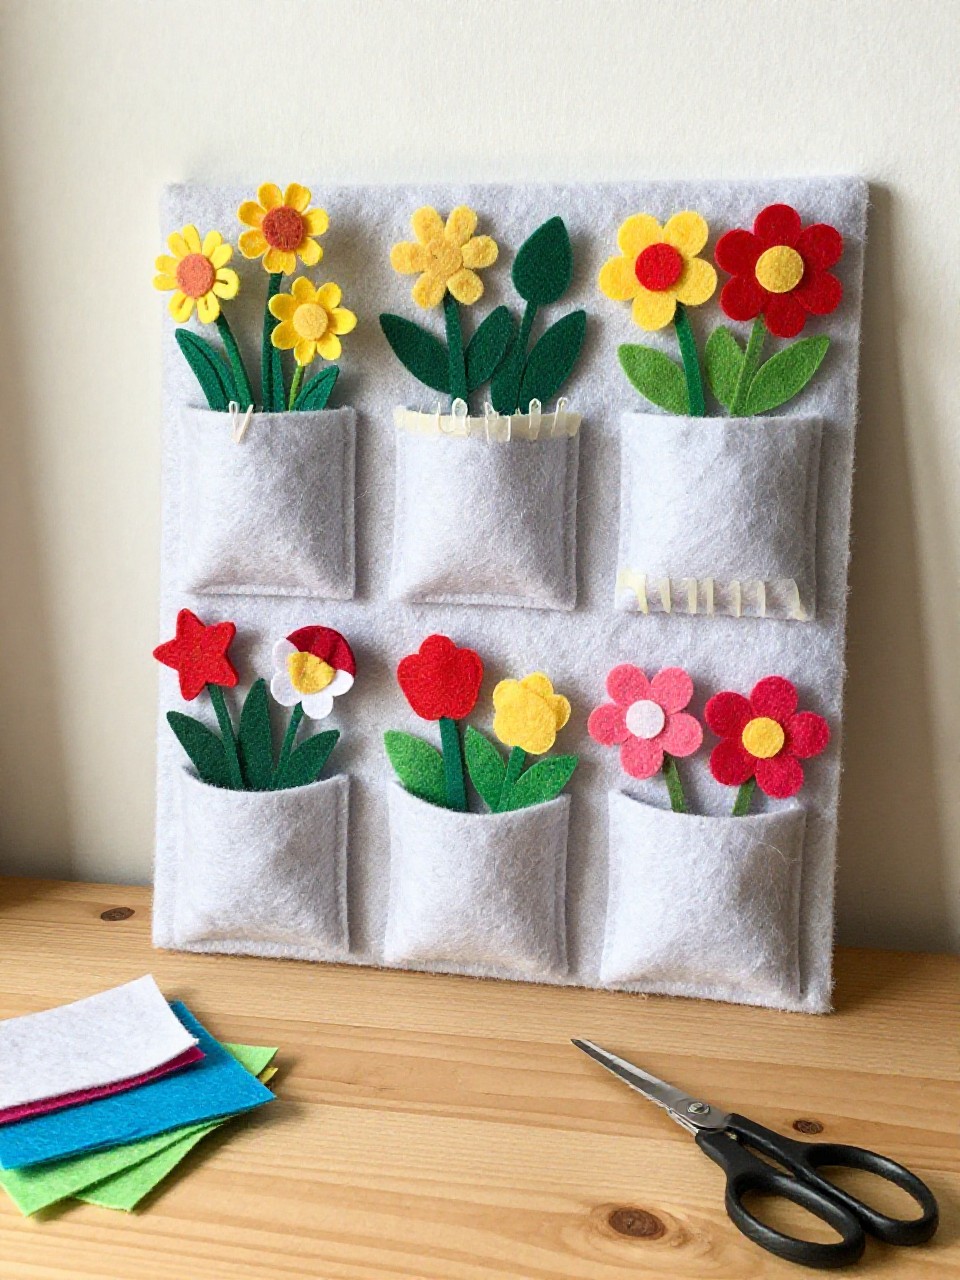
This wall hanging looks like a row of small felt “pockets” holding paper or felt flowers. Kids love tucking flowers into the pockets and choosing bright color combos.
Materials Needed:
- Felt sheets (various colors)
- Cardstock or thin cardboard backing
- White glue or fabric glue
- Paper or felt flowers
- Ribbon or dowel for hanging
How to make it:
- Glue a felt background onto a sturdy backing.
- Cut and glue U-shaped felt pockets along the bottom.
- Create simple flowers from paper or felt and slip them into pockets.
- Add a ribbon or dowel at the top and hang.
14. Handprint Tree Family Wall Art
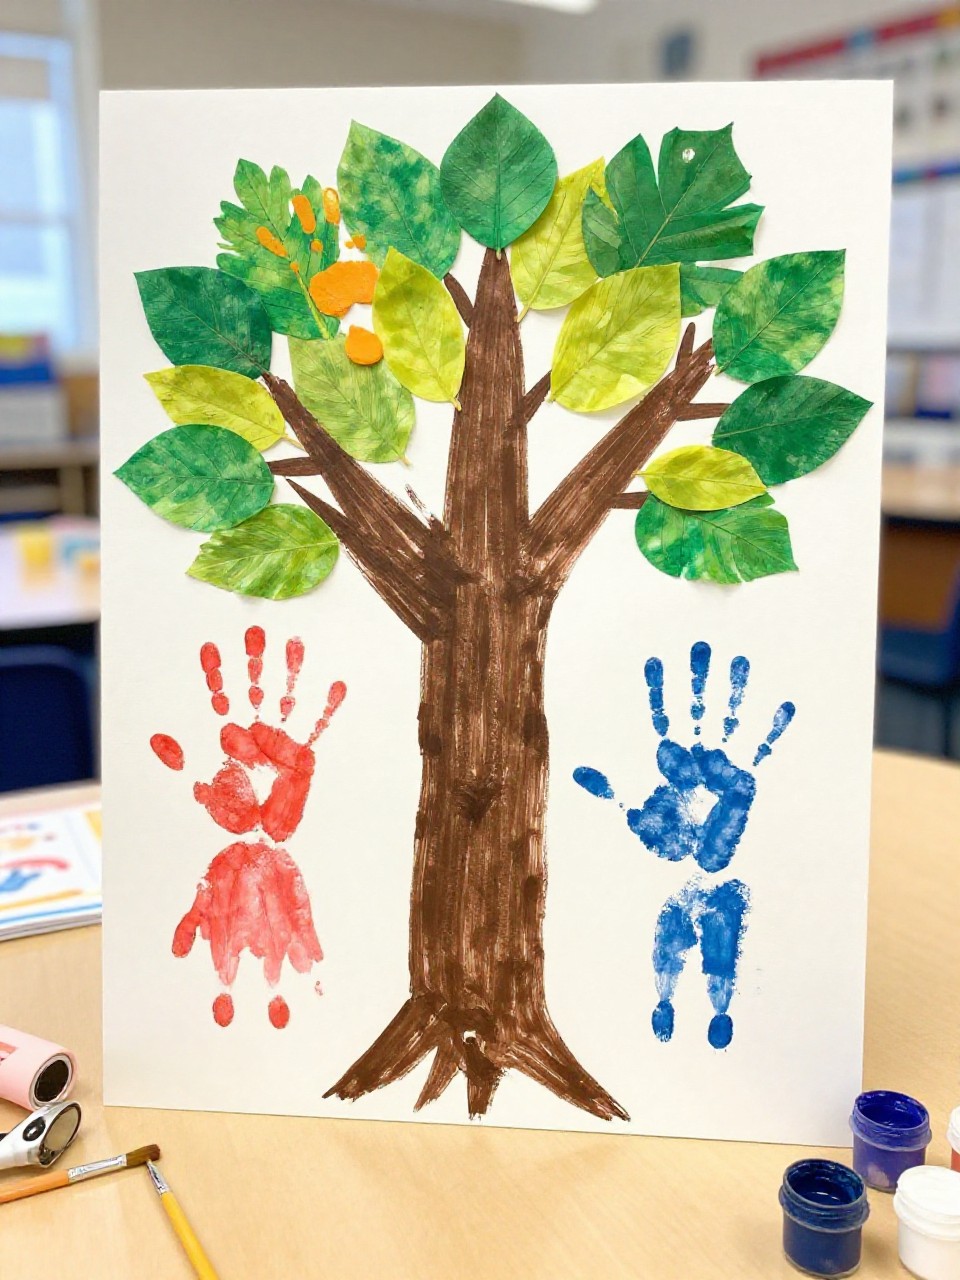
This hanging shows a tree trunk with handprint “leaves” in different colors, one handprint per student or family member. Kids enjoy stamping their hands and seeing a shared tree grow.
Materials Needed:
- Large cardstock or poster board
- Brown paper (tree trunk and branches)
- Washable paint (leaf colors)
- Glue stick
- Ribbon or tape for hanging
How to make it:
- Glue a brown trunk and branches onto the poster board.
- Paint each hand, press around the branches to make leaf prints, and label names.
- Add grass, birds, or a sun if desired.
- Let it dry fully, then hang as a group display.
15. Scrap Paper Mosaic Name Banner

This wall hanging displays a student’s name filled with a mosaic of colorful paper bits inside bold bubble letters. Kids enjoy tearing scraps and fitting the tiny pieces like a puzzle.
Materials Needed:
- White cardstock
- Colored paper scraps
- Black marker (for bubble letters)
- Glue stick
- Hole punch and string
How to make it:
- Draw large bubble letters of the name across the cardstock.
- Tear small colored paper pieces and glue them to fill each letter.
- Outline or add shadows to make letters stand out.
- Punch holes, tie string, and hang.