


Table of Contents Show
Keeping kids busy at home or finding simple ideas for class can feel hard, especially on rainy days. Wall hangings are a great answer: they decorate your space and are fun to make with easy materials. In this list, you’ll find colorful, beginner-friendly wall hanging crafts for both adults and kids.

Each project is quick to set up, relaxing to create, and cheerful to display. Let’s jump into the ideas and fill those walls with handmade joy.
1. Paper Plate Rainbow Wall Hanging

This cheerful wall hanging shows a bright paper plate rainbow with dangling paper raindrops or sunshine rays. Kids love choosing colors and arranging the stripes, while adults enjoy the neat, happy result that looks great on any wall.
Materials Needed:
- Paper plate (cut in half)
- Colored construction paper (red to purple)
- Glue stick or white glue
- String or yarn
- Tape and scissors
How to make it:
- Cut a paper plate in half to form the rainbow base.
- Cut colored paper into curved strips and glue them on the plate from red to purple.
- Cut small paper raindrops or sun rays and tape them to short yarn pieces.
- Tape yarn to the back of the plate, add a top loop for hanging, and let it dry before displaying.
2. Yarn-Wrapped Heart Wall Charm

This soft wall charm features a cardboard heart wrapped snugly with bright yarn, finished with a hanging loop and tassel. Wrapping is calming and satisfying, and kids love how quickly a simple shape turns into cozy wall art.
Materials Needed:
- Cardboard (heart shape cutout)
- Yarn (any color)
- Tape
- Bead (optional)
- Scissors
How to make it:
- Cut a heart from sturdy cardboard and poke a small hole at the top.
- Tape one end of yarn to the back and wrap the heart in different directions to cover it.
- Add a bead or two on a yarn tail and tie a tassel at the bottom if you like.
- Thread a yarn loop through the top hole for hanging and trim any loose ends.
3. Nature Stick Weaving Wall Hanging

This wall hanging uses a Y-shaped stick or a twig frame with simple yarn weaving to make a rustic piece. Kids enjoy finding sticks outside and learning a basic over-under weave that feels like magic as patterns appear.
Materials Needed:
- Clean dry sticks (Y-stick or 3-4 straight twigs)
- Yarn in a few colors
- Twine for hanging
- Hot glue (adult use) or strong tape
- Scissors
How to make it:
- Tie sticks into a triangle or square frame, or use a single Y-stick.
- Stretch yarn across the frame as warp lines and knot them tightly.
- Weave yarn over and under the warp, pushing rows close together and changing colors.
- Tie off ends, glue if needed, add a twine hanger, and trim for a neat finish.
4. Paper Leaf Garland Wall Hanging
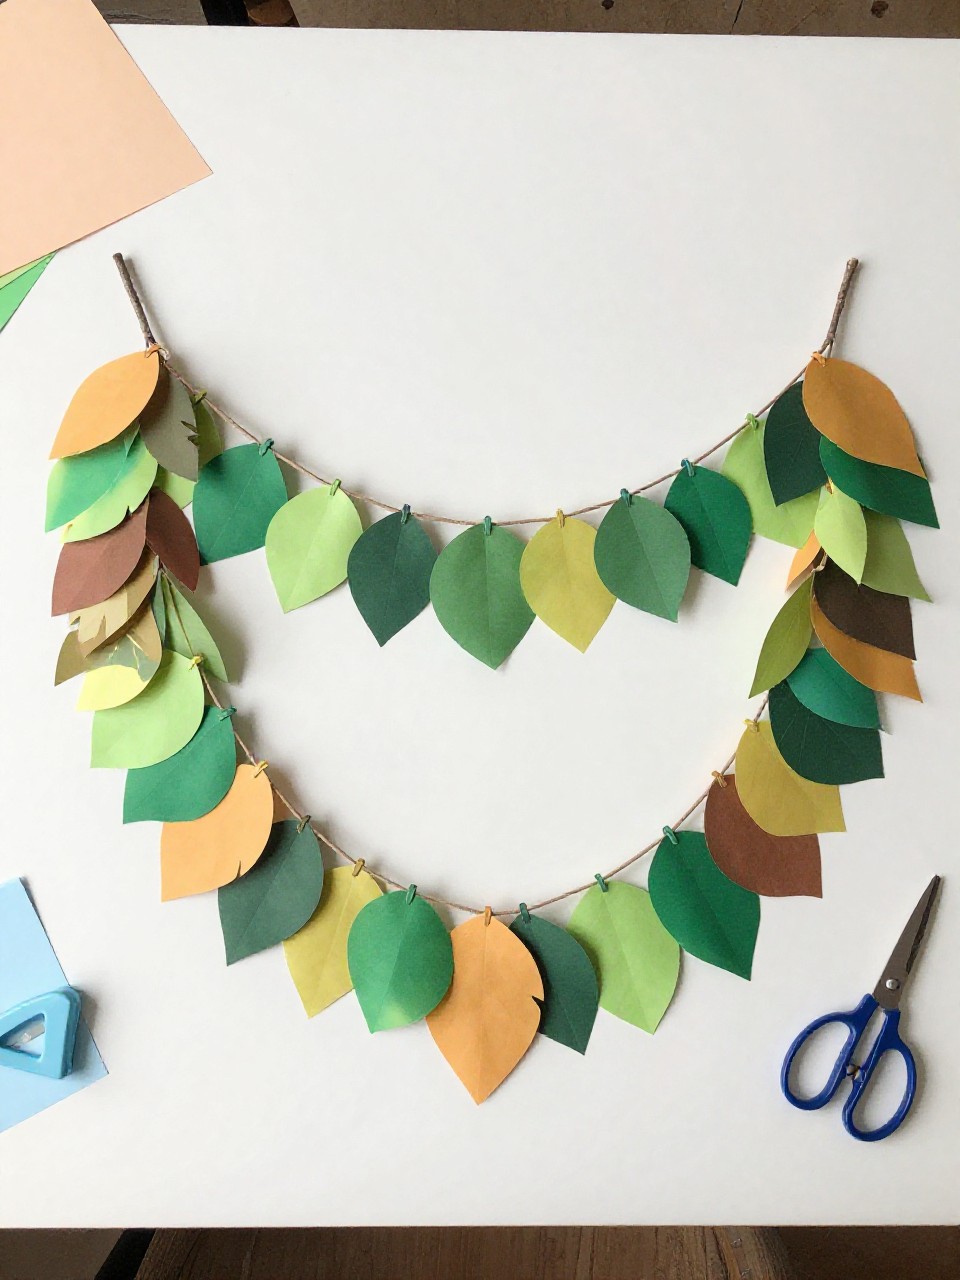
This light garland shows rows of cut paper leaves hanging from a twig or dowel, fluttering like a mini indoor forest. It’s a quick cutting-and-stringing craft that lets kids play with color blends from spring green to fall tones.
Materials Needed:
- Colored paper (greens or seasonal colors)
- Twig or wooden dowel
- Yarn or thin string
- Hole punch
- Scissors and tape
How to make it:
- Cut leaf shapes in different sizes and lightly fold a center crease.
- Punch a hole near the top of each leaf.
- Thread leaves onto strings and tie them in rows to the twig or dowel.
- Add a hanging loop to the dowel ends and adjust lengths so the garland drapes nicely.
5. Pom-Pom Cloud Wall Mobile

A fluffy felt cloud holds dangling colorful pom-poms like tiny raindrops. Kids love choosing the pom-pom colors and watching the mobile bounce gently when air moves.
Materials Needed:
- White felt (cloud shape) or white cardboard
- Pom-poms (various sizes)
- Fishing line or thread
- Glue (fabric or hot glue with adult help)
- Yarn for hanging
How to make it:
- Cut two matching cloud shapes from felt or one from cardboard.
- Glue or stitch lines of thread to the cloud bottom.
- Glue pom-poms to the thread ends and along the cloud edge for fluff.
- Attach a yarn hanger to the top and let glue dry fully before hanging.
6. Paper Circle Color Burst Wall Hanging

This graphic piece shows layered paper circles stacked into a bold burst, with a tidy hanging loop. It’s fun because kids can play with color order and pattern, and adults get a clean, modern look with simple tools.
Materials Needed:
- Colored cardstock
- Compass or round objects to trace
- Glue stick
- Hole punch
- Ribbon or cord
How to make it:
- Trace and cut circles in several sizes and colors.
- Glue smaller circles centered on larger ones to make layered medallions.
- Punch a hole near the top and add a ribbon loop; make several medallions if desired.
- Arrange on the wall as a cluster or hang in a vertical strand.
7. Painted Canvas Mini Banner

Small canvas or fabric flags hang from a string, each painted with simple shapes, letters, or patterns. Kids enjoy stamping and painting, while adults like that the banner feels custom and neat.
Materials Needed:
- Mini canvas panels or fabric rectangles
- Acrylic paint or fabric paint
- Sponge or paintbrushes
- Twine
- Tape or hot glue
How to make it:
- Cut fabric into small flag shapes or use mini canvases.
- Paint bold patterns, initials, or simple icons and let dry.
- Fold fabric tops over twine and glue; for canvases, tape twine to the back.
- Hang the banner and space flags evenly along the string.
8. Popsicle Stick Wall Pocket

This handy wall pocket looks like a tiny wooden envelope made of craft sticks, perfect for notes or dried flowers. Builders love stacking and gluing the sticks, and the finished pocket is both cute and useful.
Materials Needed:
- Popsicle sticks
- White glue or hot glue (adult help)
- Cardstock (backing)
- Paint or markers
- String for hanging
How to make it:
- Cut a rectangle of cardstock as the back panel.
- Glue sticks side-by-side to make a front panel, then glue a slanted stick “envelope” top.
- Glue the front to the back on three sides to form a pocket; paint or decorate.
- Add a string loop to the top and let it dry before filling lightly.
9. Felt Flower Wall Chain

Soft felt blooms are strung in a vertical chain or grouped as a bouquet wall hanging. Kids enjoy cutting simple petals and layering colors, and the result looks cheerful and cozy.
Materials Needed:
- Felt sheets in assorted colors
- Buttons or pom-poms (flower centers)
- Needle and thread or glue
- Ribbon or twine
- Scissors
How to make it:
- Cut circles and petal shapes from felt.
- Layer petals into flowers and stitch or glue on a center.
- Attach flowers along a ribbon or make several strands for a fuller look.
- Add a top loop and hang where you want a soft pop of color.
10. Paper Feather Dream Garland
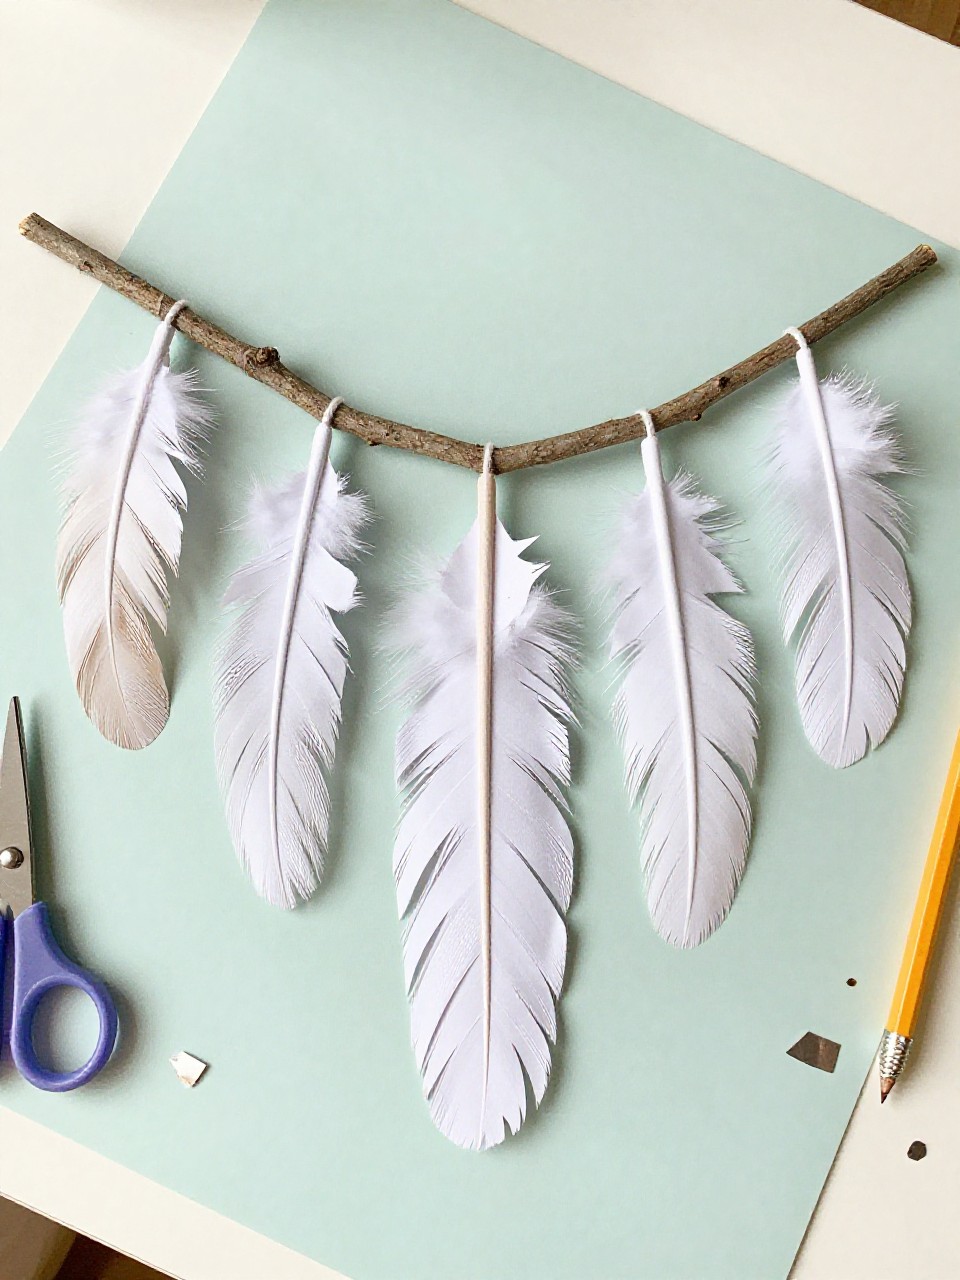
Delicate paper feathers hang from a stick or hoop to make a simple dream-inspired wall piece. Tracing and cutting the feather shapes is relaxing, and kids love adding tiny snips for the feather texture.
Materials Needed:
- Colored or metallic paper
- Pencil and scissors
- Stick, dowel, or embroidery hoop
- String or thread
- Glue (optional)
How to make it:
- Draw and cut feather shapes; add small angled snips along the sides.
- Punch a small hole at the top of each feather.
- Tie feathers to strings and attach them to the stick or hoop.
- Add a top hanger and space feathers at different lengths for movement.
11. Beaded Name Wall Hanger
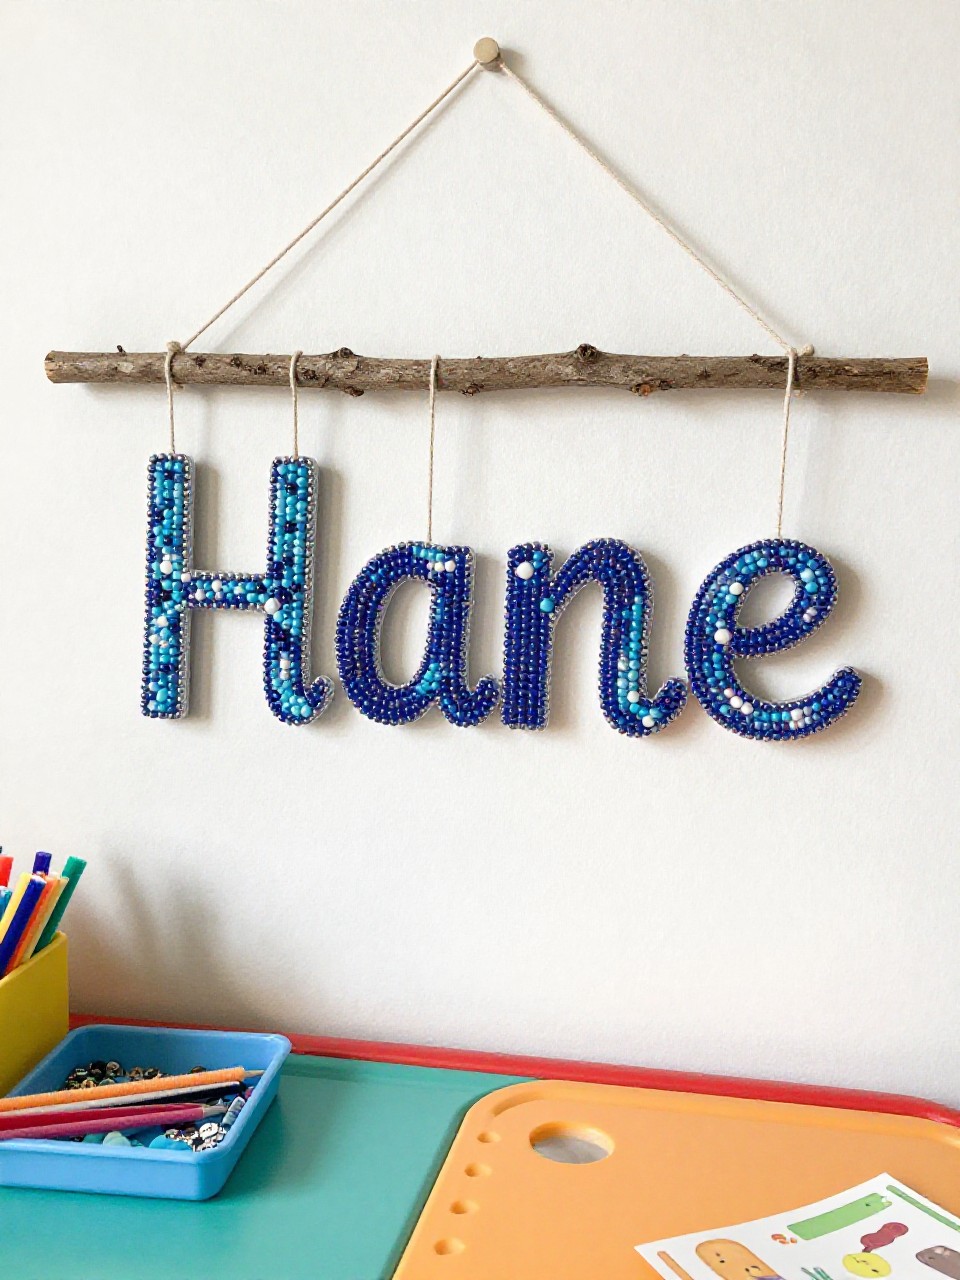
Colorful beads spell a name or word on a simple wire or pipe cleaner hanging from a stick. Kids are proud to see their name on the wall, and stringing beads helps fine motor skills.
Materials Needed:
- Alphabet beads and colorful beads
- Pipe cleaners or thin wire
- Small stick or dowel
- Yarn for hanging
- Scissors
How to make it:
- Thread beads onto a pipe cleaner to spell a name, adding color beads on both sides.
- Twist pipe cleaner ends to secure the word shape.
- Tie the word to a small stick and add a yarn hanger.
- Make extra strands with shapes or hearts if you want and hang together.
12. Washi Tape Geometric Wall Banner

A row of cardstock pennants shows bold shapes made with patterned washi tape. Kids love mixing tapes and creating patterns, and the clean lines make a modern banner adults will enjoy too.
Materials Needed:
- Cardstock pennant shapes
- Washi tapes (various patterns)
- Twine
- Hole punch
- Scissors
How to make it:
- Cut cardstock into triangle or flag-shaped pennants and punch top holes.
- Lay washi tape in stripes, chevrons, or grids across each pennant and trim edges.
- String pennants onto twine and space them evenly.
- Hang across a wall or door and smooth any tape edges.
13. Magazine Mosaic Initial Wall Art

This wall piece features a bold initial filled with tiny colorful magazine squares, giving a mosaic look. Kids enjoy hunting for colors and gluing the bits, and the final letter looks polished in a simple frame.
Materials Needed:
- Cardstock or canvas board
- Old magazines
- Glue stick
- Pencil and ruler
- Frame (optional)
How to make it:
- Draw a large block letter on cardstock.
- Cut magazine pages into small squares or rectangles.
- Glue pieces inside the letter, fitting them like tiles until it’s filled.
- Let dry, outline the letter if needed, and frame or hang with tape.
14. Scrap Fabric Tassel Wall Hanging
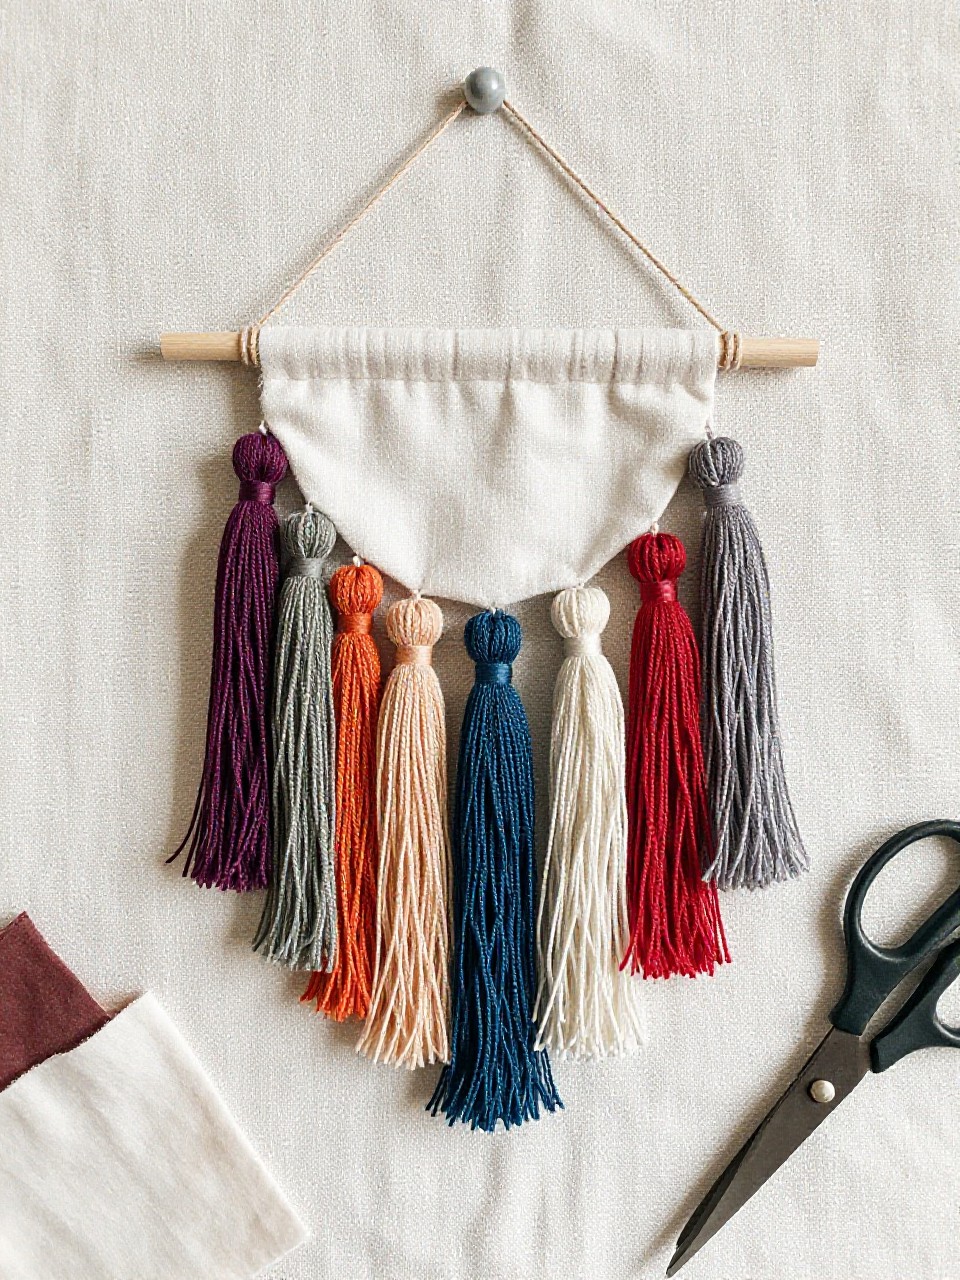
Long, soft tassels made from fabric strips hang from a dowel in a row of cozy colors. Kids like tearing or cutting the strips and seeing the tassels fluff up fast.
Materials Needed:
- Scrap fabric or old T-shirts
- Wooden dowel or stick
- Yarn or string
- Scissors
- Comb (optional for fluffing)
How to make it:
- Cut fabric into long strips about 1 inch wide.
- Fold a bundle over the dowel and tie near the top to make a tassel.
- Repeat with more colors until the dowel is filled.
- Add a hanging cord and trim tassel ends for an even finish.
15. Button Balloon Wall Art

A bunch of colorful buttons forms balloon shapes with drawn or yarn “strings,” mounted on cardstock. Sorting and arranging buttons is oddly satisfying, and the bright balloons make happy wall decor.
Materials Needed:
- Assorted buttons
- Cardstock background
- Glue (tacky glue works well)
- Marker or yarn (balloon strings)
- Frame or clipboard (optional)
How to make it:
- Lightly sketch balloon circles on cardstock.
- Glue buttons inside each circle, mixing sizes and colors.
- Draw strings with a marker or glue yarn lines from balloons downward.
- Let dry flat and frame or hang with washi tape.
16. Cardboard Loom Wall Tapestry

A small tapestry is woven on a simple cardboard loom, mixing yarn textures and a fringe bottom. Kids enjoy slipping the yarn over and under, while adults can choose calm colors for a pretty finished piece.
Materials Needed:
- Cardboard (sturdy, about 8×10 inches)
- Yarn in assorted colors and textures
- Scissors
- Tape
- Darning needle (plastic for kids)
How to make it:
- Cut small notches along two short edges of the cardboard and string warp yarn up and down, taping at the back.
- Thread yarn on a needle and weave over-under across the warp, pushing rows down.
- Change colors and add a fringe by knotting yarn pieces at the bottom.
- Tie off the top, slide the tapestry off the loom, add a hanging loop, and tidy ends.


