

Table of Contents Show
Tin boxes are one of those things we all save “just in case,” but they can end up looking messy on a shelf. Painting them turns basic storage into something pretty, personal, and calming to make.
If you want a relaxing beginner project that also helps you organize, these ideas are perfect.
Here are 16 tin box painting ideas to inspire your next cozy craft session.
1. Wildflower Meadow Tin Box
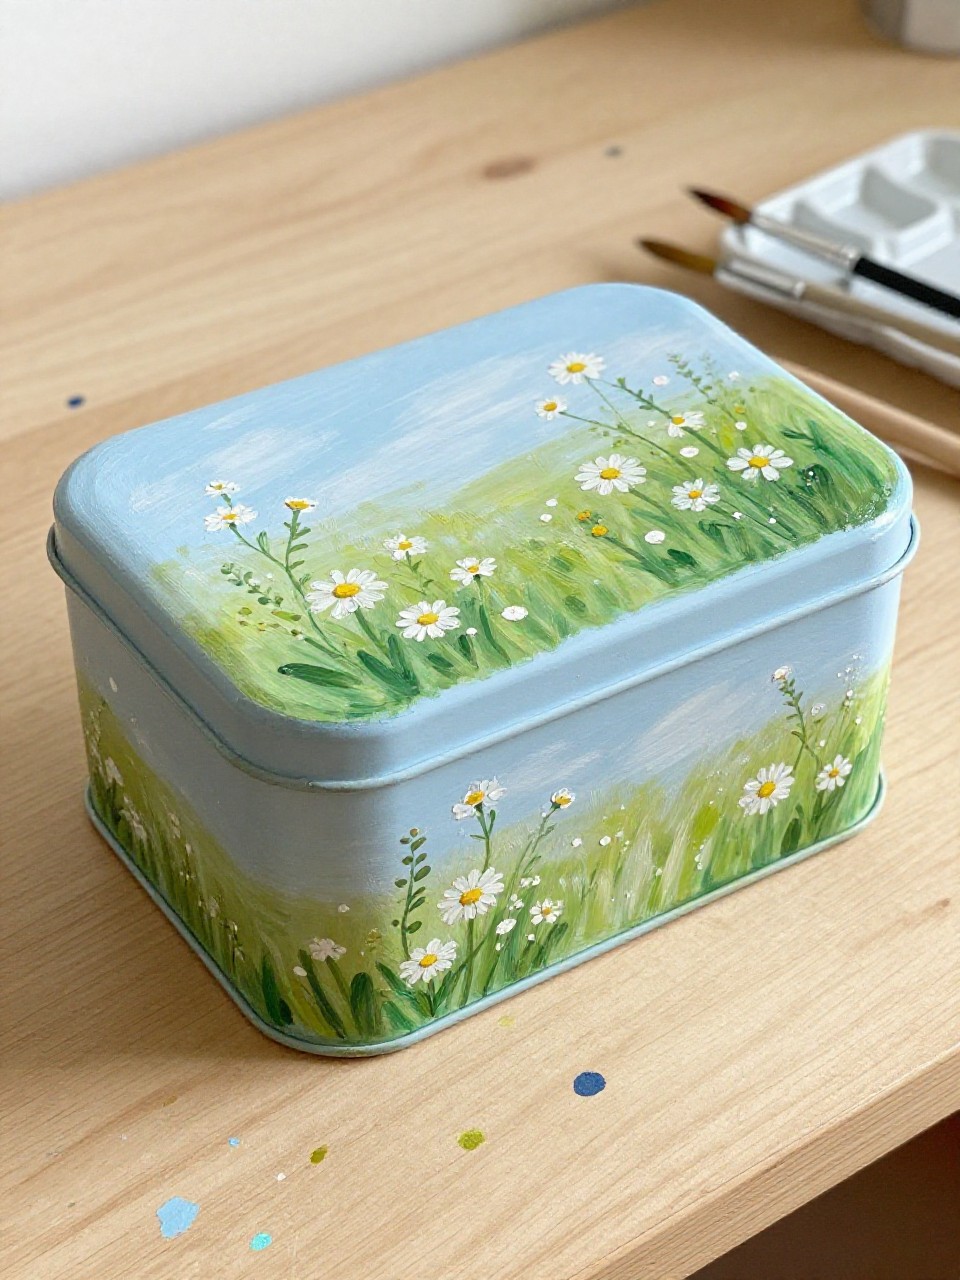
This tin box looks like a tiny flower field, with loose daisies, little leaves, and soft green stems wrapping around the sides. It’s satisfying because you can keep the flowers simple and still make it look charming, even if you’re new to painting. It’s perfect for storing tea bags, stickers, or hair pins.
Materials Needed:
- Tin box with lid
- Acrylic paint
- Paintbrushes in multiple sizes
- Palette or paint tray
- Optional sealer or varnish
Steps to Make:
- Clean the tin and lightly scuff it with a soft sanding block so paint sticks better.
- Paint a pale sky or cream base coat and let it dry fully.
- Add simple stems and leaf shapes around the box, following the curve of the sides.
- Dot in flower heads with small brush taps, then add tiny darker centers.
- Let everything dry, then seal with a thin coat of varnish before using.
2. Soft Pastel Stripes Tin Box
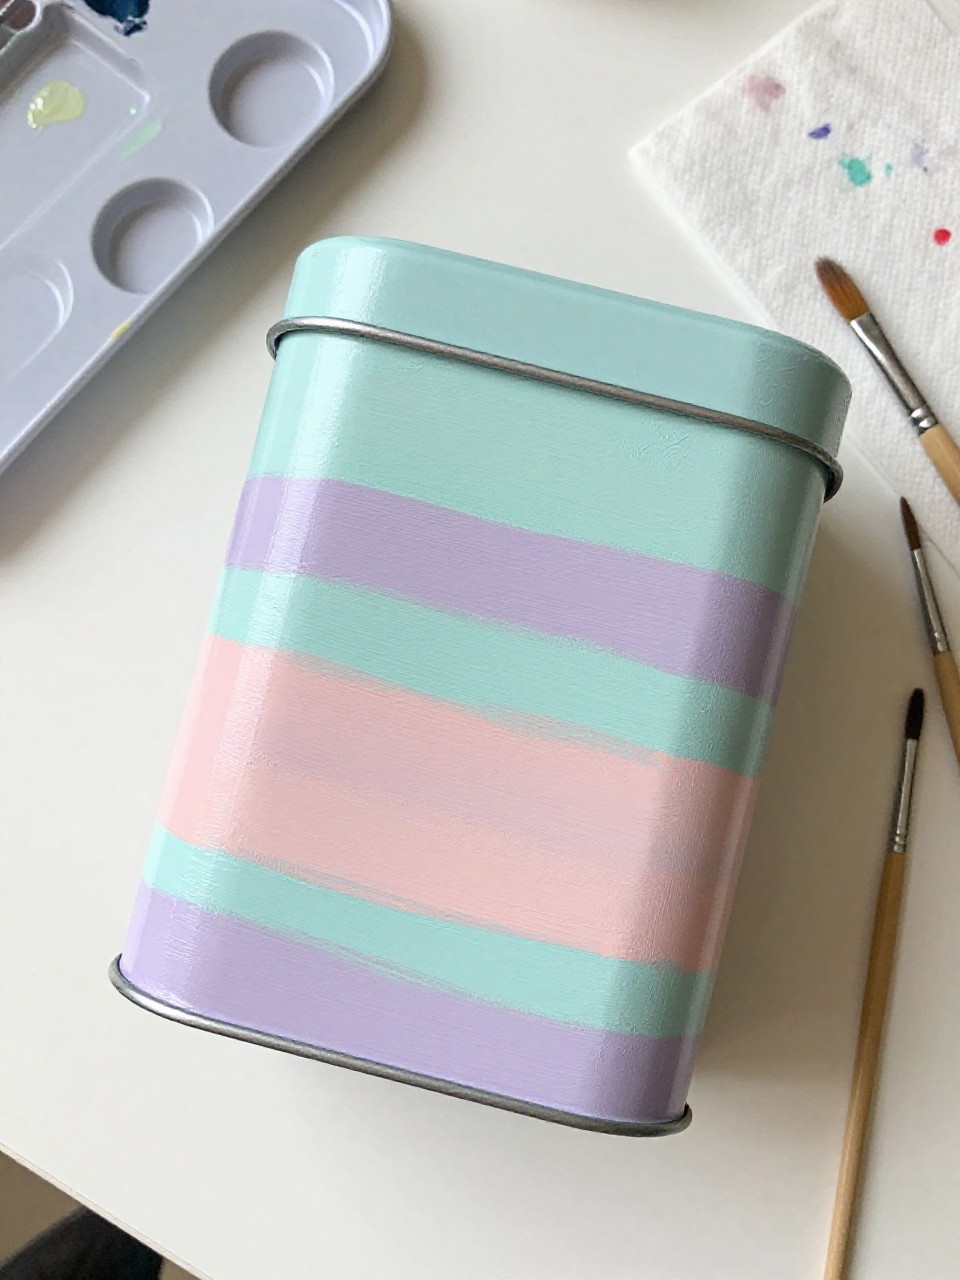
This tin box has clean, calming stripes in pastel colors that wrap neatly around the sides and lid edge. It’s a great beginner project because stripes help you practice steady brush control without needing detailed drawing skills. The finished box looks lovely on a desk for pens, notes, or craft clips.
Materials Needed:
- Tin box with lid
- Acrylic paint
- Paintbrushes in multiple sizes
- Palette or paint tray
- Optional sealer or varnish
Steps to Make:
- Wipe the tin with rubbing alcohol and let it dry.
- Paint a solid light base color and dry completely.
- Use light pencil marks or thin tape guides to map out stripe spacing around the box.
- Paint each stripe slowly, rotating the tin so the lines stay even on the curved sides.
- Peel tape (if used) and seal once the paint is fully dry.
3. Lemon Grove Tin Box
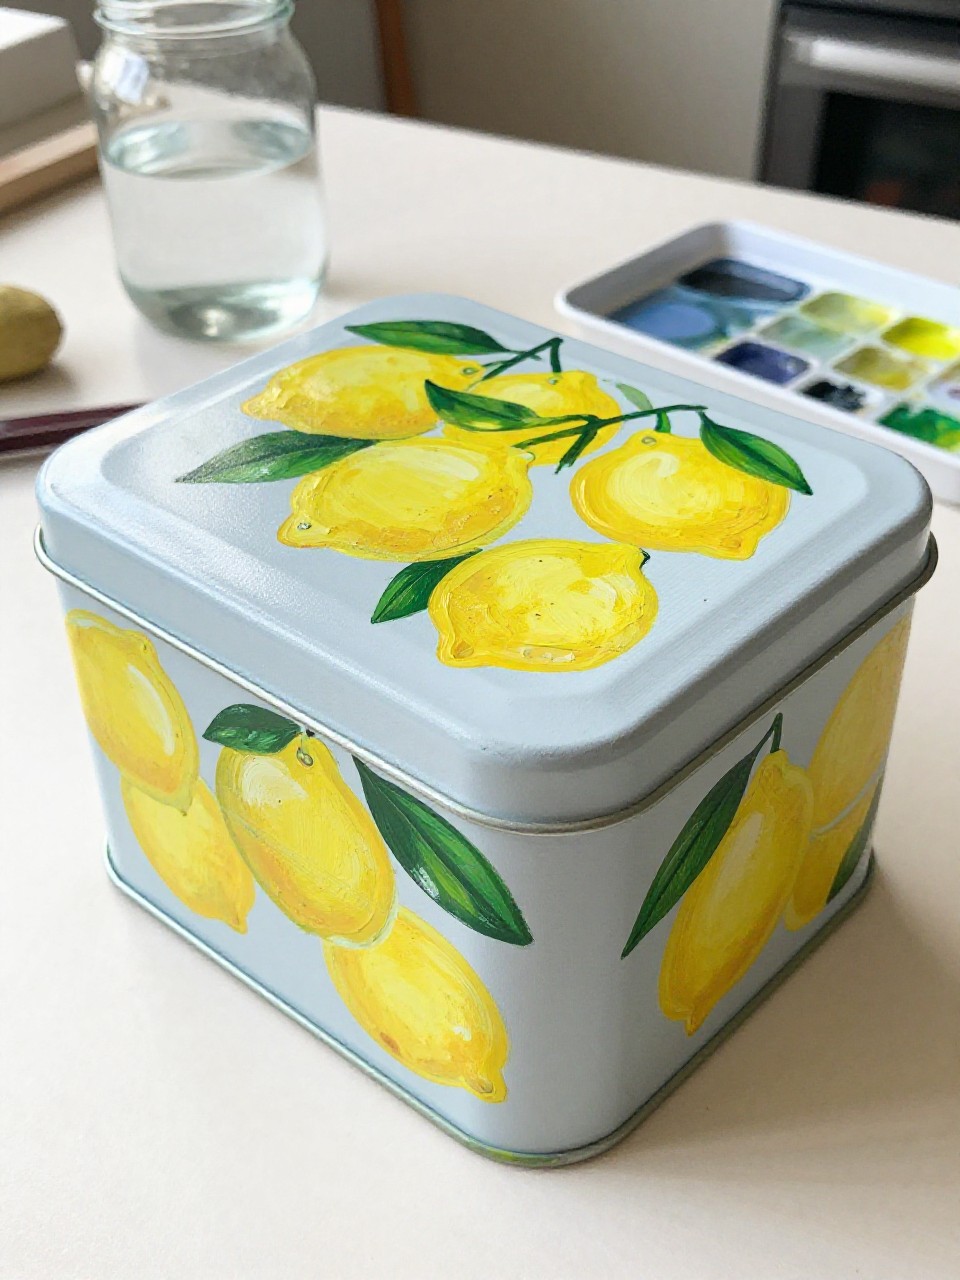
This tin box looks fresh and sunny, with hand-painted lemons and deep green leaves scattered across the lid and sides. It’s relaxing because you can paint simple oval lemon shapes, then build up color in layers for a juicy look. Use it in the kitchen for tea, sugar packets, or recipe cards.
Materials Needed:
- Tin box with lid
- Acrylic paint
- Paintbrushes in multiple sizes
- Palette or paint tray
- Optional sealer or varnish
Steps to Make:
- Clean the tin and paint a warm white base coat.
- Sketch a few lemon ovals and leaf clusters lightly with pencil.
- Block in lemon shapes with yellow, then add darker yellow shading on one side.
- Paint leaves in two greens and add quick vein lines with a thin brush.
- Let it dry and seal so the design holds up to regular handling.
4. Vintage Rose Lid Tin Box
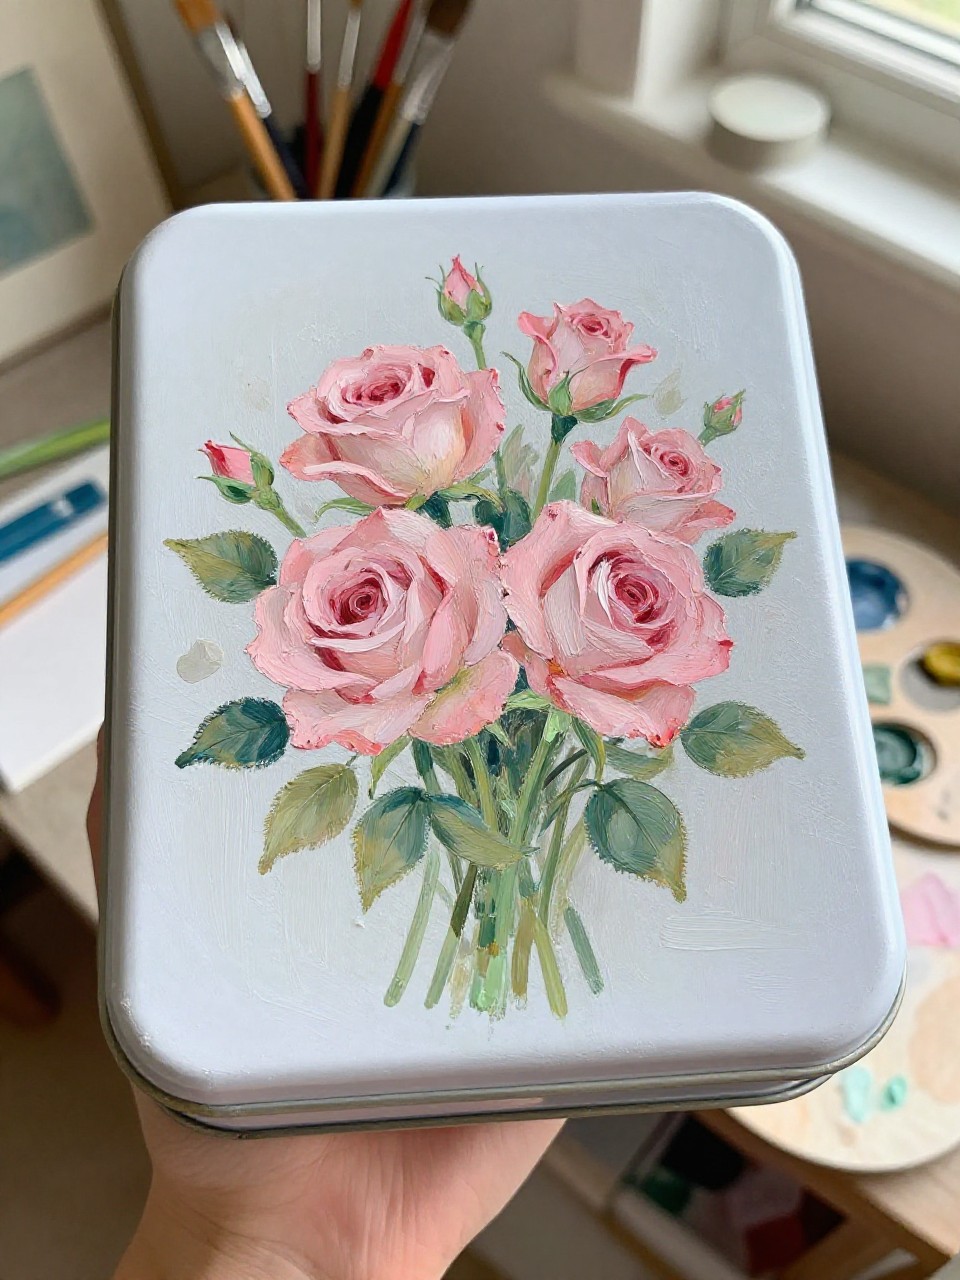
This tin box has a soft, vintage look with a bouquet of dusty pink roses painted on the lid and a few small buds around the edges. It’s a comforting project because you can keep the flowers loose and impressionistic, letting brush strokes do the work. It makes pretty storage for jewelry, letters, or sewing notions.
Materials Needed:
- Tin box with lid
- Acrylic paint
- Paintbrushes in multiple sizes
- Palette or paint tray
- Optional sealer or varnish
Steps to Make:
- Wipe the tin clean and apply a pale blush or cream base coat.
- Lightly map the flower cluster on the lid with faint pencil circles.
- Paint petals with short curved strokes, layering light pink and deeper rose tones.
- Add muted green leaves and a few tiny dots for filler flowers.
- Dry completely, then varnish the lid for a gentle sheen.
5. Night Sky Constellation Tin Box
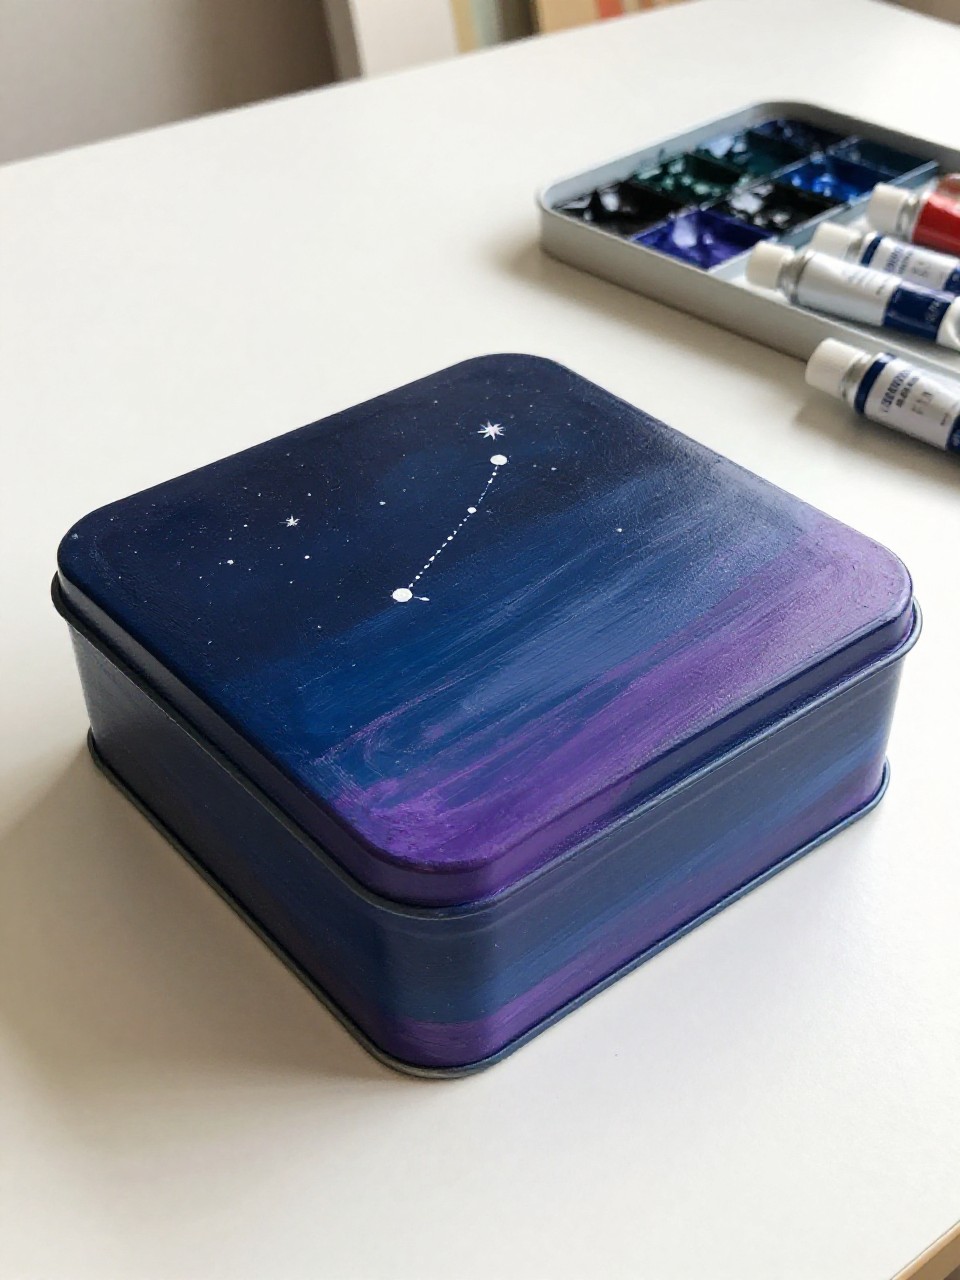
This tin box looks like a tiny night sky, painted in deep blues with scattered stars and one simple constellation line pattern on the lid. It’s great for beginners because blending a dark background is forgiving, and stars are just dots and tiny crosses. It’s perfect for storing keepsakes, crystals, or small notes.
Materials Needed:
- Tin box with lid
- Acrylic paint
- Paintbrushes in multiple sizes
- Palette or paint tray
- Optional sealer or varnish
Steps to Make:
- Clean and dry the tin, then paint a dark navy base coat.
- Blend a little purple or teal into the corners while the paint is still slightly wet.
- Add star dots using the tip of a small brush, varying sizes for a natural look.
- Paint a simple constellation with a few brighter dots and thin connecting lines.
- Let it dry, then seal to protect the darker paint from scratches.
6. Blue-and-White Porcelain-Inspired Tin Box
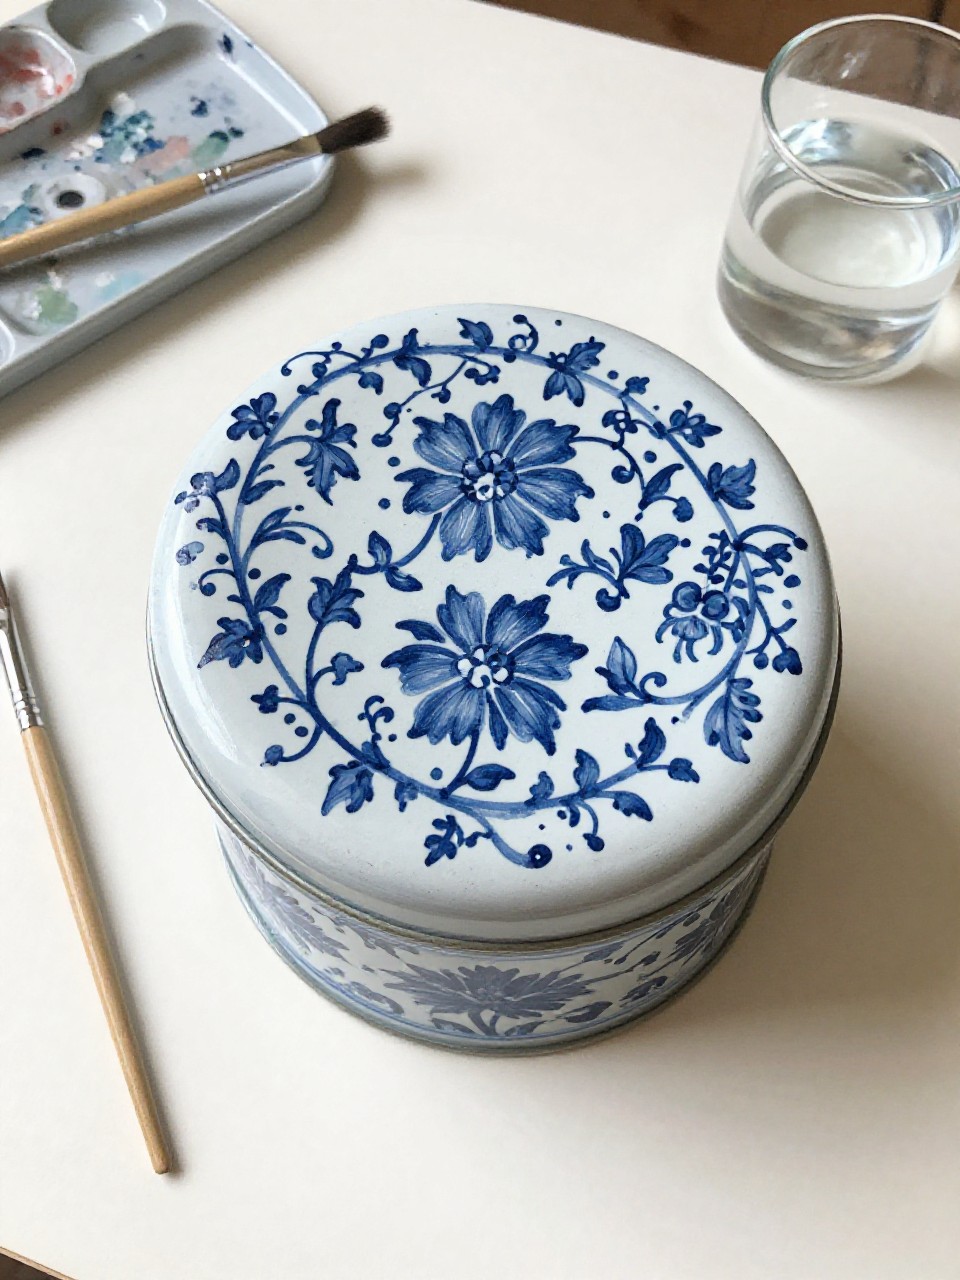
This tin box mimics classic blue-and-white porcelain, with hand-painted vines, petals, and small border details wrapping around the sides. It’s soothing because it uses repeating shapes, so you can get into a slow, steady rhythm. It looks elegant on a shelf while holding cotton pads, stationery, or tea.
Materials Needed:
- Tin box with lid
- Acrylic paint
- Paintbrushes in multiple sizes
- Palette or paint tray
- Optional sealer or varnish
Steps to Make:
- Paint the tin a solid white base coat and let it cure well.
- Use a pencil to lightly plan a border line around the lid and bottom edge.
- Paint simple floral vines in cobalt blue, rotating the tin as you work around curves.
- Add tiny dot clusters and thin line details to fill empty spaces.
- Seal with a clear varnish so the blue stays crisp over time.
7. Rainbow Confetti Dot Tin Box
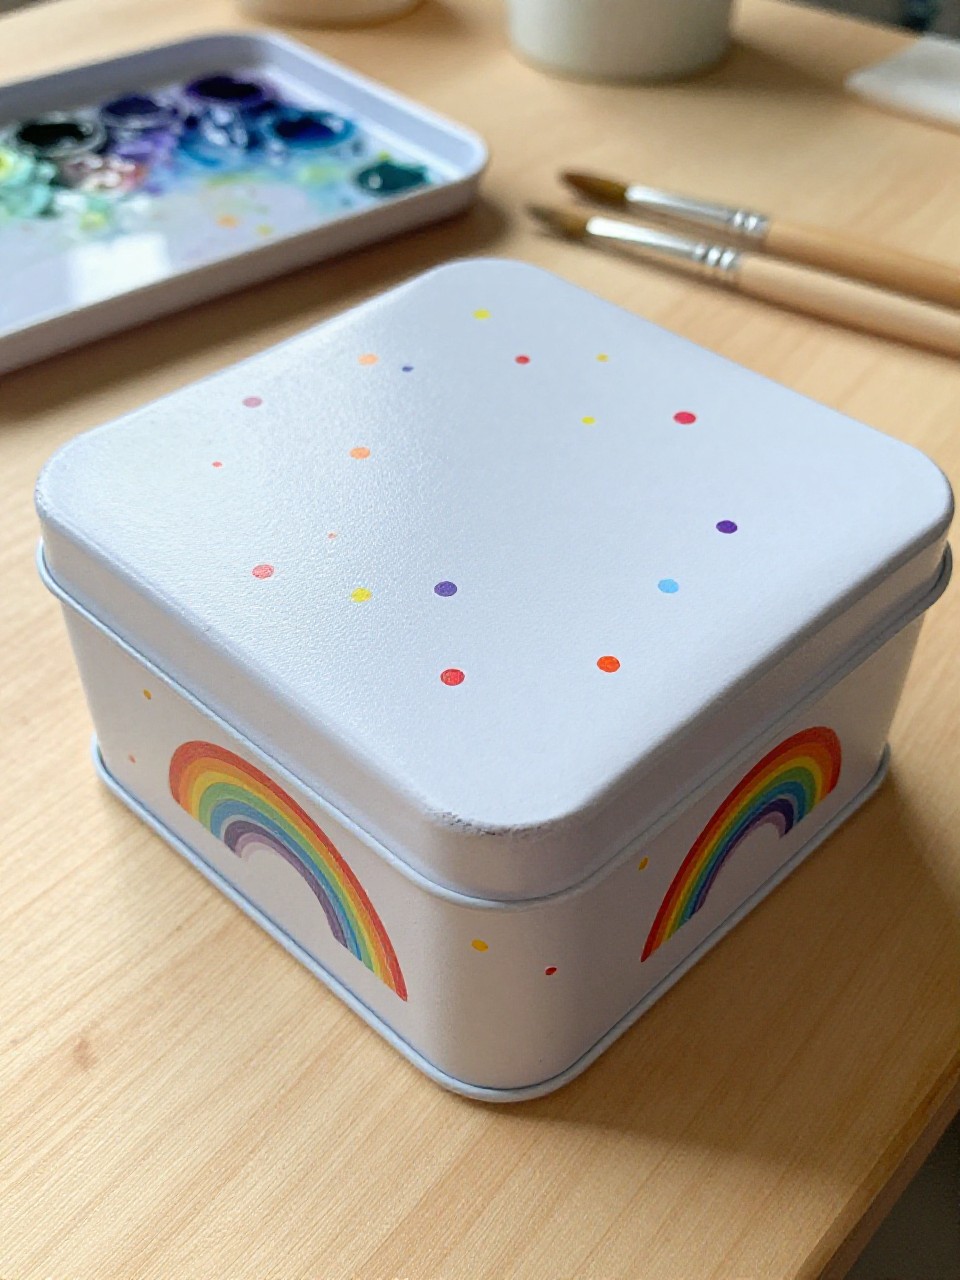
This tin box is cheerful and playful, covered in hand-painted confetti dots and tiny dashes in bright rainbow colors across the lid and sides. It’s an easy, relaxing project because it doesn’t need perfect lines—just lots of small marks. Use it for kid craft supplies, buttons, or paper clips.
Materials Needed:
- Tin box with lid
- Acrylic paint
- Paintbrushes in multiple sizes
- Palette or paint tray
- Optional sealer or varnish
Steps to Make:
- Clean the tin and paint a simple white or light pastel base coat.
- Pick 5–7 bright colors and place small puddles on a palette.
- Dot and dash the colors all over, turning the tin so coverage looks even on the sides.
- Add a few overlapping marks to create layered, hand-painted texture.
- Dry fully, then seal so the dots don’t rub off with use.
8. Gingham Picnic Tin Box
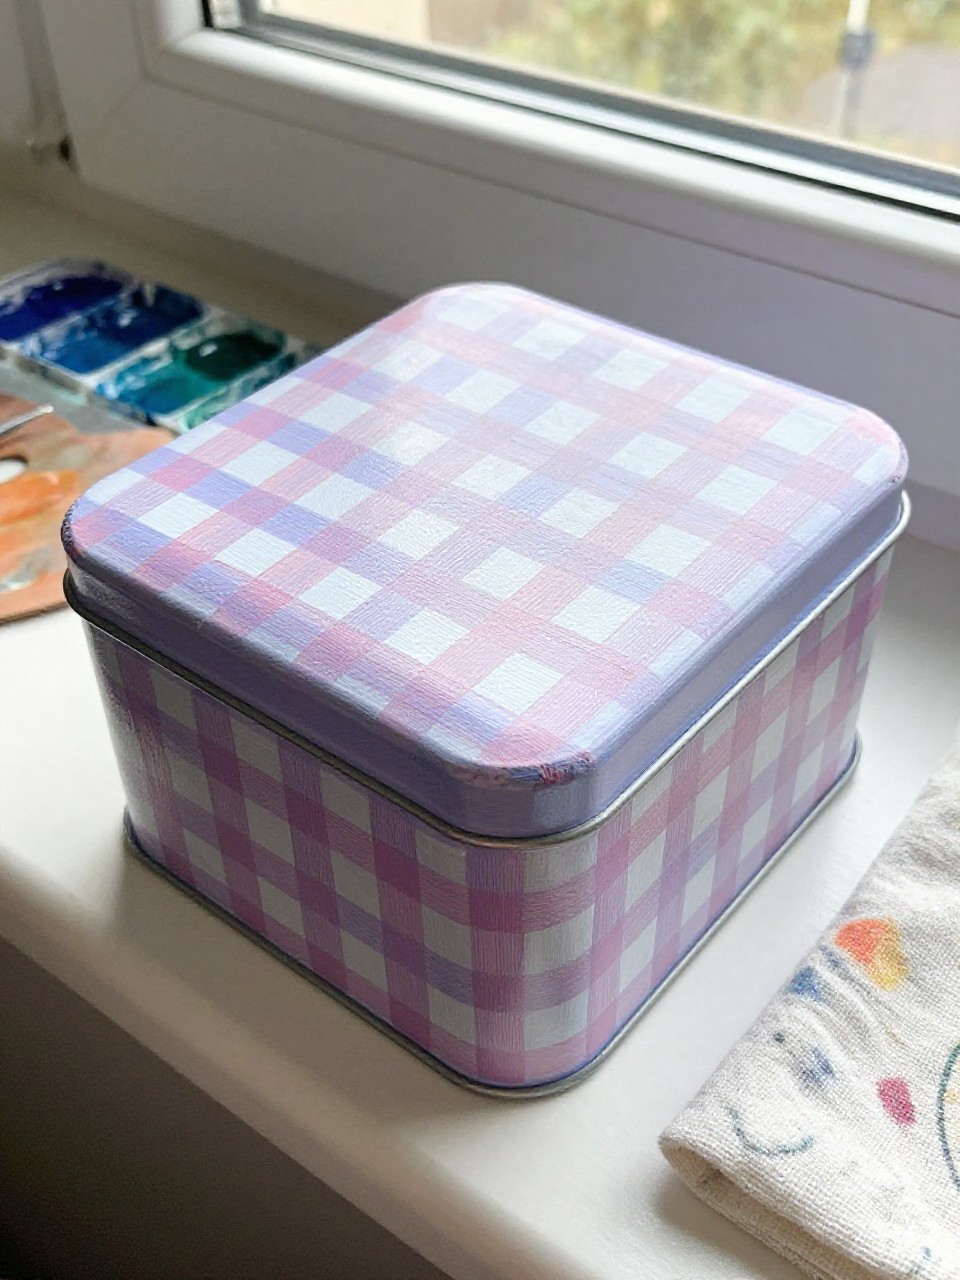
This tin box looks like a cozy picnic blanket, with a hand-painted gingham grid pattern wrapping around the box and lid. It’s a fun beginner way to practice simple straight lines without needing advanced drawing. The finished piece feels homey and works great for recipe cards, tea sachets, or small snacks.
Materials Needed:
- Tin box with lid
- Acrylic paint
- Paintbrushes in multiple sizes
- Palette or paint tray
- Optional sealer or varnish
Steps to Make:
- Paint a light base color, like pale red or soft blue, and let it dry.
- Lightly mark a grid with pencil lines to guide spacing around the tin’s sides.
- Paint vertical stripes first, keeping them evenly spaced as you rotate the box.
- Add horizontal stripes to form squares, then darken alternating squares for depth.
- Let dry and seal for a wipeable, long-lasting finish.
9. Sun-and-Moon Celestial Tin Box
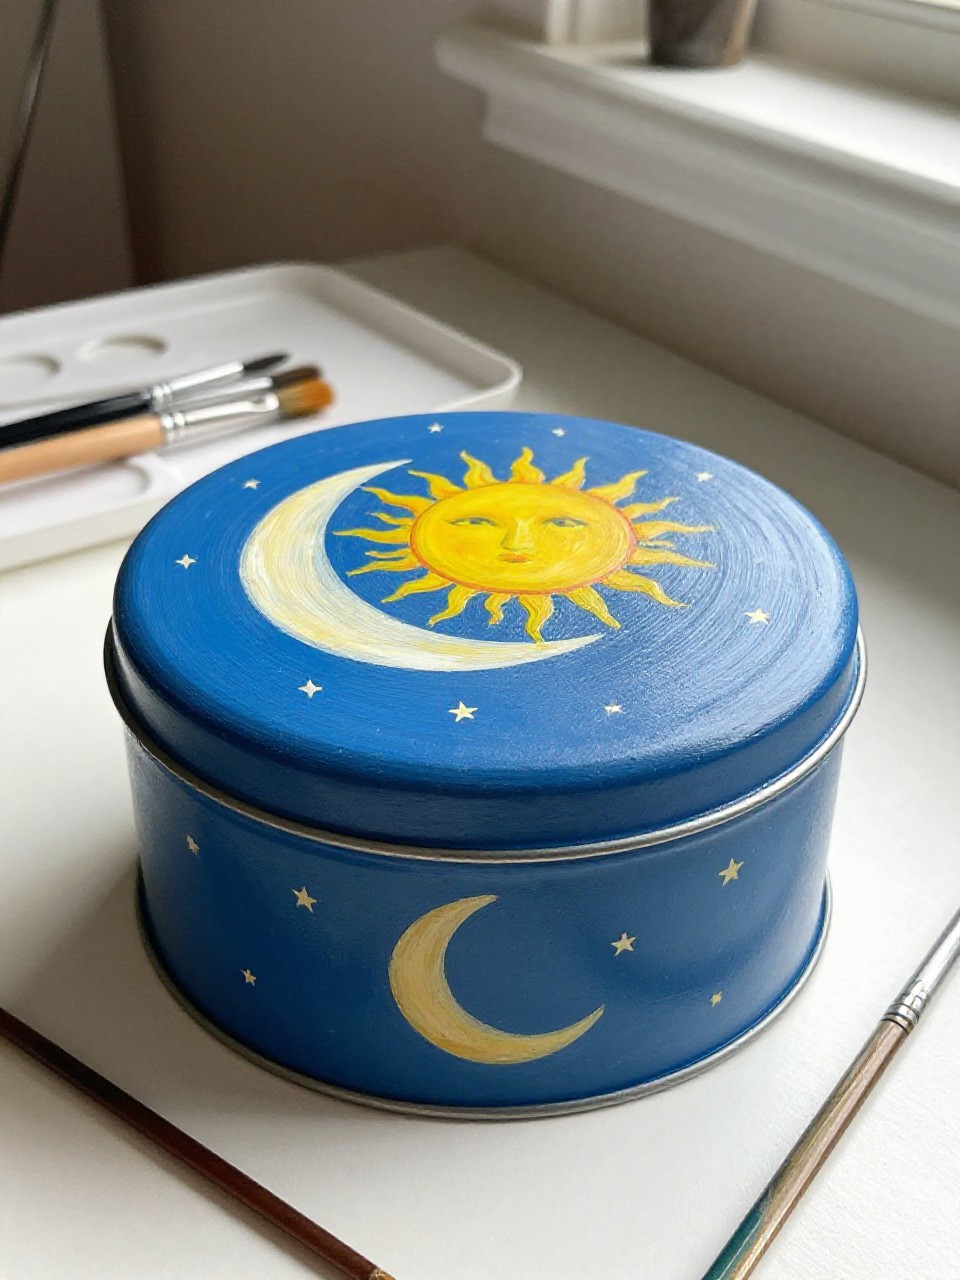
This tin box features a warm sun on one side and a cool crescent moon on the other, with tiny stars scattered between them. It’s satisfying because you can play with golds, yellows, and deep blues, and the shapes are simple to sketch. It’s lovely for storing affirmation cards, jewelry, or tiny keepsakes.
Materials Needed:
- Tin box with lid
- Acrylic paint
- Paintbrushes in multiple sizes
- Palette or paint tray
- Optional sealer or varnish
Steps to Make:
- Clean the tin and paint a smooth gradient base from warm cream to soft navy.
- Sketch a sun circle and moon crescent so they sit centered on opposite faces.
- Paint the sun with layered yellows and add simple ray strokes.
- Paint the moon in pale gray-white and dot in stars with a small brush tip.
- Dry completely and seal, especially if you’ll handle it often.
10. Botanical Herb Label Tin Box
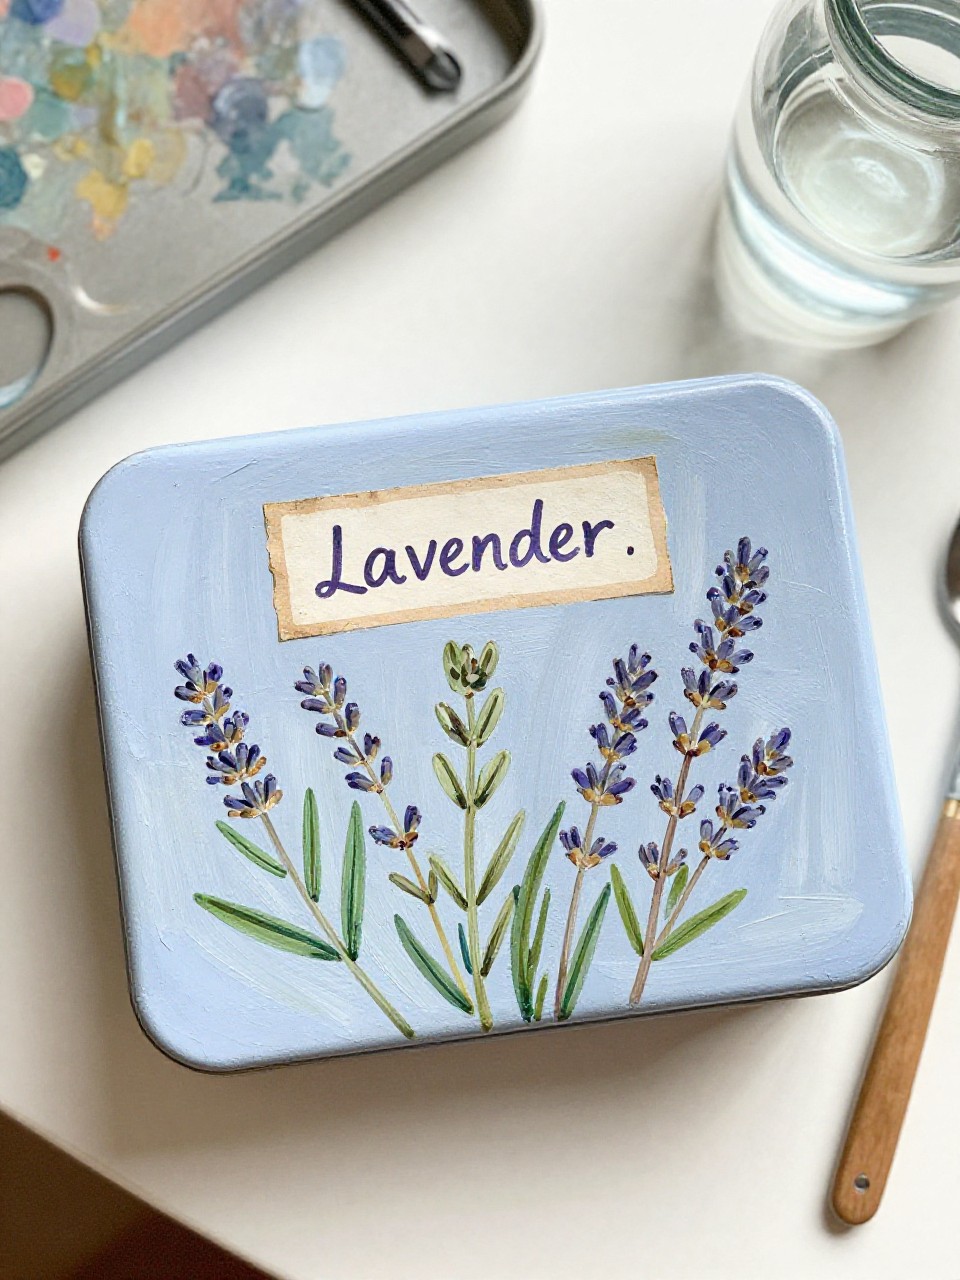
This tin box looks like a little apothecary container, with painted herb sprigs and a simple label on the lid that says something like “Mint” or “Lavender.” It’s great for beginners because the leaves can be quick brush strokes, and the label hides small mistakes. Store tea, sachets, or homemade bath salts inside.
Materials Needed:
- Tin box with lid
- Acrylic paint
- Paintbrushes in multiple sizes
- Palette or paint tray
- Optional sealer or varnish
Steps to Make:
- Paint the tin a muted base color like sage, cream, or dusty blue.
- Paint a label shape on the lid using a contrasting color, then let it dry.
- Add herb sprigs along the sides with simple leaf strokes that follow the tin’s curve.
- Write the herb name with a thin brush or paint pen style brushwork.
- Seal once dry so the lettering stays sharp and protected.
11. Ombre Sunset Tin Box
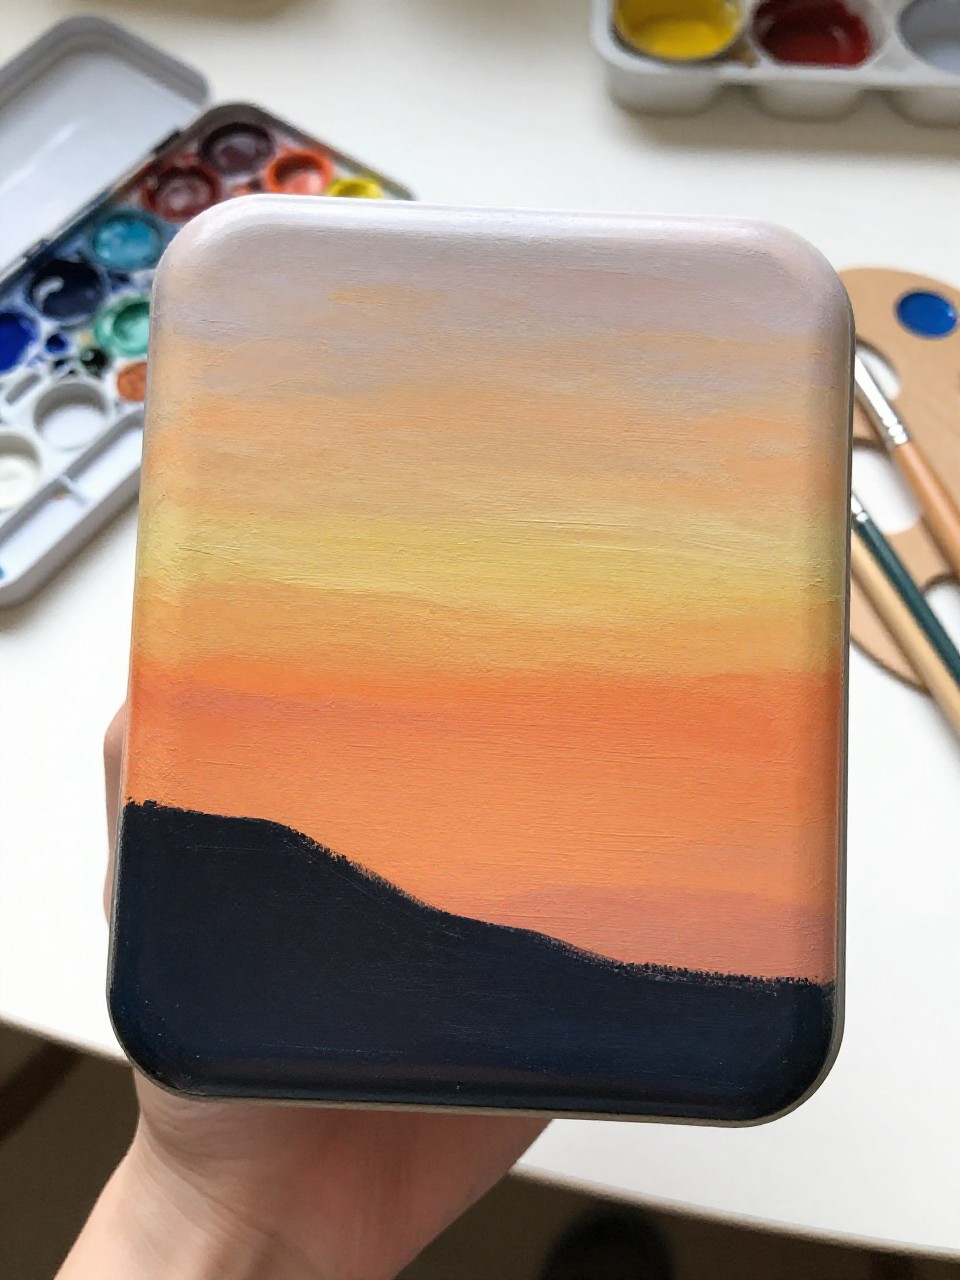
This tin box has a smooth, hand-painted sunset fade from coral to pink to soft purple, with a thin silhouette of hills along the bottom edge. It’s a relaxing project because blending colors feels slow and calming, and the landscape line is simple. It makes pretty storage for art supplies, cables, or postcards.
Materials Needed:
- Tin box with lid
- Acrylic paint
- Paintbrushes in multiple sizes
- Palette or paint tray
- Optional sealer or varnish
Steps to Make:
- Prime the tin with a light base coat to help blending look even.
- Paint horizontal bands of coral, pink, and purple while they’re still slightly wet.
- Use a clean damp brush to soften the edges where colors meet on the curved sides.
- Add a dark hill silhouette band near the bottom and a few tiny bird marks.
- Dry fully, then seal to protect the blended surface from scuffs.
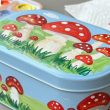
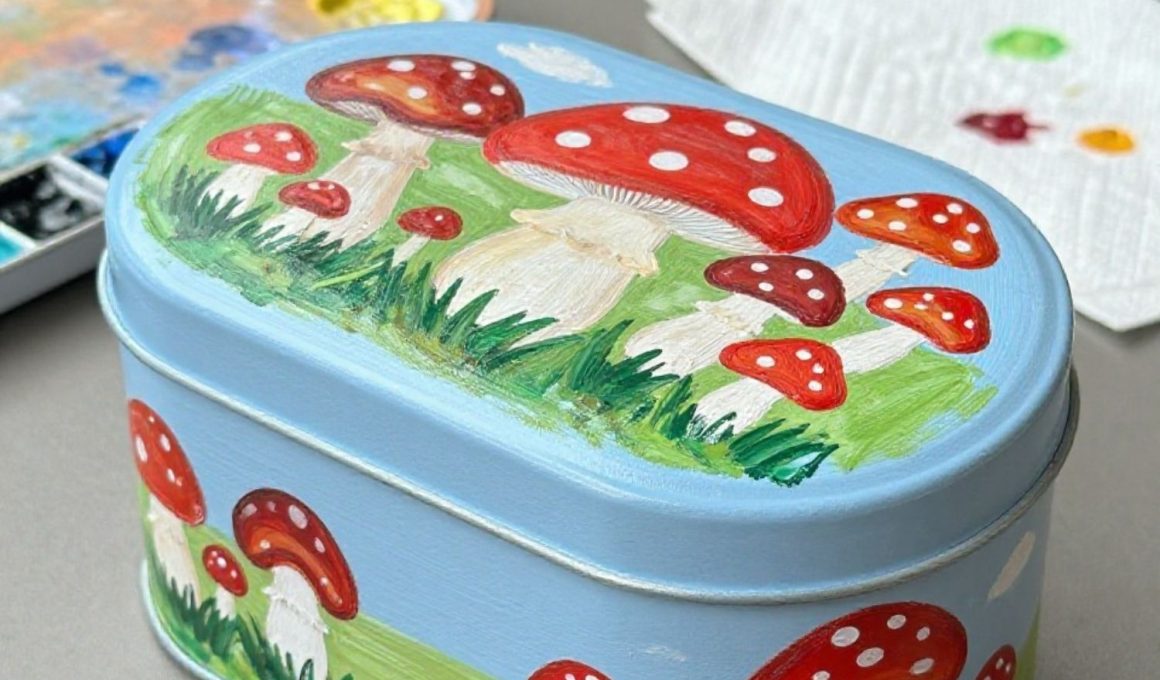
12. Cute Mushroom Garden Tin Box
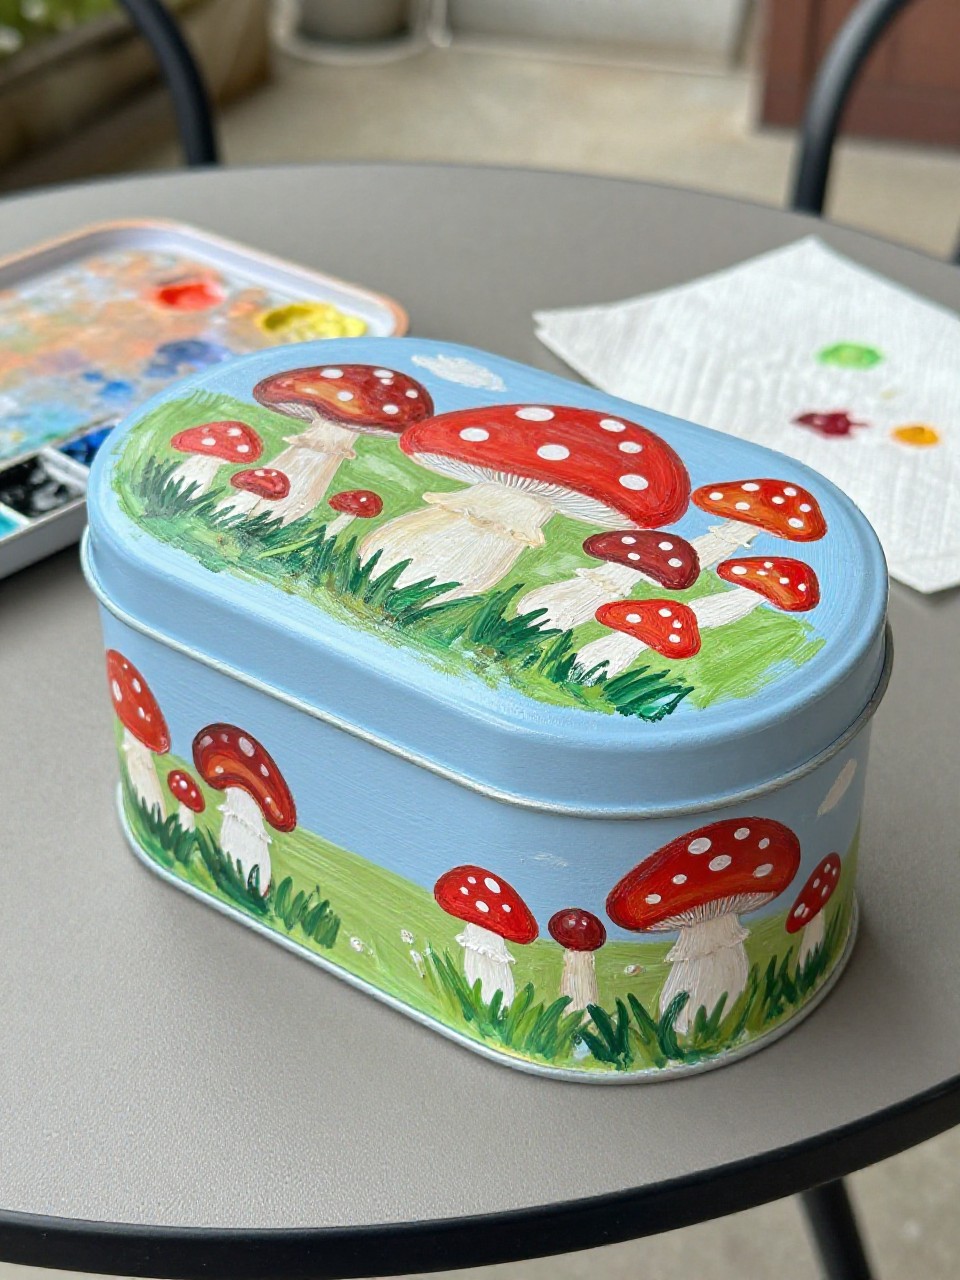
This tin box looks like a tiny forest scene, with red-capped mushrooms, little grass blades, and small dots of flowers painted around the sides. It’s perfect for beginners because mushrooms are simple shapes, and you can add as many (or as few) details as you want. Use it for trinkets, washi tape, or pins.
Materials Needed:
- Tin box with lid
- Acrylic paint
- Paintbrushes in multiple sizes
- Palette or paint tray
- Optional sealer or varnish
Steps to Make:
- Clean the tin and paint a soft earthy base like warm beige or pale green.
- Sketch a few mushroom spots around the sides so spacing feels balanced.
- Paint mushroom stems first, then add caps in reds and browns with layered shading.
- Add grass strokes and tiny flower dots, letting some brush strokes stay visible.
- Let dry and seal, especially around edges that get touched often.
13. Minimal Black Line Art Tin Box
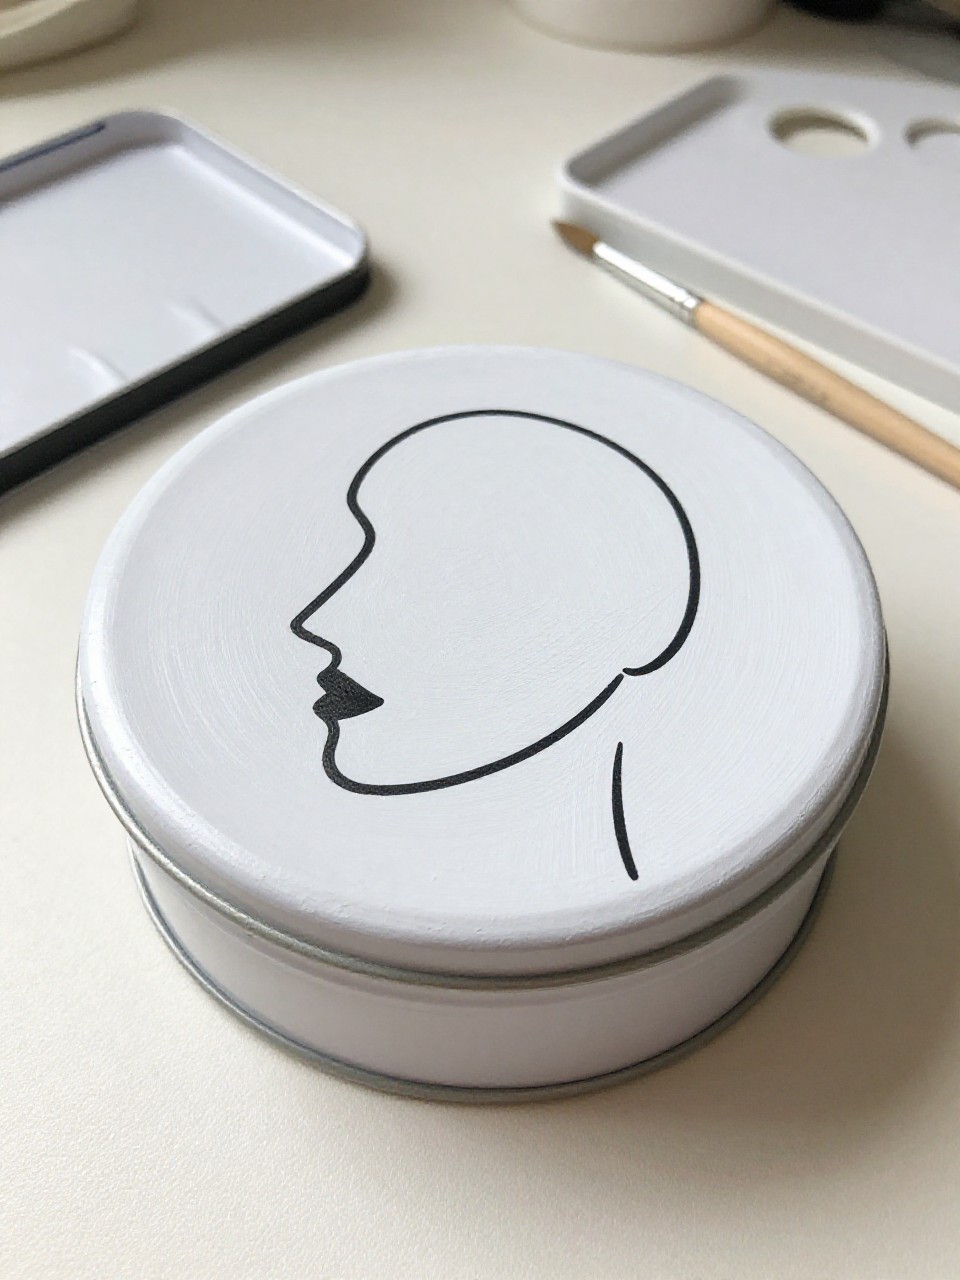
This tin box has a clean matte look with simple black line art—like a face outline or abstract leaves—on a solid neutral background. It’s great if you want something modern but still handmade, and it’s beginner-friendly because the design is simple and bold. It looks nice on a nightstand holding small essentials.
Materials Needed:
- Tin box with lid
- Acrylic paint
- Paintbrushes in multiple sizes
- Palette or paint tray
- Optional sealer or varnish
Steps to Make:
- Paint the tin a smooth matte base color like warm white, tan, or pale gray.
- Lightly sketch your line art on the lid using pencil so you can adjust placement.
- Use a thin brush to paint the black outline slowly, keeping lines confident and simple.
- Add one small accent shape (like a filled circle or leaf) for balance.
- Dry fully and seal with a clear coat that won’t turn the background yellow.
14. Polka Dot Border Tin Box
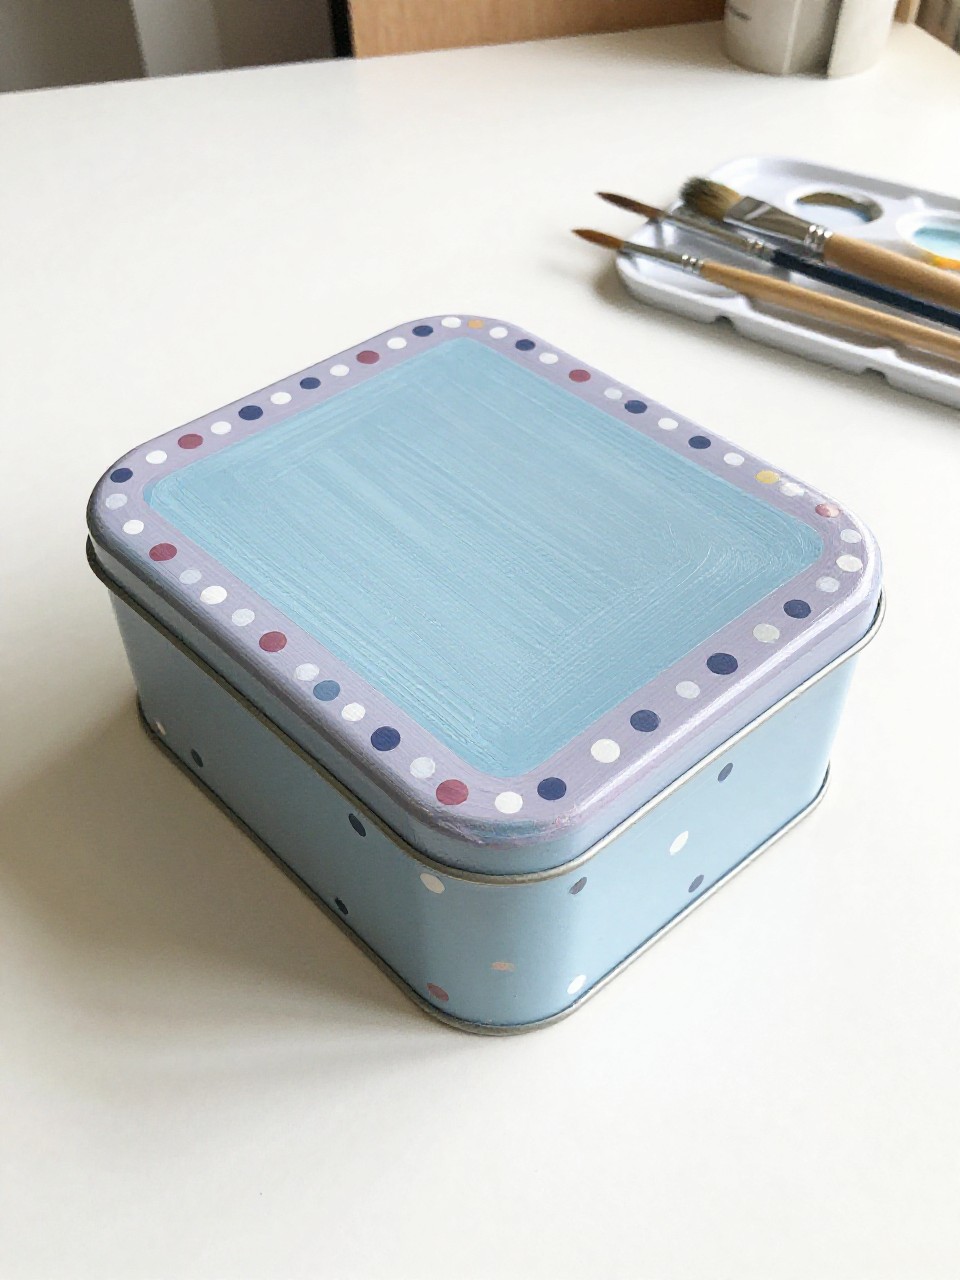
This tin box looks sweet and tidy, with a painted polka dot border around the lid and matching dots spaced evenly along the sides. It’s relaxing because dots are quick, forgiving, and fun to repeat, even if your hand shakes a little. It’s great for gift-giving—fill it with candy, notes, or mini art supplies.
Materials Needed:
- Tin box with lid
- Acrylic paint
- Paintbrushes in multiple sizes
- Palette or paint tray
- Optional sealer or varnish
Steps to Make:
- Clean the tin and paint a base color that makes your dots pop.
- Mark a light guideline around the lid edge where the border will sit.
- Use the end of a brush handle or a small round brush tip to stamp dot shapes.
- Add a second dot color in a few spots for a playful, layered look.
- Dry and seal so the border doesn’t chip from opening and closing.
15. Cozy Sweater Knit Pattern Tin Box
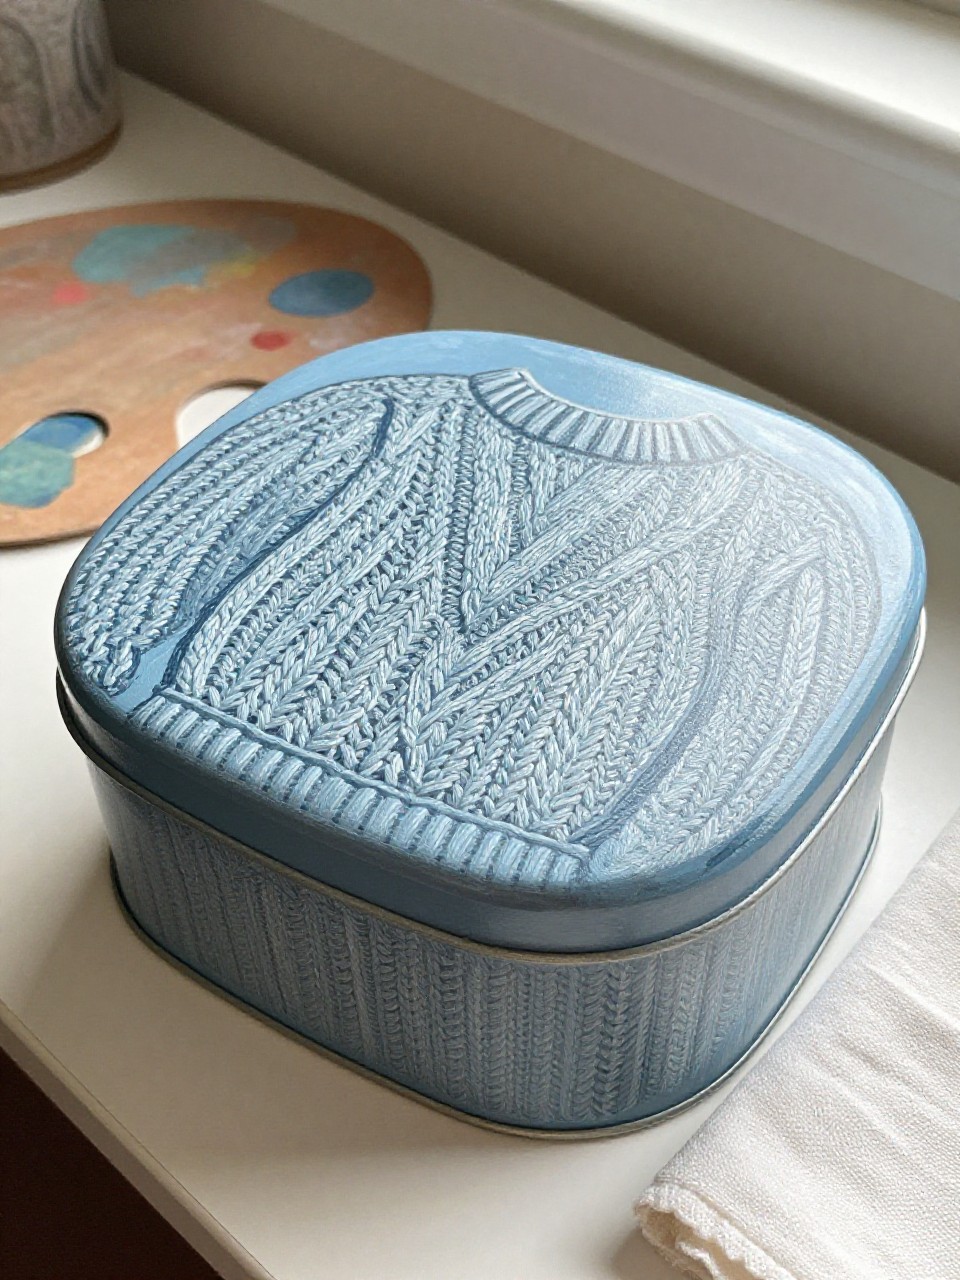
This tin box is painted to look like a cozy knit sweater, with repeating V-shaped stitches and a simple band pattern wrapping around the sides. It’s a satisfying project because the repeated marks are calming, and it looks impressive without being hard. It’s perfect for winter storage like lip balm, hand cream, or small gifts.
Materials Needed:
- Tin box with lid
- Acrylic paint
- Paintbrushes in multiple sizes
- Palette or paint tray
- Optional sealer or varnish
Steps to Make:
- Paint the tin in a warm base color like cream, dusty pink, or light gray.
- Use pencil to mark rows so your “stitches” stay level around the curved sides.
- Paint small V shapes in neat lines, rotating the tin to keep the pattern flowing.
- Add a simple stripe band near the top or bottom to mimic sweater trim.
- Let dry, then seal for a durable, cozy-looking finish.
16. Garden Strawberry Tin Box
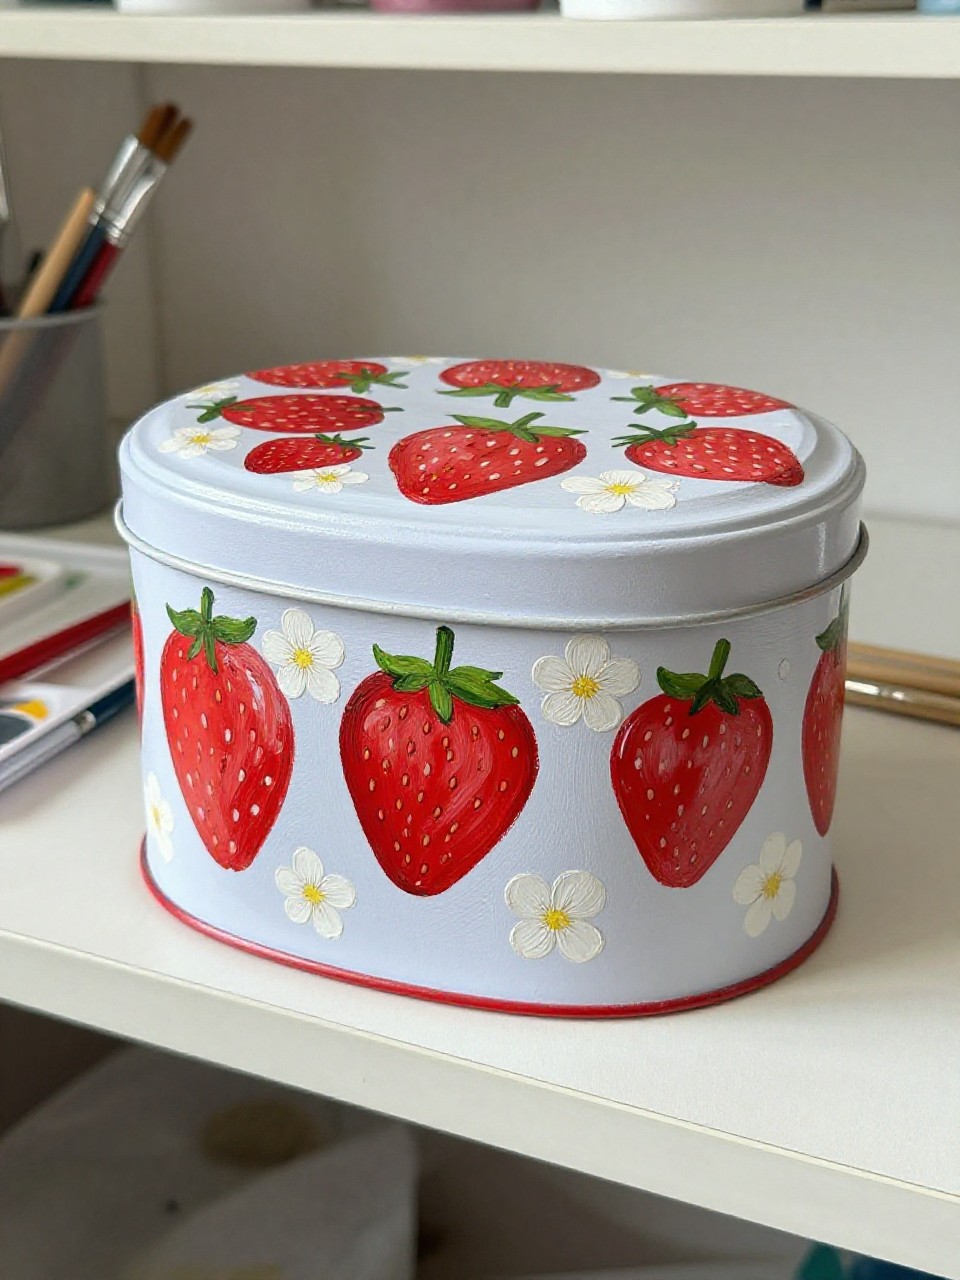
This tin box looks bright and cute, with hand-painted strawberries and tiny white blossoms scattered across the lid and sides. It’s a beginner-friendly project because strawberries are simple heart-like shapes, and the seeds are just little dots. It’s perfect for storing candies, hair ties, or small sewing supplies.
Materials Needed:
- Tin box with lid
- Acrylic paint
- Paintbrushes in multiple sizes
- Palette or paint tray
- Optional sealer or varnish
Steps to Make:
- Clean the tin and paint a soft background color like pale mint or warm white.
- Sketch a few strawberry shapes around the sides so they wrap naturally with the curve.
- Paint strawberries red in two layers, then add darker shading near the bottoms.
- Dot on seeds, add green tops, and paint a few tiny flowers with yellow centers.
- Dry fully and seal so the bright reds stay protected and glossy if desired.