Table of Contents Show
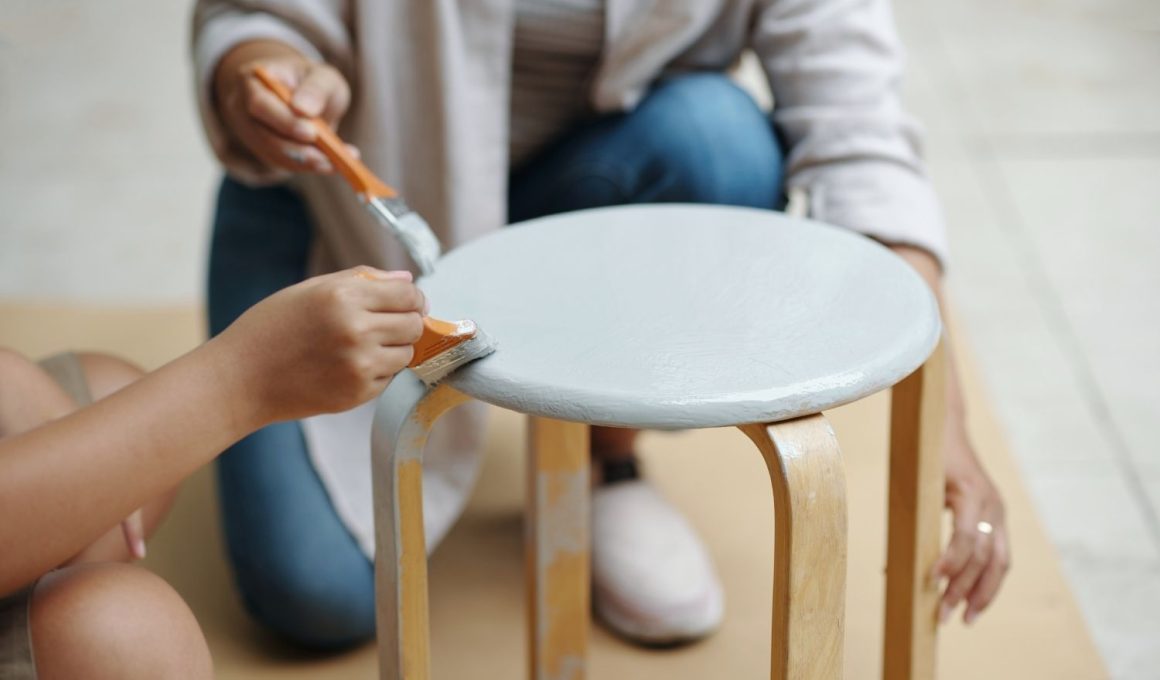
Painting a stool is one of the quickest ways to refresh a room, but it’s easy to get stuck on what to paint. If you want a relaxing hobby that also makes something useful, stool painting is perfect for beginners.

This list will give you simple, good-looking ideas that don’t take fancy tools or years of practice.
Grab a brush, and let’s turn a plain stool into a piece you’re proud to use.
1. Soft Ombre Fade Stool
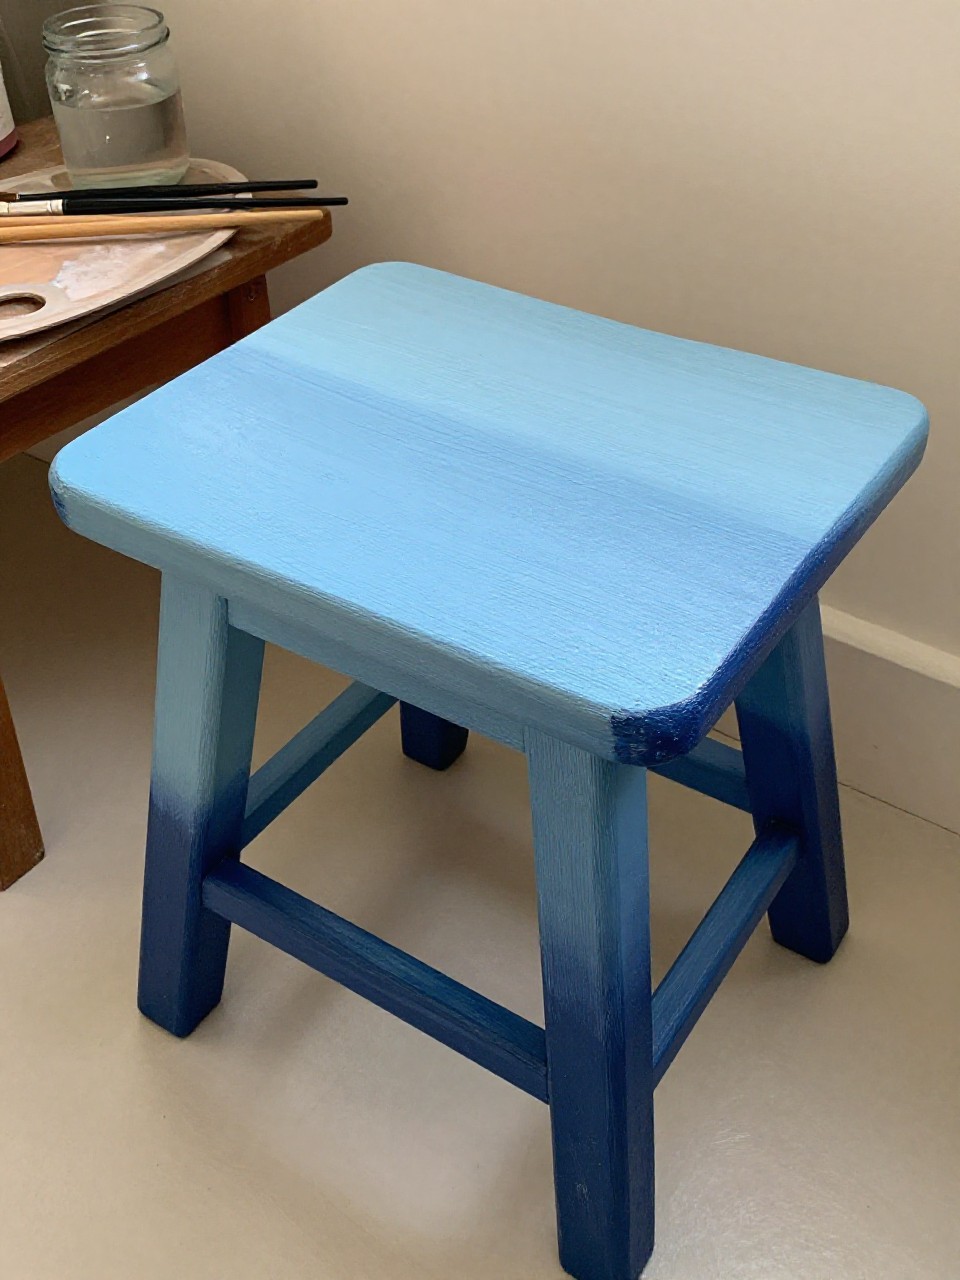
This stool looks like it slowly fades from one color to another, creating a calm, blended look across the seat and legs. It’s satisfying because you don’t need perfect lines—just gentle brush blending—so it feels relaxing and beginner-friendly while still looking modern in any room.
Materials Needed:
For People Who Love to Make Things ✂️
- Wooden stool (unfinished or previously painted)
- Acrylic paint (2–3 shades of one color family)
- Paintbrushes in multiple sizes
- Palette or paint tray
- Optional water spray bottle (for blending)
- Optional clear sealer or varnish
Steps to Make:
- Clean the stool and lightly sand glossy areas, then wipe off dust.
- Paint the lightest color over the whole seat as a base coat.
- Add the medium and darkest shades in bands, then blend where they meet using a damp brush.
- Mist lightly with water if needed and smooth the fade with long strokes.
- Let it dry fully, then seal for a more durable finish.
2. Wildflower Wreath Seat Stool

The stool seat has a hand-painted ring of tiny wildflowers around the edge, leaving the center simple and clean. It’s great for beginners because you can paint basic flower shapes and dots, and it still looks charming even if each flower is a little different.
Materials Needed:
- Wooden stool
- Acrylic paint (greens + 3–5 flower colors)
- Paintbrushes in multiple sizes
- Palette or paint tray
- Optional fine liner brush
- Optional clear sealer or varnish
Steps to Make:
- Wipe the stool clean and paint a solid base color on the seat if desired.
- Lightly sketch a circle guide near the edge of the seat with pencil.
- Paint simple leaf clusters along the circle to form the wreath base.
- Add small flowers (dots, teardrops, and quick petals) and tiny highlights.
- Dry completely, then seal the seat for everyday use.
3. Checkerboard Pop Color Stool
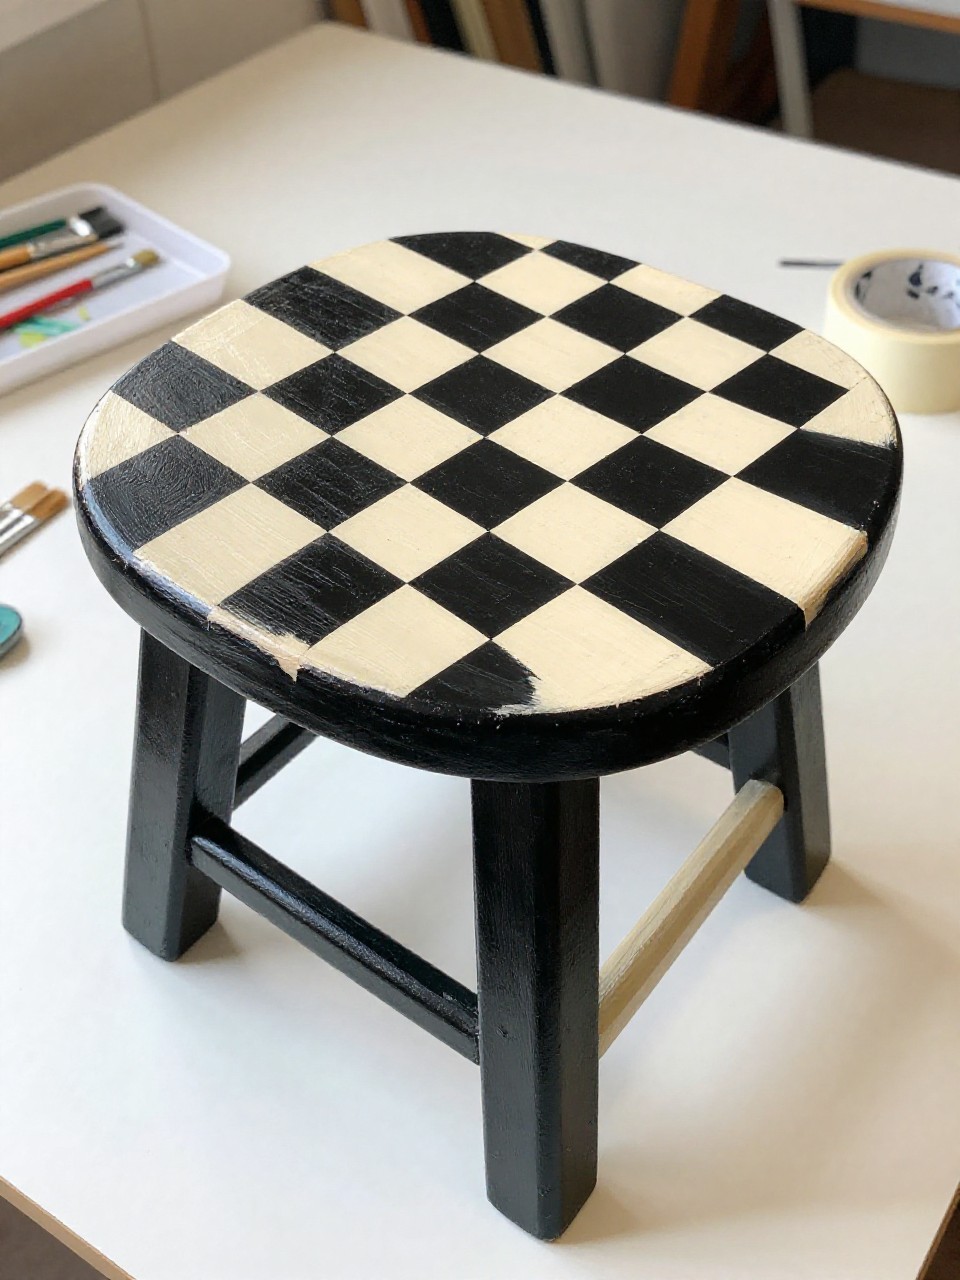
This stool has a bold checkerboard pattern on the seat, like a playful tile floor in mini form. It feels very doable because you can use tape to guide straight lines, and the repeating squares help you relax into a steady rhythm while painting.
Materials Needed:
- Wooden stool
- Acrylic paint (2 contrasting colors)
- Paintbrushes in multiple sizes
- Palette or paint tray
- Painter’s tape
- Optional clear sealer or varnish
Steps to Make:
- Clean the seat and paint a base coat in the lighter color; let dry.
- Use painter’s tape to create a grid of even squares across the seat.
- Paint the open squares with the darker color, keeping paint strokes in one direction.
- Peel tape slowly while paint is slightly tacky, then touch up edges with a small brush.
- Dry fully and seal to protect the pattern.
4. Sun-and-Moon Half Seat Stool
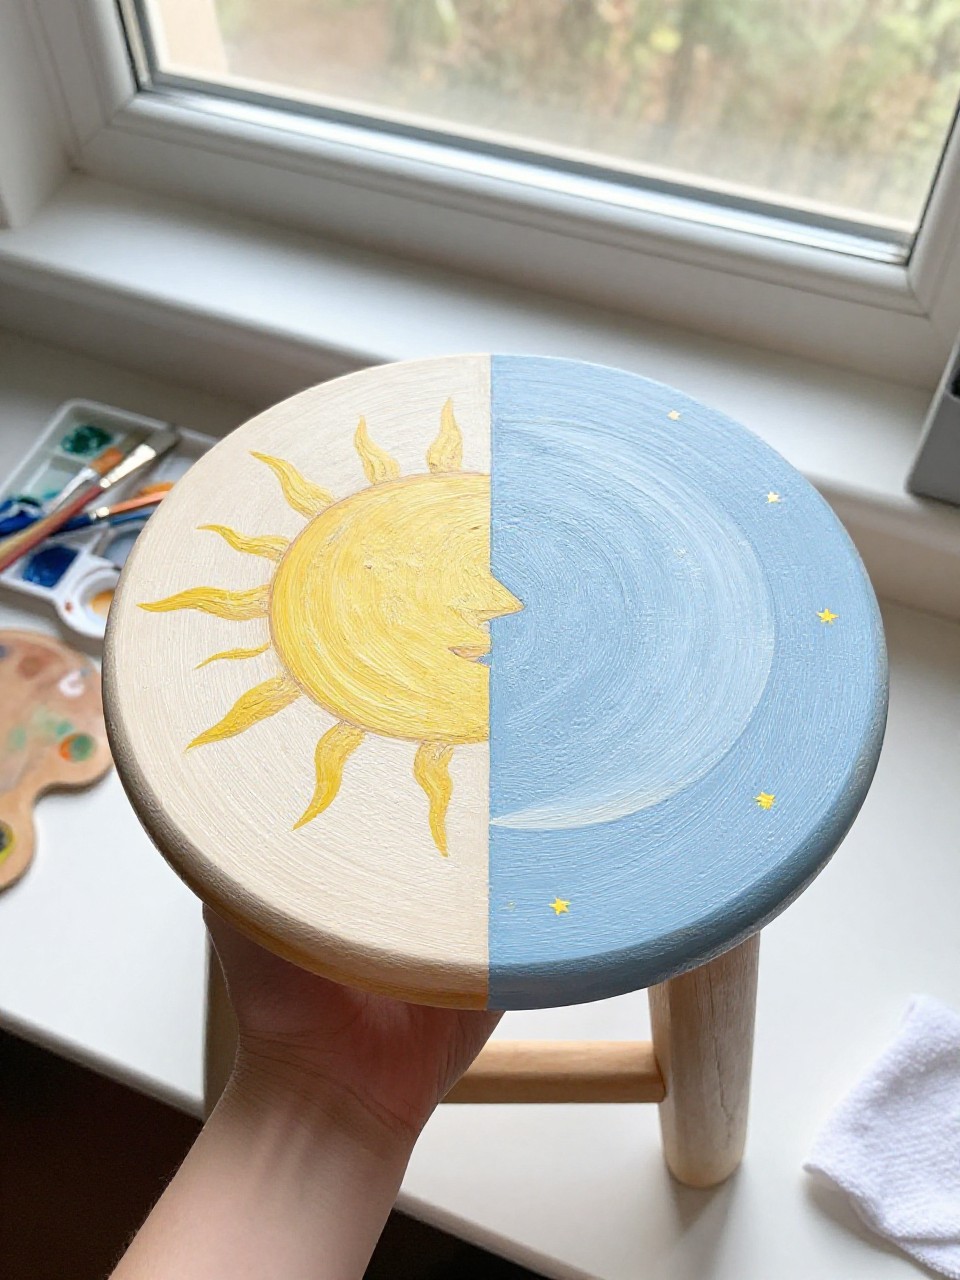
The seat shows a simple split design: a warm sun on one side and a cool moon with stars on the other. This is a fun idea for beginners because you can use big shapes and add small details slowly, making it feel like a relaxing mini painting session.
Materials Needed:
- Wooden stool
- Acrylic paint (yellow/orange + navy/white)
- Paintbrushes in multiple sizes
- Palette or paint tray
- Optional pencil for sketching
- Optional clear sealer or varnish
Steps to Make:
- Wipe the seat clean and lightly sand if it’s glossy.
- Sketch a simple dividing line across the seat and outline a sun and moon.
- Paint the “day” side with warm colors and the “night” side with deep blue.
- Add rays, stars, and small highlights with a fine brush, leaving visible brush texture.
- Let dry and seal, especially if it’s a frequently used stool.
5. Simple Scandinavian Stripe Stool
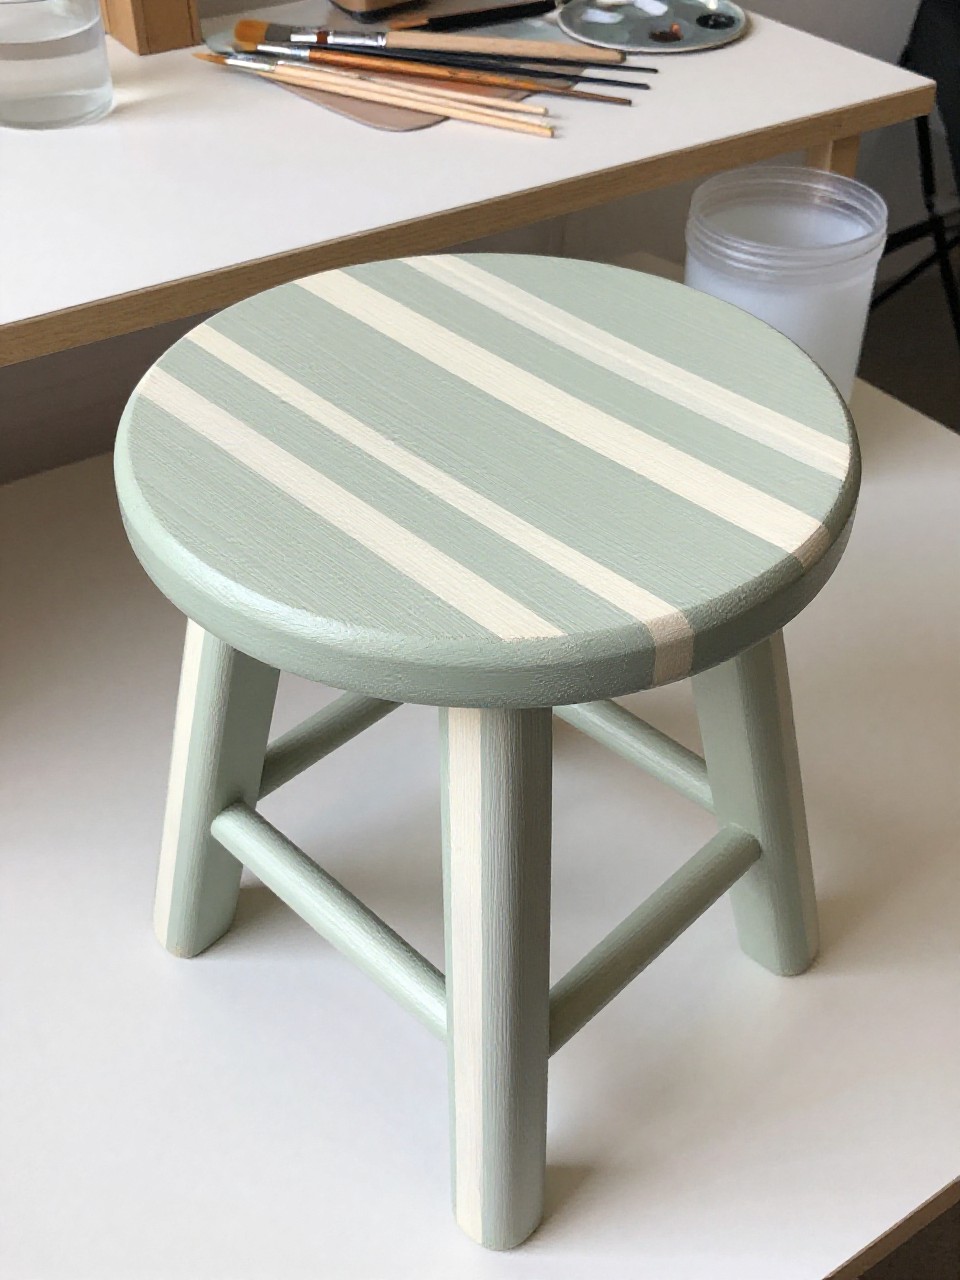
This stool has clean, hand-painted stripes that wrap around the legs and edge of the seat in a calm, tidy look. It’s satisfying because it’s mostly straight lines and steady brushwork, and it instantly makes a basic stool feel like it belongs in a neat, cozy space.
Materials Needed:
- Wooden stool
- Acrylic paint (white + 1 accent color)
- Paintbrushes in multiple sizes
- Palette or paint tray
- Painter’s tape
- Optional clear sealer or varnish
Steps to Make:
- Clean the stool and paint a white base coat on the whole piece; let dry.
- Tape off even stripe sections around the seat rim and down the legs.
- Paint the accent color over the taped sections, using thin coats to avoid bleeding.
- Remove tape and fix any wobbly edges with a small brush for a handmade look.
- Dry completely, then seal for durability.
6. Speckled Terrazzo Look Stool
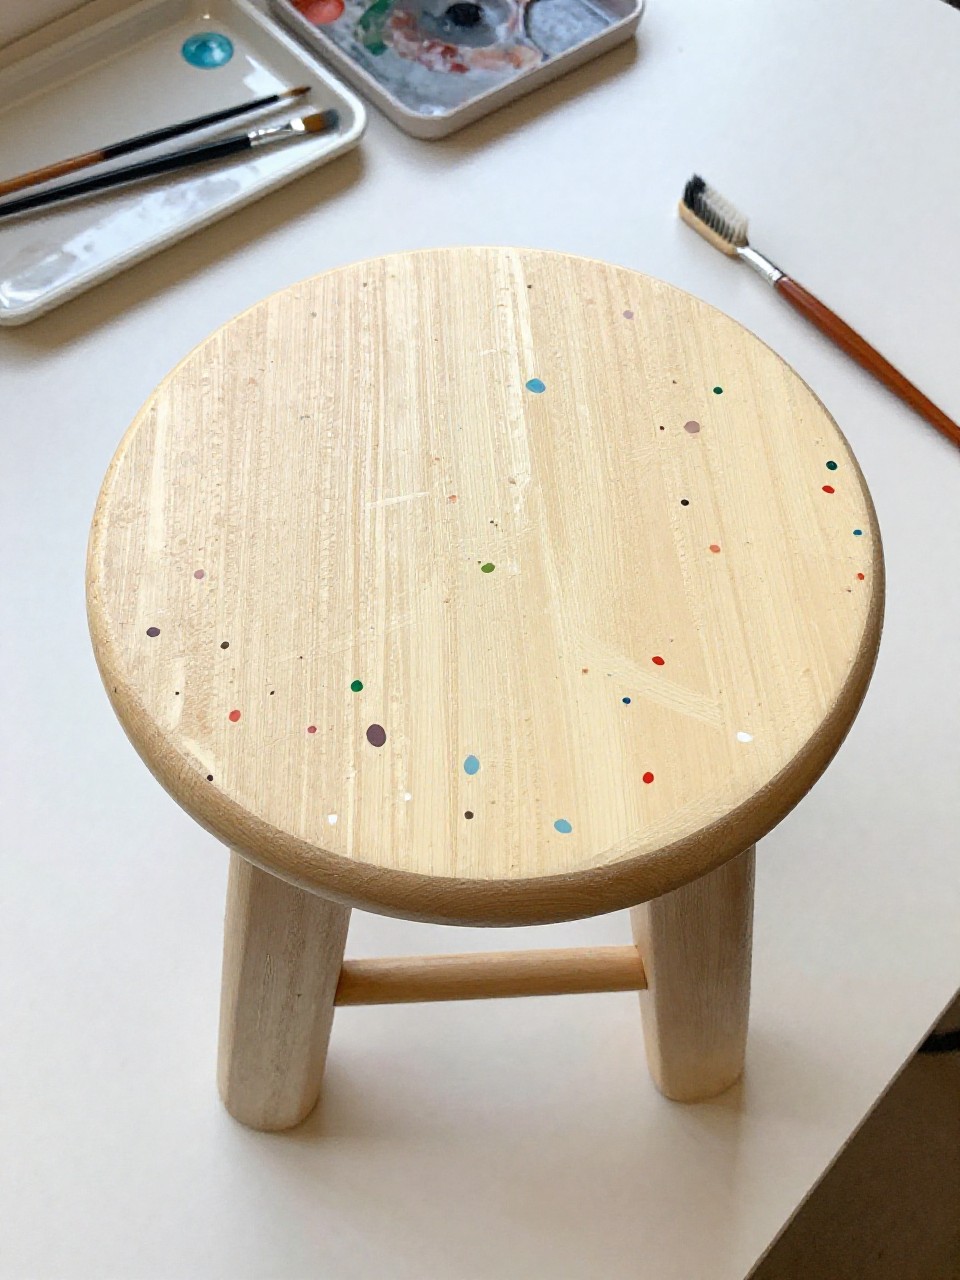
The stool looks like terrazzo, with scattered colorful speckles over a soft base color on the seat and sides. It’s perfect for beginners because speckles don’t need precision—each dot and flick adds character—so you can relax and enjoy the messy, fun part of painting.
Materials Needed:
- Wooden stool
- Acrylic paint (1 base color + 3–4 speckle colors)
- Paintbrushes in multiple sizes
- Palette or paint tray
- Old toothbrush or stiff stipple brush (for speckles)
- Optional clear sealer or varnish
Steps to Make:
- Paint the stool with a smooth base color and let it dry fully.
- Dip a toothbrush in slightly watered paint and test flicking on scrap paper first.
- Flick speckles across the seat, then add a few larger brush-dab “chips” for variety.
- Layer different colors, letting some spots overlap to create real paint texture.
- Dry and seal so the speckles don’t scuff off over time.
7. Citrus Slice Seat Stool

The seat is painted like a bright citrus slice—lemon, orange, or lime—with simple segments radiating from the center. It’s a cheerful beginner project because you’re mostly painting curved wedges, and the bold colors make small imperfections disappear in the happy, juicy look.
Materials Needed:
- Wooden stool
- Acrylic paint (white + citrus colors + green)
- Paintbrushes in multiple sizes
- Palette or paint tray
- Optional pencil for sketching segments
- Optional clear sealer or varnish
Steps to Make:
- Clean the seat and paint a white base coat; let dry.
- Sketch a circle and segment lines like a sliced fruit.
- Paint the rind first, then fill each segment with lighter and darker shades for depth.
- Add small white highlights and thin lines between segments with a fine brush.
- Let dry fully and seal the seat for wipeable shine.
8. Boho Rainbow Arch Stool
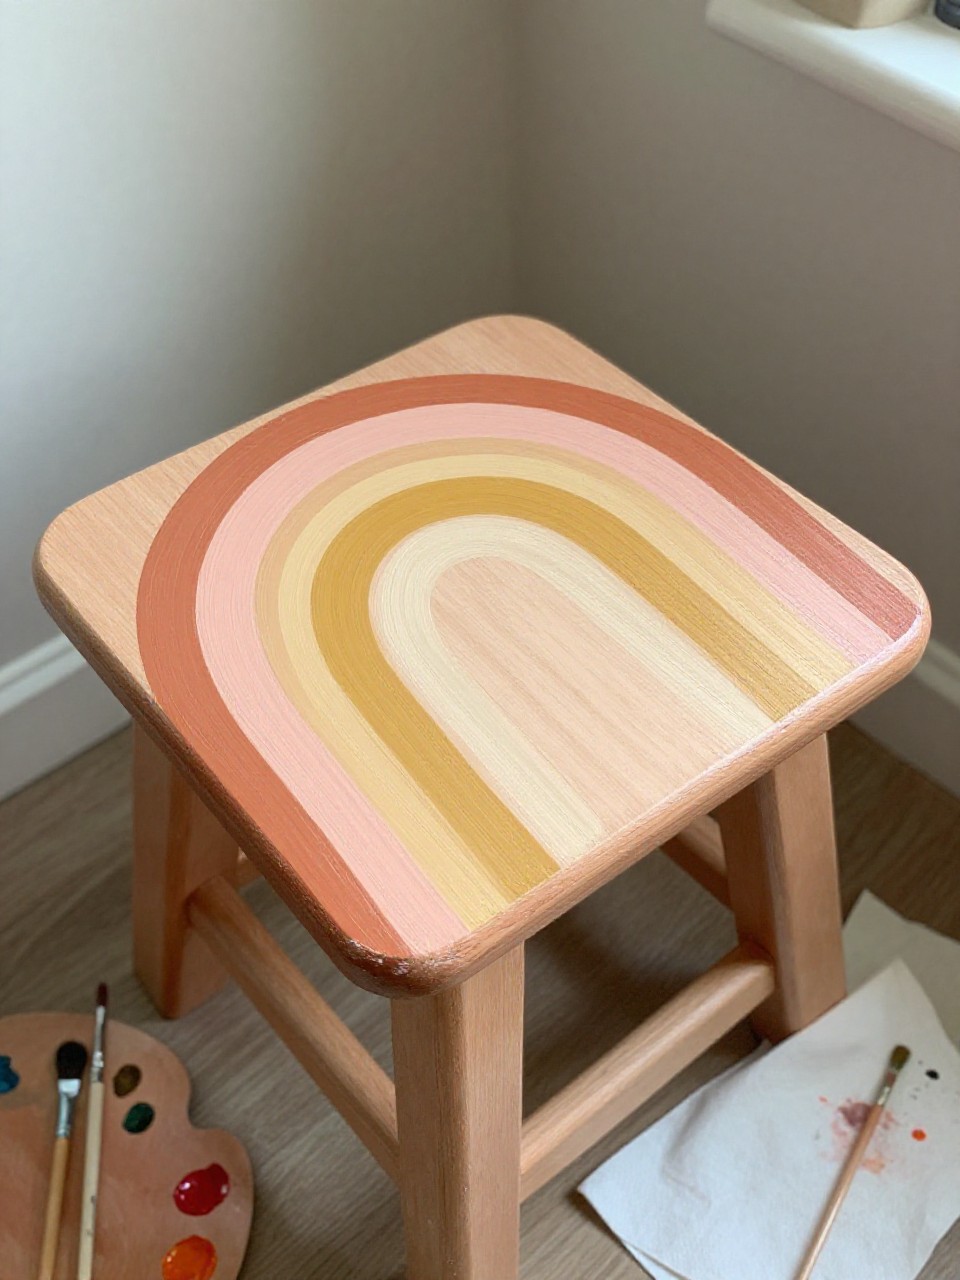
This stool features a set of simple rainbow arches on the seat in soft, earthy colors, with the legs kept plain or lightly tinted. It’s calming to paint because you repeat the same curved shape, and it’s a sweet way to add gentle color to a nursery, office, or reading corner.
Materials Needed:
- Wooden stool
- Acrylic paint (3–5 muted rainbow colors)
- Paintbrushes in multiple sizes
- Palette or paint tray
- Optional round sponge dauber (for smooth arches)
- Optional clear sealer or varnish
Steps to Make:
- Wipe the seat clean and paint a neutral base color; let dry.
- Lightly sketch arch shapes in the center or slightly off-center.
- Paint each arch band one at a time, leaving small gaps so the arches feel airy.
- Add tiny dot details or uneven edges on purpose for a warm handmade style.
- Dry completely and seal if the stool will be used often.
9. Ocean Wave Edge Stool

The stool has rolling wave shapes painted around the edge of the seat, like a tiny shoreline wrapping all the way around. This is relaxing for beginners because waves are naturally uneven, and blending blues is soothing while still giving you a finished look that feels fresh and clean.
Materials Needed:
- Wooden stool
- Acrylic paint (2–3 blues + white)
- Paintbrushes in multiple sizes
- Palette or paint tray
- Optional small sponge (for soft blending)
- Optional clear sealer or varnish
Steps to Make:
- Clean the stool and paint the seat a light sandy or white base; let dry.
- Mark a wavy band around the seat edge using a pencil guide.
- Paint the wave band with layered blues, blending darker into lighter while still wet.
- Add white foam lines with a small brush and let some brush strokes show for texture.
- Dry fully and seal, especially along the rim where hands touch.
10. Bold Polka Dot Pop Stool

This stool is covered with hand-painted polka dots on the seat (and optional dots on the legs) for a fun, upbeat look. It’s great for beginners because dots are simple, and you can make them perfectly round or slightly wonky—either way, it reads as playful home decor.
Materials Needed:
- Wooden stool
- Acrylic paint (1 base color + 1–2 dot colors)
- Paintbrushes in multiple sizes
- Palette or paint tray
- Round sponge pouncer or cotton swabs (for dots)
- Optional clear sealer or varnish
Steps to Make:
- Paint the stool with a base color and let it dry completely.
- Plan dot spacing by lightly marking a few guide points on the seat.
- Use a sponge pouncer or swab to stamp dots, reloading paint often for thick texture.
- Add smaller dots in a second color to fill gaps and create a lively pattern.
- Dry and seal so the dots stay bright and protected.
11. Faux Denim Crosshatch Stool

The stool seat looks like denim fabric, with painted crosshatch lines and soft shading that gives it a cozy, worn-in vibe. It’s satisfying because the design is made of simple strokes—no perfect drawing needed—and you can build layers slowly until the texture feels just right.
Materials Needed:
- Wooden stool
- Acrylic paint (2–3 blues + a touch of white)
- Paintbrushes in multiple sizes
- Palette or paint tray
- Optional dry brush (for texture)
- Optional clear matte sealer or varnish
Steps to Make:
- Paint the seat with a medium blue base coat and let it dry.
- Dry-brush lighter blue in soft streaks to create faded denim patches.
- Add crosshatch lines with a smaller brush, changing direction to mimic fabric weave.
- Paint a few tiny “stitch” marks around the edge using off-white paint.
- Dry fully and seal with a matte finish to keep the denim look.
12. Fruit Vine Wrap Leg Stool

This stool has a painted vine that wraps around each leg, with small leaves and tiny berries or mini fruit clusters following the curve downward. It’s a relaxing project because you paint one leg at a time, and the repeating leaves help you get comfortable with brush control.
Materials Needed:
- Wooden stool
- Acrylic paint (green + red/blue/yellow accents)
- Paintbrushes in multiple sizes
- Palette or paint tray
- Optional pencil for a spiral guide line
- Optional clear sealer or varnish
Steps to Make:
- Clean the legs well and paint a base color if you want a fresh start.
- Lightly draw a spiral guide line around each leg so the vine wraps naturally.
- Paint the vine line first, then add leaf shapes that follow the curve of the wood.
- Dot in berries or tiny fruit clusters, adding small highlights once dry.
- Let everything dry and seal the legs for a stronger finish.
13. Sunset Horizon Stool
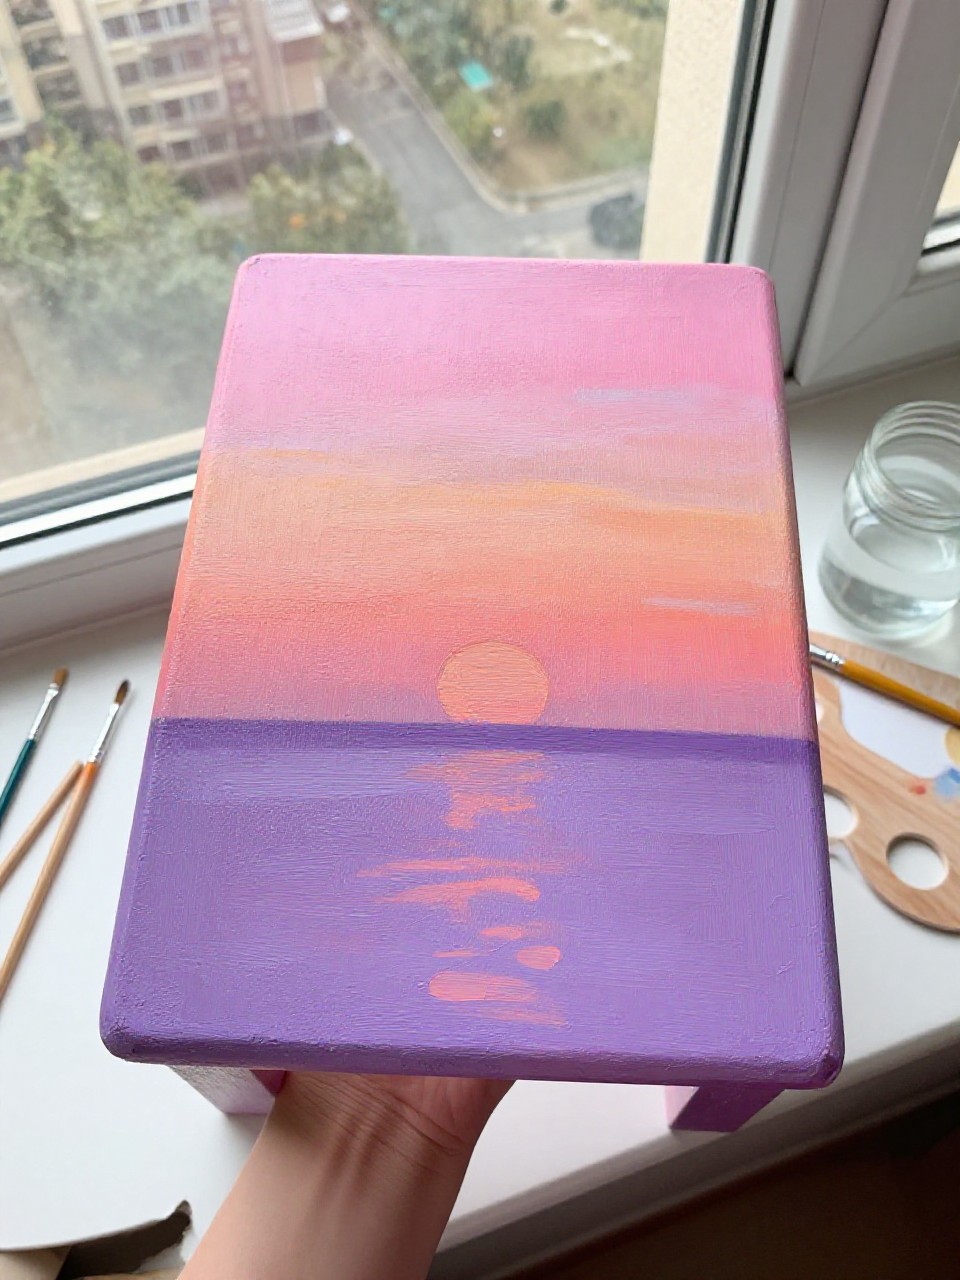
The stool seat looks like a simple sunset: a warm horizon line with blended bands of pink, orange, and purple. It’s a calm, beginner-friendly paint session because you’re mainly blending color stripes, and you can stop at any point when it feels good without overworking it.
Materials Needed:
- Wooden stool
- Acrylic paint (pink, orange, purple, yellow)
- Paintbrushes in multiple sizes
- Palette or paint tray
- Optional sponge (for blending)
- Optional clear sealer or varnish
Steps to Make:
- Wipe and sand the seat lightly, then paint a light base coat to help colors pop.
- Paint horizontal bands of color from top to bottom, working while paint is still wet.
- Blend the edges of each band with a clean damp brush or sponge for soft transitions.
- Add a thin dark horizon line or small silhouette dots (birds) for simple detail.
- Dry fully and seal the seat to protect the blended layers.
14. Minimal Line Art Face Stool

This stool has a simple line art face painted on the seat, with one continuous-style line and a few soft color blocks behind it. It’s great if you want something modern without needing realistic drawing skills, and it feels quick and relaxing since the design stays simple.
Materials Needed:
- Wooden stool
- Acrylic paint (neutral base + 1–2 accent colors + black)
- Paintbrushes in multiple sizes
- Palette or paint tray
- Optional fine liner brush
- Optional clear sealer or varnish
Steps to Make:
- Paint the seat a neutral base color and let it dry completely.
- Lightly sketch a face shape guide, keeping features simple and oversized.
- Paint soft accent blobs behind the face for gentle contrast, leaving brush texture visible.
- Use a fine brush to paint the black line art over the top with slow, steady strokes.
- Dry fully and seal to protect the line work from scuffs.
15. Cottage Gingham Seat Stool

The seat shows a hand-painted gingham pattern, like a cozy picnic cloth, in two shades of the same color. It’s satisfying for beginners because you paint simple stripes first, then overlap them to form squares, and the slightly uneven brushwork makes it feel even more charming.
Materials Needed:
- Wooden stool
- Acrylic paint (white + 2 shades of one color)
- Paintbrushes in multiple sizes
- Palette or paint tray
- Painter’s tape (optional for straighter stripes)
- Optional clear sealer or varnish
Steps to Make:
- Paint the seat white and let it dry completely.
- Paint evenly spaced vertical stripes using the light shade, leaving white gaps.
- Once dry, paint horizontal stripes with the same light shade to create a grid.
- Add the darker shade in the overlapping squares to form the gingham “checks.”
- Dry fully and seal the seat for a wipe-clean finish.