

Table of Contents Show
Spring has a way of making us want to refresh everything—our space, our mood, our routines. But starting a craft can feel overwhelming: too many supplies, too many steps, not enough time. This list is your gentle start. Each project looks impressive, but it’s actually simple and forgiving.

Most use basic materials, and none require special skills. Pick one, pour a cup of tea, and enjoy the calm of making something beautiful with your hands.
1. Painted Terra Cotta Herb Markers
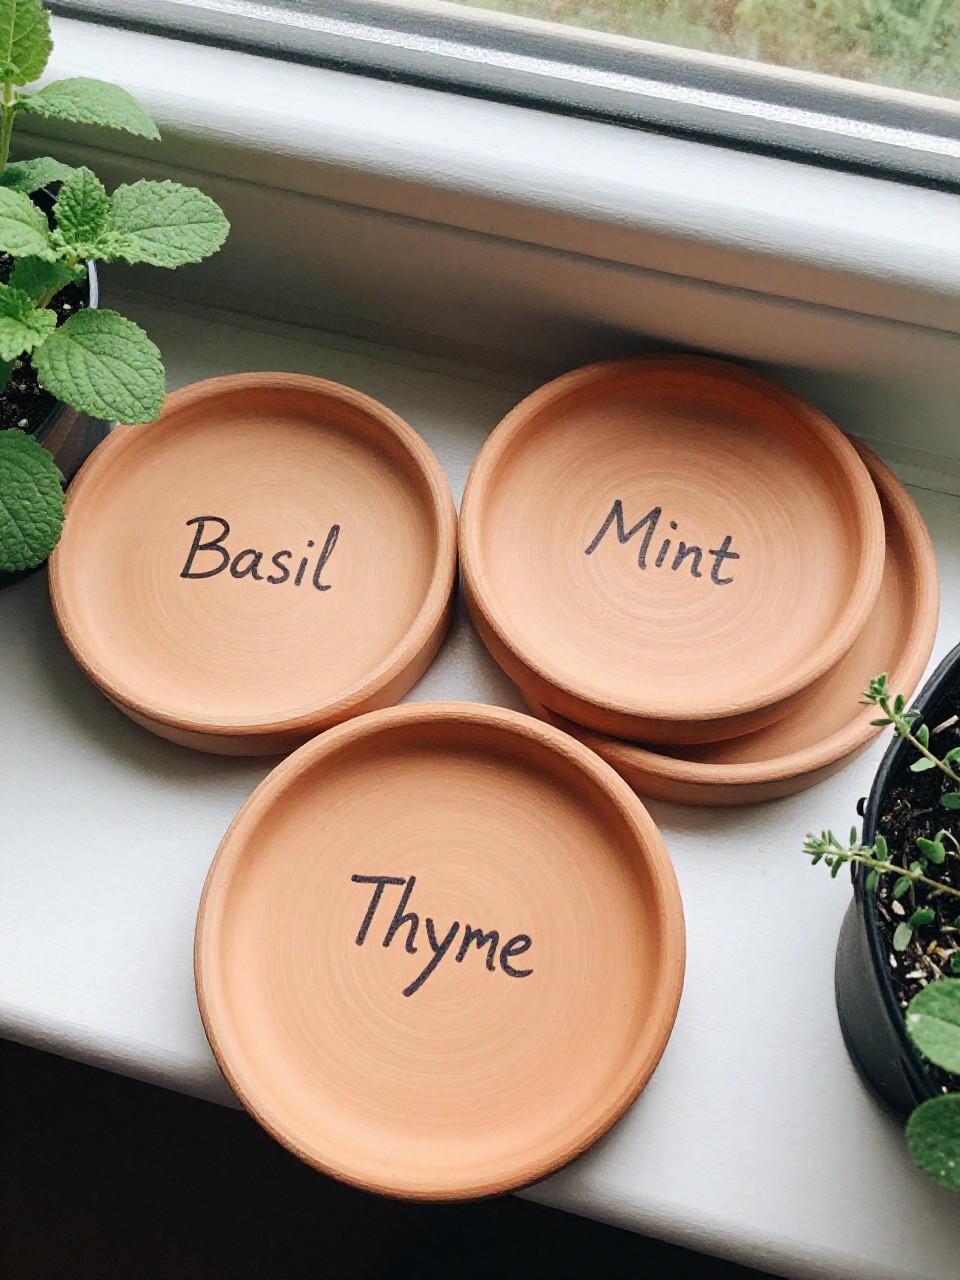
Turn simple clay saucers into chic garden markers that look like boutique finds. The matte paint and handwritten labels feel personal, and the pop of color makes your herbs feel extra fresh.
Materials Needed:
- Small terra cotta saucers
- Acrylic paint + paint pen
- Clear sealer spray
How to make it:
- 1. Paint the top of each saucer in a solid spring color; let dry.
- 2. Flip and paint the rim for a neat edge; let dry fully.
- 3. Write herb names with a paint pen in simple block letters.
- 4. Seal with clear spray and prop in soil beside each plant.
2. Pressed Flower Sun Catchers
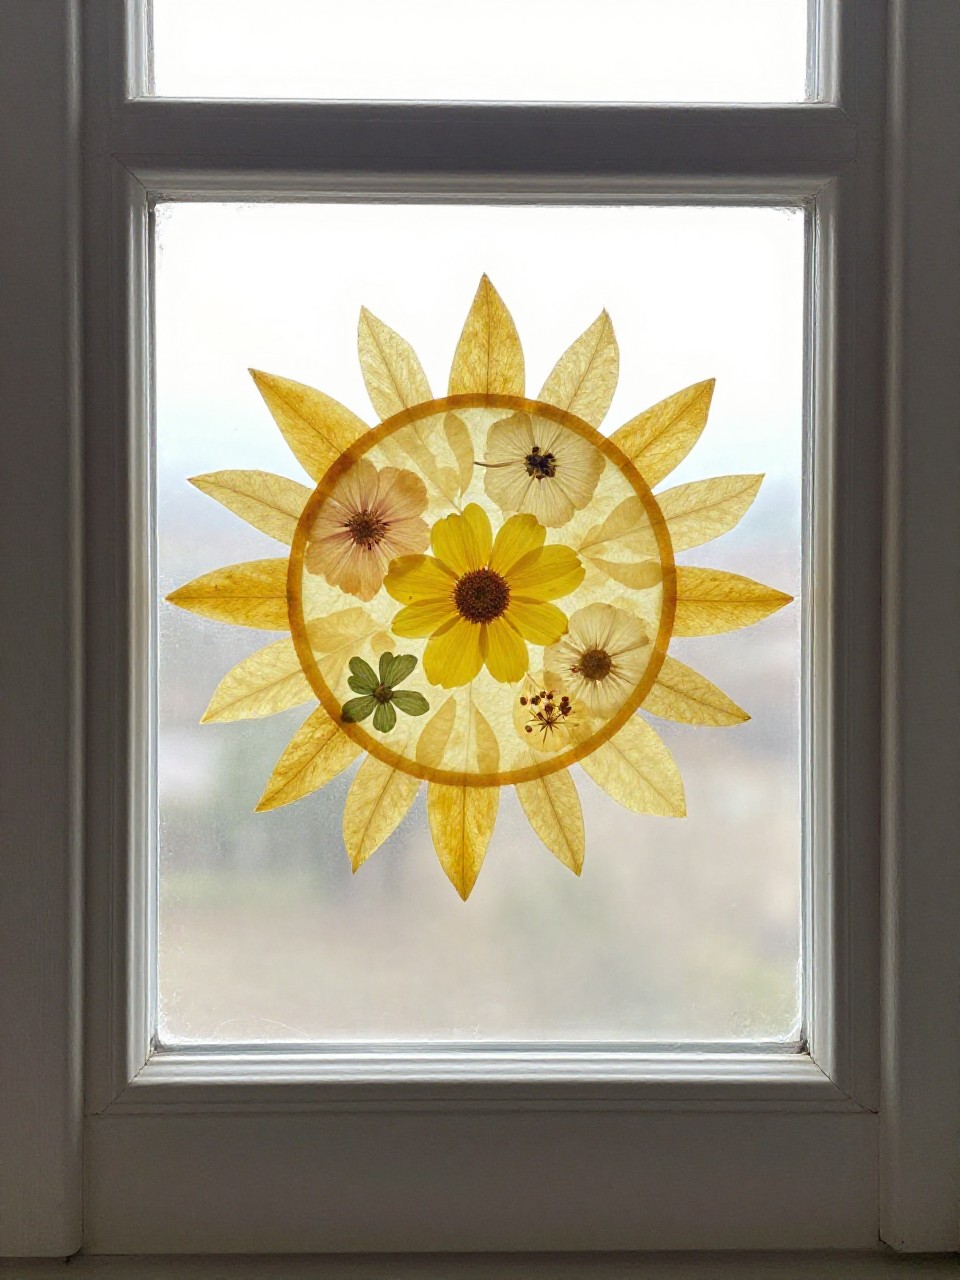
These airy, stained-glass-style hangers catch the light and make rainy days brighter. The layered petals look delicate, but the craft is just contact paper magic.
Materials Needed:
- Pressed flowers or flat leaves
- Clear contact paper
- Cotton twine
How to make it:
- 1. Cut two matching circles of contact paper; peel backing from one.
- 2. Arrange pressed flowers on the sticky side, leaving a slim border.
- 3. Lay the second circle sticky side down to seal.
- 4. Punch a small hole at the top and tie on twine to hang.
3. Speckled Eggshell Bud Vases

Tiny egg vases look like sculpture on a tray or table. Their speckled finish feels organic and artsy, perfect for single blooms.
Materials Needed:
- Cleaned eggshell halves
- Acrylic paint (white + black)
- Small clay or hot glue for base
How to make it:
- 1. Paint eggshells white; let dry.
- 2. Flick diluted black paint with a brush to create speckles; dry.
- 3. Form a tiny clay ring or glue dot to act as a stable base.
- 4. Add a bit of water and tuck in a short stem.
4. Watercolor Bookmark Garden

These bookmarks look like little landscapes—soft washes and dreamy edges. Each one is different and feels hand-painted and calm.
Materials Needed:
- Watercolor paper
- Watercolor paints + brush
- Ribbon or twine
How to make it:
- 1. Cut watercolor paper into bookmark strips.
- 2. Brush on light washes (sky blues, leafy greens), blend softly.
- 3. Add simple line details: stems, tiny dots, or a horizon.
- 4. Punch a hole and tie on ribbon when completely dry.
5. Mossy Monogram Door Hanger

A plush green letter on your door feels fresh and welcoming. It looks high-end, but it’s just foam and moss.
Materials Needed:
- Cardboard or foam board letter
- Sheet moss or preserved moss
- Hot glue
How to make it:
- 1. Trace and cut a sturdy letter from cardboard/foam board if needed.
- 2. Tear moss into flatter pieces for easy coverage.
- 3. Hot glue moss to the front and sides, pressing firmly.
- 4. Add a ribbon loop on the back to hang.
6. Citrus-Print Tea Towels
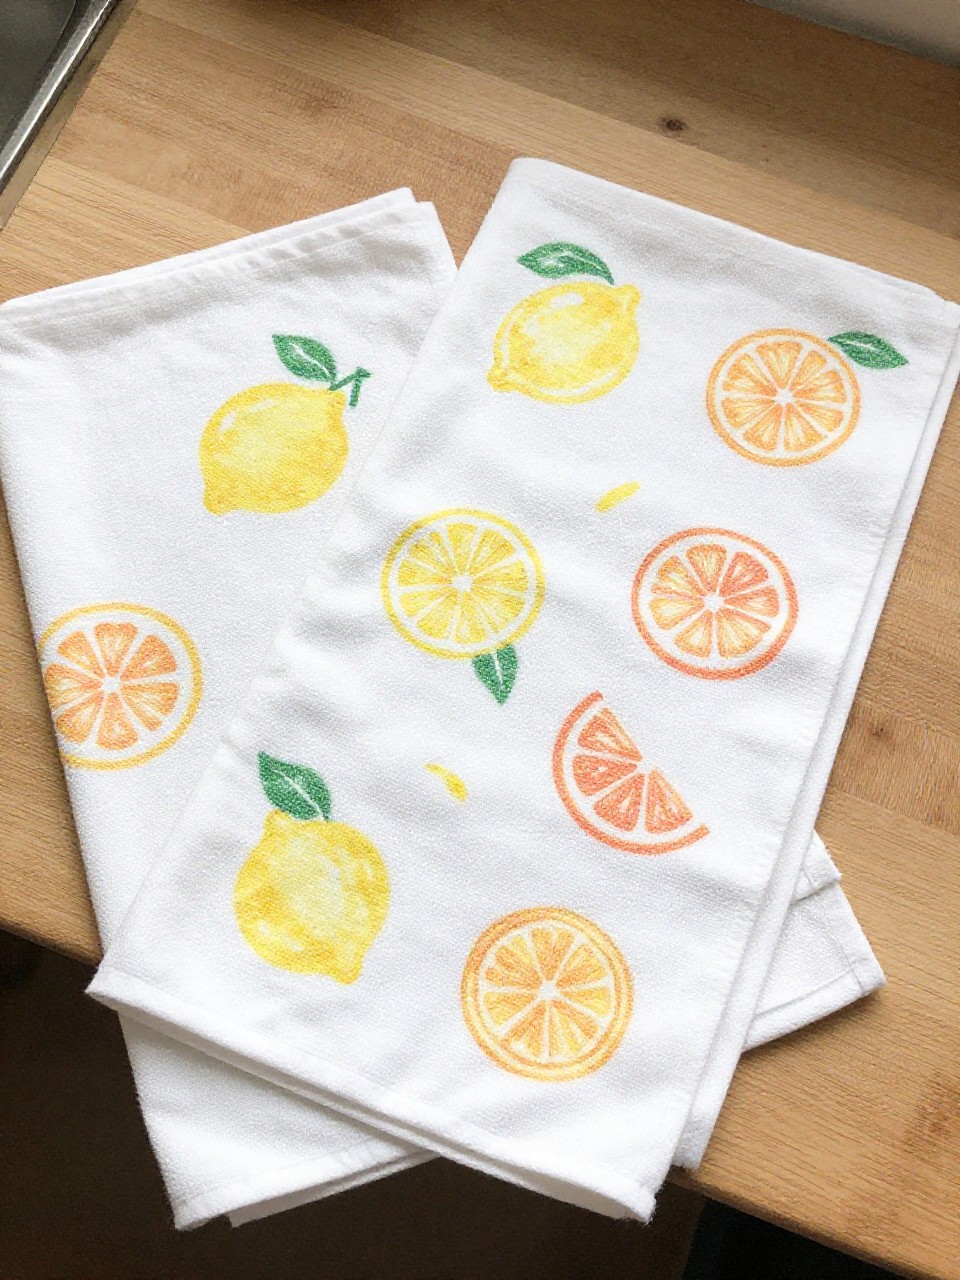
Stamping with real citrus makes cheerful, modern patterns. The juicy textures look boutique-level with almost no effort.
Materials Needed:
- Plain cotton tea towels
- Lemons/oranges, fabric paint
- Foam brush
How to make it:
- 1. Cut citrus in half and pat dry.
- 2. Paint cut surface lightly with fabric paint.
- 3. Stamp onto towel in a scattered pattern; repeat with colors.
- 4. Heat-set paint per instructions (iron) and wash gently.
7. Air-Dry Clay Pebble Magnets
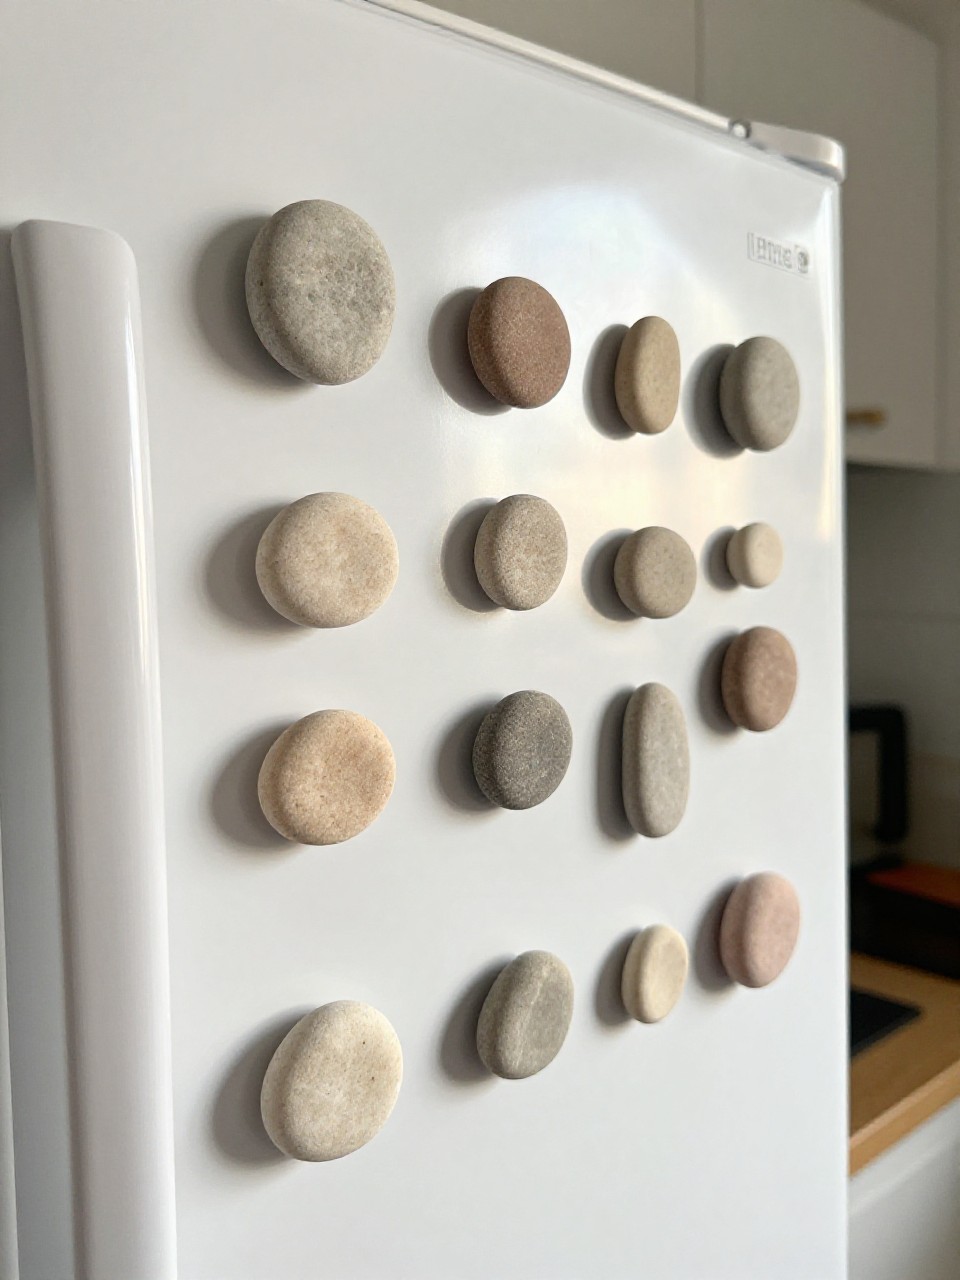
Smooth pebble shapes feel soothing and minimalist on your fridge. The matte finish and soft colors look like river stones.
Materials Needed:
- Air-dry clay
- Acrylic paint
- Small round magnets
How to make it:
- 1. Roll clay into small ovals and flatten slightly like pebbles.
- 2. Let dry fully per package directions.
- 3. Paint in muted tones; optional speckles with a toothbrush.
- 4. Glue magnets to backs and let cure.
8. Scrap Fabric Wildflower Wreath

A breezy, textural wreath made from torn fabric strips and a few faux stems. It’s charmingly imperfect and very spring.
Materials Needed:
- Wire wreath form
- Scrap cotton fabric
- Faux wildflower stems
How to make it:
- 1. Tear fabric into strips about 1 x 8 inches.
- 2. Tie strips around the wire form, pushing them close together.
- 3. Tuck and wire faux stems on one side for an asymmetrical look.
- 4. Fluff strips and trim ends for a soft halo effect.
9. Painted Window Box House Numbers
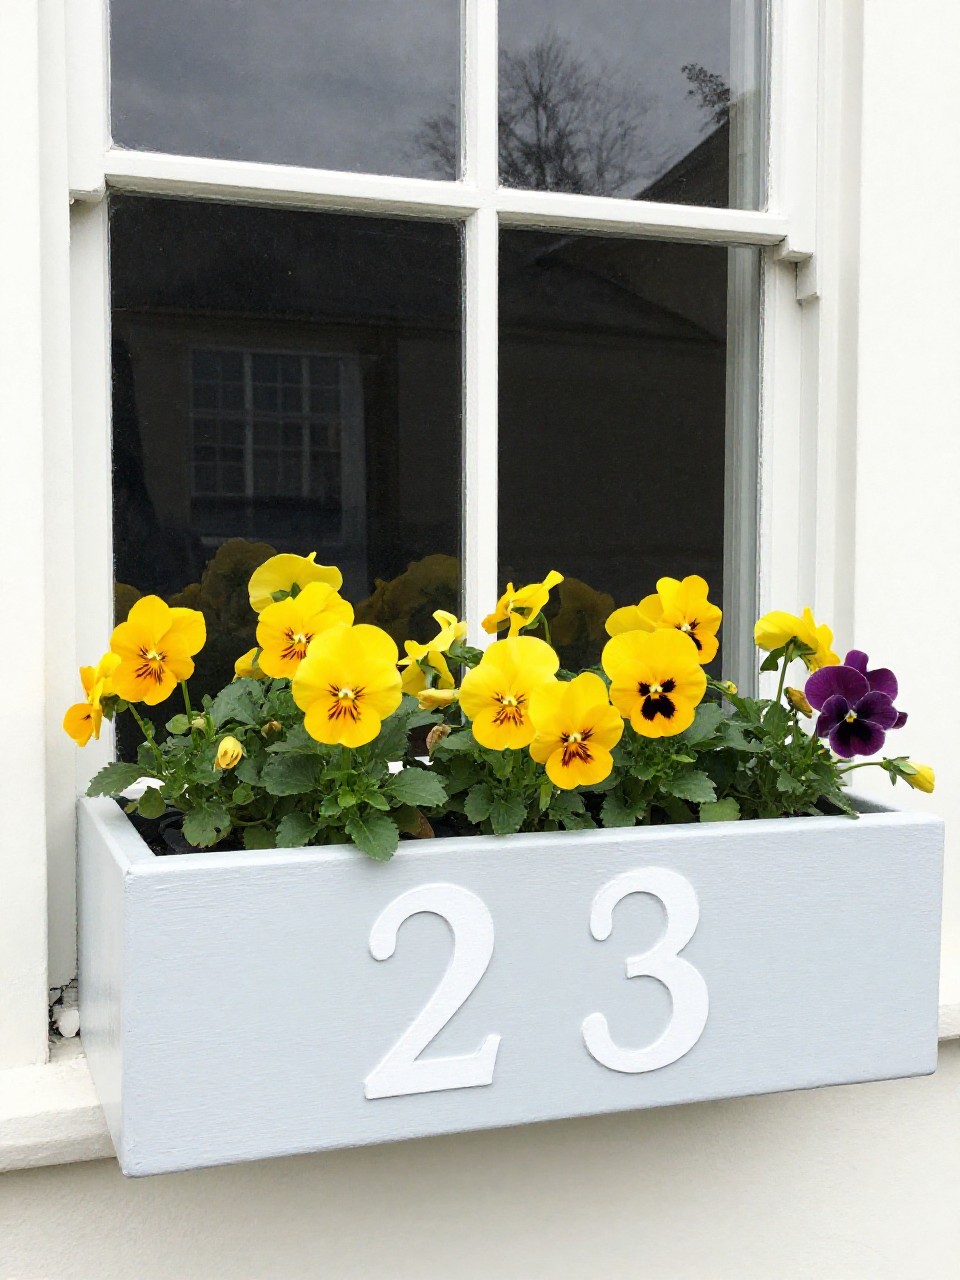
Bold, crisp numbers on a small planter look modern and tidy. Fresh plants plus clean typography = instant curb charm.
Materials Needed:
- Small wooden window box
- Outdoor paint + stencil or vinyl numbers
- Brush
How to make it:
- 1. Paint the box in a solid color; let dry.
- 2. Position stencil or apply vinyl numbers to the front.
- 3. Paint numbers and peel stencil while damp; touch up edges.
- 4. Plant spring blooms and mount or set on a sill.
10. Ombre Dyed Napkins
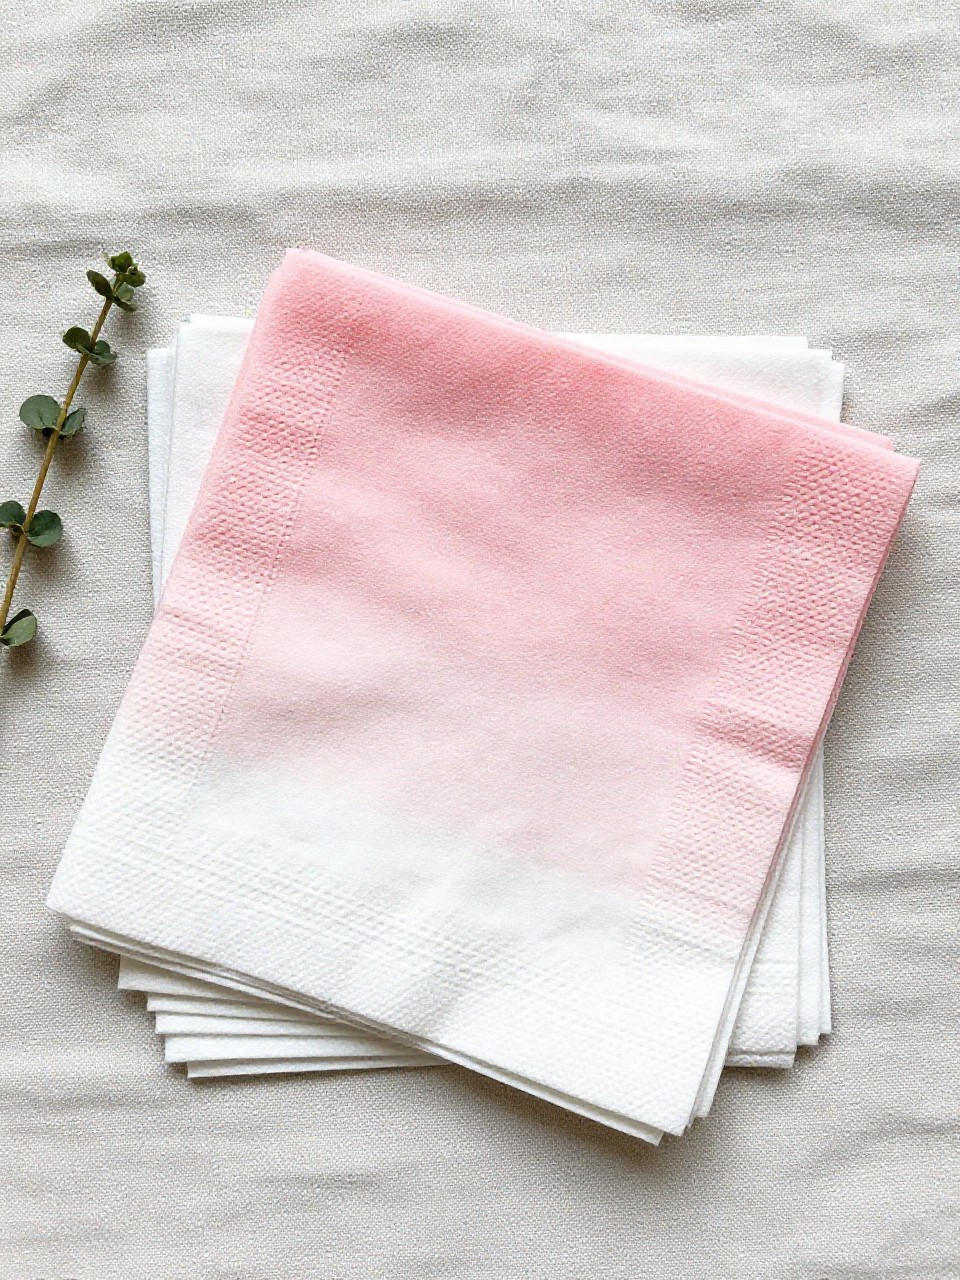
Soft gradient napkins elevate even a simple dinner. The gentle fade feels luxe but is done in minutes.
Materials Needed:
- Cotton napkins
- Fabric dye
- Large bowl or tub
How to make it:
- 1. Mix dye bath per instructions.
- 2. Dip napkin bottom third for the darkest tone.
- 3. Gradually lift and dip higher areas for a lighter fade.
- 4. Rinse, wash, and press when dry.
11. Meadow-In-A-Jar Match Striker
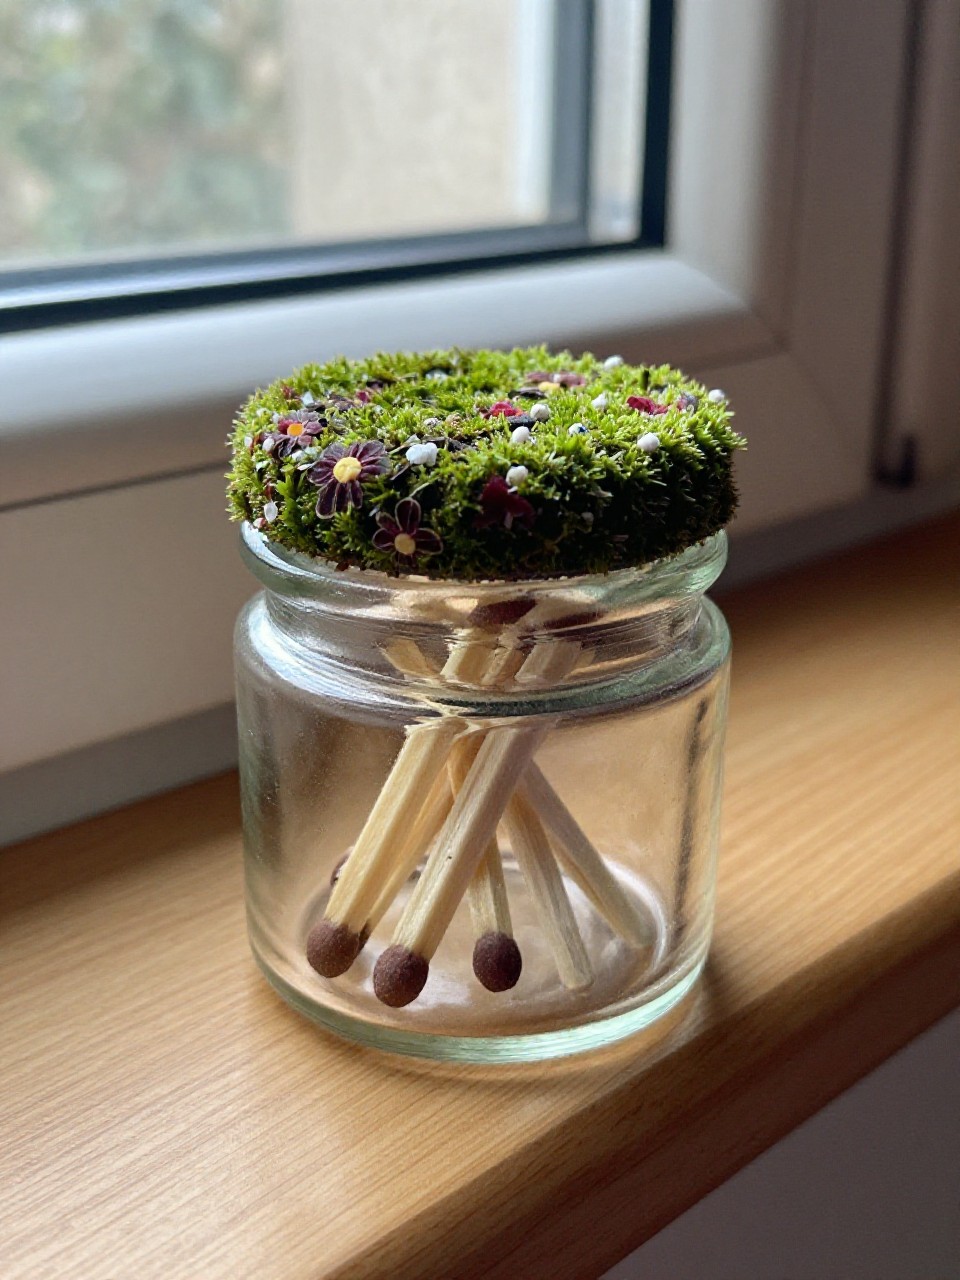
A little spring scene atop a jar of matches, with a striker bottom. Cute, practical, and a sweet gift.
Materials Needed:
- Small lidded glass jar
- Faux moss + tiny paper flowers
- Strike-anywhere matches + sandpaper
How to make it:
- 1. Glue faux moss and mini flowers to the jar lid as a tiny meadow.
- 2. Fill jar with matches, heads down.
- 3. Cut a circle of sandpaper and glue to the jar bottom.
- 4. Screw on lid and display.
12. Leaf-Stamped Airy Curtains
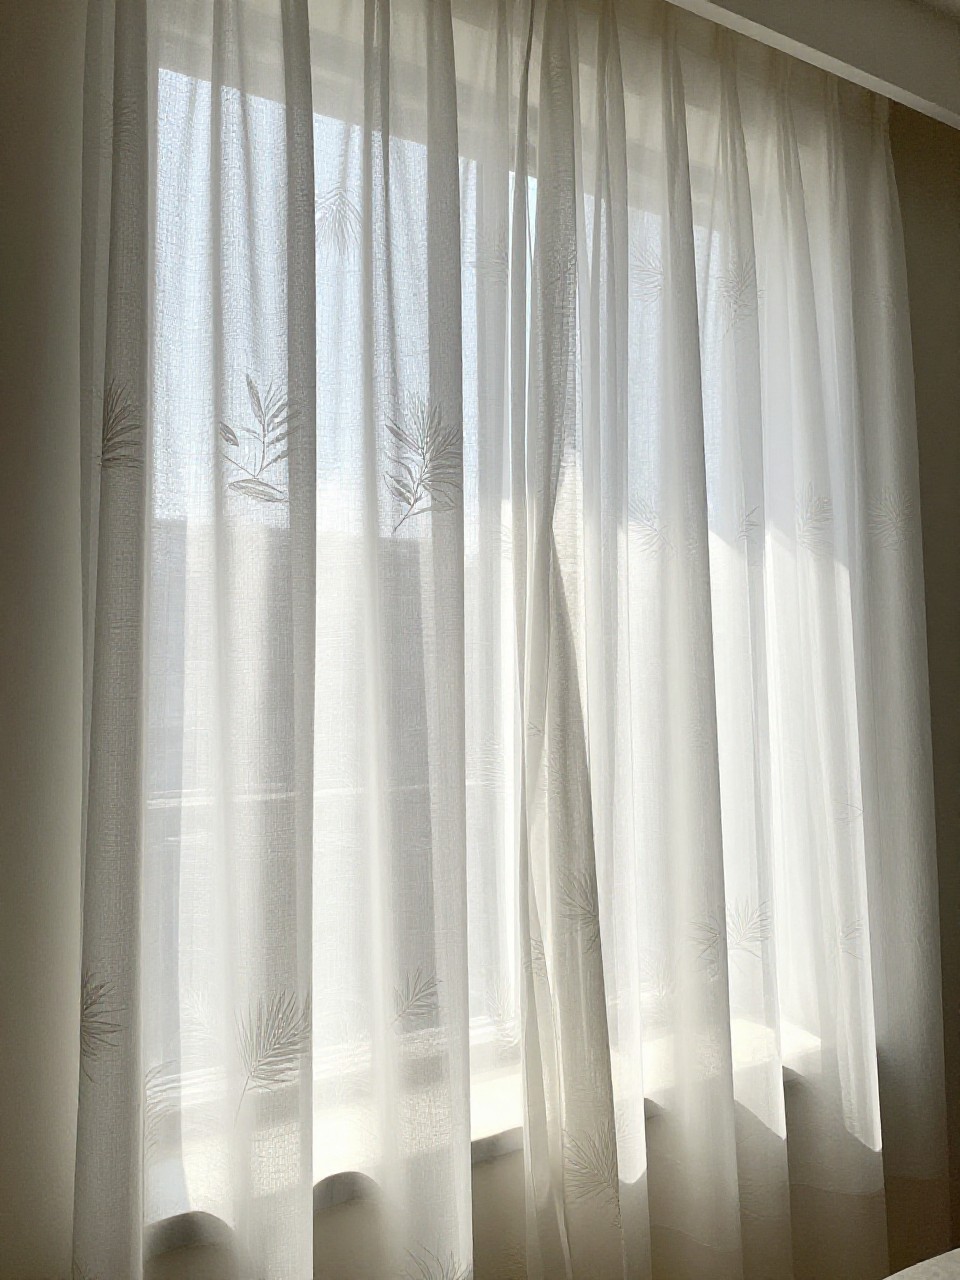
Delicate leaf prints add a subtle botanical touch to plain sheers. The pattern feels natural and breezy.
Materials Needed:
- Sheer curtains
- Fresh leaves with veins
- Fabric paint
How to make it:
- 1. Paint the back of a leaf lightly with fabric paint.
- 2. Press onto the curtain in a scattered, climbing pattern.
- 3. Repeat with different leaves and colors for variety.
- 4. Heat-set per paint directions.
13. Rustic Clay Bee Trinket Dish
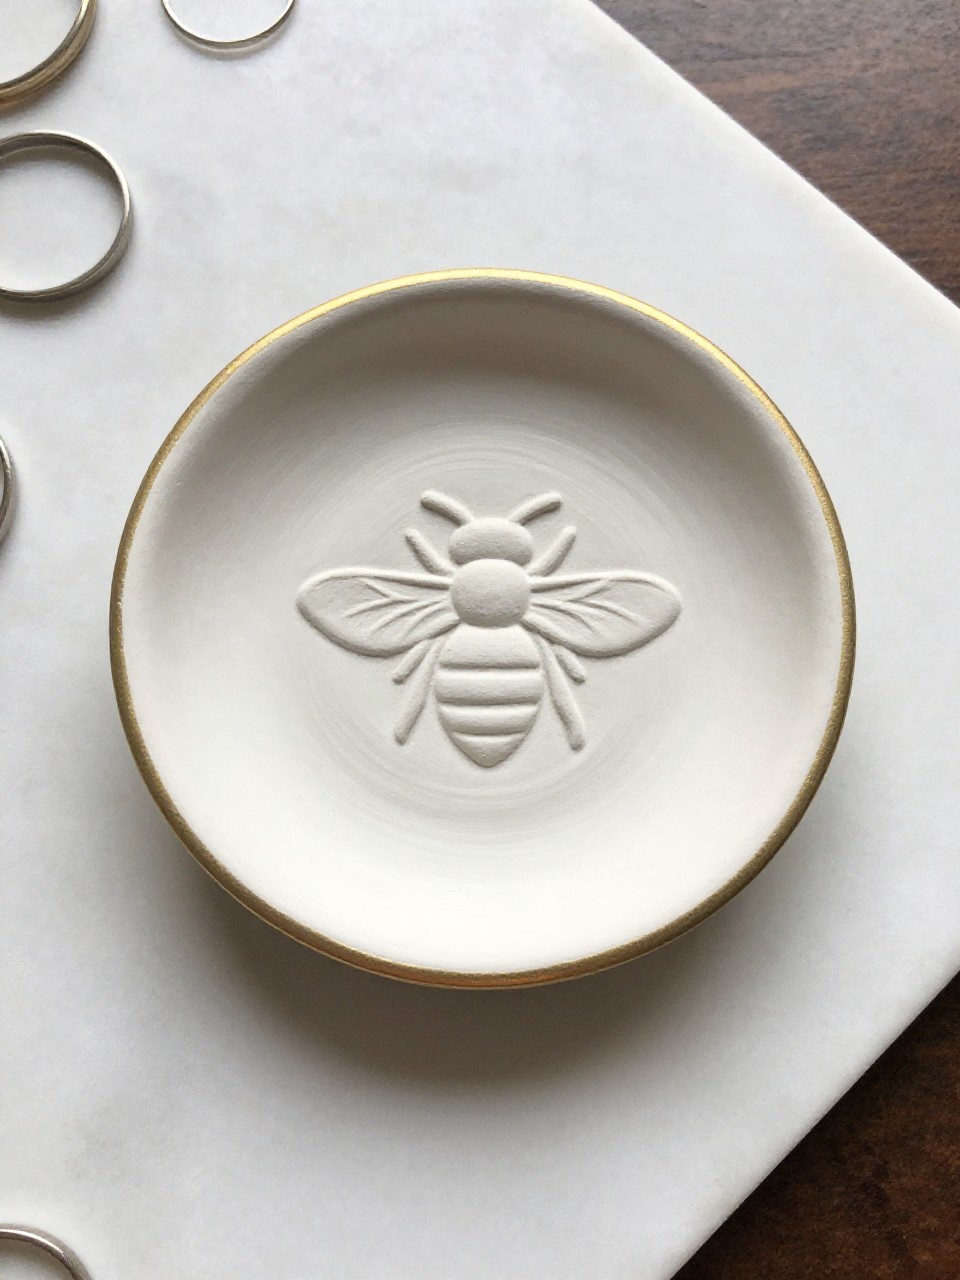
A tiny dish with a pressed bee motif and gold rim feels like pottery studio art. It’s charming and perfect for rings.
Materials Needed:
- Air-dry clay
- Rubber stamp (bee or floral)
- Gold paint or marker
How to make it:
- 1. Roll clay to 1/8 inch and cut a circle with a bowl.
- 2. Press the stamp gently into the center.
- 3. Mold into a shallow bowl over a small dish; let dry.
- 4. Paint rim gold and seal if desired.
14. Botanical Candle Wraps

Printed botanicals wrapped around plain candles look custom and fresh. The translucent paper glow is spa-level cozy.
Materials Needed:
- Pillar candles (unscented)
- Vellum or tracing paper with printed botanicals
- Double-sided tape
How to make it:
- 1. Print or draw simple botanical designs on vellum.
- 2. Cut to fit candle height and overlap slightly.
- 3. Wrap around candle and secure with double-sided tape.
- 4. Place candle inside a glass holder for safety.
15. Painted Pebble Garden Path Words

Scatter simple word stones like “Grow,” “Joy,” and “Calm” among plants. The matte paint and neat lettering feel intentional and serene.
Materials Needed:
- Smooth pebbles
- Outdoor acrylic paint + paint pen
- Clear outdoor sealer
How to make it:
- Wash and dry pebbles thoroughly.
- Paint pebbles in soft tones; let dry.
- Letter short words with a paint pen.
- Seal to protect from weather.
16. Cottagecore Fabric-Covered Pots
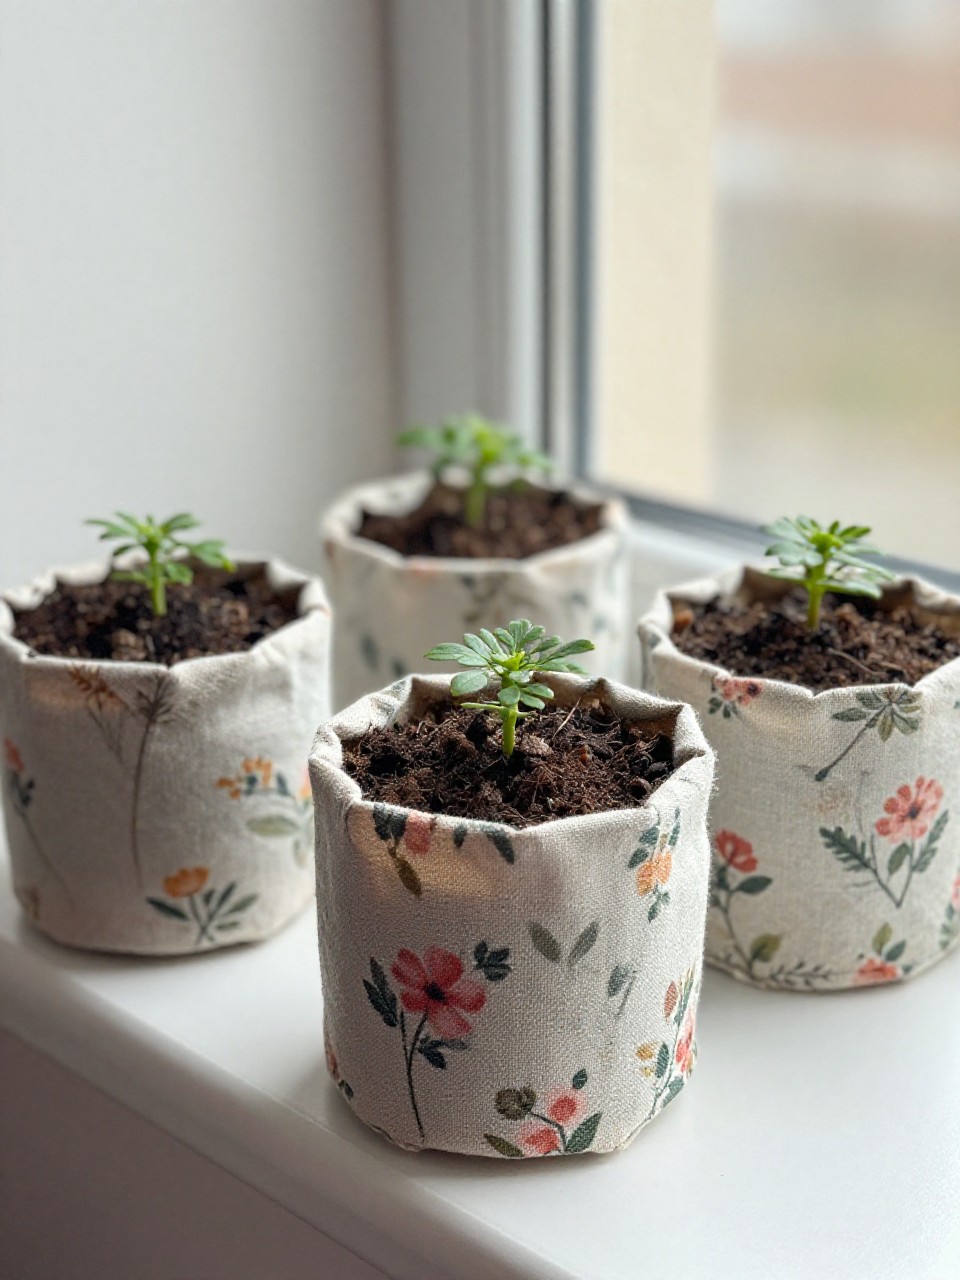
Scrap fabric turns basic pots into cozy cottage accents. The soft patterns and frayed edges feel charming and handmade.
Materials Needed:
- Small terra cotta pots
- Cotton fabric scraps
- Mod Podge or white glue
How to make it:
- 1. Cut fabric to wrap around pot with a small overlap.
- 2. Brush glue on pot, smooth fabric on, and trim excess.
- 3. Snip and fold fabric neatly around the rim and base.
- 4. Seal with a thin top coat of glue; let dry.
17. Twisted Crepe Paper Ranunculus
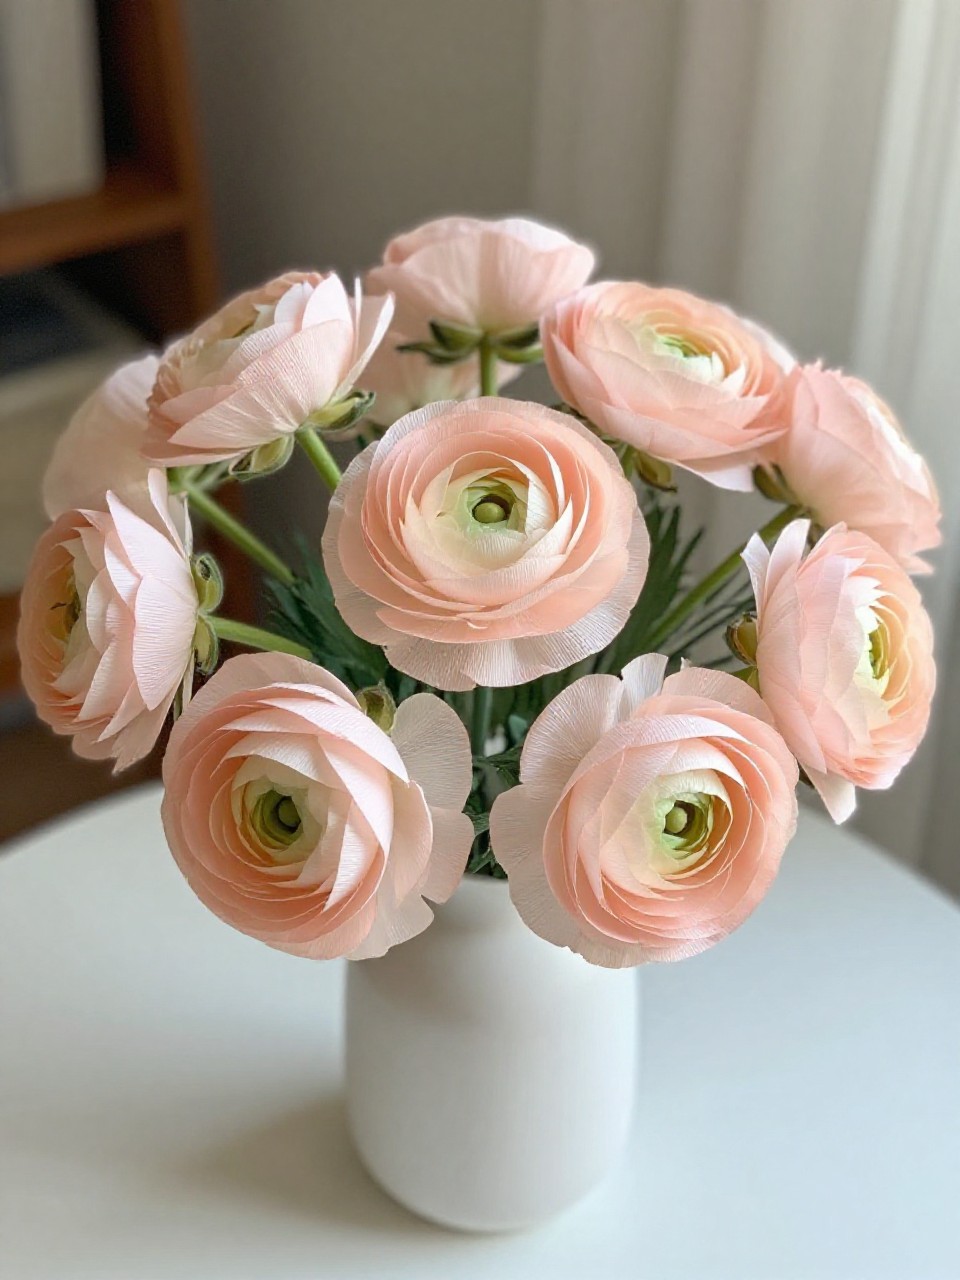
These blooms look real and lush, but they’re made from party streamers. The layered petals are satisfying to twist and build.
Materials Needed:
- Crepe paper streamers
- Floral wire + tape
- Hot glue
How to make it:
- 1. Cut streamer lengths and stretch slightly to cup the paper.
- 2. Roll a tight center and glue to floral wire.
- 3. Wrap and glue petals around, staggering layers.
- 4. Tape the stem and fluff petals open.
18. Framed Paint-Chip Collage Meadows
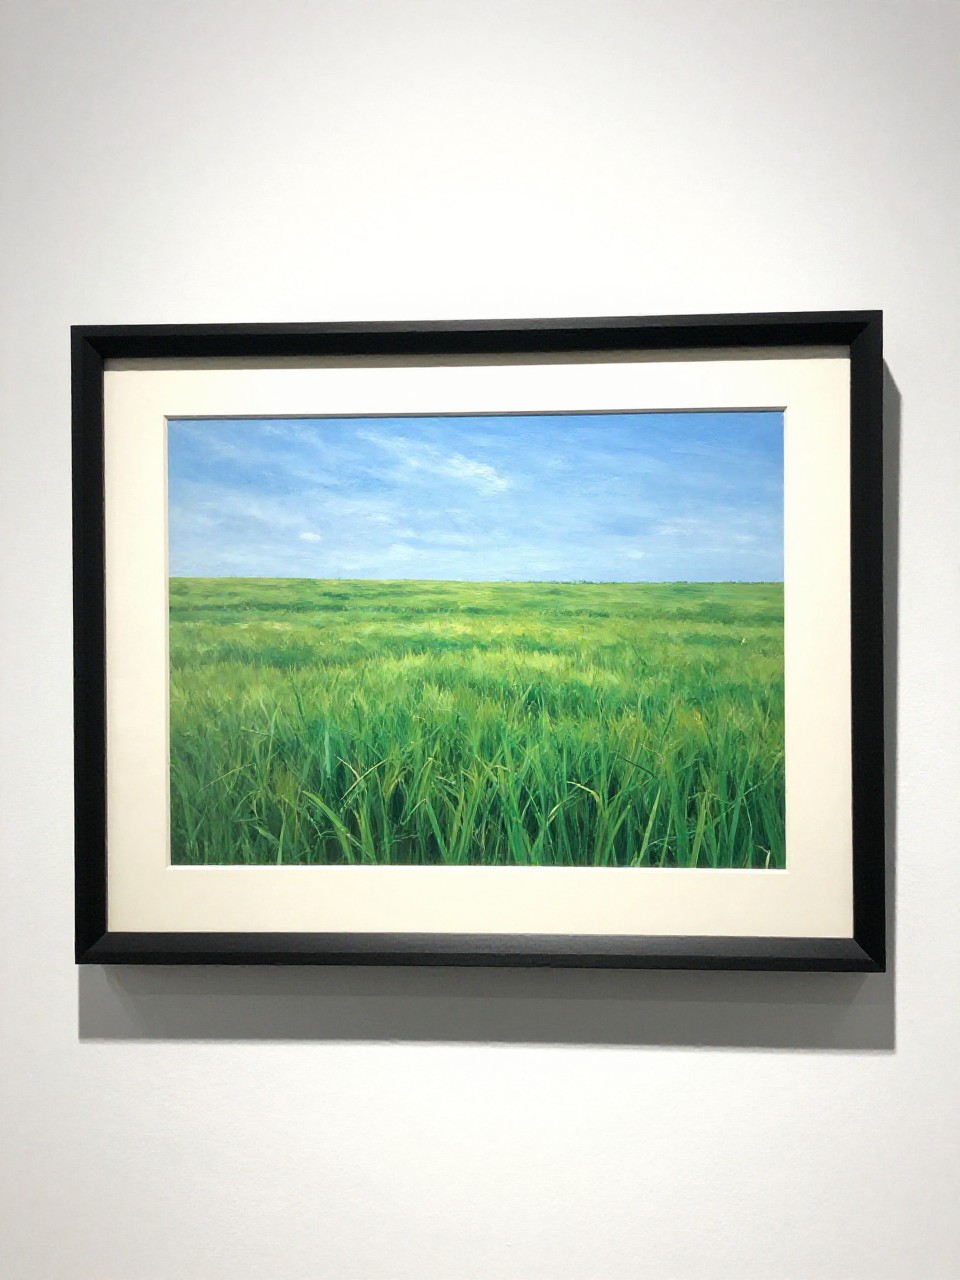
Turn free paint chips into modern art that looks like rolling fields. The color blocks blend into a soothing spring landscape.
Materials Needed:
- Paint chip samples
- Scissors + glue stick
- White frame with mat
How to make it:
- 1. Cut paint chips into soft hills and narrow sky strips.
- 2. Arrange from darkest at the bottom to lightest at the top.
- 3. Glue onto a piece of cardstock to fit your frame.
- 4. Pop into the frame and hang.
19. Limewash Ombre Terra-Cotta Pots

Give basic pots a soft, sun-faded look with a gentle ombre that feels like a seaside café. The chalky finish hides brush strokes, so it’s very forgiving and perfect for beginners.
Materials Needed:
- Terra-cotta pots
- White chalk paint or acrylic + water
- Foam brush
How to make it:
- 1. Mix a “limewash” by thinning white paint with water (about 1:1).
- 2. Brush from the rim downward, letting the color fade as you go.
- 3. While it’s damp, blend the bottom edge with a clean, wet brush for ombre.
- 4. Let dry and repeat light layers until you love the softness.
20. Blossomy Hoop Mobile
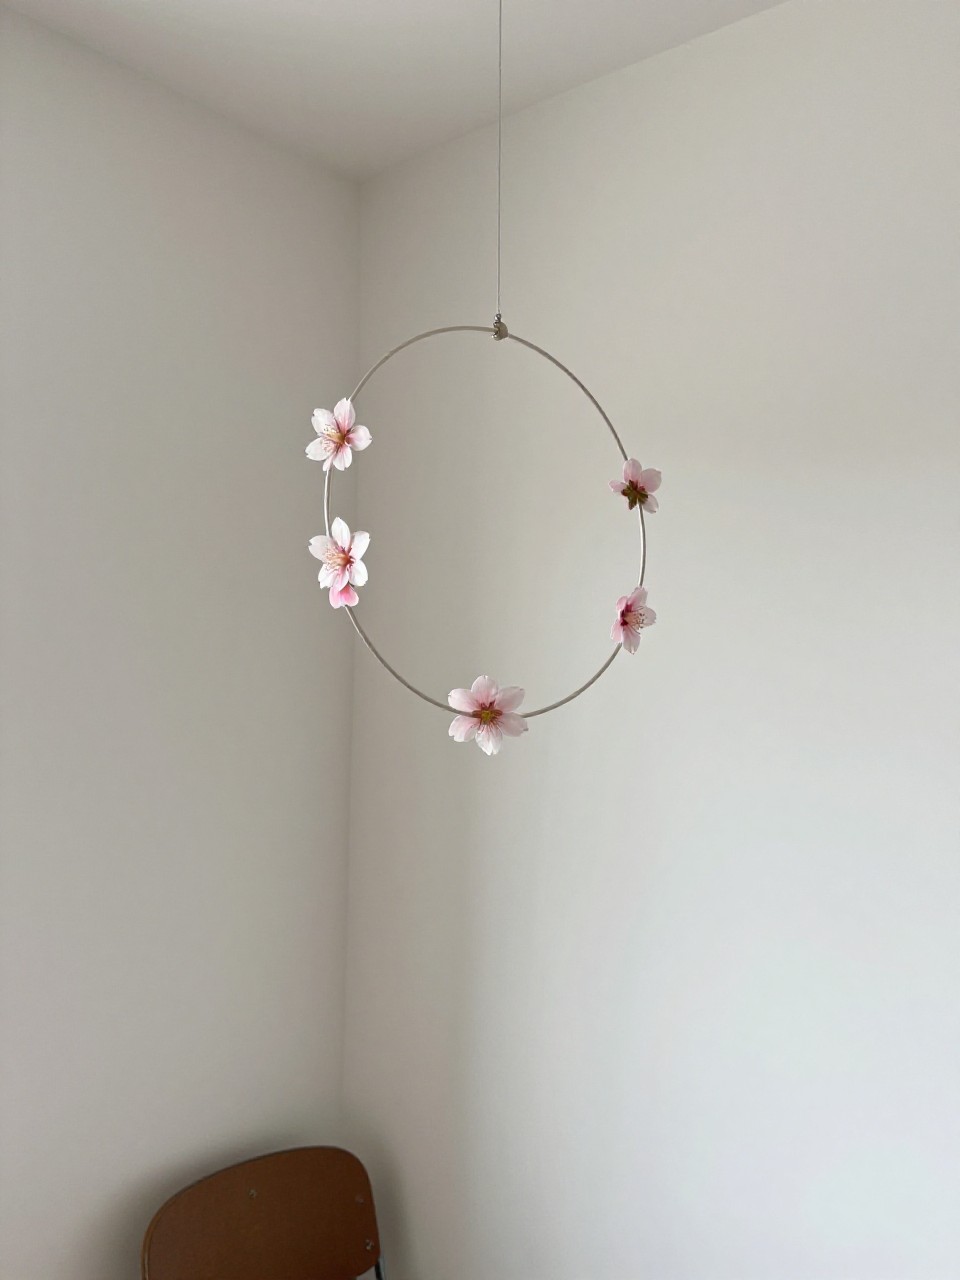
A hanging ring with airy blossoms feels light and floaty—perfect over a reading chair or nursery corner. It spins gently with any breeze.
Materials Needed:
- Embroidery hoop
- Fishing line or clear thread
- Faux blossoms or paper flowers
How to make it:
- Hang from a hook and fluff
- Tie lengths of fishing line around the hoop.
- Attach small blossoms at varying heights.
- Add a longer hanger line at the top center.