Table of Contents Show
Painting peonies can feel calming, but it’s easy to get stuck staring at a blank surface and not knowing where to start. If you want a relaxing hobby, a simple way to practice flowers, or a soft handmade piece for your home, peonies are a perfect choice.

This list gives you beginner-friendly peony painting ideas that still look elegant and special. Pick one surface you already have and try one idea today.
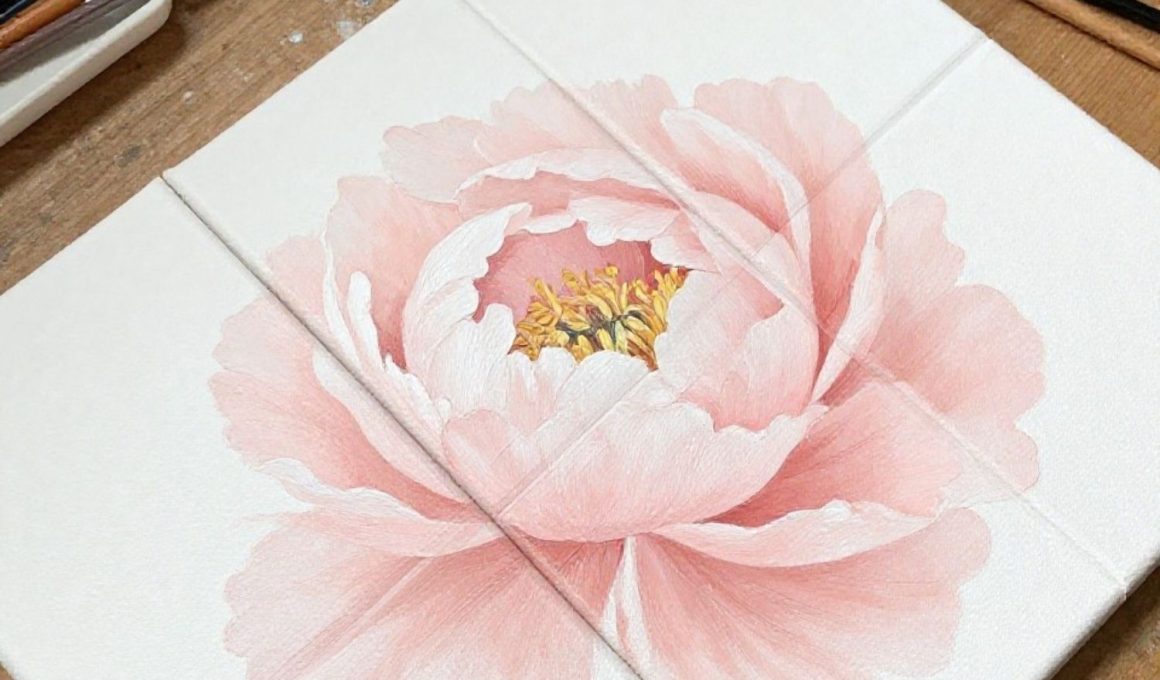
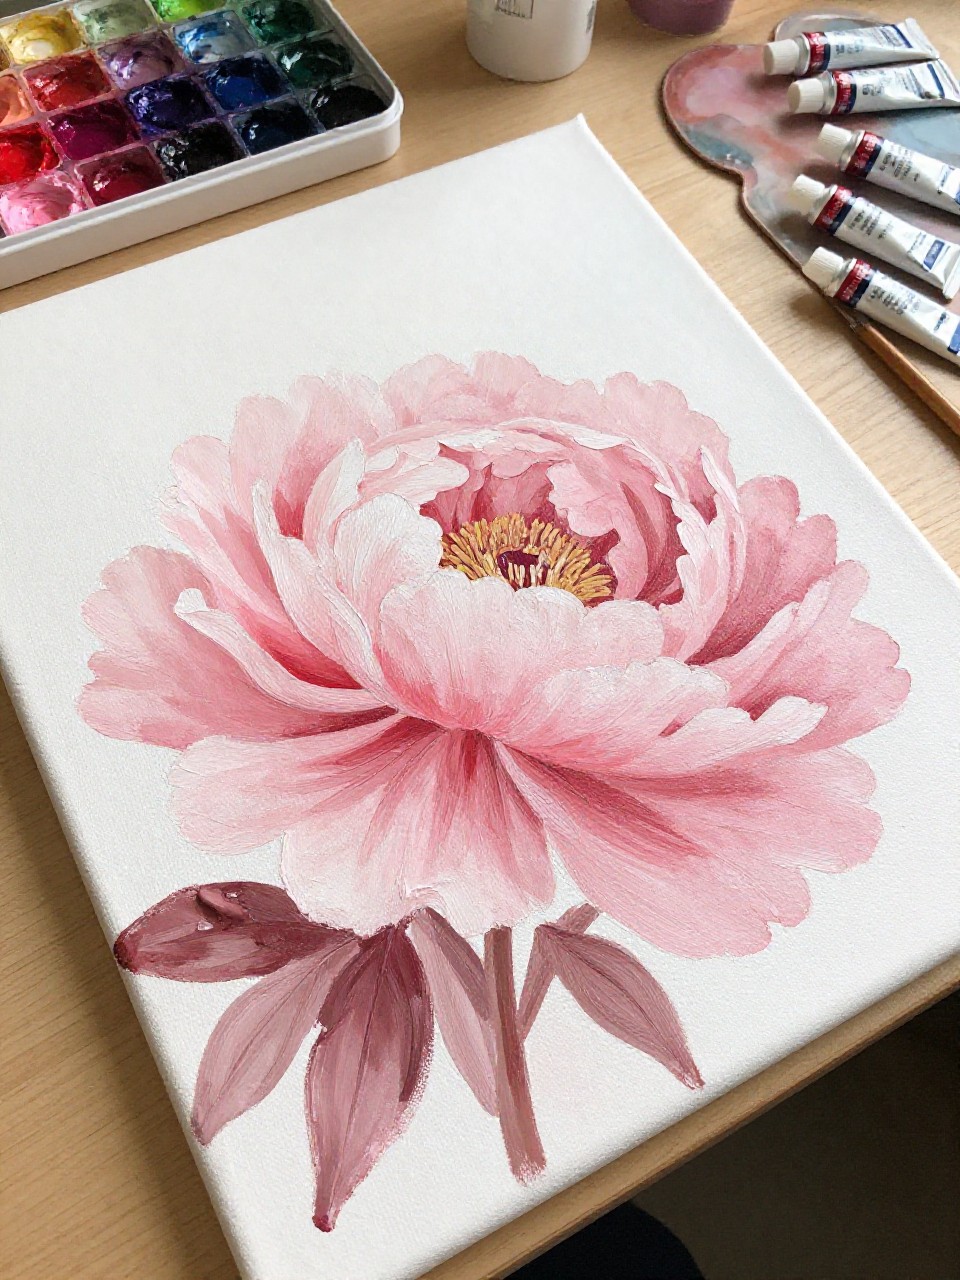
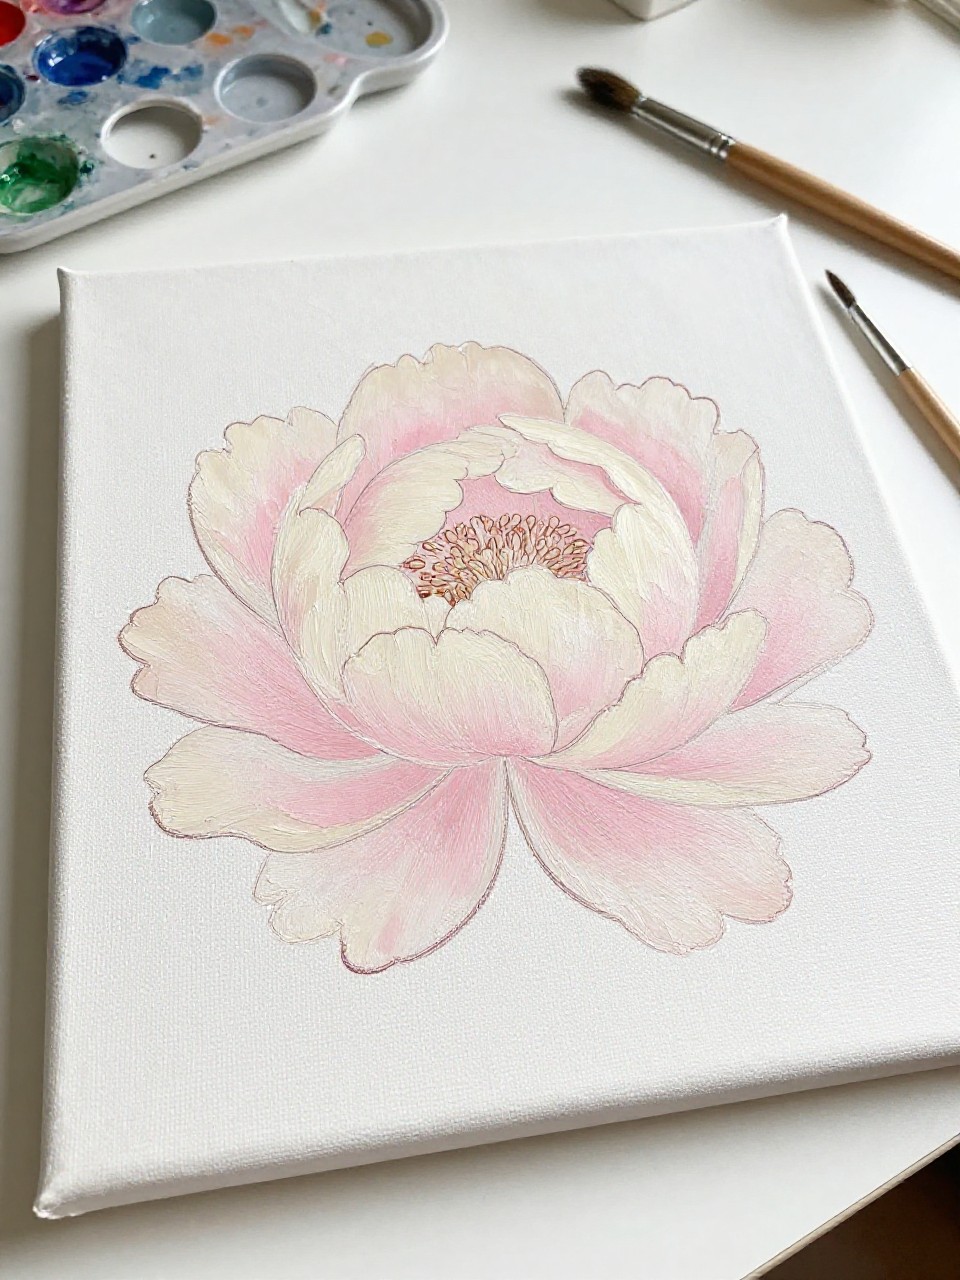
1. Blush Peony Canvas Trio
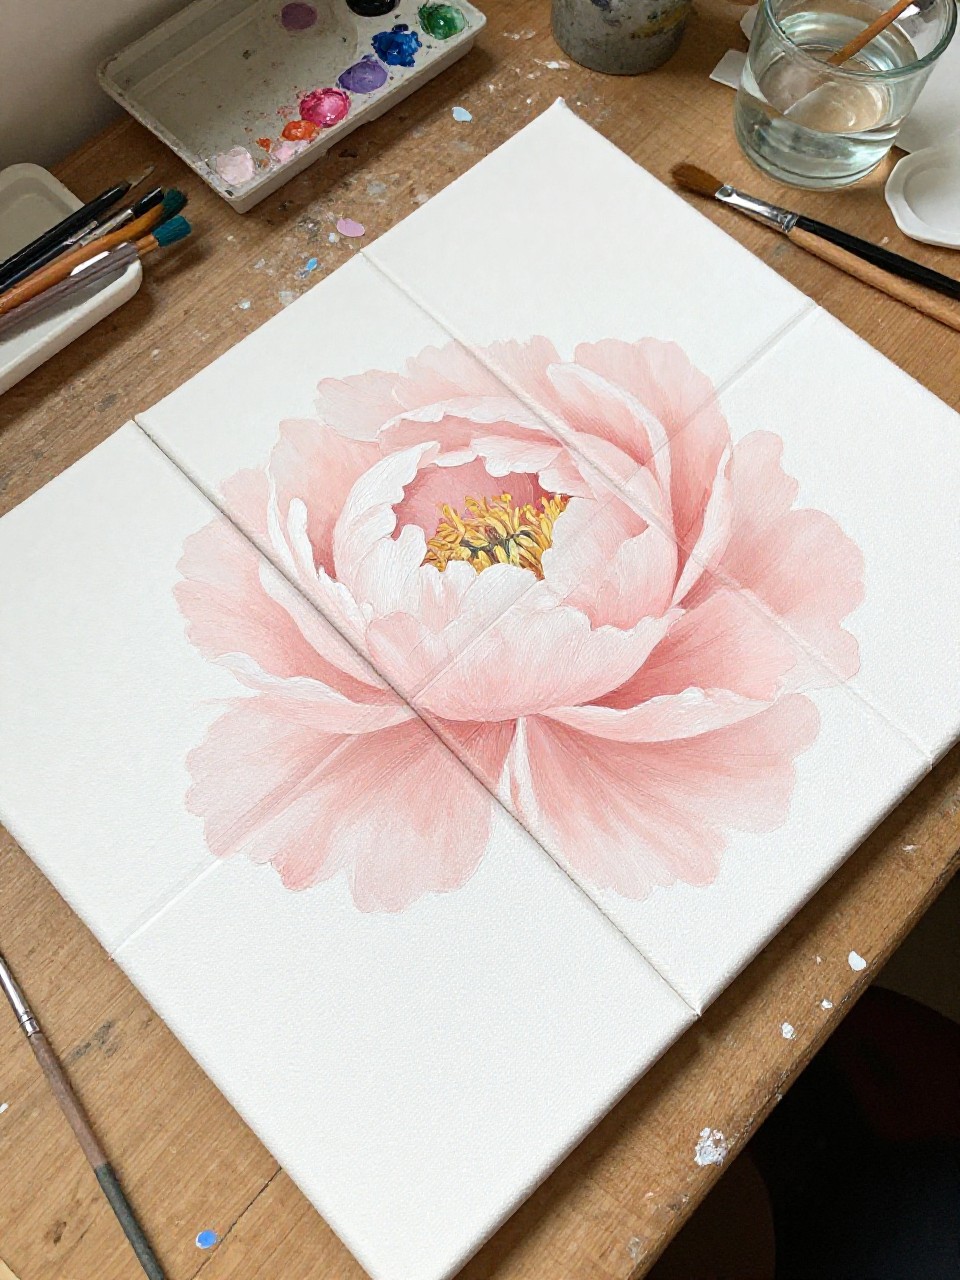
A set of three small canvases shows one large blush peony spread across the panels, with soft petals and gentle shadows. It’s satisfying because you can keep the shapes loose and still get a pretty result, and the trio format makes it feel like real wall art even for beginners.
Materials Needed:
- Stretched canvas (3 small panels)
- Acrylic paint
- Paintbrushes in multiple sizes
- Palette or paint tray
- Optional matte varnish
Steps to Make:
For People Who Love to Make Things ✂️
- Lightly sketch a big peony that spans across all three canvases, lining them up as you draw.
- Block in the flower with pale pink and warm white, leaving a few canvas gaps for sparkle.
- Add deeper blush tones in the inner petals and along folds to create depth.
- Use a small brush for thin petal edges, tiny ruffles, and a few soft green sepals.
- Let dry, varnish if you want, and hang the trio with small gaps between panels.
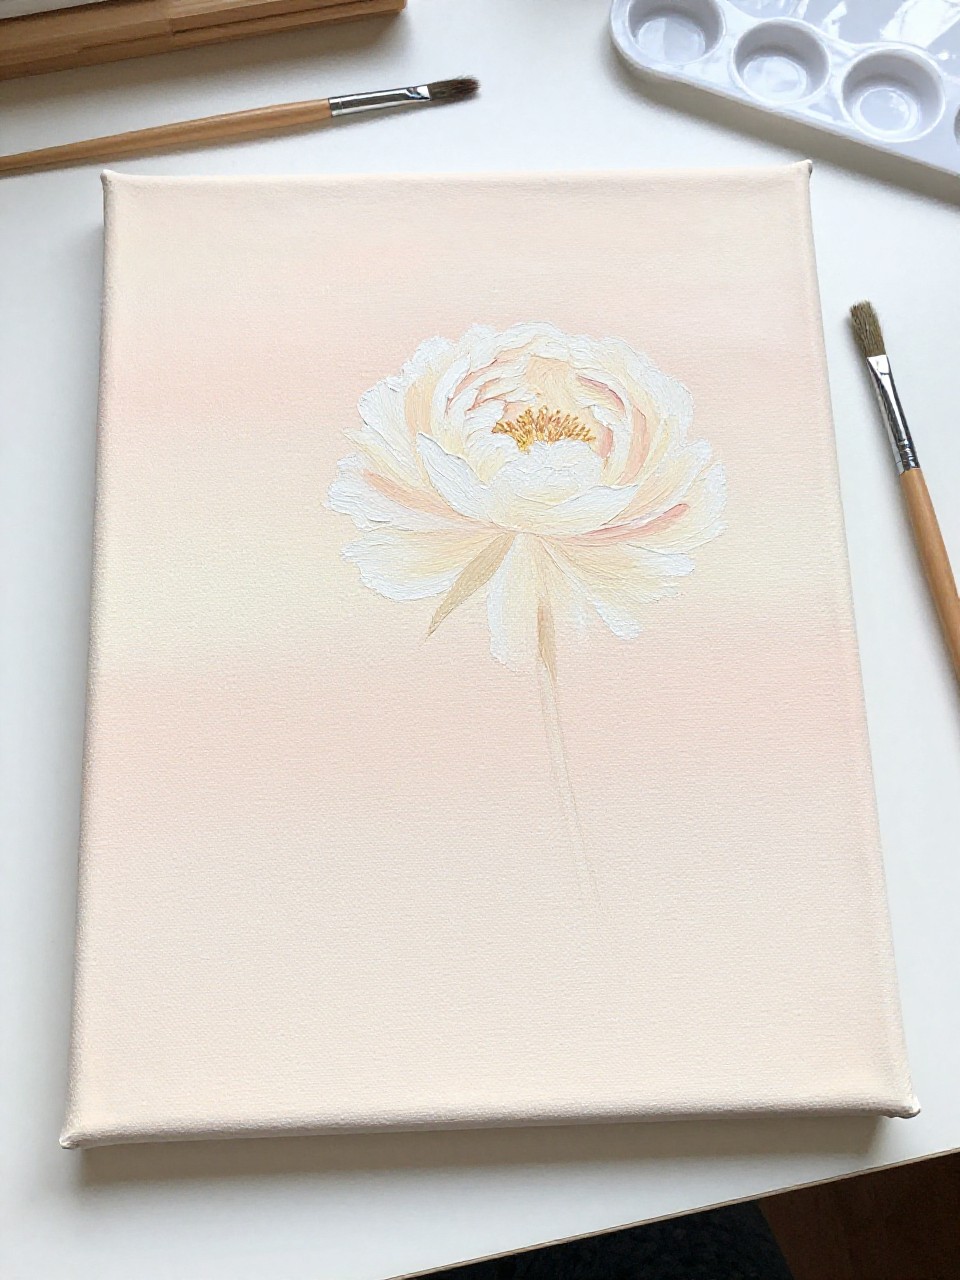
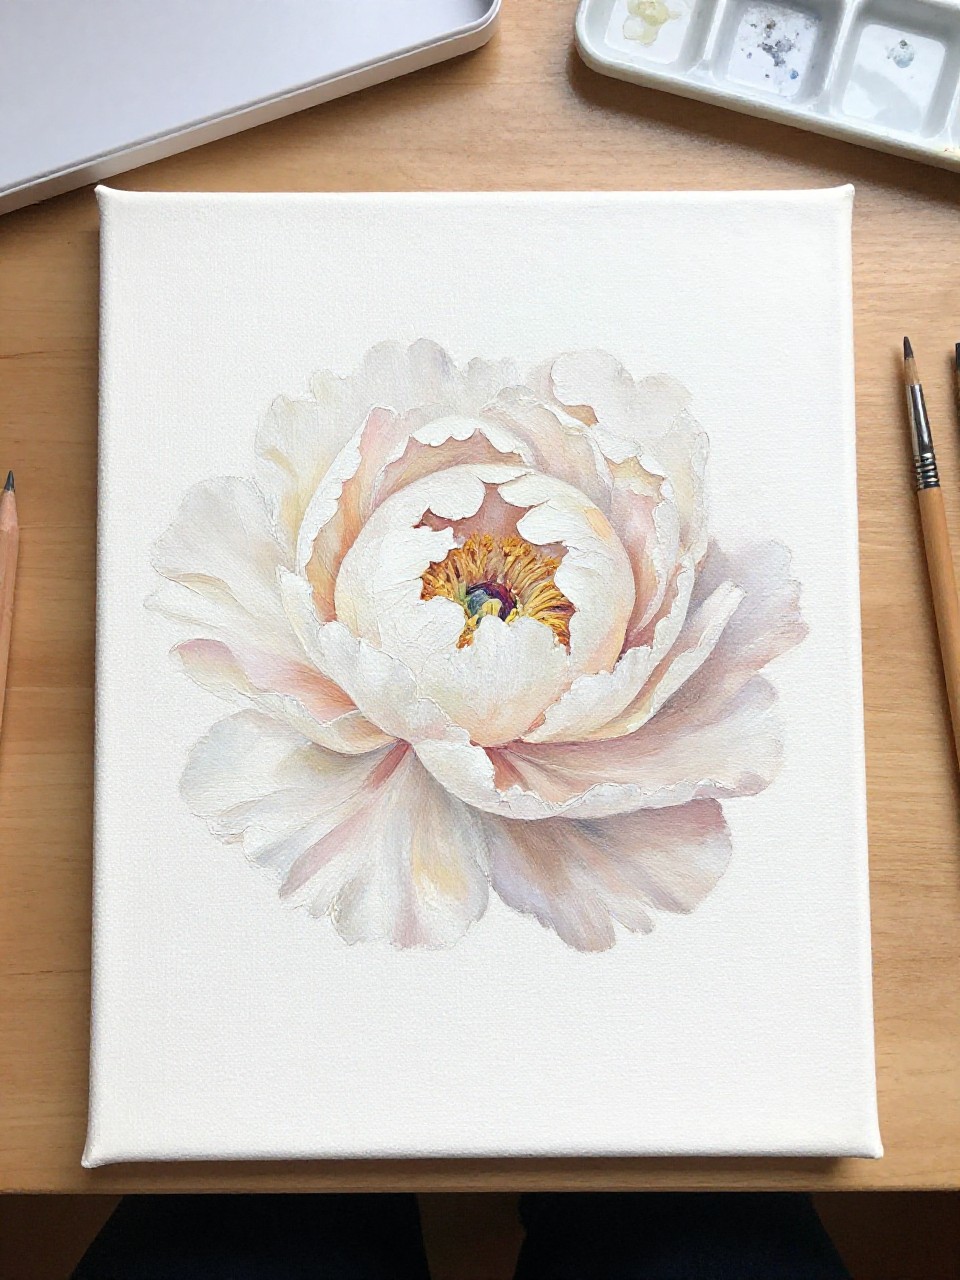
2. Minimal White Peony on Beige Canvas
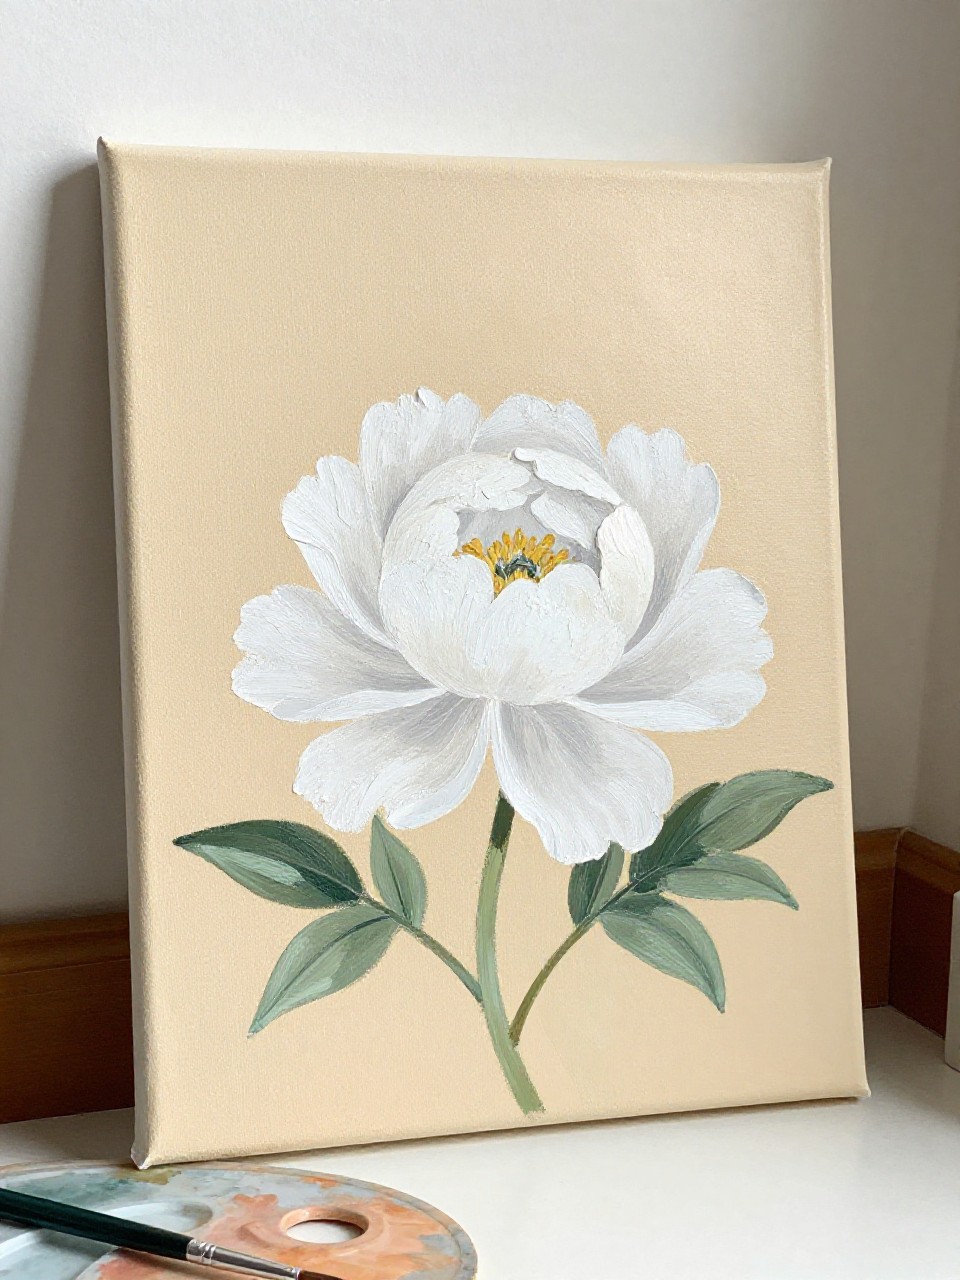
A single beige-toned canvas shows a white peony with creamy highlights and quiet, simple leaves. This is great when you want an elegant look without lots of bright color, and it’s beginner-friendly because you can blend slowly and keep the background plain and relaxing.
Materials Needed:
- Stretched canvas
- Acrylic paint
- Paintbrushes in multiple sizes
- Palette or paint tray
- Optional satin varnish
Steps to Make:
- Paint the canvas a warm beige wash and let it dry fully.
- Draw a round peony shape and place the center slightly off to one side.
- Layer creamy whites and light grays for petals, keeping the outer petals wider.
- Add thin shadow lines between petal layers and a few muted green leaves.
- Dry completely, varnish lightly, and display it in a simple frame or on a shelf.
3. Dusty Rose Peony Wreath Canvas
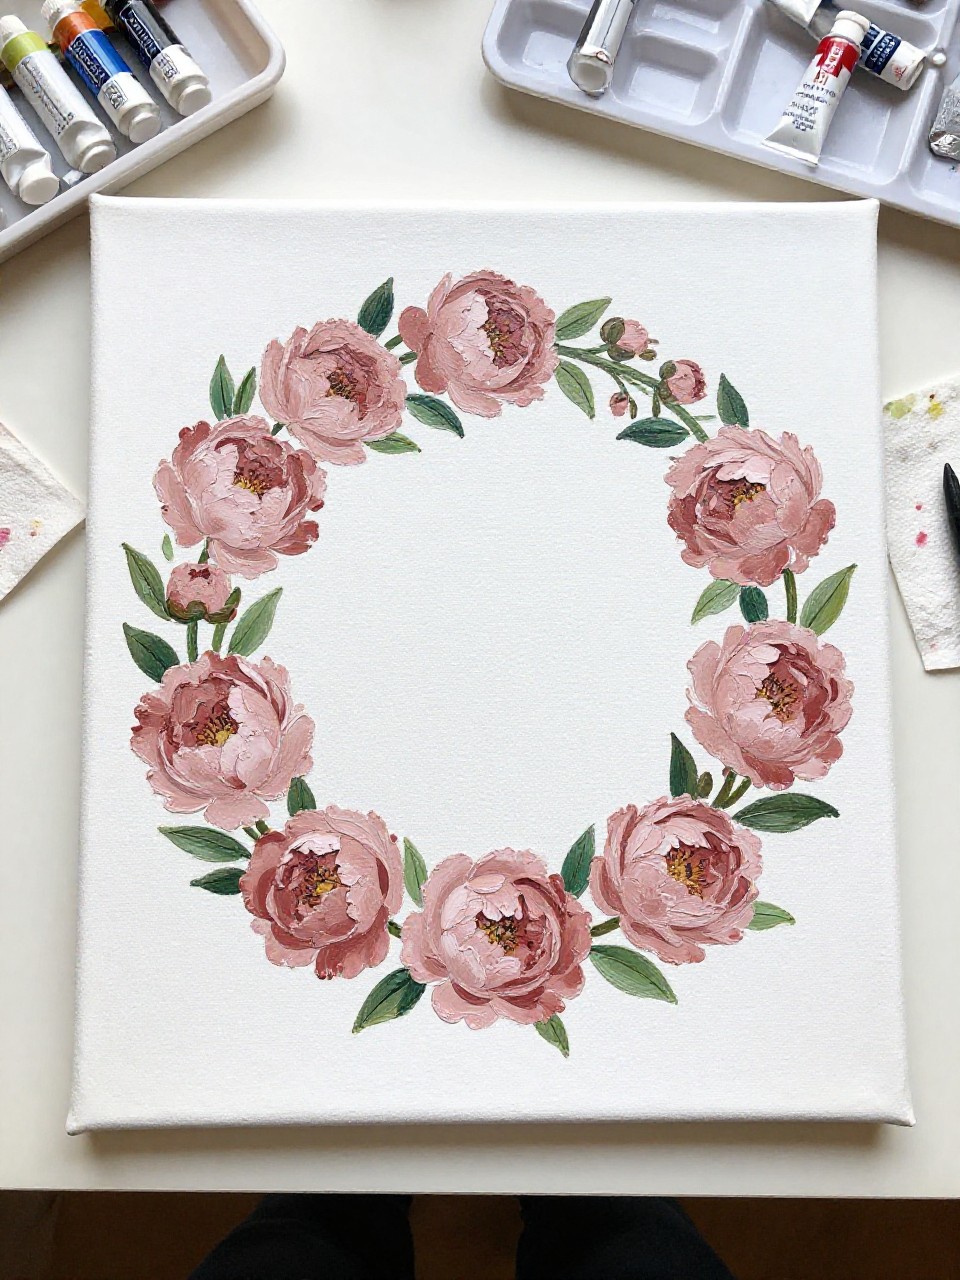
A round wreath of dusty rose peonies and small leaves wraps around the center of a canvas, leaving open space in the middle. It’s relaxing because you paint one flower at a time, and the repeating circle shape helps beginners keep the layout balanced without needing perfect drawing skills.
Materials Needed:
Stretched canvas
Acrylic paint
Paintbrushes in multiple sizes
Palette or paint tray
Optional sealer or varnish
Steps to Make:
Lightly draw a large circle guide where the wreath will sit.
Paint simple peony “cups” first, spacing them evenly around the circle.
Build petals outward with dusty rose and soft pink, layering while paint is slightly wet.
Add tiny leaf clusters and a few darker shadow petals to make the wreath pop.
Let dry, seal if desired, and leave the center blank or add a small word later.
4. Watercolor-Style Pink Peonies on Canvas
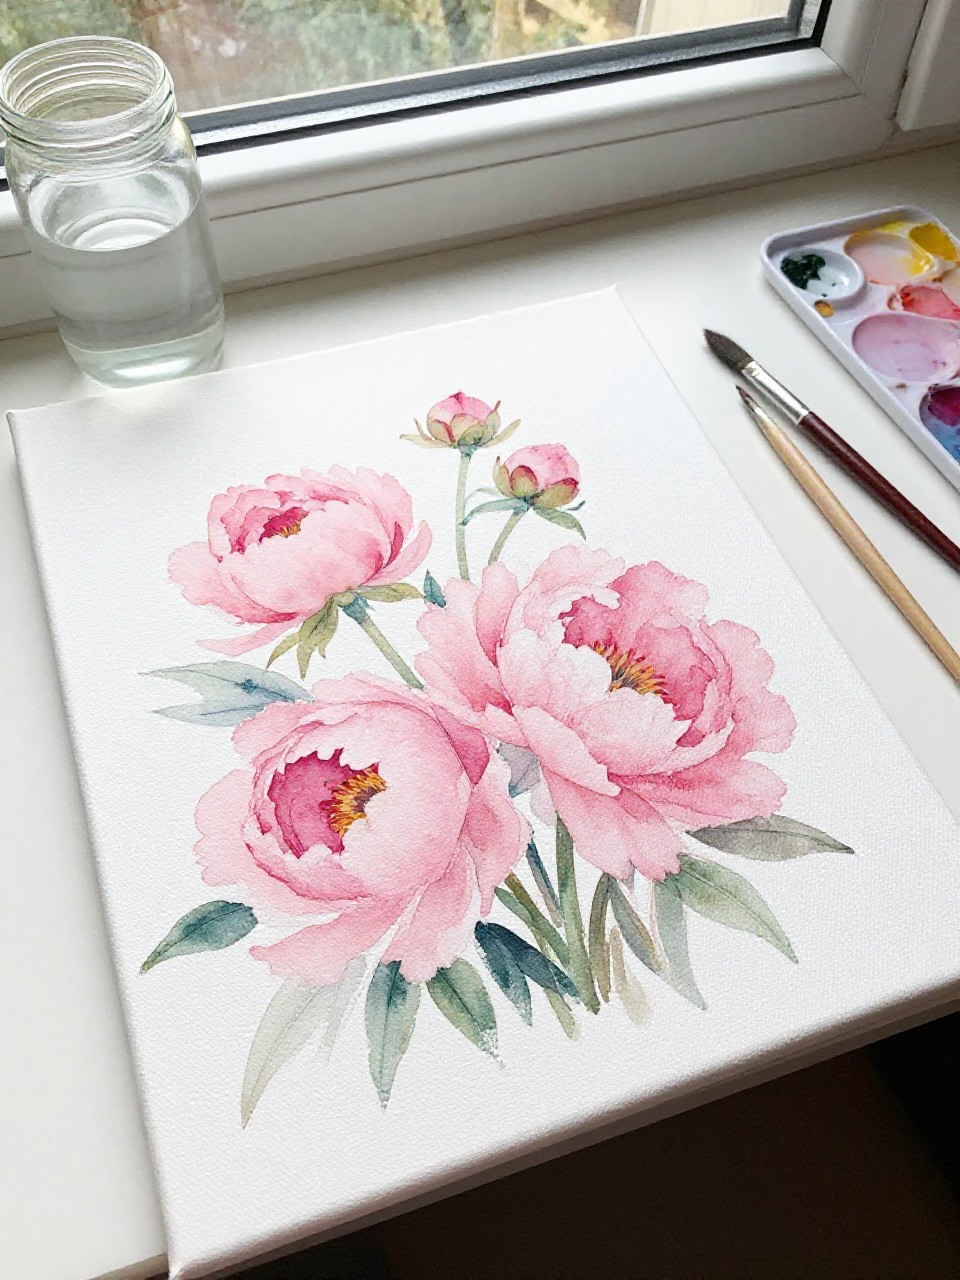
This canvas looks like soft watercolor peonies with gentle color blooms, but it’s made with thin acrylic layers. It’s great for beginners who worry about “perfect petals,” because the beauty comes from see-through washes and loose edges that feel dreamy and forgiving.
Materials Needed:
Stretched canvas
Acrylic paint (thinned with water)
Paintbrushes in multiple sizes
Palette or paint tray
Optional matte varnish
Steps to Make:
Mix watery acrylic washes in light pink, coral, and warm white.
Paint loose peony circles and let the edges feather out naturally.
Drop in deeper pink near the centers and tilt the canvas slightly for soft blending.
Once dry, add a few crisp petal lines and small leaf hints with a small brush.
Dry fully, varnish lightly, and hang where the soft colors can shine.
5. Dark Background Peony Glow Canvas
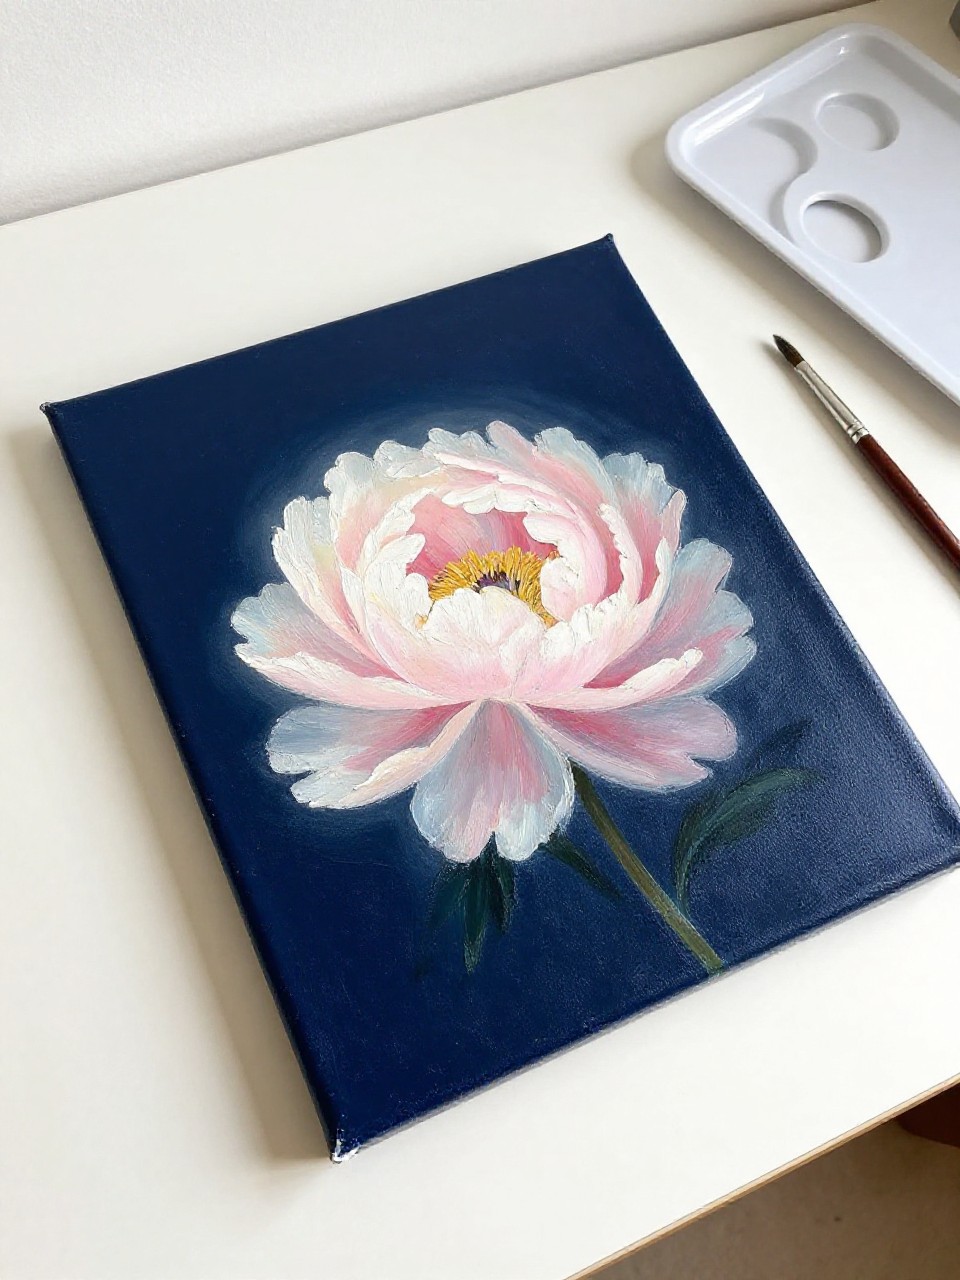
A rich, dark background makes a pale peony look like it’s glowing, with bright highlights on the petal tips. This one feels dramatic but still simple, and it’s satisfying for beginners because you can paint the background first and then “pull out” the flower with light layers.
Materials Needed:
- Stretched canvas
- Acrylic paint
- Paintbrushes in multiple sizes
- Palette or paint tray
- Optional gloss varnish
Steps to Make:
- Paint the whole canvas in deep navy or charcoal and let it dry.
- Sketch a big peony and block it in with mid-tone pink or warm gray.
- Add lighter petals on top, saving the brightest whites for the final highlights.
- Use a thin brush to define a few petal edges and add a soft halo around the flower.
- Dry completely, add varnish if you like, and display it where it catches light.
6. Pastel Peony Bouquet Canvas Corner

A cluster of small pastel peonies sits in one corner of the canvas, leaving lots of clean space. This is perfect if you like modern, airy decor, and it’s beginner-friendly because you only paint a few flowers and don’t have to fill the whole canvas.
Materials Needed:
- Stretched canvas
- Acrylic paint
- Paintbrushes in multiple sizes
- Palette or paint tray
- Optional matte varnish
Steps to Make:
- Choose a corner and lightly mark where the bouquet will sit.
- Paint 3–5 simple peony blooms using pale pinks, peaches, and creams.
- Layer petals with small curved strokes, keeping the outer petals lighter.
- Add a few thin stems and soft green leaves, then touch in tiny bud shapes.
- Let dry, varnish if desired, and hang it for a clean, calm look.
7. Soft Ombre Peony Background Canvas
This canvas has a gentle ombre background with one pale peony floating on top, giving it a soft, airy feel. It’s soothing to make because blending the background is slow and simple, and beginners can keep the peony loose while still getting a polished result.
Materials Needed:
- Stretched canvas
- Acrylic paint
- Paintbrushes in multiple sizes
- Palette or paint tray
- Optional sealer or varnish
Steps to Make:
- Blend an ombre background from warm white into blush or light peach using a wide brush.
- Once dry, sketch a single peony in the center or slightly off-center.
- Paint the flower with light layers, using slightly darker tones near the middle.
- Add a few crisp petal highlights and soft shadows to separate petal layers.
- Dry fully, seal if desired, and style it with other light-toned decor.
8. Monochrome Pink Peony Study Canvas
A monochrome canvas shows a peony painted using only shades of pink, from very light to deep rose. This is a great practice piece because you focus on petal shapes and shadows without worrying about lots of colors, and it still looks elegant and intentional on a wall.
Materials Needed:
- Stretched canvas
- Acrylic paint (pink + white)
- Paintbrushes in multiple sizes
- Palette or paint tray
- Optional matte varnish
Steps to Make:
- Mix 4–5 pink values on your palette, from pale to dark.
- Sketch a peony with a clear center and bigger outer petals.
- Paint the mid-tone base first, then add darker shadows between petal layers.
- Use your lightest mix to add highlights on the petal edges and top curves.
- Let dry, varnish lightly, and label the back as a “study” if you want.
9. Small Peony Mini Canvas Set
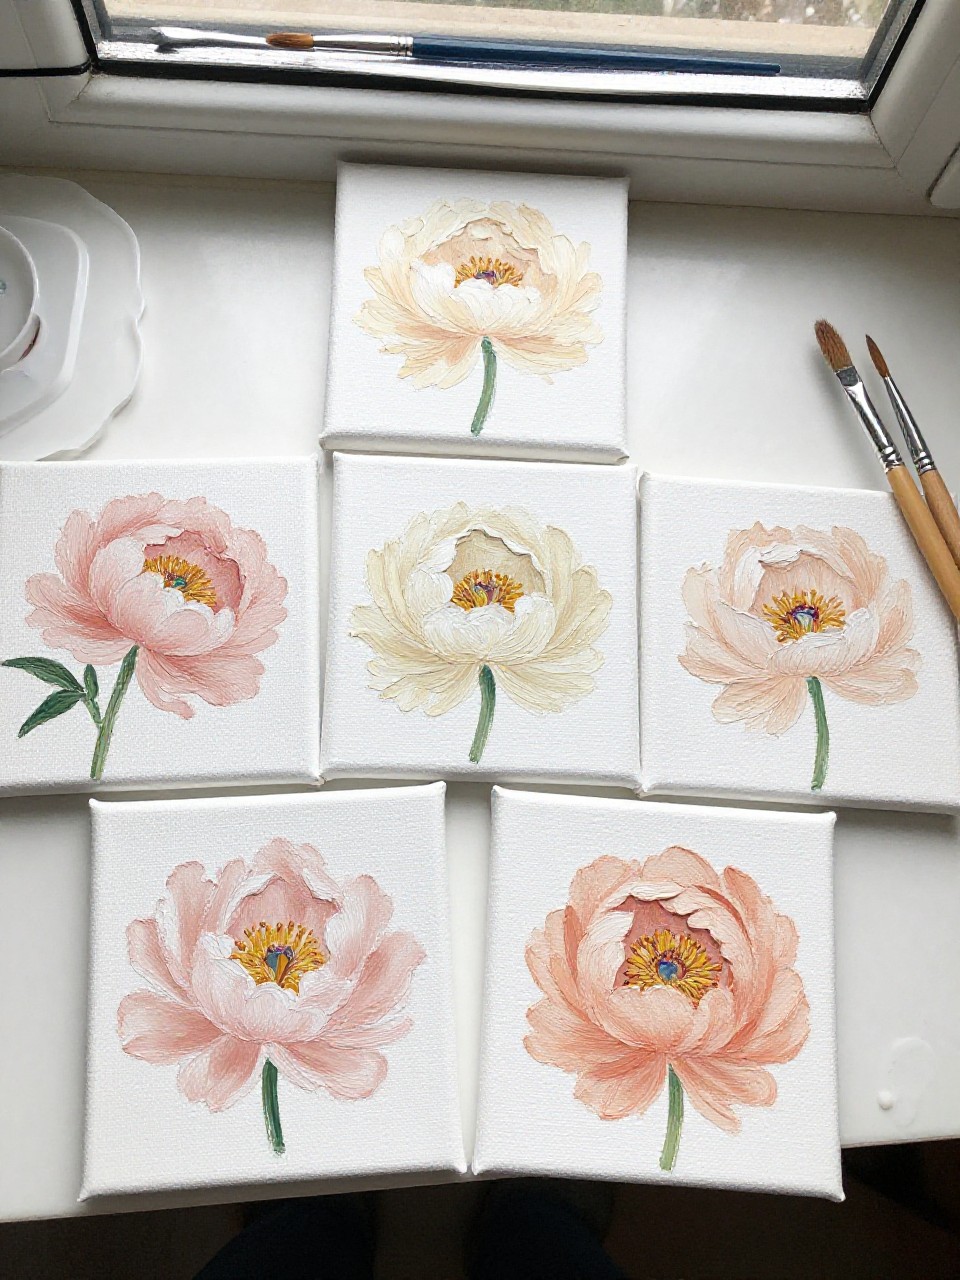
A set of tiny canvases each shows one simple peony bloom in a different soft color, like blush, cream, and peach. These are fun because they’re quick wins, and they’re perfect for beginners who want to practice petals without the pressure of a big painting.
Materials Needed:
- Stretched mini canvases (set of 4–6)
- Acrylic paint
- Paintbrushes in multiple sizes
- Palette or paint tray
- Optional varnish
Steps to Make:
- Choose a different pastel color plan for each mini canvas.
- Paint a light background wash on each one and let them dry.
- Add one peony per canvas using layered petal strokes, starting from the center outward.
- Touch in small leaves or buds to finish each mini piece without overcrowding it.
- Dry fully, varnish if desired, and arrange them in a grid on your wall.
10. Gold-Accented Peony Canvas

A soft pink peony sits on a light background with small touches of gold around the petals for a gentle sparkle. It’s satisfying to make because the flower stays simple, and the gold details instantly make it feel fancy, even if your brushwork is a little imperfect.
Materials Needed:
- Stretched canvas
- Acrylic paint + metallic gold paint
- Paintbrushes in multiple sizes
- Palette or paint tray
- Optional sealer or varnish
Steps to Make:
- Paint a clean, pale background and let it dry completely.
- Sketch a peony and paint it in soft pinks and warm whites.
- Deepen the center with a slightly darker rose tone for contrast.
- Add small gold strokes near a few petal edges or as tiny dots around the bloom.
- Dry fully, seal gently to protect the metallic paint, and display in bright light.
11. Loose Impression Peony Field Canvas
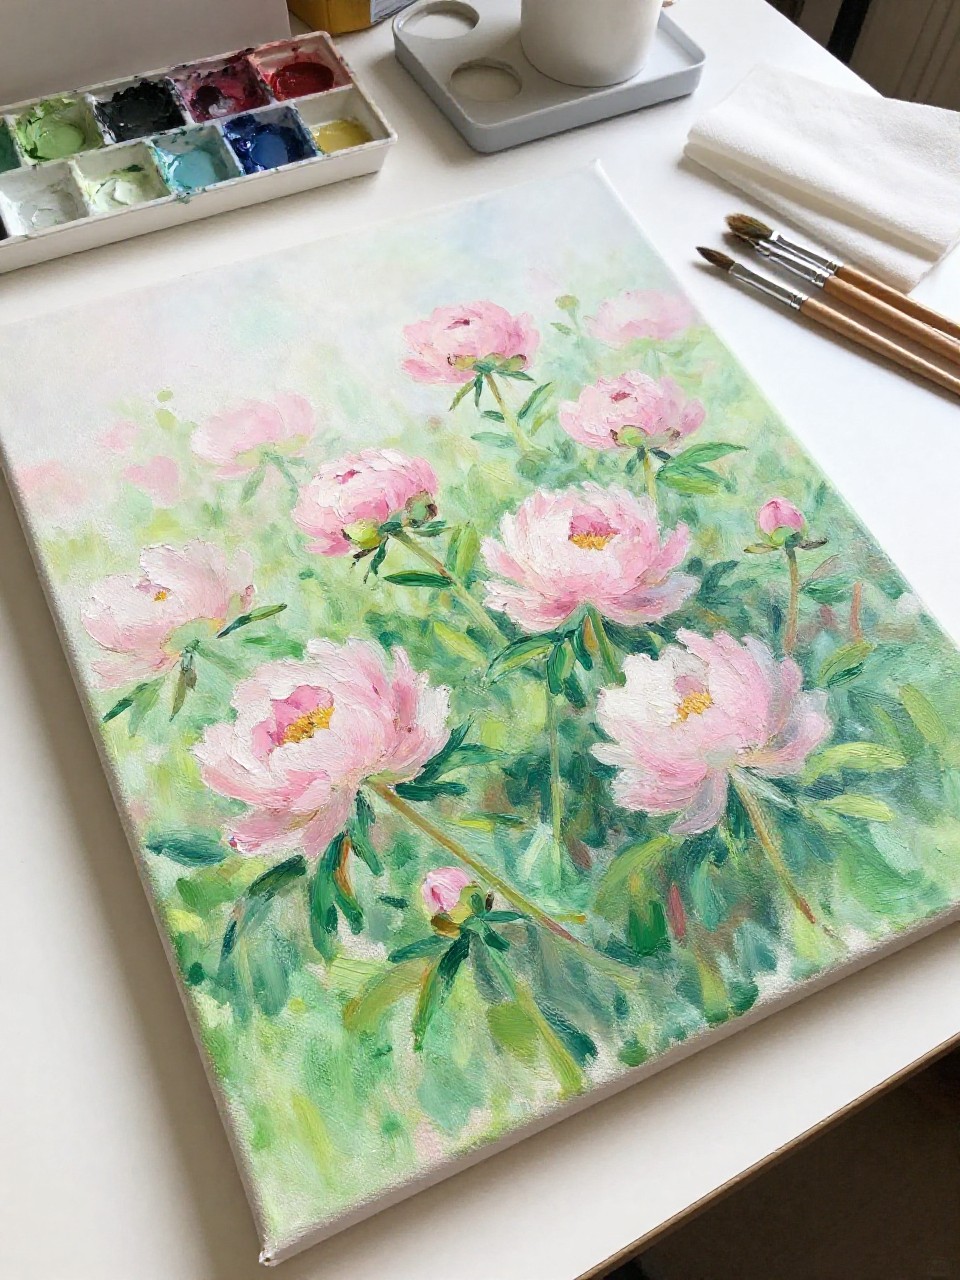
This canvas shows a soft “field” of peony blooms, painted loosely so the flowers feel airy and suggestive instead of detailed. It’s perfect for relaxing painting sessions because you can use quick strokes and blend freely, and beginners don’t have to worry about perfect petal shapes.
Materials Needed:
- Stretched canvas
- Acrylic paint
- Paintbrushes in multiple sizes
- Palette or paint tray
- Optional matte varnish
Steps to Make:
- Paint a light sky or cream background and let it set.
- Use a medium brush to dab loose circles of pinks and whites across the canvas.
- Add darker centers and a few shadow dabs to suggest layers of petals.
- Pull in soft green strokes below for stems and leaves, keeping everything loose.
- Let dry, varnish if desired, and hang it for a gentle, dreamy feel.
12. Peony Center Cutaway Study Canvas
A close-up peony shows a cutaway-style center with layered petals curling inward, using soft shading to show depth. This is a fun beginner challenge because you repeat the same petal shape again and again, and each layer makes the flower look more real without needing tiny details.
Materials Needed:
- Stretched canvas
- Acrylic paint
- Paintbrushes in multiple sizes
- Palette or paint tray
- Optional satin varnish
Steps to Make:
- Draw a large peony center and lightly map ring-like petal layers around it.
- Paint the base layer in mid-tone pink, keeping strokes curved toward the center.
- Add darker shadows in the inner rings and between petal overlaps.
- Highlight outer petals with warm white and soften edges with light blending.
- Dry completely, varnish if desired, and display it as a pretty practice piece.
13. Soft Peony Outline with Painted Petal Fills Canvas
A simple line drawing of a peony is outlined in a thin dark paint, with each petal softly filled in with pale pink and cream. This is great for beginners who like clear boundaries, and it feels calm because you can paint one petal at a time like coloring, but with real brush texture.
Materials Needed:
- Stretched canvas
- Acrylic paint
- Paintbrushes in multiple sizes
- Palette or paint tray
- Optional sealer or varnish
Steps to Make:
- Lightly sketch a peony outline with clear petal sections.
- Use a small brush to paint the outline in a thin charcoal or deep brown line.
- Fill each petal with soft pinks and creams, keeping the paint slightly translucent.
- Add tiny shadow strokes at the base of a few petals for depth.
- Let dry, seal if desired, and hang it in a simple, modern spot.
14. Peony and Lace Border Canvas
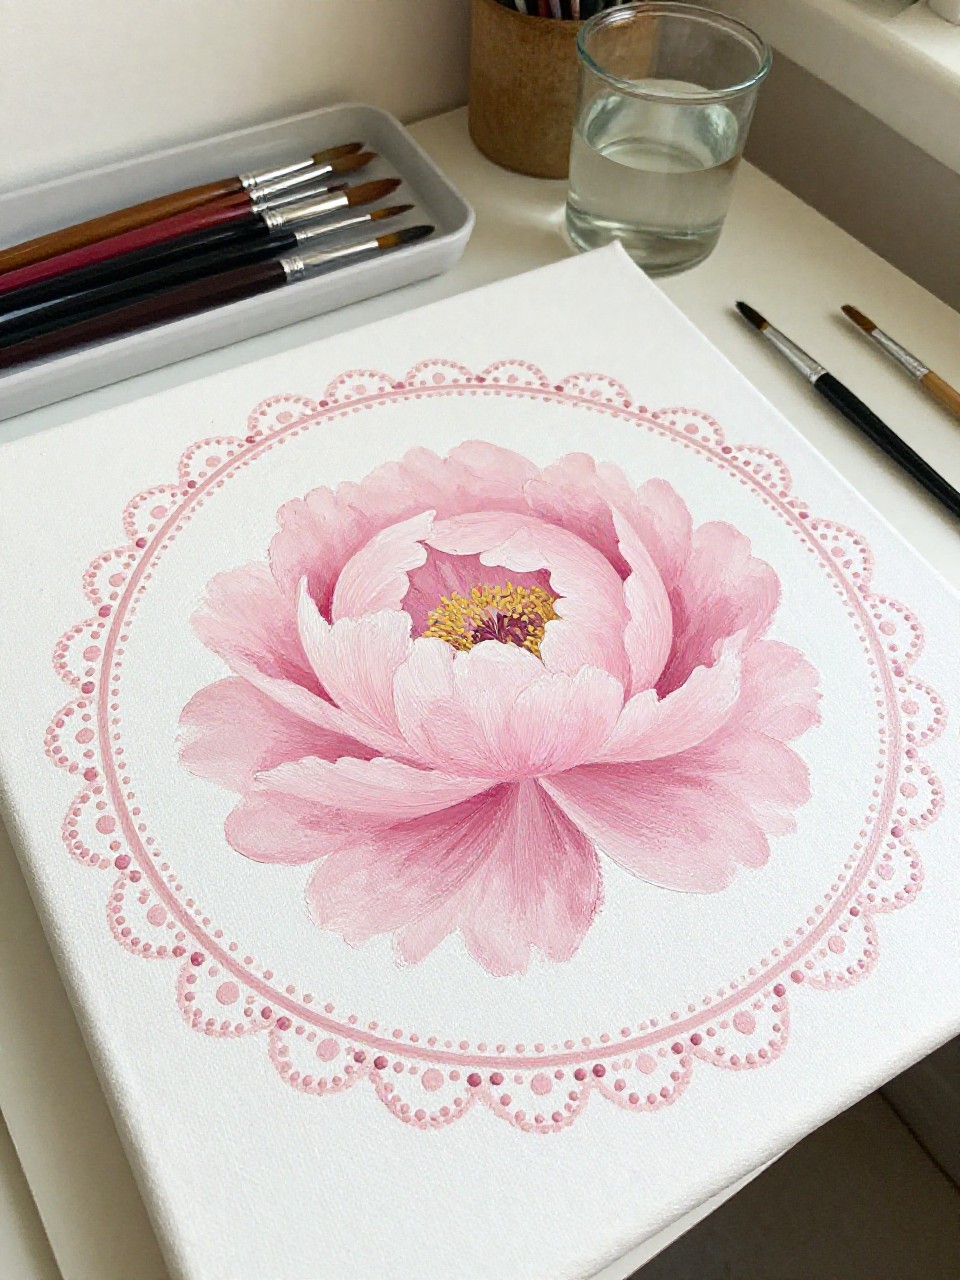
A large soft peony sits in the center with a delicate painted lace-like border around the edges of the canvas. It’s satisfying because the border is made from simple repeating loops and dots, and beginners can take their time, making it a slow, relaxing project that looks sweet and elegant.
Materials Needed:
- Stretched canvas
- Acrylic paint
- Paintbrushes in multiple sizes
- Palette or paint tray
- Optional matte varnish
Steps to Make:
- Paint a light background and let it dry so the border stays crisp.
- Sketch and paint a single peony in the center using layered soft pink petals.
- Mark a border line around the edges, leaving an even margin.
- Paint lace-like loops, tiny dots, and small scallops with a fine brush.
- Dry fully, varnish if desired, and display it in a bedroom or reading corner.
15. Two Peonies with Soft Shadow Leaves Canvas
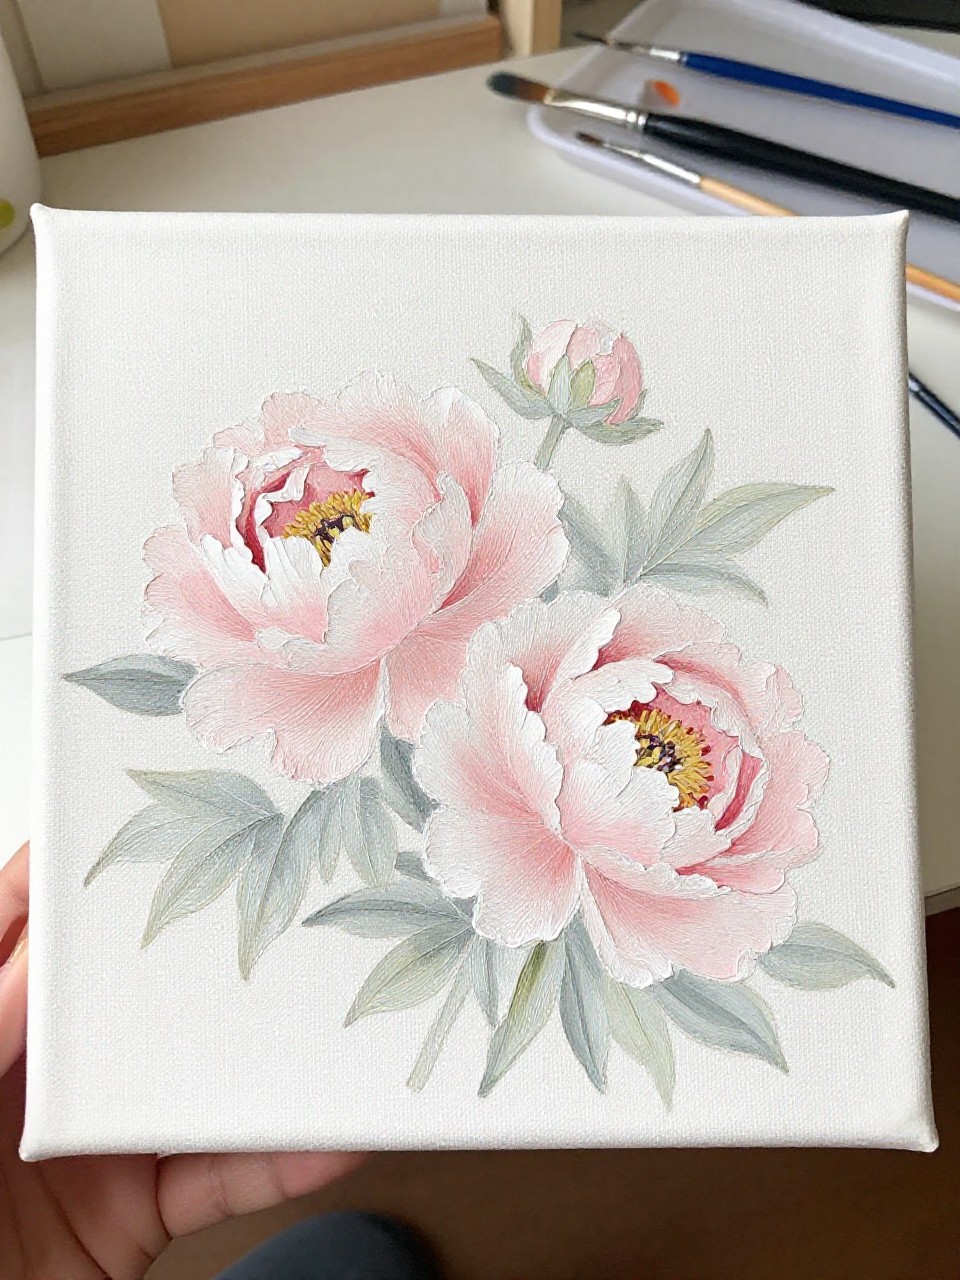
Two peonies sit side by side, with faint shadowy leaves behind them that make the flowers look extra soft and layered. This is great for beginners because the leaves can be simple silhouettes, and the two-flower layout helps the painting feel full without needing a complicated background.
Materials Needed:
- Stretched canvas
- Acrylic paint
- Paintbrushes in multiple sizes
- Palette or paint tray
- Optional sealer or varnish
Steps to Make:
- Paint a clean, pale background and allow it to dry.
- Lightly sketch two peony circles, one slightly higher than the other.
- Paint soft leaf silhouettes behind the flowers using diluted gray-green for a shadow look.
- Layer the peony petals in blush and cream, adding deeper tones near each center.
- Dry completely, seal if desired, and style it with light wood or white frames.