


Table of Contents Show
Paper bag snowman figurines are a joyful and inexpensive holiday craft that brings a little winter magic indoors. Made with simple materials like brown paper bags, buttons, and scarves, these snowmen are perfect for kids and families to make together.

Each one has its own personality—some with top hats, others with beanies—and they’re great for decorating tabletops, mantels, or classrooms.
You can even fill them with treats or small gifts to make them double as festive goodie bags.
How to Make Paper Bag Snowman Figurines
Fun, easy, and cheerful, these snowmen are guaranteed to bring smiles wherever they stand.
For People Who Love to Make Things ✂️
Materials
- Brown paper bags (lunch or small gift size)
- White or light-colored tissue paper, newspaper, or fiberfill (for stuffing)
- Black buttons or paper circles (for buttons and mouth)
- Orange paper or foam (for carrot noses)
- Googly eyes or white and black paper circles
- Small scarves, ribbons, or fabric strips
- Pipe cleaners or twigs (for arms)
- Mini hats or beanies (optional)
- Glue stick or craft glue
- Scissors
- Tape or twine for tying the neck
Shop the materials


The steps

Step 1: Prepare the Paper Bag Base
Start by gently opening the brown paper bag. If you’re using it as a figurine, fill it about two-thirds full with crumpled tissue paper, newspaper, or fiberfill stuffing to give it shape. Don’t overfill—the top section should stay flexible so you can form the snowman’s “head.”
Step 2: Shape the Snowman
Once filled, pinch the paper bag about one-third from the top and tie it tightly with string, ribbon, or a small piece of twine. This will create a round head and a fuller body underneath, giving your snowman its classic shape.
Step 3: Add the Face
Glue on two googly eyes or paper circles near the top of the “head.” Cut a small triangle from orange paper or foam for the carrot nose and glue it in the center.
Then, use small black paper dots or a marker to make a smiling mouth. If you want a playful expression, angle the dots slightly or make the mouth wavy.
Step 4: Decorate the Body
Glue two or three buttons vertically down the snowman’s belly. For extra detail, use real buttons or shiny sequins to make them stand out. You can also draw snowflakes or use white paint to add frosty accents to the bag.
Step 5: Add Arms
Insert two small twigs or brown pipe cleaners into the sides of the bag for arms. If you’re using pipe cleaners, twist them slightly for texture or curl the ends to give your snowman a friendly wave.
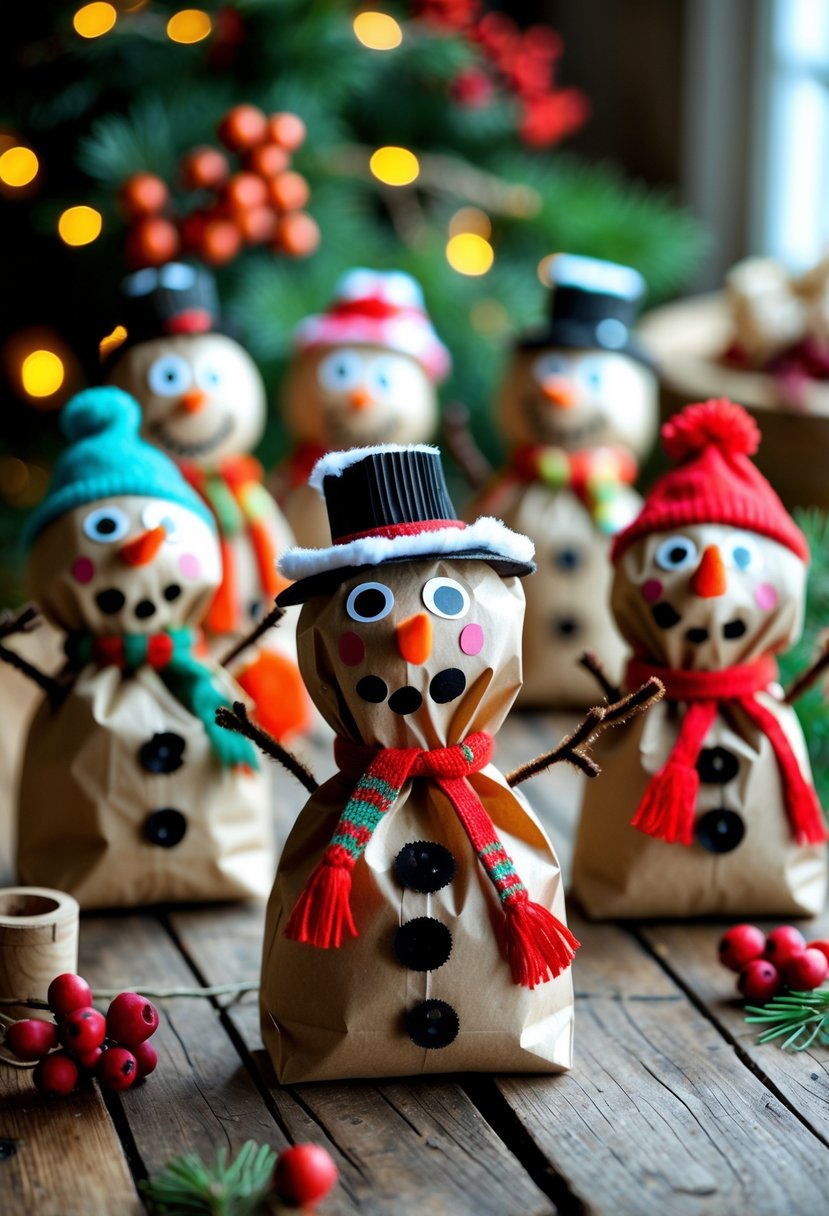
Step 6: Dress Up Your Snowman
Wrap a colorful strip of fabric or ribbon around the neck as a scarf. Tie it loosely and trim the ends for a fringed look.
If you want to go a step further, glue on a small felt hat, a paper top hat, or a tiny beanie made from the end of an old sock.
Step 7: Finishing Touches and Display
Add any final decorations—maybe a sprinkle of glitter for snow, a small bell on the scarf, or rosy cheeks using pink paint or a crayon.
Once finished, display your snowmen on a table, mantel, or windowsill. You can make a family of them in different sizes for a cozy winter scene.