
Table of Contents Show
Keeping kids busy can be tough, especially when you want something fun, simple, and not too messy. If you’re teaching the alphabet, planning a rainy-day activity, or need quick classroom centers, this list will help.

Here are 15 easy, kid-friendly crafts inspired by the letter S—each one looks like something that starts with S and highlights the letter shape.
Grab some basic supplies, and let’s jump into simple projects that spark learning and smiles.
1. Paper Plate Snake Spiral

This craft makes a colorful snake cut from a paper plate spiral with a friendly face and patterns along the body. Kids love watching the plate transform into a twisty snake that dangles and spins; it’s simple and satisfying for beginners.
Materials Needed:
- Paper plate (plain or white)
- Markers or paint
- Googly eyes
- Glue stick
- String for hanging
How to make it:
- 1. Draw a spiral on the plate starting from the rim to the center.
- 2. Cut along the spiral line to form a long snake body.
- 3. Decorate with spots, stripes, and glue on googly eyes; draw a tongue.
- 4. Tie a string through a small hole at the head and hang to display.
2. Handprint Sunshine Art

A bright sun with a round center and handprint rays makes a cheerful “S is for Sunshine” picture. Kids enjoy tracing and stamping their hands to form rays, and the sunny colors feel happy and quick to make.
Materials Needed:
- Yellow and orange construction paper
- White cardstock base
- Glue stick
- Pencil
- Marker for “S is for Sunshine”
How to make it:
- 1. Trace several handprints on yellow and orange paper and cut them out.
- 2. Cut a large yellow circle for the sun’s center.
- 3. Glue handprints around the circle as rays; add a smiley face.
- 4. Write “S is for Sunshine” at the bottom and display flat to dry.
3. Sock Puppet Seal

This sock puppet looks like a cute gray seal with whiskers and flippers, perfect for simple pretend play. Kids love bringing it to life with a silly voice; it’s easy, soft, and great for storytelling.
Materials Needed:
- Clean gray sock
- Felt (gray/white) for belly and flippers
- Googly eyes
- Yarn or thread for whiskers
- Fabric glue
How to make it:
- 1. Slide the sock over your hand to plan where the face will be.
- 2. Cut felt shapes for a white belly and flippers; glue them onto the sock.
- 3. Add googly eyes and yarn whiskers near the “nose” area.
- 4. Let glue set, then try your seal puppet show.
4. Sparkly Star Wand

A shiny star wand on a stick with ribbons makes “S is for Star” magical and fun. Kids love waving it around and choosing glitter and ribbon colors; it’s a quick, rewarding craft.
Materials Needed:
- Cardstock or craft foam (gold or any color)
- Wooden dowel or straw
- Ribbon scraps
- Glue or hot glue (adult help)
- Glitter or star stickers
How to make it:
- 1. Cut two matching star shapes from cardstock or foam.
- 2. Glue the dowel between the two stars to sandwich it.
- 3. Add ribbons at the base and decorate the star with glitter or stickers.
- 4. Let dry, then swish and play.
5. Seahorse Collage Cutouts

This project creates a colorful seahorse silhouette decorated with small paper shapes and textures. Kids enjoy choosing colors and patterns, and the curvy seahorse shape feels special without being hard to cut.
Materials Needed:
- Seahorse template or printed outline
- Colored paper scraps and tissue paper
- Glue stick
- Safety scissors
- Sequins (optional)
How to make it:
- 1. Trace and cut out a large seahorse shape from cardstock.
- 2. Cut small squares or shapes from colored paper and tissue.
- 3. Glue the pieces onto the seahorse, overlapping like scales; add sequins.
- 4. Let dry and mount on a contrasting background.
6. Sponge-Painted Spider Web
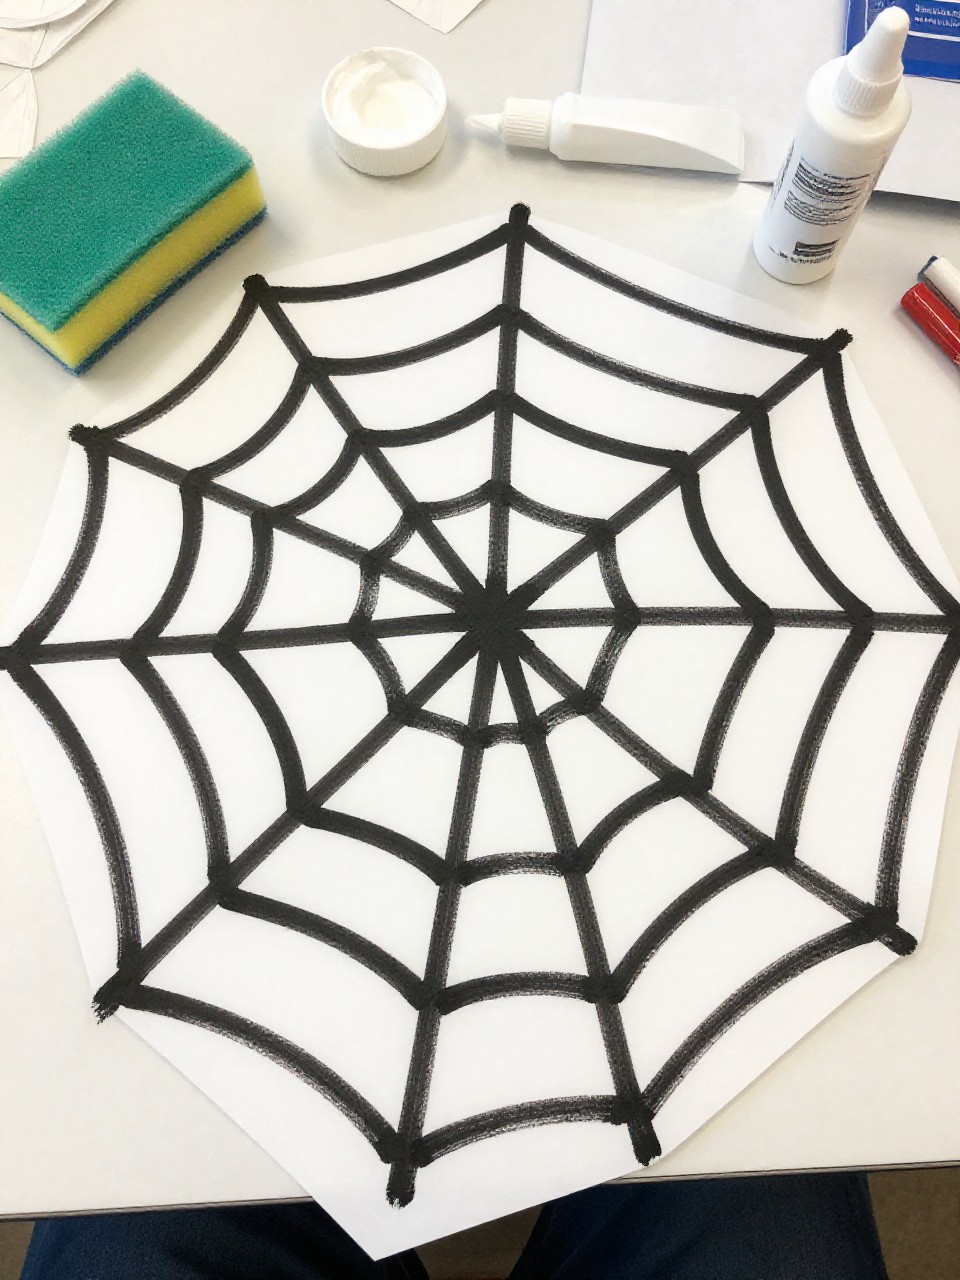
A spooky-fun spider web background with a small spider uses sponges and simple lines. Kids love dabbing paint with sponges and drawing bold web lines; it’s fast and a little messy in a good way.
Materials Needed:
- Black or dark blue construction paper
- White paint
- Small sponge pieces
- White gel pen or silver marker
- Black paper for spider (or pom-poms)
How to make it:
- 1. Lightly sponge white paint across the paper for a misty background; let dry.
- 2. Draw web lines from a corner with the gel pen or marker.
- 3. Cut a tiny black spider body and legs, or glue pom-poms.
- 4. Add eyes, let everything dry, and display.
7. Sailboat Stick Craft

A small sailboat made from craft sticks and a paper sail sits on a blue paper “sea.” Kids enjoy arranging sticks into a boat shape and choosing sail designs; it’s sturdy and cute.
Materials Needed:
- Craft sticks
- Blue and white cardstock
- Glue
- Marker or washi tape
- Small button or sticker for flag (optional)
How to make it:
- 1. Glue craft sticks into a simple boat hull on blue cardstock.
- 2. Cut a triangle sail from white cardstock and glue it above the hull.
- 3. Decorate the sail with stripes, dots, or washi tape; add a tiny flag.
- 4. Let dry flat and display on a wall or fridge.
8. S-Shaped Snake Letter Art

This craft forms the letter S into a friendly snake with patterns and a forked tongue. Kids like seeing a letter turn into an animal; it’s perfect for alphabet practice.
Materials Needed:
- Colored cardstock
- Pencil and scissors
- Markers or crayons
- Red paper for tongue
- Googly eyes
How to make it:
- 1. Draw a large bubble letter S on cardstock and cut it out.
- 2. Glue on googly eyes near the top curve and a small red tongue at the bottom.
- 3. Add spots, stripes, or scales with markers.
- 4. Flatten to dry and tape it up at kid height.
9. Simple Sunflower Paper Plate

A sunny yellow sunflower with a textured brown center made from seeds or paper bits. Kids love the big bold petals and pressing on the “seeds,” and it looks happy on any wall.
Materials Needed:
- Paper plate
- Yellow paint or paper for petals
- Brown tissue paper or dry beans/seeds
- Glue
- Green straw or paper stem (optional)
How to make it:
- 1. Paint the plate yellow or glue on yellow petal strips around the rim.
- 2. Add glue to the center and press in brown tissue bits or seeds.
- 3. Cut and attach a green stem and leaf if you like.
- 4. Let dry fully and display upright.
10. Salt Dough Seashell Prints

Make small salt dough discs pressed with real seashells to leave “S is for Seashell” textures. Kids enjoy mixing, pressing, and seeing prints appear; it doubles as a keepsake.
Materials Needed:
- Salt dough (1 cup flour, 1/2 cup salt, water as needed)
- Seashells
- Rolling pin
- Baking sheet or air-dry surface
- Paint (optional)
How to make it:
- 1. Mix salt dough and roll it to about 1/4 inch thick.
- 2. Cut circles and press seashells to make deep prints.
- 3. Let air-dry or bake per recipe; cool completely.
- 4. Paint lightly to highlight textures if desired.
11. Snowy Snowman Scene

A simple snowman with cotton ball snow on a blue background creates a cozy winter “S is for Snowman” scene. Kids like sticking on puffy snow and giving the snowman a scarf and smile.
Materials Needed:
- Blue cardstock
- White paper circles or cotton balls
- Glue
- Scraps for hat, nose, scarf
- Black marker for eyes and buttons
How to make it:
- 1. Glue two or three white circles (or cotton balls) to build a snowman.
- 2. Add a paper hat, scarf, and an orange nose.
- 3. Draw eyes, mouth, and buttons; dot the sky with tiny cotton “flakes.”
- 4. Dry flat and hang up.
12. Straw-Stamped Starfish

This craft makes a bright starfish using cut straw ends dipped in paint to create dot textures. Kids love the stamping motion and the bumpy look that feels like real starfish skin.
Materials Needed:
- Orange or pink cardstock starfish shape
- Plastic drinking straw (ends cut into fringe)
- Paint (white, yellow)
- Paper plate palette
- Googly eyes (optional)
How to make it:
- 1. Cut a large starfish shape from cardstock.
- 2. Fringe the end of a straw and dip in paint on the palette.
- 3. Stamp dotted textures over the starfish; add googly eyes if you like.
- 4. Let dry and mount on blue paper “ocean.”
13. Superhero S Shield Badge

Create a bold superhero badge with a big letter S to pin or tape onto a shirt. Kids enjoy choosing colors and pretending to fly; it’s quick and encourages role play.
Materials Needed:
- Red, yellow, and blue cardstock
- Safety pin or tape loop
- Marker or foam letter S
- Glue stick
- Glitter pen (optional)
How to make it:
- 1. Cut a badge shape (diamond or circle) from cardstock.
- 2. Layer colors and glue a big S in the center.
- 3. Add outlines or sparkles with a glitter pen.
- 4. Tape or pin the badge to a shirt or cape.
14. Spin Art Swirling Galaxy

A swirling galaxy picture with stars uses a salad spinner or spin-art toy to spread paint in spiral patterns. Kids love the surprise designs and the easy spinning action.
Materials Needed:
- White cardstock circle (fits spinner)
- Washable paint (black, purple, blue)
- Salad spinner (craft-only) or spin-art machine
- White paint pen or star stickers
- Apron or table cover
How to make it:
- 1. Place the cardstock circle inside the spinner.
- 2. Drop small blobs of paint on the paper and spin.
- 3. Add white paint pen stars or stickers on top of the swirls.
- 4. Let dry and mount on black paper.
15. Standing Paper Shark

A simple gray paper shark that stands up with a folded base and a big smile. Kids enjoy adding fins and teeth and then “swimming” the shark across the table.
Materials Needed:
- Gray cardstock
- White paper for teeth and belly
- Black marker
- Glue stick
- Googly eye
How to make it:
- 1. Cut a shark body shape and a small folded strip to use as a stand.
- 2. Glue the folded stand under the belly so the shark stands upright.
- 3. Add a white belly, pointy teeth, and a googly eye; draw gills and fins.
- 4. Let glue set and play with your standing shark.