


Table of Contents Show
Keeping kids busy can be tough, especially when you want something simple that still feels special. If you’re looking for easy, hands-on ideas for home or the classroom, this list brings you fun “Letter R” projects that help kids learn while they create.
Each craft is beginner friendly and uses common supplies.
You’ll find colorful, playful ideas that turn the letter R into animals, objects, and scenes—let’s jump into the crafts!
1. Rainbow Letter R Collage
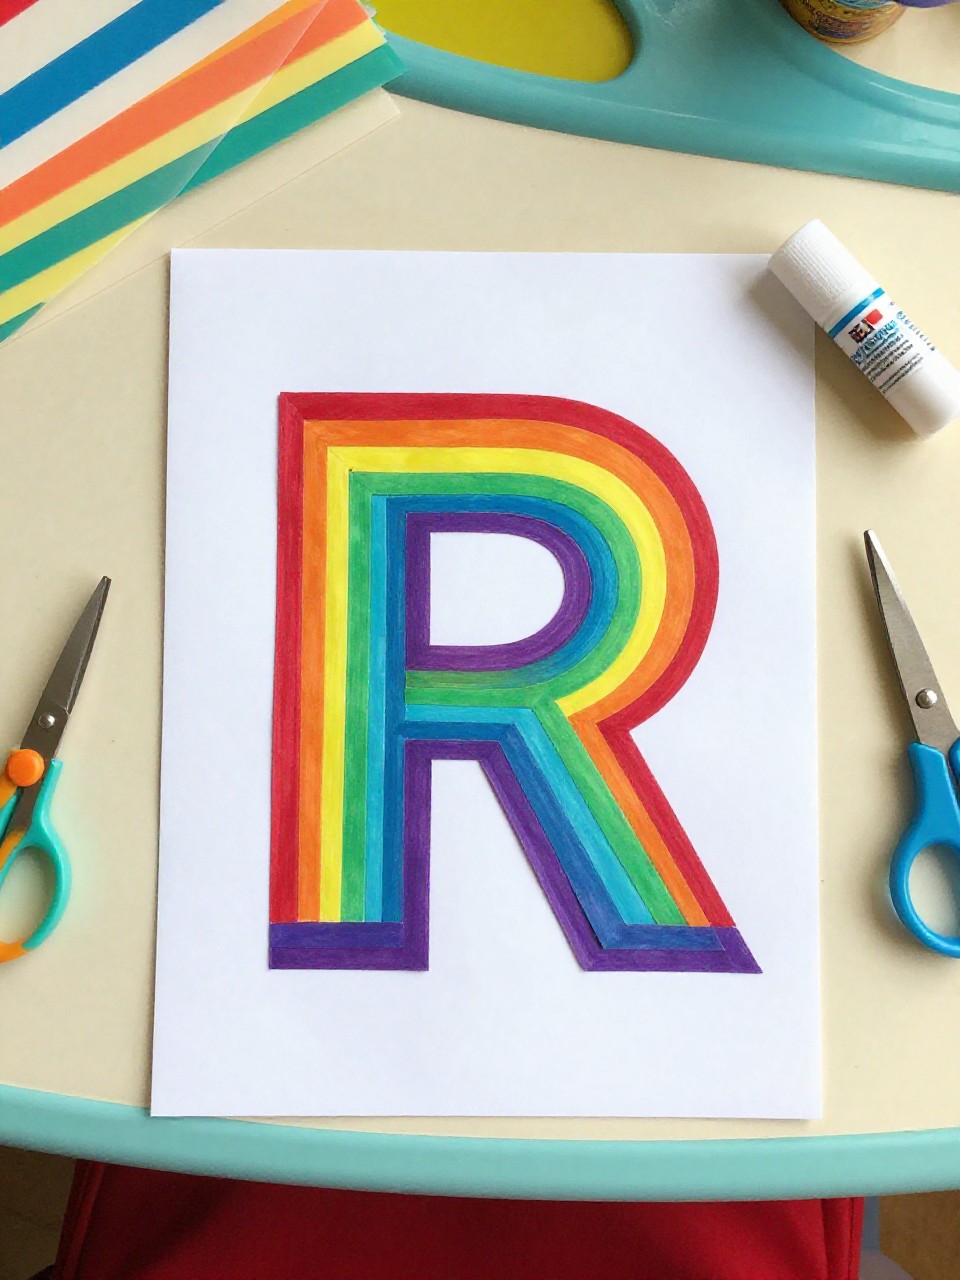
A big cut-out letter R gets covered in bright paper strips to make a bold rainbow design. Kids love choosing colors and building patterns, and it’s a great low-mess starter craft for all ages.
Materials Needed:
For People Who Love to Make Things ✂️
- Cardstock letter R (large)
- Colored paper strips
- Glue stick
- Safety scissors
- Optional: glitter or stickers
How to make it:
- 1. Cut a large R from cardstock or print and trace one.
- 2. Trim colored paper into thin strips and glue them across the R in rainbow order.
- 3. Add stickers or a glitter line at the edges for sparkle.
- 4. Let dry and hang on a wall or classroom display.
2. R is for Rocket Paper Craft

A tall letter R becomes a rocket with fins, windows, and fiery paper flames. Kids enjoy turning a letter into a vehicle and making “whoosh” sounds as they play.
Materials Needed:
- Construction paper (red, blue, yellow, orange)
- Printed or hand-drawn letter R base
- Glue stick
- Markers
- Optional: aluminum foil for shiny windows
How to make it:
- 1. Cut out a large R from cardstock as the rocket body.
- 2. Cut triangle fins and a rounded nose cone; glue them to the R.
- 3. Add circular windows and orange/yellow flame strips at the bottom leg of the R.
- 4. Draw stars on a background sheet and glue the rocket R on top.
3. Rope-Wrapped Rustic R
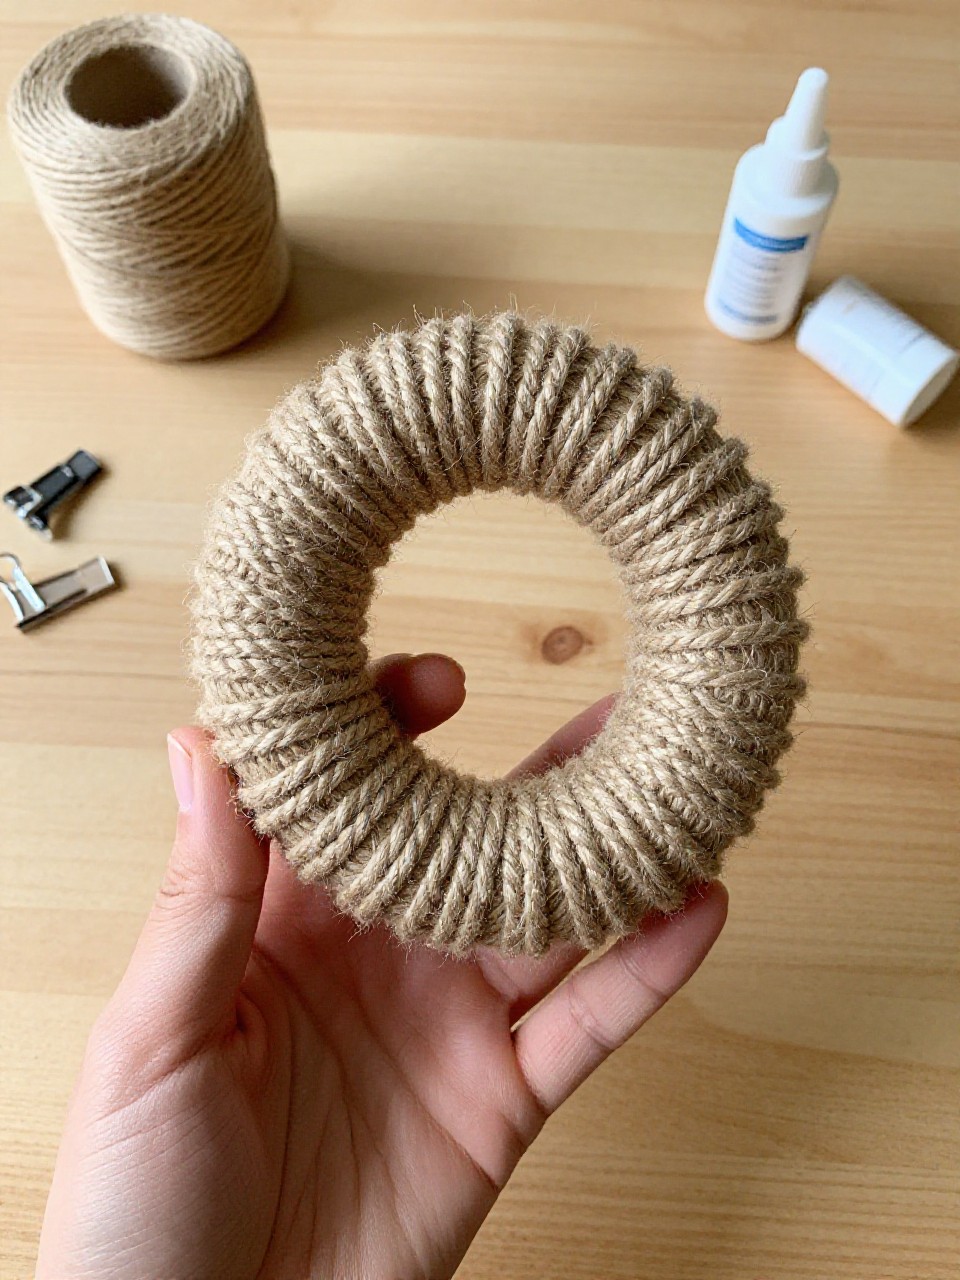
A sturdy cardboard R wrapped in twine or thin rope creates a cozy, rustic look. Kids like the hands-on wrapping and the textured feel, and it doubles as room decor.
Materials Needed:
- Cardboard letter R (cut from box)
- Jute twine or cotton rope
- White glue or tacky glue
- Clothespins or clips
- Optional: small felt flowers
How to make it:
- 1. Cut an R from corrugated cardboard.
- 2. Add glue in sections and wrap twine tightly around the R.
- 3. Clip ends with clothespins while drying; add felt flowers if you like.
- 4. Let dry completely and display on a shelf.
4. Rainbow Rice Sensory R
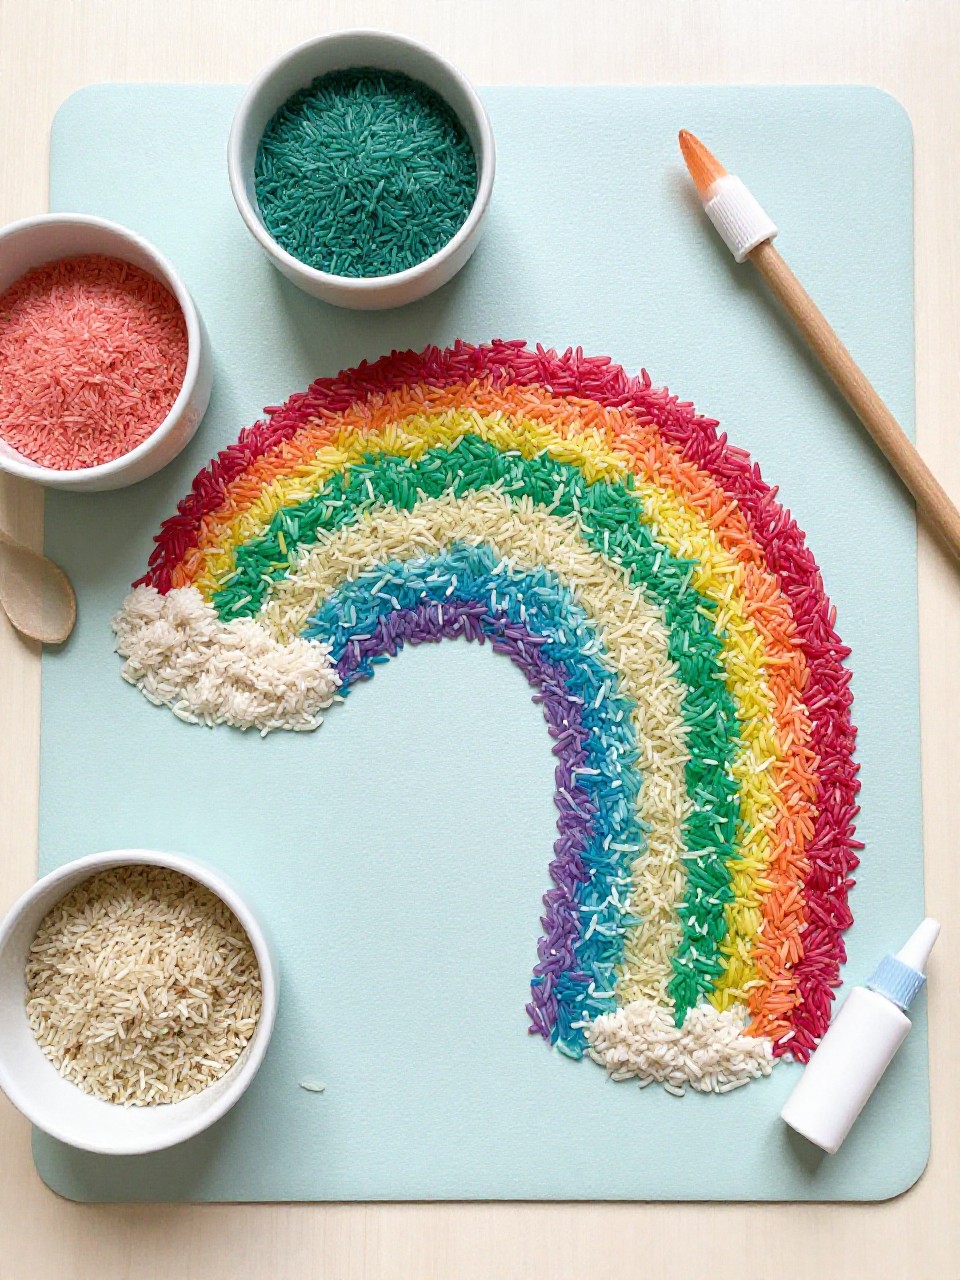
A chunky R is filled with glued rainbow-dyed rice for a colorful, bumpy mosaic. Kids enjoy the sensory sprinkle-and-press step and watching the colors pop.
Materials Needed:
- Cardboard letter R with thick outline (frame)
- White glue
- Dyed rice (multiple colors)
- Spoon
- Tray to catch rice
How to make it:
- 1. Cut two R’s; cut the inside out of one to make a frame and glue it on top of the solid R.
- 2. Squeeze glue inside the framed R.
- 3. Spoon colored rice in sections to make rainbow stripes; press gently.
- 4. Shake off extra rice onto the tray and let dry.
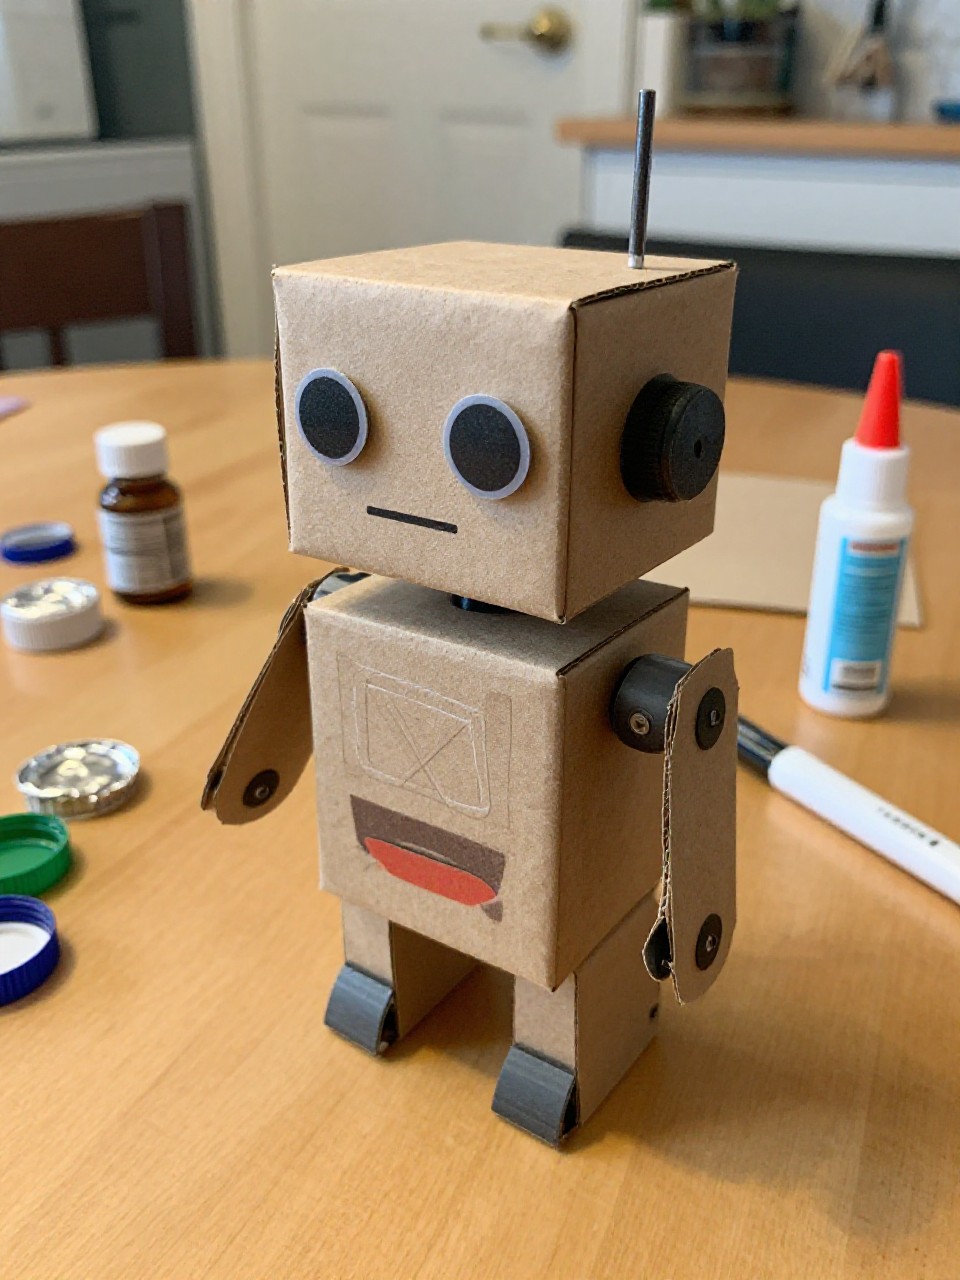
5. R is for Robot Shape Craft
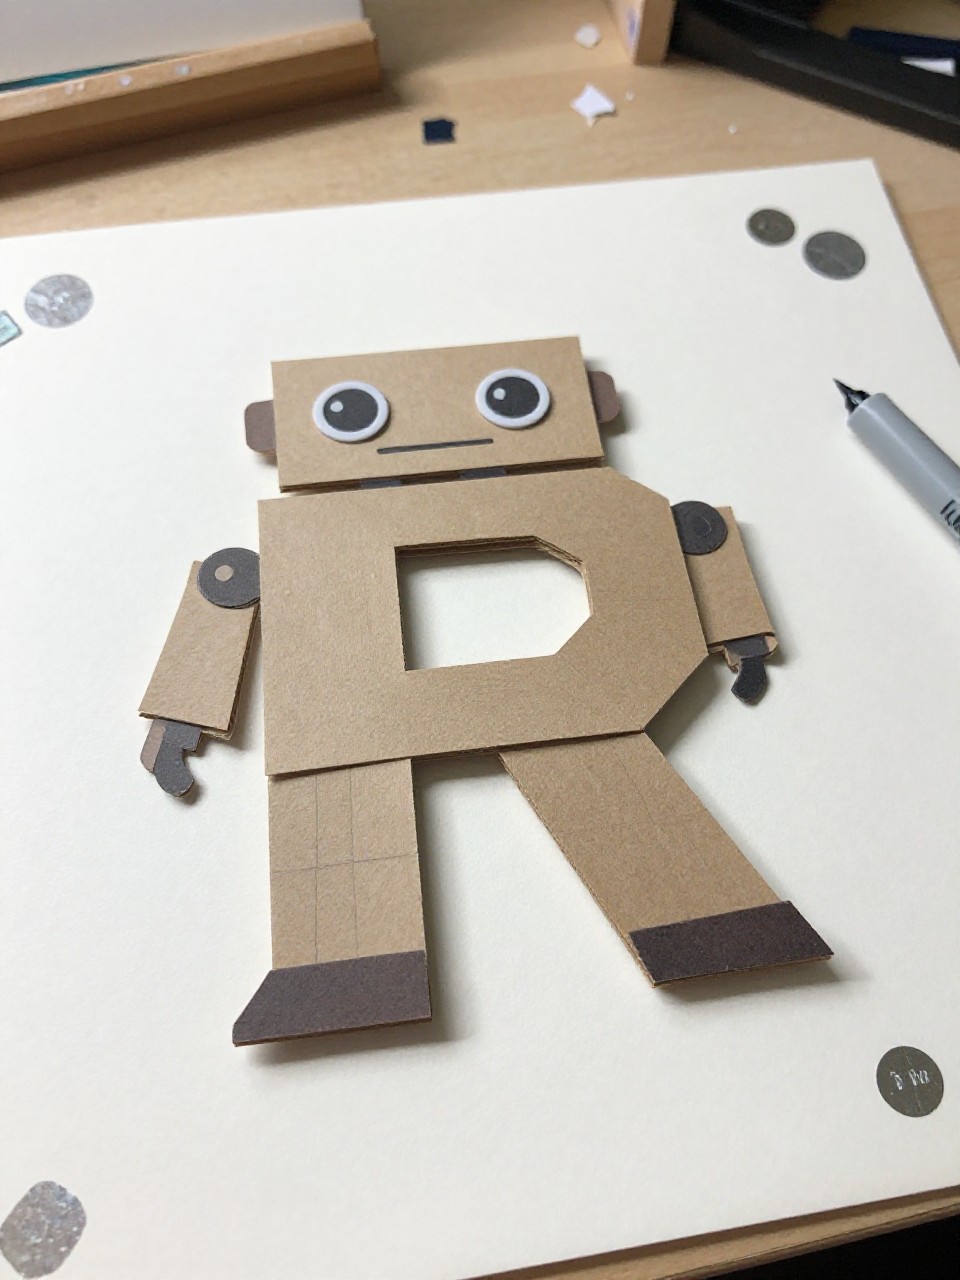
Turn the letter R into a friendly robot with rectangle arms, gear stickers, and a smiling face. Kids love giving their robot personality with buttons and dials.
Materials Needed:
- Gray or silver cardstock R
- Assorted paper shapes (rectangles, circles)
- Foil bits or metallic stickers
- Glue stick
- Black marker
How to make it:
- 1. Cut a large R from gray cardstock.
- 2. Glue rectangles for arms and circles for joints and buttons.
- 3. Add foil bits as shiny panels; draw a robot face and wires.
- 4. Let dry and display on a “R is for Robot” label card.
6. Rainbow Resist Watercolor R
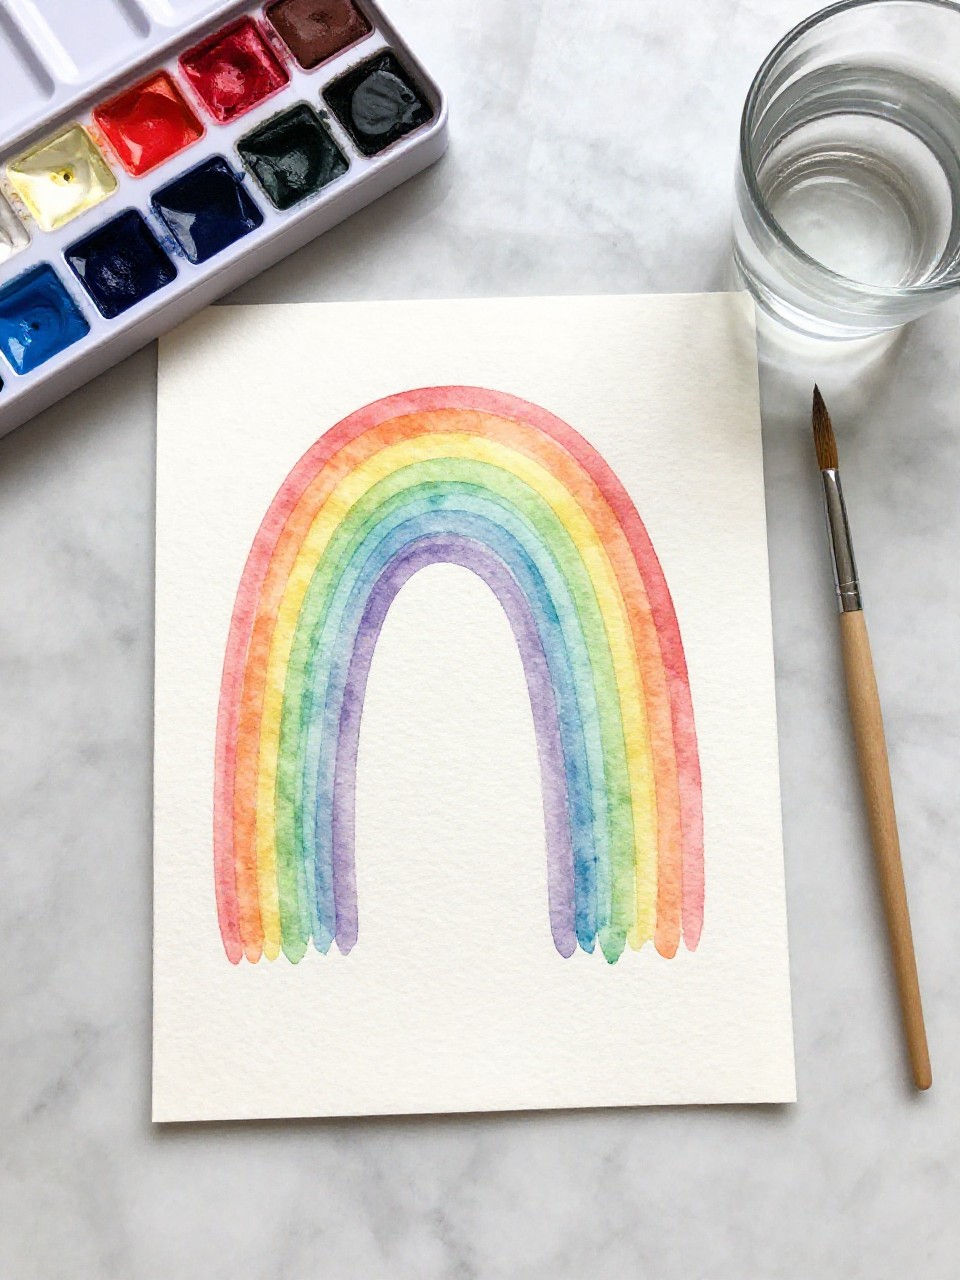
A white crayon hides secret lines on a big R that show up when painted with watercolor. Kids enjoy the “magic reveal” and mixing soft rainbow washes.
Materials Needed:
- Watercolor paper with large R outline
- White crayon or oil pastel
- Watercolor paints
- Paintbrush and water cup
- Paper towel
How to make it:
- 1. Draw or print a large R on watercolor paper.
- 2. Use white crayon to add stripes, stars, or tiny Rs inside the outline.
- 3. Paint over the whole R with rainbow watercolors to reveal the resist.
- 4. Blot extra water and let dry flat.
7. R is for Rain Cloud Mobile
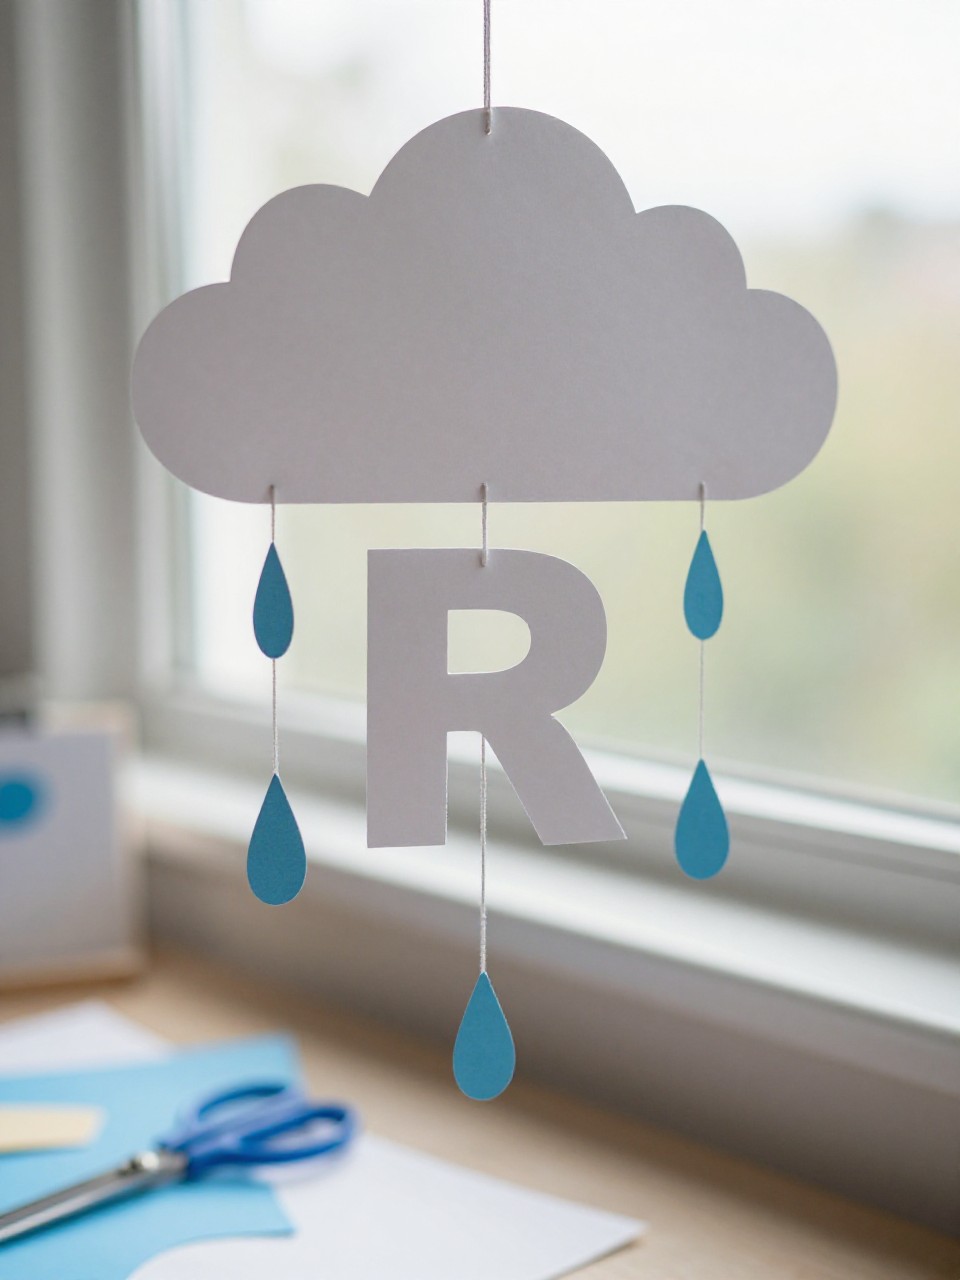
A letter R hangs under a soft cloud with raindrop strings in blue hues. Kids love watching it sway and choosing different shades for the drops.
Materials Needed:
- Cardstock R
- White felt or cotton balls (cloud)
- Blue paper or felt drops
- Yarn or thread
- Glue and tape
How to make it:
- 1. Cut and decorate a sturdy R.
- 2. Make a cloud from felt or glued cotton on a cardstock cloud base.
- 3. Tape yarn to the back of the cloud; glue blue drops along each string.
- 4. Hang the R from the cloud bottom and suspend the mobile to display.
8. Recycled Box Robot R
Use a cereal box to cut a big R and add bottle-cap eyes and cardboard gears for a recycled robot look. Kids enjoy hunting for “treasures” in the recycling bin and building something sturdy.
Materials Needed:
- Cereal box cardboard R
- Bottle caps, corrugated scraps
- Hot glue (adult help) or tacky glue
- Aluminum foil
- Markers
How to make it:
- 1. Cut a large R from a cereal box.
- 2. Wrap parts with foil for a metal effect.
- 3. Glue bottle caps as eyes and add corrugated gears and bolts.
- 4. Draw control panels and let everything dry before propping up.
9. R is for Rose Paper Bouquet
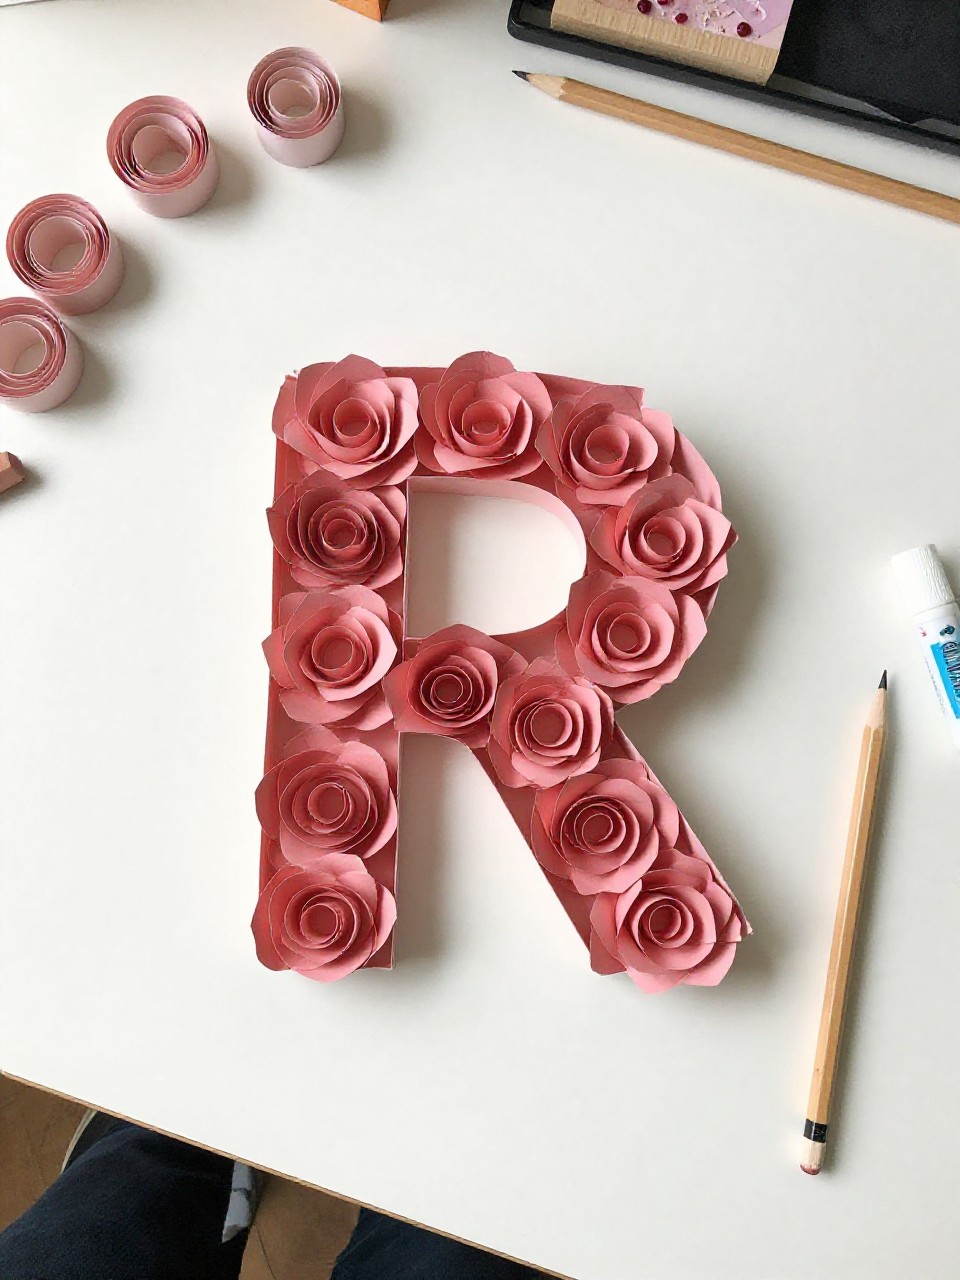
A pretty letter R becomes the stem base for rolled paper roses in pinks and reds. Kids love rolling the spirals and seeing a small “bouquet” grow.
Materials Needed:
- Green cardstock R
- Colored paper (pinks, reds)
- Glue stick or tacky glue
- Pencil for rolling
- Optional: leaf cutouts
How to make it:
- 1. Cut a large green R.
- 2. Cut spiral circles from pink and red paper; roll around a pencil and glue the base.
- 3. Glue roses along the R’s curves; add leaves near clusters.
- 4. Press flat to set and display upright.
10. Racing Road Letter R
Create a roadway R by painting dashed lines and parking spots, then add tiny paper cars. Kids enjoy driving fingers along the road and parking their “cars.”
Materials Needed:
- Thick cardboard R
- Black paint or paper to cover
- White paint pen or marker (dashes)
- Colored paper cars or stickers
- Glue
How to make it:
- 1. Cover the R with black paint or black paper.
- 2. Draw dashed center lines and small parking boxes.
- 3. Cut and glue simple paper cars or add stickers.
- 4. Let dry and use as a mini play road.
11. R is for Rainbow Fish with R Scales
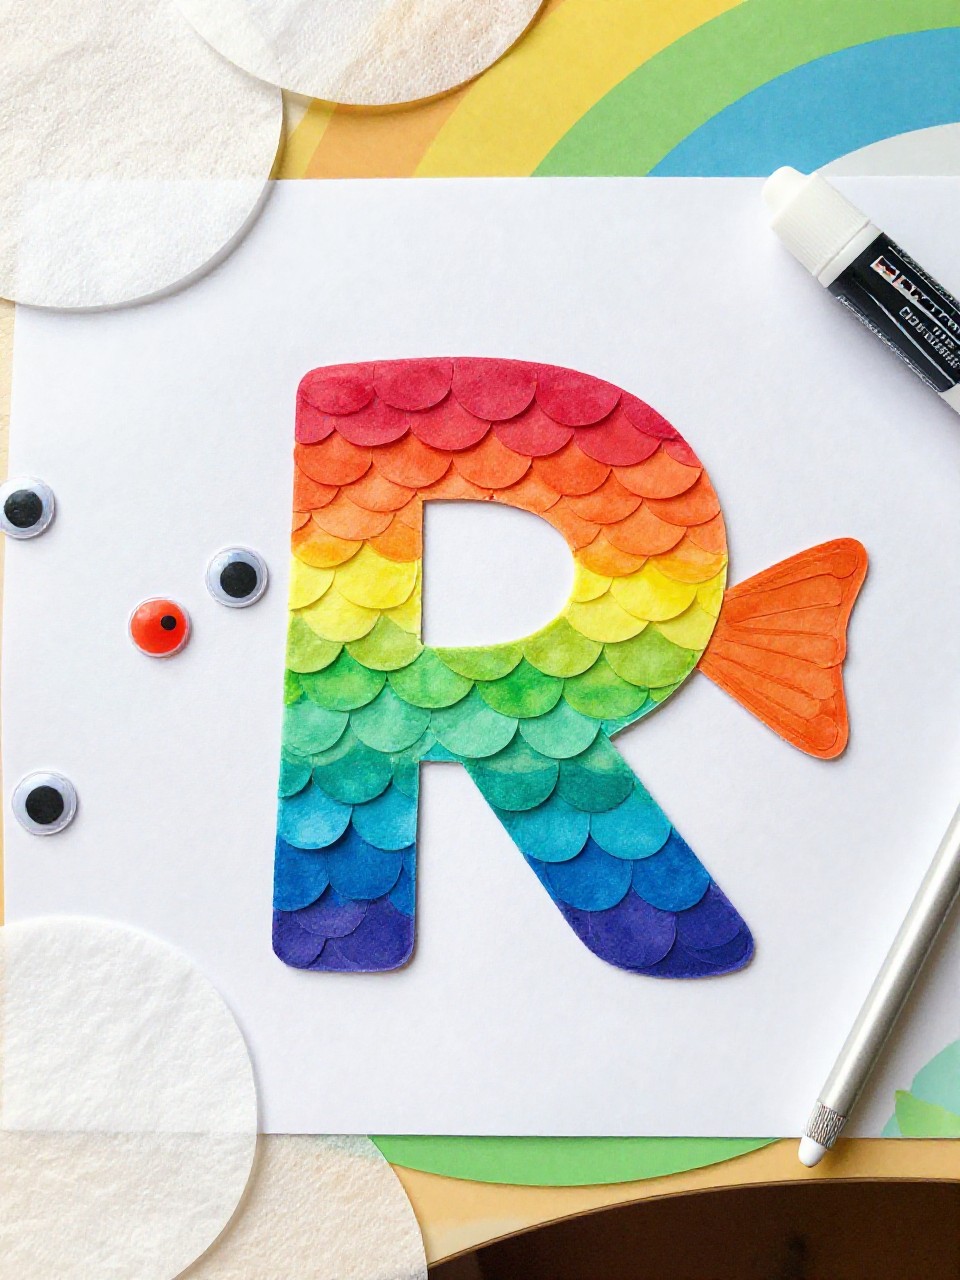
A fish body sits behind an R frame, and the R is filled with bright “scales” made from tissue circles. Kids love layering tissue pieces and seeing the fish peek through.
Materials Needed:
- Cardstock R frame
- Fish body cutout (construction paper)
- Tissue paper circles
- Glue stick
- Googly eye
How to make it:
- 1. Cut a fish shape and glue it to a background sheet.
- 2. Place an R frame over part of the fish body.
- 3. Fill the R opening with overlapping tissue circles as scales; add a googly eye.
- 4. Smooth everything and let dry flat.
12. Rock Garden Letter R
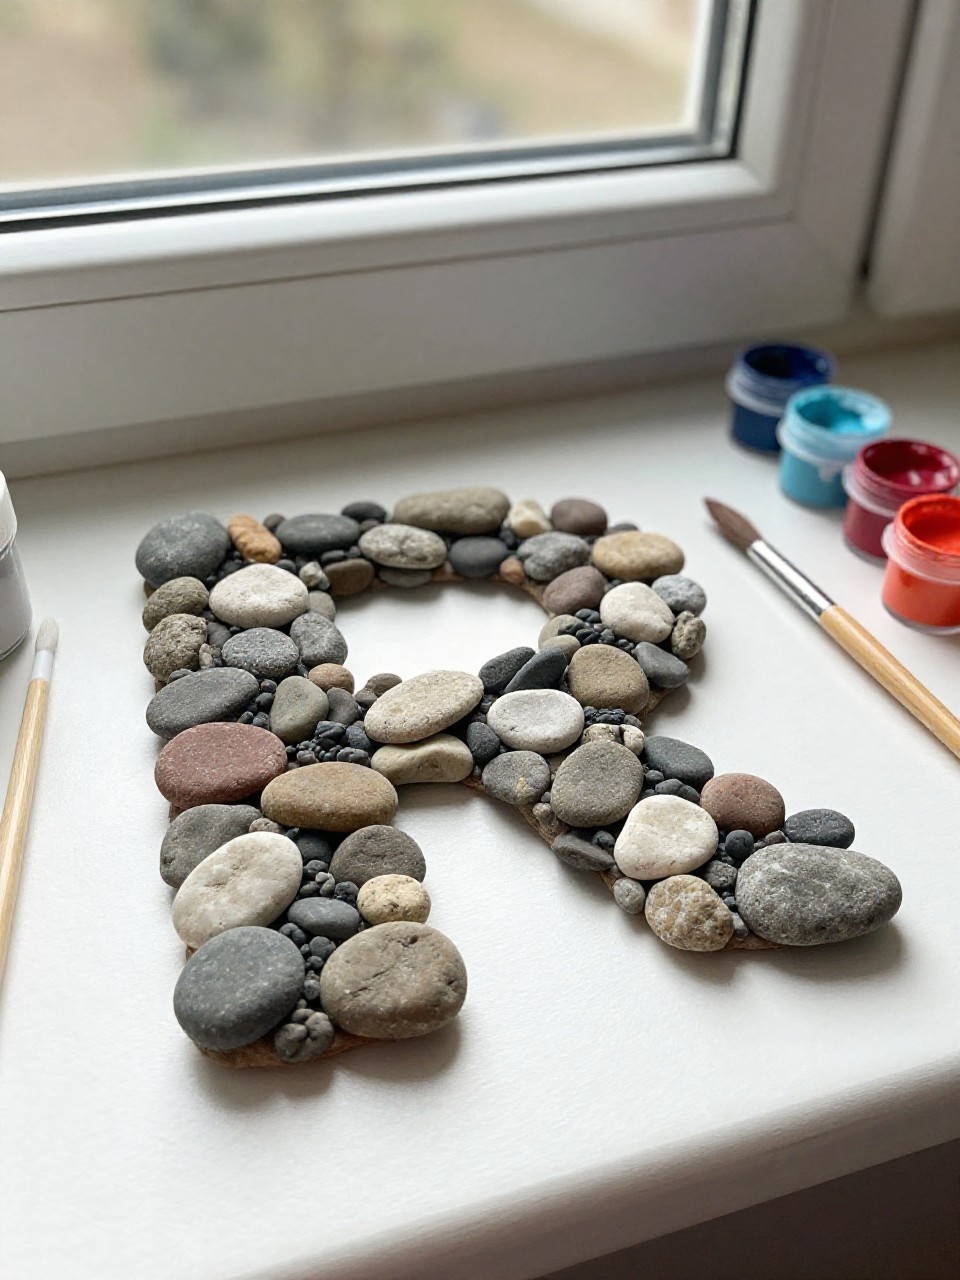
Decorate a wooden or cardboard R with tiny painted pebbles to make a mini “rock garden.” Kids enjoy painting small rocks and arranging patterns.
Materials Needed:
- Wooden or cardboard letter R
- Small smooth pebbles
- Acrylic paint and brushes
- Strong glue
- Optional: moss or faux greenery
How to make it:
- 1. Paint pebbles in bright or earth tones and let them dry.
- 2. Arrange pebbles along the R’s outline to test the layout.
- 3. Glue stones in place; tuck small moss bits in gaps if desired.
- 4. Dry completely before standing it up to display.
13. R is for Rabbit Paper Plate Mask
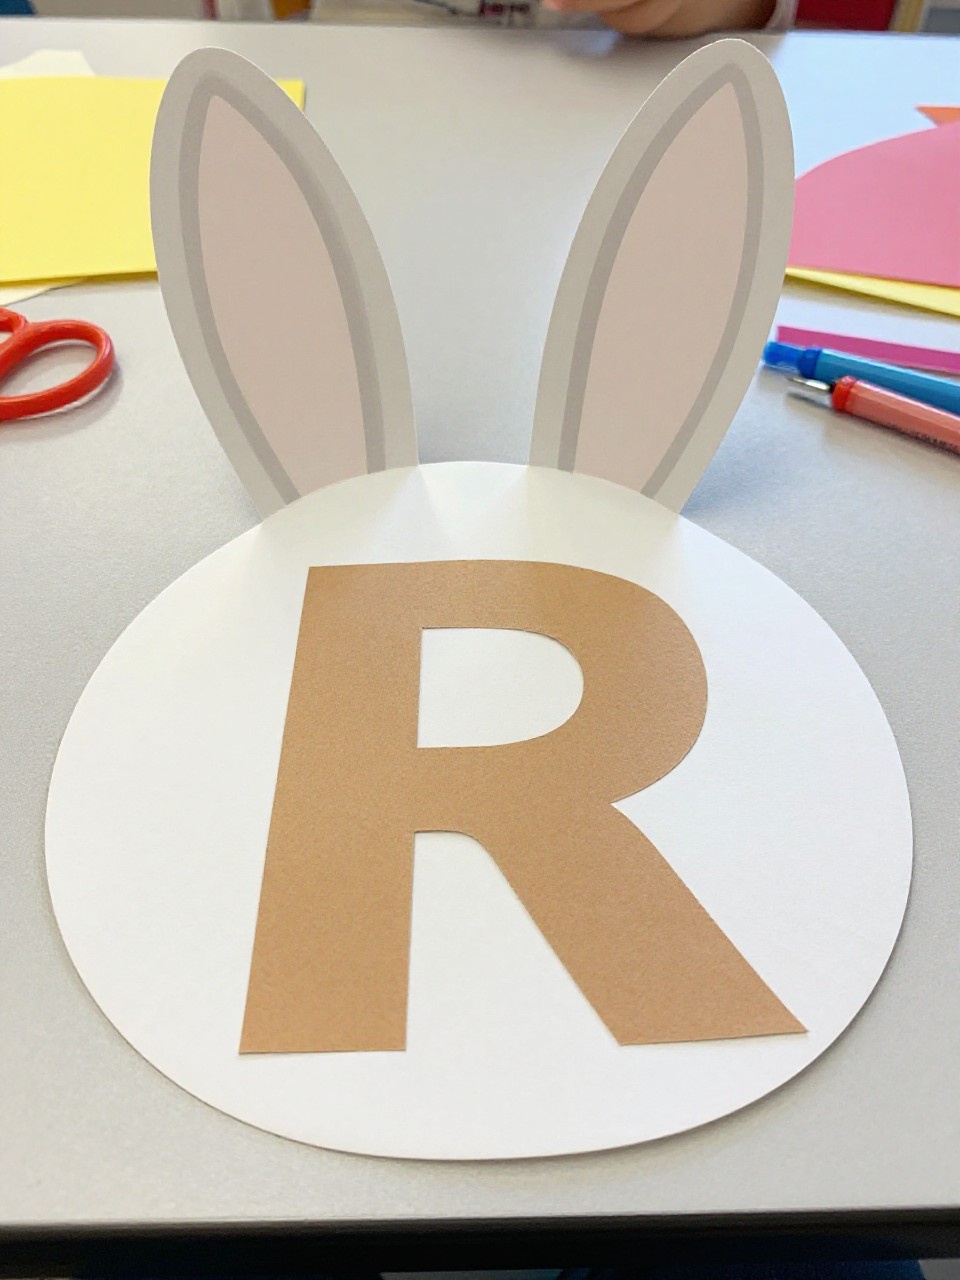
A paper plate becomes a rabbit face with tall R-shaped ears and a pink nose. Kids love trying on the mask and pretending to hop around.
Materials Needed:
- Paper plate
- Construction paper (white, pink, gray)
- Elastic string or craft stick
- Glue and scissors
- Marker for whiskers
How to make it:
- 1. Cut eye holes in the paper plate.
- 2. Cut two tall ears shaped like the letter R’s leg and curve; glue to the top.
- 3. Add a pink nose, inner ears, and whiskers with marker.
- 4. Attach elastic or a craft stick handle and try it on.
14. Rainforest Letter R Diorama
Build a shoebox rainforest where a big R sits like a tree trunk with leaves, vines, and tiny paper animals. Kids enjoy creating layers and learning about habitats.
Materials Needed:
- Shoebox
- Cardstock R (brown or green)
- Green paper leaves and vines (yarn)
- Animal stickers or cutouts
- Glue and tape
How to make it:
- 1. Line the shoebox with green or blue paper for sky and canopy.
- 2. Stand the R inside and tape it to the base.
- 3. Add paper leaves, yarn vines, and animal stickers around the R.
- 4. Close the box on its side to display the scene.
15. Ribbon-Tied Letter R Weaving
A cardboard R gets holes punched along the edges, and kids weave colorful ribbons through like laces. The weaving motion is calming, and the finished R looks bright and textured.
Materials Needed:
- Cardboard letter R
- Hole punch
- Assorted ribbons or yarn
- Tape (to wrap ribbon ends)
- Optional: beads for ends
How to make it:
- 1. Punch holes around the R about 1 inch apart.
- 2. Wrap tape around ribbon tips to make “needles.”
- 3. Weave ribbons in and out of the holes, mixing colors and directions.
- 4. Tie off ends, add beads if you like, and hang up.