


Table of Contents Show
If you have a little one who is currently obsessed with dinosaurs, you probably have a pile of plastic dinos taking over your living room floor. I’ve been there. It’s easy to run out of ideas to keep that fascination going in a way that doesn’t involve more screen time.

This list is full of simple, hands-on crafts that use stuff you probably already have at home.
Whether you need a rainy day activity or something to keep little hands busy while you make dinner, these projects will help your preschooler stomp, roar, and create to their heart’s content.
1. Paper Plate Dinosaur

This classic craft turns a simple paper plate into a friendly triceratops or stegosaurus. It’s easy enough for little hands to handle with minimal help, and the result is a cute, sturdy toy they can actually play with.
Materials Needed:
- Paper plate (one per dino)
- Paint (green, brown, or any color)
- Construction paper (for spikes or horns)
- Googly eyes
- Glue stick
How to make it:
- Step 1: Fold the paper plate in half to create the dinosaur’s body. This creates a 3D effect and a base for the face.
- Step 2: Have your child paint the folded plate and let it dry completely.
- Step 3: Cut out triangles from construction paper for spikes or horns and glue them along the spine or forehead. Add the googly eyes.
- Step 4: Let the glue dry before opening the plate slightly so it stands on its own.
2. Footprint Dinosaur

This craft makes a great keepsake by using your child’s actual footprint as the body of the dinosaur. It’s a little messy but very satisfying to watch their reaction when their foot becomes a giant creature.
Materials Needed:
- Washable paint (green or blue)
- White cardstock (thick paper works best)
- Paintbrush
- Marker (black)
- Wet wipes (for quick cleanup)
How to make it:
- Step 1: Paint the bottom of your child’s foot with a solid coat of washable paint.
- Step 2: Press their foot firmly onto the cardstock to make a footprint. Lift straight up to avoid smudging.
- Step 3: Wash their foot immediately. Once the paint is dry, turn the footprint so the toes are facing down. The heel becomes the head, and the toes become the spikes or frill.
- Step 4: Use a black marker to draw a face, legs, and a tail onto the footprint shape.
3. Clothespin Dinosaurs

These little guys are perfect for practicing fine motor skills. Kids can clip and unclip the clothespins to add legs and spikes, turning a simple craft into a fun building toy.
Materials Needed:
- Wooden clothespins
- Cardstock or craft foam (assorted colors)
- Markers or paint
- Glue
- Googly eyes
How to make it:
- Step 1: Color or paint the wooden clothespin to be the dinosaur’s body.
- Step 2: Cut out a small head and tail shape from cardstock or foam.
- Step 3: Glue the head and tail to the ends of the clothespin. Glue on googly eyes.
- Step 4: Clip additional clothespins along the back to create spikes or legs. No glue needed for these—they can be rearranged for more play.
4. Egg Carton Triceratops

Upcycle an old egg carton into a bumpy, textured triceratops. The carton’s natural shape makes the perfect dinosaur body with very little cutting required.
Materials Needed:
- Cardboard egg carton
- Paint
- Pipe cleaners
- Googly eyes
- Scissors
How to make it:
- Step 1: Cut the egg carton so you have three cups connected in a row. This will be the body.
- Step 2: Paint the entire piece and let it dry. This might take two coats.
- Step 3: Cut a small slit in the front cup and insert a short pipe cleaner for the horn. You can also poke two holes in the top for a pipe cleaner frill.
- Step 4: Glue on googly eyes and bend the pipe cleaners to shape the horns and frill.
5. Dinosaur Hatching from Egg

This craft has a fun surprise—a baby dinosaur hiding inside a cracking egg. It’s great for storytelling and imagining baby dinos hatching.
Materials Needed:
- Construction paper (brown, white, and a dino color)
- Scissors
- Glue
- Markers
- Brass fasteners (optional, for moving eggshells)
How to make it:
- Step 1: Cut out an oval shape from brown or white paper for the egg. Cut a zigzag line across the middle to create the cracked shell.
- Step 2: Cut out a small dinosaur shape from colored paper.
- Step 3: Glue the dinosaur behind the egg so it peeks out from the crack. If you want the shell to open and close, use brass fasteners to attach the shell pieces to a backing paper.
- Step 4: Draw details like spots or eyes on the dinosaur with markers.
6. Salt Dough Fossils

This is a sensory-friendly craft that feels like playdough but hardens into real-looking fossils. Kids love pressing things into the dough and seeing the imprint left behind.
Materials Needed:
- Flour
- Salt
- Water
- Small plastic dinosaurs (or dino skeletons)
- Rolling pin
- Baking sheet
How to make it:
- Step 1: Mix 2 cups flour, 1 cup salt, and 1 cup water to form a dough. Knead until smooth.
- Step 2: Roll out the dough flat with a rolling pin.
- Step 3: Press plastic dinosaurs firmly into the dough to make imprints. Lift them out carefully.
- Step 4: Bake at a low temperature (around 200°F) for a few hours until hard, or air dry for a couple of days.
7. Pasta Skeleton Dinosaur

Use different shapes of dry pasta to build a dinosaur skeleton on paper. It’s a clever way to talk about bones while letting kids sort and design with textures.
Materials Needed:
- Black or dark blue construction paper
- Assorted dry pasta (spaghetti, macaroni, rotini, shells)
- White glue
- A picture of a dinosaur skeleton (for reference)
How to make it:
- Step 1: Look at a picture of a dinosaur skeleton together and talk about where the bones go.
- Step 2: Arrange the pasta on the paper to form a skeleton without gluing first. Use spaghetti for long bones and shells for the body.
- Step 3: Once the design is set, carefully glue each piece down.
- Step 4: Let the glue dry completely before moving the picture.
8. Handprint Stegosaurus

Similar to the footprint craft, this one uses a handprint to create the distinctive plates on a stegosaurus back. It’s personal and fun to compare hand sizes.
Materials Needed:
- Construction paper (green and a contrasting color)
- Paint (optional)
- Scissors
- Glue
- Marker
How to make it:
- Step 1: Trace your child’s hand on green paper and cut it out. This will be the stegosaurus body.
- Step 2: Cut out small triangles from the contrasting paper for the plates.
- Step 3: Glue the triangles along the curve of the handprint (the thumb side works well for the back).
- Step 4: Glue on a googly eye or draw one with a marker. Add a small smile.
9. Paper Bag Dinosaur Puppet

These puppets are perfect for putting on a show. A simple lunch bag becomes a roaring dinosaur mouth that actually opens and closes.
Materials Needed:
- Brown paper lunch sack
- Construction paper
- Glue
- Markers or paint
- Googly eyes
How to make it:
- Step 1: Place the paper bag with the flap facing up. The flap will be the mouth.
- Step 2: Paint or color the entire bag green or your dino color.
- Step 3: Cut out spikes, a tongue, and any other details from construction paper. Glue them onto the bag.
- Step 4: Glue googly eyes above the flap. To make it talk, put your hand inside and move the flap up and down.
10. Paper Roll Dinosaurs

Toilet paper rolls are a crafting staple for a reason. With a little folding and painting, they transform into standing dinosaurs that are the perfect size for small world play.
Materials Needed:
- Empty toilet paper roll
- Paint
- Construction paper
- Scissors
- Glue
How to make it:
- Step 1: Paint the toilet paper roll and let it dry.
- Step 2: Flatten the roll slightly. Cut four small slits near the bottom to insert legs, or cut two arches on each side to shape the legs.
- Step 3: Cut out a head and tail from construction paper and glue them to the roll.
- Step 4: Add spikes, spots, or googly eyes to finish the face.
11. Bubble Wrap Dinosaur Painting
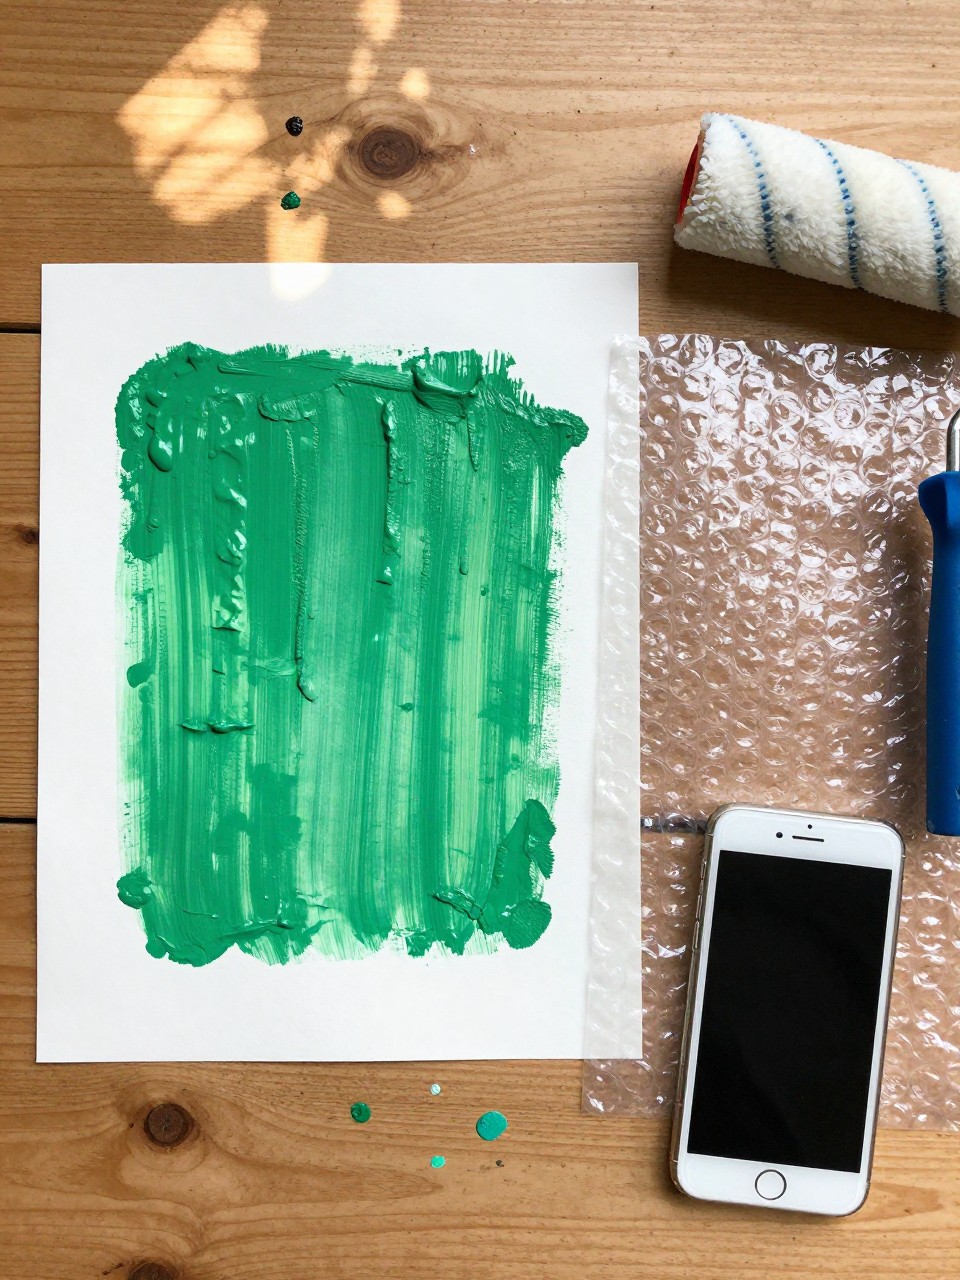
This craft is less about the final product and more about the process. Painting on bubble wrap and making prints is a sensory delight for preschoolers.
Materials Needed:
- Bubble wrap
- Paint
- Paper
- Tape (to hold bubble wrap down)
- Roller or paintbrush
How to make it:
- Step 1: Tape a piece of bubble wrap to the table, bubble side up.
- Step 2: Let your child paint directly onto the bubble wrap. Use different colors.Step 3: Gently press a piece of paper on top of the painted bubble wrap and rub lightly.
- Step 4: Peel the paper off to reveal a bumpy, textured print. Once dry, you can cut it into a dinosaur shape.
12. Coffee Filter Dinosaur

This craft combines a simple science experiment with art. Watching the colors bleed on the coffee filter is mesmerizing for little ones.
Materials Needed:
- Coffee filters
- Washable markers
- Spray bottle with water
- Construction paper
- Scissors
How to make it:
- Step 1: Have your child color all over the coffee filter with washable markers.
- Step 2: Lay the filter on a tray and spray it lightly with water. Watch the colors run and blend.
- Step 3: Let the filter dry completely. Once dry, it will have a tie-dye effect.
- Step 4: Cut out a dinosaur head, legs, and tail from construction paper and glue them onto the filter to create the body.
13. Dinosaur Sensory Bin

Okay, this is less of a traditional craft and more of a setup, but it provides hours of engagement. Let kids help you mix the “dirt” and place the rocks.
Materials Needed:
- Large plastic bin
- Play sand or dry rice/beans
- Small rocks or pebbles
- Plastic dinosaur figures
- Small cups and spoons
How to make it:
- Step 1: Fill the bottom of the bin with sand or dyed rice to create the ground.
- Step 2: Add small rocks, sticks, or fake plants to create a landscape.
- Step 3: Bury the plastic dinosaurs in the sand for kids to discover.
- Step 4: Add scoops, cups, and brushes for digging and cleaning the dinosaurs.
14. Paper Chain Dinosaur

This is a great craft for practicing cutting and gluing while building something three-dimensional. The paper chain makes a bumpy stegosaurus spine or a long tail.
Materials Needed:
- Construction paper (multiple colors)
- Scissors
- Glue or tape
- Printable dinosaur head template (or drawn freehand)
How to make it:
- Step 1: Cut construction paper into strips.
- Step 2: Glue or tape the strips into loops, linking them together to form a chain. This will be the dinosaur’s body or spine.
- Step 3: Cut out a dinosaur head and tail from paper.
- Step 4: Attach the head and tail to the ends of the paper chain.
15. Dinosaur Mask

Let your child become their favorite dinosaur with a simple paper plate mask. It’s perfect for imaginative play and chasing siblings around the house.
Materials Needed:
- Paper plate
- Paint
- Construction paper (for spikes/horns)
- Craft stick (or elastic string)
- Scissors
- Glue
How to make it:
- Step 1: Cut the paper plate in half. Cut out eye holes near the straight edge.
- Step 2: Paint the plate half and let it dry.
- Step 3: Glue on construction paper spikes along the top edge for a triceratops or dinosaur look.
- Step 4: Glue a craft stick to the bottom edge so your child can hold it up to their face, or punch holes and add elastic string.


