

Table of Contents Show
If you have a preschooler, you know community helpers week is coming. Maybe you’re a teacher prepping for a unit, or a parent who got the last-minute email about needing a costume or craft for tomorrow. I’ve been there. It’s easy to overthink it, but it doesn’t have to be complicated.
This list rounds up 17 simple, hands-on craft ideas that help little ones learn about the people who make our neighborhoods work—from firefighters to mail carriers.
Most use materials you already have at home, and they’re designed for small hands to actually do most of the work themselves.
1. Handprint Firefighter

This craft turns your child’s own hand into a heroic firefighter. It’s a personal keepsake that looks impressive on the fridge but only takes about ten minutes to put together.
Materials Needed:
- Red, black, and white washable paint
- Paintbrush
- Googly eyes
- Construction paper (yellow)
How to make it:
- Step 1: Paint your child’s entire palm and thumb red, then paint each finger individually with red to create the helmet shape.
- Step 2: Press the hand firmly onto white paper, fingers together, to make the print.
- Step 3: Once dry, glue on googly eyes above the thumb and draw a smile. Add a yellow badge cut from construction paper onto the helmet.
- Step 4: Use a black marker to draw on a coat and boots below the handprint.
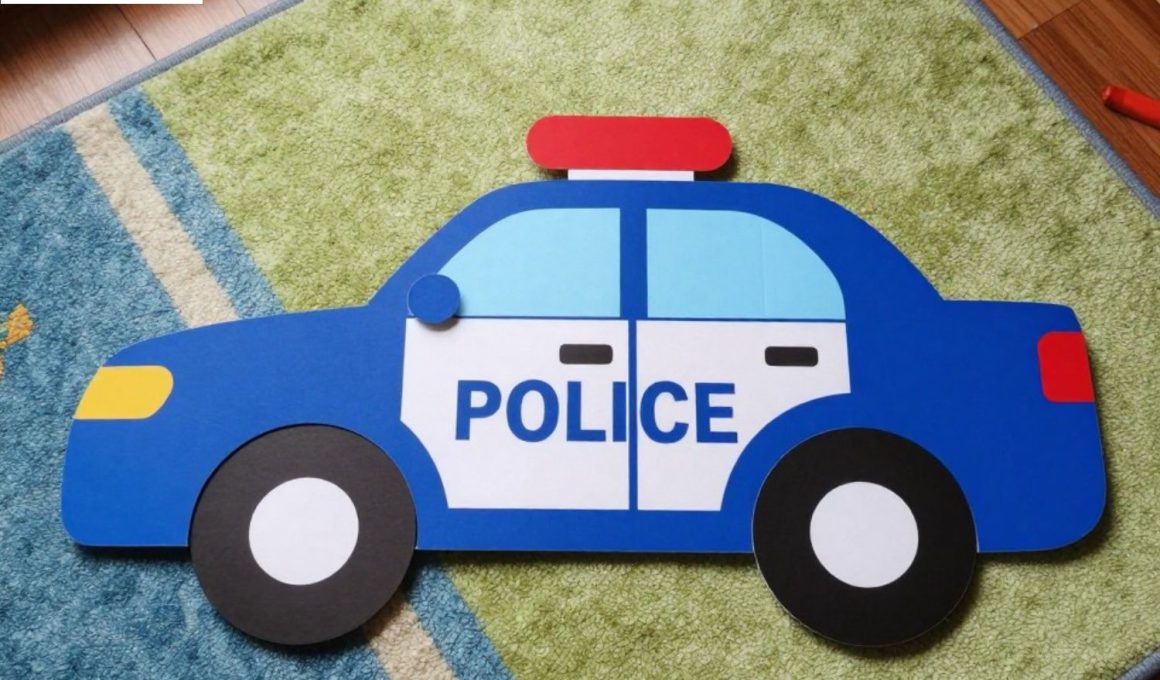
2. Shape Police Car
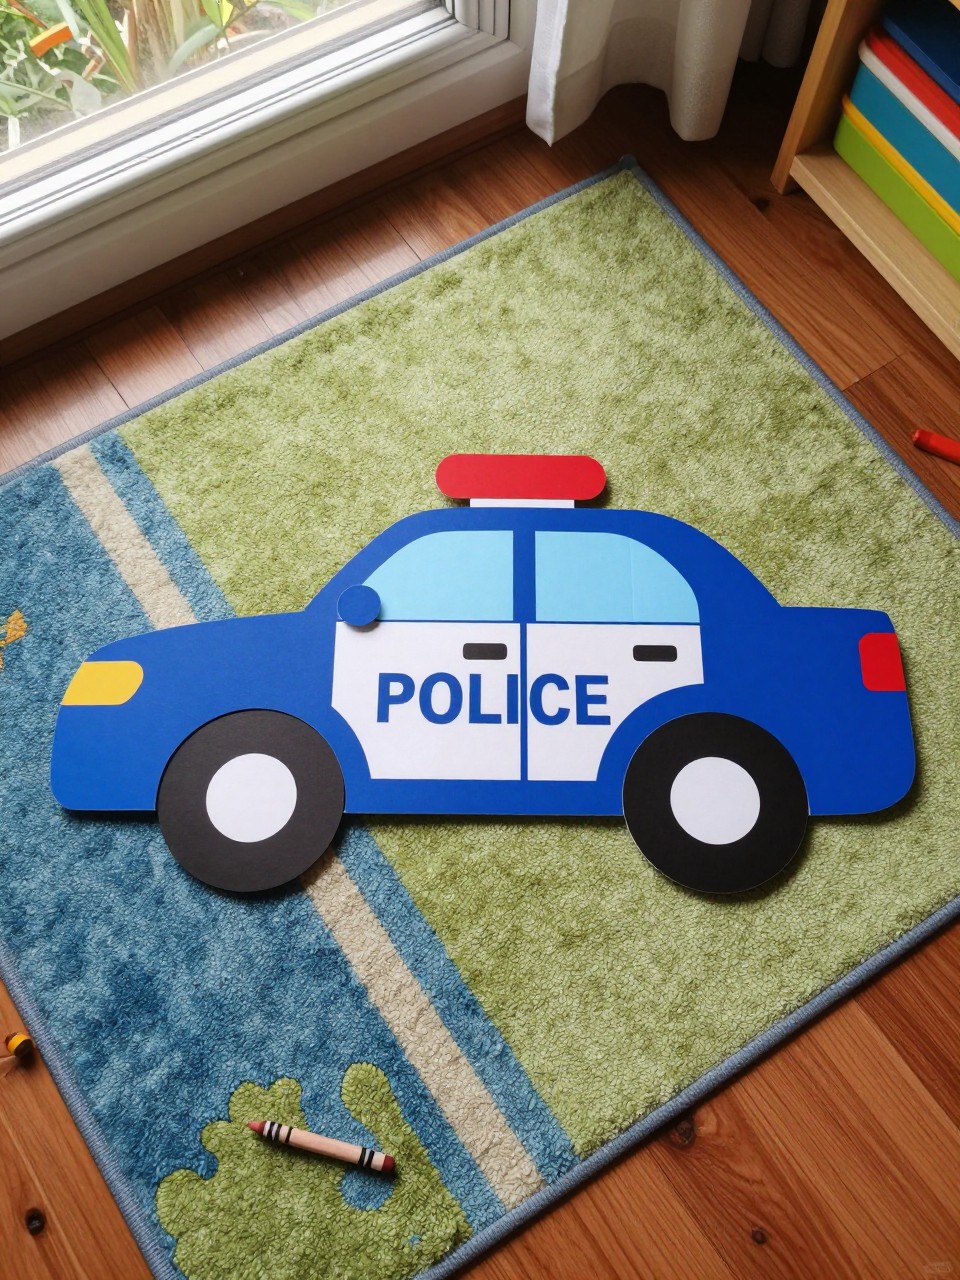
This project uses basic shapes to build a police car, making it a sneaky math lesson disguised as art. It’s satisfying for kids who like things neat and structured.
Materials Needed:
- Pre-cut construction paper shapes (large rectangle, small squares, circles)
- Glue stick
- Black marker
- Blue construction paper for background
How to make it:
- Step 1: Glue the large rectangle (the car body) onto the center of the blue paper.
- Step 2: Attach the small squares to the top and sides for windows and doors.
- Step 3: Glue the circles at the bottom for wheels. Add tiny black circles in the center of the wheels if you have them.
- Step 4: Draw on a simple star badge and the word “POLICE” with a black marker.
3. Paper Plate Doctor’s Kit

This opens and closes like a real bag, giving kids a prop they can actually play with afterward. The cross-top handle makes it feel authentic.
Materials Needed:
Two white paper plates
Red construction paper
Stapler
Markers or crayons
Medical tape or cotton balls
How to make it:
- Step 1: Place the two plates together with the eating surfaces facing each other. Staple halfway around the edges, leaving the top open.
- Step 2: Cut a strip of red paper and staple it to the top as a handle.
- Step 3: Let kids decorate the “bag” with a red cross or “Dr. [Name]” using markers.
- Step 4: Fill the kit with cotton balls, a popsicle stick tongue depressor, and pieces of medical tape.
4. Toilet Paper Roll Construction Worker

This gives a boring old cardboard tube a second life as a hard-working builder. It stands up on its own, which kids find endlessly cool.
Materials Needed:
- Empty toilet paper roll
- Yellow and brown construction paper
- Glue
- Mini popsicle stick
- Small play-doh tool or toothpick
How to make it:
- Step 1: Wrap the cardboard tube with yellow paper and glue it in place.
- Step 2: Cut a small hard hat shape from brown paper and glue it to the top of the tube.
- Step 3: Draw a face on the front. Glue on a tiny piece of popsicle stick as a “sign” the worker is holding.
- Step 4: Add a tiny tool (like a play-doh hammer) glued near the hand area.
5. Coffee Filter Mail Carrier
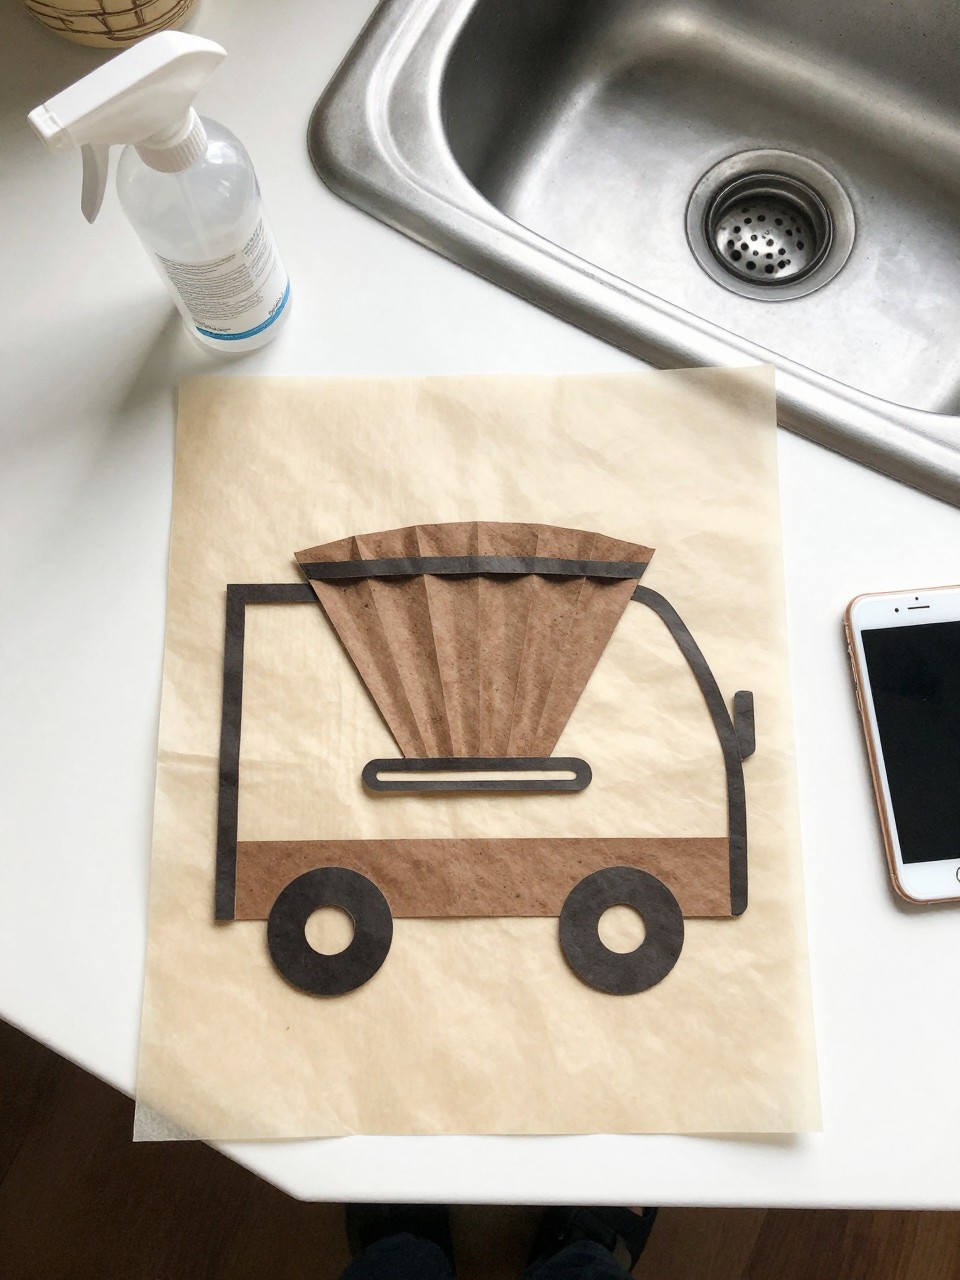
The magic of this craft is watching the white coffee filter absorb the colors to make a uniform. It feels almost like a science experiment.
Materials Needed:
- White coffee filter
- Washable markers
- Spray bottle with water
- Construction paper (brown and blue)
How to make it:
- Step 1: Color the entire coffee filter with blue washable markers.
- Step 2: Spray the filter lightly with water and watch the blue spread and blend. Let it dry completely.
- Step 3: While it dries, cut a small mailbag shape from brown paper and a strap from blue paper.
- Step 4: Once dry, lay the filter flat and glue the mailbag onto it. Draw a face above it.
6. Chef’s Hat and Spoon
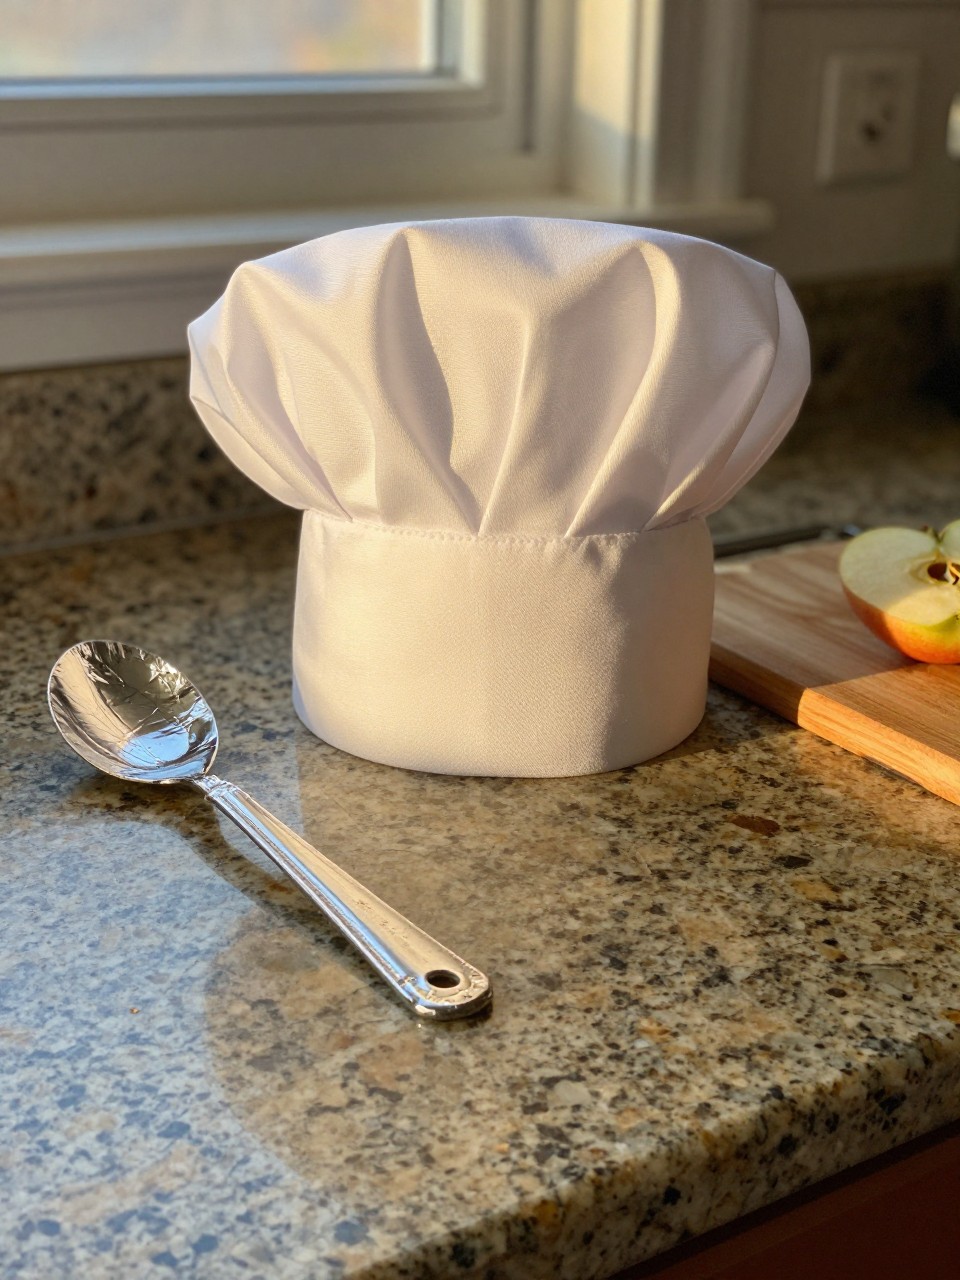
This is a wearable craft that doubles as a dress-up item. The puffy hat looks very official, even though it’s just paper.
Materials Needed:
- White construction paper (two sheets)
- White tissue paper
- Tape or stapler
- Aluminum foil
- Large wooden spoon
How to make it:
- Step 1: Tape or staple two sheets of white construction paper together end-to-end to form a headband that fits the child’s head.
- Step 2: Gather a sheet of tissue paper in the center and staple it to the inside of the headband to create the poofy hat top.
- Step 3: Wrap the bowl of the wooden spoon tightly with aluminum foil.
- Step 4: Let kids pretend to stir and cook while wearing the hat.
7. Paper Bag Firefighter Vest
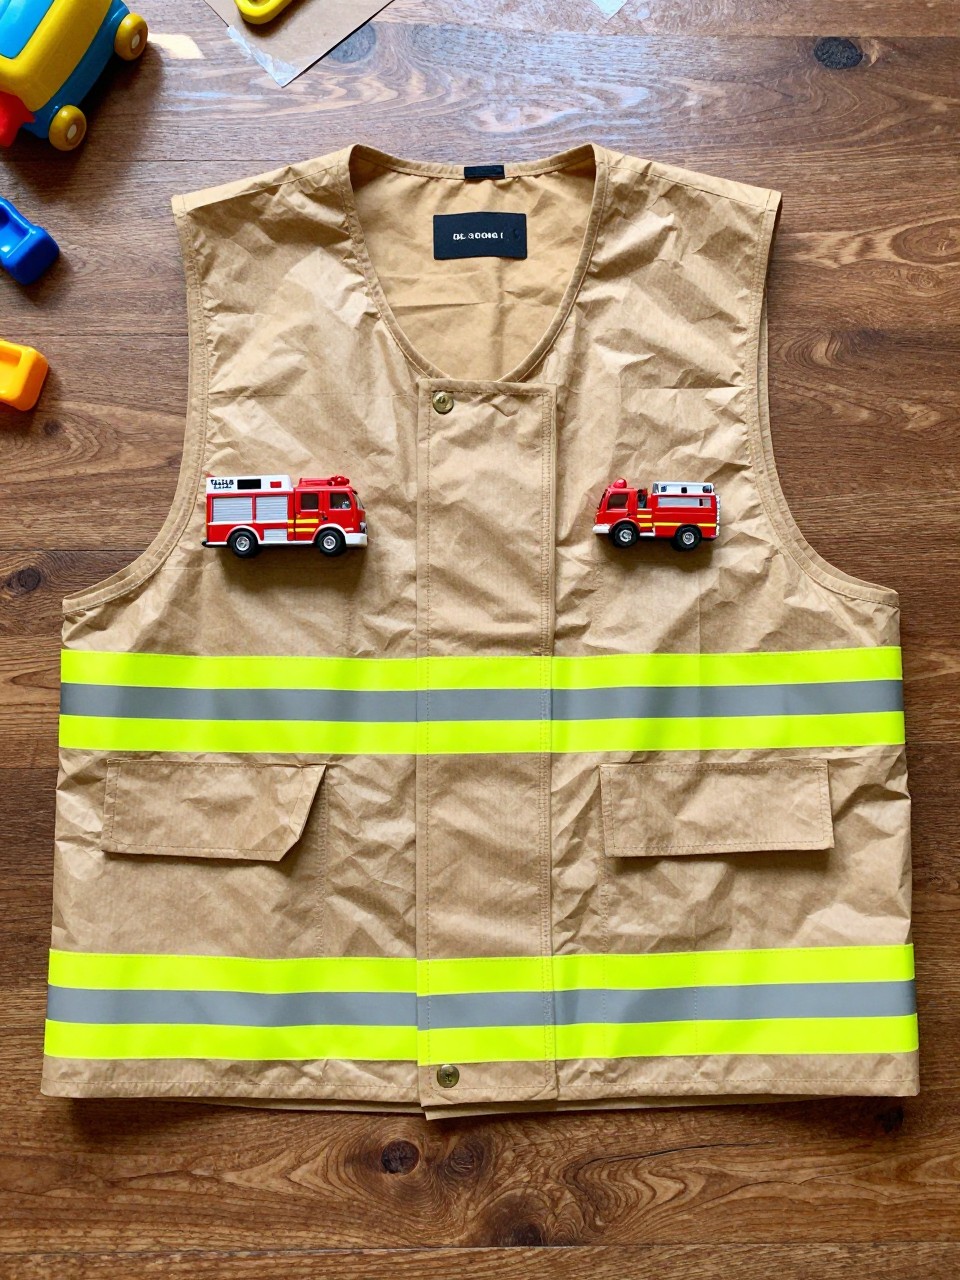
This turns a simple lunch sack into a piece of dramatic play clothing. It’s sturdy enough to withstand a whole afternoon of heroic play.
Materials Needed:
- Large brown paper grocery bag
- Scissors
- Red, yellow, and black paint or markers
- Yellow construction paper
- Glue
How to make it:
- Step 1: Cut the bag up the center front, then cut out a hole for the head and armholes.
- Step 2: Let the child paint or color the entire bag red. Let it dry.
- Step 3: Cut a badge shape from yellow paper and glue it to the front. Add a “fire department” number with marker.
- Step 4: Cut reflective strips from yellow paper and glue them around the bottom hem.
8. Q-Tip Skeleton for Doctor’s Office
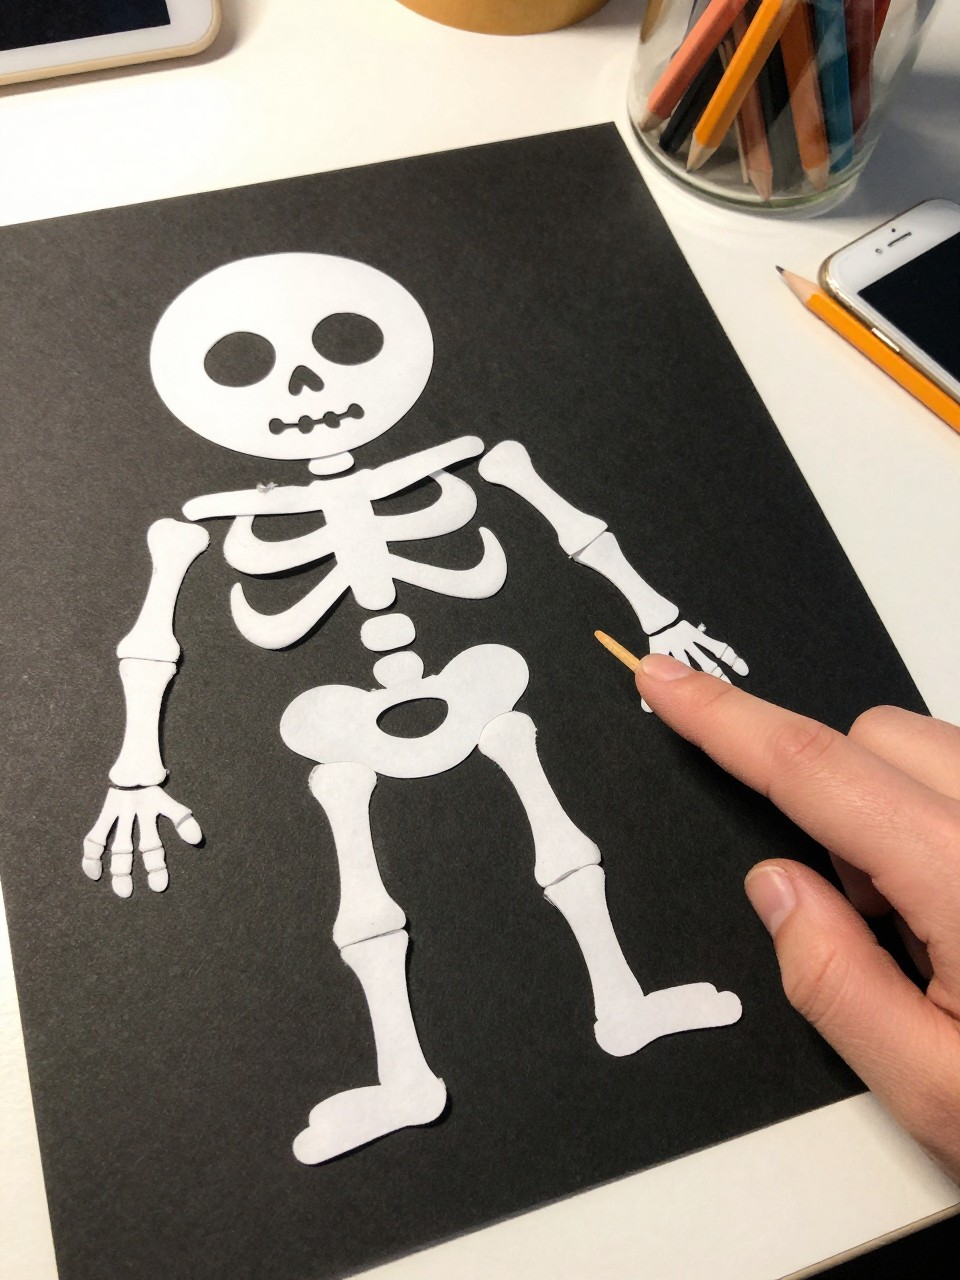
This craft is perfect for talking about what’s inside our bodies, which connects well to a doctor theme. It’s also great for fine motor practice.
Materials Needed:
- Black construction paper
- Q-tips (at least 6 per child)
- White school glue
- Googly eyes
- White crayon
How to make it:
- Step 1: Arrange one Q-tip horizontally for the head and one vertically for the spine.
- Step 2: Break two Q-tips in half and arrange them as arms and legs coming off the spine.
- Step 3: Glue everything down carefully. Let dry completely.
- Step 4: Glue on googly eyes above the head and draw a smile with white crayon.
9. Yogurt Cup Bell for a Crossing Guard

This recycles a food container into a toy that actually makes noise. Kids love that immediate audio feedback.
Materials Needed:
- Clean, empty yogurt cup
- Aluminum foil
- Pipe cleaner
- Small jingle bell
- Paint or stickers
How to make it:
- Step 1: Paint or sticker the outside of the yogurt cup. Let dry.
- Step 2: Wrap the outside with aluminum foil for that shiny metal look, or leave it painted.
- Step 3: Poke a small hole in the bottom of the cup. Thread a pipe cleaner through, add a jingle bell inside, and twist the pipe cleaner to secure it on top.
- Step 4: Show kids how to shake it gently to direct traffic.
10. Cardboard Tube Pilot

This is a quick project that focuses on the cool accessories pilots wear. The headphone detail is the star of the show here.
Materials Needed:
- Toilet paper roll
- Blue paint
- Black pipe cleaner
- Two small pom-poms
- White paper for wings
How to make it:
- Step 1: Paint the toilet paper roll blue and let it dry.
- Step 2: Draw a face on the tube.
- Step 3: Cut a small strip of white paper to wrap around the “head” as a headband. Attach a black pipe cleaner shaped like a headphone band, gluing small pom-poms to the ends as ear cups.
- Step 4: Cut out small wing shapes from white paper and glue them to the back of the tube.
11. Paper Plate Astronaut Helmet

This is a wearable craft for the community helper who works way above the neighborhood. It’s simple but sparks huge imagination.
Materials Needed:
- Large paper plate
- Aluminum foil
- White cardstock
- Stapler
- Markers
How to make it:
- Step 1: Cut the center out of the paper plate, leaving just the outer rim as the helmet ring.
- Step 2: Cover the rim completely with aluminum foil and staple to secure on the back.
- Step 3: Cut a rectangle from white cardstock and attach it to the back as a “communications device.”
- Step 4: Let kids decorate the front with American flag stickers or drawn buttons.
12. Cotton Swab Vet Clinic

This craft focuses on caring for stuffed animals, connecting the community helper role directly to the child’s own toys. It’s very hands-on.
Materials Needed:
- Small cardboard box (like a shoebox)
- Cotton swabs
- Gauze or medical tape
- Markers
- Small stuffed animal
How to make it:
- Step 1: Decorate the box with markers to look like a vet clinic. Draw a red cross on the side.
- Step 2: Fill the box with cotton swabs and small pieces of gauze.
- Step 3: Show kids how to “examine” their stuffed animal and wrap its leg with tape or use swabs as thermometers.
- Step 4: Let them name their clinic and treat their patient.
13. Farm Stand for a Farmer

This craft builds a tiny 3D scene that teaches where food comes from. The standing produce is very cute and easy for small hands.
Materials Needed:
- Small cardboard box (open on one side)
- Green, red, and brown play-doh
- Popsicle sticks
- Green pipe cleaners
How to make it:
- Step 1: Turn the box on its side so the open front is the entrance to the farm stand.
- Step 2: Roll small balls of red play-doh for tomatoes and apples. Shape brown play-doh into small potatoes.
- Step 3: Stick the produce onto green pipe cleaner “vines” or simply pile them inside the stand.
- Step 4: Use popsicle sticks to create a sign that says “Farm” and stand it up with a bit of play-doh.
14. Cupcake Liner Teacher
This uses simple pantry items to create a sweet tribute to a teacher. The layers of the liner mimic a skirt or a dress shirt collar nicely.
Materials Needed:
- Paper cupcake liner
- White cardstock
- Markers or crayons
- Glue stick
- Small button or sequin
How to make it:
- Step 1: Flatten the cupcake liner and glue it onto the cardstock. This is the teacher’s body or shirt.
- Step 2: Draw a head above the liner and legs below it.
- Step 3: Add arms coming out from the sides of the liner.
- Step 4: Glue a small button or sequin onto the liner as a fun brooch or shirt button.
15. Bus Driver Craft with Fold-Down Door

This craft features a moving part—the bus door folds open. Kids love that interactive element.
Materials Needed:
- Yellow construction paper
- Black marker
- Scissors
- Glue
- Small photo of child’s face (optional)
How to make it:
- Step 1: Cut a large rectangle from yellow paper for the bus body. Cut a smaller square for the driver’s window.
- Step 2: Cut a long, thin rectangle from yellow paper. Fold it in half lengthwise, then glue only the folded edge to the front of the bus to create a door that can swing open.
- Step 3: Draw on wheels, windows, and a stop sign.
- Step 4: Glue a small photo of the child’s face in the driver’s window so they are driving the bus.
16. Palette and Brush for an Artist

This celebrates the community helper who makes our world beautiful. It uses a recycled cardboard base for the palette.
Materials Needed:
- Cardboard scrap
- Four different colors of paint
- Paintbrush
- Popsicle stick
- Glue
How to make it:
- Step 1: Cut the cardboard into a rough palette shape (a circle with a thumb hole cut out).
- Step 2: Squeeze a small dot of each paint color onto the palette.
- Step 3: Glue the popsicle stick to the side of the palette as a handle or “brush rest.”
- Step 4: Let kids dip the real paintbrush in the paint and make a sample stroke on a separate piece of paper.
17. Magnetic Trash Truck

This craft turns into a toy that can actually pick up metal objects. It’s a huge hit because it actually works.
Materials Needed:
- Small cardboard box (like a tissue box)
- Gray or green paint
- Four bottle caps
- Glue
- Small magnet
- Paper clips
How to make it:
- Step 1: Paint the entire box gray or green. Let dry.
- Step 2: Glue the four bottle caps onto the sides as wheels.
- Step 3: Glue a small magnet securely to the front or back of the truck.
- Step 4: Once dry, let kids “pick up” paper clips and other small metal items from the floor by driving the truck over them.