


Table of Contents Show
Want a relaxing art project but don’t know what to paint that’s also useful for school? Painting a basic calculator is a fun way to make something plain look personal, without needing fancy skills.

These ideas are beginner-friendly, and they help you practice simple shapes, patterns, and color blending.
Here are 15 fun calculator painting ideas to try next.
1. Pastel Gradient Calculator Cover

The finished calculator has a soft pastel fade from one color to another, with gentle brush marks that make it feel dreamy and handmade. It’s satisfying because gradients look impressive even with simple blending, and it’s a calm project when you want a slow, relaxing paint session.
Materials Needed:
- Calculator (plastic body)
- Acrylic paint
- Paintbrushes in multiple sizes
- Palette or paint tray
- Clear acrylic sealer (optional)
Steps to Make:
- Clean the calculator casing with a dry cloth and carefully mask the screen and buttons with tape.
- Paint the top section in your first pastel color, keeping strokes in one direction.
- While it’s still a little wet, blend the second color into the first using light back-and-forth strokes.
- Smooth the middle “blend line” with a slightly damp brush to soften harsh edges.
- Let it dry fully, then add a thin sealer coat if you want extra protection.
2. Daisy Border School Calculator

The finished piece looks like a cheerful calculator with small white daisies and yellow centers painted around the edges, leaving the middle clean and easy to read. It’s great for beginners because daisies are just simple petal shapes, and the repeating border feels steady and relaxing to paint.
Materials Needed:
- Calculator (plastic body)
- Acrylic paint
- Paintbrushes in multiple sizes
- Palette or paint tray
- Painter’s tape
- Clear acrylic sealer (optional)
Steps to Make:
- Tape off the screen and buttons so paint stays only on the casing.
- Lightly mark a border line with a pencil so the flowers stay evenly spaced.
- Paint small white petal ovals in clusters around the border, following the calculator’s shape.
- Add yellow centers, then dot a few tiny green leaves between some flowers.
- Dry completely, remove tape carefully, and seal with a light clear coat if desired.
3. Checkerboard Pop Calculator Design

This calculator has a bold checkerboard pattern across the front, with slightly imperfect squares that clearly show it was hand-painted. It’s perfect if you like clean-looking designs but still want something easy, because you can use tape to guide the lines and fill in the blocks slowly.
Materials Needed:
- Calculator (plastic body)
- Acrylic paint
- Paintbrushes in multiple sizes
- Palette or paint tray
- Painter’s tape
- Clear acrylic sealer (optional)
Steps to Make:
- Mask the screen and buttons, then tape a neat square “paint area” on the casing.
- Lay thin tape strips in a grid to map out your checkerboard squares.
- Paint every other square your main color, keeping paint slightly thicker for solid coverage.
- Peel a few tape lines once paint is tacky, then touch up wobbly edges with a small brush.
- Let it dry and seal lightly so the pattern doesn’t chip in your backpack.
4. Galaxy Night Sky Calculator

The finished calculator looks like a tiny night sky with deep blues and purples, scattered white stars, and a soft, cloudy glow where colors overlap. It’s a fun project for beginners because you can dab and layer paint without needing perfect lines, and the texture makes it look extra magical.
Materials Needed:
- Calculator (plastic body)
- Acrylic paint
- Paintbrushes in multiple sizes
- Palette or paint tray
- Small sponge (optional)
- Clear acrylic sealer (optional)
Steps to Make:
- Tape off the screen and buttons, then paint a dark base coat (navy or black) on the casing.
- Dab purple and blue in patches using a sponge or stiff brush to build a cloudy nebula look.
- Blend edges lightly so the colors fade into each other instead of forming hard shapes.
- Flick watered-down white paint for stars, then add a few larger dots as “bright stars.”
- Dry fully and seal with a thin coat to protect the layered paint.
5. Smiley Face Sticker-Style Calculator

This calculator looks like it’s covered in hand-painted “sticker” doodles—smiley faces, little hearts, and tiny stars—on a bright solid background. It’s great for school because it feels playful and personal, and it’s beginner-friendly since each doodle is quick and you can fix small mistakes easily.
Materials Needed:
- Calculator (plastic body)
- Acrylic paint
- Paintbrushes in multiple sizes
- Palette or paint tray
- Paint pen (optional)
- Clear acrylic sealer (optional)
Steps to Make:
- Mask the screen and buttons, then paint the casing a solid base color and let it dry.
- Sketch simple doodle spots lightly so the spacing feels balanced.
- Paint smiley faces and mini shapes one at a time, letting your brush lines show.
- Outline a few doodles with a paint pen or thin brush to make them pop.
- Dry completely and add a gentle sealer coat if the calculator will be used daily.
6. Minimal Mountain Line Calculator

The finished piece shows simple layered mountains in two or three colors, with a thin line “sun” rising behind them, all shaped to fit the calculator front. It’s calming to make because the design uses slow, steady brush strokes, and it’s perfect for beginners who like clean, simple art.
Materials Needed:
- Calculator (plastic body)
- Acrylic paint
- Paintbrushes in multiple sizes
- Palette or paint tray
- Painter’s tape
- Clear acrylic sealer (optional)
Steps to Make:
- Tape off the screen and buttons, then choose a soft sky color for the background.
- Paint the sky, then let it dry so the next layers don’t smear.
- Use tape or a steady hand to paint one mountain layer at a time, darker toward the front.
- Add a small sun circle peeking over the back ridge, plus a few tiny highlight strokes.
- Let it dry, remove tape, and seal lightly for a smooth, lasting finish.
7. Rainbow Drip Paint Calculator

This calculator has bright rainbow “drips” coming down from the top edge, with paint lines that look thick in places where colors overlap. It’s a fun beginner project because drips don’t need to be perfect, and you can make each one a different length to fit your style.
Materials Needed:
- Calculator (plastic body)
- Acrylic paint
- Paintbrushes in multiple sizes
- Palette or paint tray
- Painter’s tape
- Clear acrylic sealer (optional)
Steps to Make:
- Mask the screen and buttons, then paint a clean light base coat (white or pale color).
- Mark a top border line with tape so the drips start evenly.
- Paint short rounded “drip tops,” then pull paint downward into drip lines of different lengths.
- Layer a second color on a few drips to create thicker, blended spots with visible brush texture.
- Dry fully, remove tape, and seal with a thin coat to help prevent chipping.
8. Composition Notebook Pattern Calculator

The finished calculator looks like a classic composition notebook cover, with a speckled black-and-white area and a simple label box painted on the front. It’s satisfying because it’s mostly dots and simple shapes, and it makes your calculator look “school themed” in a cute, handmade way.
Materials Needed:
- Calculator (plastic body)
- Acrylic paint
- Paintbrushes in multiple sizes
- Palette or paint tray
- Toothbrush or stiff brush (optional for speckles)
- Clear acrylic sealer (optional)
Steps to Make:
- Tape off the screen and buttons, then paint the casing white and let it dry.
- Paint an irregular black “marble” patch, leaving white areas showing around it.
- Flick tiny black speckles using a toothbrush or stiff brush for the classic notebook look.
- Add a small white label box and hand-paint thin lines inside it like a name tag.
- Dry fully and seal lightly so the speckles don’t rub off in your bag.
9. Cute Fruit Slice Calculator (Lemon or Orange)

The finished piece shows a bright fruit-slice design, like a lemon or orange wheel, centered on the calculator with curved segments that follow the casing shape. It’s great for beginners because you can paint simple curved wedges, and the cheerful colors make it feel fresh and uplifting.
Materials Needed:
- Calculator (plastic body)
- Acrylic paint
- Paintbrushes in multiple sizes
- Palette or paint tray
- Pencil (optional for sketching)
- Clear acrylic sealer (optional)
Steps to Make:
- Mask the screen and buttons, then paint a light background color and let it dry.
- Sketch a circle and wedge lines lightly where you want the fruit slice to sit.
- Paint the outer rind first, then fill each wedge with lighter and darker tones for depth.
- Add thin white lines between wedges and small highlight strokes to mimic juicy shine.
- Let it dry completely and seal with a clear coat for everyday use.
10. School Supply Icons Calculator

This calculator is covered with tiny hand-painted school icons—mini pencils, paper clips, rulers, and little notebooks—spaced out like a pattern. It’s relaxing because you can paint one small icon at a time, and it’s perfect for beginners who like cute details without having to paint one big scene.
Materials Needed:
- Calculator (plastic body)
- Acrylic paint
- Paintbrushes in multiple sizes
- Palette or paint tray
- Fine-tip paint pen (optional)
- Clear acrylic sealer (optional)
Steps to Make:
- Tape off the screen and buttons, then paint a solid background color and dry it fully.
- Plan your icon spacing by placing a few tiny pencil dots as “markers” across the casing.
- Paint simple icon shapes (like a ruler rectangle or paper clip loop) with a small brush.
- Add outlines and tiny details with a paint pen or very thin brush for clarity.
- Dry, then seal with a thin coat so small details stay protected.
11. Polka Dot Color Pop Calculator

The finished calculator has bold polka dots in two or three bright colors, with a few dots slightly different in size for a playful, hand-painted look. It’s an easy beginner project because dots are forgiving, and it’s a nice choice when you want something fun that doesn’t take hours.
Materials Needed:
- Calculator (plastic body)
- Acrylic paint
- Paintbrushes in multiple sizes
- Palette or paint tray
- Round sponge dauber or cotton swab (optional)
- Clear acrylic sealer (optional)
Steps to Make:
- Mask the screen and buttons, then paint the base color and let it dry.
- Use a sponge dauber, cotton swab, or round brush tip to stamp dots across the casing.
- Add a second dot color in between the first layer, changing sizes slightly as you go.
- Touch up a few dots with thicker paint so brush texture shows and colors feel bright.
- Dry fully and seal lightly for a smooth, durable finish.
12. Starry Nameplate Calculator Personalization
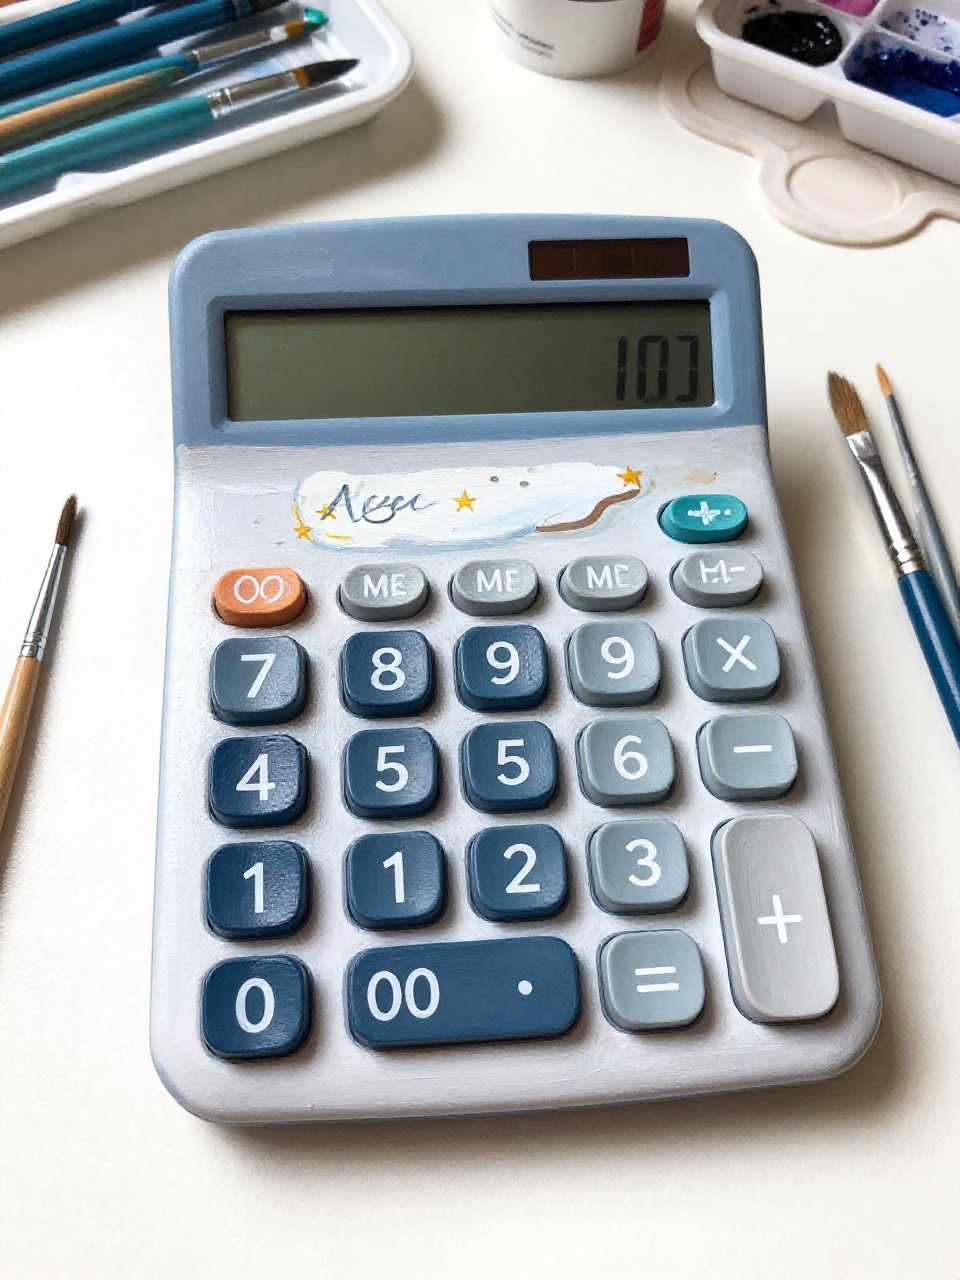
The finished piece has a painted nameplate area with your name in simple hand lettering, surrounded by small stars and sparkly dots that wrap around the calculator front. It’s great for school because it helps you spot your calculator fast, and it’s beginner-friendly since you can keep the lettering simple.
Materials Needed:
- Calculator (plastic body)
- Acrylic paint
- Paintbrushes in multiple sizes
- Palette or paint tray
- Fine-tip paint pen (optional)
- Clear acrylic sealer (optional)
Steps to Make:
- Tape off the screen and buttons, then paint a soft background color on the casing.
- Paint a rounded rectangle “nameplate” panel and let it dry before lettering.
- Write your name with a thin brush or paint pen, keeping letters thick enough to read.
- Add small stars, dots, and a few highlight strokes around the nameplate for sparkle.
- Dry completely and seal lightly so the name doesn’t wear off.
13. Wavy Retro Stripes Calculator

This calculator has smooth, wavy stripes in warm retro colors, flowing from one side to the other and naturally following the calculator’s shape. It’s satisfying because the curves feel loose and artistic, and it’s beginner-friendly since you can paint one stripe at a time and fix edges as you go.
Materials Needed:
- Calculator (plastic body)
- Acrylic paint
- Paintbrushes in multiple sizes
- Palette or paint tray
- Pencil (optional)
- Clear acrylic sealer (optional)
Steps to Make:
- Mask the screen and buttons, then paint a light base coat and let it dry.
- Sketch a few gentle wavy lines across the casing so your stripes don’t crowd together.
- Paint the widest stripe first, then fill in neighboring stripes with two or three colors.
- Add a thin contrasting line on one stripe edge for extra retro detail and depth.
- Dry fully and seal with a clear coat to help the stripes last longer.
14. Tiny Clouds and Blue Sky Calculator

The finished piece looks like a bright blue sky with small puffy white clouds, with soft edges and visible brush blending where white overlaps the blue. It’s a peaceful project for beginners because clouds are easy to shape, and the simple color palette makes the whole process feel calm.
Materials Needed:
- Calculator (plastic body)
- Acrylic paint
- Paintbrushes in multiple sizes
- Palette or paint tray
- Small sponge (optional)
- Clear acrylic sealer (optional)
Steps to Make:
- Tape off the screen and buttons, then paint the casing sky blue and let it dry.
- Lightly dab white cloud shapes using a sponge or a dry brush to keep edges soft.
- Add a second layer of white to the tops of clouds so they look puffy and layered.
- Blend a tiny bit of pale blue into the bottom of clouds for gentle shadow.
- Dry completely and seal lightly so the soft layers stay protected.
15. Geometric Color Block Calculator

The finished calculator has bold geometric color blocks—triangles, rectangles, and angled shapes—stacked together like a modern art pattern with crisp edges and visible paint layers. It’s great for beginners because you can tape off sections and paint slowly, and it looks stylish even with simple shapes.
Materials Needed:
- Calculator (plastic body)
- Acrylic paint
- Paintbrushes in multiple sizes
- Palette or paint tray
- Painter’s tape
- Clear acrylic sealer (optional)
Steps to Make:
- Mask the screen and buttons, then place painter’s tape to form a few geometric sections.
- Paint one color at a time, letting each section dry before taping over it again.
- Add a second layer where needed so colors look solid and brush strokes stay visible.
- Peel tape carefully, then touch up tiny gaps with a small brush for a handmade-but-clean look.
- Let it dry fully and seal with a thin clear coat for daily school use.