Table of Contents Show
You want a birthday cake that looks great without extra stress, and I’ll show you easy ways to get there. Let’s pick out simple techniques and small touches that really stand out so you can decorate confidently, even if you’ve never iced a cake before.

Check out these step-by-step ideas—there’s something for every skill level and party style. Colorful sprinkles, fresh berries, quick piping, easy stencils—I’ll keep it all simple so you can finish faster and actually enjoy the celebration.
1. Use colorful sprinkles to add a festive touch instantly.

I toss sprinkles over frosted cakes for a quick burst of color.
They add texture and turn a plain cake into something fun.
I press sprinkles onto the sides or just scatter them on top.
A little is usually enough for a cheerful finish.
2. Create a simple ombre effect with different shades of buttercream.

I tint three or four bowls of buttercream from light to dark.
After stacking and crumb-coating the cake, I spread each shade in bands and smooth it out with a bench scraper.
A gentle blend at the joins softens the transition.
For People Who Love to Make Things ✂️
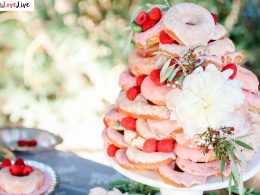
3. Top with fresh berries for a natural, elegant look.

Fresh berries are my favorite for finishing a cake—they add bright color and a light, juicy flavor.
I arrange strawberries, raspberries, and blueberries in small clusters for a tidy effect.
Sometimes I dust with powdered sugar, but honestly, they look great left bare.
4. Use a piping bag with a star tip for rosette decorations.

I grab a piping bag with an open star tip and pipe rosettes in one smooth spiral.
Starting in the center and working outward helps keep each flower even.
A quick practice swirl on parchment helps me get the size and spacing right.
5. Add edible gold leaf for a luxe finish

Edible gold leaf makes a simple cake look instantly elegant.
I use a dry brush or tweezers to apply tiny flakes exactly where I want them.
Gold leaf adds sparkle without messing with the taste.
It’s delicate, so I handle it gently, but it’s not as tricky as it looks.
6. Arrange candy bars around the edge as a fun border.

I line up mini candy bars around the edge for color and a bit of height.
A gentle press into the frosting keeps them in place.
It’s playful and honestly, guests always notice.
7. Make a drip effect with melted chocolate or colored glaze

I melt chocolate or whip up a colored glaze until it’s pourable.
Chilling the frosted cake first helps the drips set quickly and stay tidy.
A spoon or squeeze bottle gives me control over each drip.
I usually test a little on the edge to check the temperature and flow.
8. Use stencils and powdered sugar for easy patterns

I lay a food-safe stencil on a cooled cake and sift powdered sugar or cocoa right over it.
It’s a fast way to get a crisp, repeatable pattern with barely any effort.
Lifting the stencil straight up helps avoid smudges.
This trick works on lots of cake surfaces, too.
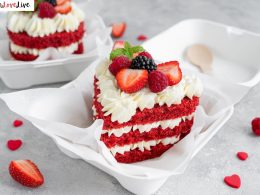
9. Layer different cake flavors and frost between layers

I stack two or three cake flavors for a little surprise when you cut in.
A thin layer of frosting or jam between each keeps everything balanced.
Chilling the cake briefly before the final coat helps prevent slipping and makes for cleaner slices.
10. Decorate with edible flowers for a fresh appearance

Edible flowers always feel fresh and simple.
I pick safe ones like pansies, violets, or rose petals and set them on well-chilled frosting.
Small clusters or just one standout bloom keep things elegant, not crowded.
11. Create a simple confetti cake with dyed buttercream dots

I tint small batches of buttercream in bright colors and pipe tiny dots all over the cake.
These dots look like sprinkles but stay put on the frosting, and they’re surprisingly quick to do.
I stick to a few bold colors for a clean, festive look.
12. Use fondant cut-outs in shapes matching the party theme.

I roll fondant thin and cut out shapes to fit the party theme—stars, animals, letters, whatever fits.
Letting them dry a bit helps them hold their shape, then I place them on the cake for a pop of color.
A little detail with edible markers or dust makes them look polished.
13. Add a personalized cake topper made from paper or acrylic.

I make a simple topper out of paper or acrylic—names, ages, or just a fun shape.
Cut or order the design, attach it to a skewer or stick, and pop it into the cake.
It’s a custom touch that doesn’t take much effort.
14. Use crushed cookies as a crunchy cake coating.

I coat cakes with crushed cookies to add flavor and crunch.
Pressing crumbs into buttercream or ganache keeps them in place.
Mixing cookie types gives a nice contrast.
I keep extra crumbs in bags for next time.
15. Create a marbled fondant covering for a modern look

I usually grab two or three fondant colors, roll them into ropes, and twist them together before gently rolling everything out to get that marbled look.
Then I drape the marbled sheet over the cake, hoping for that sleek, modern finish everyone seems to love lately.
I try not to overwork the fondant—just enough to keep those veins subtle and the pattern interesting.