


Table of Contents Show
DIY wooden summer signs are a simple way to refresh your porch, patio, garden corner, or entryway without spending much. A plain wood board, a little paint, and a few seasonal details can turn into something cute enough to display all summer.
These ideas are easy enough for a weekend project, even if you are not an expert crafter. Some use simple painted designs, while others add rope, shells, flowers, or small wood pieces for extra texture and charm.
1. Simple Lemon Wood Sign
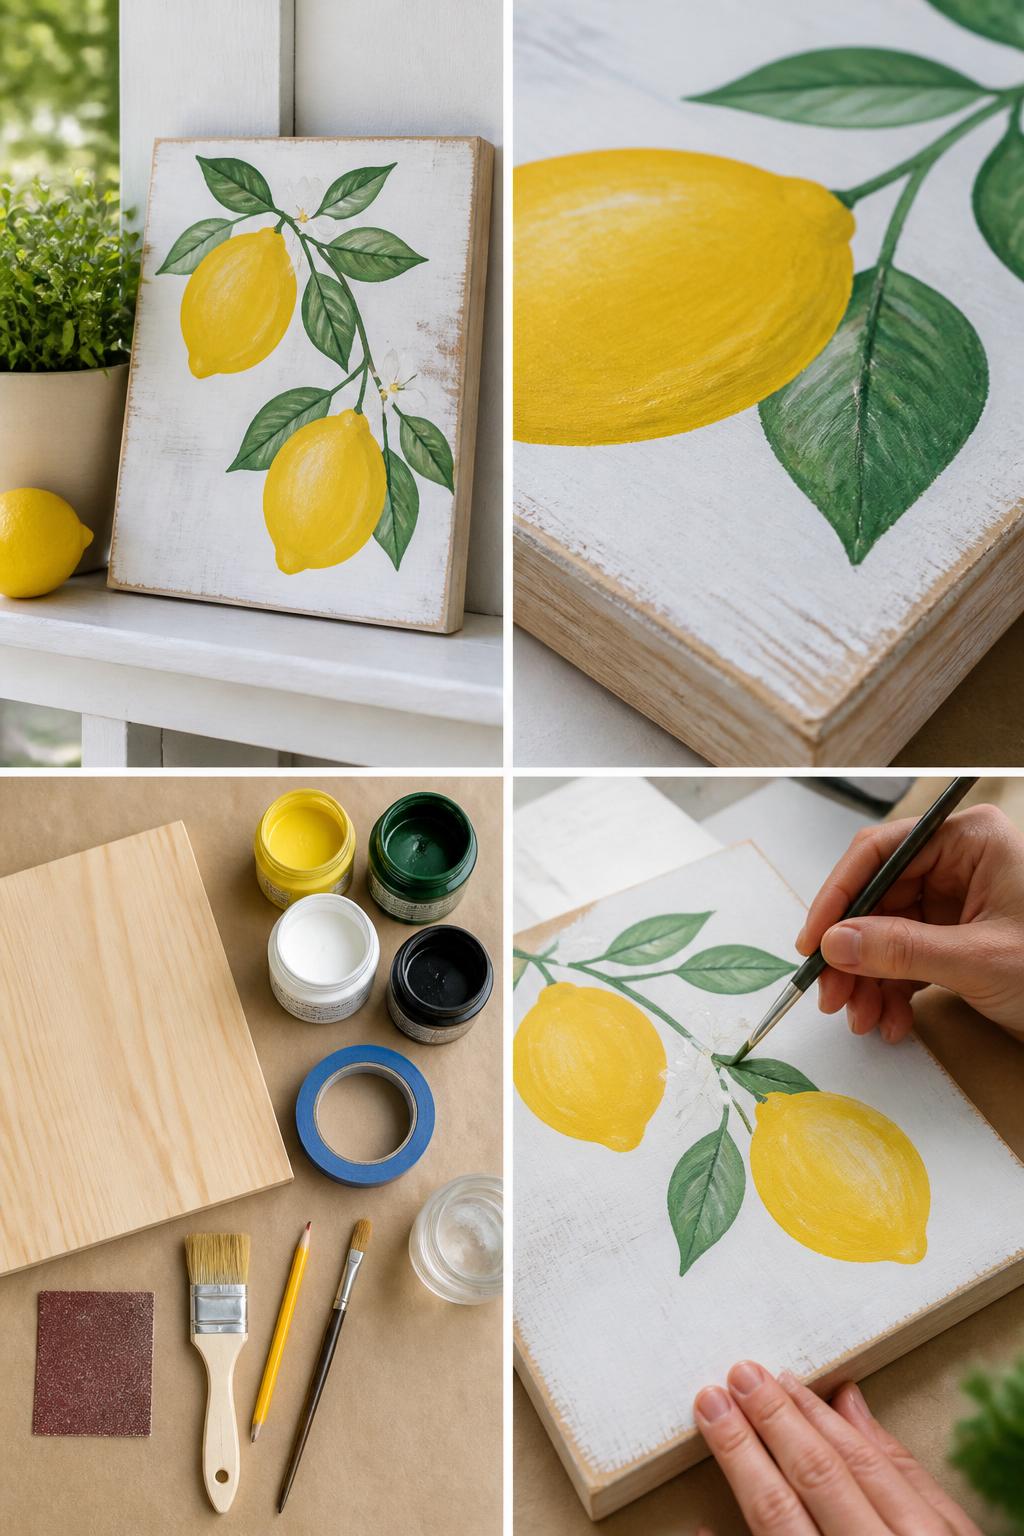
A lemon wood sign is one of the easiest summer signs to make because the shapes are simple and the colors look fresh right away. Yellow lemons and green leaves look beautiful on white, black, natural wood, or soft blue backgrounds.
This sign works well on a porch shelf, beside a planter, or leaned near a front door. Keep the lemons grouped in one corner if you want a clean look, or scatter them lightly around the board for more color.
Materials Needed:
For People Who Love to Make Things ✂️
- Small wooden board
- Yellow, green, white, and black outdoor paint
- Paintbrushes
- Pencil
- Sandpaper
- Painter’s tape
- Clear outdoor sealer
Steps To Make:
- Sand the wooden board until the surface feels smooth.
- Paint the background and let it dry fully.
- Sketch simple lemon shapes and leaves with pencil.
- Paint the lemons yellow and add green leaves around them.
- Seal the finished sign before placing it outside.
2. Mini Beach House Arrow Sign
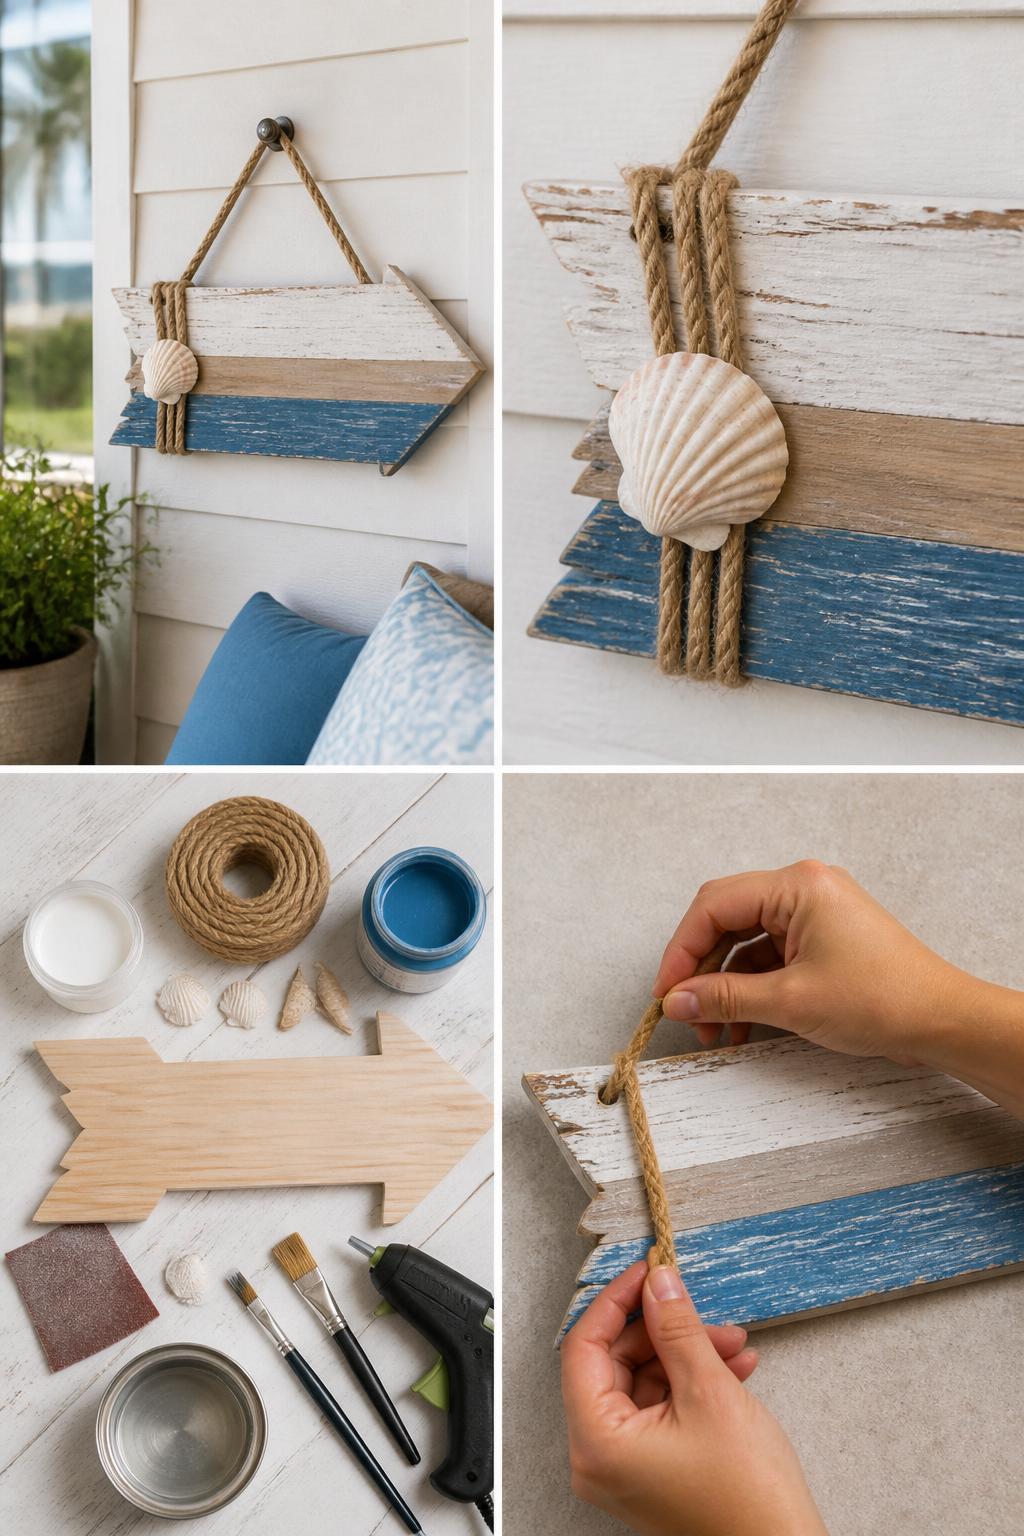
A beach arrow sign gives your porch a relaxed summer feel without needing a lot of supplies. The arrow shape adds a fun direction-style detail, while blue paint, rope, and shells make it feel coastal.
This project is great for covered porches, patios, pool areas, or lake house decor. You can distress the edges with sandpaper to make the sign look softly weathered.
Materials Needed:
- Arrow-shaped wood blank
- Blue, white, and tan outdoor paint
- Jute rope
- Small shells
- Hot glue gun
- Paintbrushes
- Sandpaper
- Clear sealer
Steps To Make:
- Sand the arrow-shaped wood piece.
- Paint the sign in white, tan, or blue and let it dry.
- Lightly sand the edges for a rustic look.
- Glue shells or rope details onto one side.
- Add a rope hanger and seal the sign if it will be outdoors.
3. Painted Watermelon Porch Sign
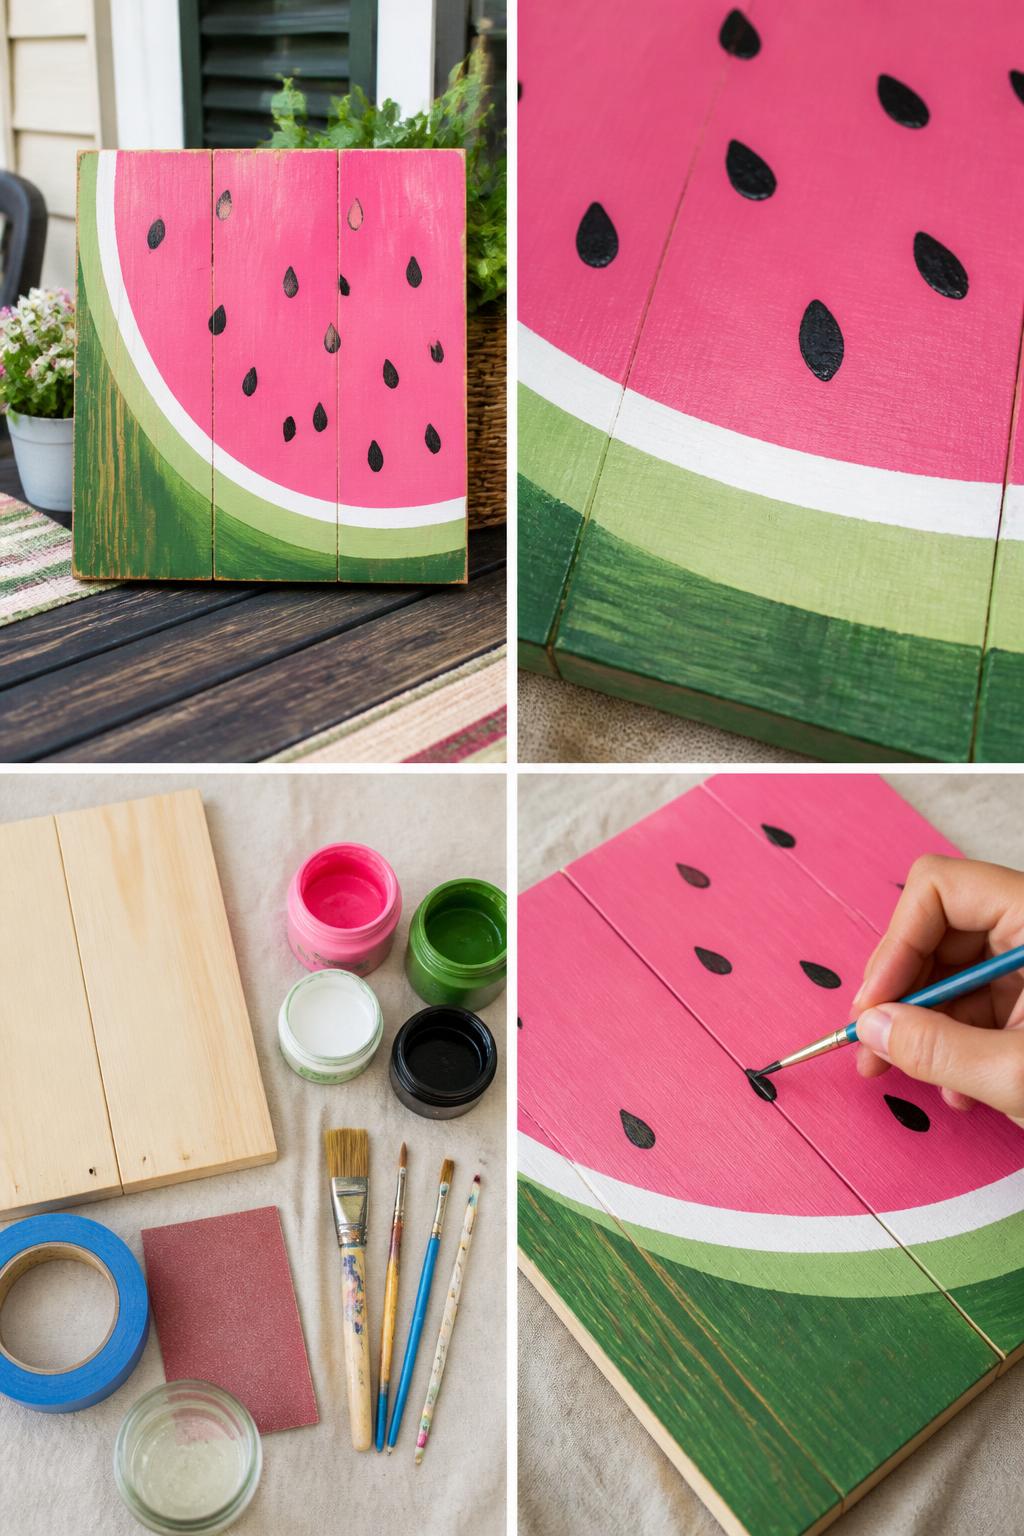
A watermelon porch sign is bright, cute, and easy enough to finish in an afternoon. The design uses basic shapes, and the color palette makes it feel like summer right away.
This is a good choice for party decor, poolside spaces, or family porches. Paint one large slice in the center or add smaller slices around the edges for a playful look.
Materials Needed:
- Wooden board
- Pink, green, white, and black outdoor paint
- Paintbrushes
- Pencil
- Painter’s tape
- Sandpaper
- Clear outdoor sealer
Steps To Make:
- Sand the board and wipe away dust.
- Sketch a large half-circle or triangle watermelon slice.
- Paint the pink fruit section first.
- Add the white stripe, green rind, and black seed details.
- Let the paint dry fully, then seal the sign.
4. Small Daisy Garden Sign
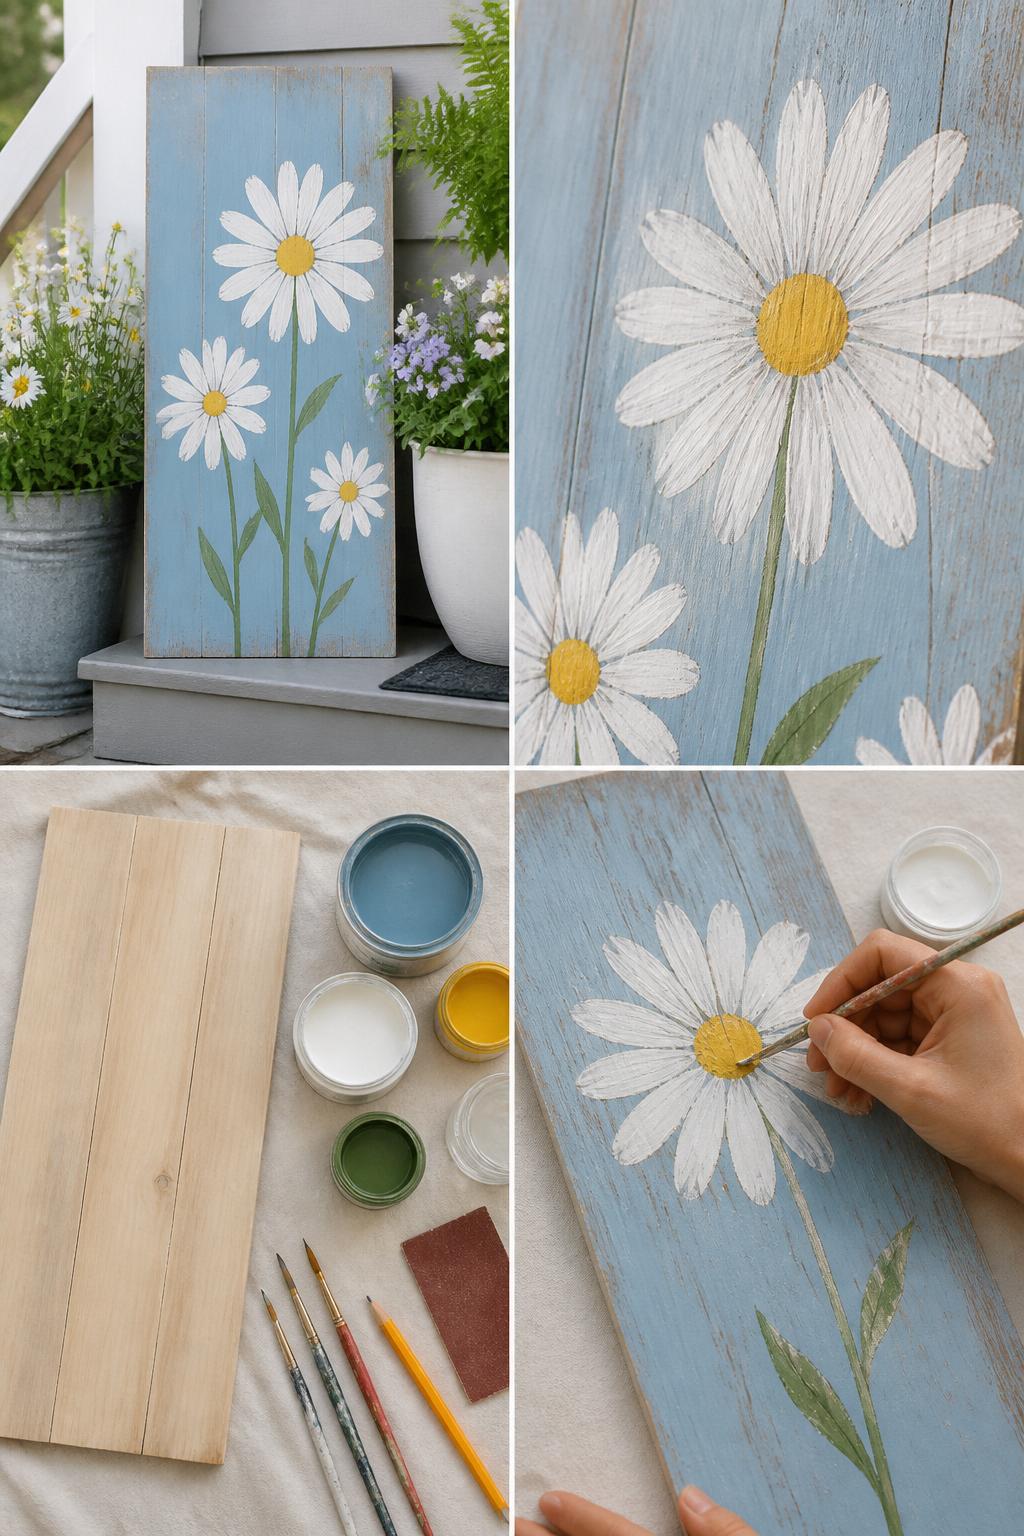
A daisy garden sign feels sweet, cheerful, and easy to paint. Daisies are beginner-friendly because the petals do not have to be perfect to look pretty.
This sign looks lovely near flower pots, on a garden bench, or leaned against the wall on a covered porch. Use a soft blue, cream, or natural wood background to make the white flowers stand out.
Materials Needed:
- Wooden board
- Blue, white, yellow, and green outdoor paint
- Fine paintbrushes
- Pencil
- Sandpaper
- Clear outdoor sealer
Steps To Make:
- Sand the board and paint the background color.
- Lightly sketch daisy stems and flower heads.
- Paint the green stems first.
- Add white petals and yellow centers.
- Seal the sign once the paint is completely dry.
5. Coastal Rope Border Wood Sign
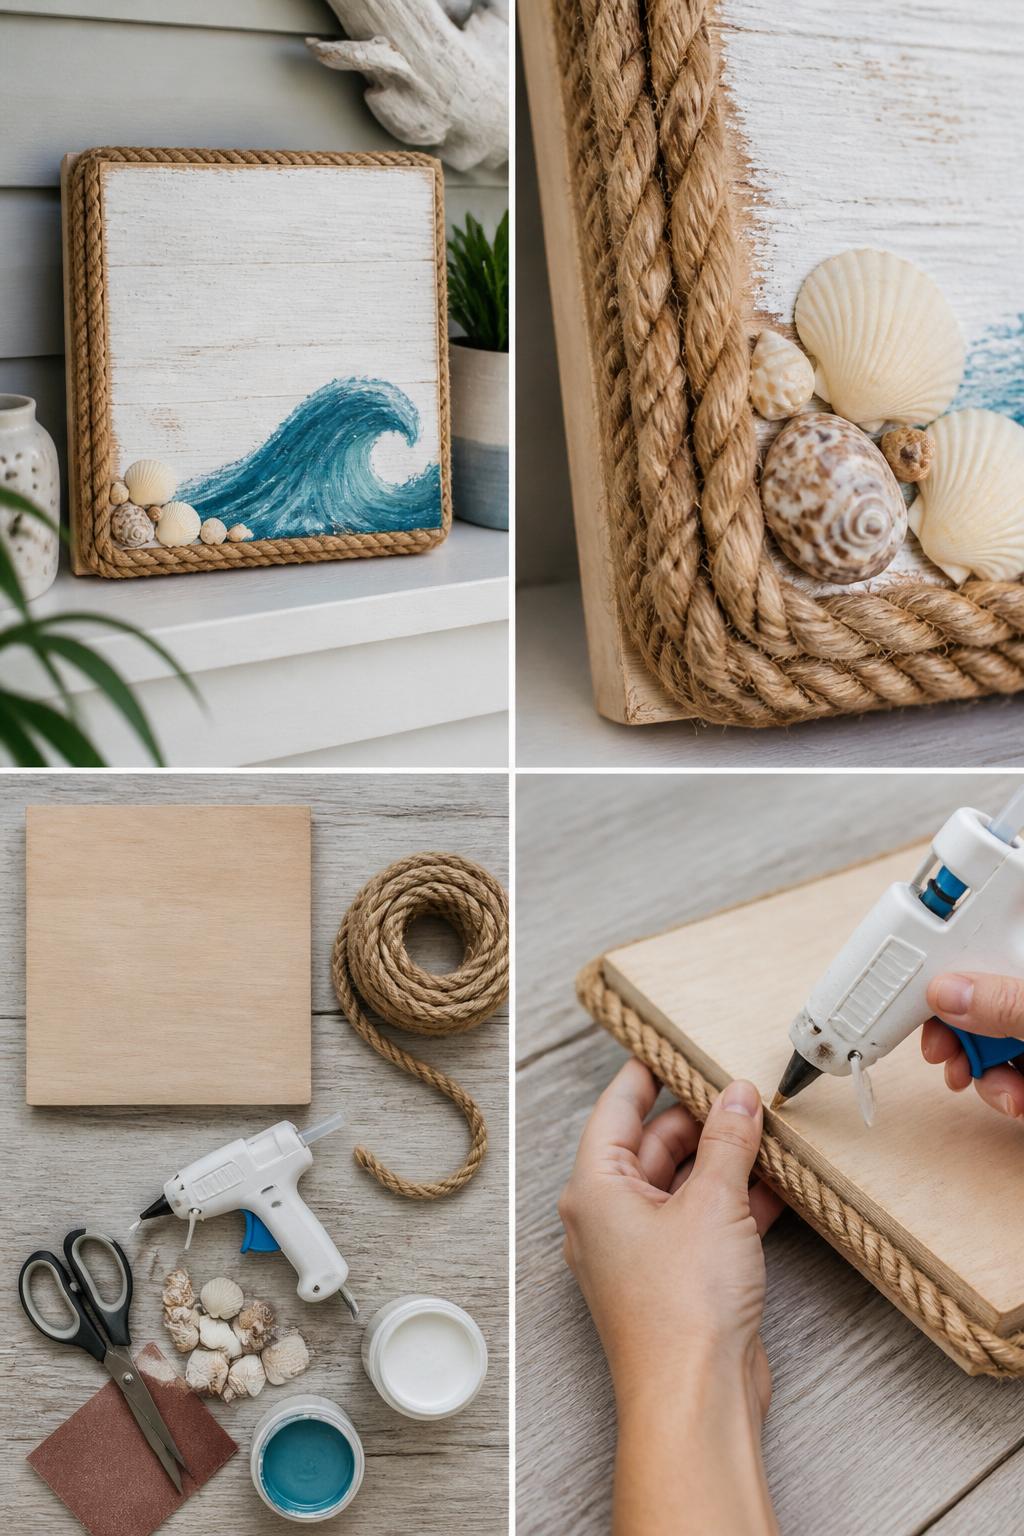
A rope border sign is simple but looks more finished because the rope frames the wood. Add a small painted wave or shell detail in the center for a clean coastal summer look.
This project works best for covered porches or indoor summer displays. It looks beautiful on a shelf, entry table, or wall near other beach-inspired pieces.
Materials Needed:
- Square or rectangle wood board
- Jute rope
- Blue and white outdoor paint
- Small shells
- Hot glue gun
- Scissors
- Sandpaper
- Clear sealer
Steps To Make:
- Sand the board and paint a whitewashed background.
- Paint a small wave, shell, or simple coastal shape.
- Measure and cut jute rope for the sign edges.
- Glue the rope around the border.
- Add shell accents and seal the painted section.
6. Wooden Popsicle Sign

A wooden popsicle sign is cute, playful, and perfect for a quick weekend craft. The shapes are easy to sketch, and you can use any colors that match your porch or party decor.
This sign is great for summer birthdays, kids’ spaces, pool areas, or casual porch styling. Add tiny sprinkles, stripes, or drip details to make each popsicle look different.
Materials Needed:
- Wooden board
- Pastel outdoor paint
- Tan paint
- Fine paintbrushes
- Pencil
- Sandpaper
- Clear sealer
Steps To Make:
- Sand the wooden board and paint the background if desired.
- Sketch a few popsicle shapes across the front.
- Paint the popsicles in different summer colors.
- Add tan sticks, sprinkle dots, stripes, or drip details.
- Seal the sign after all paint has dried.
7. Wood Plank Sun Sign
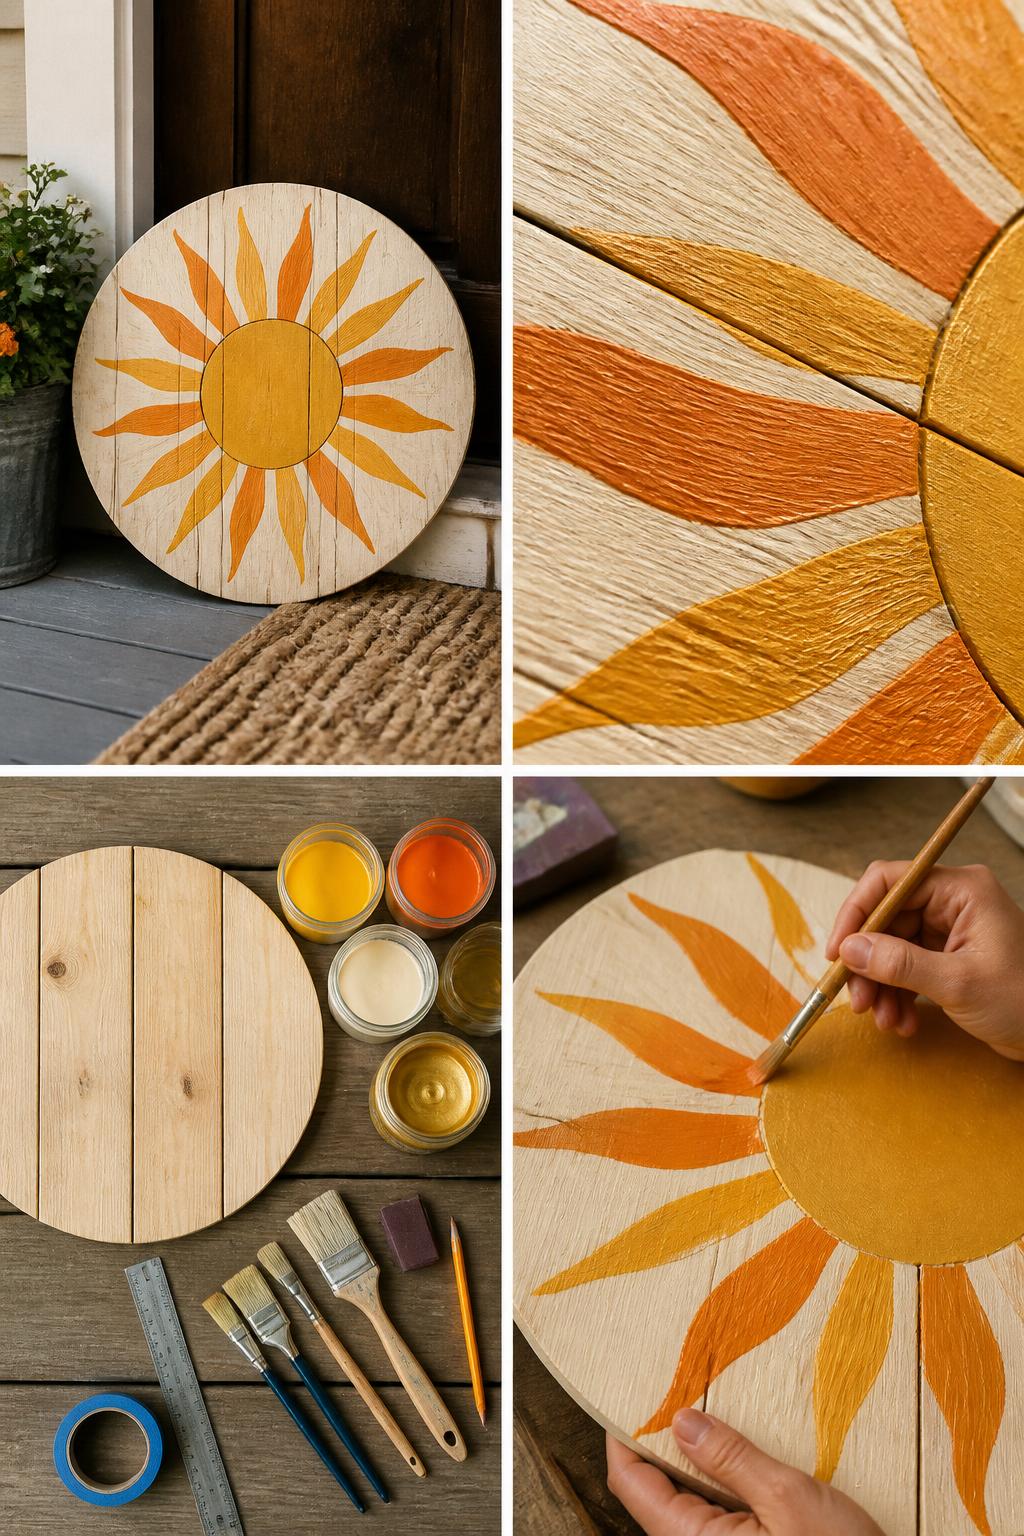
A sun sign is easy to make and brings a warm summer touch to your porch. You can paint a simple sun in the center of a square board or use a round wood blank for a softer look.
This design works well with yellow, orange, cream, and gold paint. It looks especially pretty near plants, woven baskets, or a simple outdoor chair.
Materials Needed:
- Wooden board or round wood blank
- Yellow, orange, cream, and gold paint
- Paintbrushes
- Pencil
- Ruler
- Painter’s tape
- Sandpaper
- Clear sealer
Steps To Make:
- Sand the wood and wipe it clean.
- Sketch a circle for the sun center.
- Add long and short ray guides with a pencil or tape.
- Paint the sun and rays in warm colors.
- Let the paint dry, then seal the sign.
8. Mini Flower Pot Wooden Sign
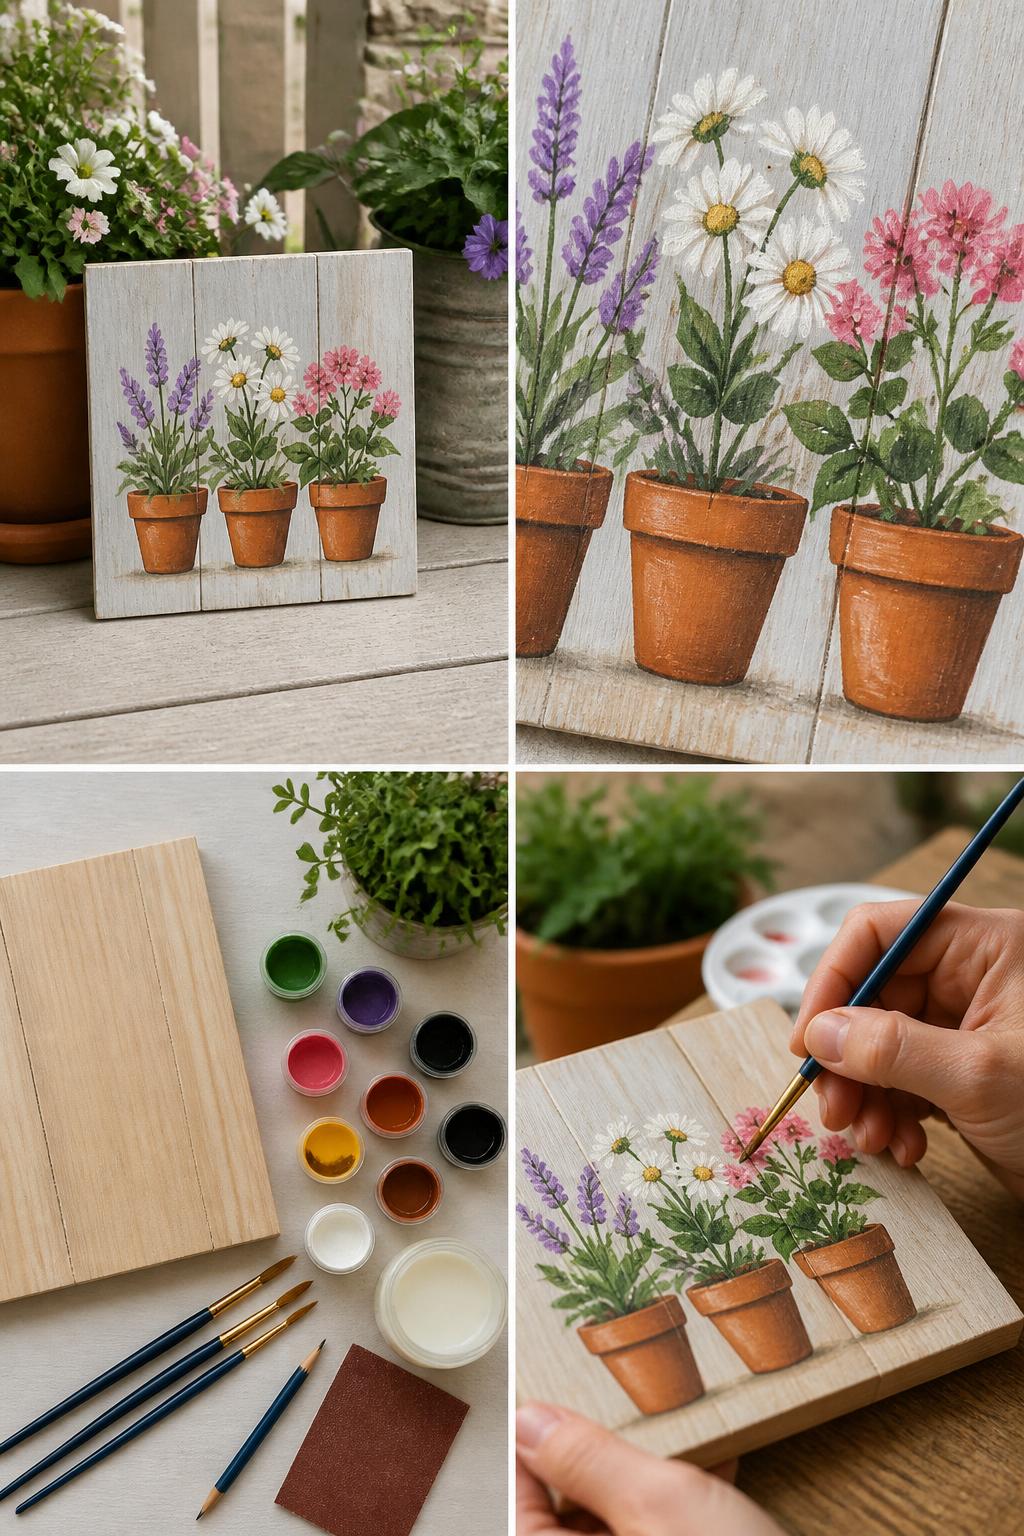
A mini flower pot sign is a lovely project for porches with lots of plants. The painted pots and flowers echo the real planters nearby and make the space feel more pulled together.
This design is easy to customize with your favorite flower colors. Paint one large pot in the center or a row of small pots across the bottom of the board.
Materials Needed:
- Small wooden board
- Outdoor paint
- Fine paintbrushes
- Pencil
- Sandpaper
- Clear outdoor sealer
Steps To Make:
- Sand the board until smooth.
- Paint the background color and let it dry.
- Sketch flower pots and simple flower shapes.
- Paint the pots first, then add stems, leaves, and blooms.
- Seal the sign before placing it near your planters.
9. Starfish Wood Slice Sign
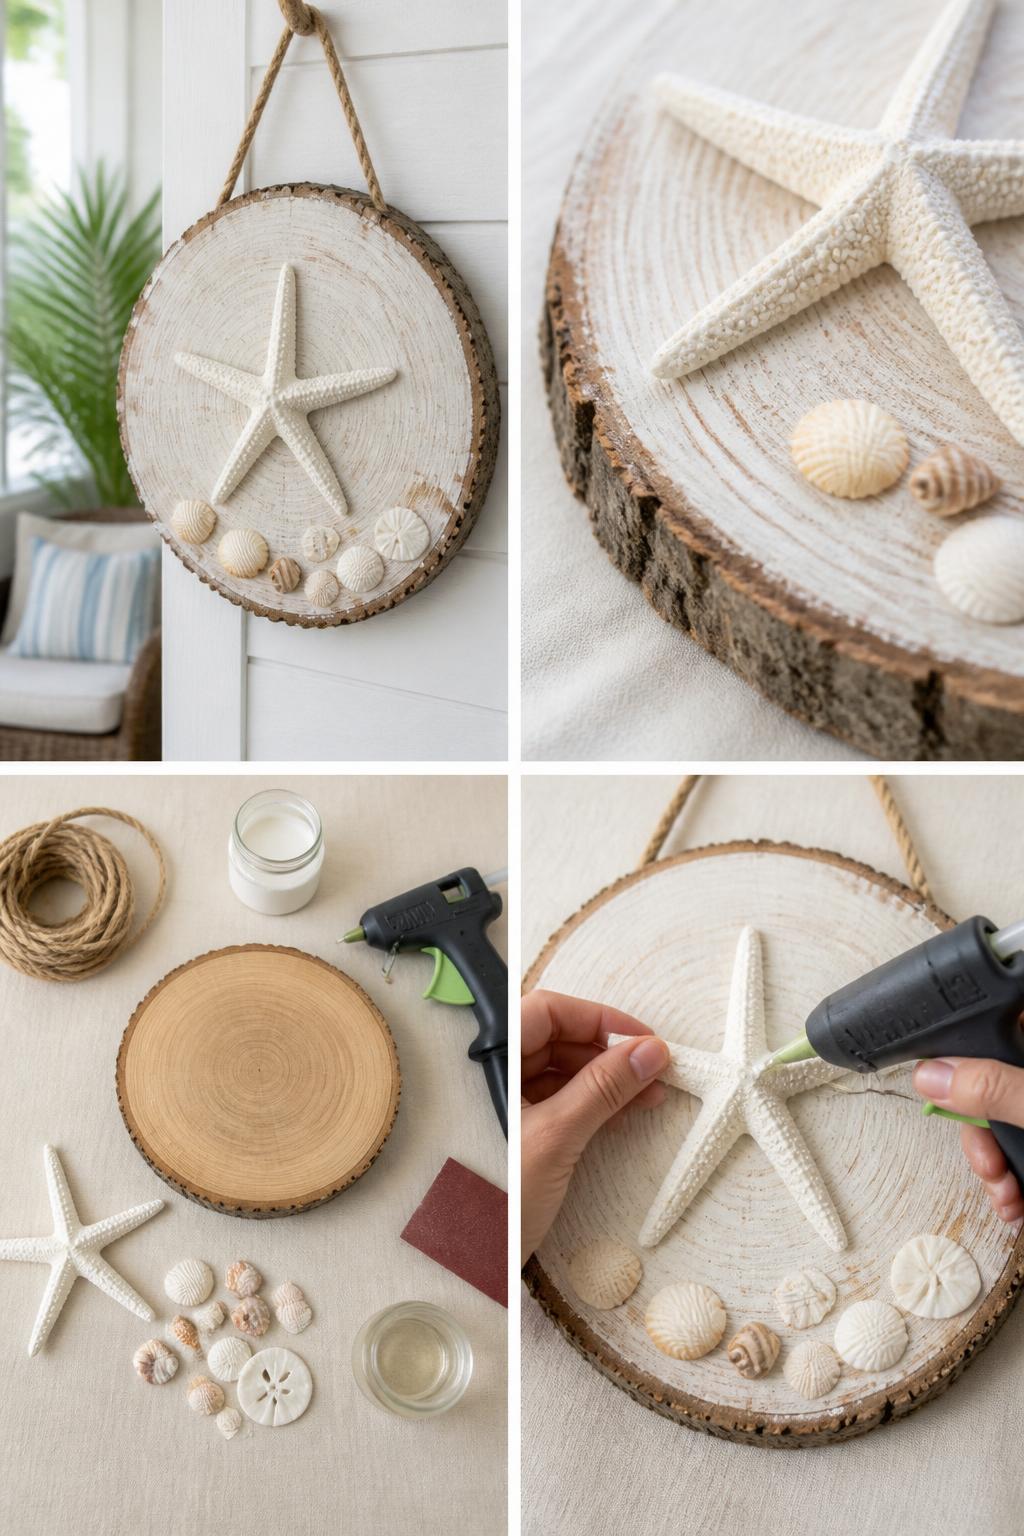
A starfish wood slice sign is a quick way to make rustic coastal decor. The natural wood edge adds texture, while the starfish and shells make it feel clearly summer-ready.
This project is best for covered porches, beach-themed entryways, or patio walls. Keep the background lightly whitewashed so the wood texture still shows.
Materials Needed:
- Wood slice
- Faux starfish
- Small shells
- Jute rope
- White paint
- Hot glue gun
- Sandpaper
- Clear sealer
Steps To Make:
- Lightly sand the front of the wood slice.
- Brush on a thin whitewash layer and let it dry.
- Arrange the starfish and shells before gluing.
- Glue the starfish in the center and add small shells around it.
- Attach a rope hanger and seal the sign if needed.
10. Painted Palm Leaf Sign
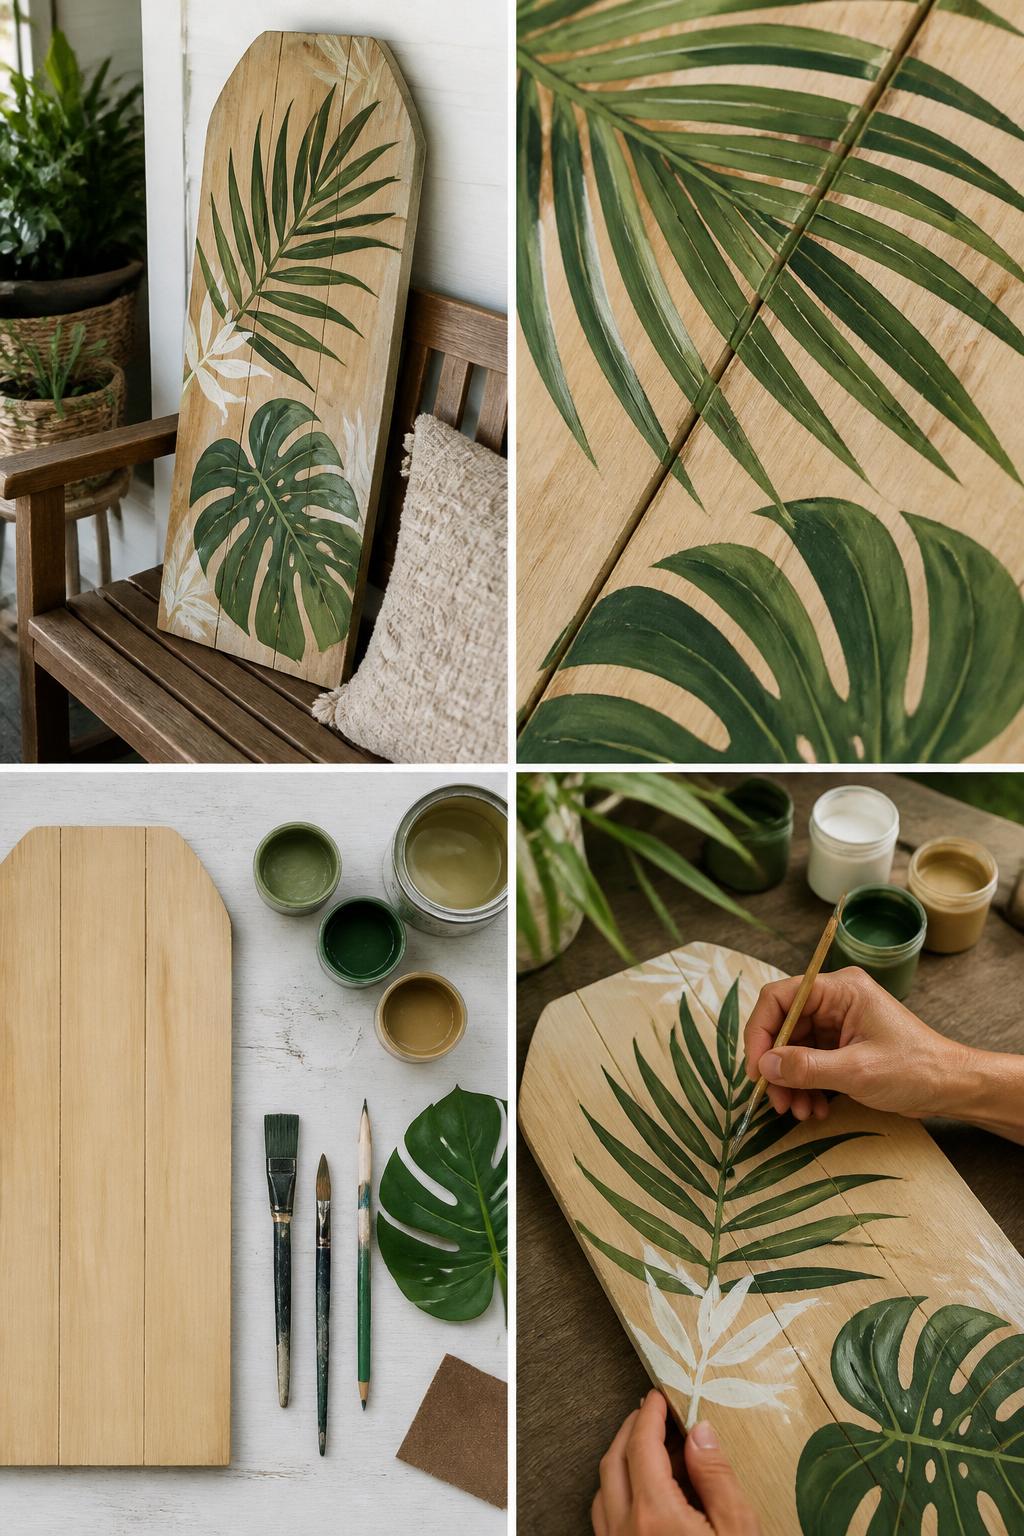
A palm leaf sign brings a tropical look to your porch without using bright fruit or flowers. The green leaves look beautiful against natural wood, white paint, or a sandy tan background.
This sign is great for patios, pool areas, screened porches, or spaces with potted plants. Layer a few leaf styles to make it feel fuller and more decorative.
Materials Needed:
- Wooden board
- Green, white, tan, and dark green outdoor paint
- Paintbrushes
- Pencil
- Leaf reference, optional
- Sandpaper
- Clear outdoor sealer
Steps To Make:
- Sand the wood and paint the background if desired.
- Sketch palm or monstera-style leaves on the board.
- Paint the main leaf shapes with green paint.
- Add darker and lighter lines for leaf veins.
- Seal the sign once everything is dry.
11. Rustic Scrap Wood Flower Sign
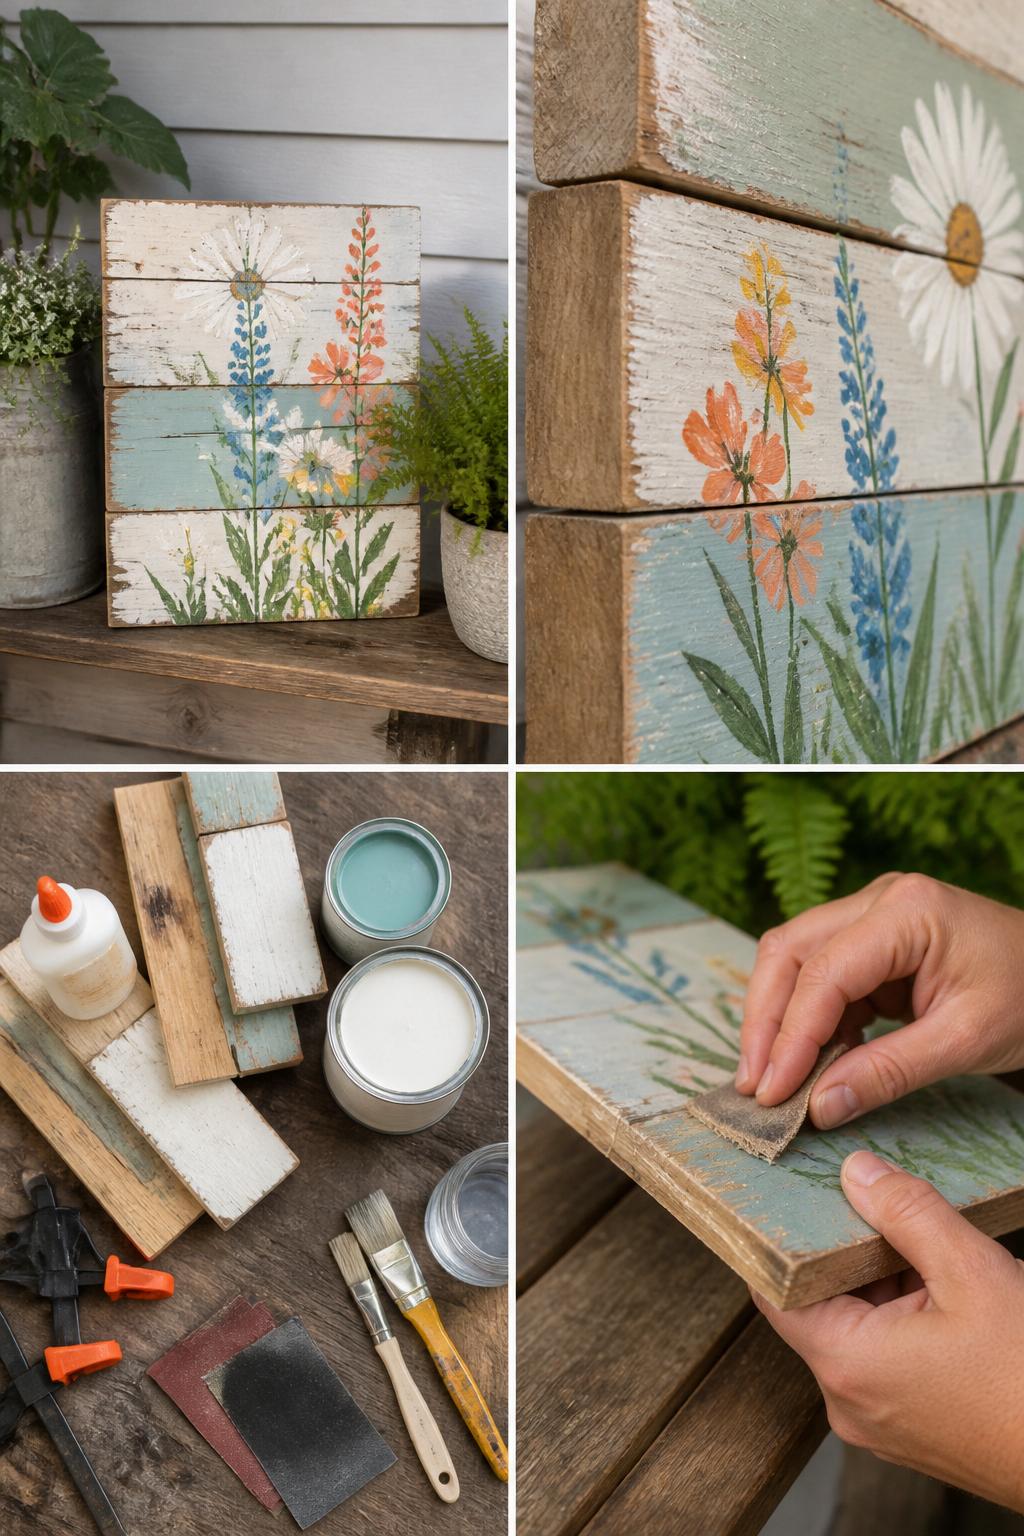
A scrap wood flower sign is a great weekend project if you have leftover wood pieces. The plank look gives the sign a rustic feel, and painted flowers make it bright enough for summer.
This is a nice option for farmhouse porches, garden sheds, and casual outdoor displays. The sign does not need to look perfect, which makes it beginner-friendly.
Materials Needed:
- Scrap wood pieces
- Wood glue or small nails
- Outdoor paint
- Paintbrushes
- Sandpaper
- Clamps, optional
- Clear sealer
Steps To Make:
- Line up scrap wood pieces to form a small sign.
- Glue or nail the pieces together.
- Paint the background and let it dry.
- Add simple flowers, leaves, or vines.
- Lightly sand the edges and seal the finished sign.
12. DIY Porch Planter Label Sign
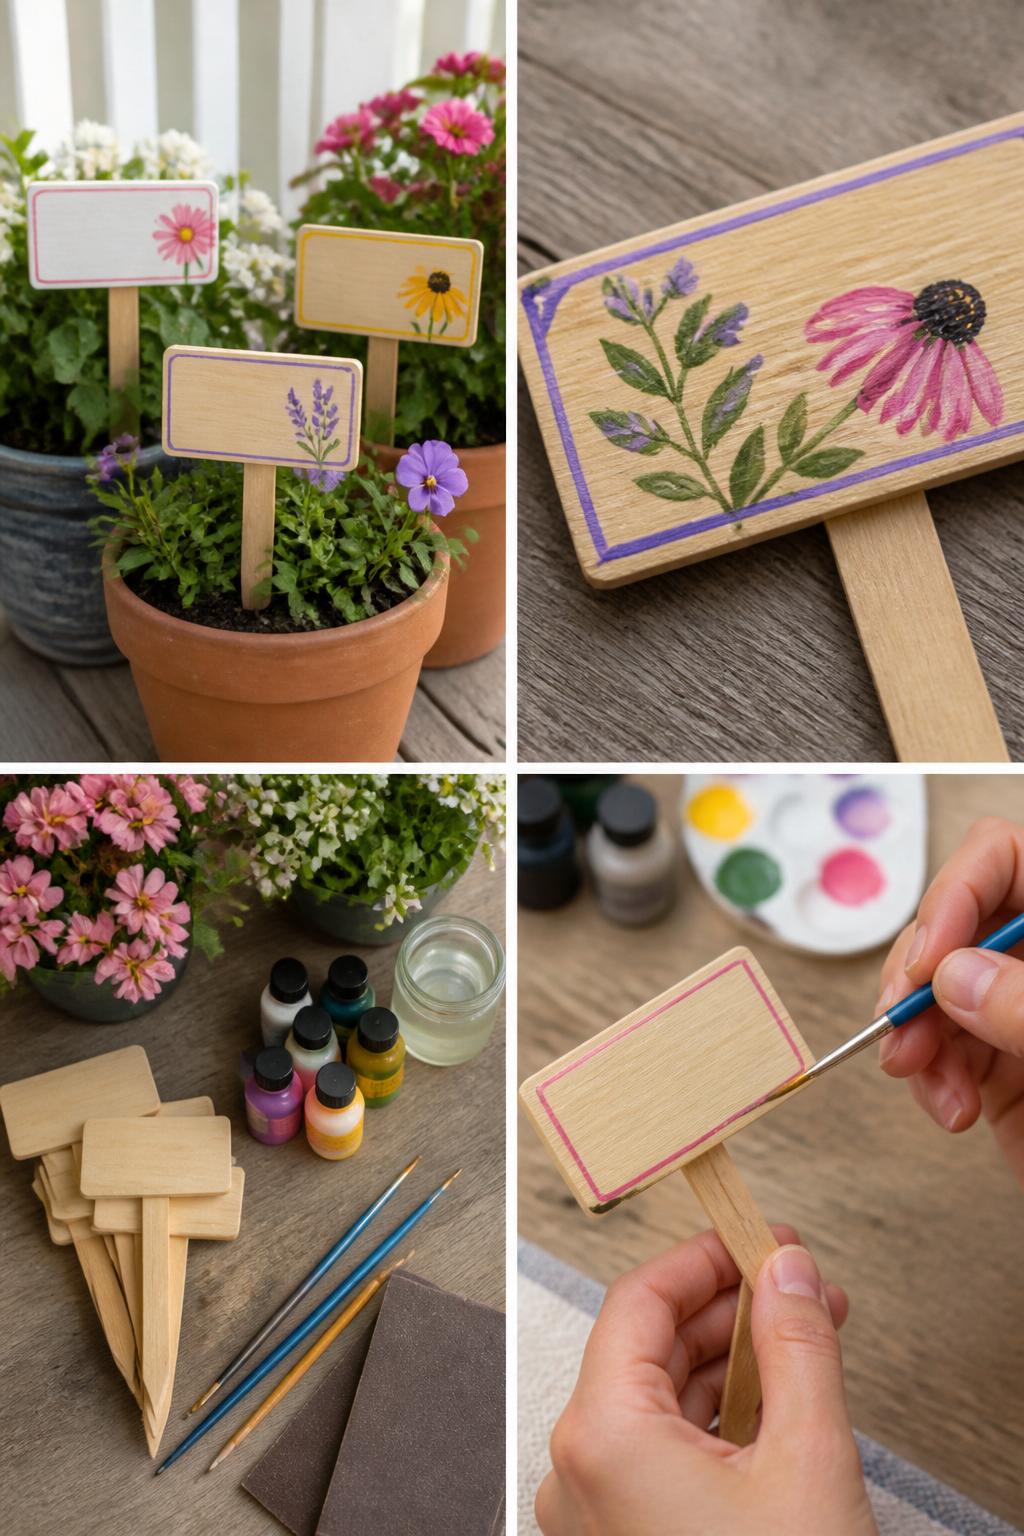
Porch planter label signs are small, easy, and perfect if you want a quick project that still looks useful. They can mark herbs, flowers, or seasonal planters while adding a cute handmade detail.
This is also a good project for using leftover paint from other signs. Add simple flower borders, leaves, or color blocks so the labels feel decorative without being hard to make.
Materials Needed:
- Small wooden stakes or mini boards
- Outdoor paint
- Fine paintbrushes
- Pencil
- Sandpaper
- Clear outdoor sealer
Steps To Make:
- Sand each wood stake or mini board.
- Paint the background or leave the wood natural.
- Add small flowers, leaves, or painted borders.
- Let the paint dry fully.
- Seal the signs and place them in porch planters.