


Table of Contents Show
Friendship bracelets are one of the easiest summer crafts to start with because they do not need expensive supplies or advanced skills. A few threads, beads, cords, or charms can turn into something cute enough to wear, gift, or make with friends during camp, sleepovers, beach days, or quiet afternoons at home.
For beginners, the best designs are simple but still fun to look at. These bracelet ideas use easy knots, braids, beads, and color patterns, so you can make something that feels handmade without getting stuck on a complicated pattern.
1. Simple Three-Strand Braided Bracelet
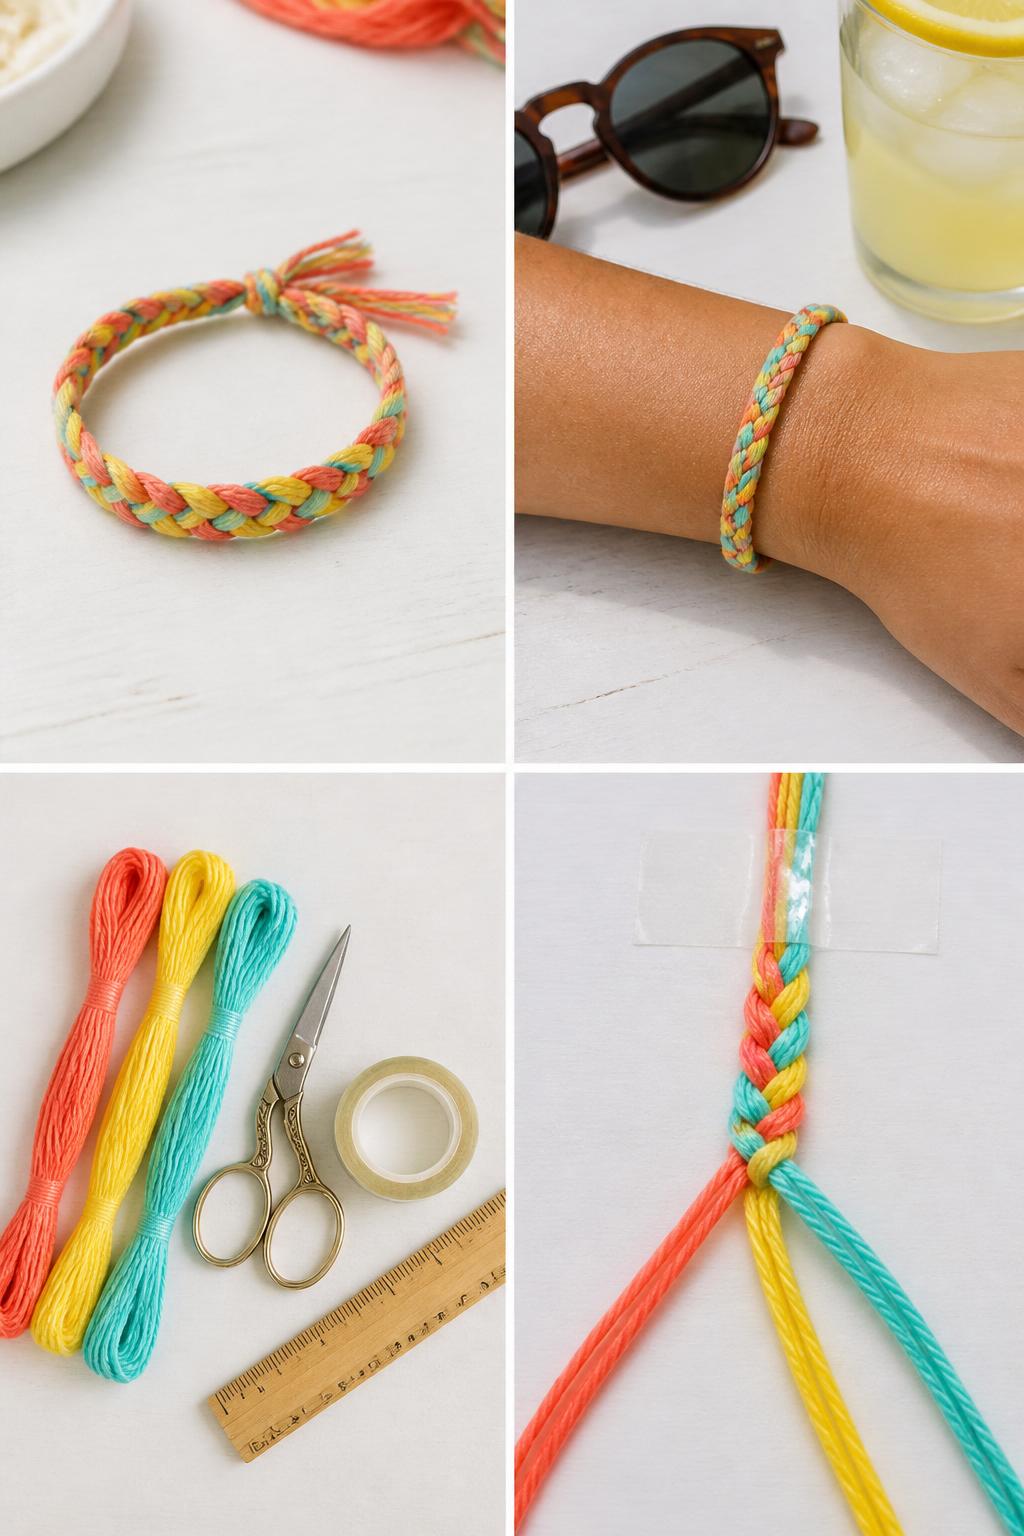
A three-strand braid is one of the easiest friendship bracelet designs for beginners. It uses the same basic braiding method many people already know, so it is a great place to start before trying knots or bead patterns.
This design also works well when you want to make several bracelets quickly. Use bright summer colors, school colors, or matching colors for a group of friends.
Materials Needed:
For People Who Love to Make Things ✂️
- Embroidery floss in 3 colors
- Scissors
- Tape or clipboard
- Ruler
Steps To Make:
- Cut 3 strands of embroidery floss to about 24 to 30 inches long.
- Tie the strands together at the top, leaving a small tail for tying later.
- Tape the knot to a table or secure it to a clipboard.
- Braid the three strands until the bracelet is long enough for the wrist.
- Tie a knot at the end and trim any uneven thread.
2. Candy Stripe Knot Bracelet
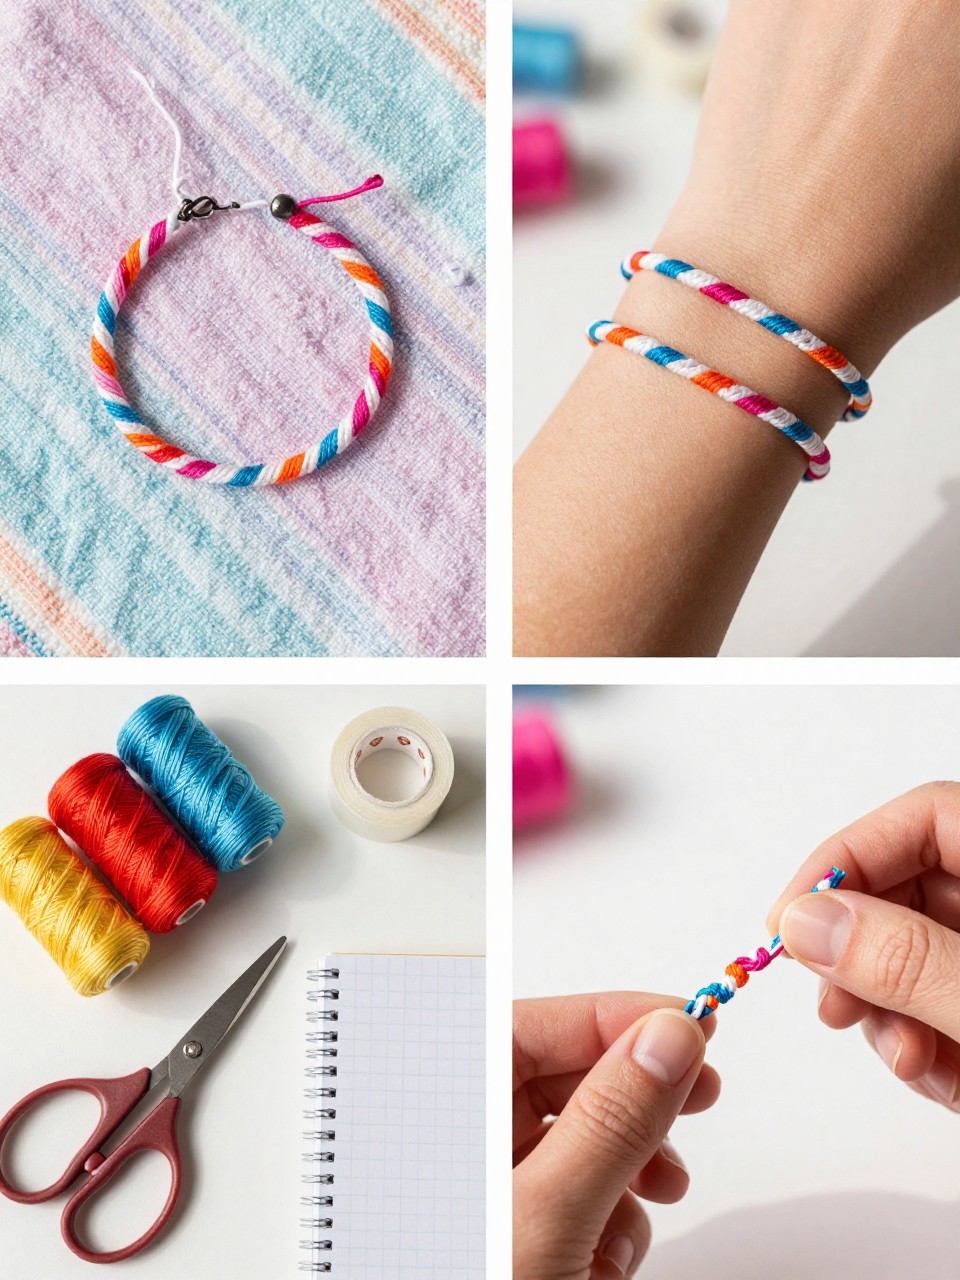
The candy stripe bracelet is a classic beginner design because the same knot repeats across the bracelet. Once you learn the forward knot, the pattern becomes easy to follow and has a clean diagonal stripe look.
This is a good next step after simple braids. It gives the bracelet more texture and makes the colors stand out nicely, especially when you use four or more bright threads.
Materials Needed:
- Embroidery floss in 4 to 6 colors
- Scissors
- Tape or clipboard
- Ruler
Steps To Make:
- Cut each thread to the same length and tie them together at the top.
- Arrange the thread colors in the order you want the stripes to appear.
- Take the first thread and make forward knots across each thread to the right.
- Repeat the same step with the next thread in line.
- Keep going until the bracelet fits, then knot and trim the ends.
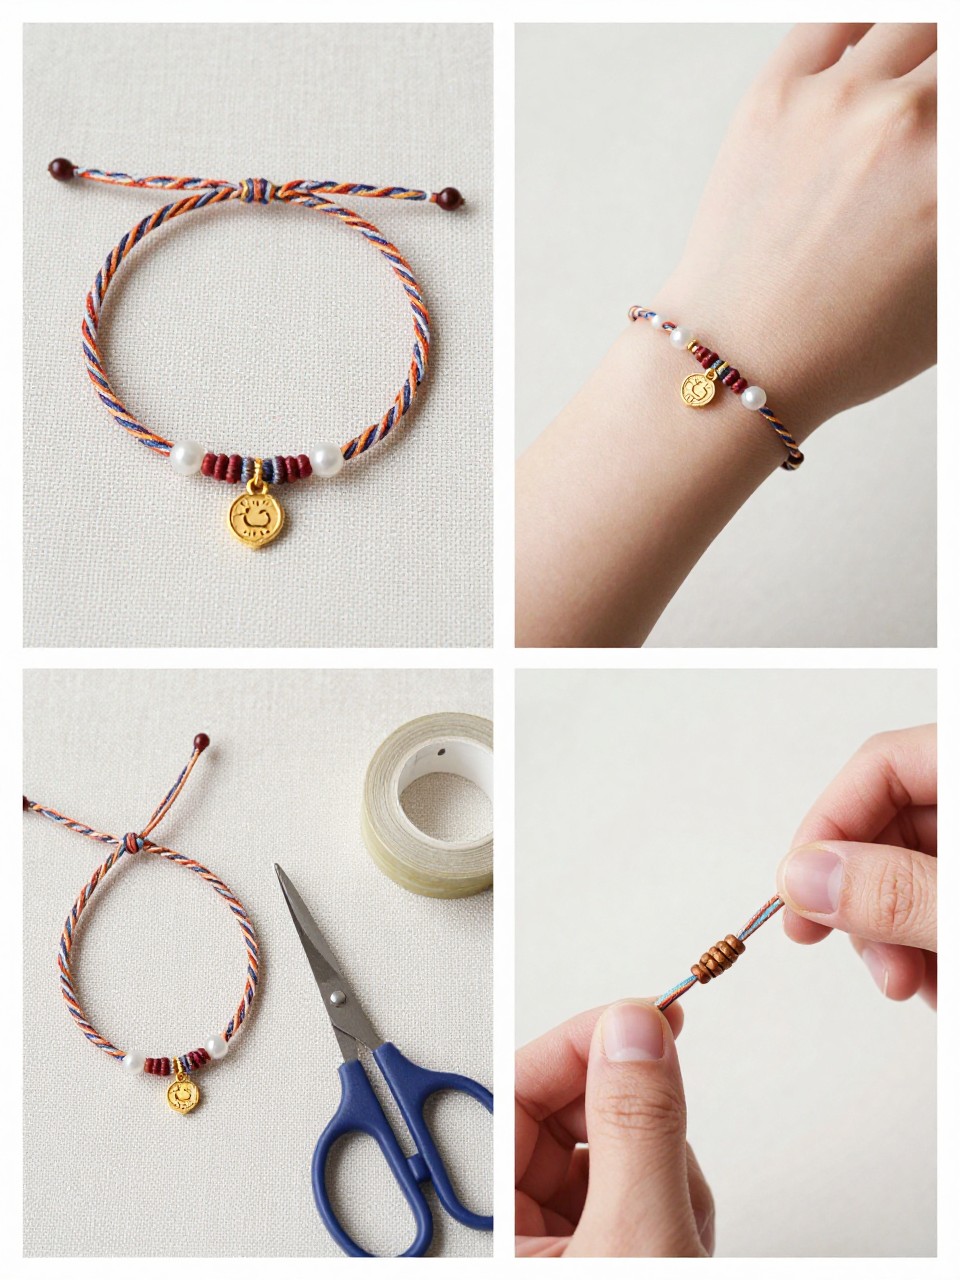
3. Single Bead Center Bracelet

A single bead center bracelet is easy but still looks pretty and thoughtful. The bead becomes the main detail, so even a simple braid or cord bracelet can feel more finished.
This design is great for beginners who want something quick but not plain. You can use pearl beads, letter beads, clay beads, wood beads, or small glass beads depending on the style you like.
Materials Needed:
- Embroidery floss or thin cord
- 1 large bead
- Scissors
- Tape or clipboard
Steps To Make:
- Cut 3 strands of cord or thread to the same length.
- Tie a knot at the top and braid until you reach the center of the bracelet.
- Slide one bead onto the middle strand.
- Continue braiding after the bead until the bracelet fits the wrist.
- Tie the ends securely and trim extra thread.
4. Twisted Rope Friendship Bracelet
A twisted rope bracelet is one of the fastest friendship bracelet designs to make. It only needs two bundles of thread, and the twist creates a neat spiral effect without any knot pattern.
This is a smart choice for younger beginners or anyone making bracelets in a group. You can finish one in a few minutes, and the final bracelet still looks fun and wearable.
Materials Needed:
- Embroidery floss in 2 colors
- Scissors
- Tape
- Ruler
Steps To Make:
- Cut two groups of thread in equal lengths.
- Tie the groups together at one end and tape the knot down.
- Twist each group in the same direction until tight.
- Let the two twisted groups wrap around each other in the opposite direction.
- Tie the end and trim any loose pieces.
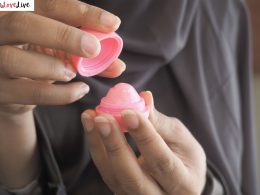
5. Clay Disc Bead Bracelet
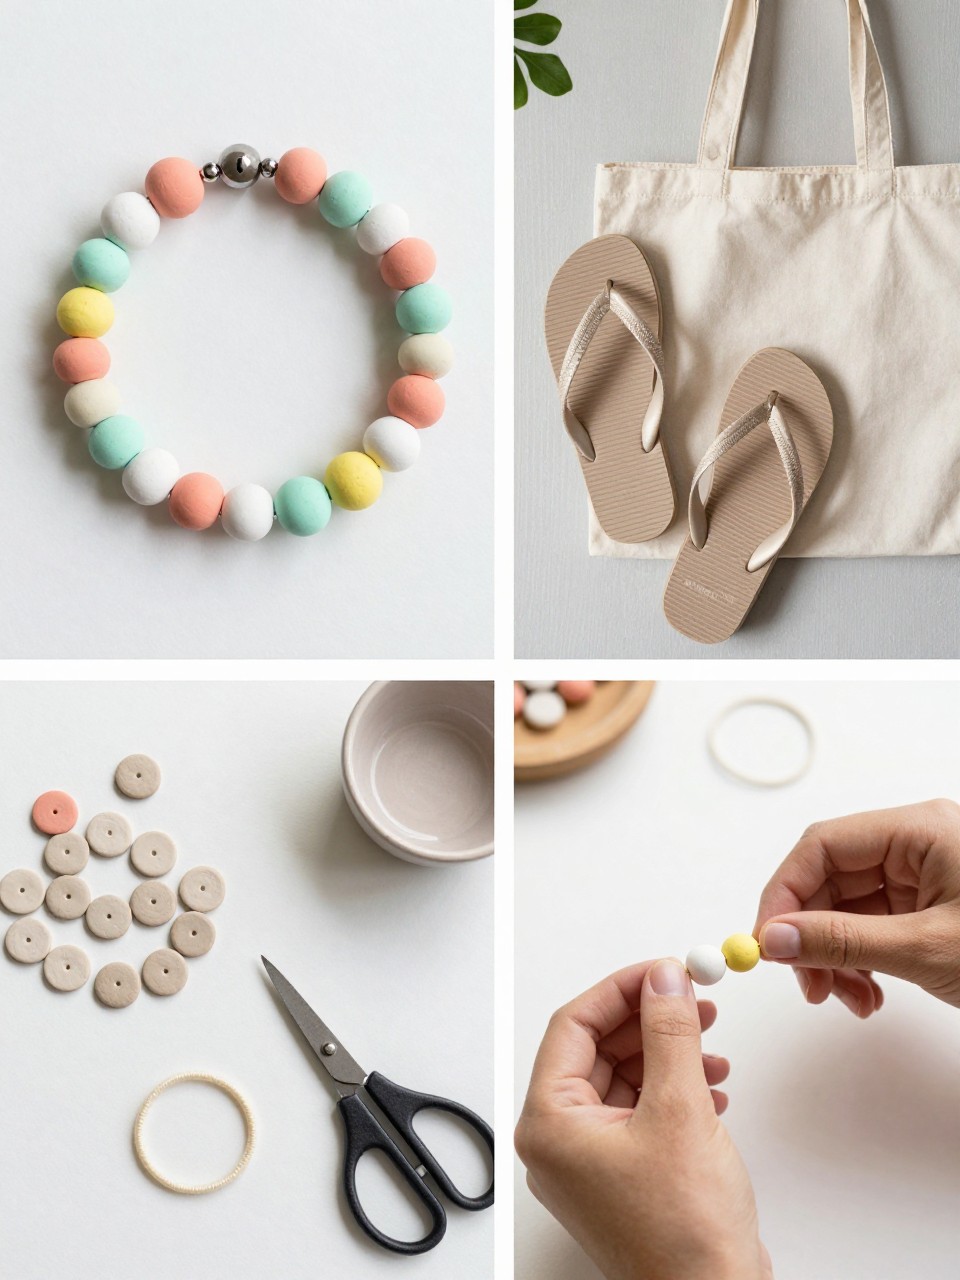
Clay disc bead bracelets are beginner-friendly because they do not need knots beyond the final closure. The flat beads give the bracelet a trendy summer look, and the colors can be changed to match any outfit or mood.
This is also a great bracelet for parties because everyone can choose their own bead mix. Add a gold spacer bead or letter bead if you want it to feel more personal.
Materials Needed:
- Clay disc beads
- Elastic jewelry cord
- Scissors
- Clear nail polish or jewelry glue
- Spacer beads, optional
Steps To Make:
- Cut elastic cord slightly longer than the wrist size.
- Arrange your clay beads in a color pattern before stringing.
- Slide the beads onto the elastic cord one by one.
- Test the fit around the wrist.
- Tie a tight knot, secure it with clear polish or glue, and trim the extra cord.
6. Button Loop Bracelet
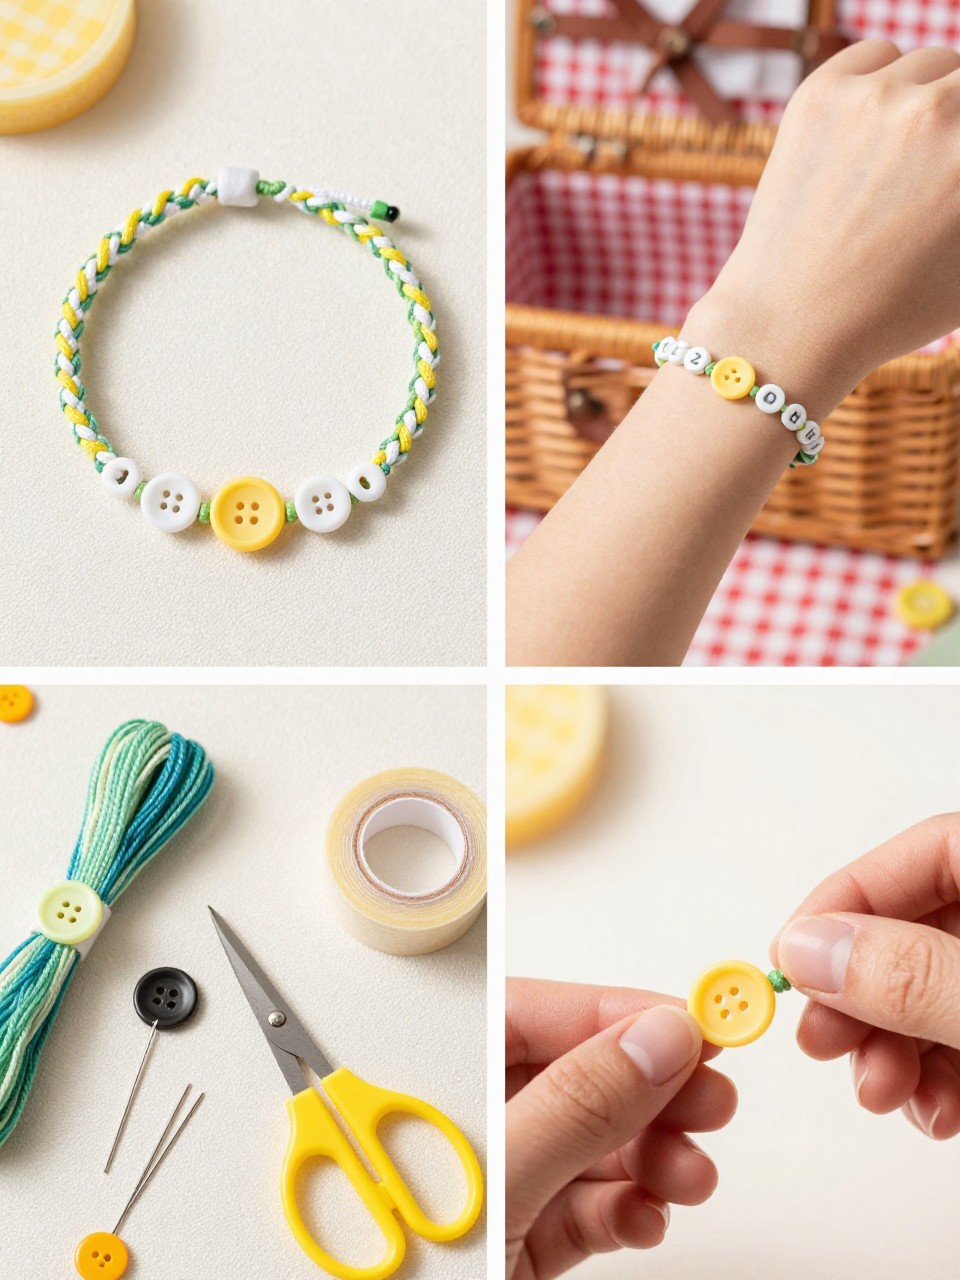
A button loop bracelet is easy to make and gives the bracelet a neat closure. Instead of tying the bracelet every time, you can slip the loop over the button to open and close it.
This is a useful design for beginners who want their bracelets to feel a little more finished. It works with braided, twisted, or simple knotted bracelet bases.
Materials Needed:
- Embroidery floss or thin cord
- 1 small button
- Scissors
- Tape or clipboard
- Needle, optional
Steps To Make:
- Fold your thread in half and tie a knot near the fold to create a loop.
- Tape the looped end to your workspace.
- Braid or twist the bracelet until it fits around the wrist.
- Thread the button onto the end of the bracelet.
- Tie a strong knot behind the button and trim the extra thread.
7. Color Block Bracelet
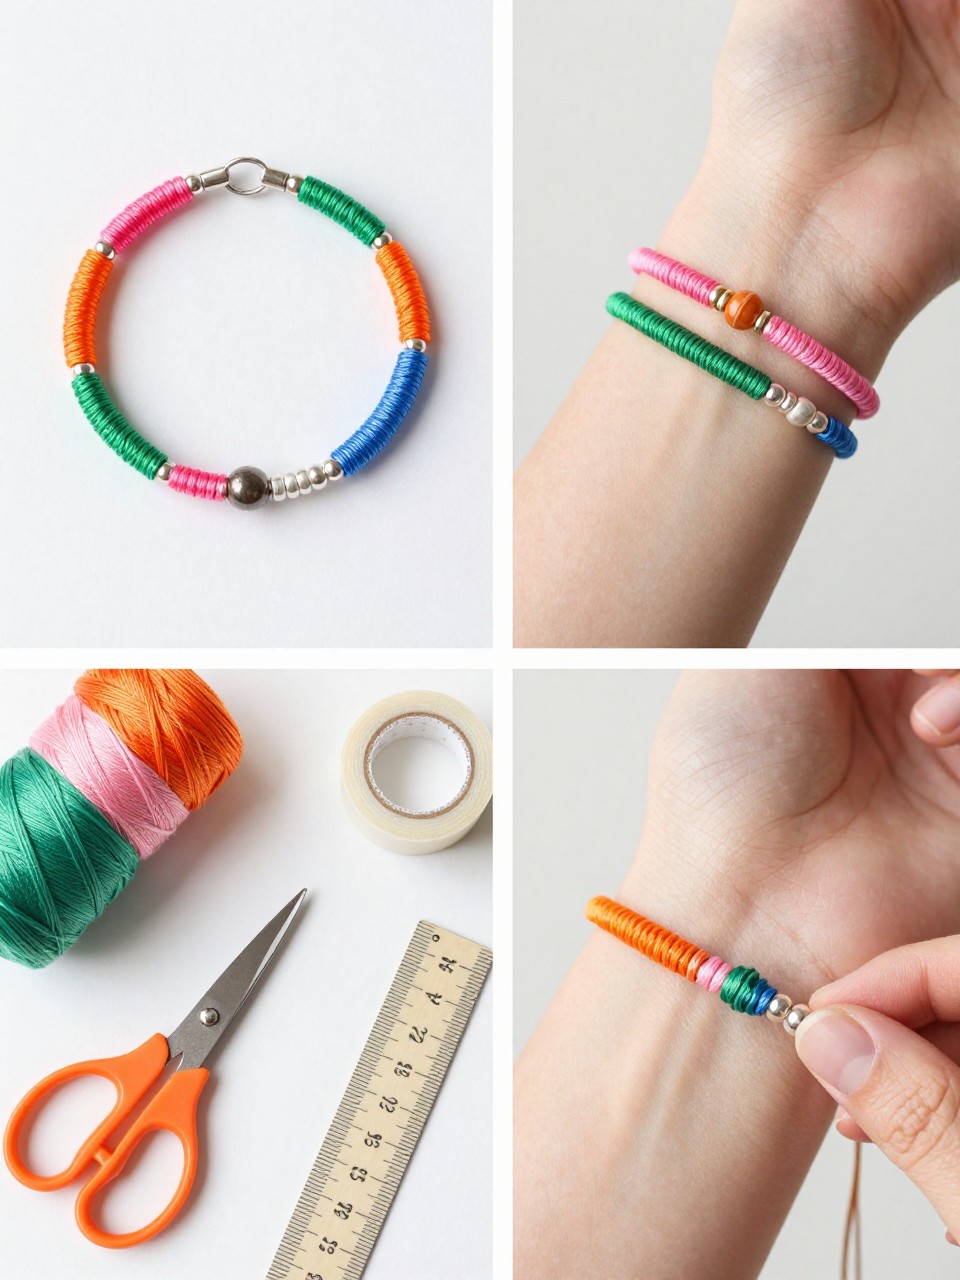
A color block bracelet is a great beginner option because it looks bold without needing a hard pattern. You make the bracelet in small sections, wrapping one color at a time around a simple thread base.
This design is easy to customize for summer. Try sunset colors, beach colors, fruit-inspired colors, or a set of bracelets where each friend gets a different color order.
Materials Needed:
- Embroidery floss in 4 or more colors
- Scissors
- Tape or clipboard
- Ruler
Steps To Make:
- Cut several base strands and tie them together at the top.
- Choose one thread color and wrap it tightly around the base strands.
- After about 1 inch, tie off that color and switch to the next.
- Repeat with different colors until the bracelet is long enough.
- Tie the ends and trim loose thread.
8. Letter Bead Initial Bracelet
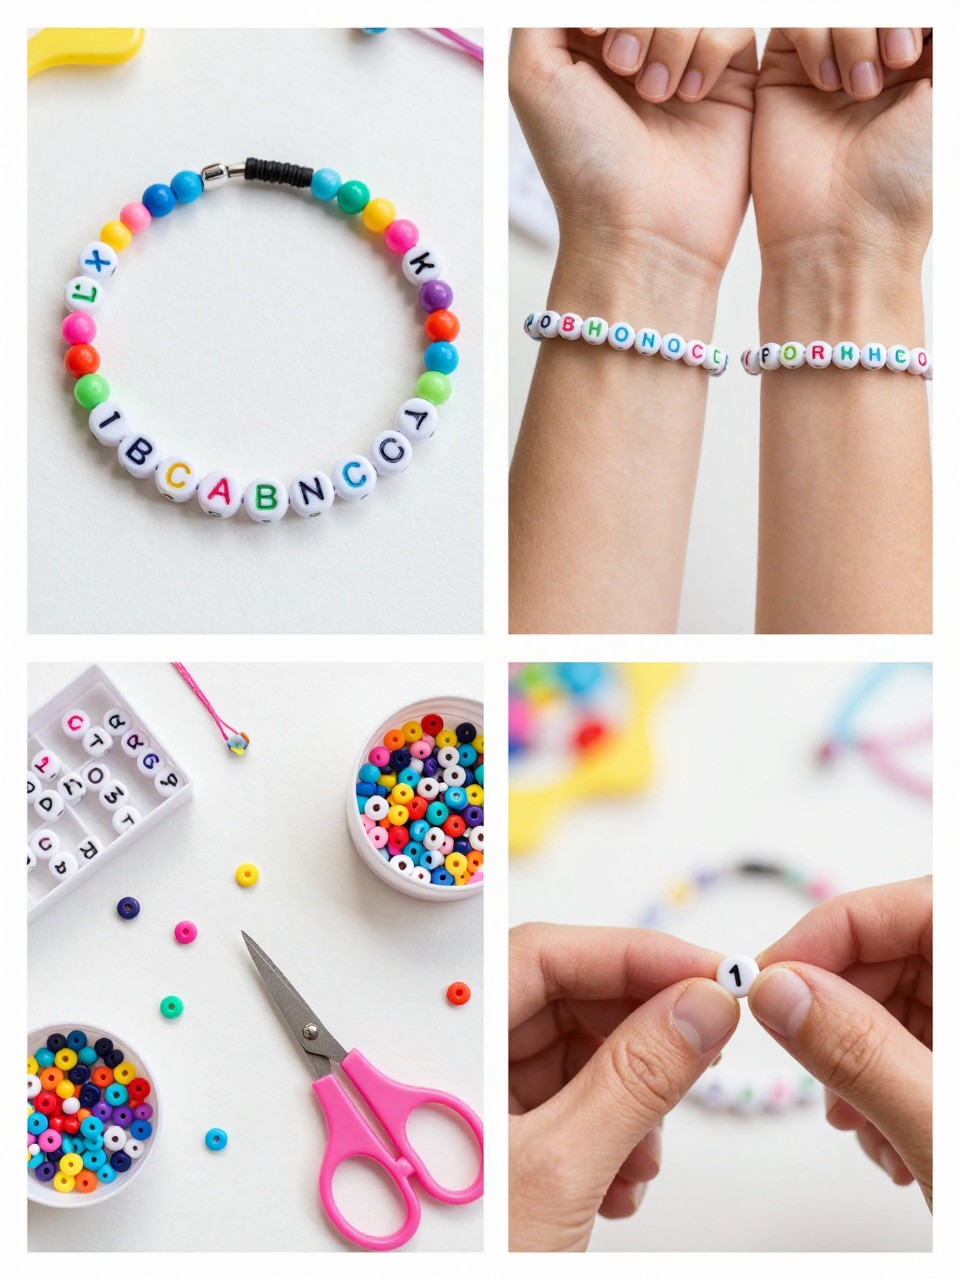
An initial bracelet is simple, personal, and quick to make. Instead of spelling a full name, you only need one letter bead, which keeps the bracelet clean and beginner-friendly.
This is a great option for best friends, siblings, cousins, or summer camp groups. Each person can choose their own colors while keeping the initial bead as the main detail.
Materials Needed:
- Alphabet initial beads
- Small round beads
- Elastic cord
- Scissors
- Jewelry glue or clear nail polish
Steps To Make:
- Cut a piece of elastic cord long enough for the wrist.
- Pick one initial bead and place it in the center of your bead layout.
- Add round beads on both sides of the initial bead.
- String the beads onto the cord and test the fit.
- Tie a strong knot, secure it, and trim the extra cord.
9. Simple Macrame Square Knot Bracelet

A square knot bracelet is a beginner-friendly way to try macrame. The same knot repeats down the bracelet, and once you get the rhythm, it becomes simple and relaxing.
This design looks nice with waxed cord, hemp cord, or embroidery floss. You can keep it plain or add a tiny charm in the center for a small summer detail.
Materials Needed:
- Waxed cord or embroidery floss
- Scissors
- Tape or clipboard
- Small charm, optional
Steps To Make:
- Cut one center cord and two longer side cords.
- Secure the top with tape or a clipboard.
- Make square knots around the center cord using the two side cords.
- Continue knotting until the bracelet is long enough.
- Tie the ends securely and add a charm if desired.
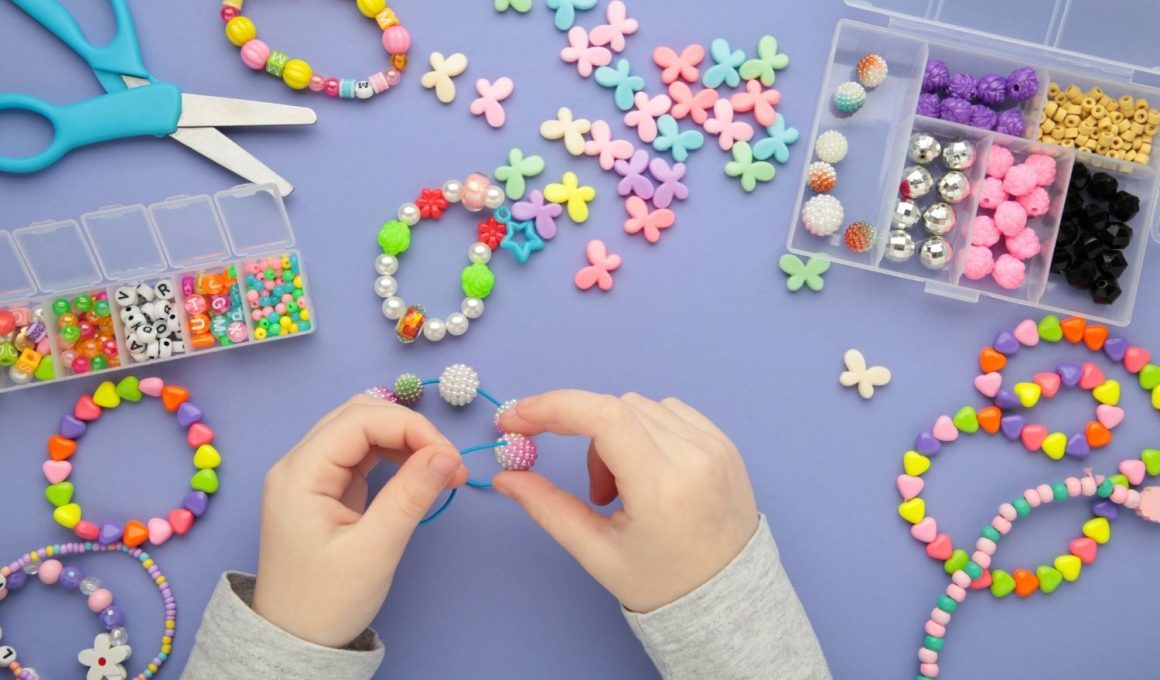
10. Pony Bead Summer Bracelet

Pony bead bracelets are perfect for beginners because the beads are larger and easier to handle. They are especially good for kids, group crafts, summer camp, and quick party activities.
The best part is how easy they are to change. You can make a beach color bracelet, a rainbow bracelet, a red-white-blue bracelet, or a matching set for a whole group.
Materials Needed:
- Pony beads
- Elastic cord or plastic lacing cord
- Scissors
- Clear nail polish or glue, optional
Steps To Make:
- Cut a piece of cord long enough for the wrist.
- Choose a simple bead color pattern.
- String the pony beads onto the cord.
- Wrap it around the wrist to check the size.
- Tie the ends in a secure knot and trim the extra cord.
11. Wrapped Shell Cord Bracelet

A wrapped shell cord bracelet is simple but still has a strong summer feel. One small shell charm in the center is enough to make the bracelet look beachy without needing many supplies.
This is a nice choice after a beach trip or for a summer party craft. You can use natural cream cord for a relaxed look or colorful cord for something more playful.
Materials Needed:
- Cotton cord or waxed cord
- Small shell charm
- Scissors
- Tape
- Jump ring, optional
Steps To Make:
- Cut two pieces of cord to the same length.
- Attach the shell charm to the center using a knot or jump ring.
- Braid or twist the cord on both sides of the shell.
- Check the bracelet length around the wrist.
- Tie the ends together or create a simple sliding knot.
12. Two-Color Spiral Knot Bracelet

A spiral knot bracelet looks more detailed than it really is. It uses the same knot over and over, and the bracelet naturally twists as you work.
This design is great for beginners who want to try knotting but still need something easy. Two colors are enough to make the spiral stand out, but you can add more once you feel confident.
Materials Needed:
- Embroidery floss in 2 colors
- Scissors
- Tape or clipboard
- Ruler
Steps To Make:
- Cut two long strands of each color.
- Tie all strands together at the top and tape them down.
- Use one outside strand to make the same knot repeatedly around the center strands.
- Let the bracelet twist naturally as the knots build.
- Stop when it fits the wrist, then tie and trim the ends.
13. Braided Bead Bracelet

A braided bead bracelet is a simple way to make a basic braid feel more special. You only need to add a bead every few braid sections, so it stays beginner-friendly.
This design works with small glass beads, seed beads, or round plastic beads. It is a nice option when you want a bracelet that feels handmade but still has a little sparkle or color detail.
Materials Needed:
- Embroidery floss
- Small beads
- Scissors
- Tape or clipboard
- Beading needle, optional
Steps To Make:
- Cut 3 strands of embroidery floss and tie them together at the top.
- Tape the knot to your work surface.
- Start braiding for about 1 inch.
- Slide a bead onto one strand, then continue braiding.
- Repeat with more beads, then tie the bracelet closed when it fits.
14. Easy Adjustable Sliding Knot Bracelet
An adjustable sliding knot bracelet is helpful because it can fit different wrist sizes. This makes it a great design for gifts, group crafts, or bracelets you want to share with friends.
The bracelet base can be as simple as one cord with a charm or bead in the center. Once you learn the sliding knot, you can use it for many other bracelet styles too.
Materials Needed:
- Waxed cord or cotton cord
- Small charm or bead
- Scissors
- Tape
Steps To Make:
- Cut one long piece of cord and add a charm or bead to the center.
- Cross the two cord ends over each other to form a bracelet shape.
- Use one end to tie a sliding knot around the opposite cord.
- Repeat on the other side with the second cord end.
- Pull both knots to adjust the bracelet size and trim extra cord.