


Table of Contents Show
The first day of summer is the perfect excuse to make something bright, happy, and full of sunshine. Kids are usually excited for longer days, outdoor play, cold treats, beach trips, pool time, flowers, and all the little things that make summer feel special. A simple craft can help mark the start of the season in a fun and memorable way.
These first day of summer crafts are easy to set up and cheerful enough for home, daycare, preschool, summer camp, or classroom activities.
Each idea feels colorful and seasonal without being too basic, so kids can paint, glue, stamp, build, and decorate something they will actually enjoy making.
1. First Day of Summer Sunshine Crown
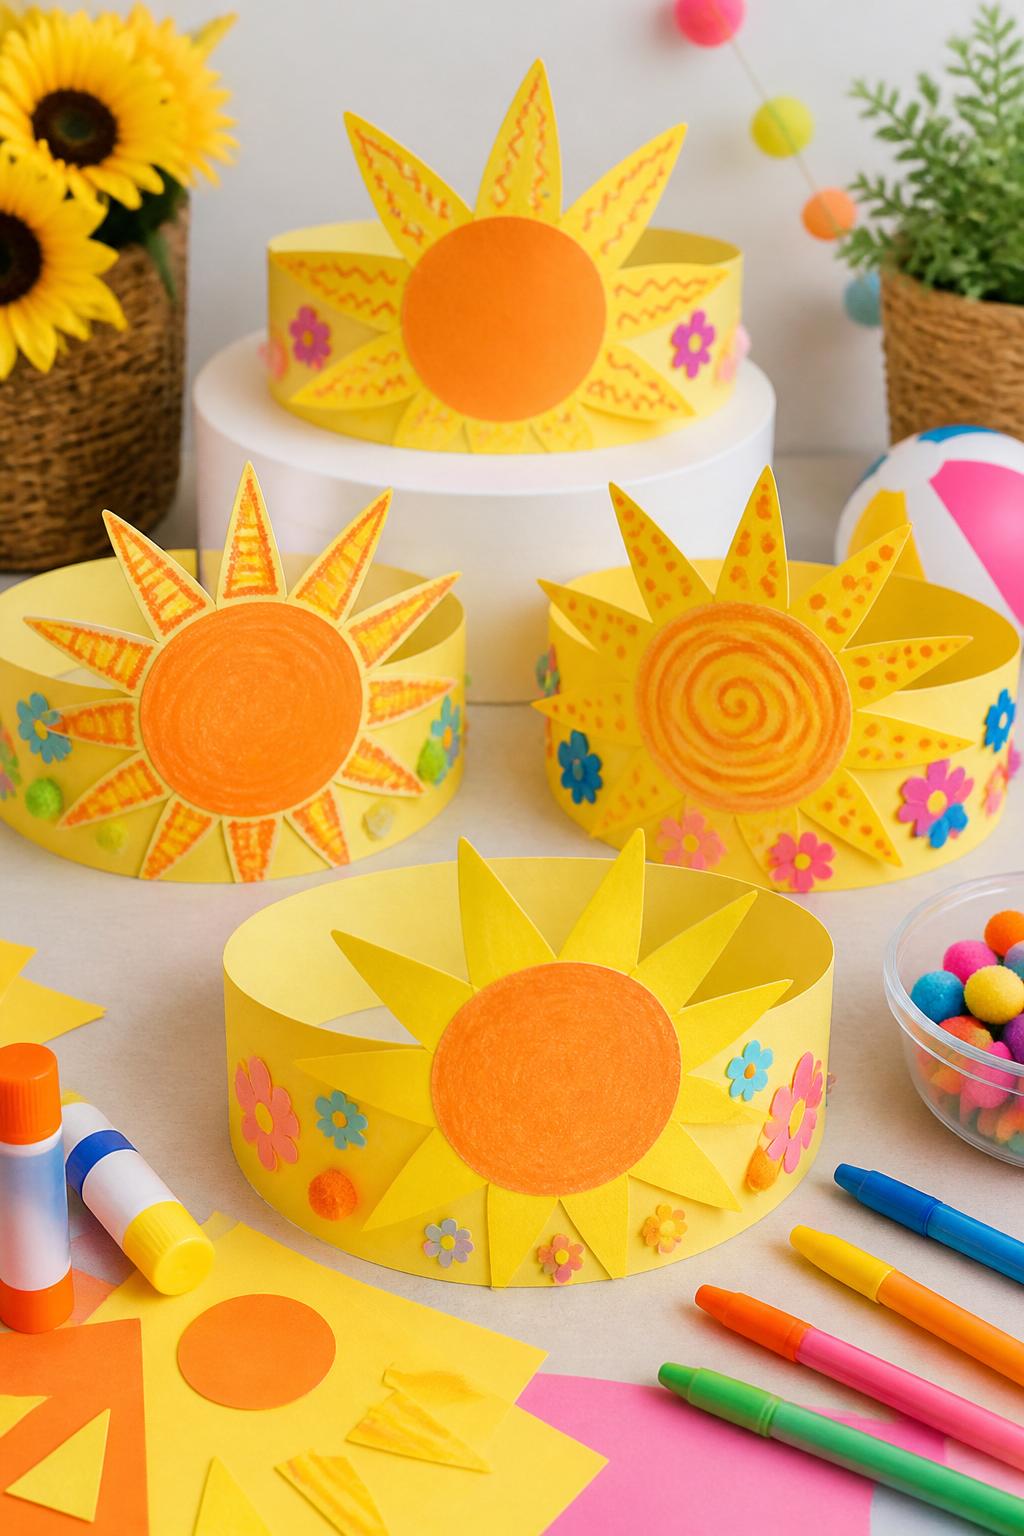
This sunshine crown is a fun way to make the first day of summer feel like a mini celebration. Kids can wear it during outdoor play, a picnic, a classroom activity, or a summer-themed photo setup.
Materials Needed:
For People Who Love to Make Things ✂️
- Yellow construction paper
- Orange construction paper
- Stickers
- Pom-poms
- Glue stick
- Markers or crayons
- Tape or stapler
- Child-safe scissors
Steps To Make:
- Cut a long strip of yellow paper for the crown band.
- Cut triangle sun rays from yellow or orange paper.
- Help kids glue the rays along the top edge of the band.
- Let them decorate the band with stickers, pom-poms, and crayon patterns.
- Measure the crown around the child’s head.
- Tape or staple the ends together with adult help.
- Let kids wear their crowns to celebrate summer.
2. Summer Bucket List Poster
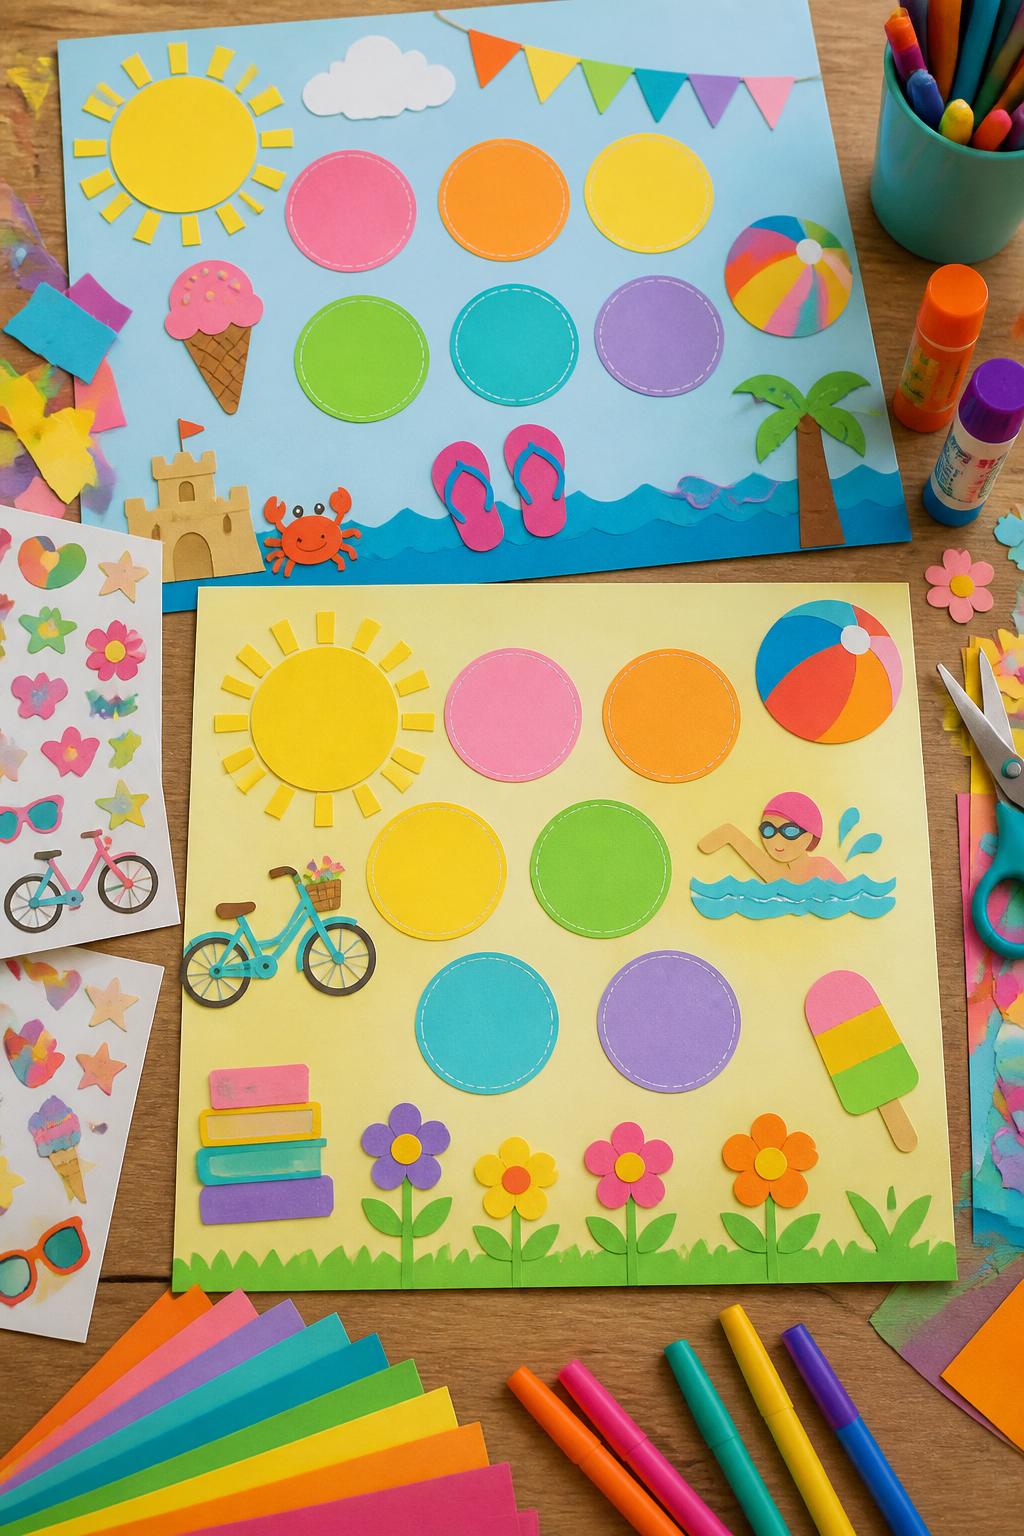
This poster helps kids think about what they want to do during summer. Younger kids can draw pictures, while older kids can add simple activity ideas like reading outside, making lemonade, visiting a park, or having a picnic.
Materials Needed:
- Large cardstock or poster board
- Construction paper
- Stickers
- Markers
- Glue stick
- Child-safe scissors
- Crayons
Steps To Make:
- Give each child a large sheet of cardstock or poster board.
- Cut out summer shapes like suns, flowers, fruit, and beach balls.
- Let kids glue the shapes around the poster.
- Add blank circles, squares, or clouds for activity ideas.
- Help kids write or draw summer goals inside the spaces.
- Decorate with stickers and crayon details.
- Hang the poster where kids can see it all summer.
3. Paper Plate Summer Clock
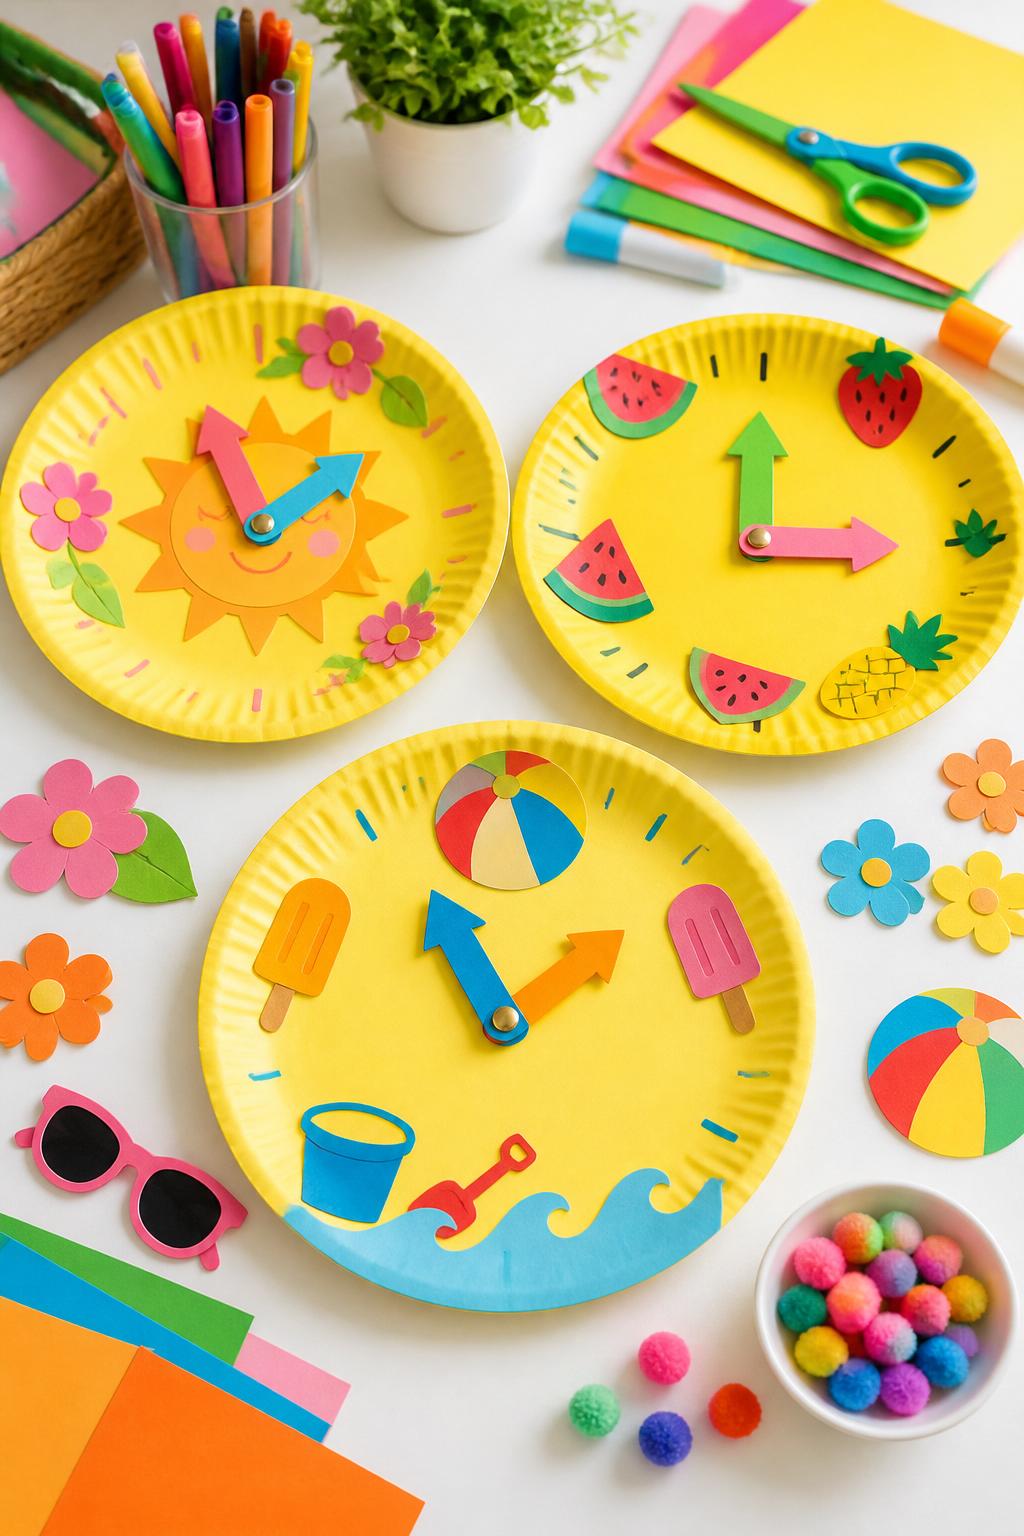
A summer clock is a cute way to mark the start of the season. Instead of regular numbers, kids can fill the plate with summer activities, favorite foods, or things they are excited to do.
Materials Needed:
- Paper plate
- Markers or crayons
- Construction paper
- Brass fastener
- Glue stick
- Stickers
- Child-safe scissors
Steps To Make:
- Decorate the paper plate with a bright background.
- Cut small summer shapes from construction paper.
- Glue the shapes around the plate like clock numbers.
- Cut two paper clock hands.
- Attach the hands to the center with a brass fastener.
- Let kids point the hands to their favorite summer activity.
- Display it as a first day of summer craft.
4. Popsicle Stick Summer Door Hanger
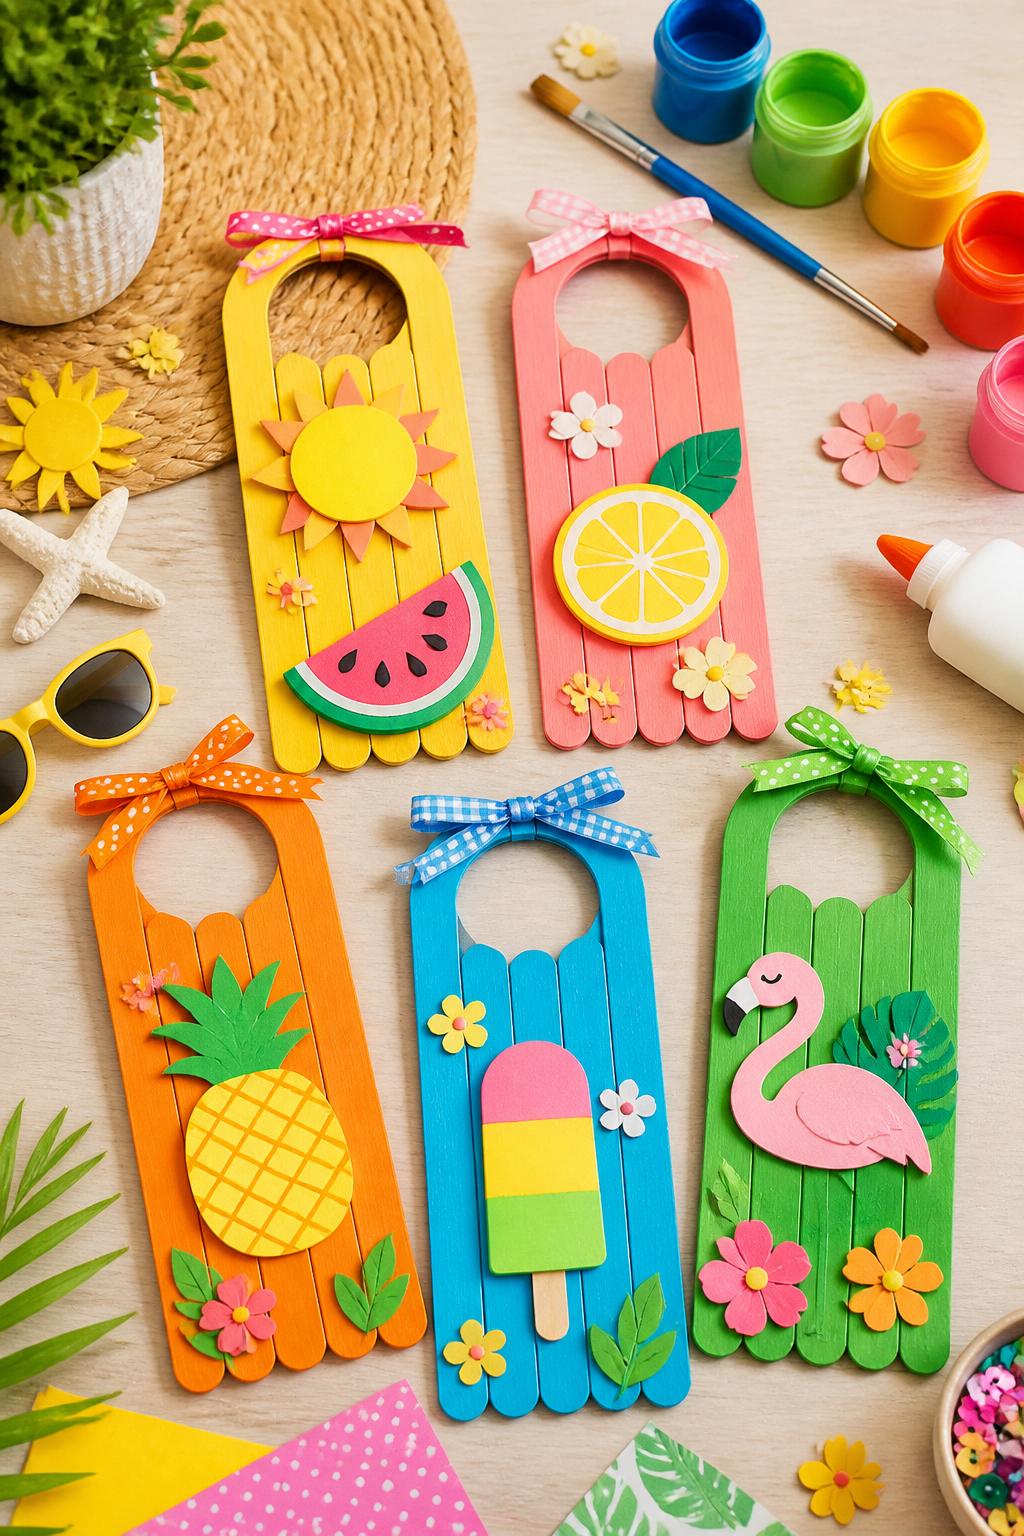
This door hanger gives kids a cute way to welcome summer into their bedroom or playroom. It feels like a small decor project, but it is still easy enough for kids to make with help.
Materials Needed:
- Popsicle sticks
- Washable paint
- Glue
- Ribbon or yarn
- Stickers
- Construction paper
- Paintbrushes
- Child-safe scissors
Steps To Make:
- Paint several popsicle sticks in bright summer colors.
- Let the sticks dry.
- Glue them side by side onto two support sticks on the back.
- Cut summer shapes like suns, flowers, or fruit.
- Glue the shapes onto the front.
- Add ribbon or yarn at the top for hanging.
- Let it dry before placing it on a door.
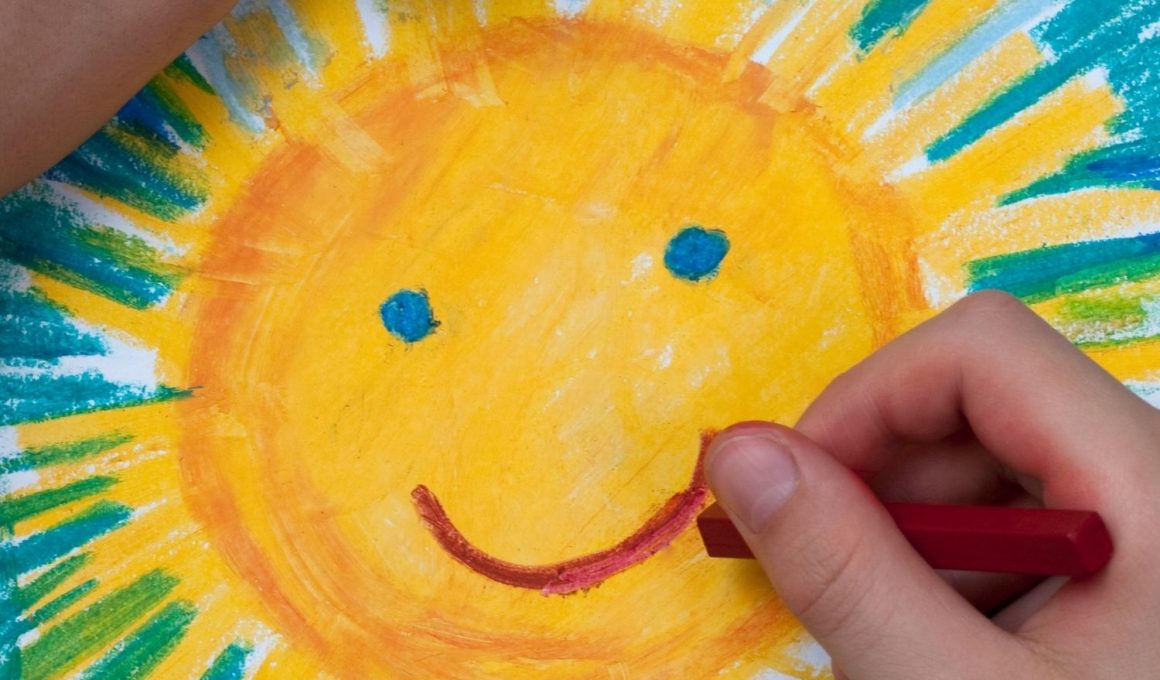
5. First Day of Summer Handprint Sun
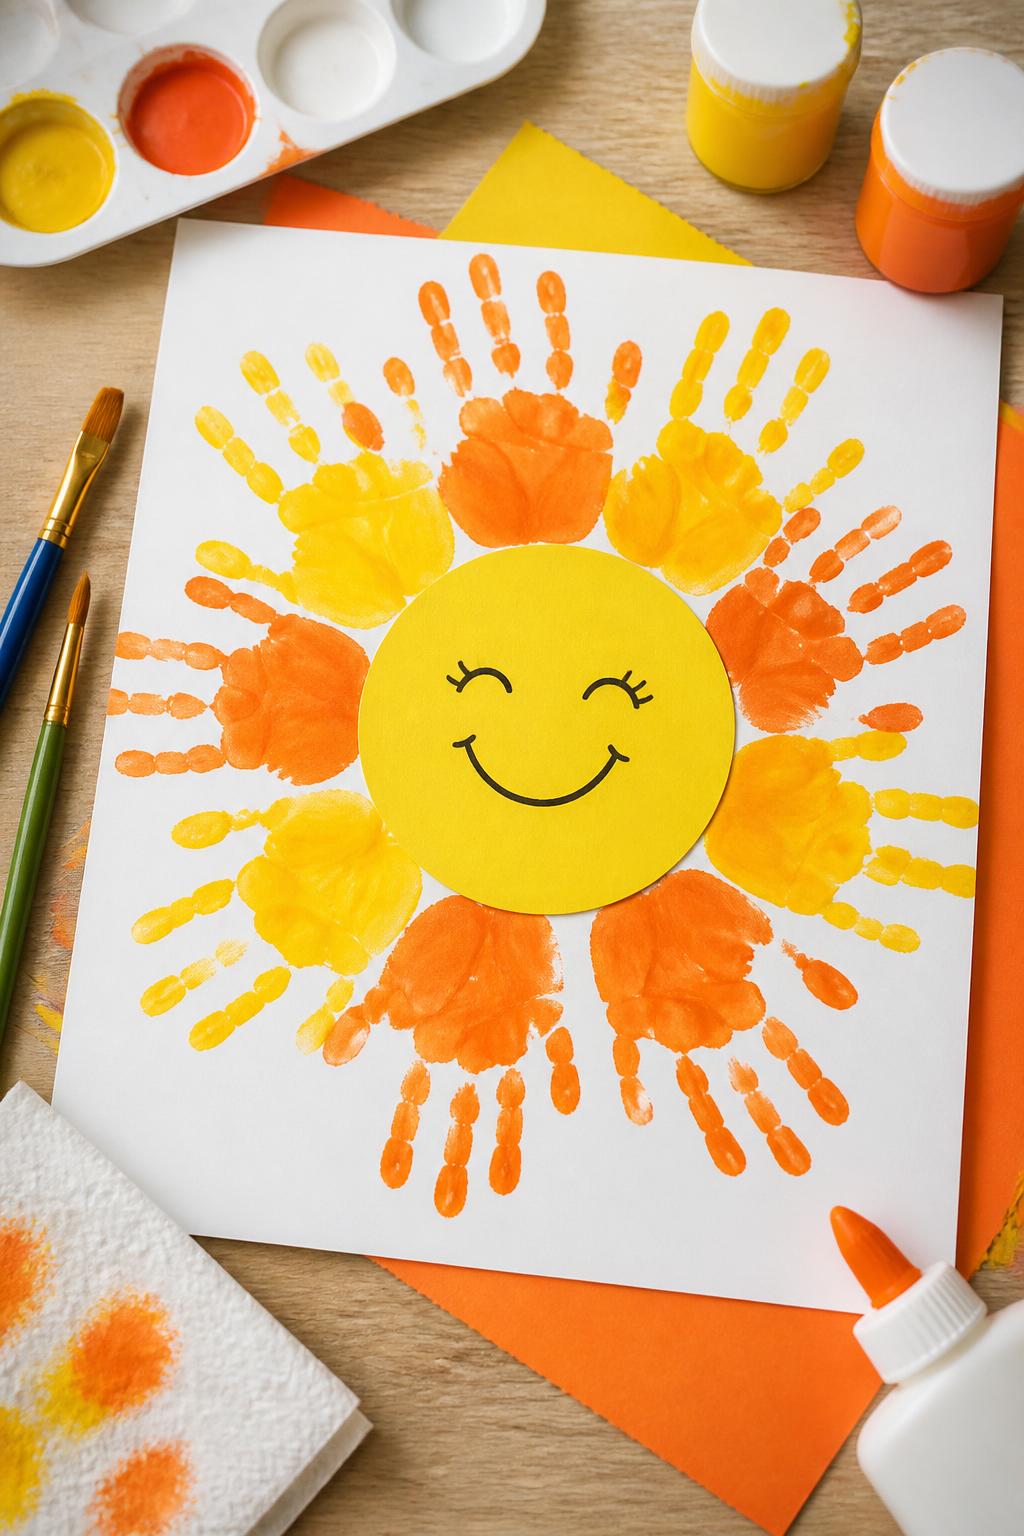
This handprint sun is simple, bright, and perfect as a first day of summer keepsake. It captures the start of the season in a way parents can save or display.
Materials Needed:
- White cardstock
- Yellow construction paper
- Yellow and orange washable paint
- Paintbrush
- Marker
- Glue stick
- Wipes for cleanup
Steps To Make:
- Cut a yellow circle for the sun’s center.
- Paint the child’s hand yellow or orange.
- Press handprints around the cardstock to create sun rays.
- Let the handprints dry.
- Glue the yellow circle in the middle.
- Draw a smiling face on the sun.
- Add the date on the back if saving it as a keepsake.
6. Summer Treat Paper Garland
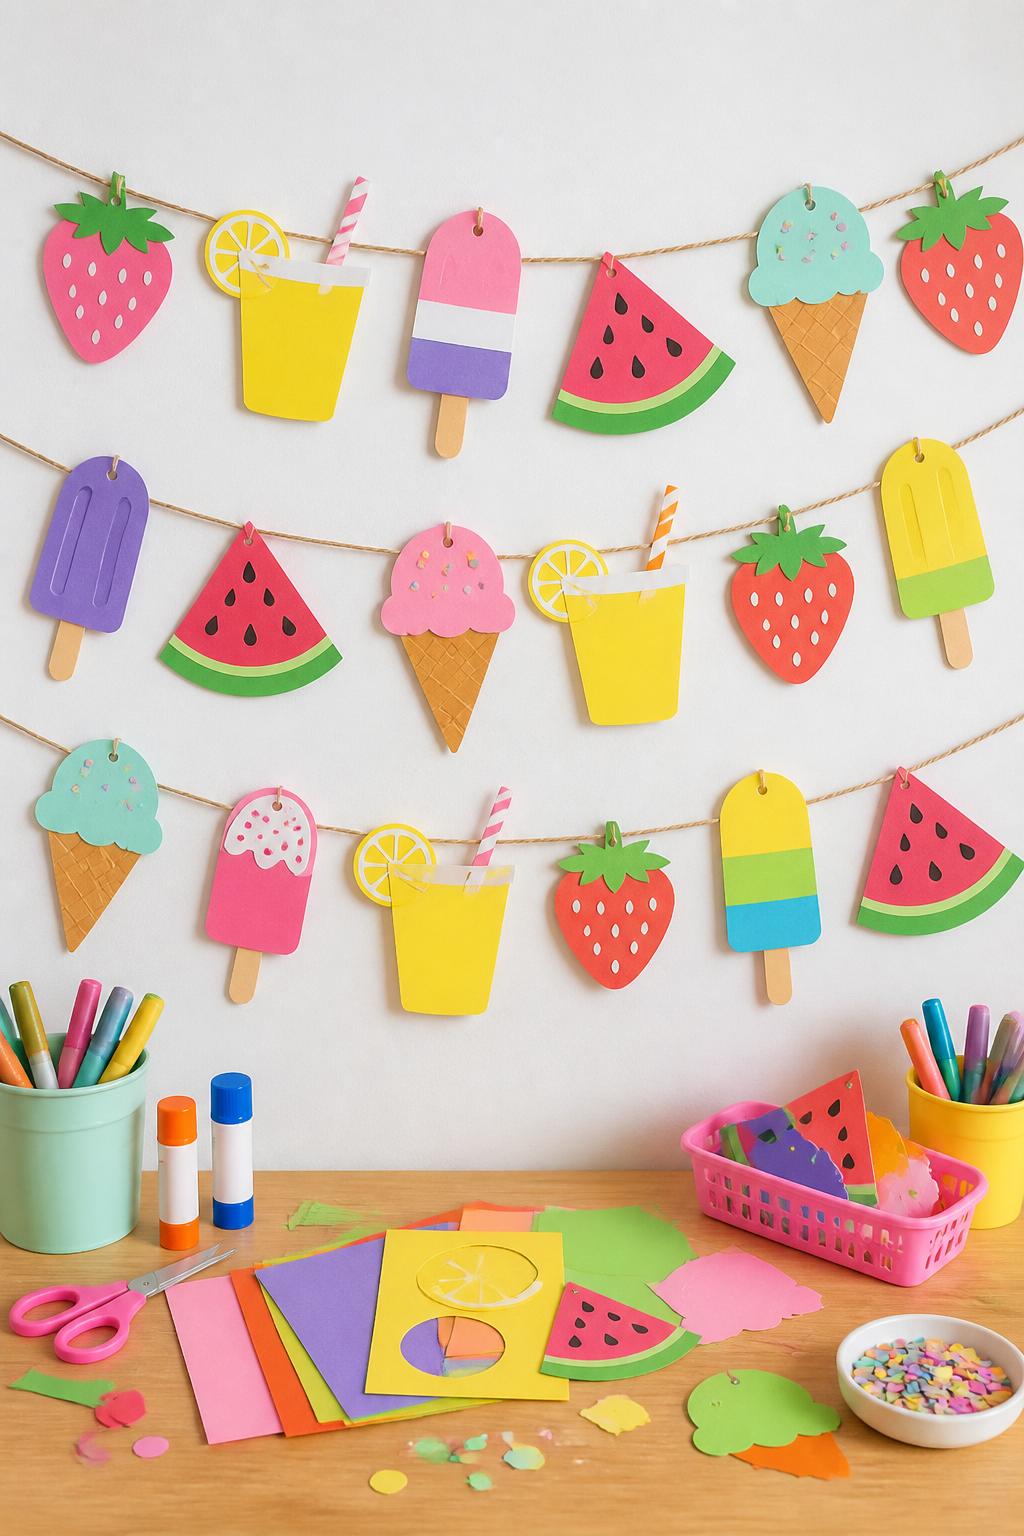
This paper garland turns the first day of summer into a little celebration. Kids can each make one treat shape, or one child can create a full garland for a bedroom, kitchen, or party table.
Materials Needed:
- Construction paper
- Twine or yarn
- Hole punch
- Glue stick
- Markers
- Stickers
- Child-safe scissors
Steps To Make:
- Cut summer treat shapes from construction paper.
- Choose popsicles, ice cream cones, fruit slices, and lemonade cups.
- Let kids decorate each shape with markers and stickers.
- Punch a hole near the top of each shape.
- Thread the shapes onto twine or yarn.
- Space them evenly along the string.
- Hang the garland on a wall, shelf, or party table.
7. Sunshine Suncatcher Window Art
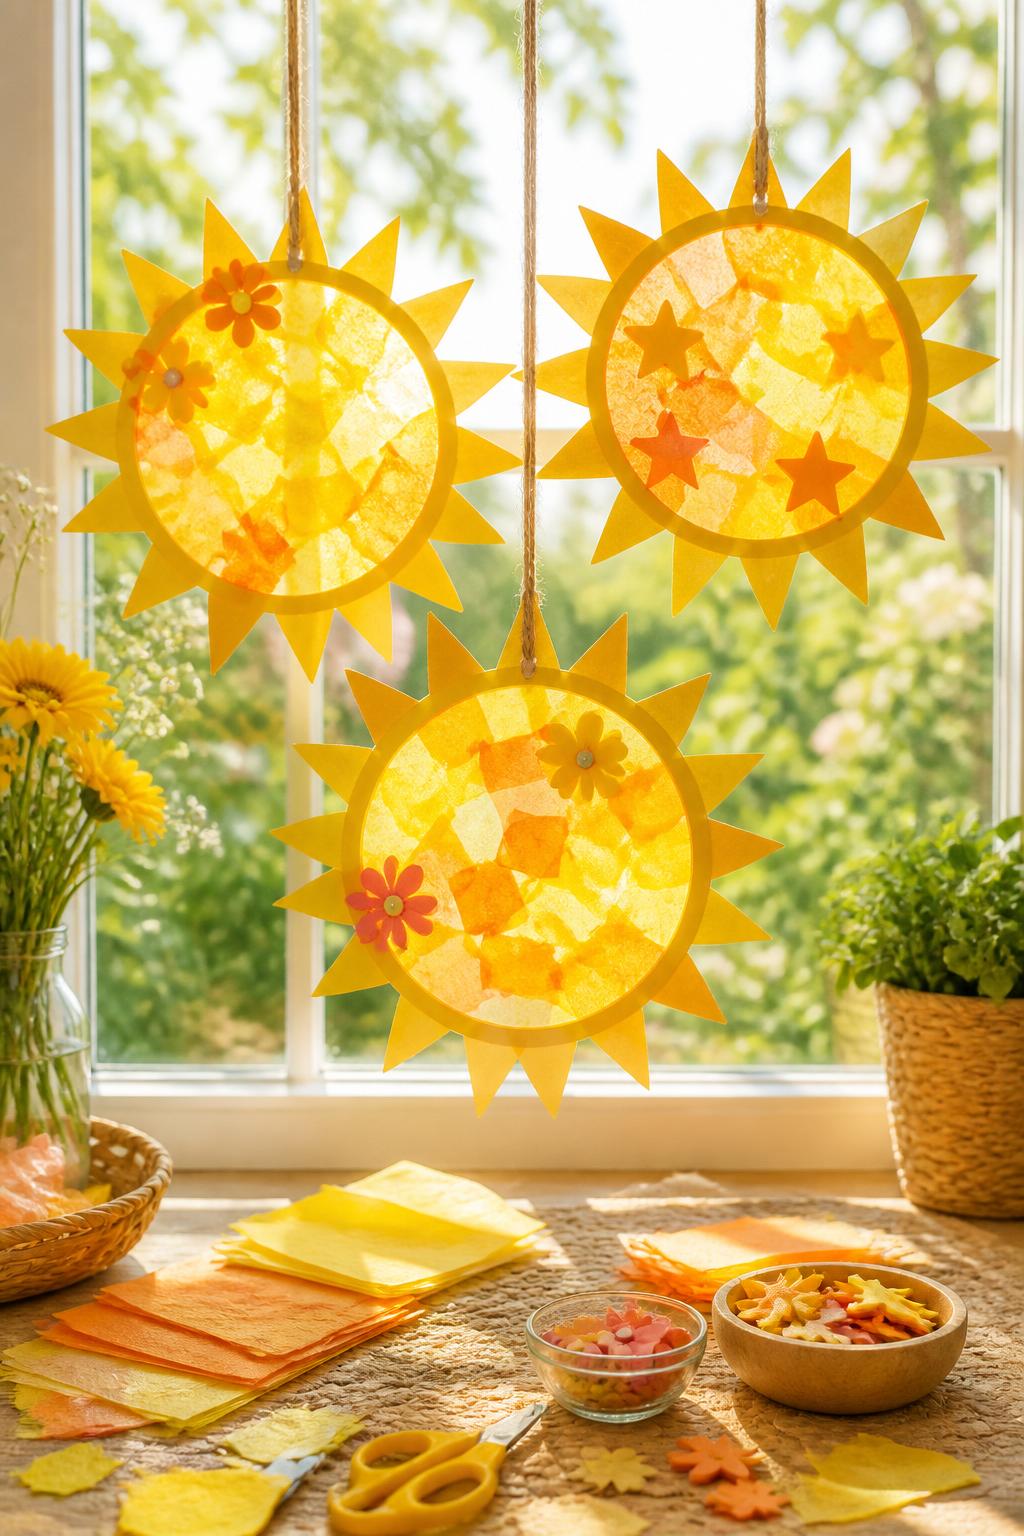
A sunshine suncatcher is a lovely way to bring summer light indoors. Kids can tear and stick tissue paper pieces, and the finished craft looks pretty when sunlight shines through it.
Materials Needed:
- Clear contact paper
- Yellow and orange tissue paper
- Yellow construction paper
- Scissors
- Tape
- Hole punch
- Ribbon or string
Steps To Make:
- Cut a circle from clear contact paper.
- Tape it sticky-side up to the table.
- Let kids place yellow and orange tissue pieces onto it.
- Seal with another contact paper circle.
- Cut paper rays and tape or glue them around the edge.
- Punch a hole at the top.
- Hang it in a sunny window.
8. Paper Lemonade Stand Craft
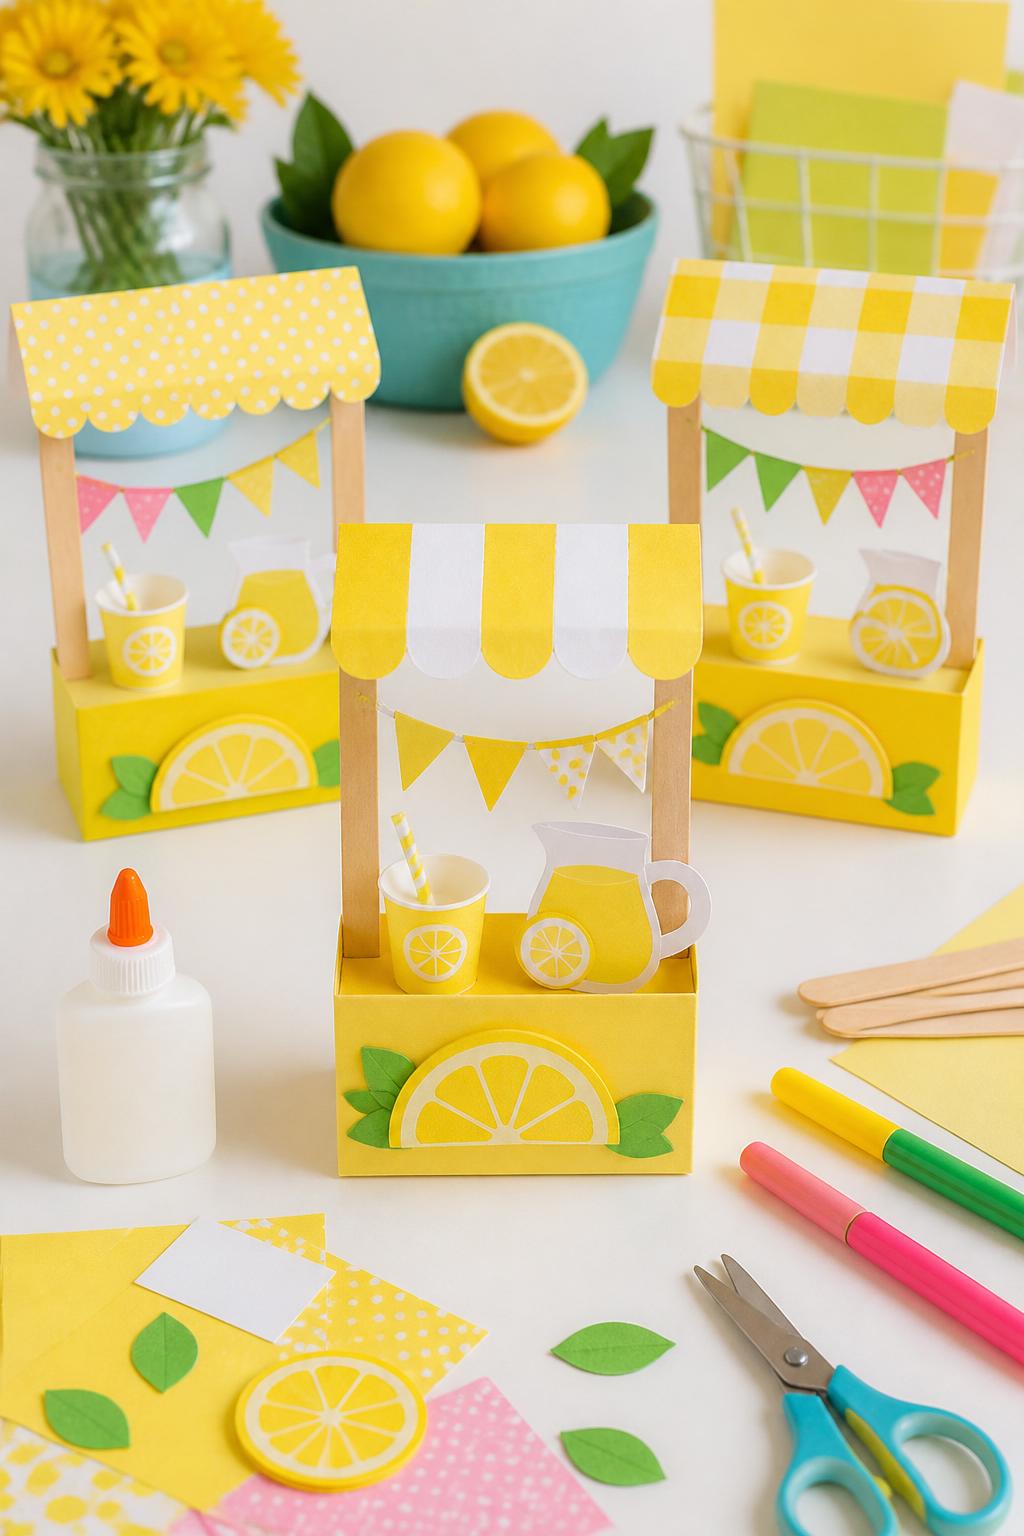
A lemonade stand craft feels perfect for the start of summer. It gives kids a fun pretend-play project, and they can use it to dream up their own summer stand or backyard shop.
Materials Needed:
- Cardstock
- Yellow and white construction paper
- Craft sticks
- Glue stick
- Markers
- Stickers
- Child-safe scissors
Steps To Make:
- Cut a rectangle from cardstock for the stand base.
- Add a striped yellow awning at the top.
- Glue craft sticks along the sides for support.
- Cut small paper cups and lemon circles.
- Glue the cups and lemons onto the stand.
- Add tiny paper bunting or stickers.
- Let the craft dry before using it for pretend play.
9. Painted Rock Summer Start Stones
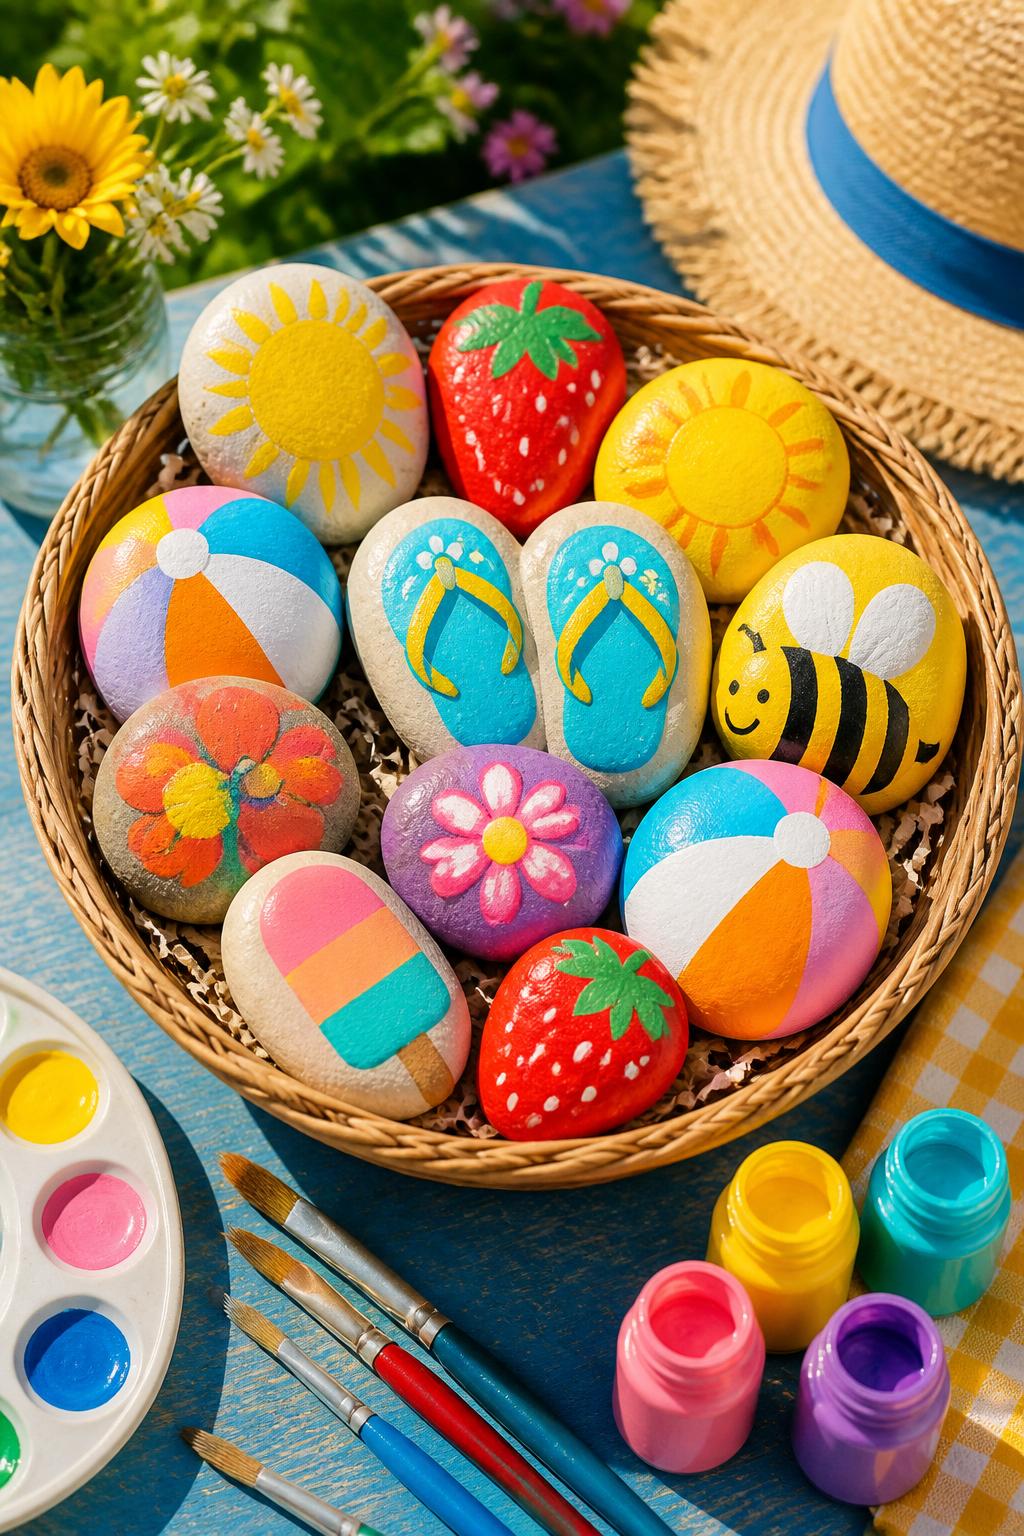
Painted rocks are fun because kids can make a whole set of tiny summer symbols. They can place them in a garden, use them for pretend play, or save them as little seasonal keepsakes.
Materials Needed:
- Smooth rocks
- Acrylic or washable craft paint
- Paintbrushes
- Paint pens, optional
- Paper plate
- Clear sealer, adult-applied if used outside
Steps To Make:
- Wash and dry the rocks.
- Paint each rock with a bright base color.
- Add simple summer pictures like suns, fruit, flowers, or beach balls.
- Let each layer dry before adding details.
- Use paint pens for small lines and dots.
- Seal the rocks if they will go outside.
- Place them in a basket, garden, or windowsill.
10. Summer Adventure Binoculars
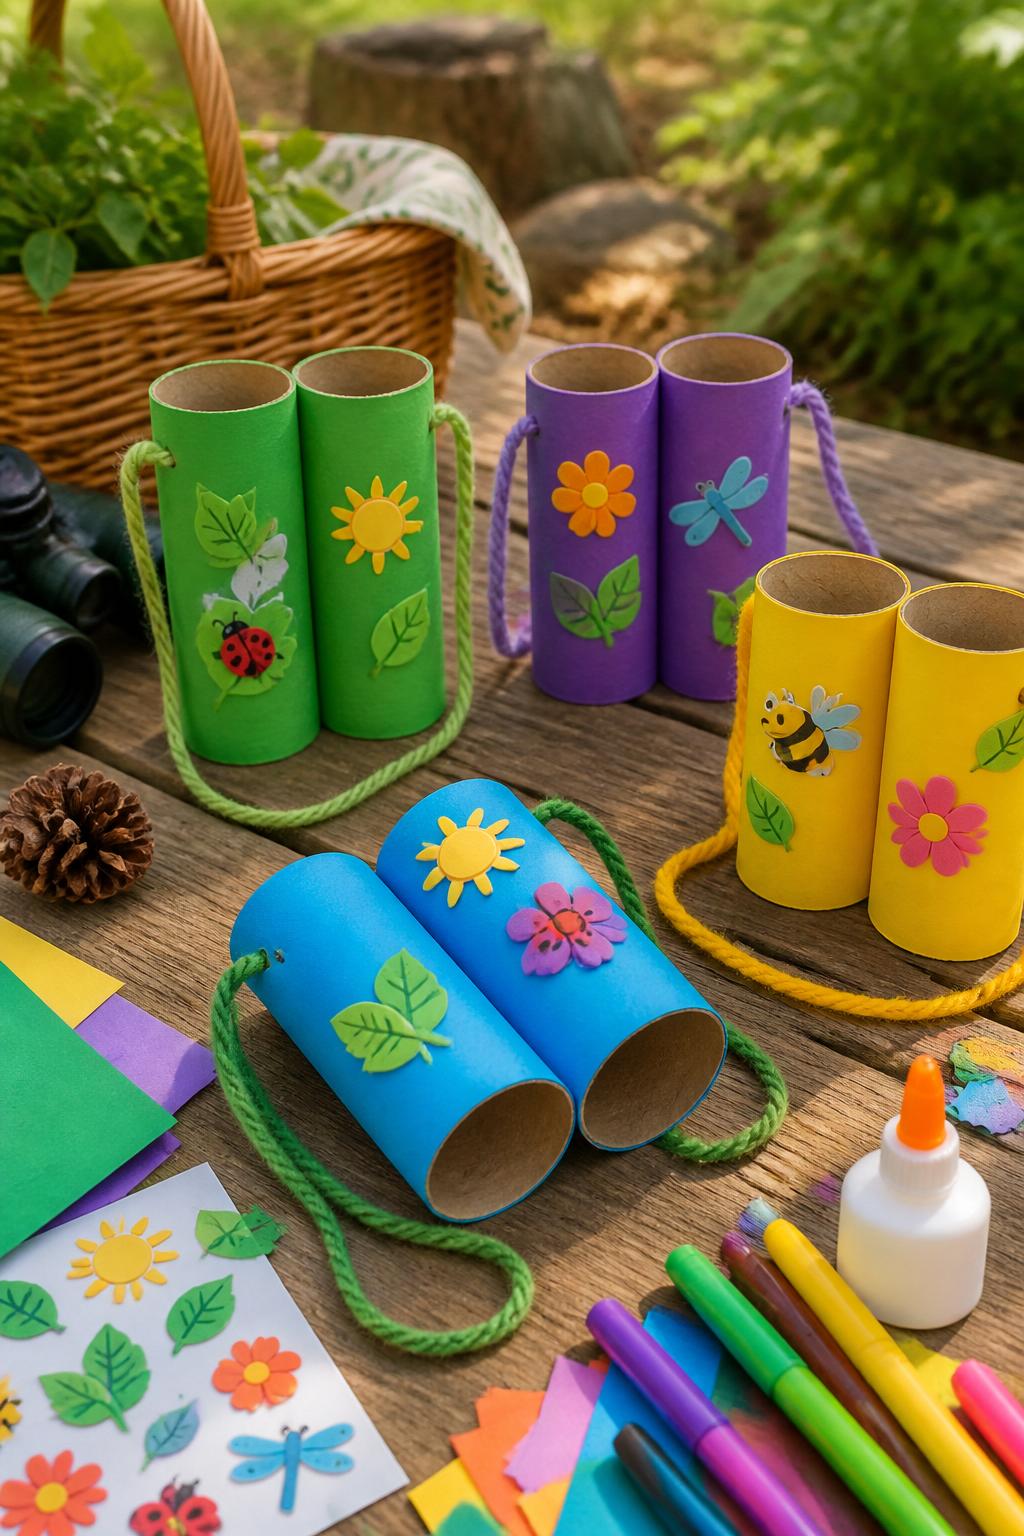
These binoculars are great for starting summer with outdoor exploring. Kids can use them for backyard bug hunts, park walks, bird watching, or pretend travel games.
Materials Needed:
- Two toilet paper rolls
- Construction paper
- Glue or tape
- Yarn
- Hole punch
- Stickers
- Markers
- Child-safe scissors
Steps To Make:
- Glue or tape two toilet paper rolls side by side.
- Wrap the rolls with colorful construction paper.
- Decorate with stickers, markers, or paper shapes.
- Punch one hole on each outside edge.
- Tie yarn through the holes to make a strap.
- Let the glue dry.
- Use the binoculars for summer exploring.
11. Rainbow Flip-Flop Paper Craft
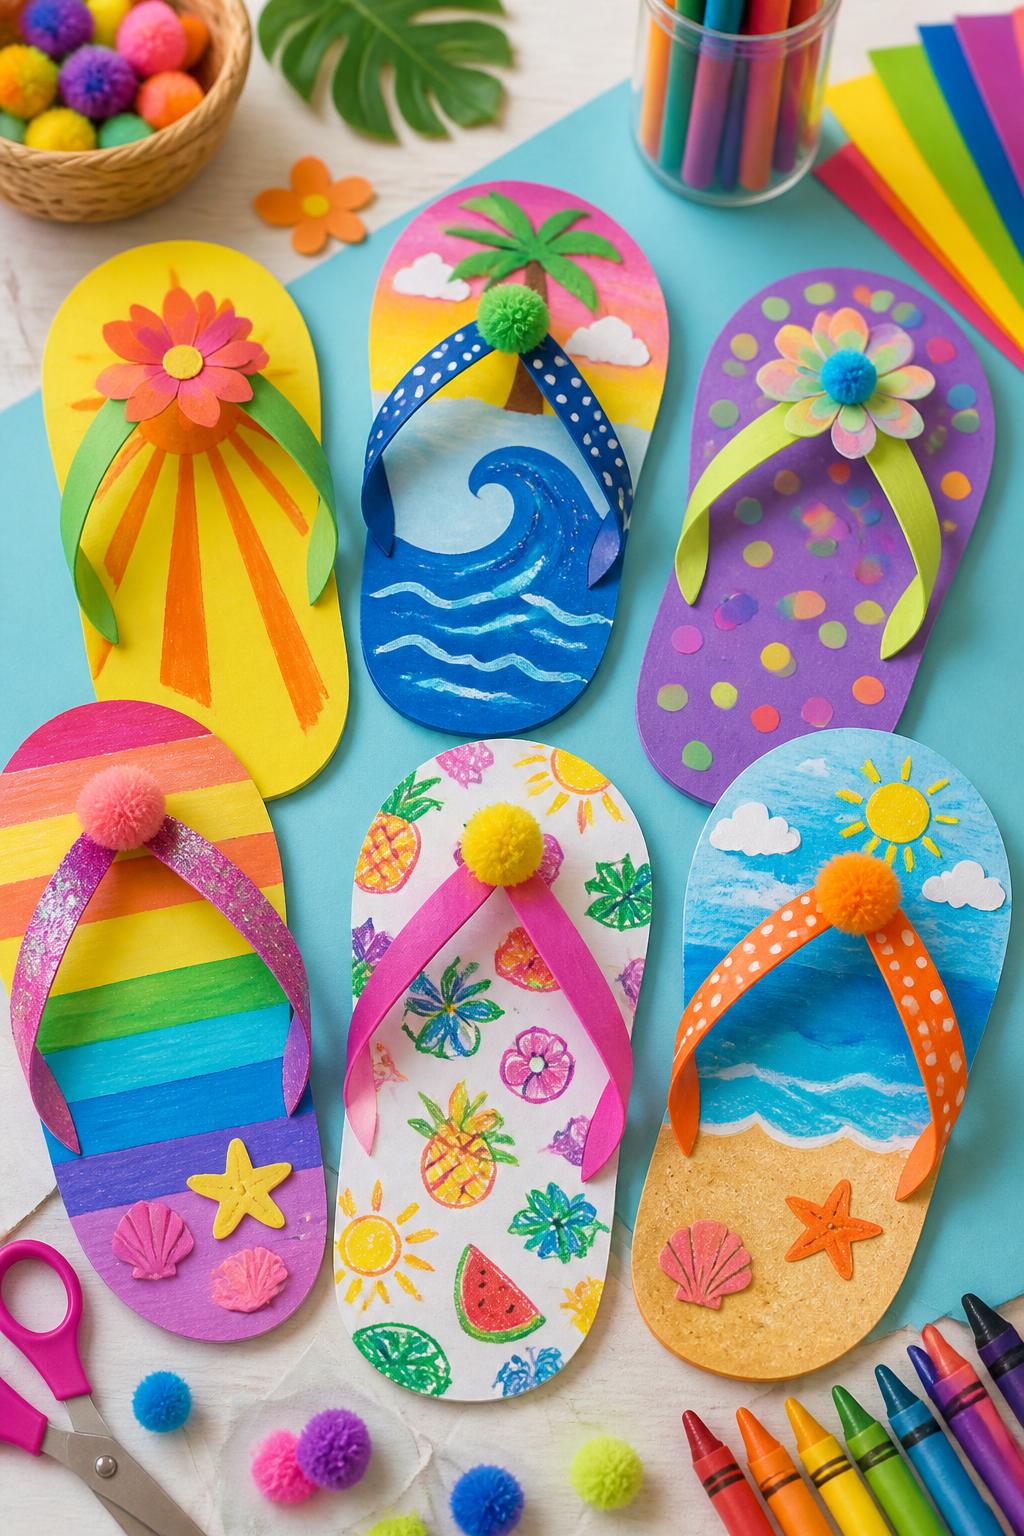
This flip-flop craft is fun, easy, and perfect for a beachy summer mood. Kids can design their dream pair with bright colors, flowers, stickers, and playful patterns.
Materials Needed:
- Cardstock
- Construction paper
- Markers or crayons
- Pom-poms
- Stickers
- Glue
- Child-safe scissors
- Pencil
Steps To Make:
- Draw and cut out large flip-flop shapes from cardstock.
- Cut paper strips for the sandal straps.
- Help kids glue the straps onto the flip-flops.
- Let them decorate with stickers, pom-poms, and marker patterns.
- Add paper flowers or dots if desired.
- Let the glue dry.
- Display the flip-flops as summer wall art.
12. Summer Flower Pot Collage
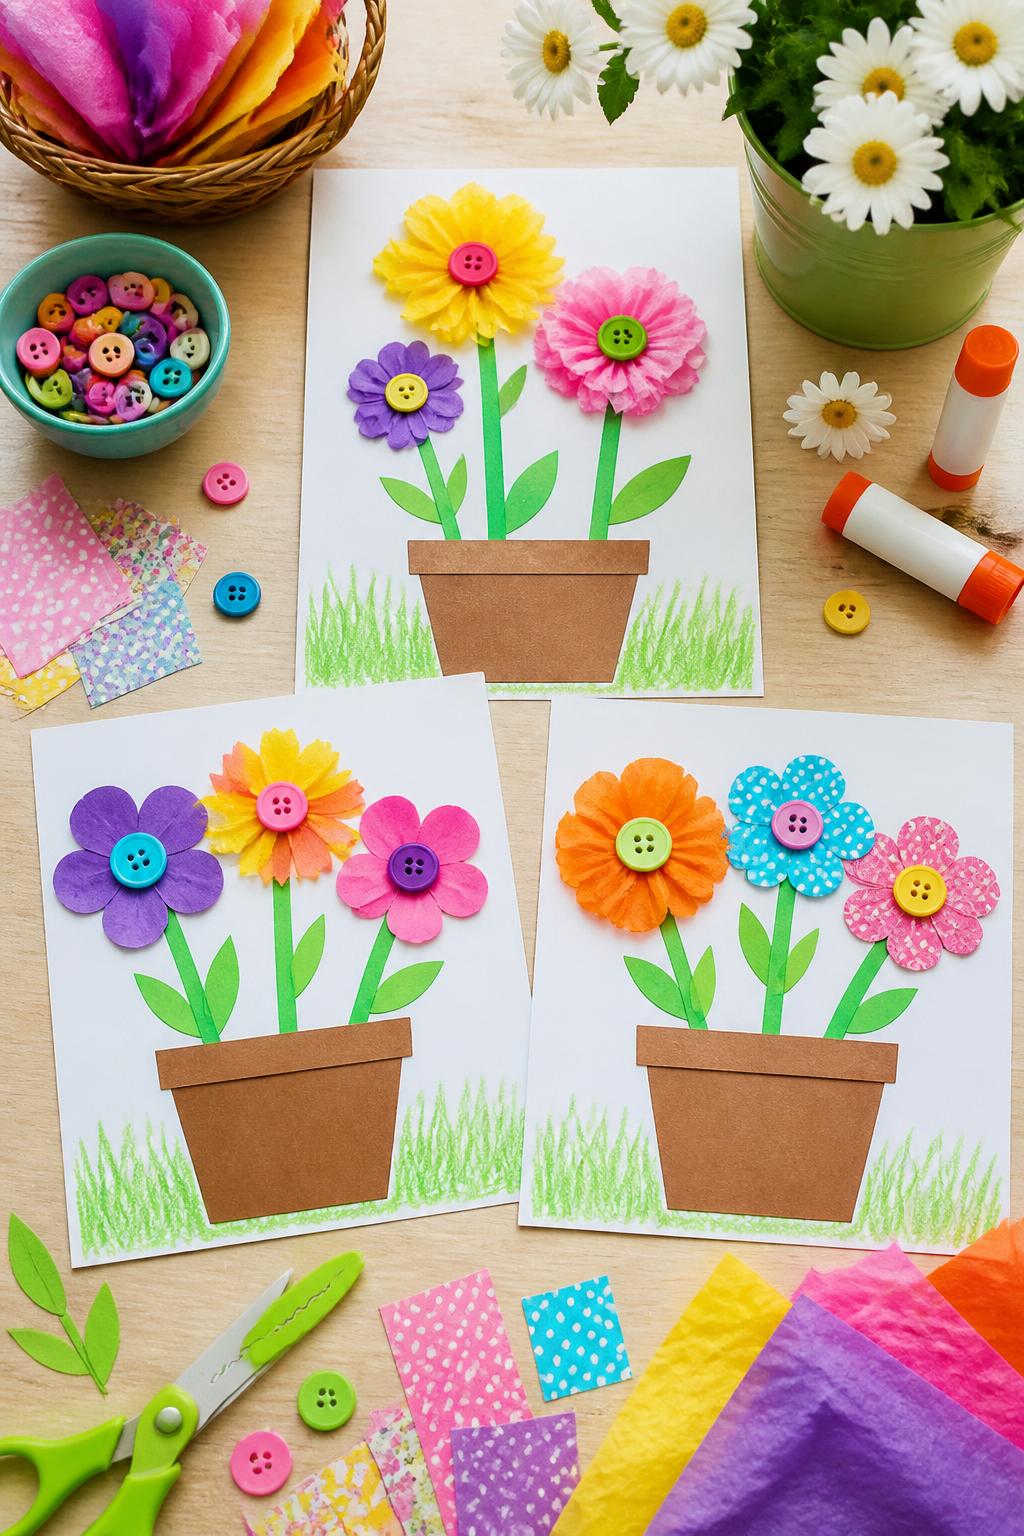
This flower pot collage is a cheerful way to welcome the season. Kids can build a bright garden picture with paper, tissue, buttons, and simple cut shapes.
Materials Needed:
- White cardstock
- Brown construction paper
- Green construction paper
- Tissue paper
- Buttons, optional
- Glue stick
- Crayons
- Child-safe scissors
Steps To Make:
- Cut a flower pot shape from brown paper.
- Glue the pot onto white cardstock.
- Cut green stems and glue them above the pot.
- Make flowers from tissue paper, paper circles, or buttons.
- Glue the flowers onto the stems.
- Let kids draw grass, bees, or sunshine around the pot.
- Let the collage dry flat.
13. First Day of Summer Memory Flag
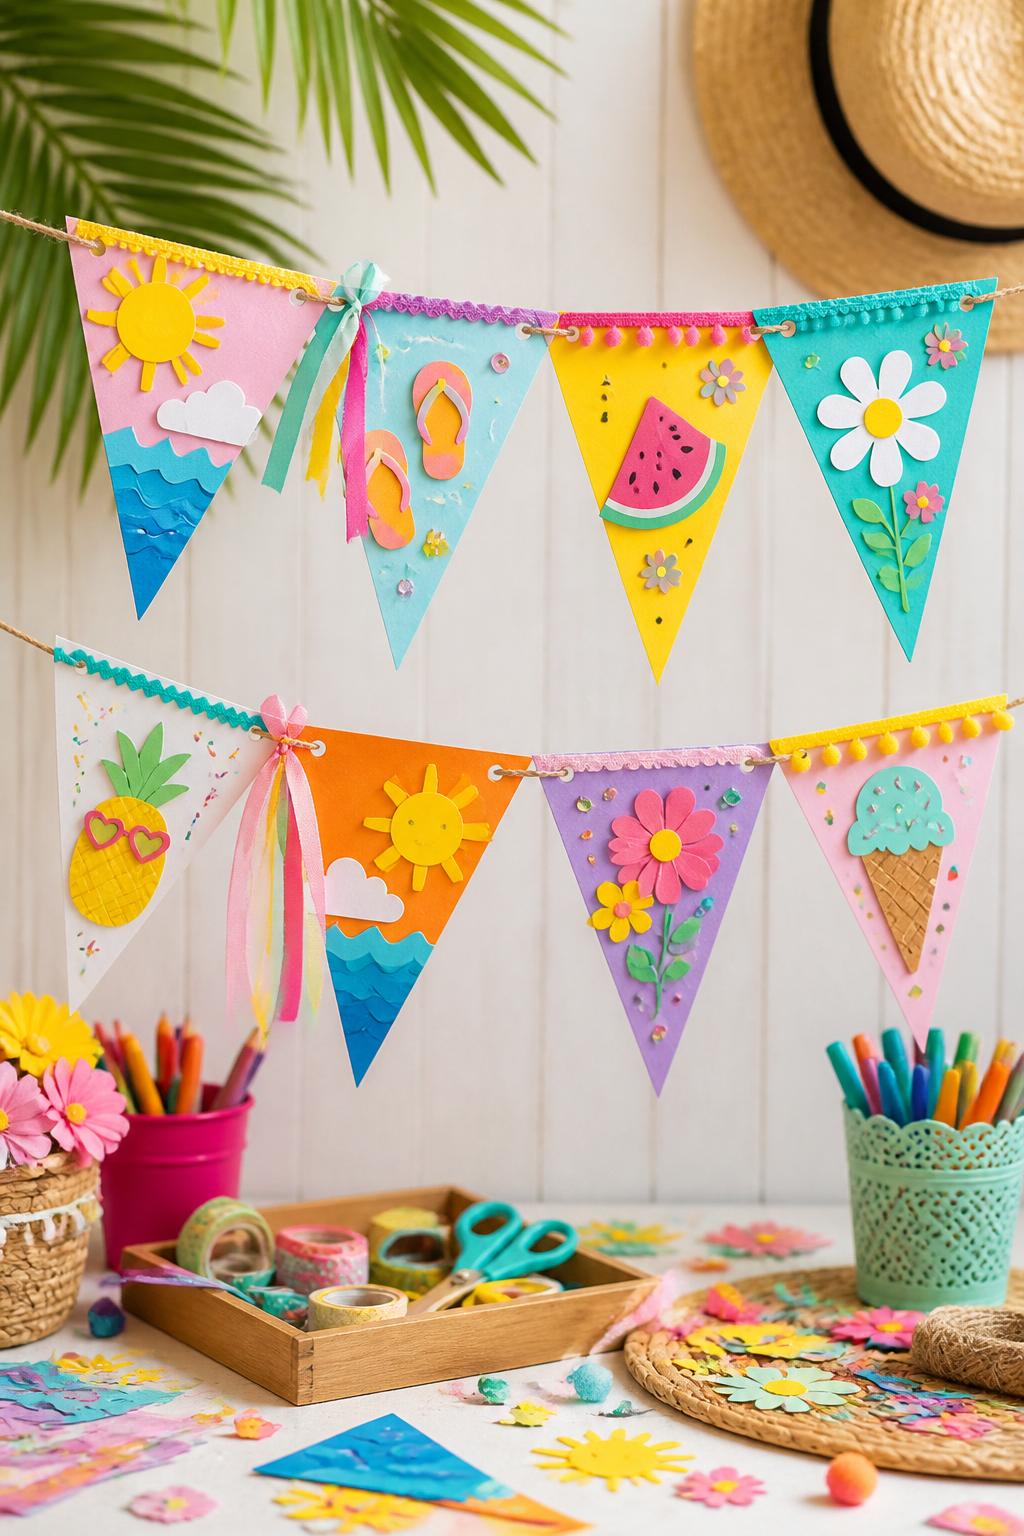
A memory flag gives kids a small place to show what they are excited about for summer. Several flags can also be joined together to make a classroom or family summer banner.
Materials Needed:
- Cardstock
- Markers
- Stickers
- Ribbon or twine
- Glue stick
- Hole punch
- Child-safe scissors
Steps To Make:
- Cut triangle pennant shapes from cardstock.
- Let kids decorate each flag with summer drawings and stickers.
- Add paper suns, waves, flowers, or fruit shapes.
- Punch two holes near the top edge.
- Thread ribbon or twine through the holes.
- Tie several flags together if making a banner.
- Hang the banner as first day of summer decor.
14. Pool Party Paper Float Craft
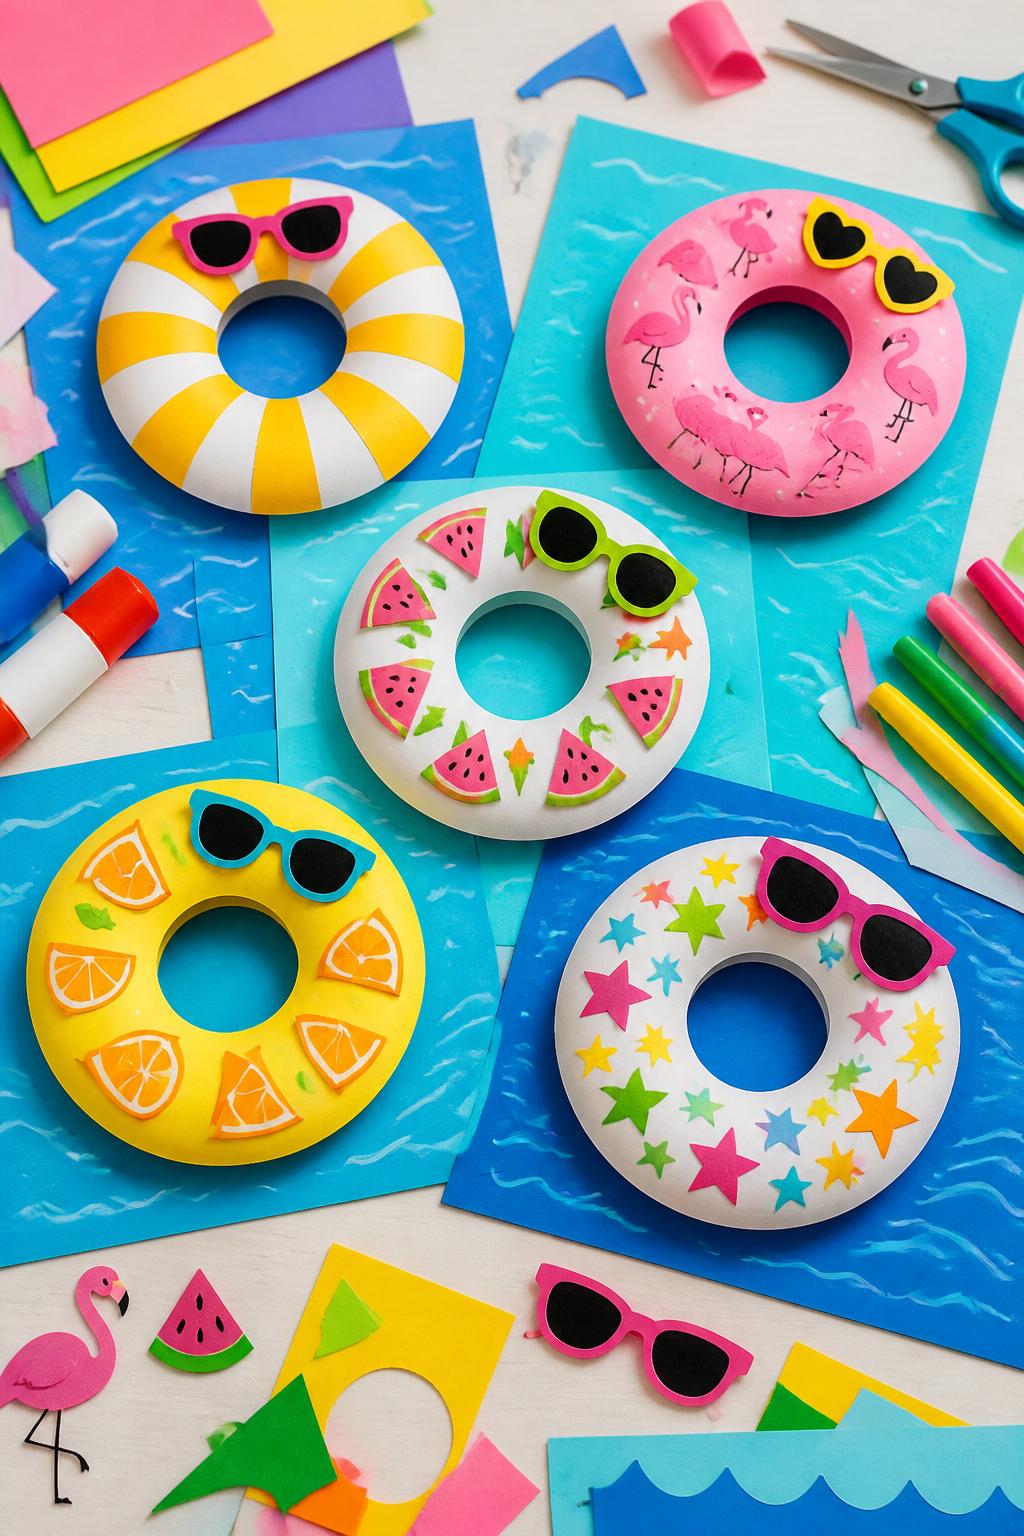
This pool float craft feels playful and modern for summer. Kids can create donut floats, flamingo floats, fruit floats, or rainbow floats, then place them on a paper “pool.”
Materials Needed:
- Blue cardstock
- Colored construction paper
- Glue stick
- Markers
- Stickers
- Child-safe scissors
- Paper plate for tracing circles
Steps To Make:
- Use a paper plate to trace a large circle onto colored paper.
- Cut out the circle and cut a smaller circle from the middle.
- Decorate the float with stripes, dots, fruit shapes, or stickers.
- Glue the float onto blue cardstock.
- Draw water lines around it.
- Add tiny paper sunglasses, beach balls, or suns.
- Let the craft dry flat.
15. Summer Welcome Wind Streamer
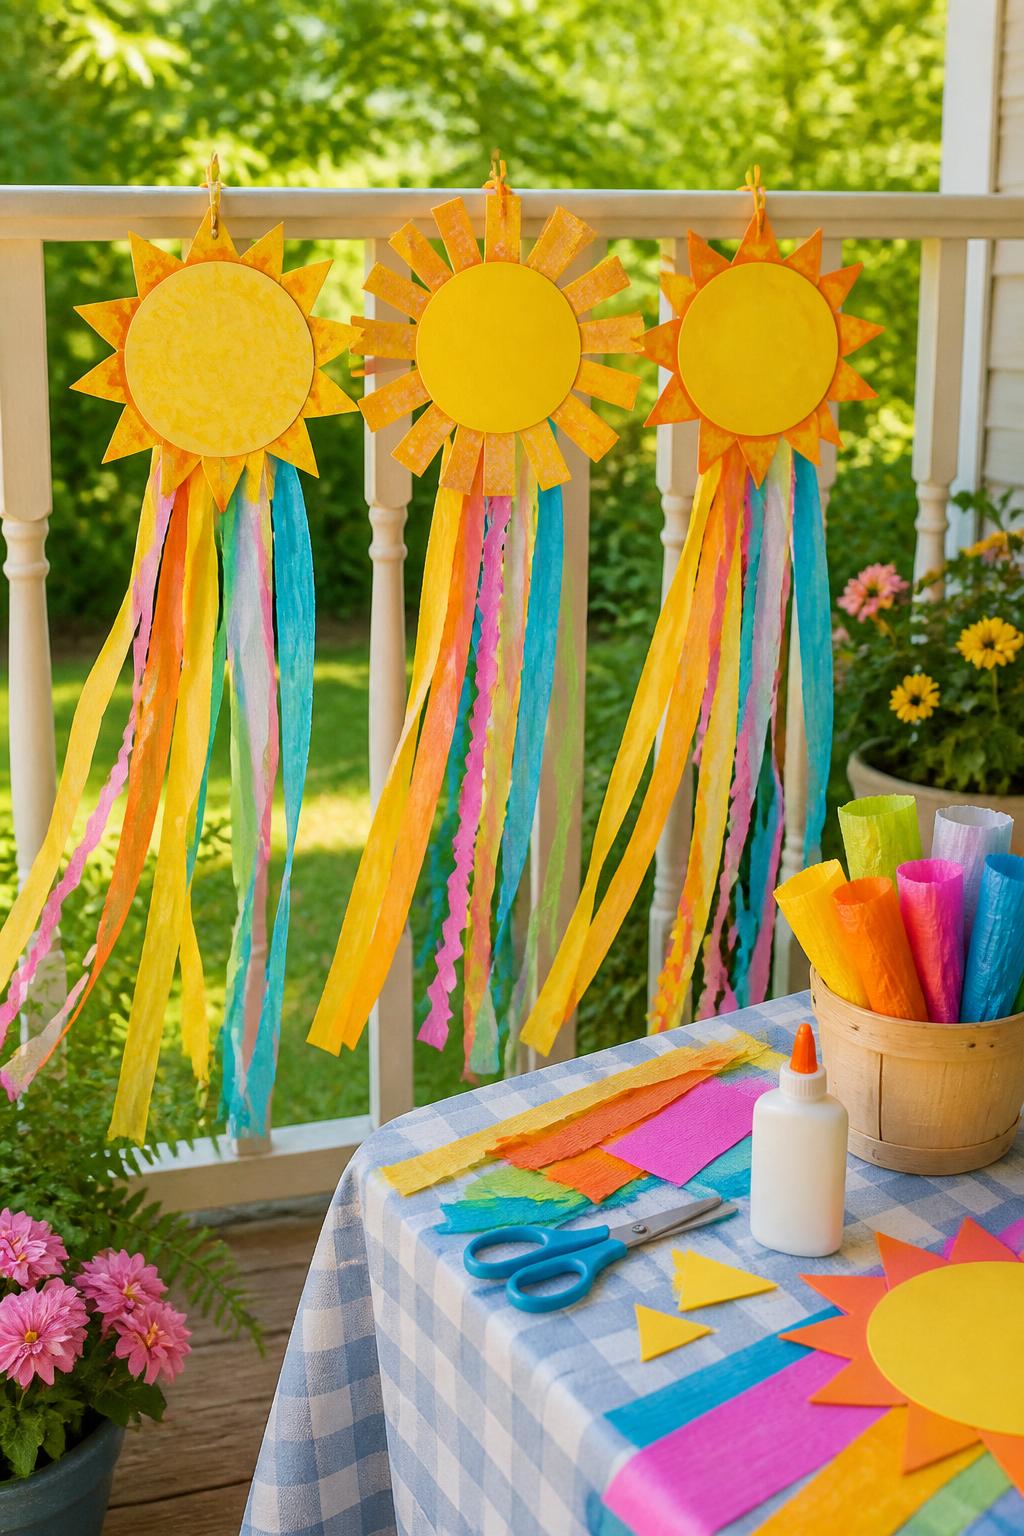
This wind streamer is a bright way to welcome summer outdoors. It moves in the breeze and works well for porches, patios, garden fences, classrooms, or party corners.
Materials Needed:
- Yellow cardstock
- Crepe paper strips
- Ribbon
- Glue or tape
- Hole punch
- Markers
- Child-safe scissors
- String for hanging
Steps To Make:
- Cut a large sun shape from yellow cardstock.
- Let kids decorate the sun with markers or stickers.
- Cut long strips of crepe paper and ribbon.
- Tape or glue the strips to the bottom of the sun.
- Punch a hole at the top.
- Add string for hanging.
- Hang it where the wind can move the streamers gently.