


Table of Contents Show
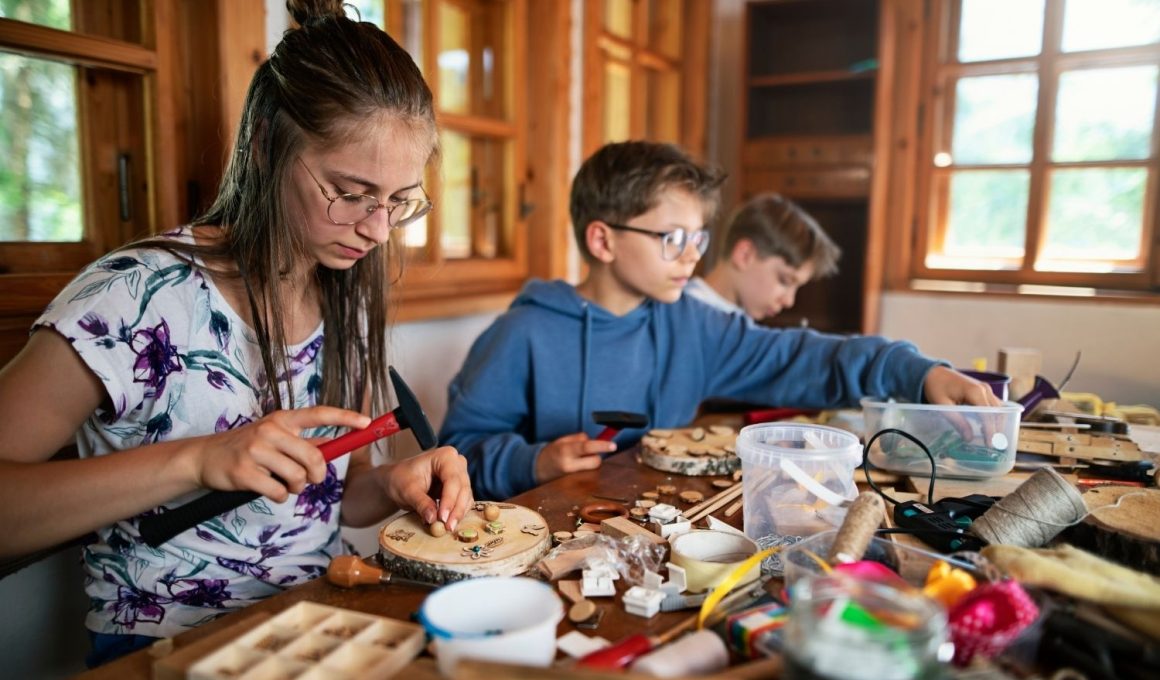
Summer camp crafts should feel fun, colorful, and a little more exciting than everyday paper projects. Kids want crafts they can wear, play with, trade with friends, hang in their bunk space, or take home as a memory from the week. The best ideas are easy enough for group settings but still creative enough to feel special.
These summer camp crafts are made for busy tables, mixed age groups, outdoor setups, and camp-style fun. They use simple supplies, but the final projects feel useful, playful, and worth keeping.
From nature badges and paracord bracelets to campfire lanterns and painted walking sticks, each idea gives kids a hands-on way to make something bright, clever, and full of summer camp charm.
1. Camp Name Bead Bracelets
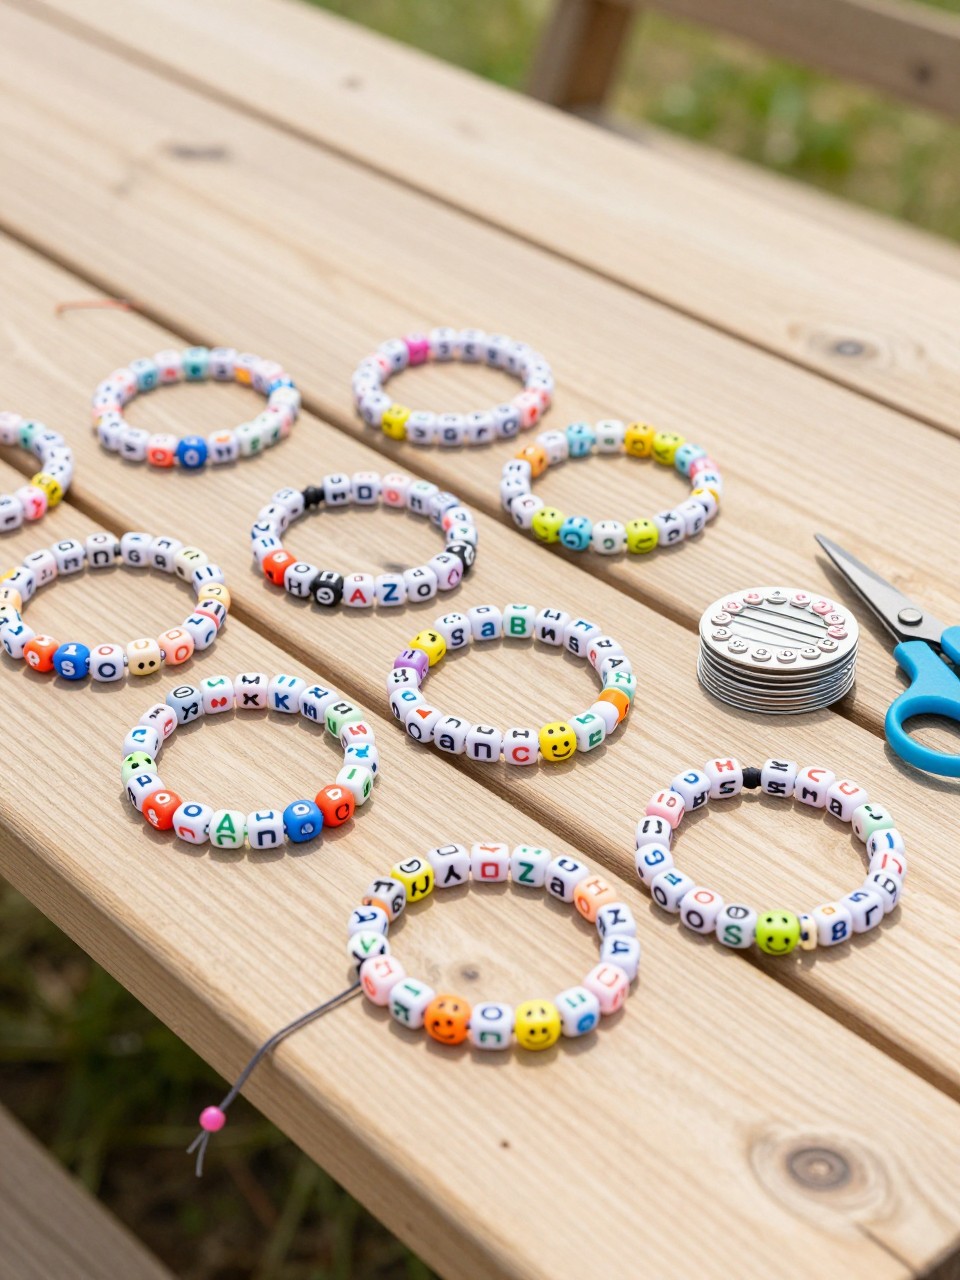
Camp name bracelets are perfect for making, trading, and wearing all week. Kids can use initials, camp nicknames, color themes, or simple bead patterns to make each bracelet feel personal.
Materials Needed:
For People Who Love to Make Things ✂️
- Pony beads
- Letter beads
- Elastic cord
- Small charms, optional
- Scissors
- Clear nail polish or craft glue for sealing knots
Steps To Make:
- Cut a piece of elastic cord long enough for a bracelet.
- Tie a temporary knot at one end so the beads do not fall off.
- Add letter beads, pony beads, and small charms in a pattern.
- Check the bracelet size around the wrist.
- Tie the ends together with a strong knot.
- Add a small dot of clear nail polish or craft glue to the knot.
- Let it dry before wearing or trading.
2. Painted Nature Walking Sticks
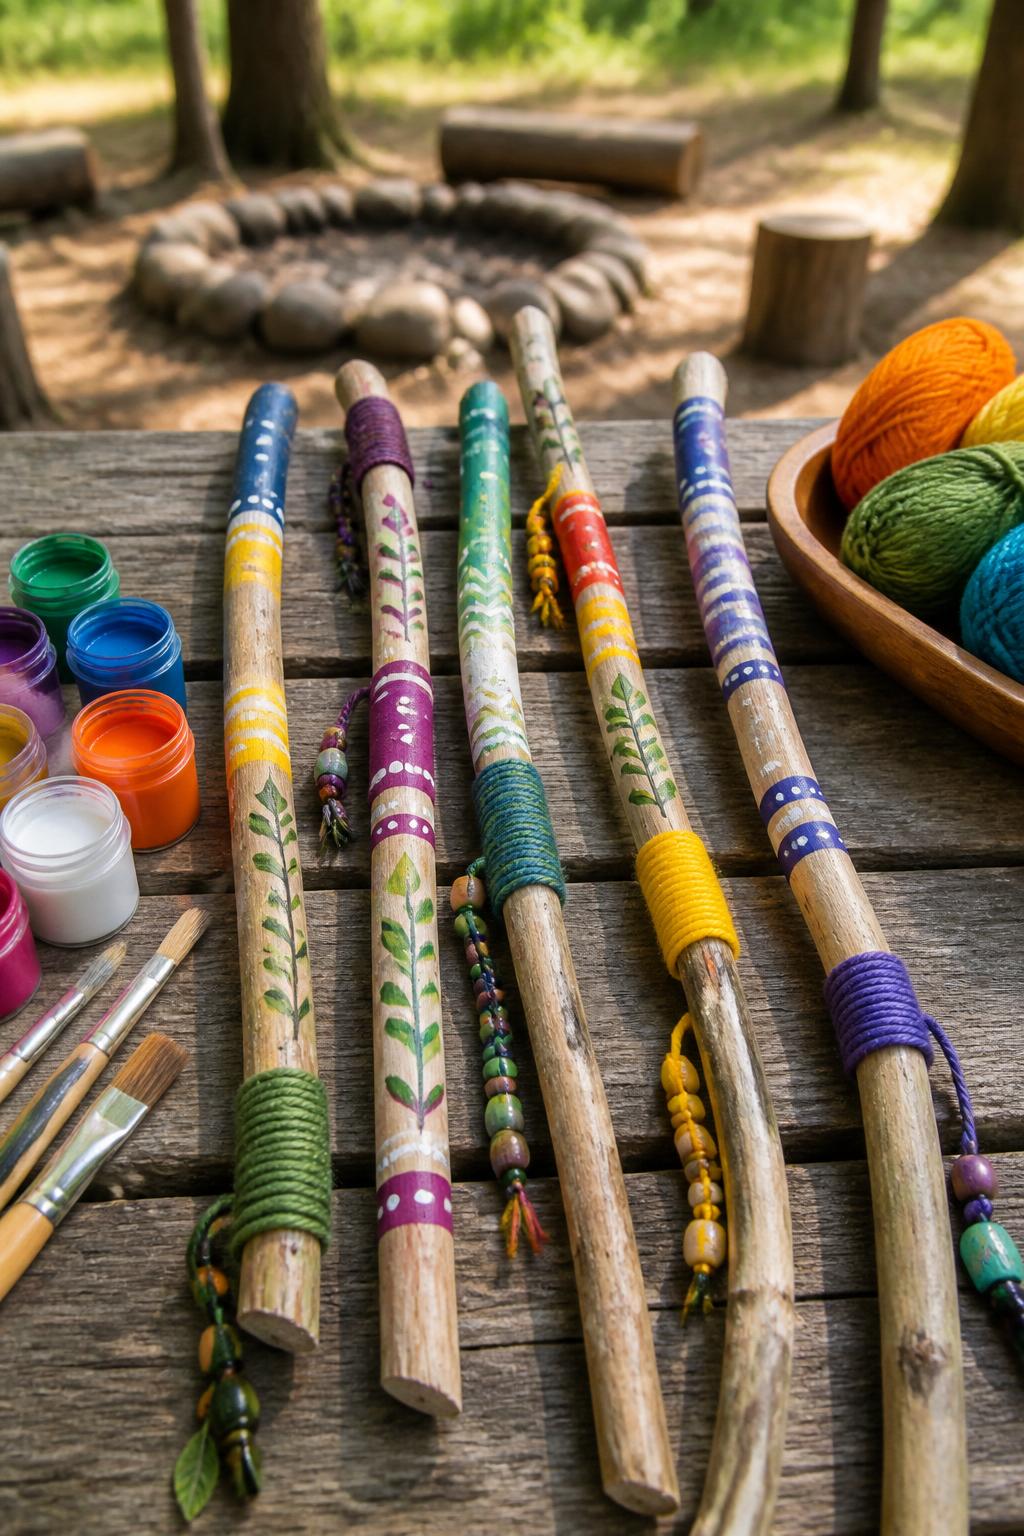
Painted walking sticks are fun for nature walks, hikes, and camp adventures. Kids can turn a plain stick into something colorful and useful while learning to decorate with patterns.
Materials Needed:
- Smooth walking sticks
- Washable or acrylic paint
- Paintbrushes
- Yarn
- Beads with large holes
- Craft glue
- Optional clear sealer, adult-applied
Steps To Make:
- Choose a smooth stick that is safe to hold.
- Wipe off dirt and loose bark.
- Paint bands, dots, stripes, leaves, or simple patterns.
- Let the paint dry.
- Wrap yarn around one section for a soft grip.
- Add beads to yarn ends if desired.
- Ask an adult to seal it if it will be used often outdoors.
3. Campfire Tissue Paper Lantern
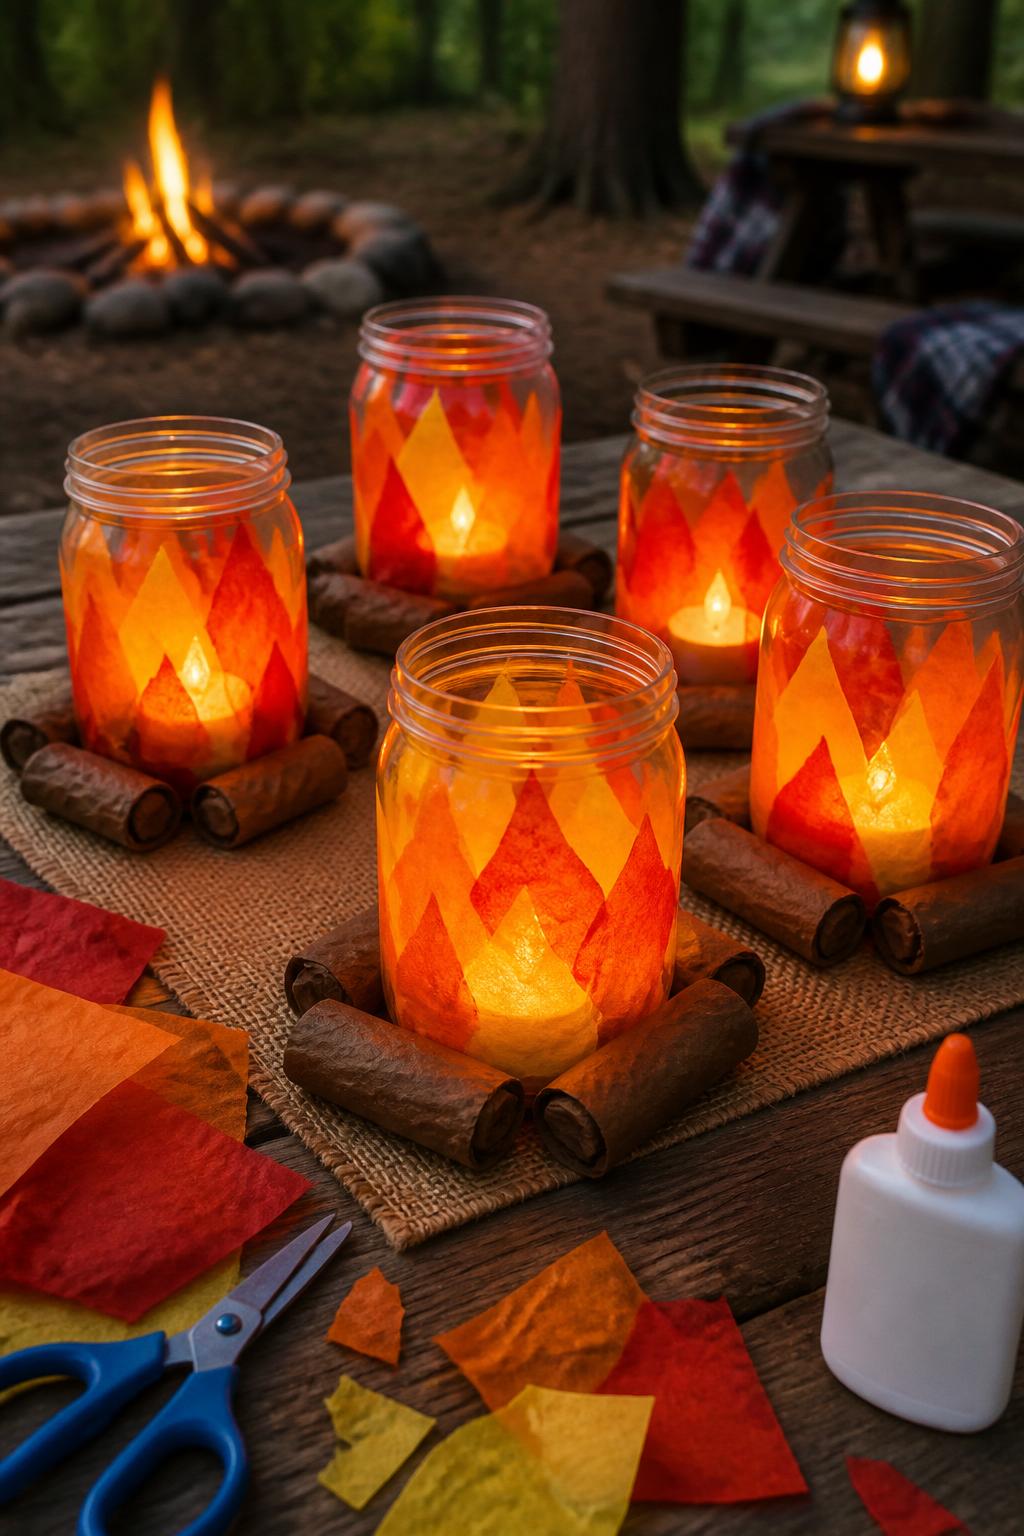
This lantern gives kids the campfire feeling without real flames. It works well for evening camp activities, cabin decor, sleepovers, or a pretend campsite setup.
Materials Needed:
- Clear plastic jar
- Red, orange, and yellow tissue paper
- Brown construction paper
- Glue or Mod Podge
- Foam brush
- Battery tea light
- Child-safe scissors
Steps To Make:
- Tear tissue paper into small flame-like pieces.
- Brush glue onto the outside of the jar.
- Stick red, orange, and yellow tissue pieces around the jar.
- Cut small brown paper logs.
- Glue the logs near the bottom.
- Let the jar dry fully.
- Place a battery tea light inside for a soft glow.
4. Nature Explorer Badge
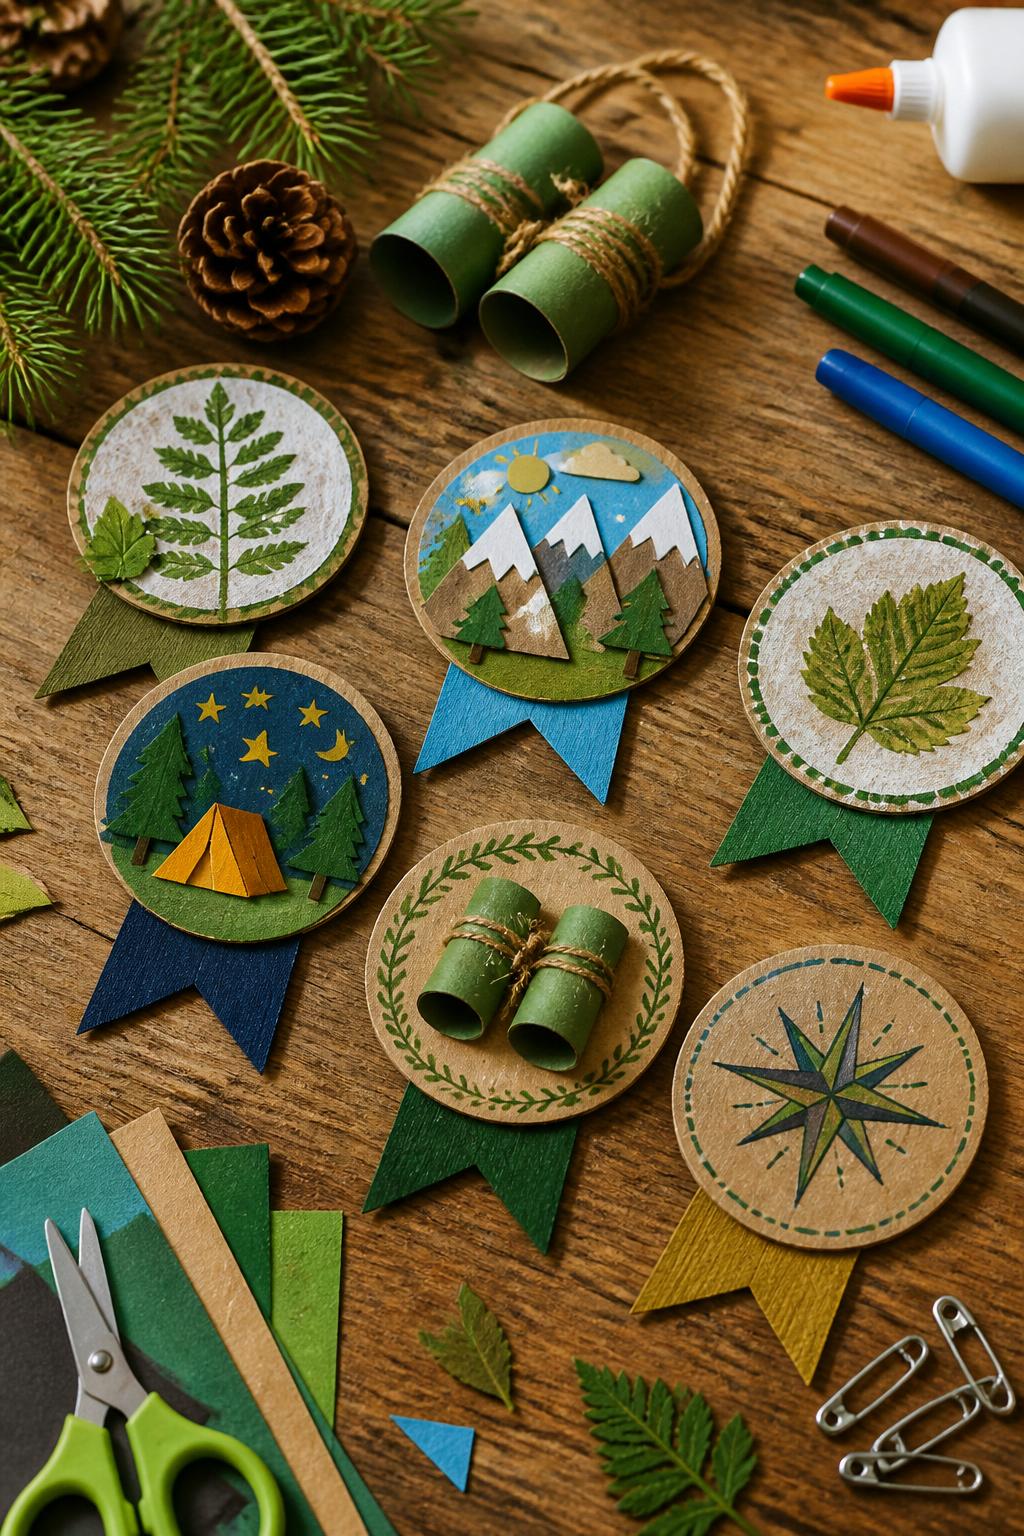
A nature explorer badge makes kids feel like they are part of a camp adventure. They can wear it during hikes, scavenger hunts, bug walks, or nature journaling time.
Materials Needed:
- Cardboard circles
- Markers or paint
- Ribbon strips
- Glue
- Safety pins or tape
- Leaf stickers or real leaves for printing
- Child-safe scissors
Steps To Make:
- Cut circles from cardboard.
- Let kids decorate the front with mountains, leaves, stars, or binocular shapes.
- Add leaf prints by pressing painted leaves onto the badge.
- Glue ribbon strips to the bottom.
- Let the badge dry.
- Attach a safety pin to the back with adult help, or use tape.
- Wear it during a nature walk or camp game.
5. DIY Camp Postcards
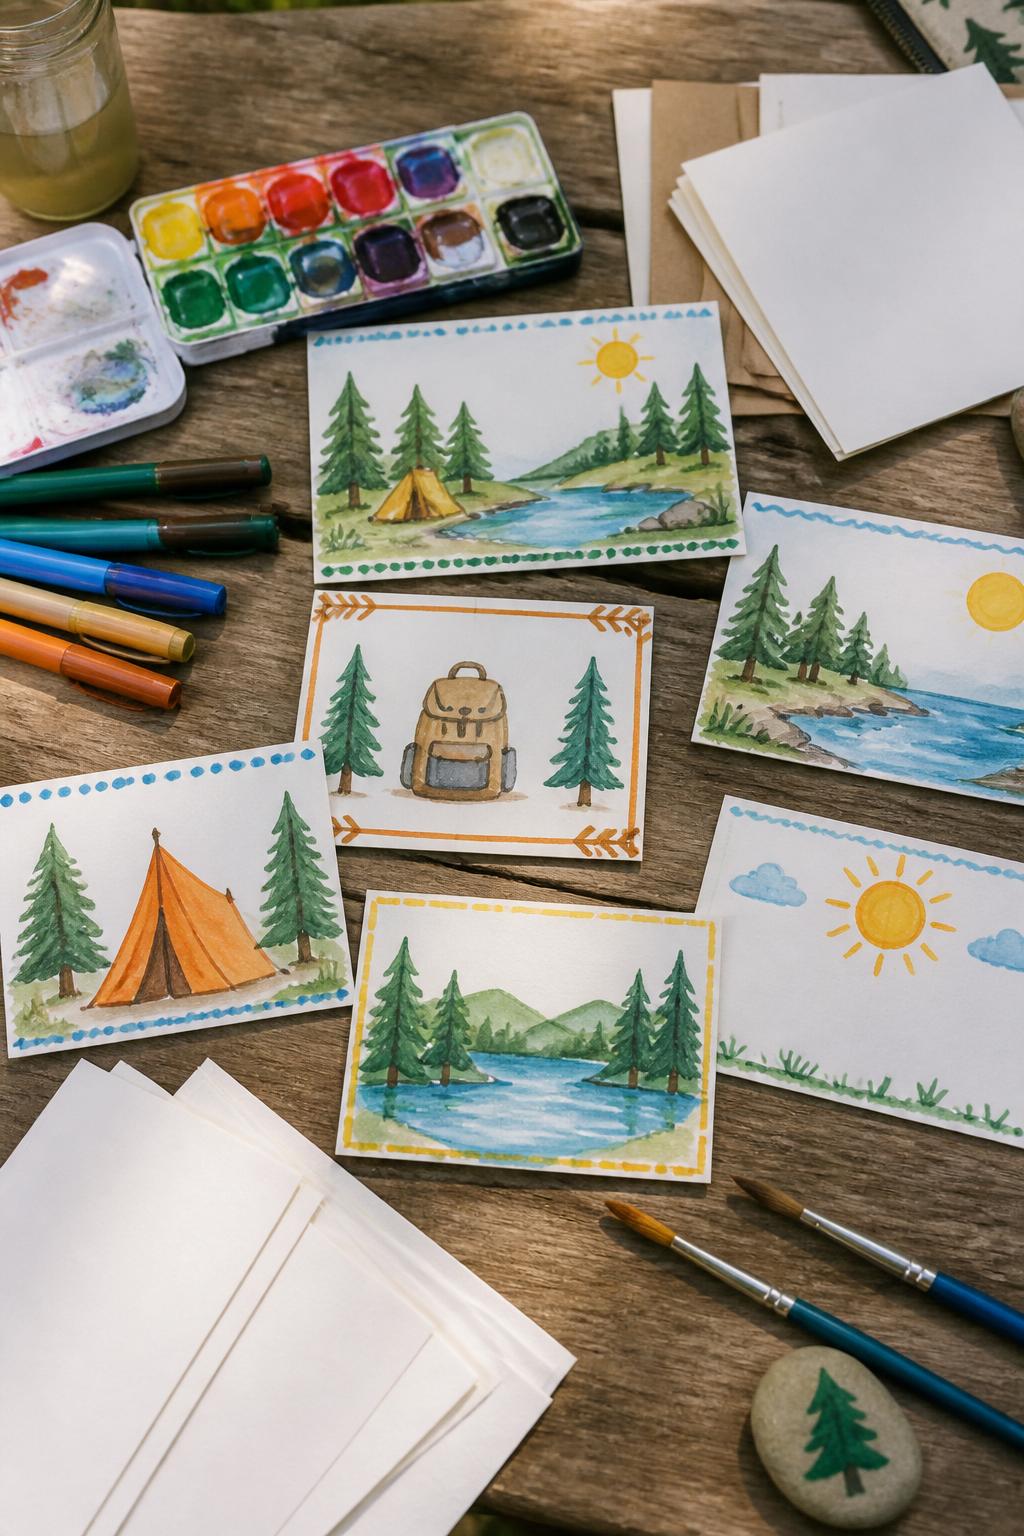
Camp postcards are sweet because kids can make them and send them to family or friends. They also work as small memory cards at the end of camp.
Materials Needed:
- Blank cardstock cards
- Watercolor paints
- Markers
- Stickers
- Stamps, optional
- Paintbrushes
- Cup of water
Steps To Make:
- Cut cardstock into postcard-size rectangles.
- Paint a simple camp scene on the front.
- Add trees, tents, lakes, stars, or sunshine.
- Let the paint dry.
- Add borders or sticker details.
- Write a short message on the back with help if needed.
- Save it, mail it, or use it as a camp keepsake.
6. Popsicle Stick Tent Frames
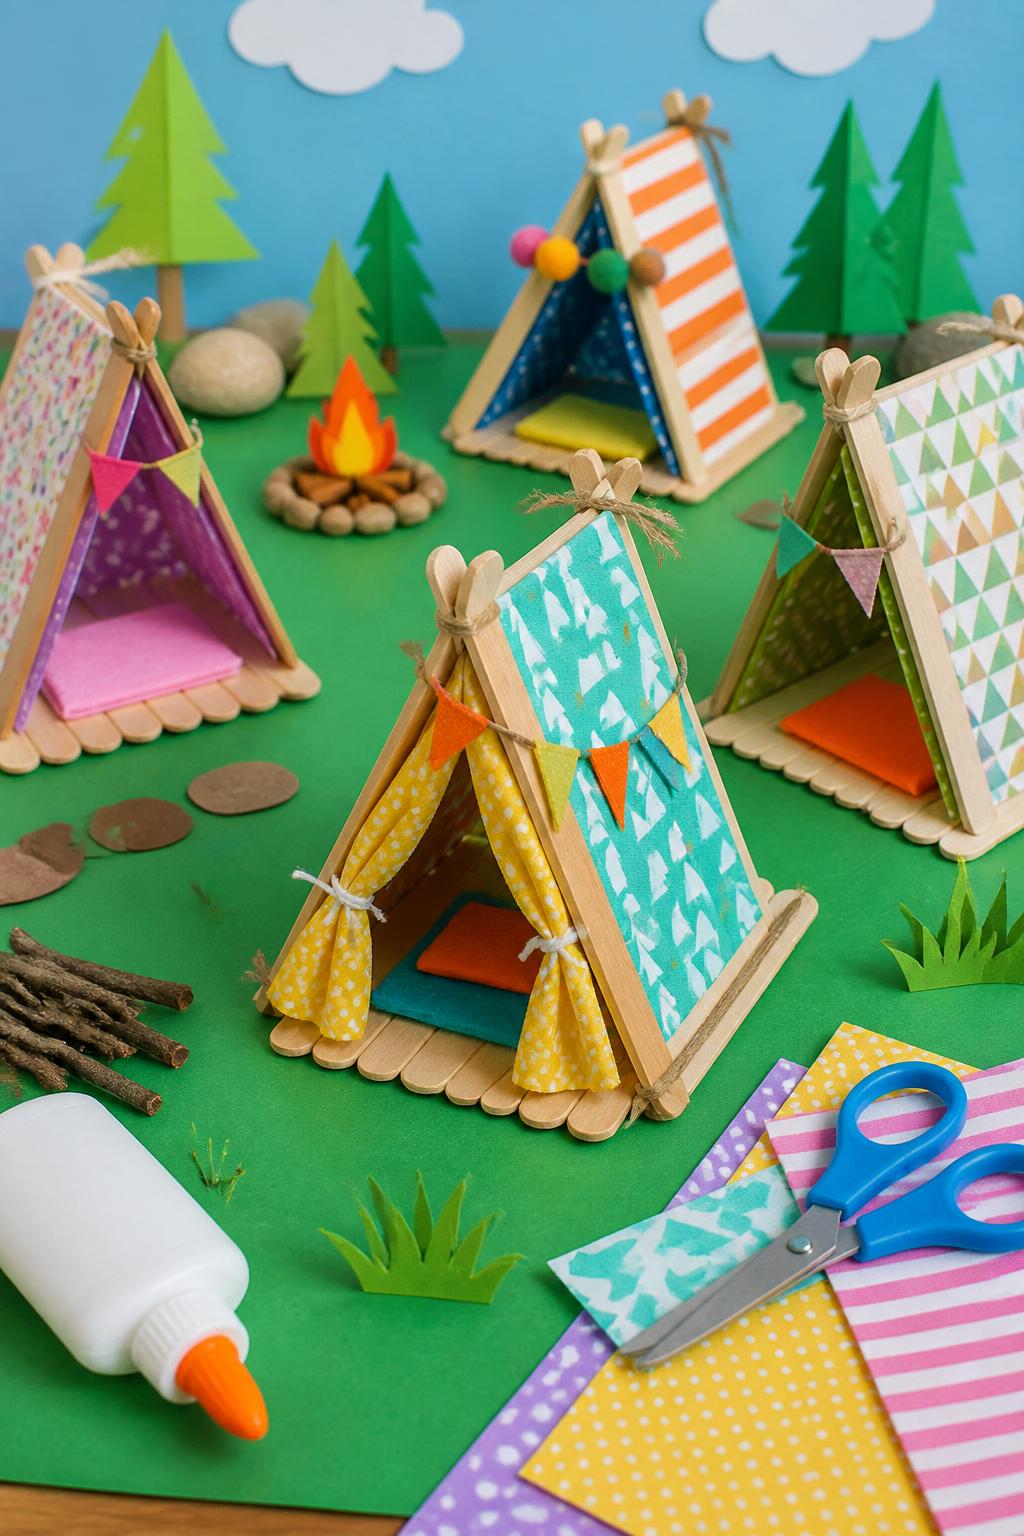
These little tent frames are easy to make and fun to decorate. Kids can build one tent or create a full mini campsite with trees, signs, and paper campfires.
Materials Needed:
- Popsicle sticks
- Craft glue
- Patterned paper or fabric scraps
- Markers
- Green cardstock
- Child-safe scissors
- Small stickers, optional
Steps To Make:
- Glue three popsicle sticks into a triangle.
- Let the triangle dry.
- Cut patterned paper or fabric to fit behind the frame.
- Glue the paper to the back of the tent shape.
- Decorate the tent with markers, stickers, or tiny bunting.
- Glue the tent to green cardstock if making a campsite.
- Add paper trees, rocks, or a small campfire.
7. Pinecone Camp Critters

Pinecone critters are great for camp because kids can collect part of the craft during a nature walk. Each pinecone can become a different woodland animal or silly made-up creature.
Materials Needed:
- Pinecones
- Felt or construction paper
- Googly eyes
- Pipe cleaners
- Glue
- Pom-poms
- Child-safe scissors
Steps To Make:
- Choose clean, dry pinecones.
- Decide what critter to make, such as an owl, fox, bug, or hedgehog.
- Cut ears, wings, or tails from felt or paper.
- Glue the pieces onto the pinecone.
- Add googly eyes and pom-pom noses.
- Use pipe cleaners for legs or antennae.
- Let the critter dry before moving it.
8. Paracord Keychain Pulls

Paracord keychains feel useful and a little more grown-up, making them great for older kids at camp. They can clip them to backpacks, water bottles, or camp bags.
Materials Needed:
- Paracord
- Keyrings
- Scissors
- Lighter for adult-only cord sealing
- Wooden beads, optional
- Small charms, optional
Steps To Make:
- Cut a length of paracord.
- Fold it through a keyring.
- Tie a simple cobra knot or braid down the cord.
- Keep the knots tight and even.
- Add beads or charms if desired.
- Trim extra cord.
- Have an adult seal the ends safely if needed.
9. Leaf Print Bandanas
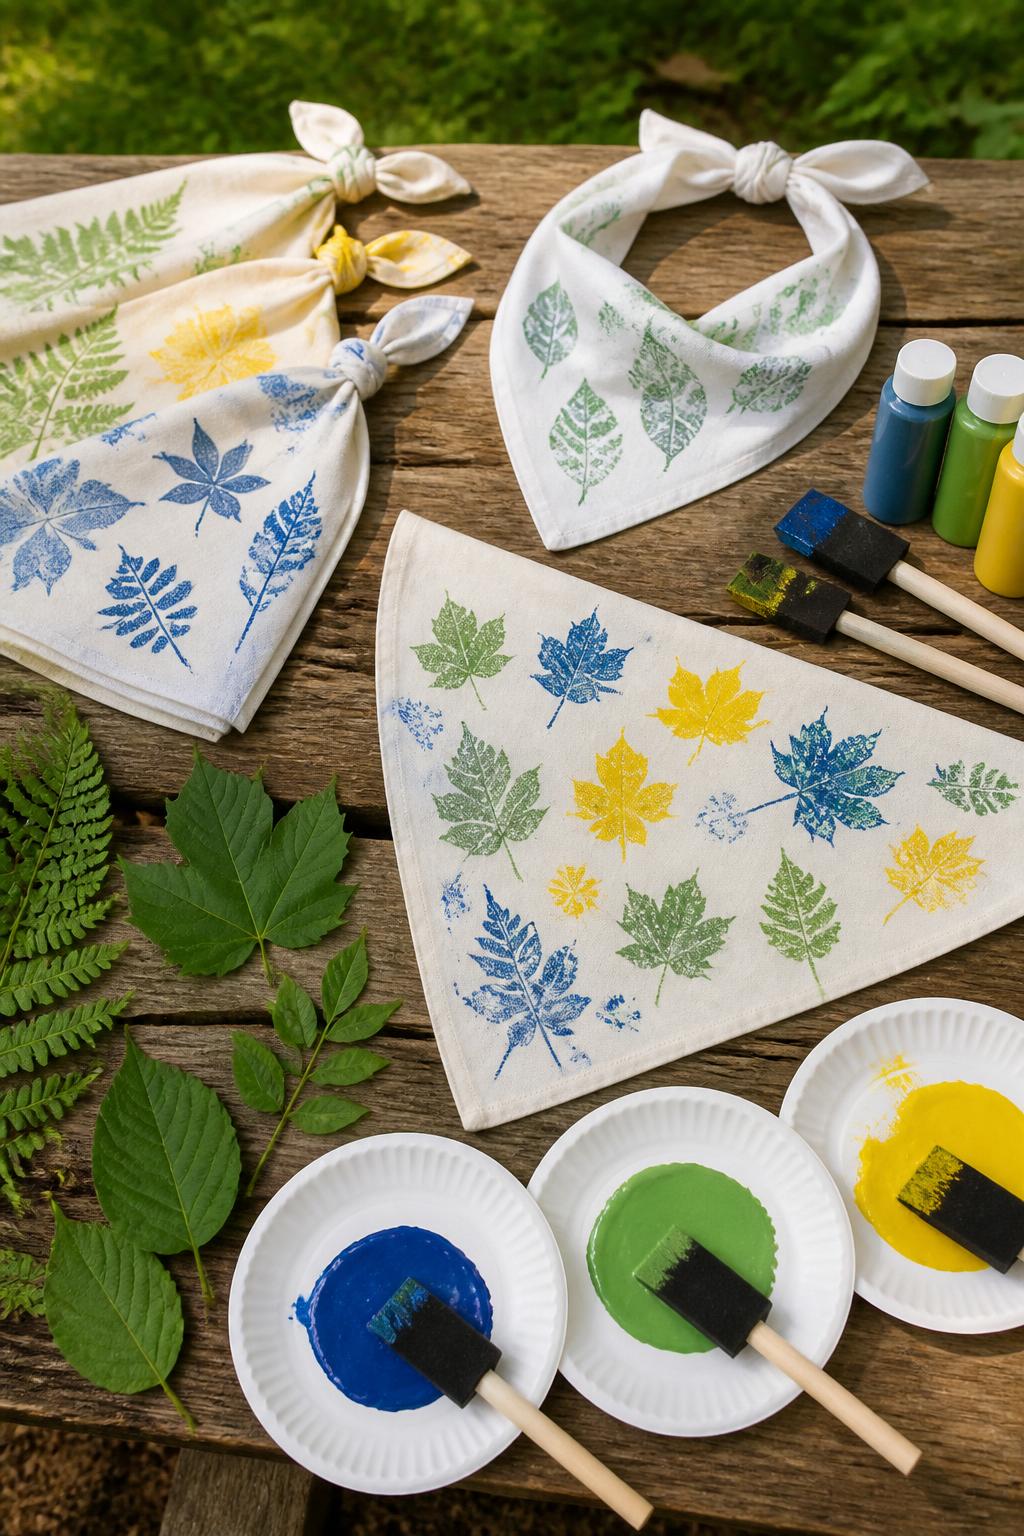
Leaf print bandanas are practical and creative. Kids can wear them during camp games, use them as bag ties, or take them home as a nature-inspired keepsake.
Materials Needed:
- Plain cotton bandanas
- Fabric paint
- Real leaves
- Foam brushes
- Paper plates
- Cardboard insert
- Paper towels
Steps To Make:
- Place cardboard under the bandana to protect the table.
- Brush fabric paint onto the back of a leaf.
- Press the painted leaf onto the bandana.
- Lift the leaf carefully.
- Repeat with different leaf shapes and colors.
- Let the paint dry fully.
- Follow fabric paint directions before wearing or washing.
10. Bottle Cap Compass Craft
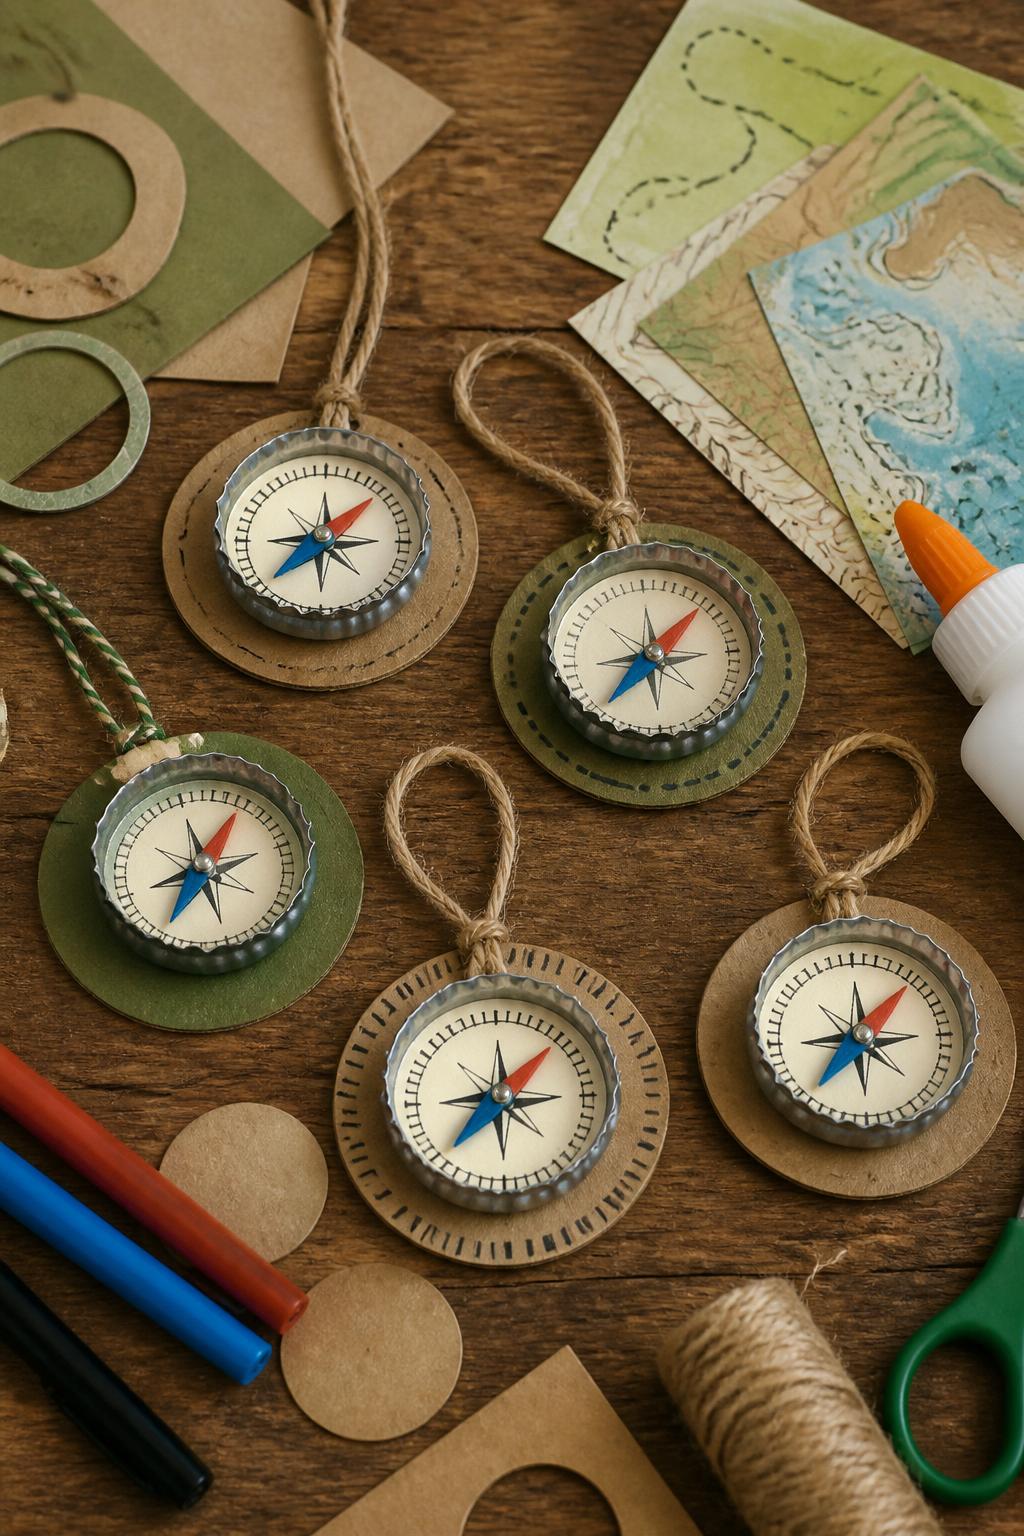
This is a fun pretend-play compass craft that gives kids a camp explorer feeling. It is not meant for real navigation, but it works beautifully for scavenger hunts, adventure games, and camp storytelling.
Materials Needed:
- Clean bottle caps
- Cardboard circles
- Toothpicks
- Markers
- Glue
- String
- Paper scraps
- Child-safe scissors
Steps To Make:
- Cut a small cardboard circle to fit inside the bottle cap.
- Draw simple compass-style marks on the cardboard.
- Glue the cardboard into the bottle cap.
- Break or cut a toothpick to make a short pointer.
- Glue the pointer across the center.
- Add a string loop to the back if desired.
- Use it for pretend explorer games.
11. Camp Memory Pennant
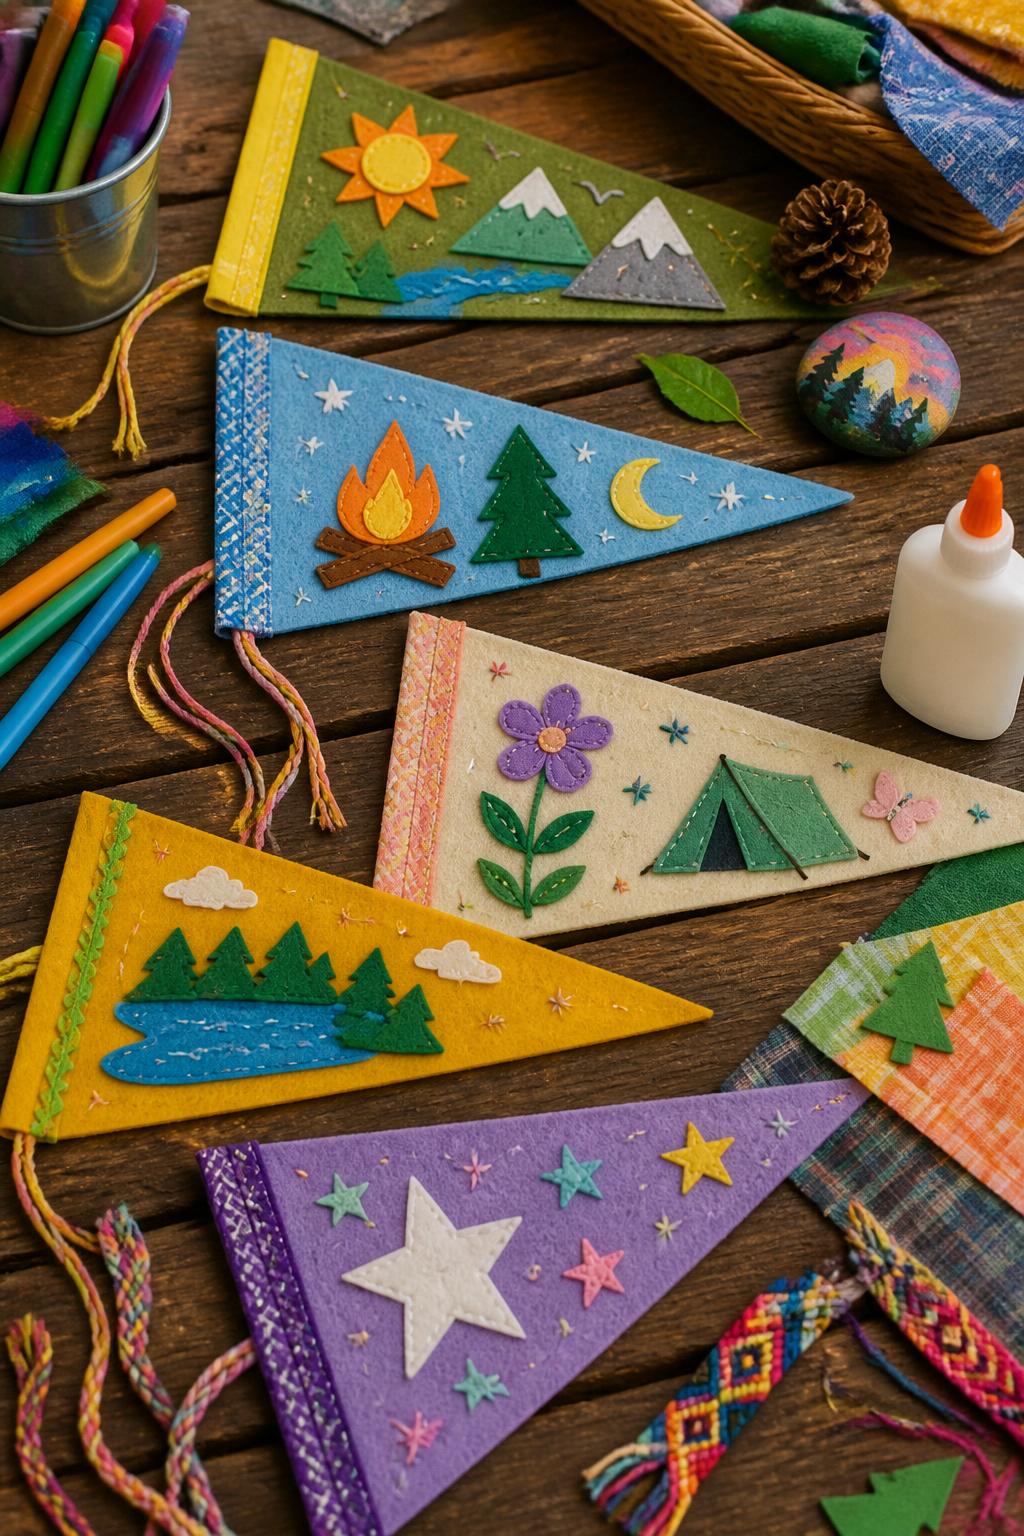
A camp memory pennant gives kids a place to collect little symbols from their camp experience. It can include favorite colors, activities, animals, cabin themes, or small decorations from the week.
Materials Needed:
- Felt or cardstock
- Markers or fabric paint
- Ribbon
- Stickers
- Paper scraps
- Glue
- Hole punch
- String
Steps To Make:
- Cut a large triangle pennant from felt or cardstock.
- Add a ribbon strip along the top edge.
- Decorate with stars, trees, tents, suns, or camp icons.
- Glue on small paper patches or fabric scraps.
- Punch two holes near the top corners.
- Thread string through the holes.
- Hang it in a room or camp area.
12. Bug Hotel Mini Craft

A mini bug hotel is a clever craft for nature-loving kids. It also helps them learn about small garden creatures and gives them a reason to observe the outdoors more closely.
Materials Needed:
- Cardboard tubes
- Small sticks
- Leaves
- Bark pieces
- Pinecones
- Paper straws
- Twine
- Child-safe scissors
Steps To Make:
- Gather dry natural materials from the ground.
- Fill a cardboard tube with sticks, leaves, bark, and paper straws.
- Pack the materials gently so they stay in place.
- Wrap twine around the tube.
- Tie the twine securely.
- Place the bug hotel in a safe outdoor spot.
- Check later to see if tiny insects visit.
13. Campfire Story Stones
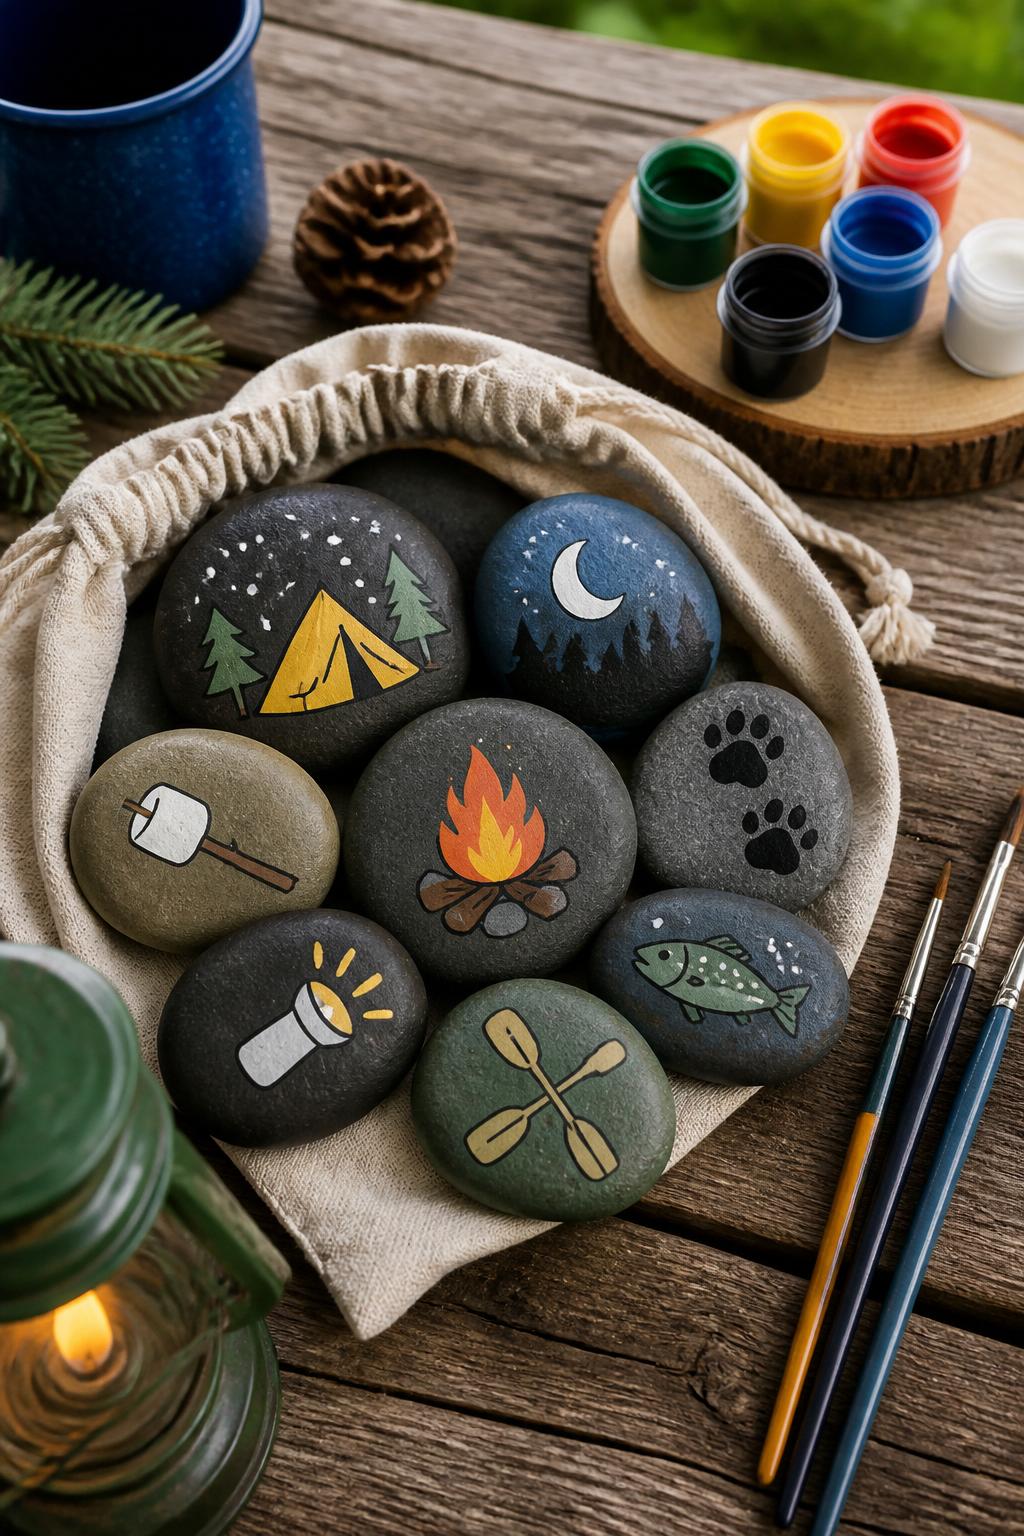
Story stones are fun because they turn craft time into a group game. Kids can pick stones from a bag and use the pictures to build silly, spooky, or sweet campfire stories.
Materials Needed:
- Smooth rocks
- Acrylic or washable craft paint
- Paintbrushes
- Paint pens, optional
- Small cloth bag
- Clear sealer, optional
Steps To Make:
- Wash and dry smooth rocks.
- Paint one simple picture on each stone.
- Use camp icons like tents, stars, fish, trees, or marshmallows.
- Let the paint dry.
- Add small details with a paint pen if desired.
- Place the stones in a cloth bag.
- Take turns pulling stones and telling a story.
14. DIY Camp Binoculars
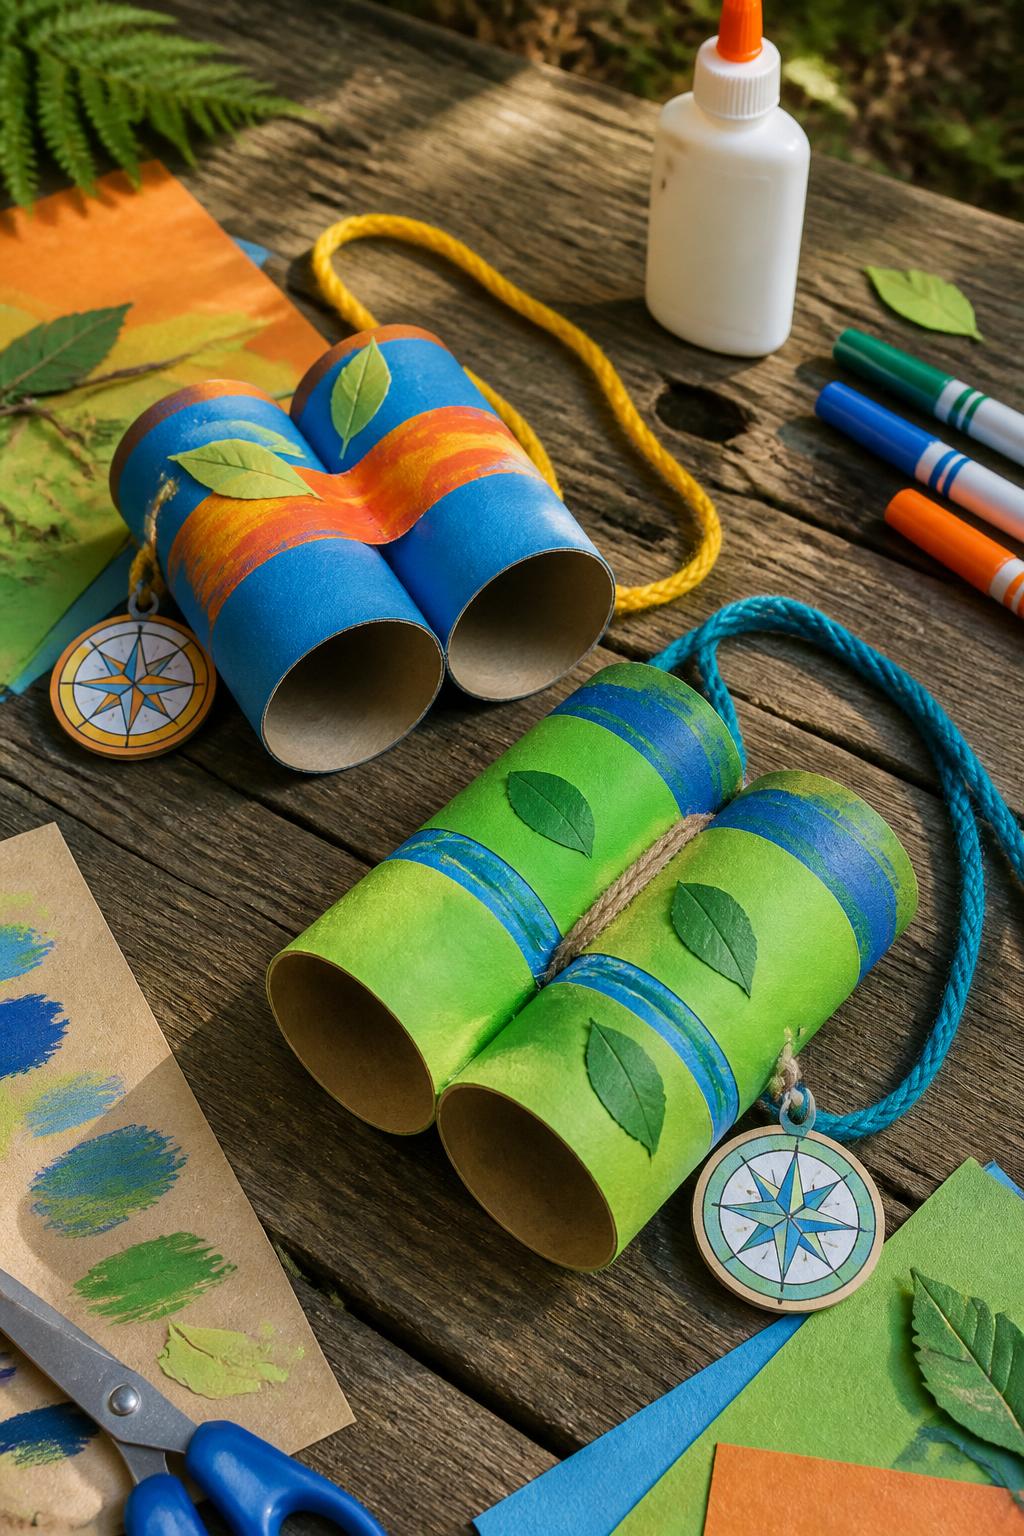
DIY binoculars are simple, fun, and perfect for pretend camp adventures. Kids can use them during bird watching, scavenger hunts, nature walks, or backyard explorer games.
Materials Needed:
- Two toilet paper rolls
- Construction paper
- Glue or tape
- Yarn
- Stickers
- Markers
- Hole punch
- Child-safe scissors
Steps To Make:
- Glue or tape two toilet paper rolls side by side.
- Wrap the rolls with construction paper.
- Decorate with stickers, stripes, leaves, or stars.
- Punch one hole on each outside edge.
- Tie yarn through the holes to make a neck strap.
- Add extra paper details if desired.
- Use the binoculars for pretend nature exploring.