


Table of Contents Show
If you’ve ever wanted a relaxing painting project but didn’t know what to paint, avocados are a fun place to start. They’re simple shapes, but you can make them look cute, modern, or even fancy with just a few colors.
This list gives you beginner-friendly avocado painting ideas that also look trendy enough to display or gift.
Pick one surface, grab your paint, and let’s get into the ideas.
1. Minimal Avocado Canvas with One Bold Pit
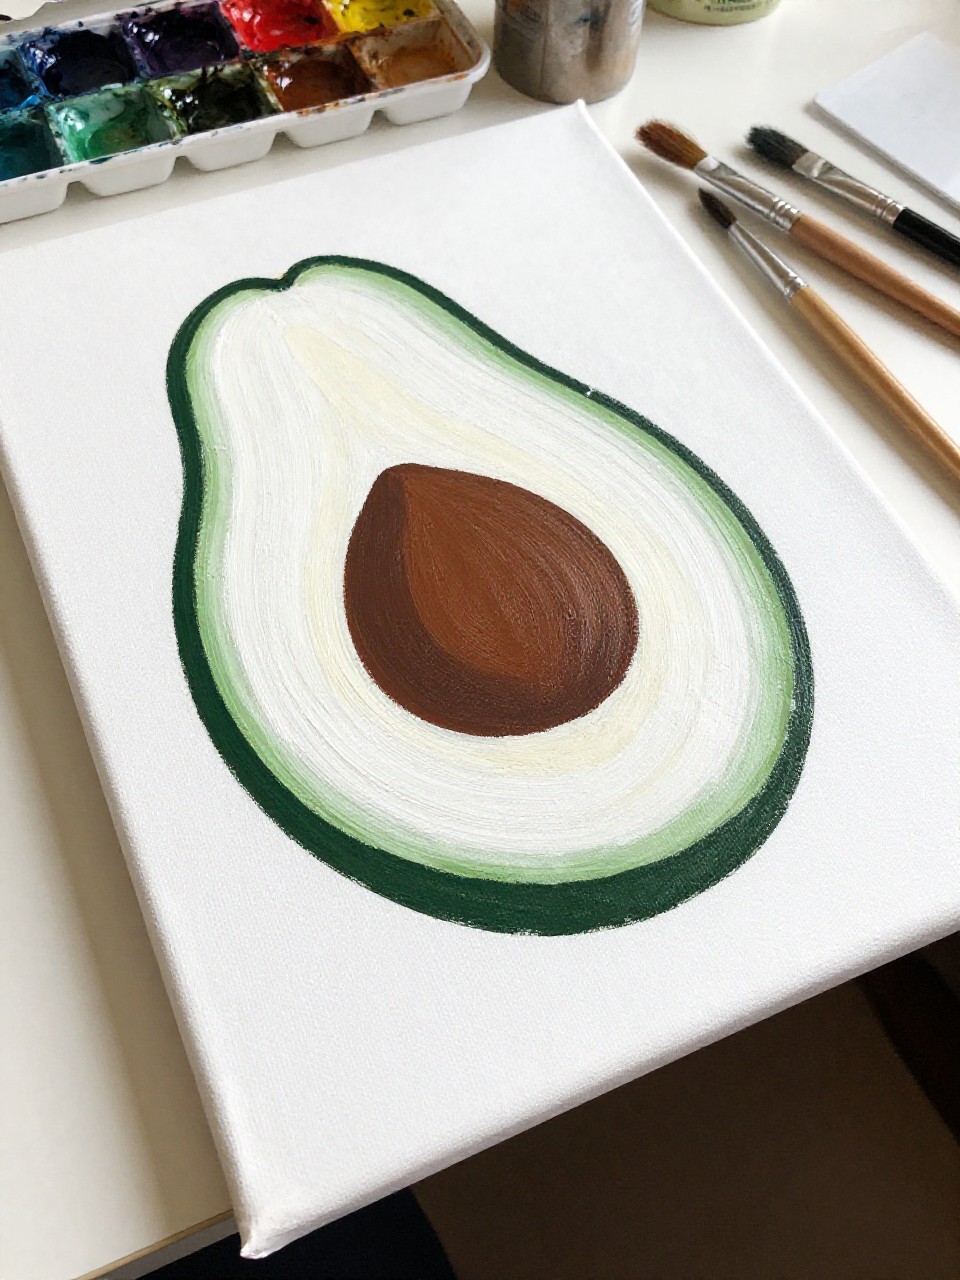
This finished canvas shows a clean avocado half with a dark round pit and lots of open white space. It’s calming to paint because it uses simple shapes and only a few colors, which makes it great for beginners and modern home decor.
Materials Needed:
For People Who Love to Make Things ✂️
- Stretched canvas
- Acrylic paint
- Paintbrushes in multiple sizes
- Palette or paint tray
- Optional sealer or varnish
Steps to Make:
- Lightly sketch an avocado half shape in the center of the canvas.
- Paint the outer skin in a deep green curve, leaving a thin edge.
- Fill the inside with pale green, blending slightly toward the center.
- Add a dark brown pit and tiny highlights with a smaller brush.
- Let it dry fully, then seal and hang or lean it on a shelf.
2. Avocado Pattern Canvas Grid
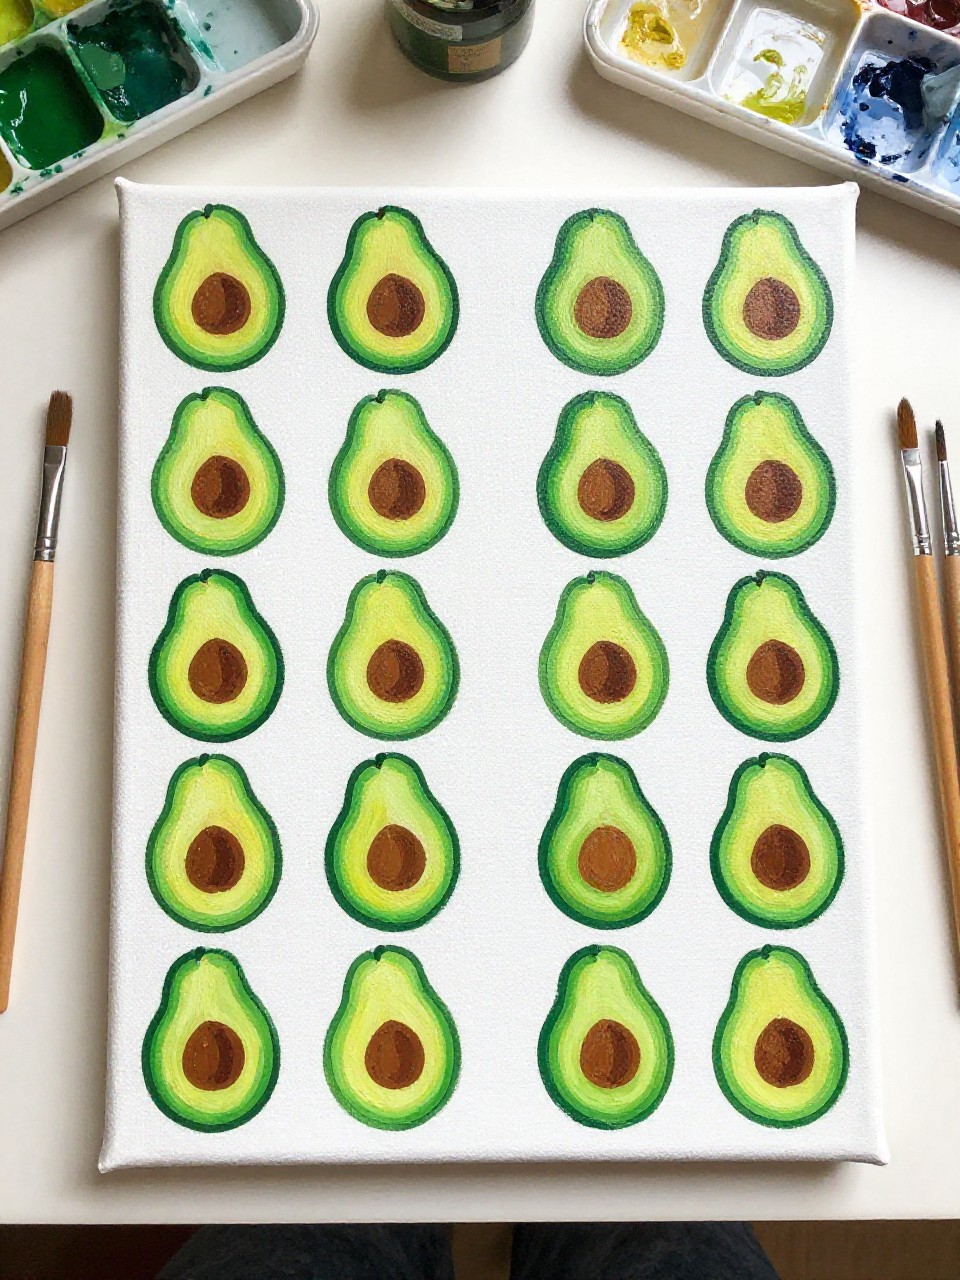
The finished canvas looks like a neat grid filled with tiny avocado halves, each one slightly different in green shades and pit placement. It’s satisfying because you can paint one square at a time, so it feels relaxing and doable even if you’re new to painting.
Materials Needed:
- Stretched canvas
- Acrylic paint
- Paintbrushes in multiple sizes
- Palette or paint tray
- Pencil and ruler
Steps to Make:
- Use a ruler to draw a light grid across the canvas.
- In each square, sketch a small avocado half or slice outline.
- Paint skins first, then fill in the lighter green centers.
- Dot in pits and add simple shadows to make a few avocados pop.
- Erase stray pencil lines after drying, then display as wall art.
3. Trendy Avocado Toast Canvas Art
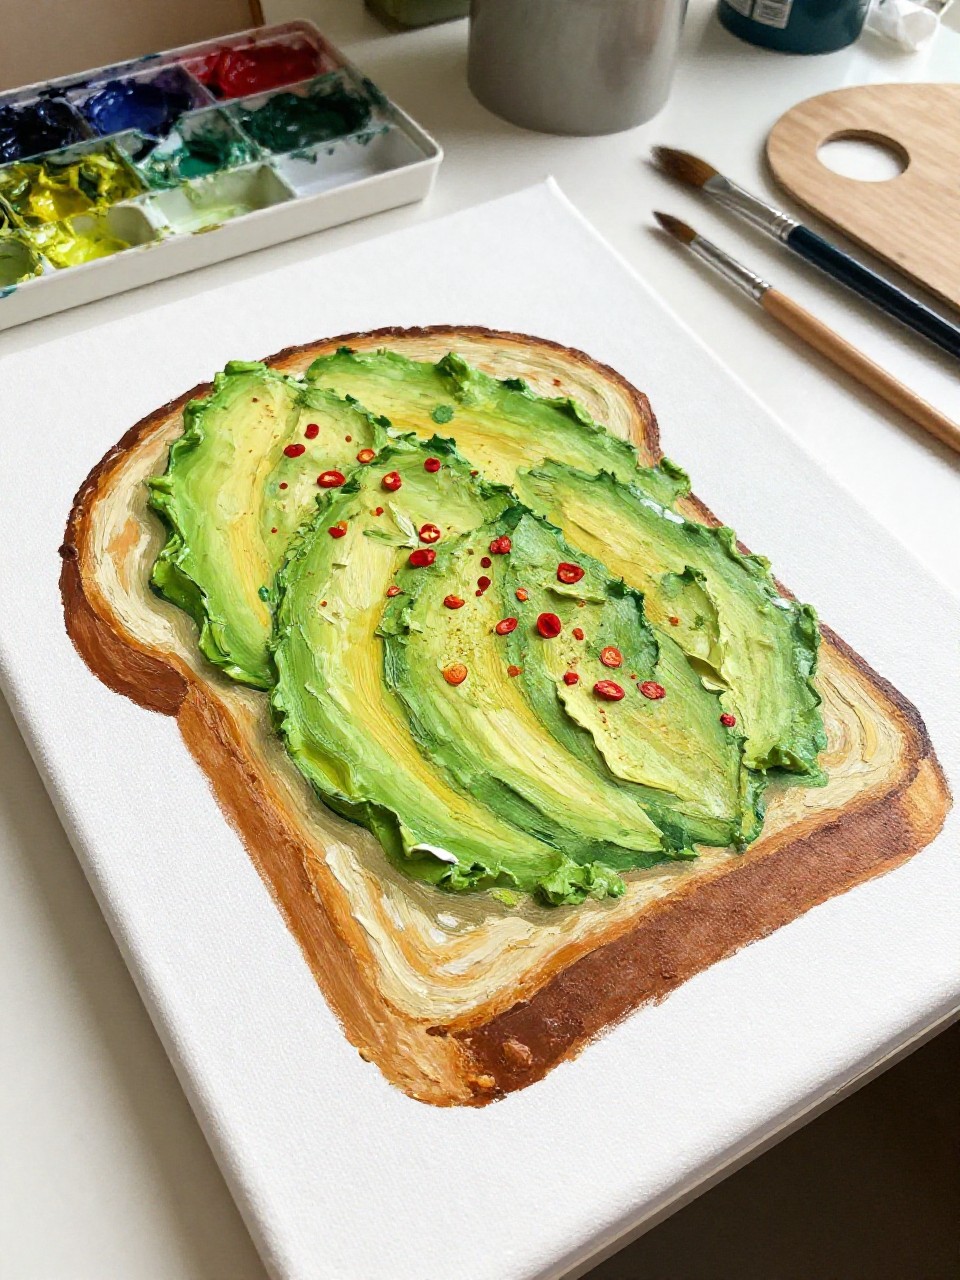
This canvas painting shows a crisp toast shape topped with mashed avocado texture and a few painted chili flakes. It’s great for beginners because the toast and topping are easy blocks of color, and the messy texture is forgiving and fun.
Materials Needed:
- Stretched canvas
- Acrylic paint
- Paintbrushes in multiple sizes
- Palette or paint tray
- Optional sealer or varnish
Steps to Make:
- Sketch a rounded toast shape in the center of the canvas.
- Paint the toast in warm tan tones, adding a darker crust edge.
- Stipple light and dark greens to create mashed avocado texture on top.
- Add tiny red flakes and a thin shadow under the toast for depth.
- Let dry, seal if you want, and hang it in a kitchen nook.
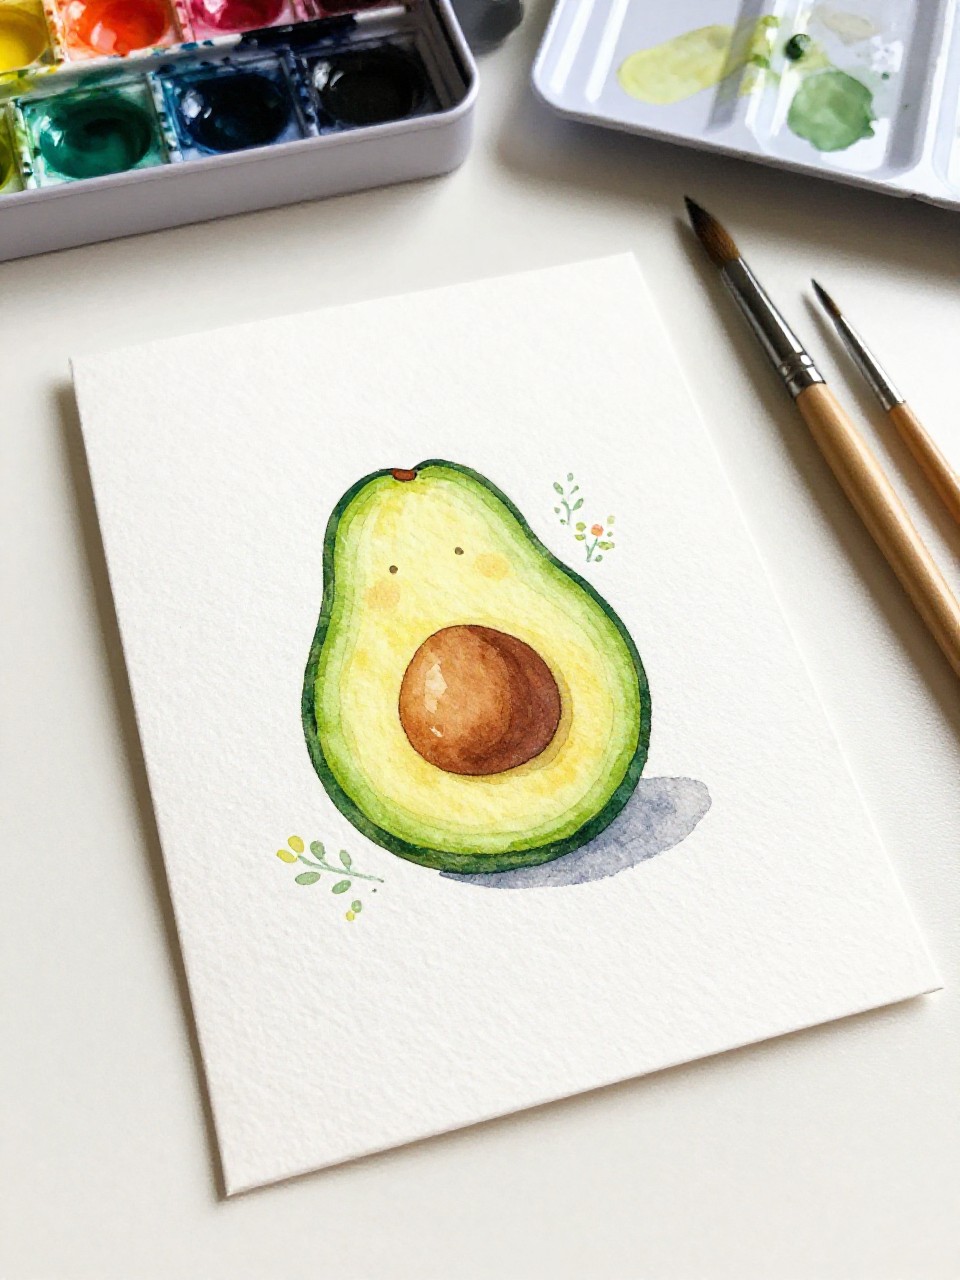
4. Smiling Avocado Character Canvas
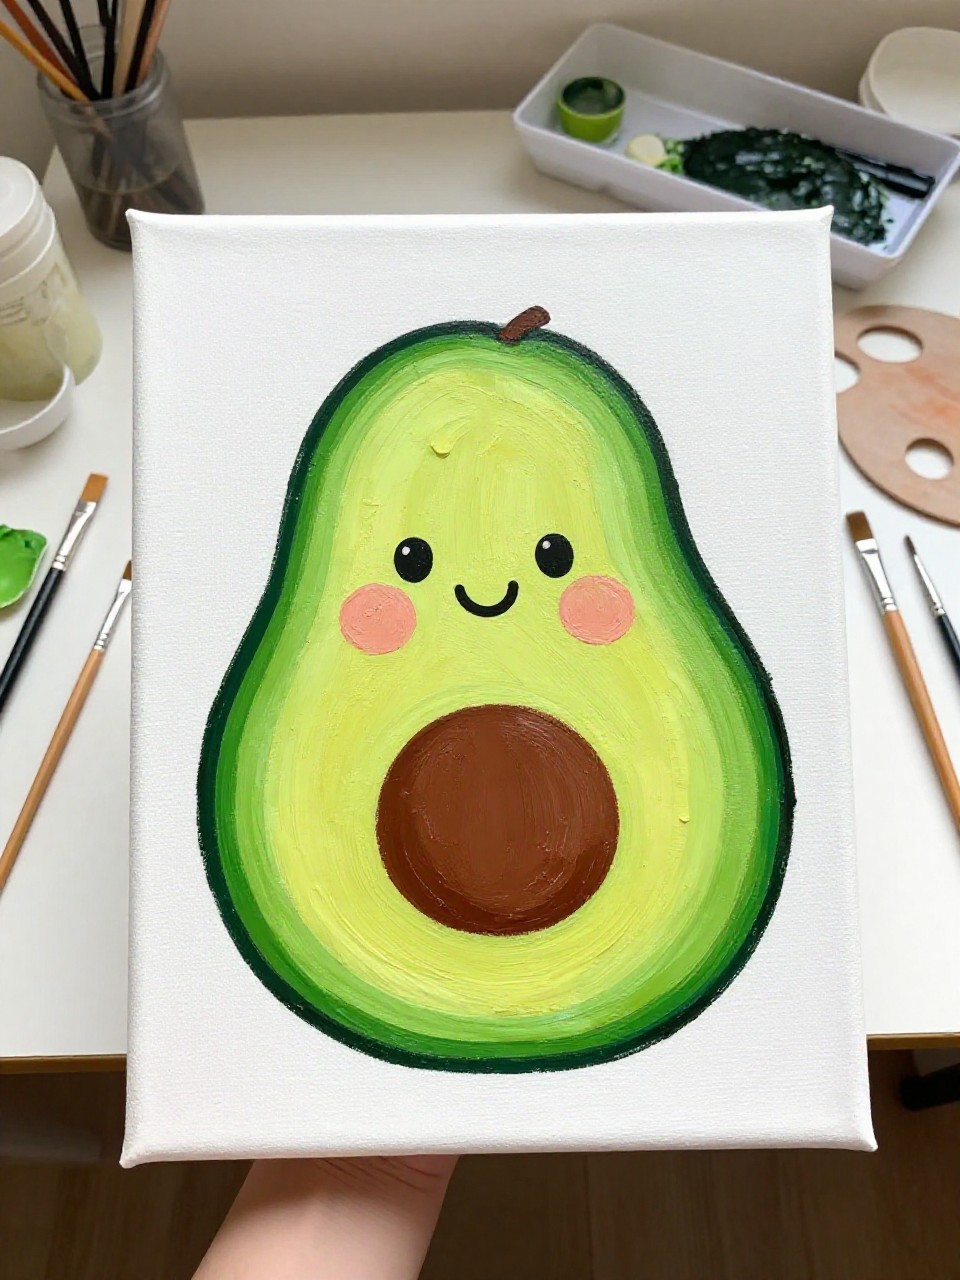
The finished canvas shows a cute avocado with a smiling face, rosy cheeks, and a big round pit like a belly. This is a feel-good project that’s quick to finish, and it’s perfect if you want something playful for a kid’s room or your craft corner.
Materials Needed:
- Stretched canvas
- Acrylic paint
- Paintbrushes in multiple sizes
- Palette or paint tray
- Fine-tip paint pen (optional)
Steps to Make:
- Draw a simple avocado outline with a pencil, leaving room for a face.
- Paint the outer skin, then fill the center with lighter green.
- Add the pit as a large oval and paint it dark brown with a soft highlight.
- Paint simple eyes, a smile, and pink cheeks using a small brush.
- Let it dry and touch up the outline with a paint pen if needed.
5. Abstract Avocado Color-Block Canvas
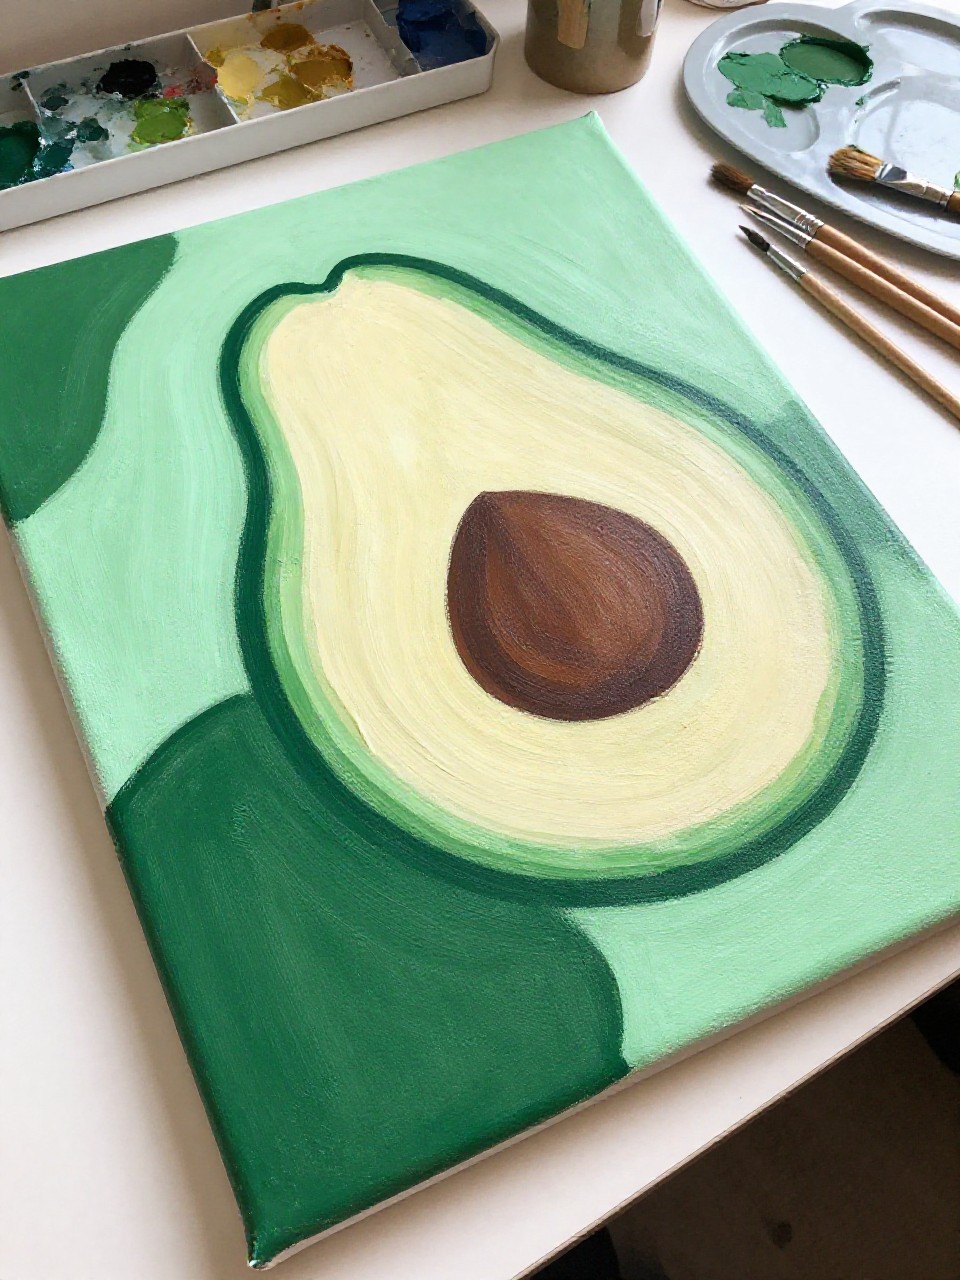
This canvas looks modern with avocado-inspired shapes broken into bold color blocks: deep green, mint, cream, and a circle for the pit. It’s relaxing because you can focus on clean sections instead of perfect realism, and it fits well with trendy, simple wall decor.
Materials Needed:
- Stretched canvas
- Acrylic paint
- Paintbrushes in multiple sizes
- Palette or paint tray
- Painter’s tape
Steps to Make:
- Tape off a few large geometric sections across the canvas.
- Paint each section with avocado colors, keeping edges along the tape.
- Add a circle or oval “pit” shape in one area using a medium brush.
- Peel tape carefully once paint is touch-dry to reveal crisp lines.
- Let dry fully and seal for a smooth, finished look.
6. Avocado Botanical Canvas with Leafy Background
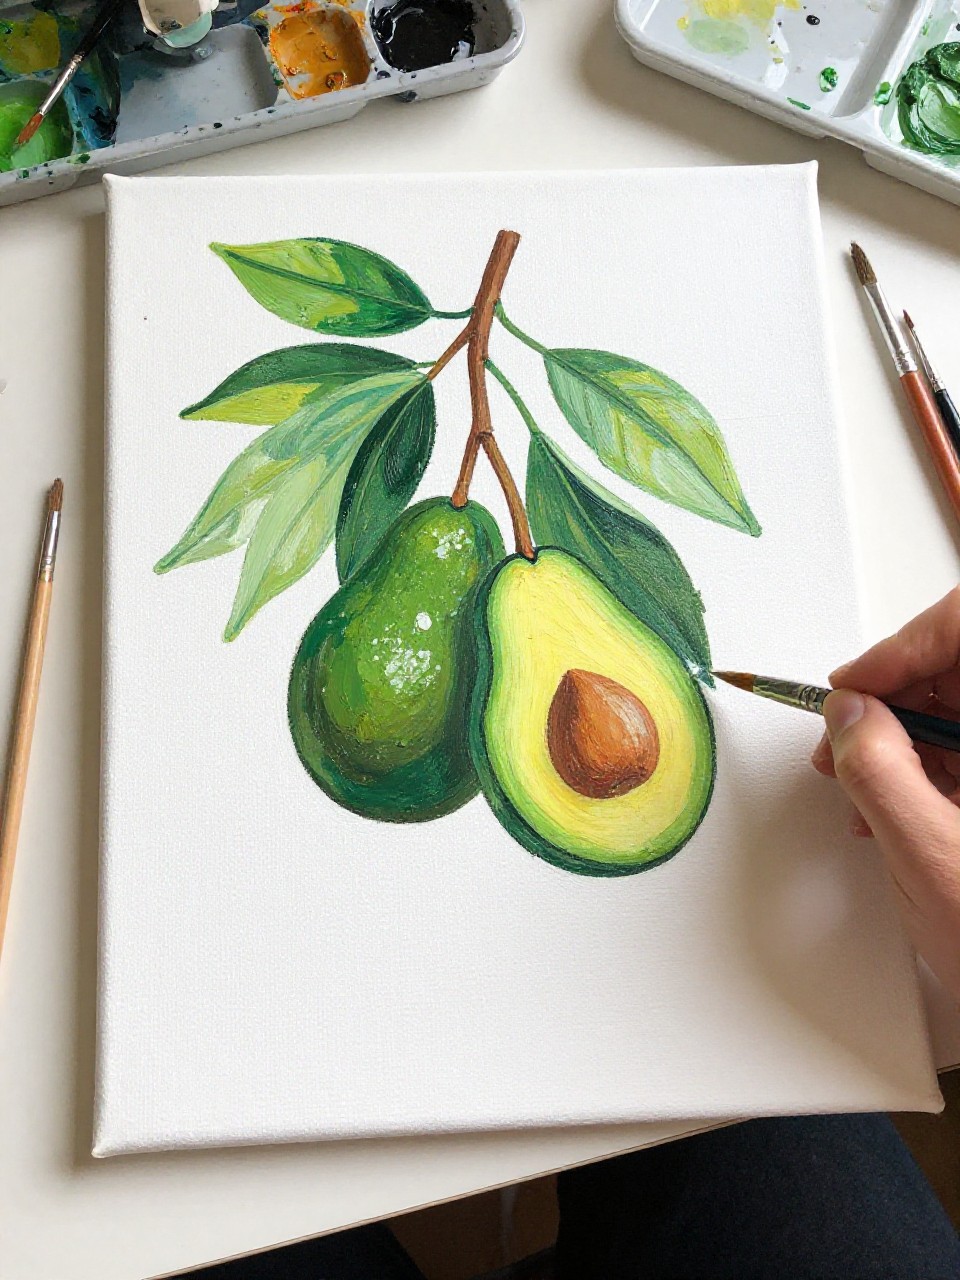
The finished piece shows a central avocado branch with small leaves, plus one sliced avocado hanging like fruit. It feels calming to paint because the leaves are loose and layered, and beginners can keep it simple while still getting a pretty, natural look.
Materials Needed:
- Stretched canvas
- Acrylic paint
- Paintbrushes in multiple sizes
- Palette or paint tray
- Pencil
Steps to Make:
- Sketch a thin branch line and place one avocado and a few leaves around it.
- Paint a light, soft green wash in the background for a gentle mood.
- Layer darker greens for leaves, using quick strokes that show texture.
- Paint the avocado slice with a pale center and a darker pit, then add shadows.
- Let dry and add a few final vein lines on leaves with a small brush.
7. Avocado Doodle Sketchbook Page
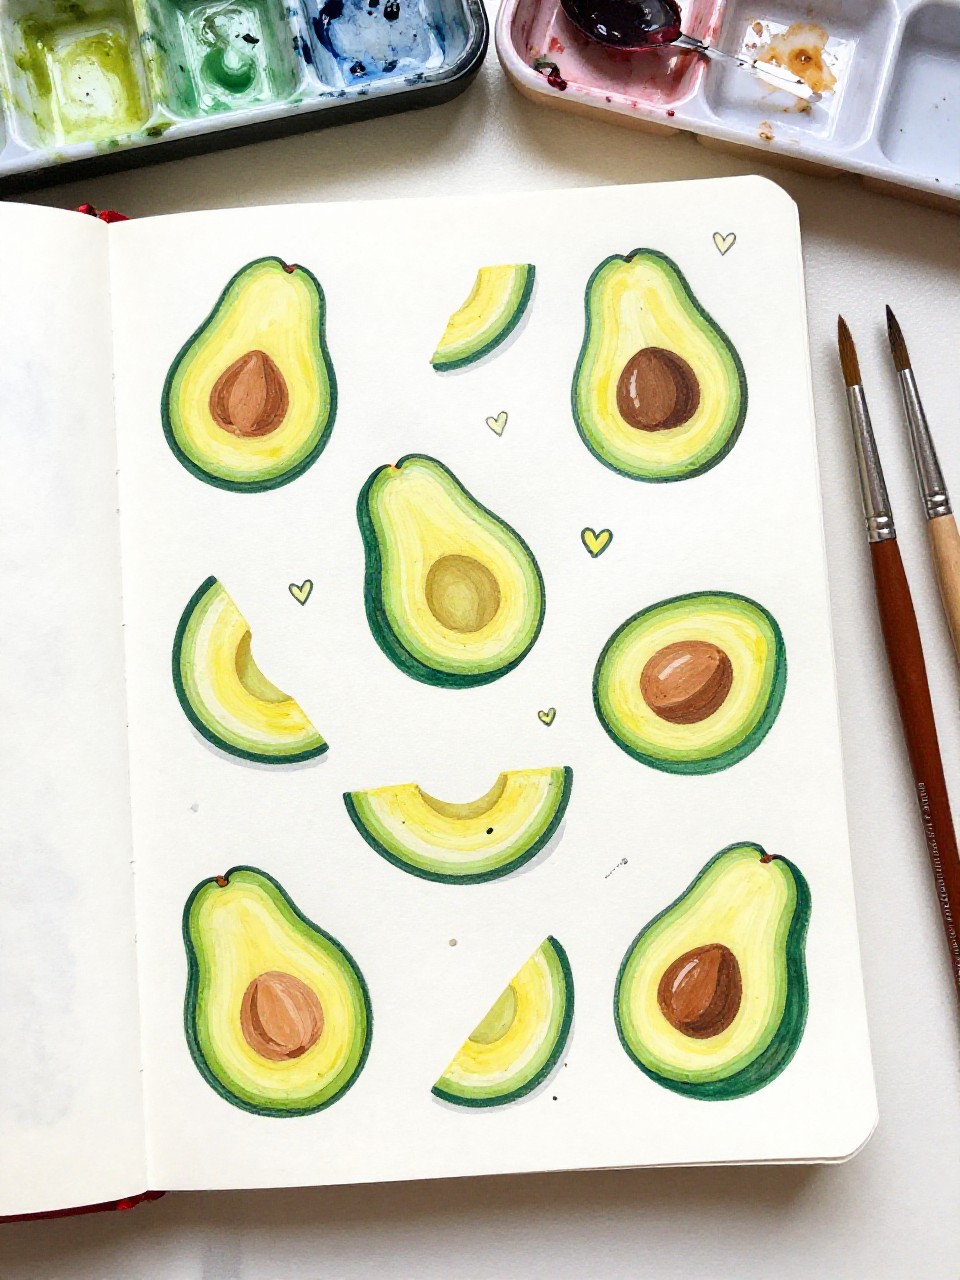
This sketchbook page looks like a fun collection of avocado doodles—halves, slices, tiny hearts, and little notes in the margins. It’s great for beginners because there’s no pressure to be perfect, and it’s an easy way to practice shapes and brush control.
Materials Needed:
- Mixed-media sketchbook
- Gouache paint
- Paintbrushes in multiple sizes
- Palette or paint tray
- Black fineliner (optional)
Steps to Make:
- Open to a clean page and lightly plan where a few avocados will go.
- Paint simple avocado shapes in different sizes, leaving white space between them.
- Add pits, shadows, and quick highlights while the paint is still slightly wet.
- Outline a few doodles or add tiny faces using a fineliner if you like.
- Let the page dry flat, then close the book with a sheet of scrap paper inside.
8. Avocado Greeting Card Set
These greeting cards show hand-painted avocado halves with sweet little details like tiny flowers, freckles, or simple “hello” lettering. They’re satisfying because each card is small and quick, and you can make a matching set for gifts, lunch notes, or happy mail.
Materials Needed:
- Watercolor paper cards
- Watercolor paint
- Paintbrushes in multiple sizes
- Palette or paint tray
- Water jar and paper towel
Steps to Make:
- Tape the card edges if you want a clean white border.
- Paint a light green avocado center first, then add the darker skin edge.
- Drop in the pit color and let it bleed slightly for a soft watercolor look.
- Add tiny details like dots, flowers, or simple lettering once dry.
- Let dry completely, then stack the cards with wax paper between them.
9. Avocado Bookmark with Gradient Greens
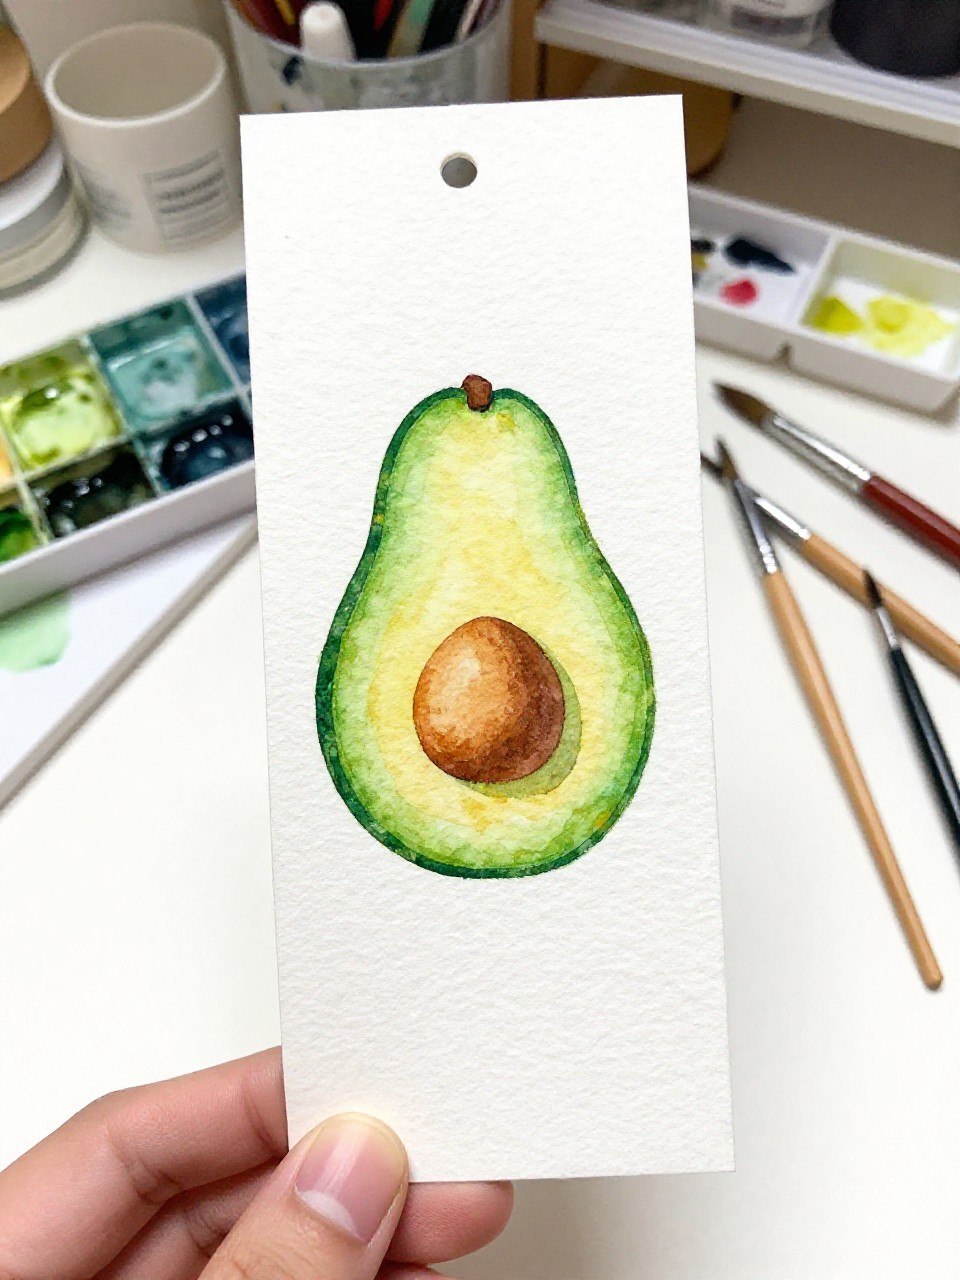
The finished bookmark shows a tall avocado shape with a smooth gradient from pale green to deeper green, plus a small brown pit near the bottom. This is a relaxing project because it’s mostly blending practice, and it makes a cute little gift for any reader.
Materials Needed:
- Watercolor paper strip (bookmark size)
- Watercolor paint
- Paintbrushes in multiple sizes
- Palette or paint tray
- Hole punch and ribbon (optional)
Steps to Make:
- Cut watercolor paper into a bookmark strip and round the corners if you like.
- Paint a wet wash in light green, then blend in darker green along one edge.
- Add an avocado outline by deepening the outside shape with a smaller brush.
- Paint the pit and a thin shadow to make it look slightly rounded.
- Let dry, punch a hole, and tie a ribbon for a finished look.
10. Avocado Phone Case Painting
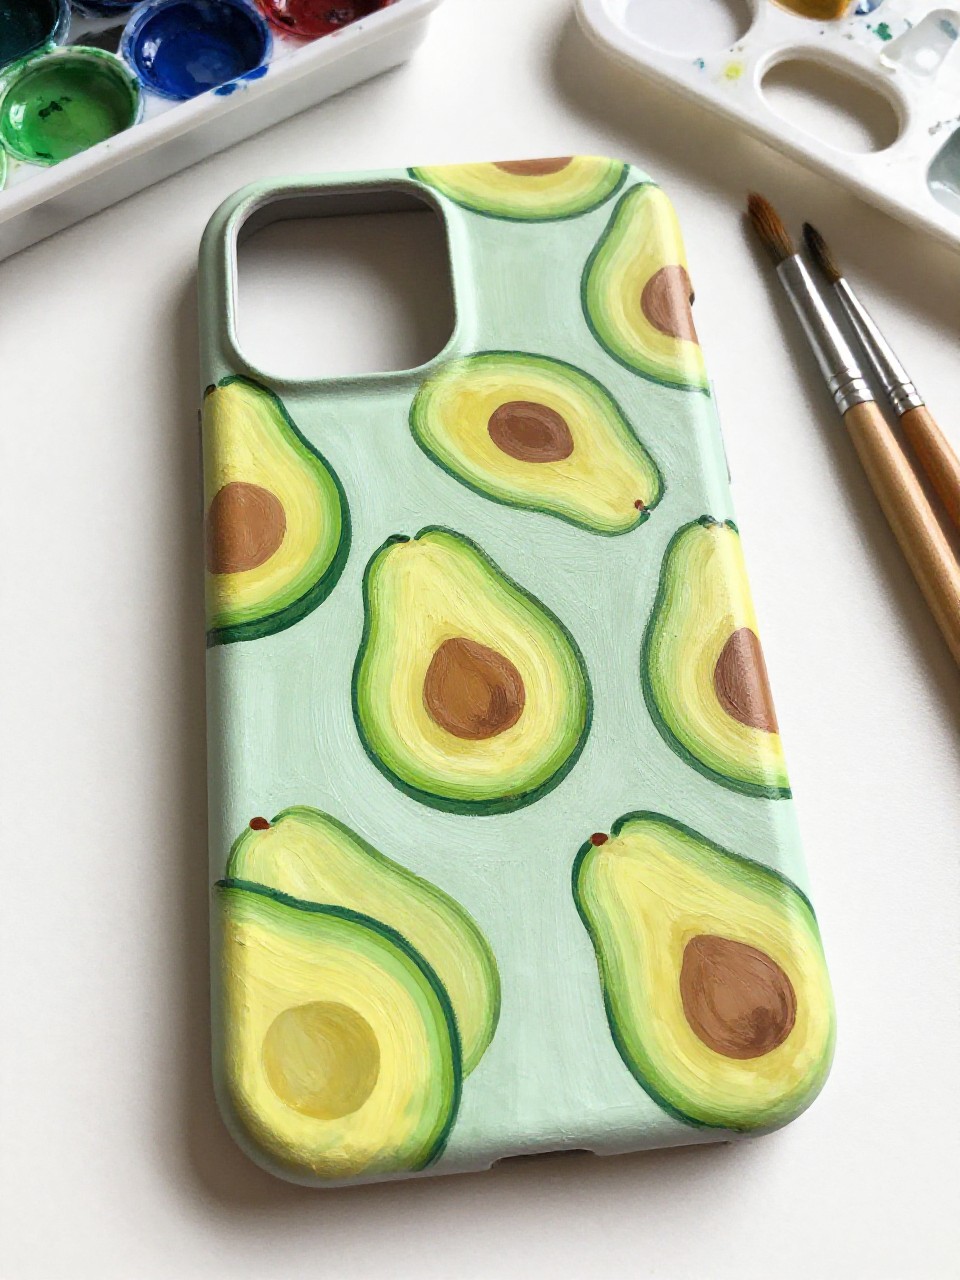
This painted phone case shows a repeating avocado pattern that wraps naturally around the curves and edges, with tiny pits and soft shadows for depth. It’s a fun beginner project because the shapes are simple, and you end up with something useful and very trendy.
Materials Needed:
- Plain hard phone case
- Acrylic paint
- Paintbrushes in multiple sizes
- Palette or paint tray
- Clear sealer spray or varnish
Steps to Make:
- Wipe the phone case clean and lightly scuff glossy spots if needed.
- Sketch small avocado halves across the case, spacing them evenly around curves.
- Paint skins and centers first, turning the case as you go so the pattern flows.
- Add pits, tiny highlights, and a few darker edges to define each avocado.
- Let dry fully, then apply a clear sealer in thin coats for protection.
11. Avocado Canvas Tote Bag Design
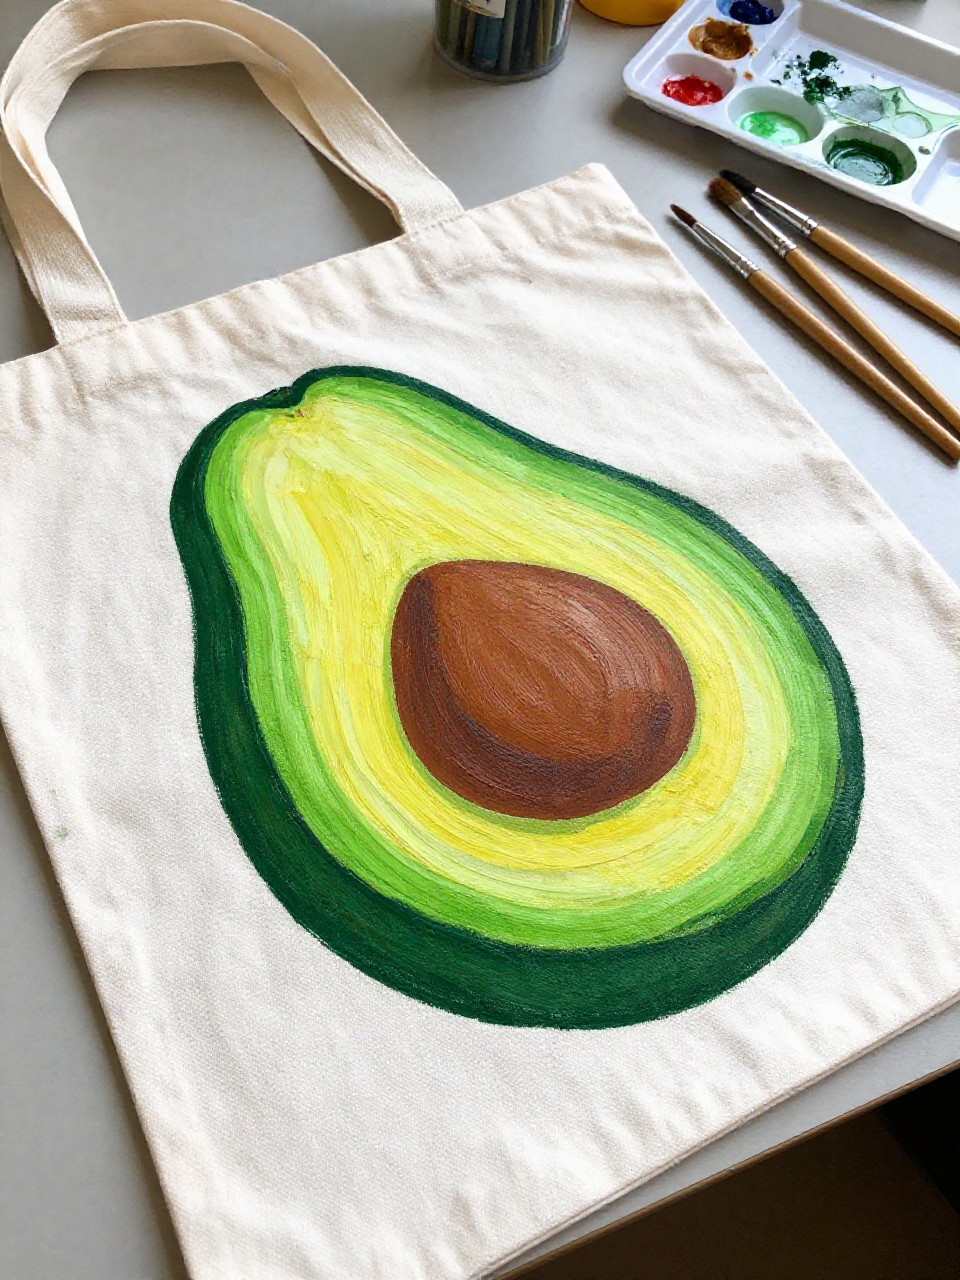
The finished tote bag has a big avocado half on one side, painted with layered greens and a rich brown pit, with the design curving naturally with the fabric. It’s great for beginners because you can keep the shapes bold, and it turns into a wearable piece of art.
Materials Needed:
- Plain canvas tote bag
- Fabric paint
- Paintbrushes in multiple sizes
- Palette or paint tray
- Cardboard insert (to prevent bleed-through)
Steps to Make:
- Slide cardboard inside the tote to keep paint from soaking through.
- Lightly sketch a large avocado shape on the front panel.
- Paint the dark skin first, then fill the inside with lighter greens in layers.
- Add the pit and a few stitched-look lines or dots for extra style.
- Let dry completely, then heat-set following your fabric paint instructions.
12. Avocado Terracotta Pot for a Kitchen Herb
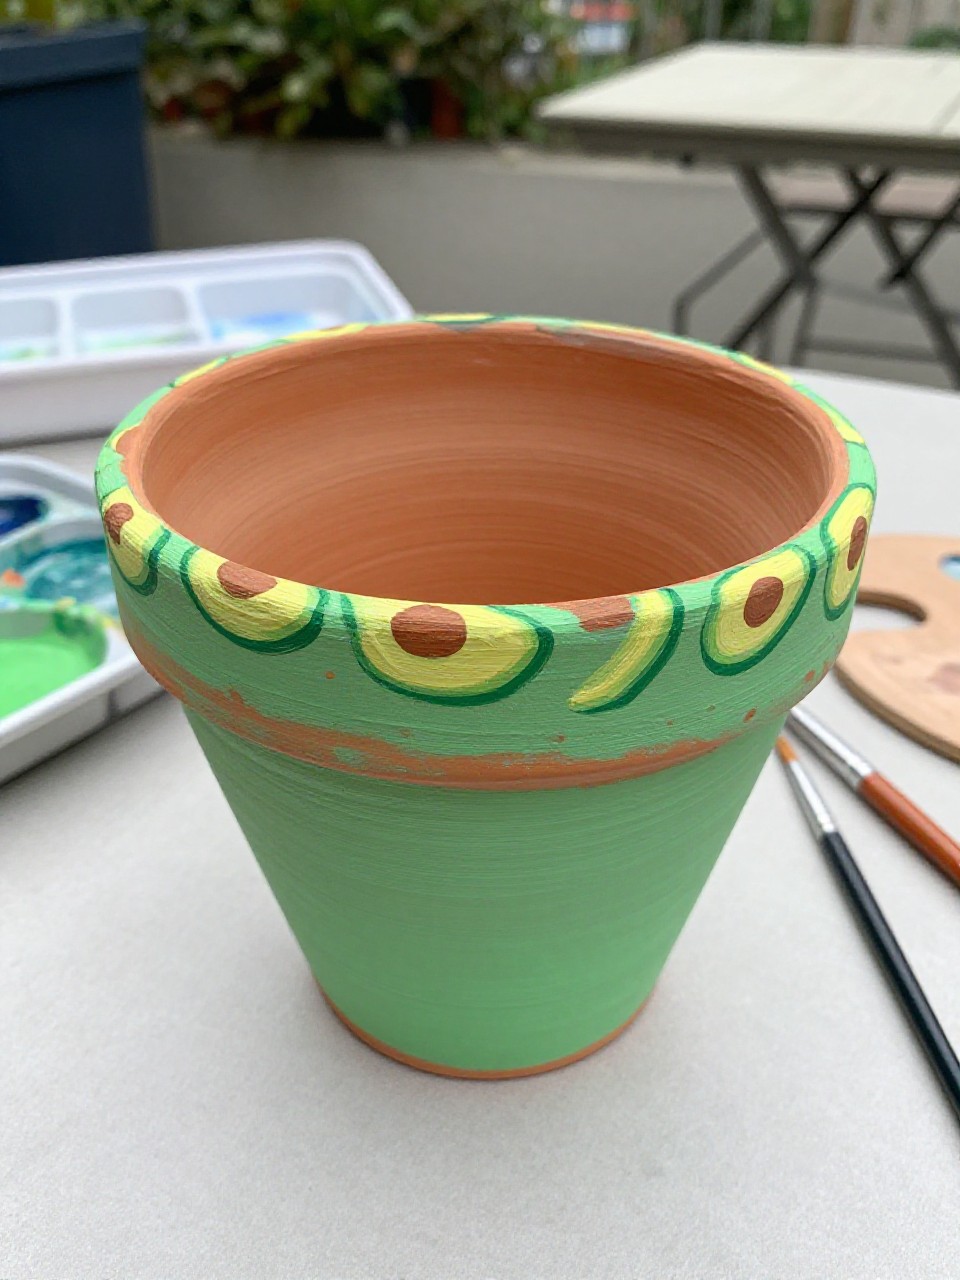
This terracotta pot shows avocados painted around the rim, wrapping smoothly with the pot’s curve, plus a simple green border line. It’s a satisfying project because terracotta is forgiving, and the finished pot looks adorable on a sunny windowsill with basil or mint.
Materials Needed:
- Terracotta pot
- Acrylic paint
- Paintbrushes in multiple sizes
- Palette or paint tray
- Outdoor-safe sealer (optional)
Steps to Make:
- Dust off the pot and paint a light base coat if you want brighter colors.
- Mark evenly spaced avocado shapes around the rim so they wrap evenly.
- Paint each avocado with layered greens, leaving small gaps between them.
- Add pits and tiny highlights, then paint a thin border line to tie it together.
- Let dry and seal, then plant an herb and display by a window.
13. Avocado Ceramic Mug with Wraparound Slices
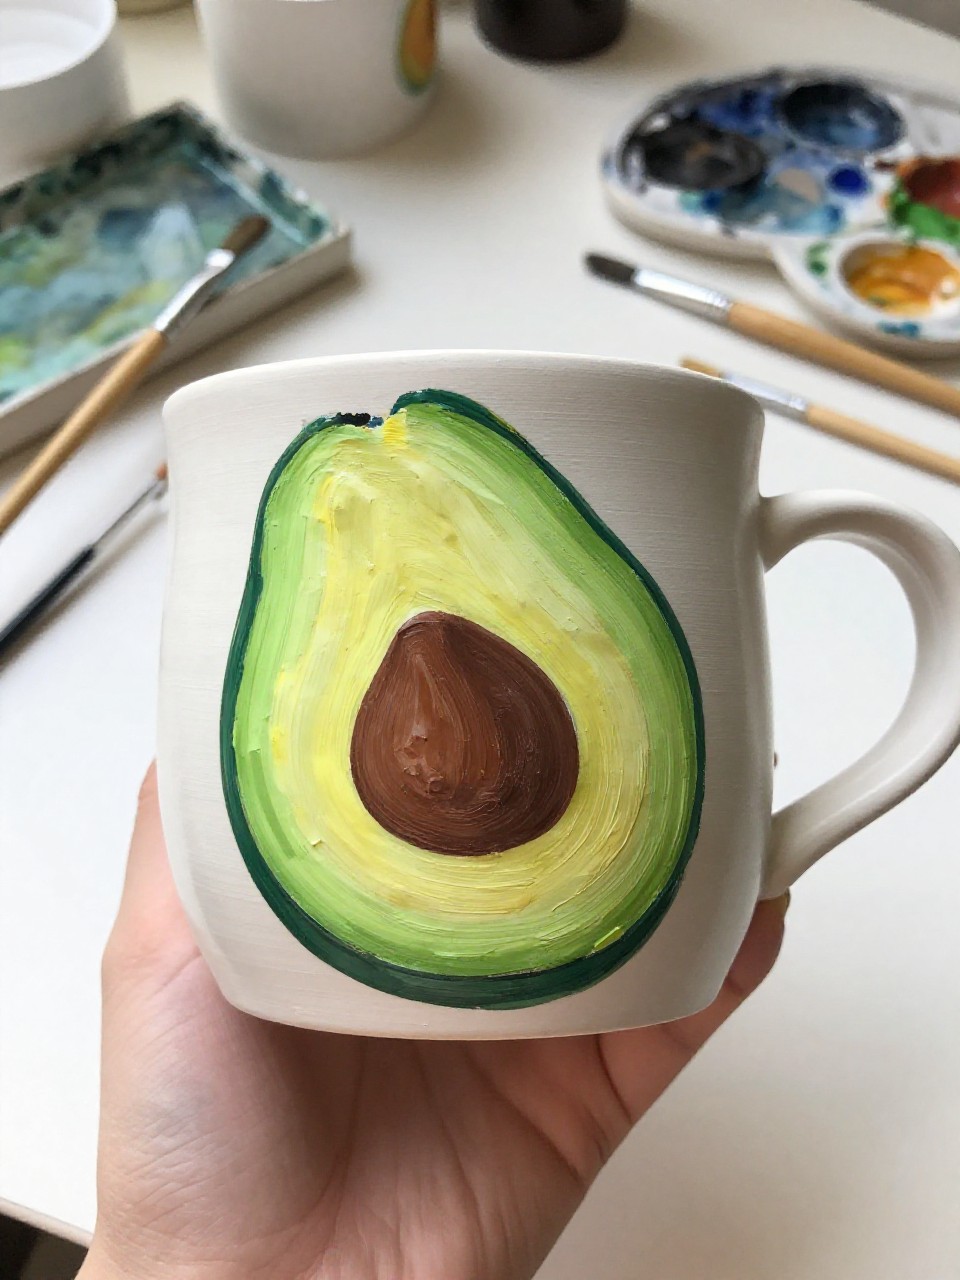
This ceramic mug has avocado slices painted to wrap around the cup, with uneven brush texture that makes it feel handmade and cozy. It’s a nice beginner project because each slice is simple, and you can build the pattern slowly while keeping the design playful.
Materials Needed:
- Plain ceramic mug
- Porcelain paint (bake-set)
- Paintbrushes in multiple sizes
- Palette or paint tray
- Optional clear porcelain sealer
Steps to Make:
- Wash and dry the mug, avoiding fingerprints where you’ll paint.
- Lightly mark a line to guide where the avocado slices will wrap around.
- Paint the dark green skins first, turning the mug as you go to keep spacing even.
- Fill centers with lighter greens, then add pits and tiny shadows with a small brush.
- Let dry, then bake or cure following the paint instructions for durability.
14. Avocado Ceramic Plate Rim Border
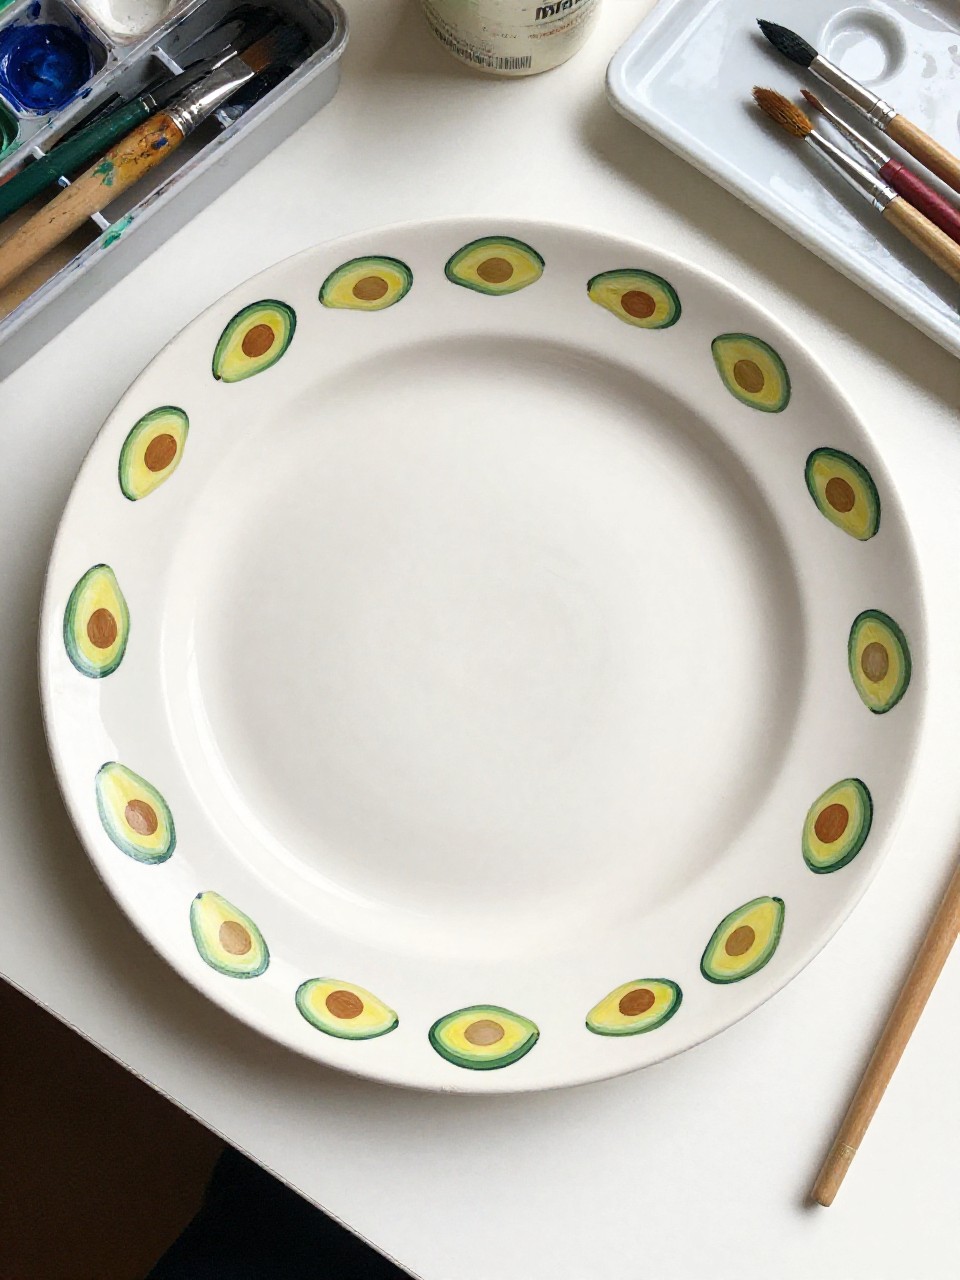
This ceramic plate features a clean avocado border around the rim, leaving the center mostly white like a modern restaurant plate. It’s relaxing because you repeat the same simple shape around the curve, and the result looks polished enough for a cute serving or display plate.
Materials Needed:
- Plain ceramic plate
- Porcelain paint (bake-set)
- Paintbrushes in multiple sizes
- Palette or paint tray
- Pencil (optional, for light guides)
Steps to Make:
- Clean the plate and plan a rim border area with light pencil dots for spacing.
- Paint small avocado halves around the rim, following the plate’s curve.
- Layer light and dark greens so each avocado has depth without being too detailed.
- Add pits and tiny highlight strokes, keeping the center area clean and simple.
- Let dry, then bake/cure according to the porcelain paint directions.
15. Avocado Glass Jar Candle Holder
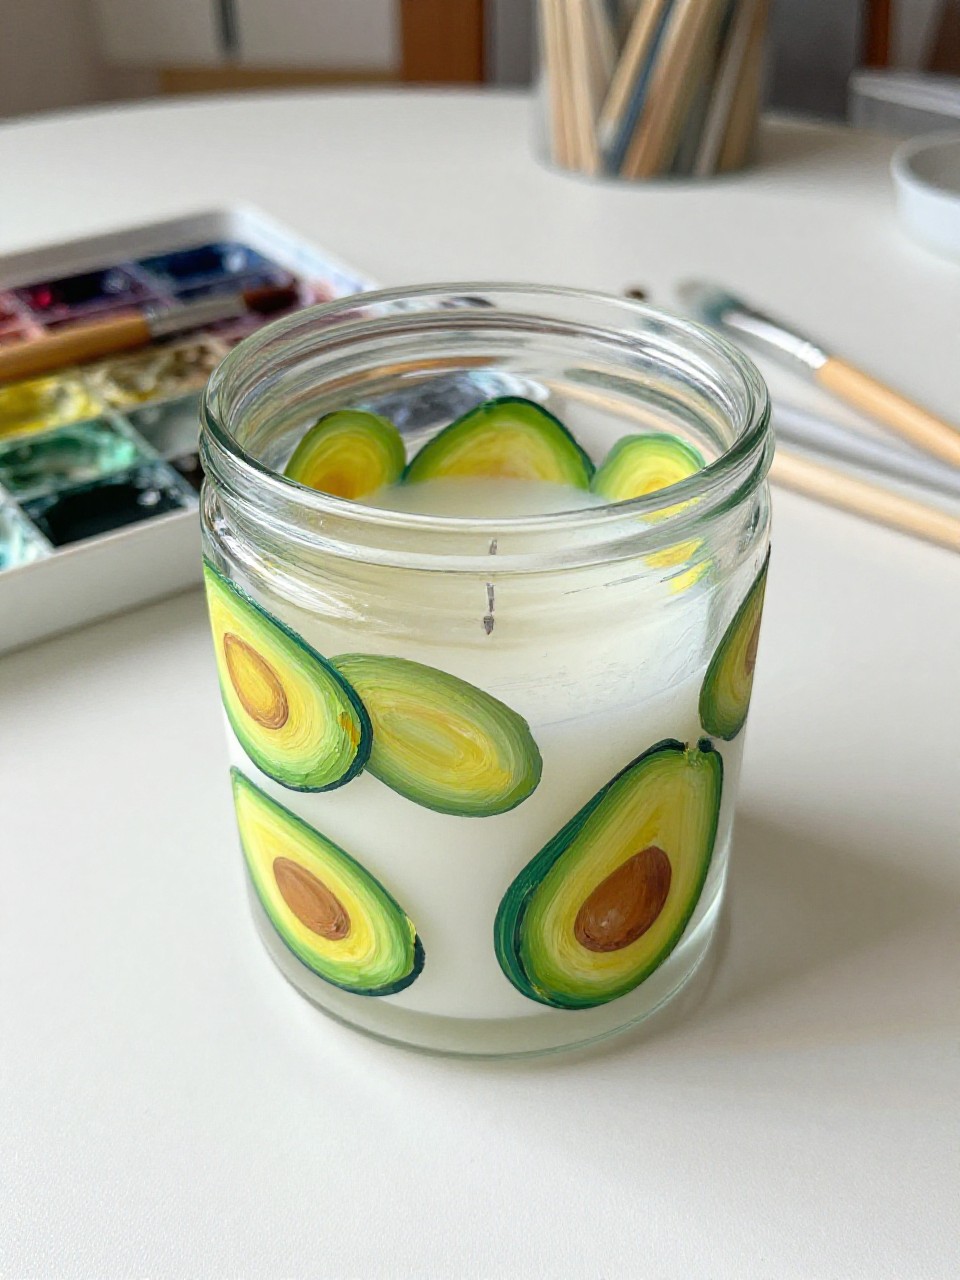
This glass jar candle holder shows painted avocado halves scattered around the outside, with the shapes curving naturally as they wrap the jar. It’s a soothing project because the jar is small and quick to finish, and the glow from a tealight makes the colors look extra warm.
Materials Needed:
- Clear glass jar
- Acrylic paint (multi-surface)
- Paintbrushes in multiple sizes
- Palette or paint tray
- Clear sealer (optional)
Steps to Make:
- Wash the jar well and let it dry so paint sticks better.
- Lightly plan avocado placement around the jar, leaving space between each one.
- Paint the avocado shapes in layers, rotating the jar to keep the wrap consistent.
- Add pits and small highlights, then paint a few dots or tiny stars as filler.
- Let dry, seal lightly if desired, and place a tealight inside for display.
16. Avocado Skateboard Deck Wall Art
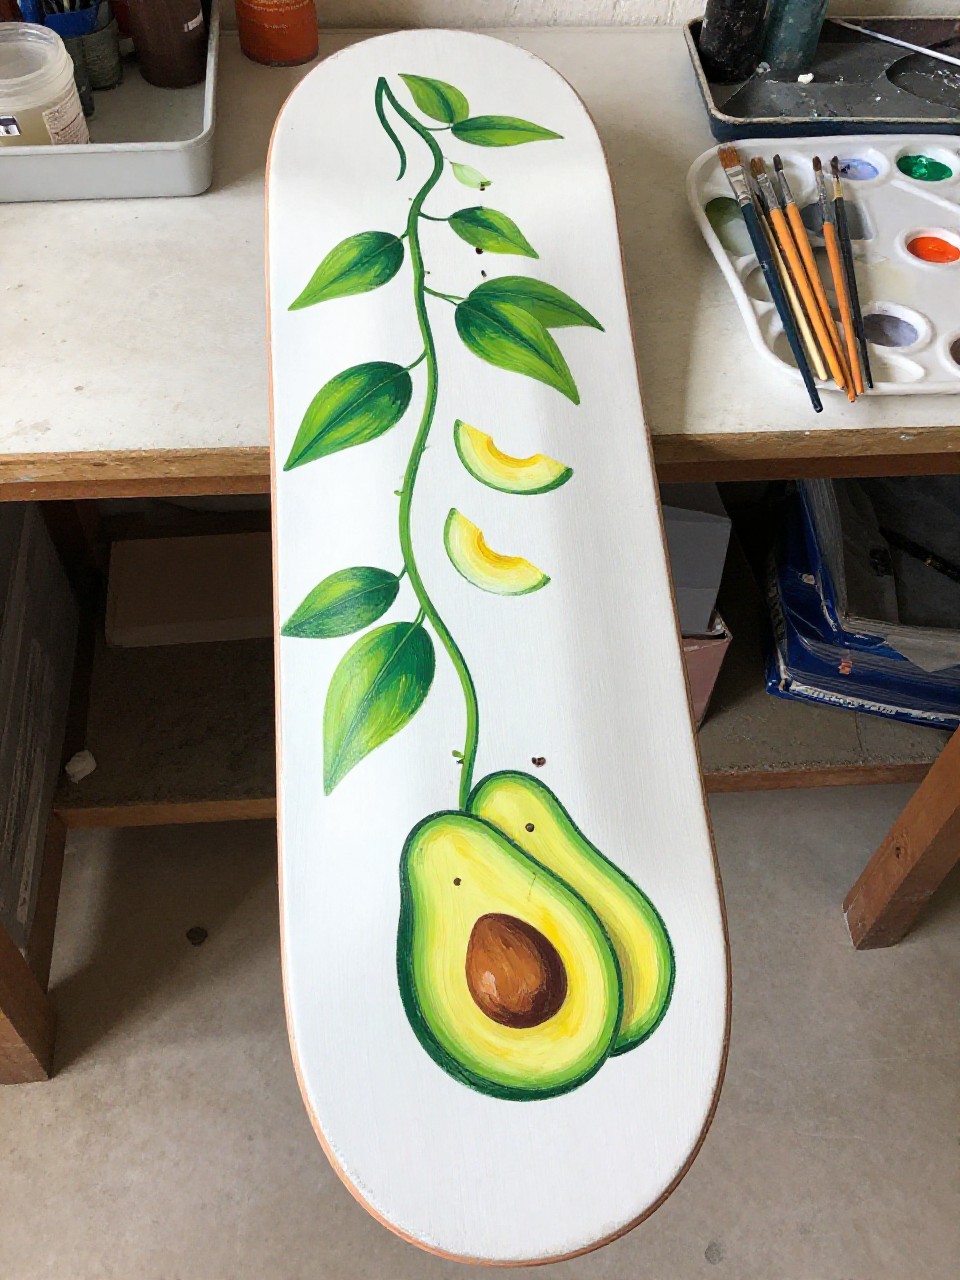
This skateboard deck wall piece shows a long avocado vine design stretching from one end to the other, with a few sliced avocados painted along the curve of the board. It’s a trendy project that still feels beginner-friendly because you can keep the leaves loose, and the deck makes instant statement decor.
Materials Needed:
- Blank skateboard deck (ungripped)
- Acrylic paint
- Paintbrushes in multiple sizes
- Palette or paint tray
- Clear varnish (optional)
Steps to Make:
- Wipe the deck clean and set it on cups or blocks so it doesn’t wobble.
- Sketch a flowing vine line that follows the deck’s long shape.
- Paint loose green leaves along the vine, layering darker greens on top.
- Add a few avocado halves with pits, then paint soft shadows to ground them.
- Let dry fully and varnish for protection before hanging it on the wall.