


Table of Contents Show
When I want a relaxing hobby, I often get stuck on what to paint that feels cute but is still easy. Mushrooms are perfect because they can be simple shapes, yet they always look a little magical.
This list will give you beginner-friendly mushroom painting ideas that also make sweet decor and handmade gifts.
Grab your paints, and let’s start with some whimsical options.
1. Red Toadstool Trio Canvas
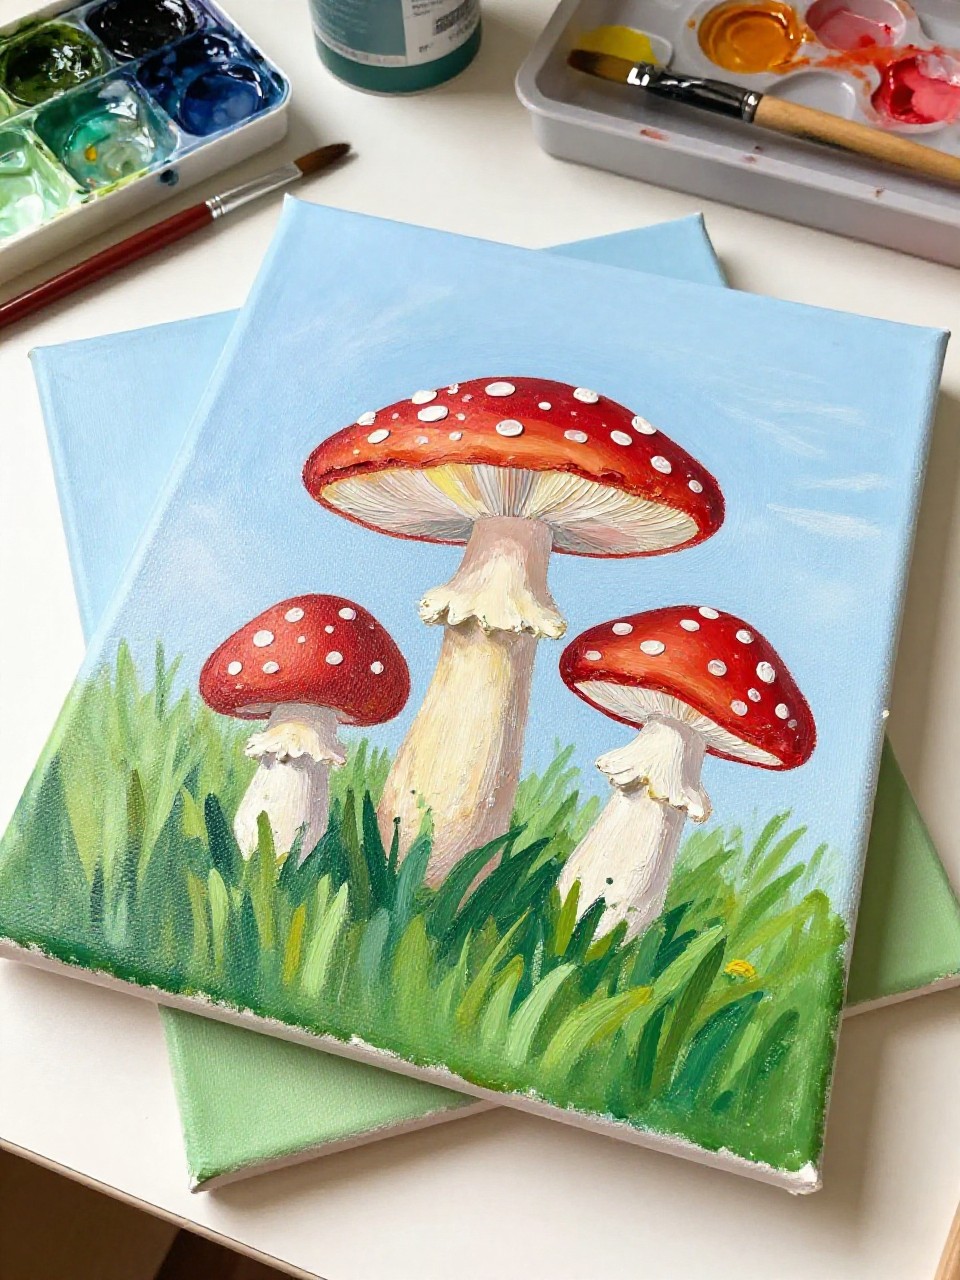
A bright little canvas shows three red toadstools with white spots, sitting in soft green grass under a pale blue sky. It’s satisfying because you can paint simple circles and stems, then add playful dot details. Beginners love it because it looks impressive without needing perfect lines.
Materials Needed:
For People Who Love to Make Things ✂️
- Stretched canvas
- Acrylic paint
- Paintbrushes in multiple sizes
- Palette or paint tray
- Optional sealer or varnish
Steps to Make:
- Lightly sketch three mushroom caps and stems with a pencil, spacing them across the canvas.
- Block in the sky and ground with large brush strokes, letting the colors blend a bit.
- Paint the red caps and creamy stems, leaving some brush texture visible.
- Add white spots, tiny grass strokes, and a few darker shadows under each mushroom.
- Let it dry, seal if you want, and hang it where the colors can brighten the room.
2. Moonlit Mushrooms Night-Sky Canvas
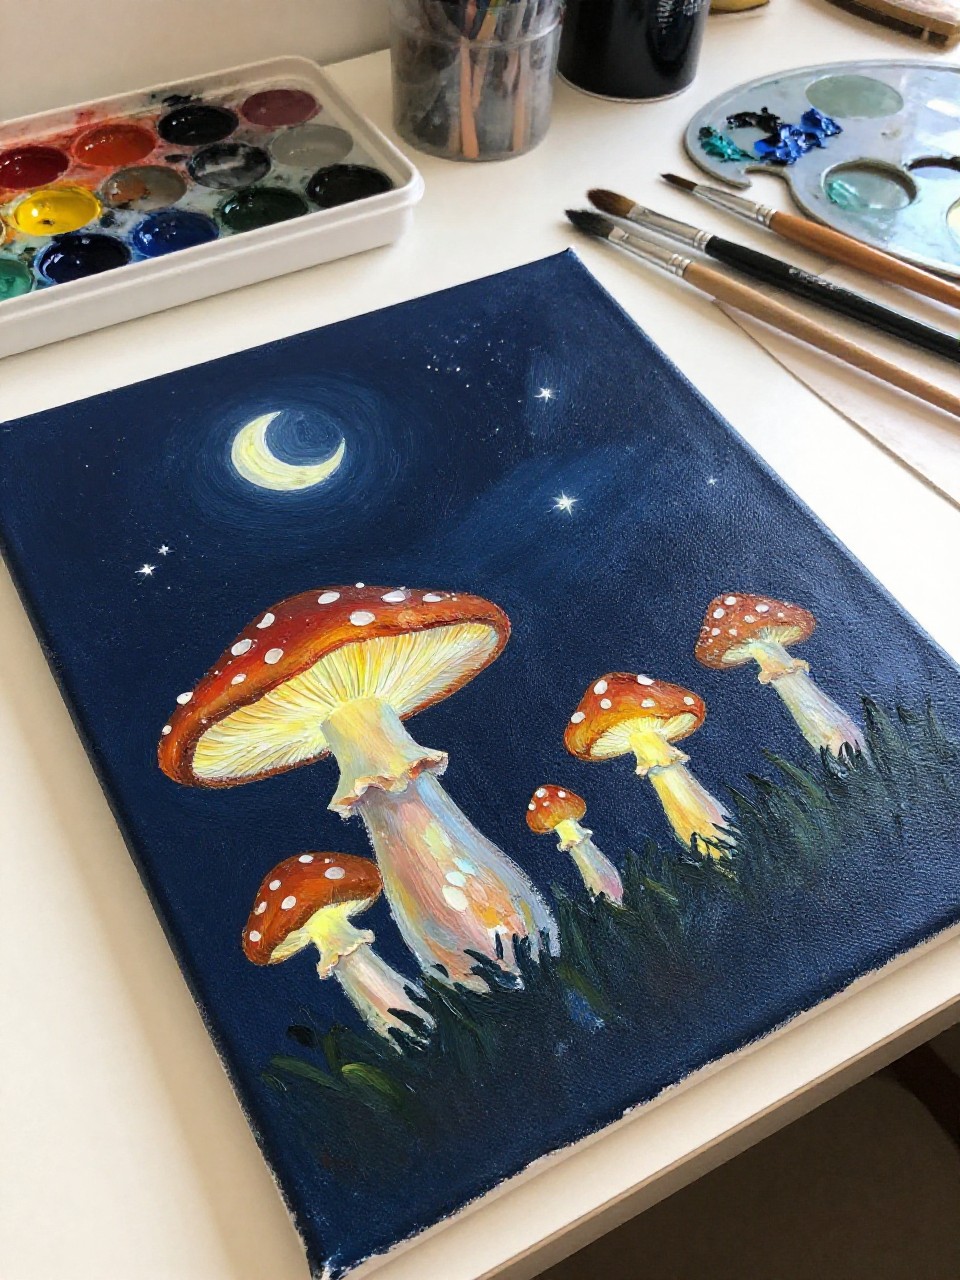
This canvas shows glowing mushrooms under a deep navy sky with a small moon and scattered stars. It feels calming to make because you can paint the background in big, smooth layers, then add tiny light dots for sparkle. It’s great for beginners who enjoy cozy, dreamy colors.
Materials Needed:
- Stretched canvas
- Acrylic paint
- Paintbrushes in multiple sizes
- Palette or paint tray
- Optional sealer or varnish
Steps to Make:
- Paint the whole canvas dark blue, then blend in a little purple while it’s still wet.
- Add a soft moon circle and a hazy glow around it using watered-down white paint.
- Paint simple mushroom silhouettes at the bottom, then layer lighter colors to make them “glow.”
- Dot on stars and add a few bright highlights on the mushroom caps and stems.
- Dry fully, then seal and display near a reading nook or bedside table.
3. Pastel Mushroom Meadow Mini Canvas Set
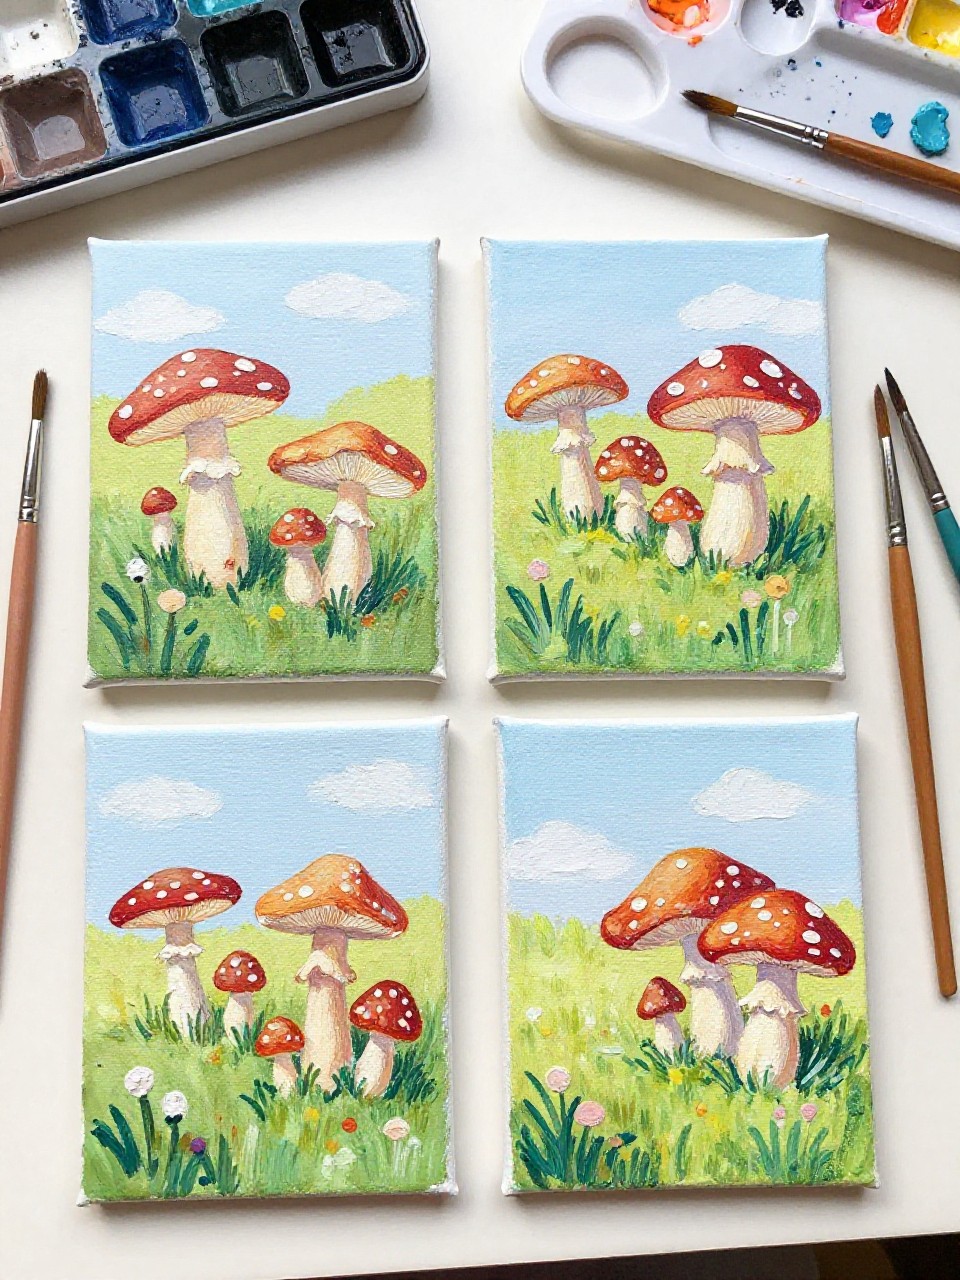
A set of mini canvases shows different pastel mushrooms, each with its own tiny meadow background. It’s relaxing because each piece is small, so you can finish one quickly and not overthink it. This is perfect for beginners who like bite-size projects and cute wall clusters.
Materials Needed:
- Mini stretched canvases (set)
- Acrylic paint
- Paintbrushes in multiple sizes
- Palette or paint tray
- Optional sealer or varnish
Steps to Make:
- Paint quick pastel backgrounds on each mini canvas, like mint, blush, or lavender skies.
- Sketch one simple mushroom per canvas, keeping the shapes bold and easy.
- Fill in caps and stems with solid color, then add gentle shading along one side.
- Add tiny flowers, dots, or blades of grass to make each scene feel finished.
- Let them dry, seal, and arrange them in a grid on your wall or shelf.
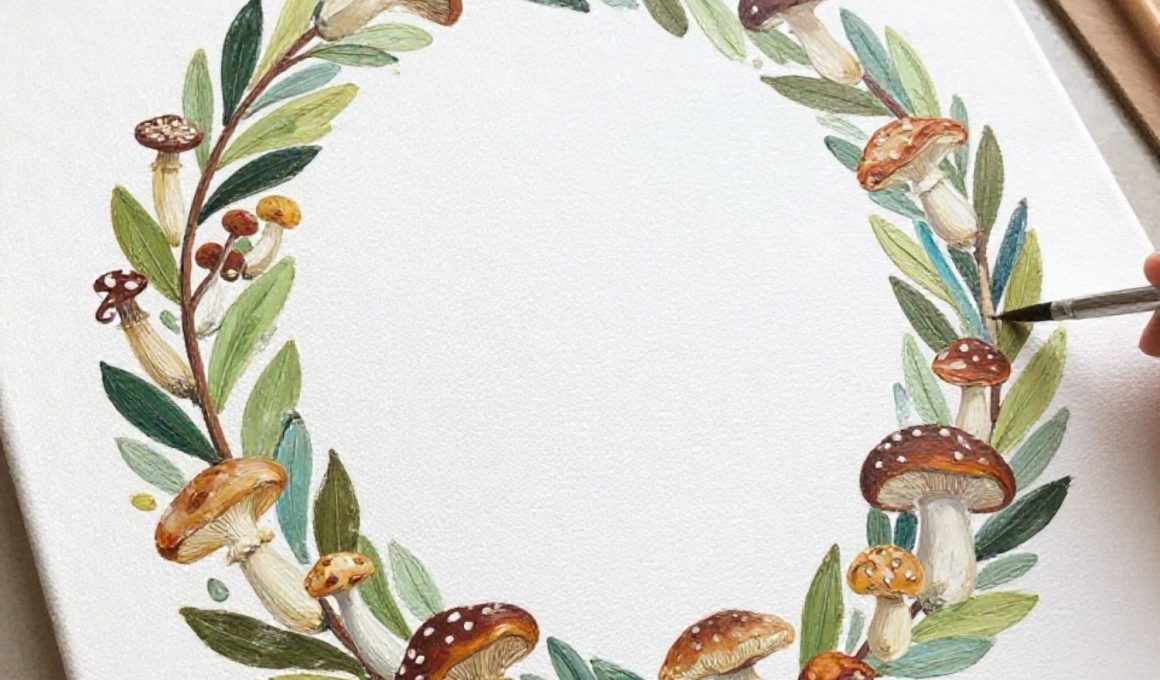
4. Whimsical Mushroom Wreath Canvas
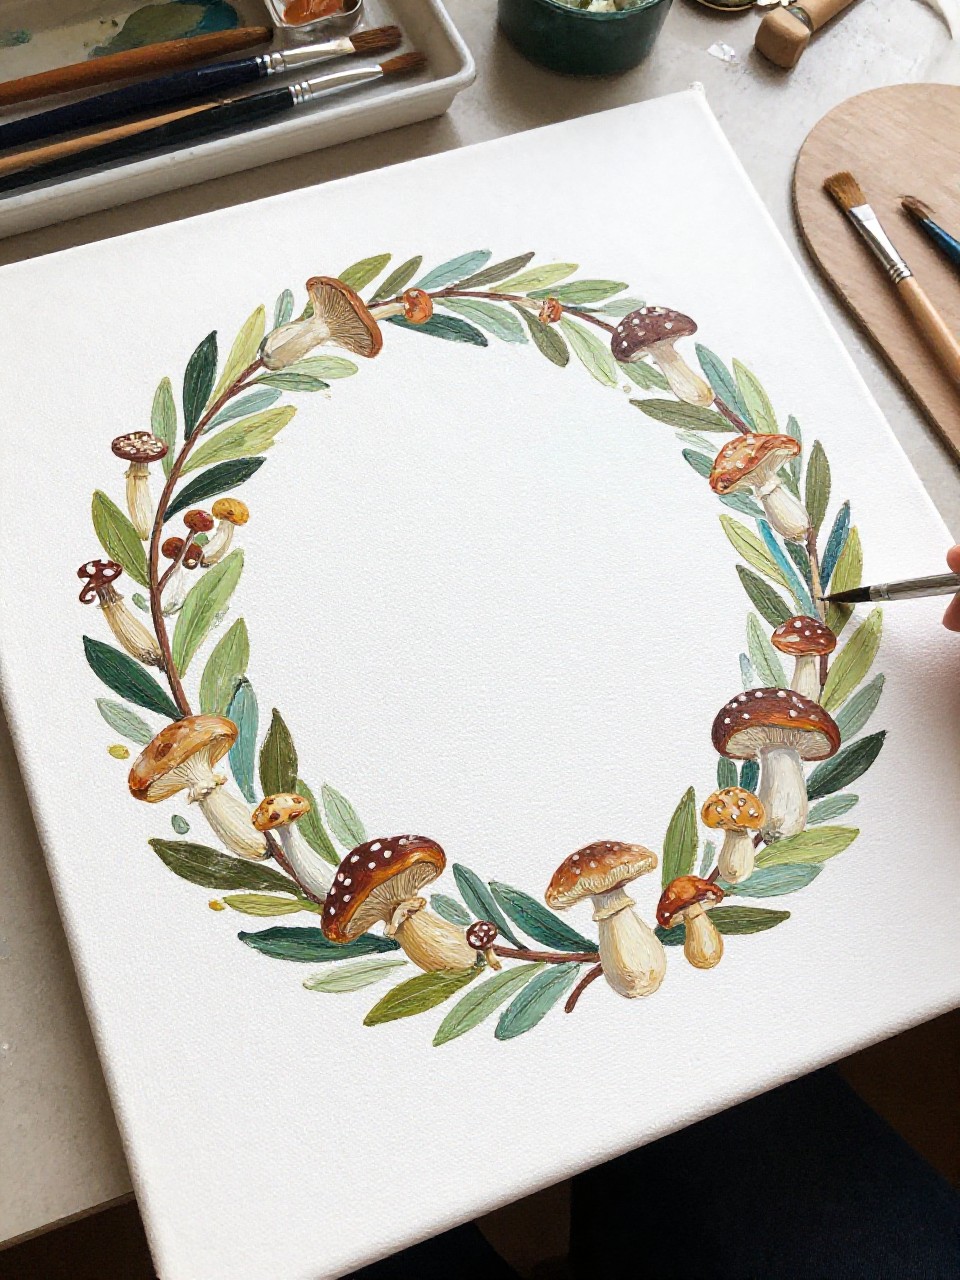
A round wreath of mushrooms and leaves wraps around the center of the canvas like a fairytale frame. It’s satisfying because you can repeat simple mushroom shapes in a circle, and repetition feels calming. Beginners can go slow, filling the wreath with as much detail as they want.
Materials Needed:
- Stretched canvas
- Acrylic paint
- Paintbrushes in multiple sizes
- Palette or paint tray
- Optional sealer or varnish
Steps to Make:
- Lightly draw a large circle guide in the center so your wreath stays balanced.
- Paint base leaves and mushroom shapes around the circle, alternating colors as you go.
- Layer a second pass of paint to deepen shadows and make the wreath feel full.
- Add small details like dots, tiny stems, and thin outline strokes in a darker color.
- Dry completely, seal, and lean it on a shelf as simple woodland decor.
5. Frog-on-a-Mushroom Storybook Canvas
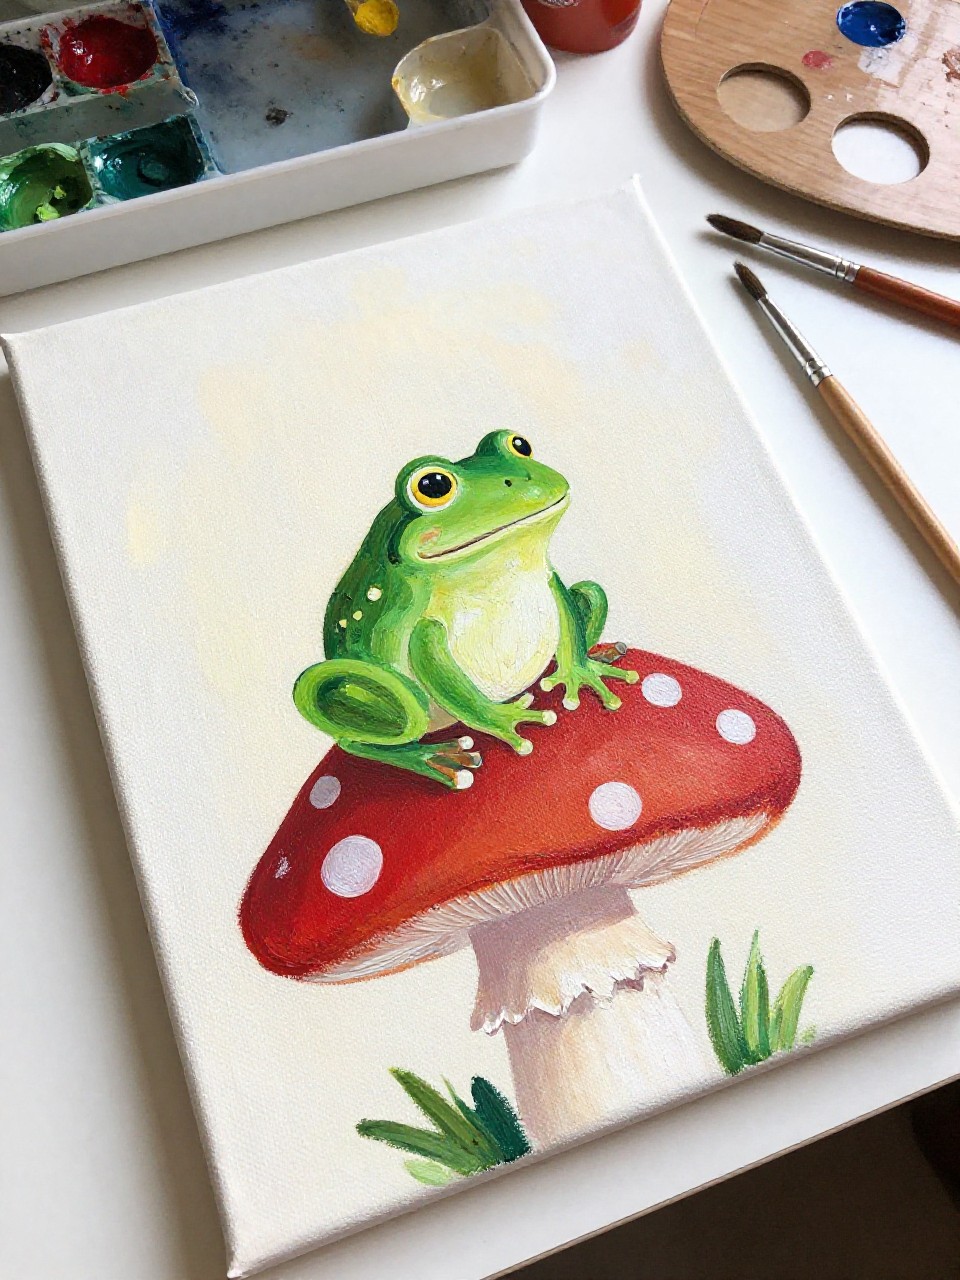
This canvas shows a tiny green frog sitting on a red mushroom cap, like a page from a storybook. It’s fun because the frog is just a few simple shapes, and the mushroom gives you an easy base to paint. Great for beginners who like cute characters without hard anatomy.
Materials Needed:
- Stretched canvas
- Acrylic paint
- Paintbrushes in multiple sizes
- Palette or paint tray
- Optional sealer or varnish
Steps to Make:
- Paint a soft background wash, like warm cream or light sky blue.
- Block in one large mushroom and a simple frog shape on top using flat colors.
- Add shading under the frog and along the mushroom stem to create depth.
- Paint small details like frog eyes, mushroom spots, and a few grass strokes below.
- Let it dry, seal, and display it in a kid’s room or a cozy hallway corner.
6. Polka-Dot Toadstool Terracotta Pot
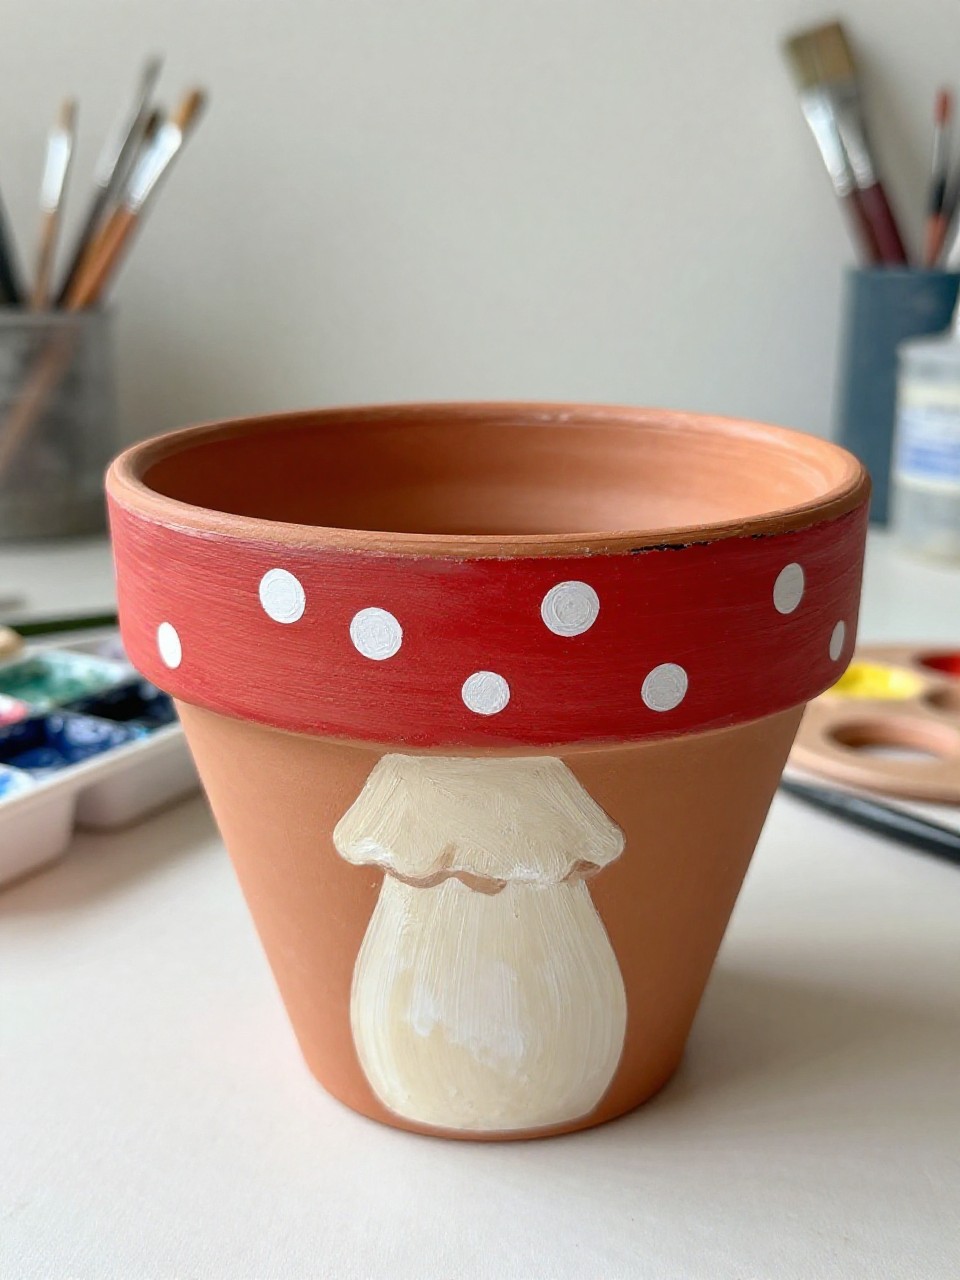
A terracotta plant pot is painted with a big red toadstool cap band and scattered white polka dots that wrap around the pot’s curve. It’s satisfying because the pot already feels earthy, and the mushroom colors pop against it. Beginners will enjoy how forgiving terracotta is with brushy paint.
Materials Needed:
- Terracotta pot
- Acrylic paint
- Paintbrushes in multiple sizes
- Palette or paint tray
- Optional sealer or varnish
Steps to Make:
- Wipe off dust and paint a base coat if you want a cleaner, brighter look.
- Mark a band around the pot where the mushroom “cap” will wrap, then paint it red.
- Paint the lower area a creamy off-white for the “stem” section, following the curve.
- Add white polka dots and a few soft shadows where the cap meets the stem.
- Dry fully, seal the outside, and style it with a leafy plant for extra whimsy.
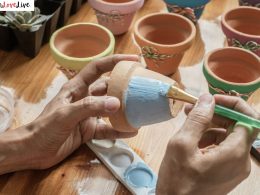
7. Woodland Mushroom Cluster Terracotta Pot
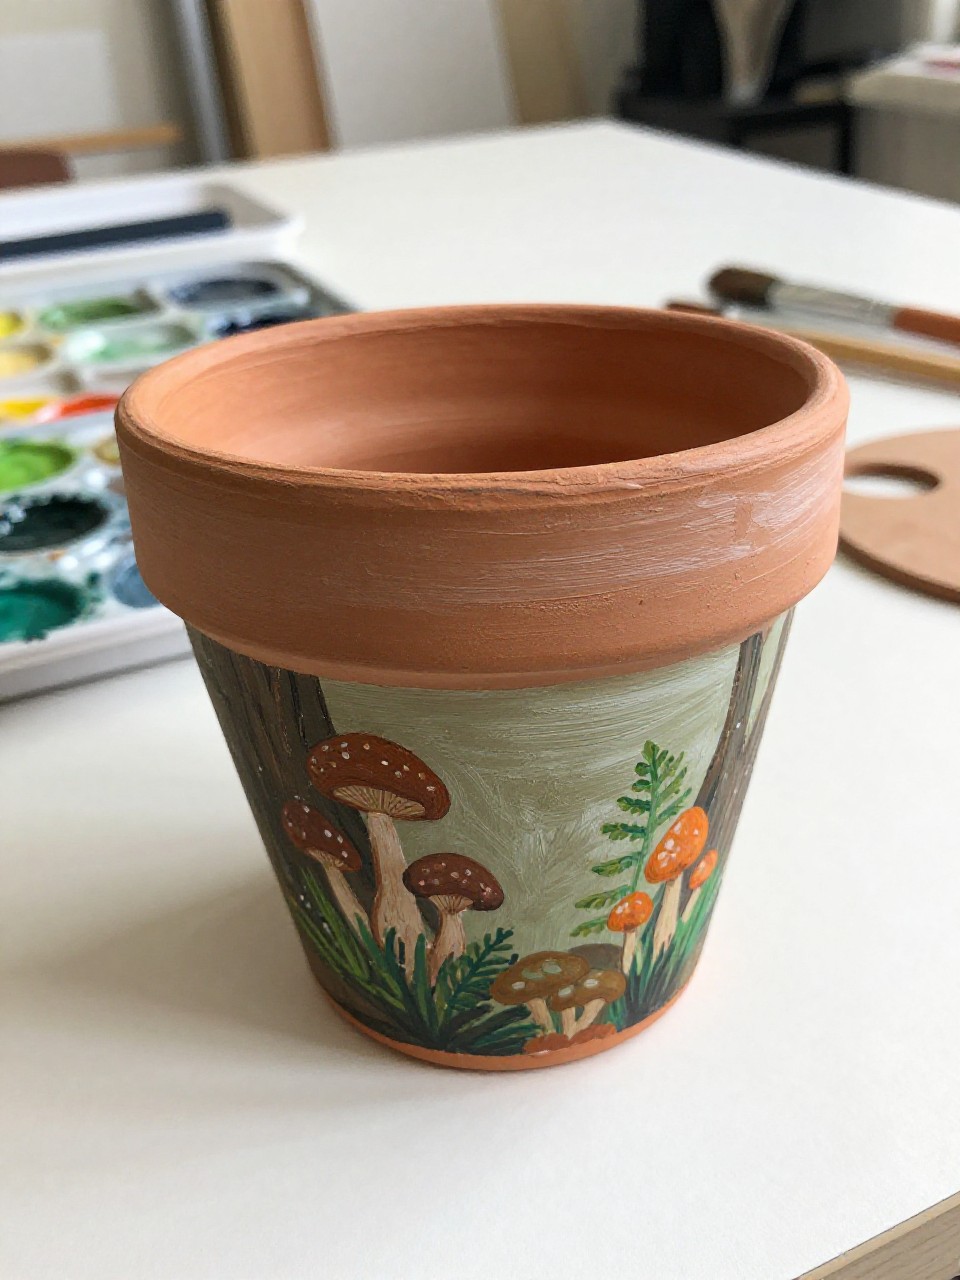
This terracotta pot shows a cluster of small brown and orange mushrooms growing around the pot, with tiny ferns painted between them. It feels relaxing because you can paint one mushroom at a time, slowly building the scene. It’s great for beginners who want something detailed but still made of simple shapes.
Materials Needed:
- Terracotta pot
- Acrylic paint
- Paintbrushes in multiple sizes
- Palette or paint tray
- Optional sealer or varnish
Steps to Make:
- Clean the pot and decide where the mushroom cluster will wrap around the front.
- Paint basic mushroom caps and stems in warm earthy colors, keeping edges slightly uneven.
- Layer darker browns under caps and near the base to create gentle shadows.
- Add fern-like strokes and tiny dots to fill space and make it feel like a forest floor.
- Let it dry, seal the outside, and place it on a sunny windowsill.
8. Fairy Door Mushroom House Terracotta Pot
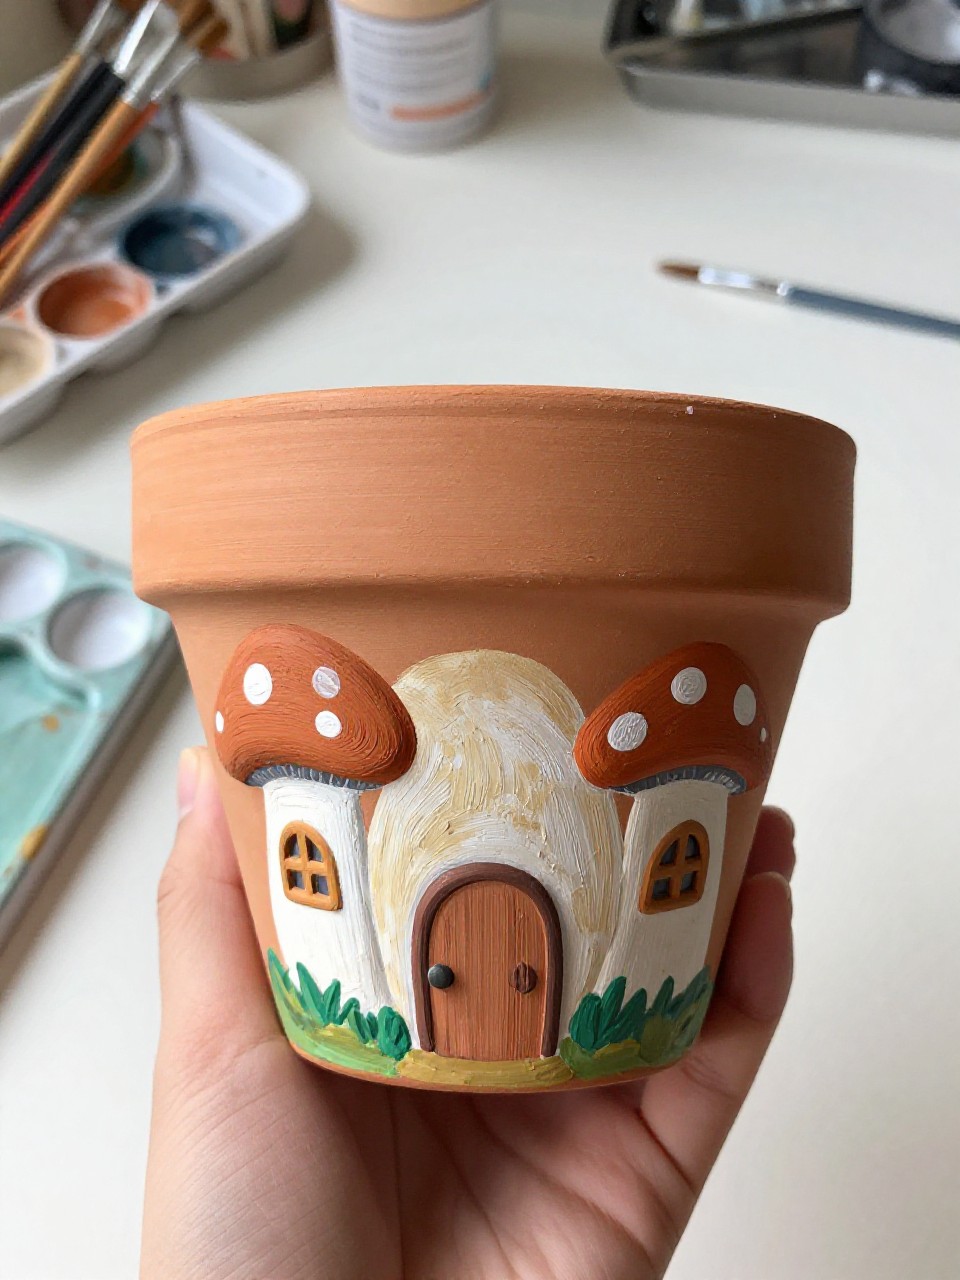
A terracotta pot is painted like a mushroom house, with a tiny painted door, windows, and a cap-like pattern around the rim. It’s satisfying because it feels like building a little world, but the shapes stay simple. Beginners can keep the details minimal and still get a charming result.
Materials Needed:
- Terracotta pot
- Acrylic paint
- Paintbrushes in multiple sizes
- Palette or paint tray
- Optional sealer or varnish
Steps to Make:
- Paint the pot a warm base color, like pale beige, and let it dry.
- Add a red or rust “cap” band near the rim that wraps around the pot’s curve.
- Paint a small door and two windows on the front, using simple rectangles and circles.
- Add stone dots, tiny vines, and highlights along the door edges for a cozy look.
- Dry completely, seal the outside, and use it as a planter or a desk holder.
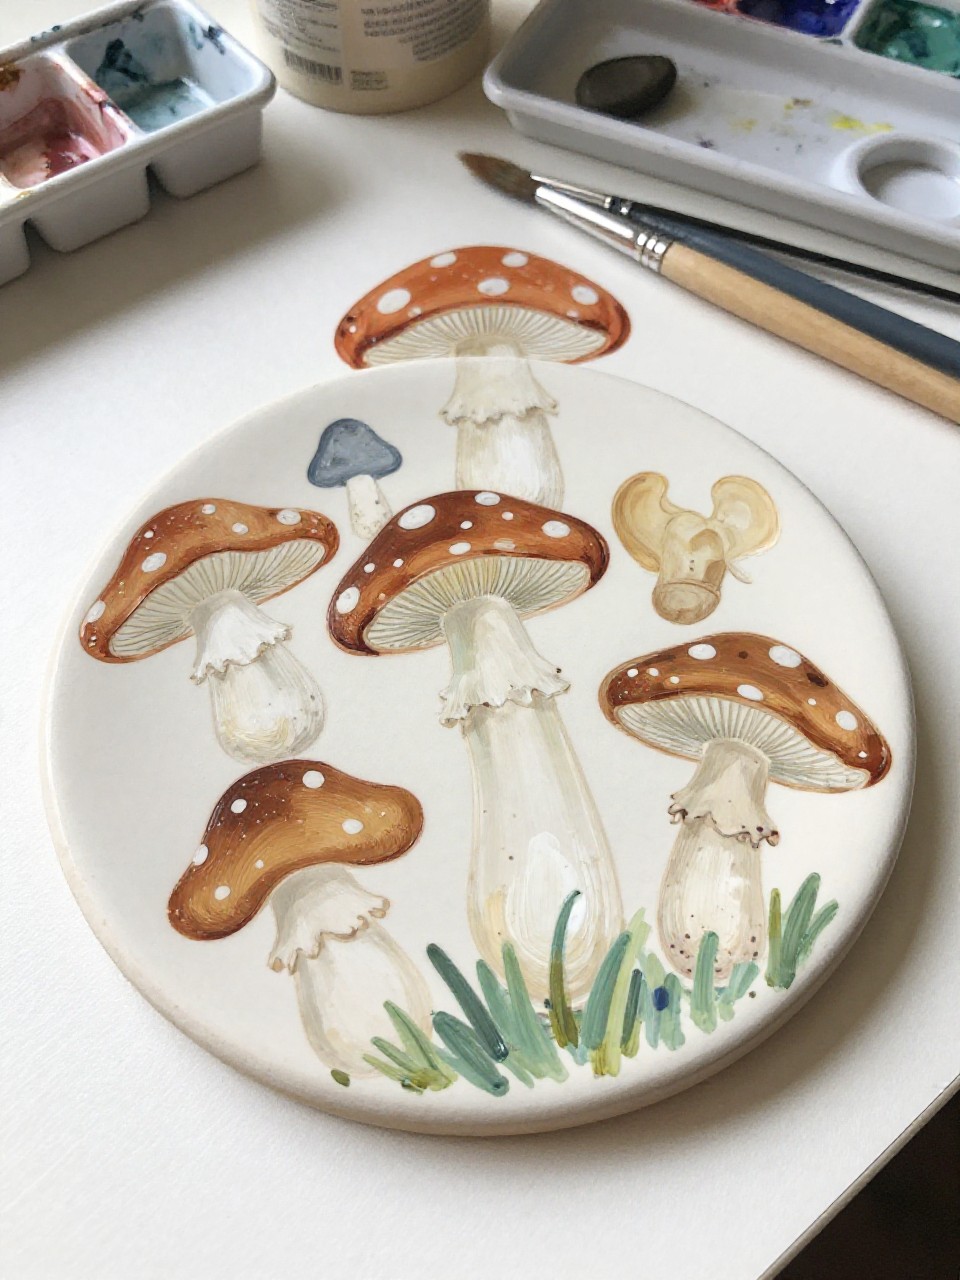
9. Mushroom Border Ceramic Plate

A white ceramic plate has a ring of small mushrooms painted around the rim, like a neat woodland border. It’s a calming project because you repeat the same shape and color palette in a simple pattern. This is great for beginners who want something tidy and decorative for a shelf display.
Materials Needed:
- Ceramic plate (plain)
- Porcelain paint or ceramic paint
- Paintbrushes in multiple sizes
- Palette or paint tray
- Optional sealer or varnish
Steps to Make:
- Wipe the plate with rubbing alcohol so paint sticks well and dries clean.
- Lightly pencil a border line near the rim and mark evenly spaced mushroom spots.
- Paint small caps and stems, alternating colors like red, tan, and muted green.
- Add dots, tiny gill lines, and thin outlines to make each mushroom stand out.
- Let it dry fully and cure according to your paint instructions, then display it upright.
10. Cottagecore Mushroom Ceramic Mug
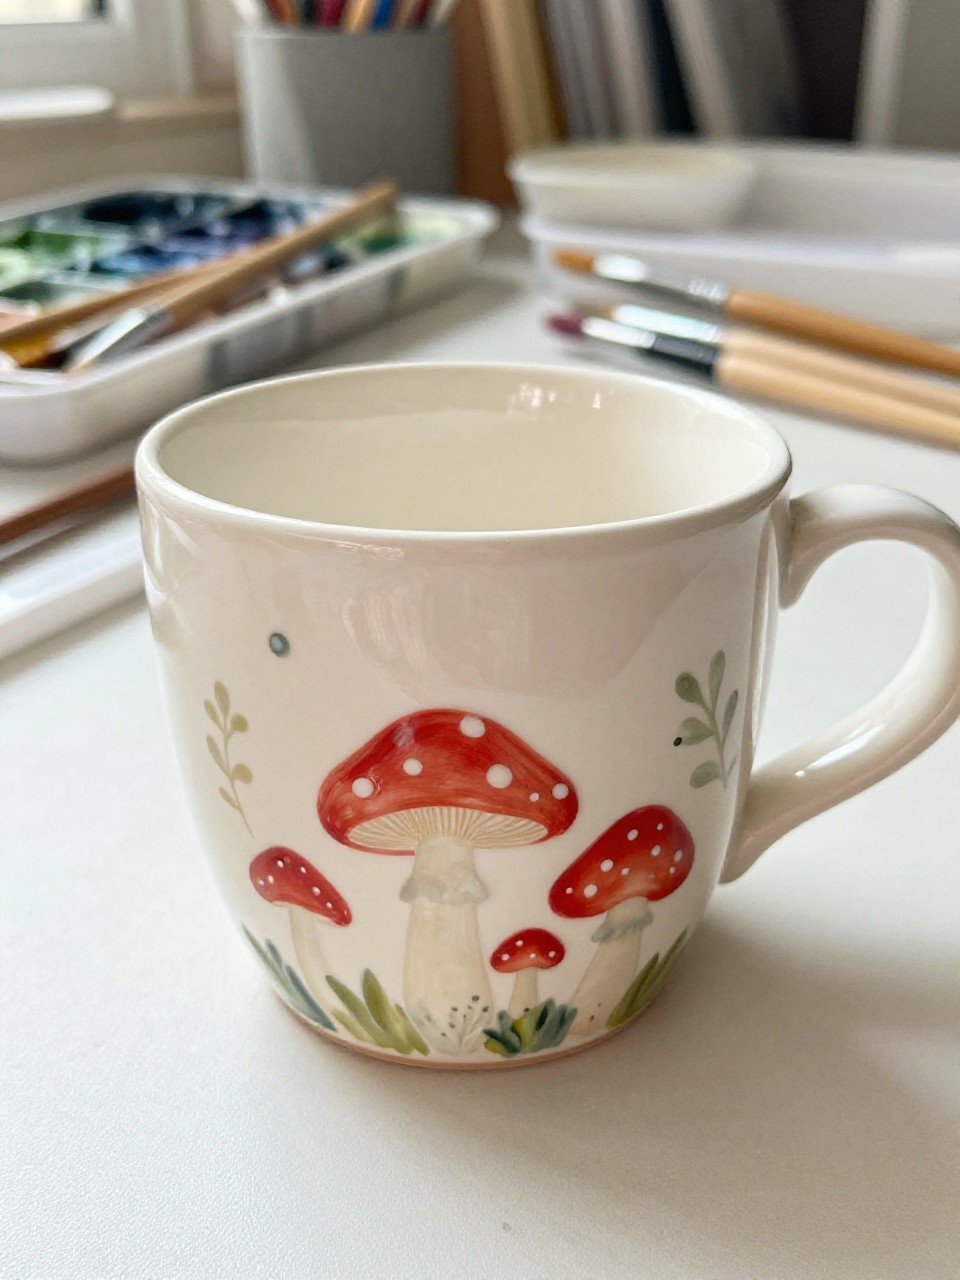
A ceramic mug features a wraparound scene of tiny red mushrooms, little leaves, and a few scattered dots on a creamy background. It’s satisfying because it feels like making your own cozy cafe mug, and the repeating mini shapes are forgiving. Beginners can keep the design simple and still make it adorable.
Materials Needed:
- Ceramic mug (plain)
- Porcelain paint or ceramic paint markers
- Paintbrushes in multiple sizes
- Palette or paint tray
- Optional sealer or varnish
Steps to Make:
- Clean the mug well and avoid touching the painting area with oily fingers.
- Plan a simple band design that wraps around the mug, leaving space near the handle.
- Paint mushrooms first, then add little leaf shapes that follow the mug’s curve.
- Dot in accents and add tiny highlights on caps to show paint texture and shine.
- Let it dry and cure per your paint directions before washing or using.
11. Mushroom Field Ceramic Bowl
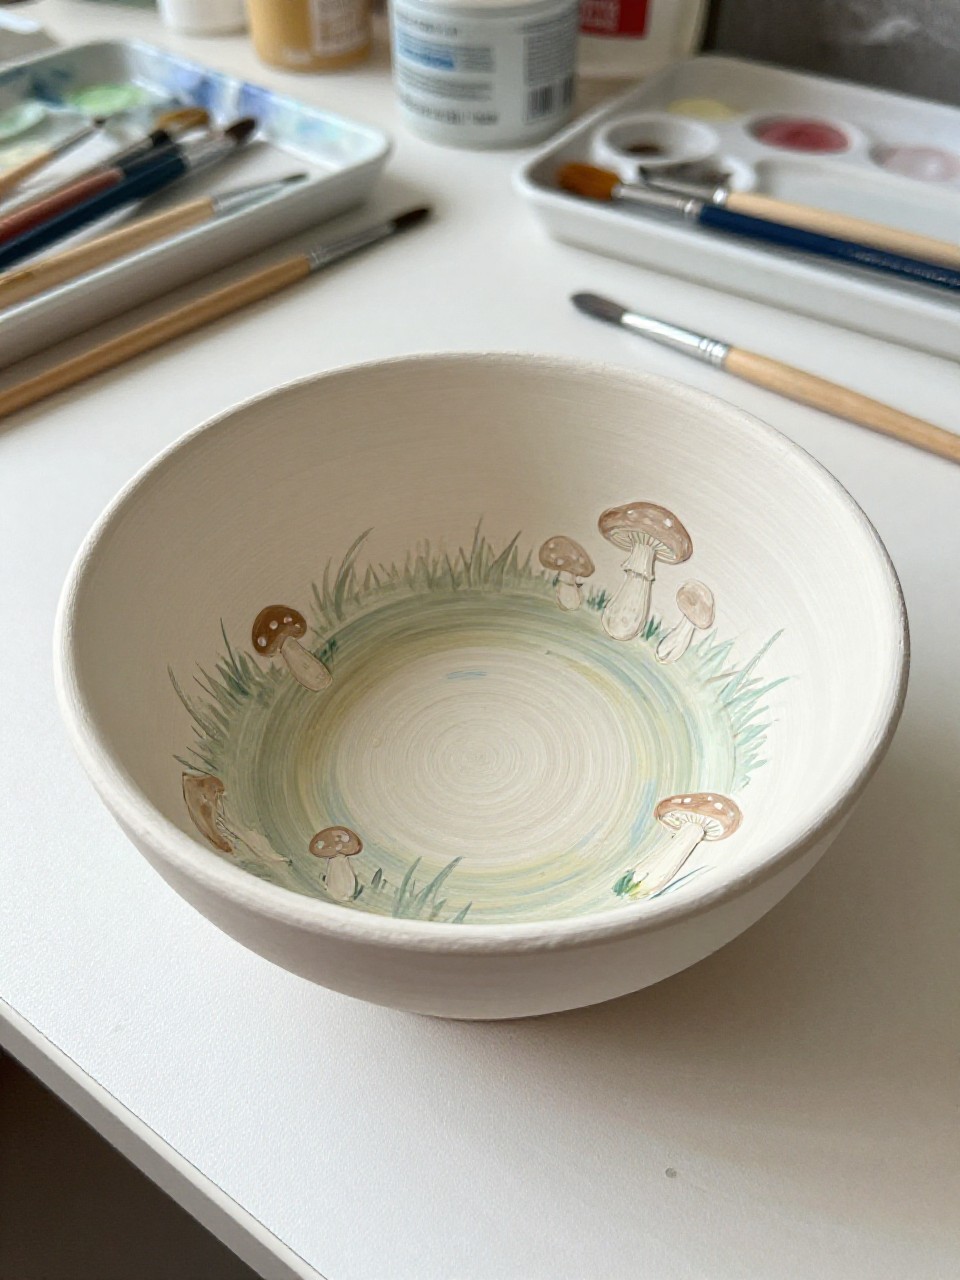
A ceramic bowl has a field of little mushrooms painted along the outside, with the design naturally curving as the bowl rounds. It’s relaxing because you can turn the bowl as you paint, working in small sections. Beginners will like that the bowl shape hides tiny imperfections and still looks charming.
Materials Needed:
- Ceramic bowl (plain)
- Porcelain paint or ceramic paint
- Paintbrushes in multiple sizes
- Palette or paint tray
- Optional sealer or varnish
Steps to Make:
- Clean and dry the bowl, then decide where the mushroom band will sit around the outside.
- Paint a light background stripe if you want the mushrooms to stand out more.
- Add simple mushroom shapes in a row, varying cap sizes so it feels natural.
- Paint thin grass strokes and small dots between mushrooms, following the bowl’s curve.
- Dry and cure according to your paint, then use it for keys, snacks, or display.
12. Minimal Line Mushroom Ceramic Tile
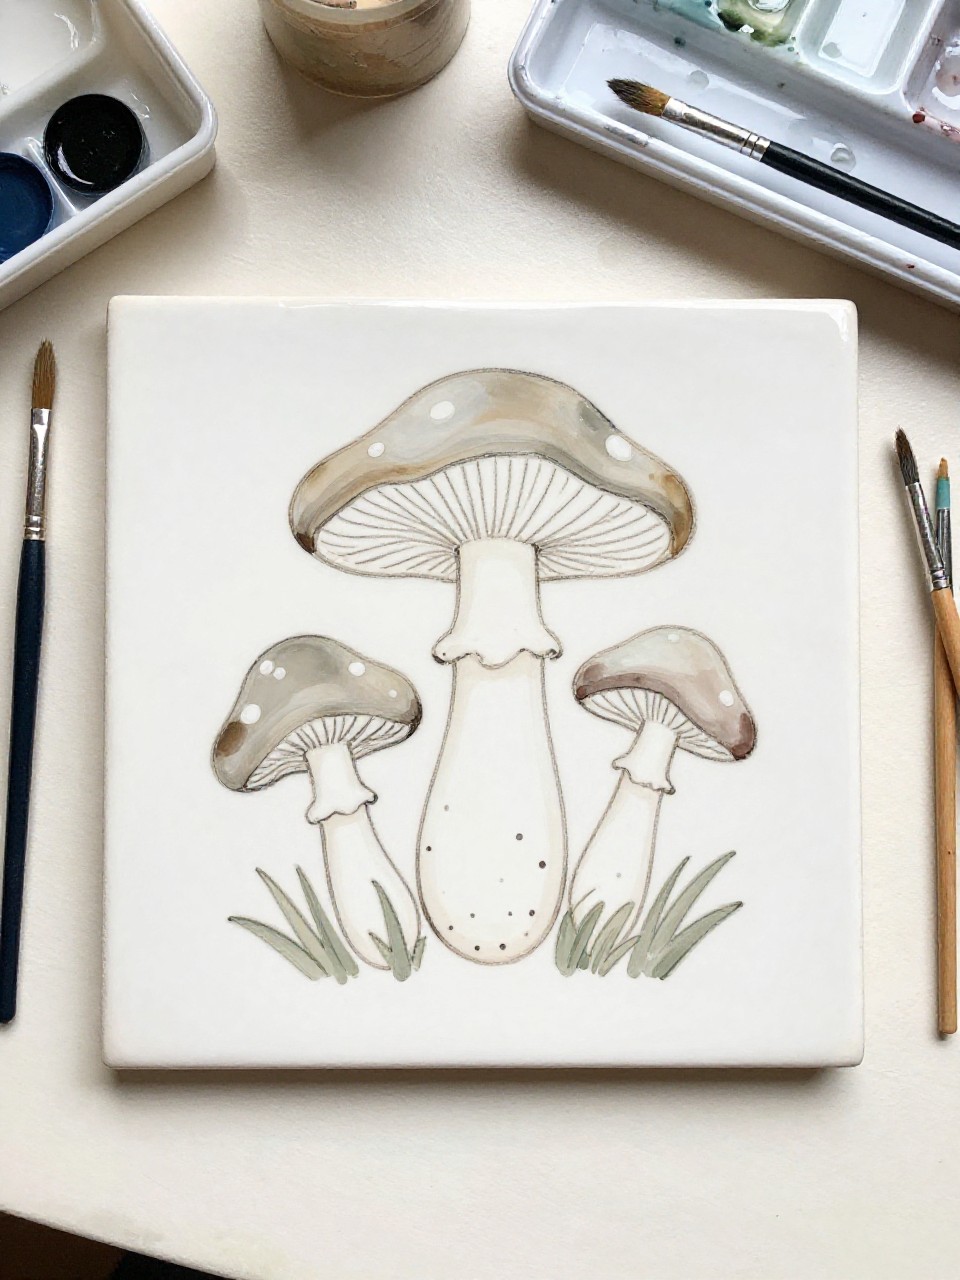
A small ceramic tile shows simple line-drawn mushrooms with a few soft watercolor-like fills, perfect for a clean whimsical look. It’s satisfying because you don’t need many colors, and the design comes together fast. Beginners who like neat, minimal art will enjoy this one.
Materials Needed:
- Ceramic tile (plain)
- Porcelain paint or ceramic paint
- Paintbrushes in multiple sizes
- Palette or paint tray
- Optional sealer or varnish
Steps to Make:
- Wipe the tile clean and tape the edges if you want crisp borders.
- Paint thin mushroom outlines with a small brush, using steady, slow strokes.
- Fill a few areas with diluted color so some white space stays visible.
- Add tiny dots and a light shadow under each mushroom for a grounded look.
- Dry, cure if needed, and display the tile on a tiny easel or shelf.
13. Speckled Mushroom Ceramic Coaster Set
A set of ceramic coasters shows different mushroom caps—red, tan, and mossy green—each with speckles and little brushy highlights. It’s great for beginners because each coaster is small, so you can practice without pressure. Plus, they make a useful handmade gift that feels special.
Materials Needed:
- Ceramic coasters (plain set)
- Porcelain paint or ceramic paint
- Paintbrushes in multiple sizes
- Palette or paint tray
- Optional sealer or varnish
Steps to Make:
- Clean each coaster and plan one mushroom cap design per piece.
- Paint the cap shapes first, letting brush strokes show for a cozy handmade feel.
- Add speckles, dots, and a few uneven edge marks to make them look natural.
- Paint simple stems or small leaves underneath to balance the composition.
- Dry and cure, then seal if recommended and stack them neatly for display.
14. Rainbow Mushrooms Sketchbook Page
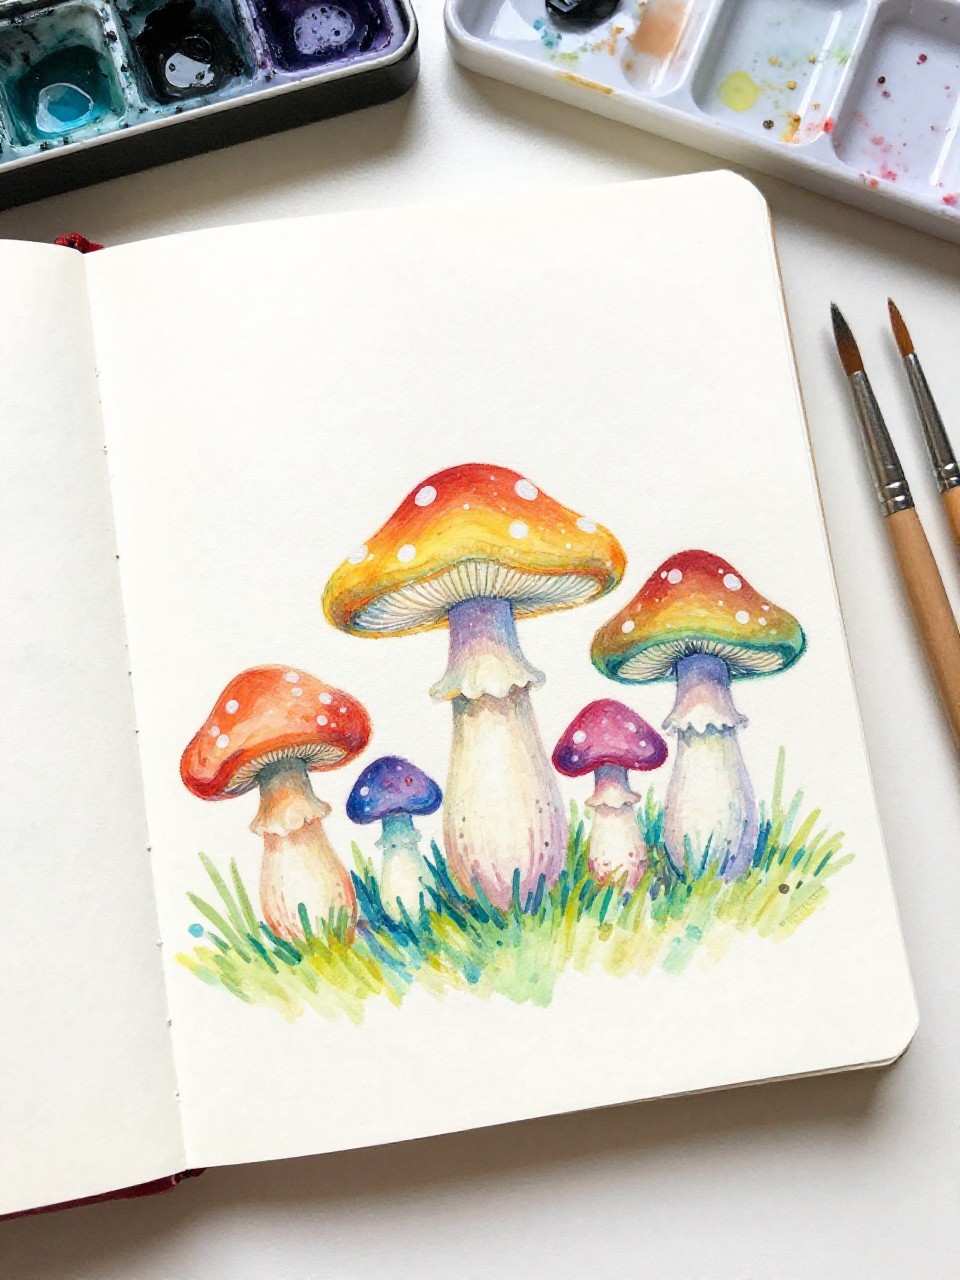
A sketchbook page shows a row of mushrooms painted in gentle rainbow colors, from pink to purple, with soft blended shading. It’s relaxing because you can test colors freely, and nothing has to be perfect on paper. Beginners love it as a warm-up exercise before painting on bigger surfaces.
Materials Needed:
- Mixed-media sketchbook or watercolor paper
- Gouache or watercolor paint
- Paintbrushes in multiple sizes
- Palette or paint tray
- Water jar and paper towel
Steps to Make:
- Tape your paper edges if you want a clean border, then lightly sketch mushroom shapes.
- Paint each cap a different rainbow color, blending two shades while still wet.
- Add stems in pale neutrals and paint a soft shadow under each mushroom.
- Use a fine brush to add dots, gill hints, and small highlights on the caps.
- Let it dry flat, then date the page and keep it as a color reference.
15. Mushroom Jar Lantern Glass Painting
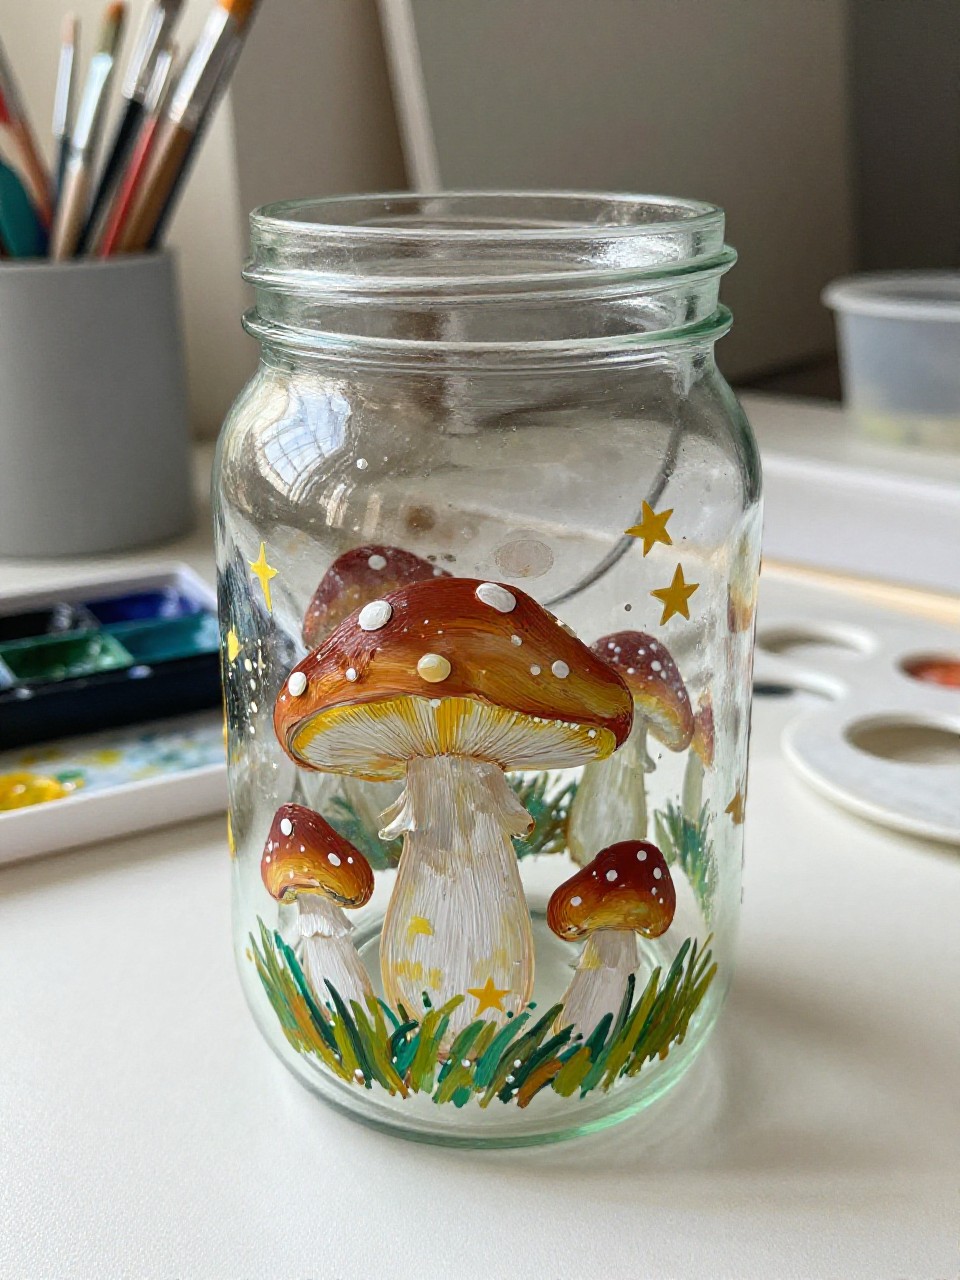
A glass jar is painted with a ring of mushrooms and tiny stars, and when you add a tealight or fairy lights, it glows softly. It’s satisfying because the design looks magical with very simple shapes. Beginners will enjoy making it as calm evening decor for a porch or bedside table.
Materials Needed:
- Glass jar
- Glass paint (or acrylic paint with glass medium)
- Paintbrushes in multiple sizes
- Palette or paint tray
- Optional sealer or varnish
Steps to Make:
- Wash and dry the jar, then avoid fingerprints by holding it from the bottom.
- Paint a wraparound row of mushroom caps and stems, spacing them evenly around the curve.
- Layer darker paint near the base of stems and under caps to create depth.
- Add tiny stars, dots, and a few brighter highlights so it sparkles when lit.
- Let it dry completely, seal if needed, and place a light inside for a cozy glow.
16. Mushroom Garden Stone Painting
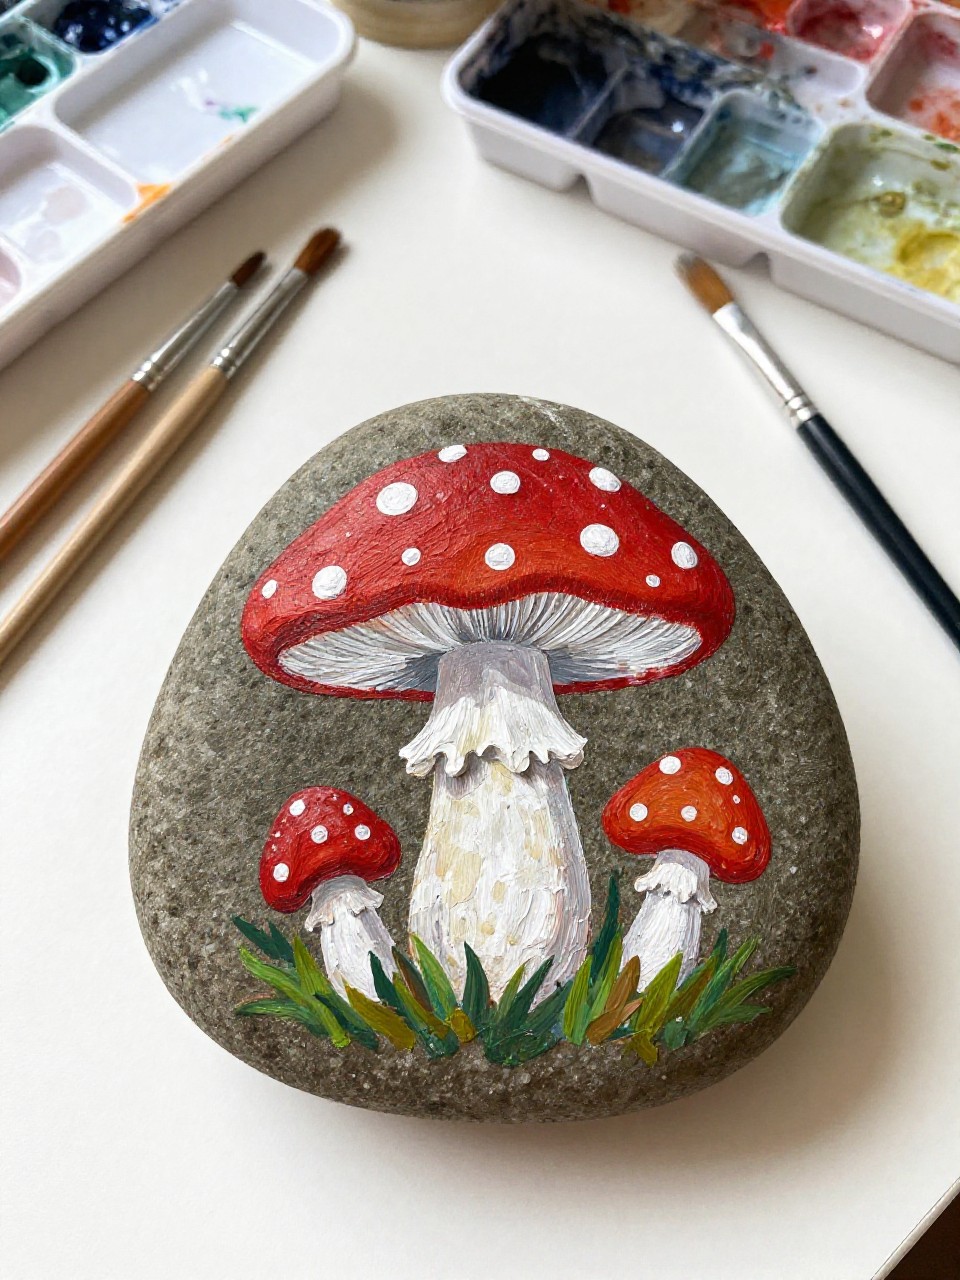
A smooth garden stone is painted with a bold red mushroom cap and a few smaller mushrooms beside it, like a tiny woodland sign. It’s satisfying because the stone shape guides your design, and thick paint looks great on the textured surface. Beginners can finish one in an afternoon and place it in a plant pot or garden bed.
Materials Needed:
- Smooth garden stone
- Acrylic paint
- Paintbrushes in multiple sizes
- Palette or paint tray
- Optional outdoor sealer or varnish
Steps to Make:
- Rinse and dry the stone, then paint a base coat if the rock is very dark.
- Sketch a large mushroom cap shape that fits the stone’s top curve.
- Paint the cap and stems with thick, layered strokes so the texture feels real.
- Add white spots, grassy edges, and a darker shadow under the mushrooms.
- Dry fully, seal with an outdoor varnish, and tuck it near plants for a surprise detail.