Table of Contents Show
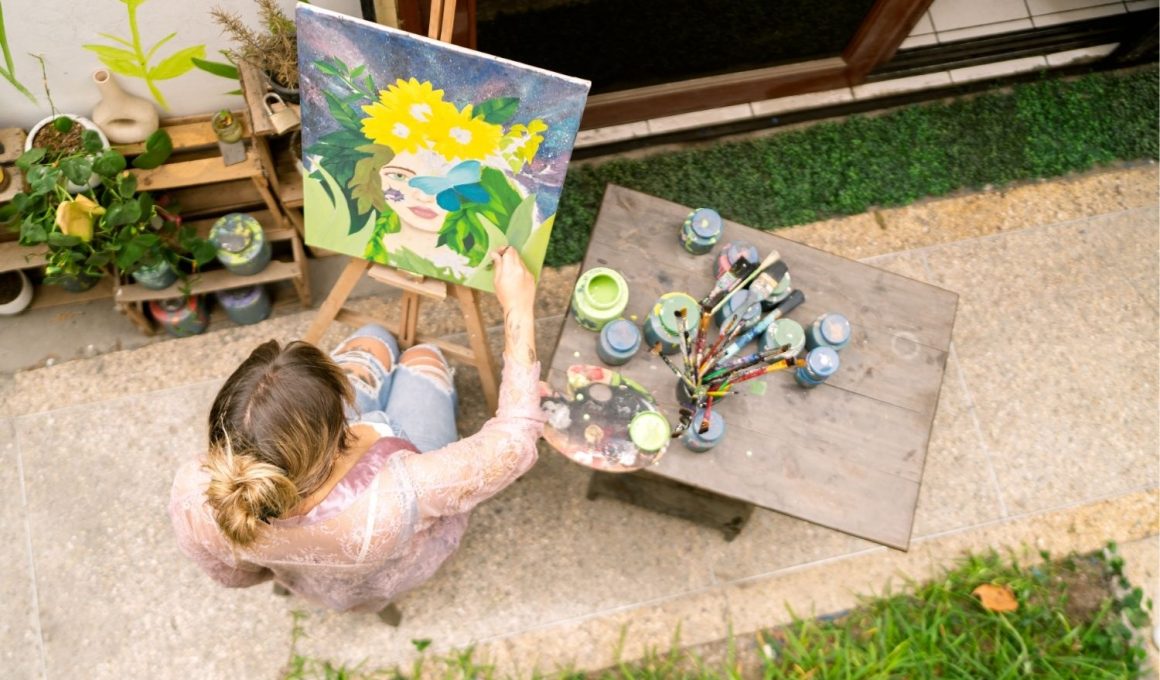
Want a relaxing painting project, but not sure what to paint next? Fairy art is perfect when you want something cute, dreamy, and beginner-friendly without needing “serious” drawing skills.
These ideas are meant to be calming to make, pretty to look at, and easy to hang up or gift.
Let’s jump into 17 fairy painting ideas that feel whimsical and sweet.
1. Moonlit Fairy Silhouette Canvas
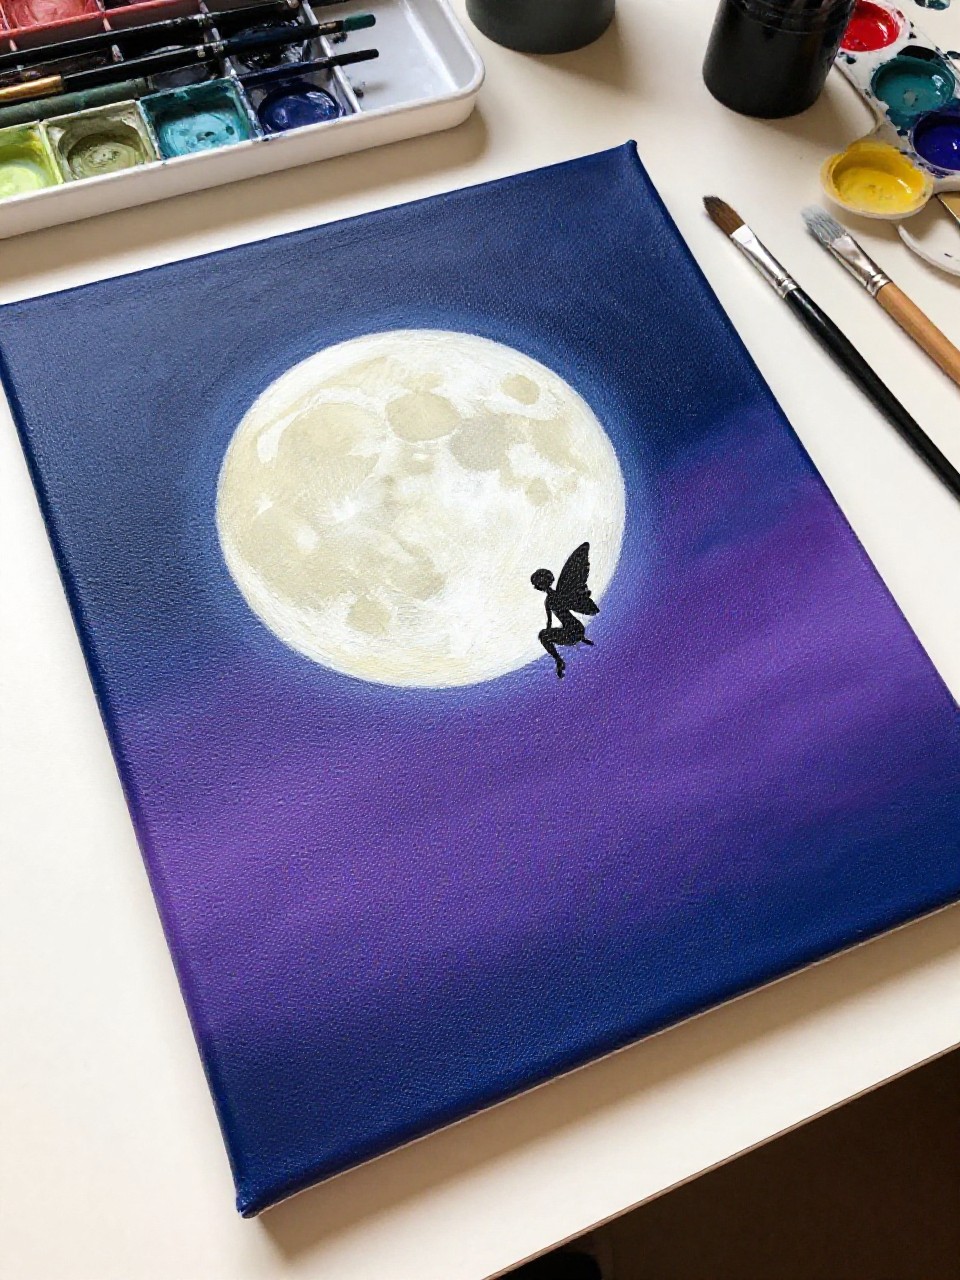
A dark blue night sky fades into a glowing moon, with a tiny fairy silhouette sitting on the moon’s edge. This one feels satisfying because it’s mostly simple shapes and blending, so beginners can focus on relaxing brushwork and a few crisp details at the end.
Materials Needed:
For People Who Love to Make Things ✂️
- Stretched canvas
- Acrylic paint
- Paintbrushes in multiple sizes
- Palette or paint tray
- Optional sealer or varnish
Steps to Make:
- Prime the canvas with a quick white or light gray base coat and let it dry.
- Blend a night-sky gradient (navy to purple) across the background.
- Paint a soft, round moon using off-white, then add a pale glow around it.
- Add a small black fairy silhouette and a few star dots with a tiny brush.
- Let it dry fully, then seal and hang where the light can catch the texture.
2. Wildflower Meadow Fairy Canvas
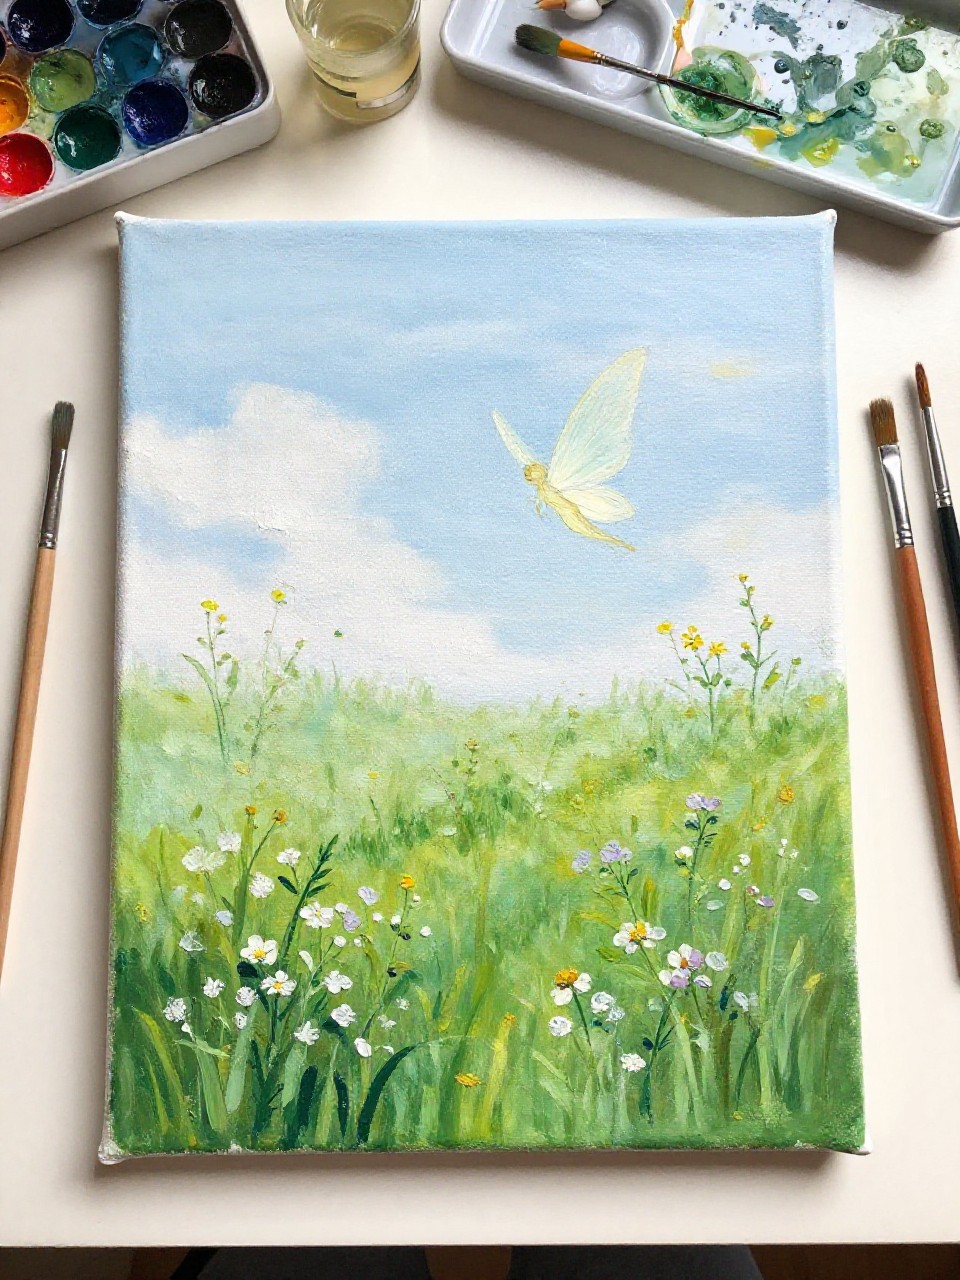
This canvas shows a tiny fairy hovering above a loose field of wildflowers, with soft greens and bright petals. It’s great for beginners because the flowers can be messy and impressionistic, and it still looks charming when the brush strokes stay visible and playful.
Materials Needed:
- Stretched canvas
- Acrylic paint
- Paintbrushes in multiple sizes
- Palette or paint tray
- Optional sealer or varnish
Steps to Make:
- Paint a light sky and grassy base layer, then let it dry until it’s not tacky.
- Block in the fairy’s simple body shape and wings with pale colors.
- Use dabbing strokes to build wildflowers in pinks, yellows, and whites.
- Add wing veins, a little glow around the fairy, and a few taller grass lines.
- Dry completely, seal if you want, and display in a cozy corner.
3. Mushroom House Fairy Door Canvas
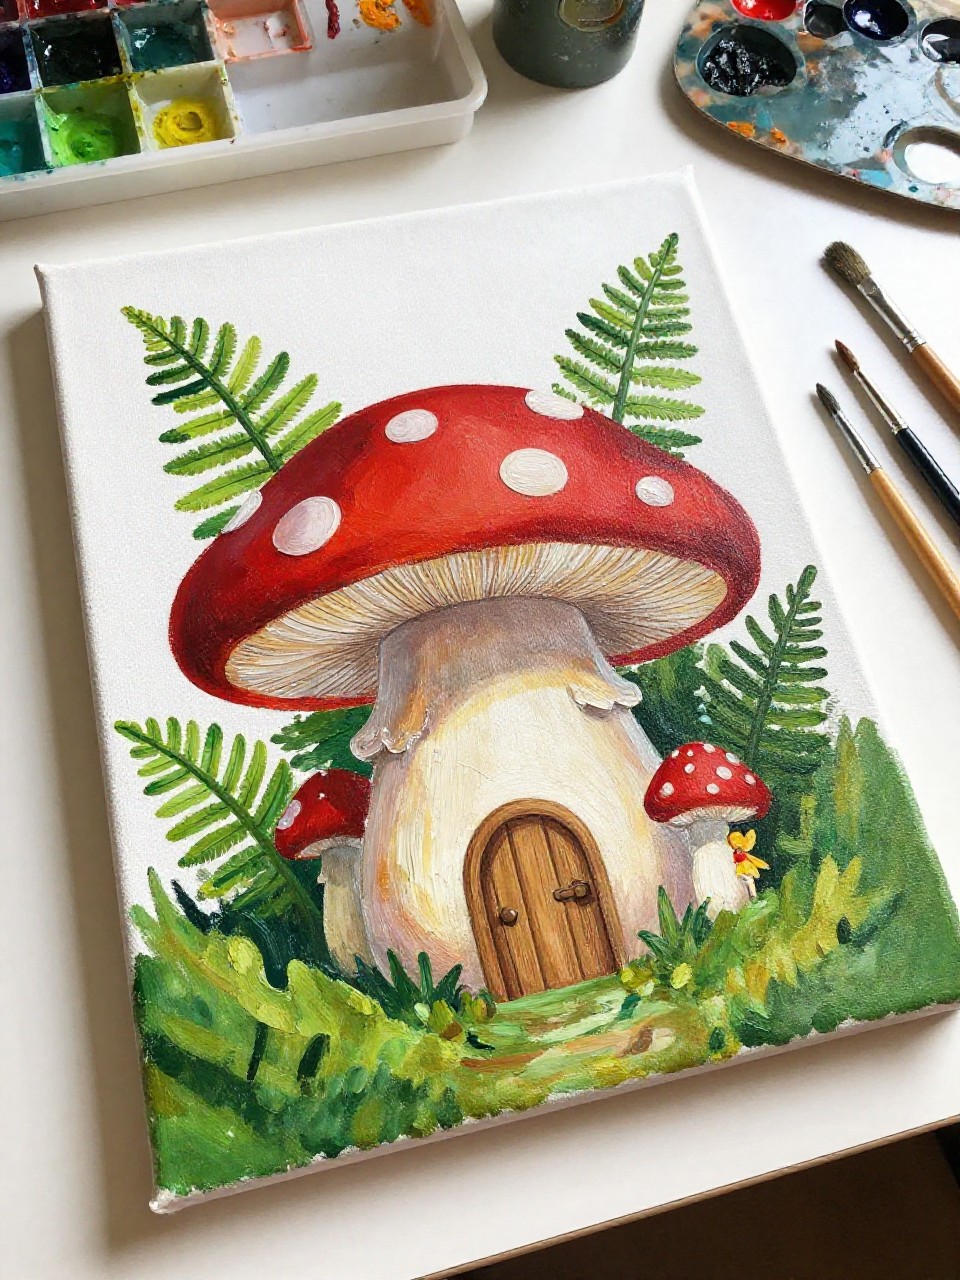
A cute red mushroom “house” with a tiny wooden door sits under ferns, with a fairy peeking out. This is relaxing because you can build it in layers—background first, then the mushroom, then details—without needing perfect line work.
Materials Needed:
- Stretched canvas
- Acrylic paint
- Paintbrushes in multiple sizes
- Palette or paint tray
- Optional sealer or varnish
Steps to Make:
- Paint a soft forest background using muted greens and browns, then dry.
- Sketch the mushroom cap and stem lightly, then block them in with color.
- Add a small door, window dots, and shaded curves to show the mushroom shape.
- Paint the fairy peeking out and add fern leaves with quick, confident strokes.
- Let it dry and seal for a finished look that still shows brush texture.
4. Teacup Fairy Canvas Scene

A painted teacup sits on a table, and a tiny fairy lounges on the rim with sparkly swirls drifting upward like steam. It’s a sweet decor piece for kitchens or craft rooms, and the curved cup shading is a fun beginner skill that feels impressive fast.
Materials Needed:
- Stretched canvas
- Acrylic paint
- Paintbrushes in multiple sizes
- Palette or paint tray
- Optional sealer or varnish
Steps to Make:
- Paint a simple tabletop and light background, keeping it soft and warm.
- Block in the teacup shape and shade one side darker to make it feel round.
- Add the fairy on the rim with a simple pose and light pastel wings.
- Paint “steam” swirls with thin lines and dot in sparkles with white paint.
- Dry fully, seal, and hang near your coffee or tea station.
5. Crystal Cave Fairy Canvas
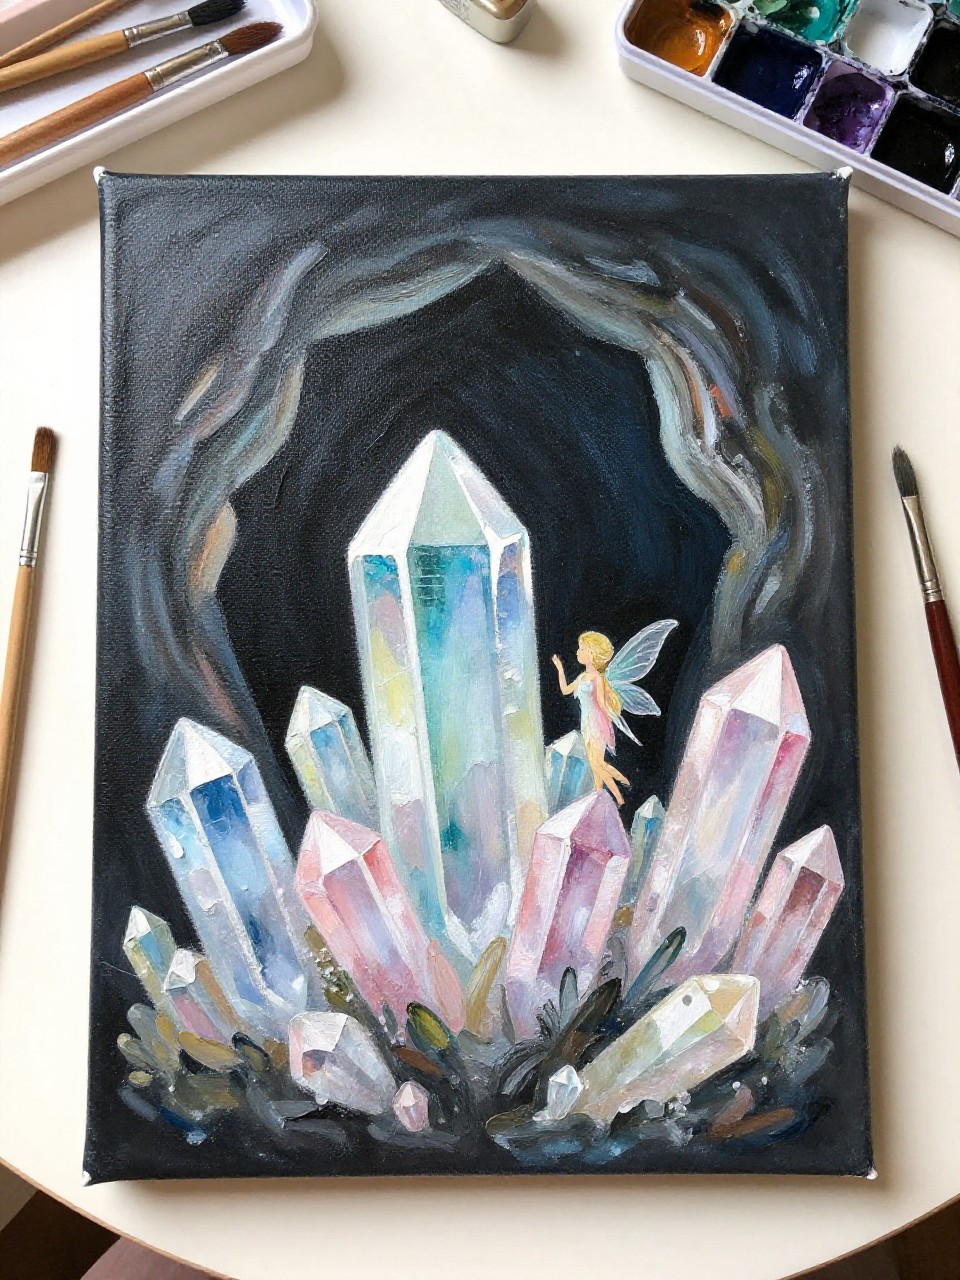
This painting shows a small fairy standing in a cave full of pastel crystals with bright highlights. It’s especially satisfying if you like color, because crystals are just sharp shapes and layered paint, and you can keep adding little shine marks until it feels magical.
Materials Needed:
- Stretched canvas
- Acrylic paint
- Paintbrushes in multiple sizes
- Palette or paint tray
- Optional sealer or varnish
Steps to Make:
- Paint a dark cave base with charcoal and deep purple, then let it dry.
- Block in crystal shapes using simple triangles and angled rectangles.
- Layer brighter crystal colors on one side to create a faceted look.
- Add the fairy silhouette and paint white highlights along crystal edges.
- Dry, seal, and display where daylight can pick up the contrast.
6. Dandelion Wish Fairy Canvas
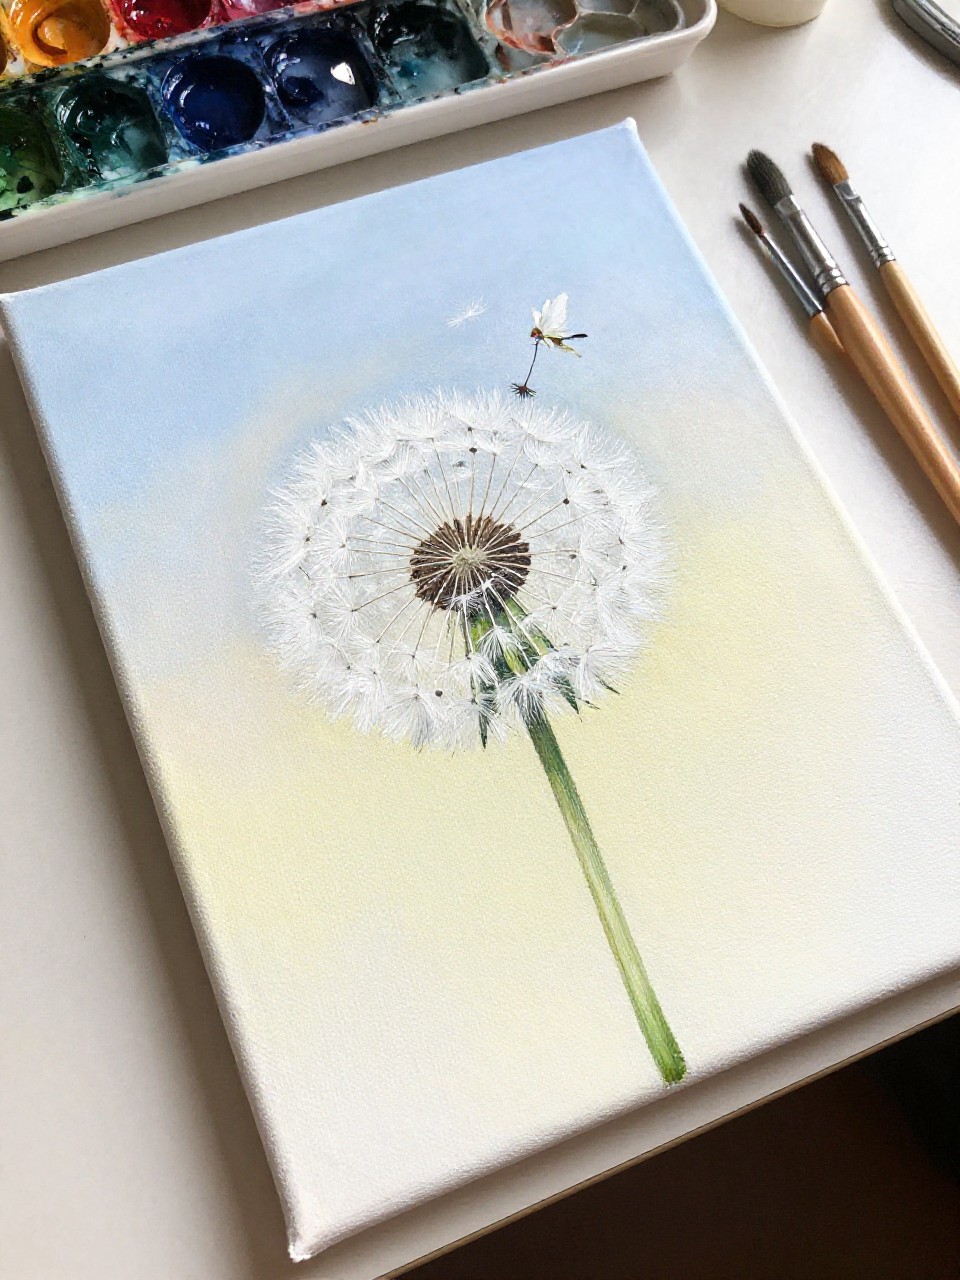
A fairy blows on a fluffy dandelion, and tiny seeds float across the canvas like little parachutes. This one is calming and simple because it’s mostly gentle blending and small repeated strokes, and it looks lovely even if your seed shapes aren’t perfect.
Materials Needed:
- Stretched canvas
- Acrylic paint
- Paintbrushes in multiple sizes
- Palette or paint tray
- Optional sealer or varnish
Steps to Make:
- Paint a soft, airy background gradient (sky tones or warm sunset).
- Add the dandelion stem and round seed head with light, feathery strokes.
- Paint a small fairy figure close to the dandelion, angled as if blowing.
- Dot and flick tiny seeds drifting across, adding a few brighter white tips.
- Let it dry, seal, and hang somewhere you want a peaceful vibe.
7. Rainy Leaf Umbrella Fairy Canvas
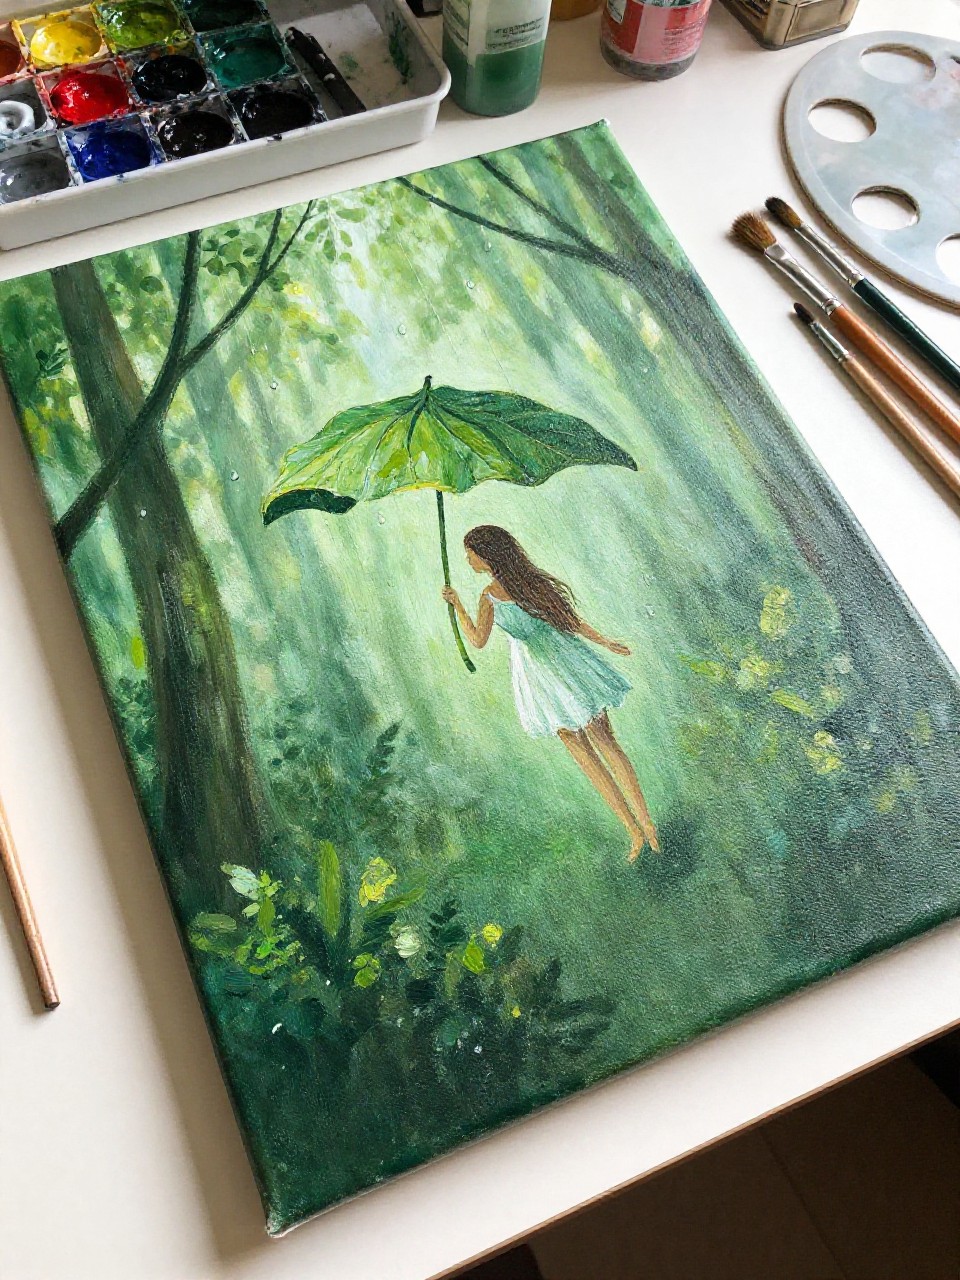
A fairy holds a big leaf like an umbrella while raindrops fall around her in a green forest. It’s great for beginners because the leaf is one main shape, and the raindrops are simple lines and dots that instantly add mood and movement.
Materials Needed:
- Stretched canvas
- Acrylic paint
- Paintbrushes in multiple sizes
- Palette or paint tray
- Optional sealer or varnish
Steps to Make:
- Paint a misty green background with soft, blended strokes and let dry.
- Sketch and paint a large leaf canopy with visible vein lines.
- Add the fairy underneath, keeping the body simple and the wings light.
- Paint raindrops with thin vertical strokes and a few bright splash dots.
- Dry, seal, and display near a plant shelf for a cozy rainy-day feel.
8. Lantern Path Fairy Canvas
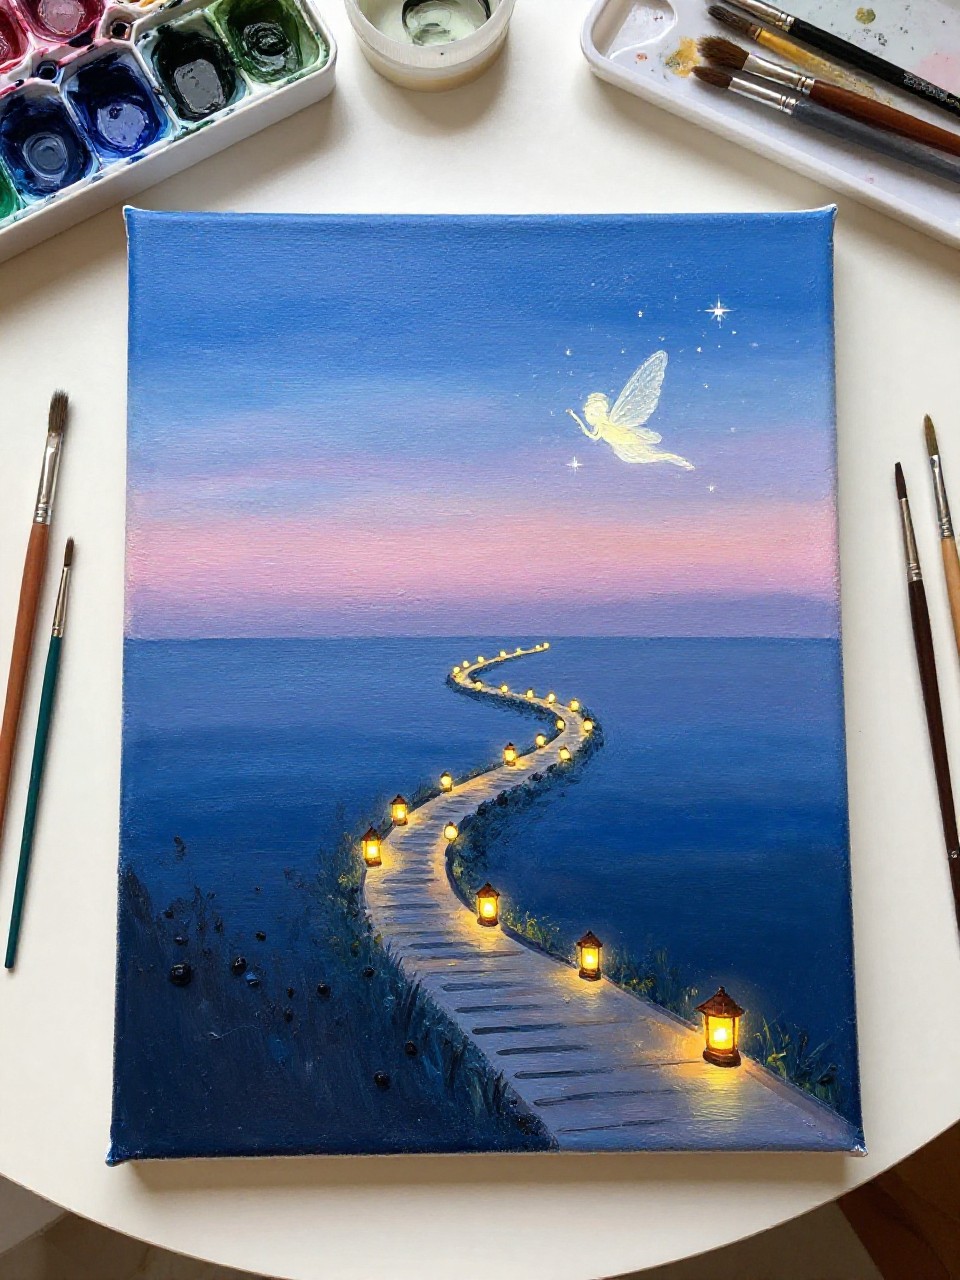
A line of tiny lanterns glows along a winding path, and a fairy floats above the warm light. This makes an easy, eye-catching wall piece because the lanterns are just small shapes with bright centers, and you can practice soft halos and glow effects.
Materials Needed:
- Stretched canvas
- Acrylic paint
- Paintbrushes in multiple sizes
- Palette or paint tray
- Optional sealer or varnish
Steps to Make:
- Paint a twilight background with deep blue fading into dusk purple.
- Add a winding path shape using darker tones to guide the viewer’s eye.
- Paint small lanterns along the path, with bright yellow centers and soft halos.
- Add the fairy hovering near the brightest lantern, plus a few sparkles.
- Let dry completely, seal, and hang where it can feel like a night story.
9. Sunflower Swing Fairy Canvas
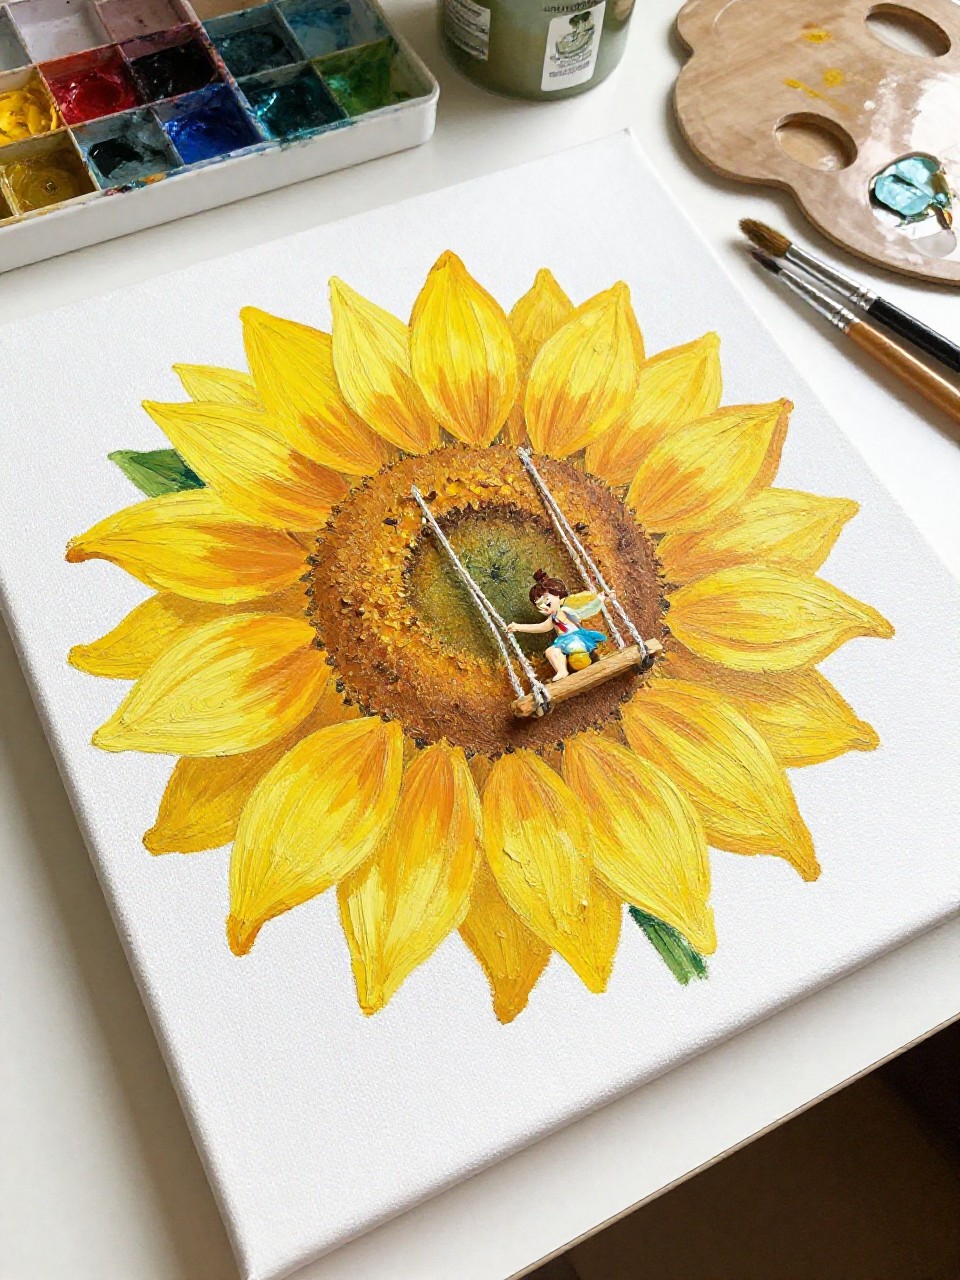
A fairy sits on a little swing hanging from a sunflower stem, with bold petals framing the scene. It’s a cheerful beginner project because you can paint the sunflower in loose layers, then add the swing lines and fairy last for a cute “reveal.”
Materials Needed:
- Stretched canvas
- Acrylic paint
- Paintbrushes in multiple sizes
- Palette or paint tray
- Optional sealer or varnish
Steps to Make:
- Paint a simple sky background and a soft green base for stems.
- Block in a large sunflower head with a dark center and yellow petal shapes.
- Add the swing ropes hanging from the stem and a small seat near the flower.
- Paint the fairy sitting on the swing, then add highlights on petals and wings.
- Dry, seal, and display as bright, happy wall art.
10. Strawberry Garden Fairy Canvas
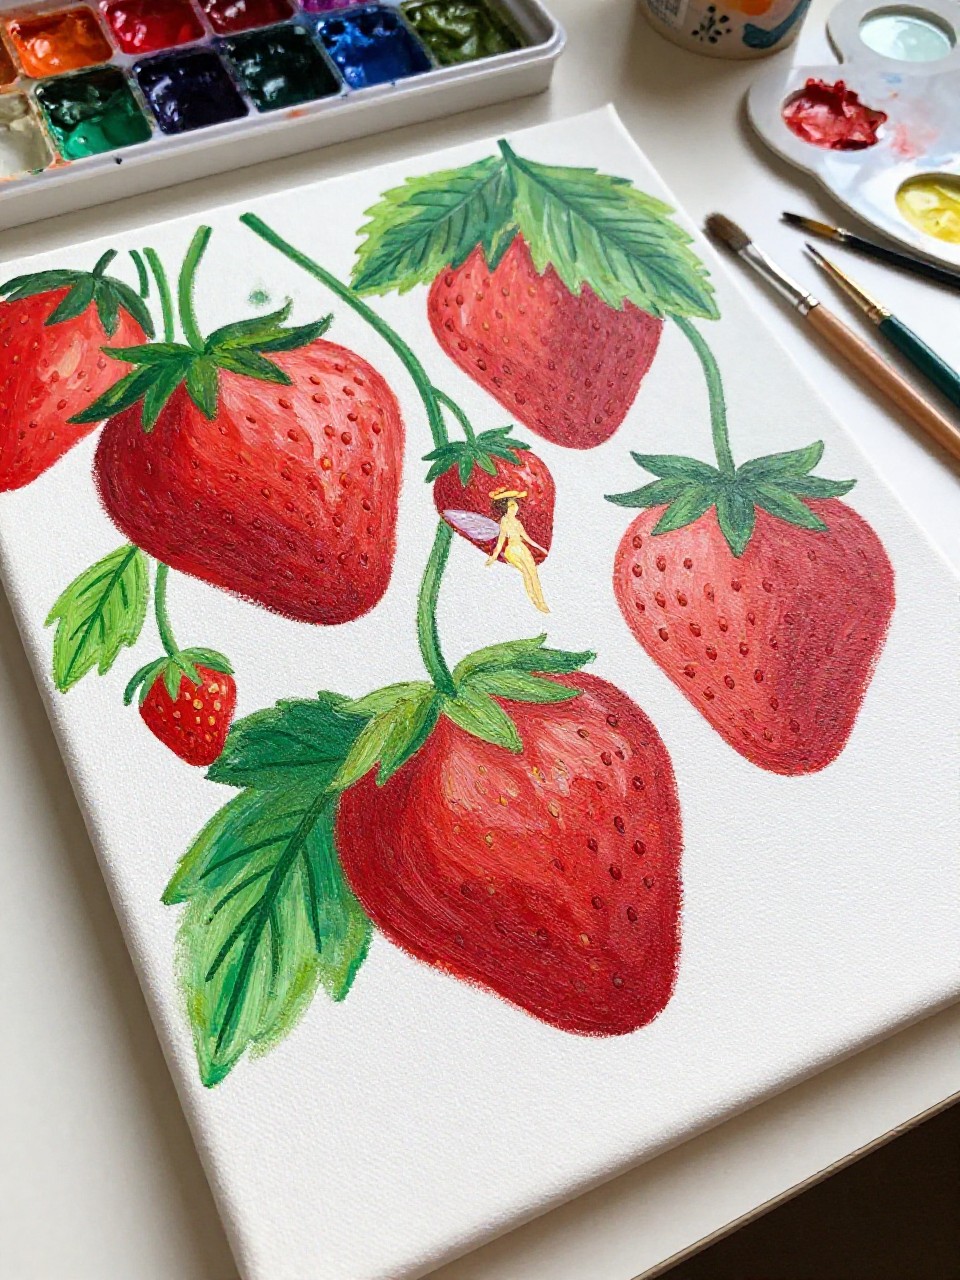
A cluster of strawberries and leaves fills the canvas, with a small fairy tucked between the berries like she’s hiding. This is great for beginners because strawberries are easy heart-like shapes, and the tiny seed dots and leaf veins are relaxing details you can do slowly.
Materials Needed:
- Stretched canvas
- Acrylic paint
- Paintbrushes in multiple sizes
- Palette or paint tray
- Optional sealer or varnish
Steps to Make:
- Paint a light green background wash and let it dry so colors stay crisp.
- Block in strawberry shapes using reds, then shade one side darker.
- Paint leaves in layered greens, adding quick vein lines while still a bit wet.
- Add the fairy nestled between berries, then dot seeds and tiny white highlights.
- Dry fully, seal, and hang in a kitchen or fruit-themed nook.
11. Butterfly Friend Fairy Canvas
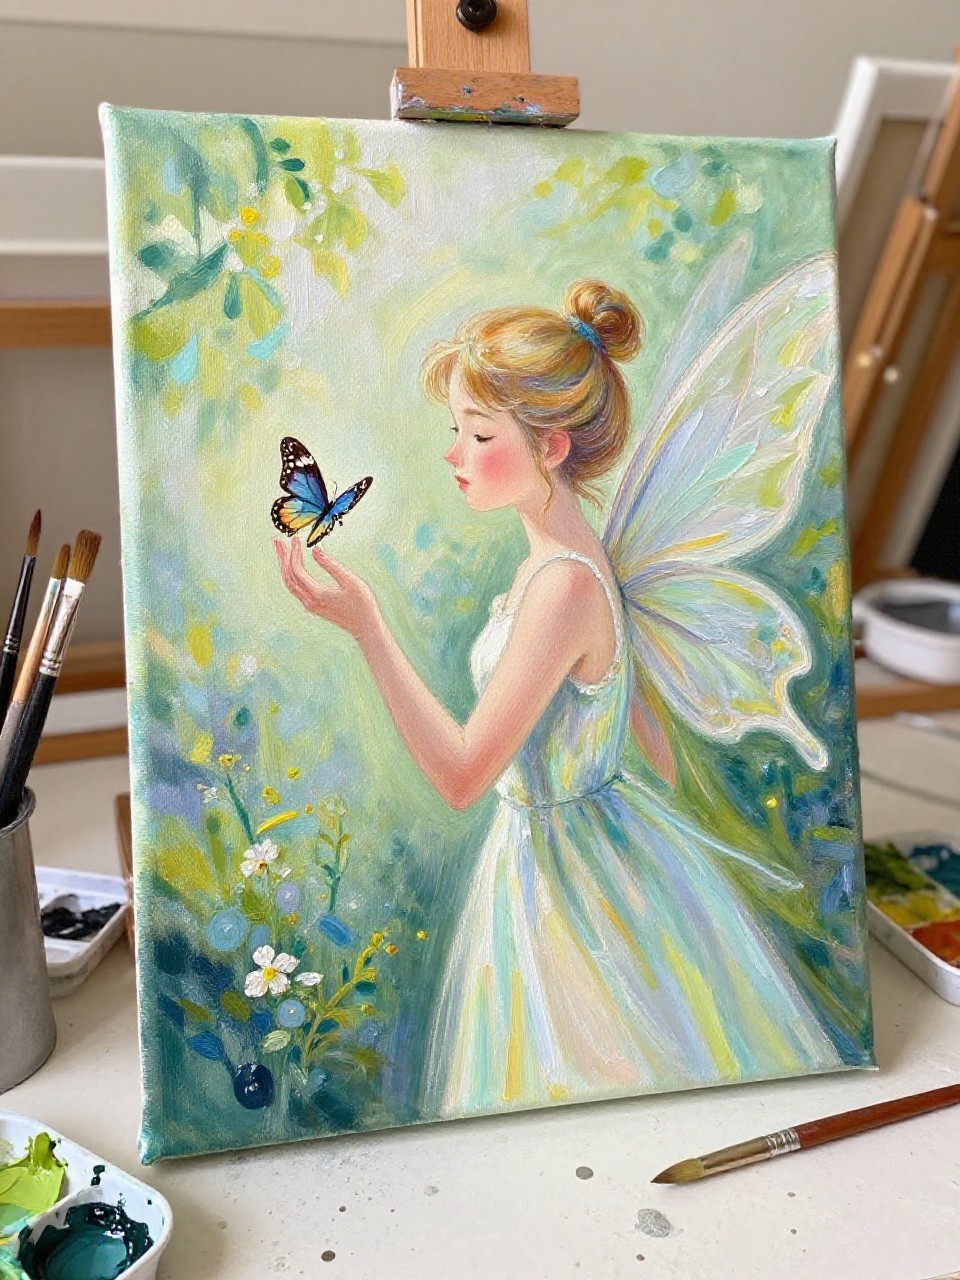
A fairy gently holds out a hand while a butterfly rests on her finger, painted in soft pastels. This feels sweet and beginner-friendly because you can keep the fairy simple and focus on the butterfly’s wing patterns, which look beautiful even with slightly wobbly lines.
Materials Needed:
- Stretched canvas
- Acrylic paint
- Paintbrushes in multiple sizes
- Palette or paint tray
- Optional sealer or varnish
Steps to Make:
- Paint a soft, blurred garden background with light greens and warm light.
- Block in the fairy’s face and dress shapes using simple color areas.
- Paint the butterfly wings with two main colors, then add a few bold pattern lines.
- Add tiny sparkles and highlights on the wings and fairy hair for extra glow.
- Dry, seal, and display near a window for a gentle look.
12. Cloud Bed Sleeping Fairy Canvas
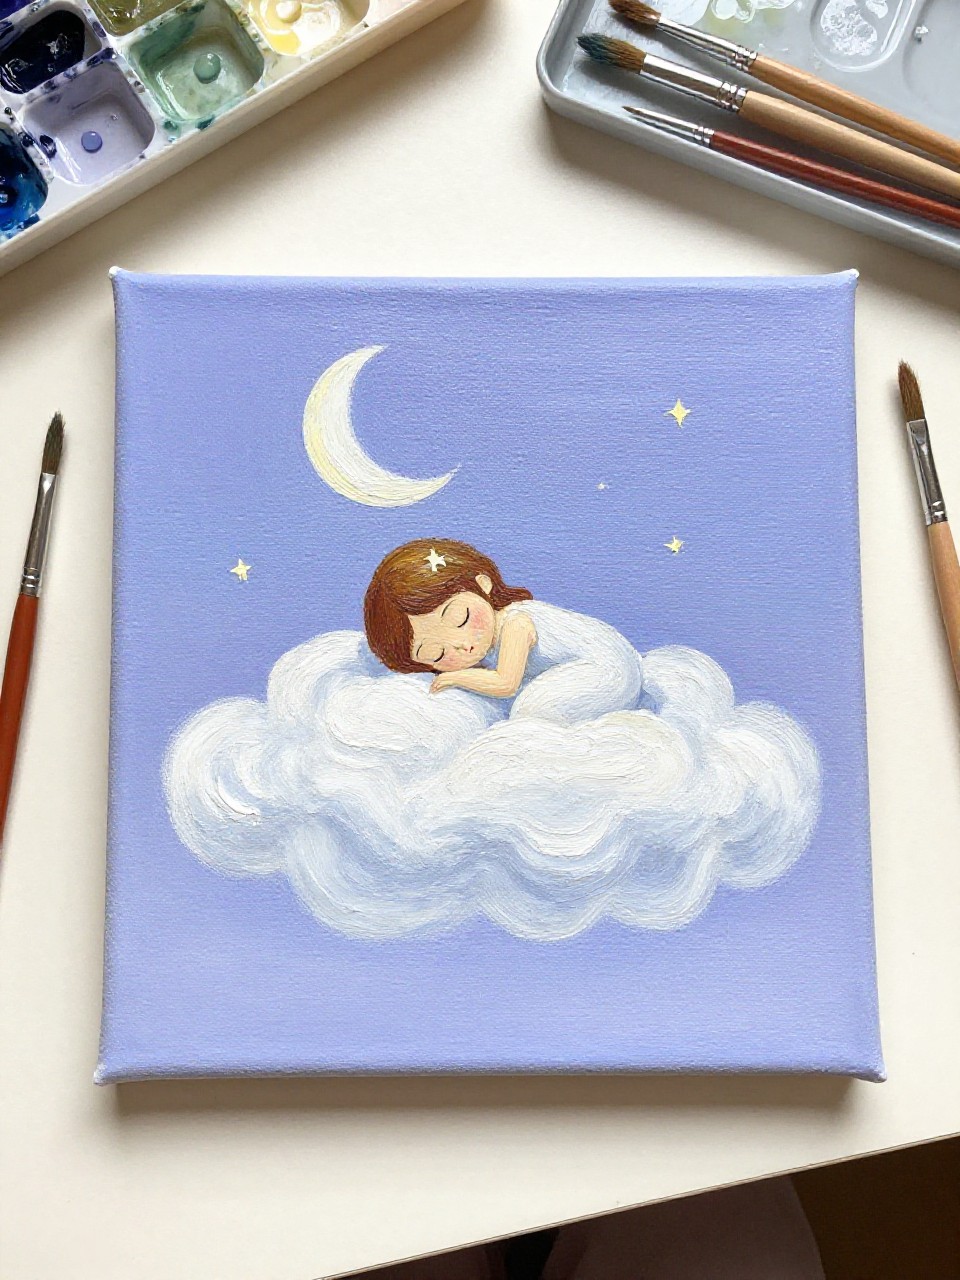
A tiny fairy sleeps curled up on a fluffy cloud, with a pale moon and soft stars around her. It’s a relaxing project for winding down because the colors are gentle, the shapes are rounded, and you can use dry brushing to make the cloud texture look soft.
Materials Needed:
- Stretched canvas
- Acrylic paint
- Paintbrushes in multiple sizes
- Palette or paint tray
- Optional sealer or varnish
Steps to Make:
- Paint a light sky gradient from lavender to pale blue and let it dry.
- Use white paint to build a cloud shape with layered, puffy strokes.
- Add the sleeping fairy in simple lines and soft pastel clothing.
- Dot in stars and add a faint moon glow with thin, blended paint.
- Dry, seal, and hang in a bedroom or calm reading spot.
13. Firefly Jar Fairy Canvas
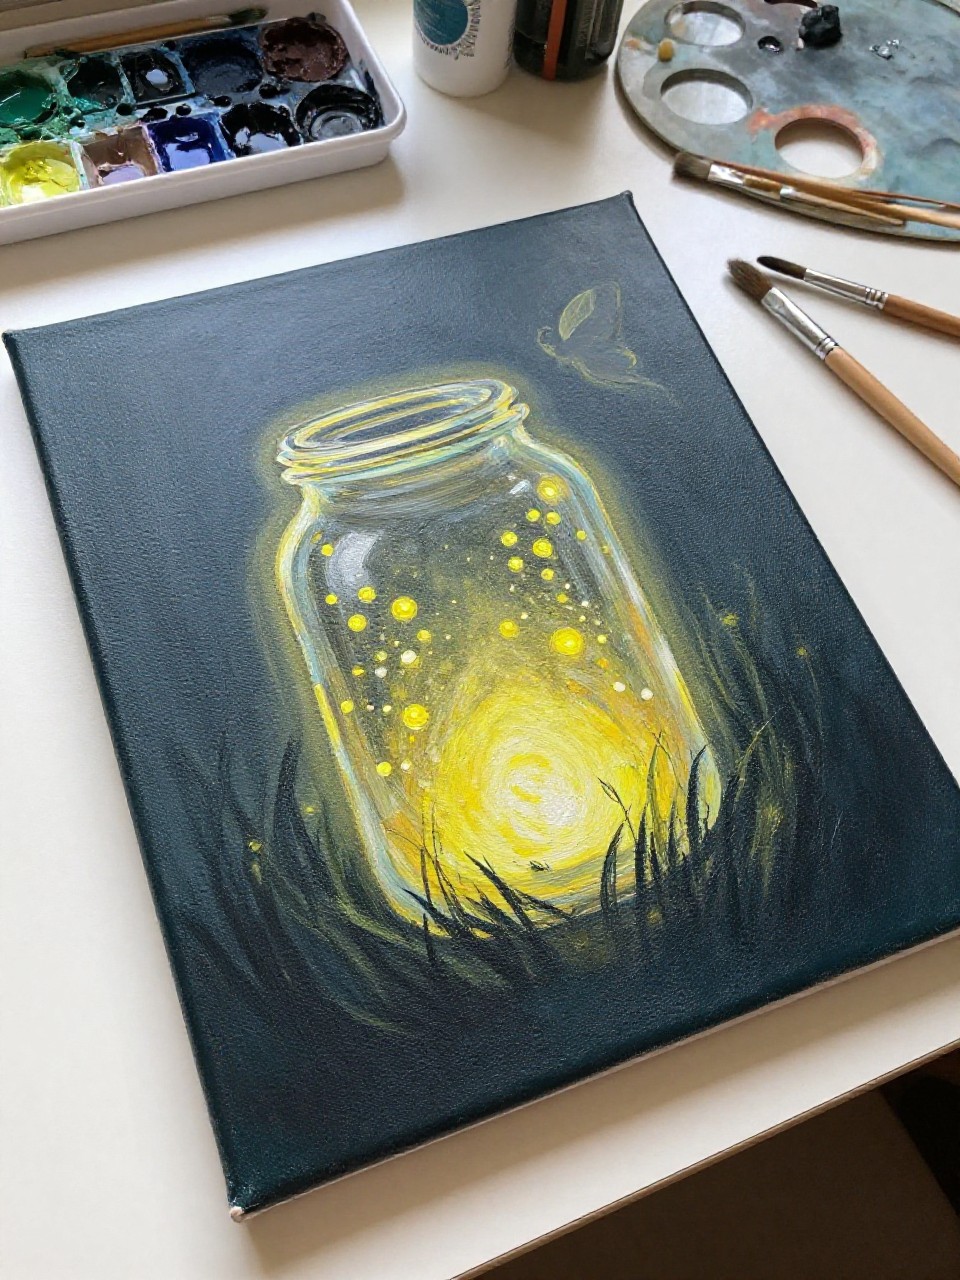
A glowing jar full of fireflies sits in the grass, and a fairy hovers nearby as if she’s guiding the light. This idea is perfect if you love warm glow effects, and it’s beginner-friendly because the fireflies are just dots with soft halos over darker paint.
Materials Needed:
- Stretched canvas
- Acrylic paint
- Paintbrushes in multiple sizes
- Palette or paint tray
- Optional sealer or varnish
Steps to Make:
- Paint a dark evening background with deep greens and blues, then dry.
- Block in a jar shape with light gray-blue, leaving room for reflections.
- Dot in warm yellow fireflies inside and around the jar, then blend halos softly.
- Add the fairy silhouette near the jar and paint a few bright highlight streaks.
- Dry fully, seal, and display where the glow can stand out.
14. Cherry Blossom Fairy Canvas
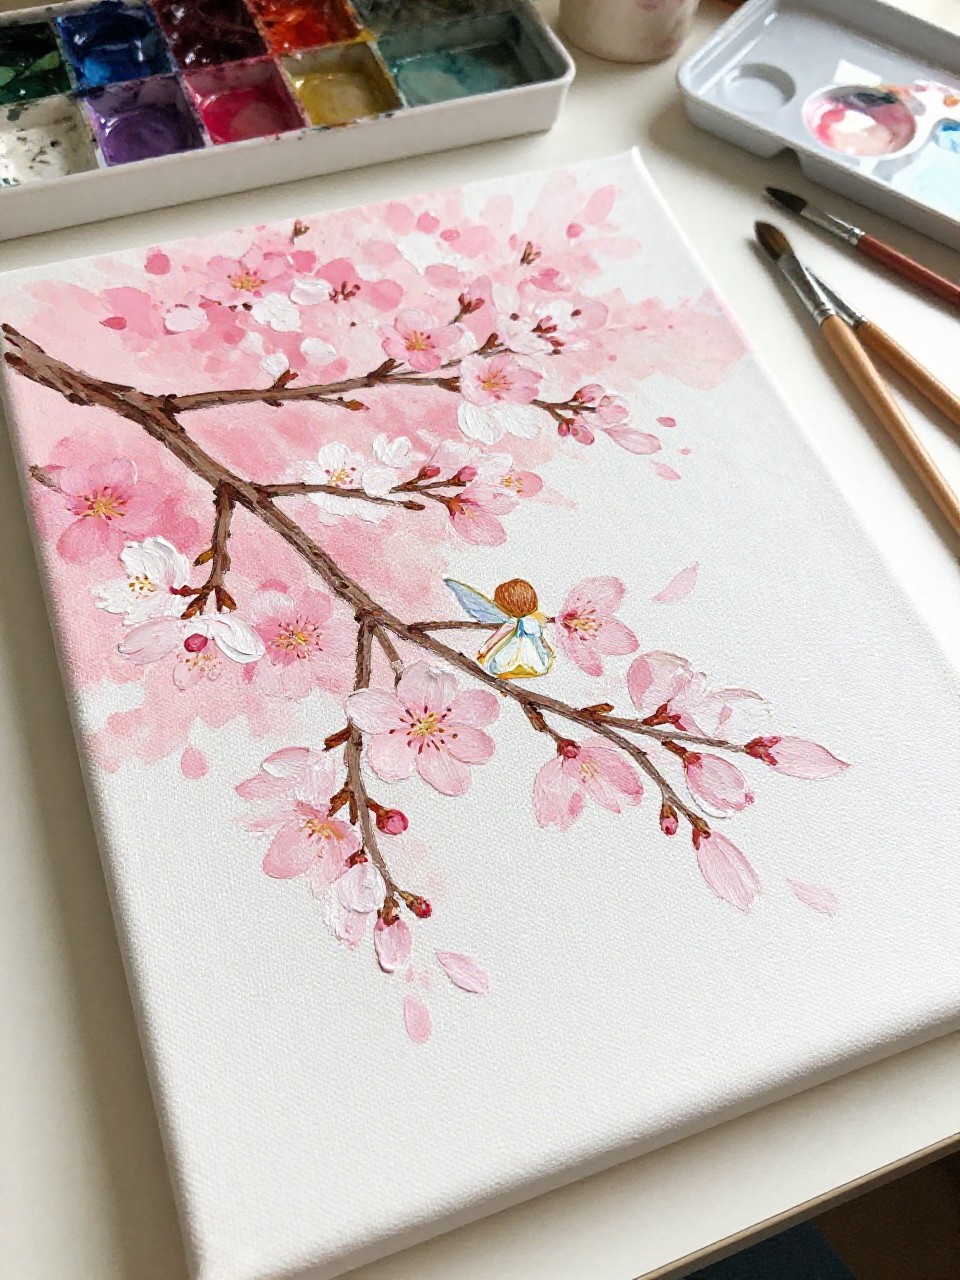
A branch of cherry blossoms stretches across the canvas, and a fairy sits among the petals like it’s her favorite spot. This one is calming because blossoms are made with quick dabs, and the branch can be imperfect and still look natural and hand-painted.
Materials Needed:
- Stretched canvas
- Acrylic paint
- Paintbrushes in multiple sizes
- Palette or paint tray
- Optional sealer or varnish
Steps to Make:
- Paint a light sky background and let it dry to keep blossoms crisp.
- Paint a brown branch with uneven edges and a few smaller twigs.
- Dab pink and white blossoms in clusters, leaving some sky peeking through.
- Add the fairy sitting on the branch and dot tiny flower centers with a small brush.
- Dry, seal, and hang for a soft springtime feel.
15. Pebble Path Tiny Fairy Canvas
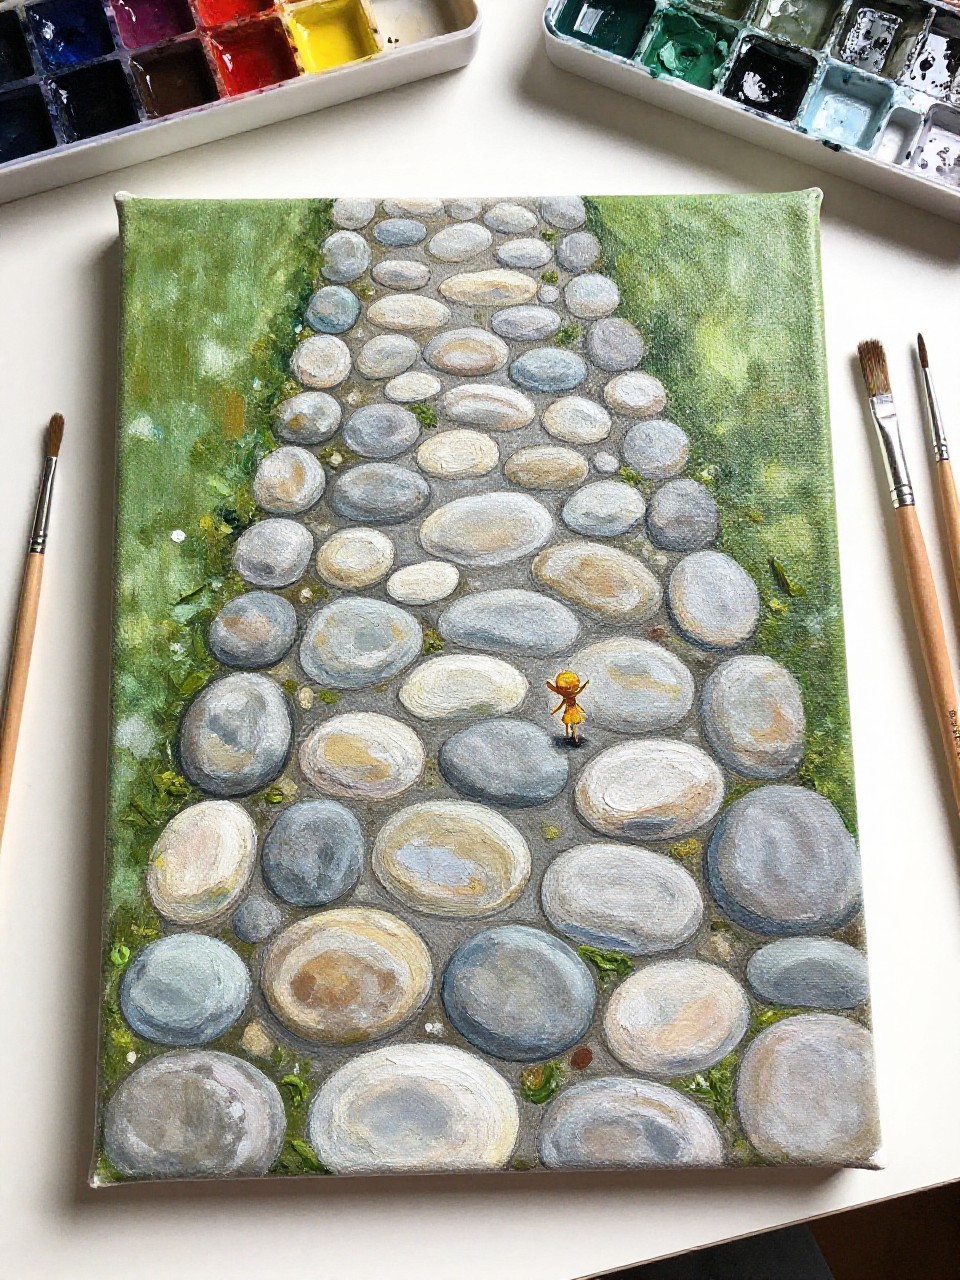
A close-up scene shows a pebble path with mossy edges, and a tiny fairy stands on one stone as if it’s a stage. It’s great for beginners because pebbles are easy ovals with highlights, and repeating them feels almost like a soothing pattern practice.
Materials Needed:
- Stretched canvas
- Acrylic paint
- Paintbrushes in multiple sizes
- Palette or paint tray
- Optional sealer or varnish
Steps to Make:
- Paint a neutral ground base (warm gray or tan) and let it dry.
- Add pebble shapes in different sizes, leaving thin gaps between stones.
- Shade each pebble on one side and add a small highlight to make them look rounded.
- Paint mossy green edges and place a tiny fairy on one “special” stone.
- Dry, seal, and display as a cute close-up nature scene.
16. Pastel Rainbow Wing Fairy Canvas
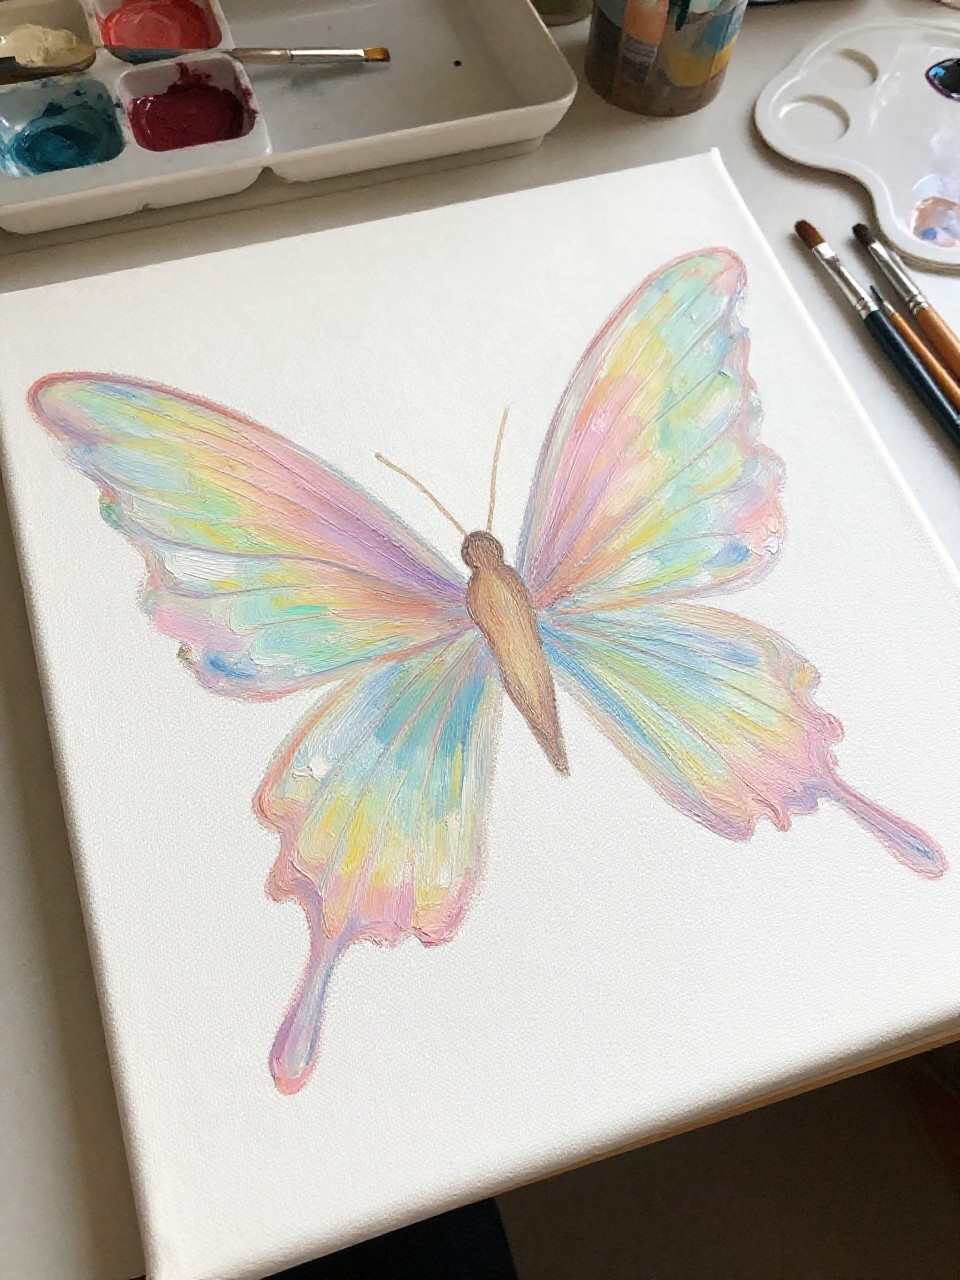
A fairy with large rainbow wings fills the center of the canvas, with soft blended colors and sparkly accents. This is a fun beginner project because the face and body can stay simple, while the wings let you play with color blending and layered brush strokes.
Materials Needed:
- Stretched canvas
- Acrylic paint
- Paintbrushes in multiple sizes
- Palette or paint tray
- Optional sealer or varnish
Steps to Make:
- Paint a pale background wash so the wing colors pop more brightly.
- Sketch the fairy body lightly, then paint it in simple, clean shapes.
- Blend pastel rainbow bands across the wings, letting brush strokes show softly.
- Add wing veins, tiny dots, and bright white highlights where colors overlap.
- Dry, seal, and hang as cheerful, colorful wall art.
17. Garden Gate Fairy Welcome Canvas
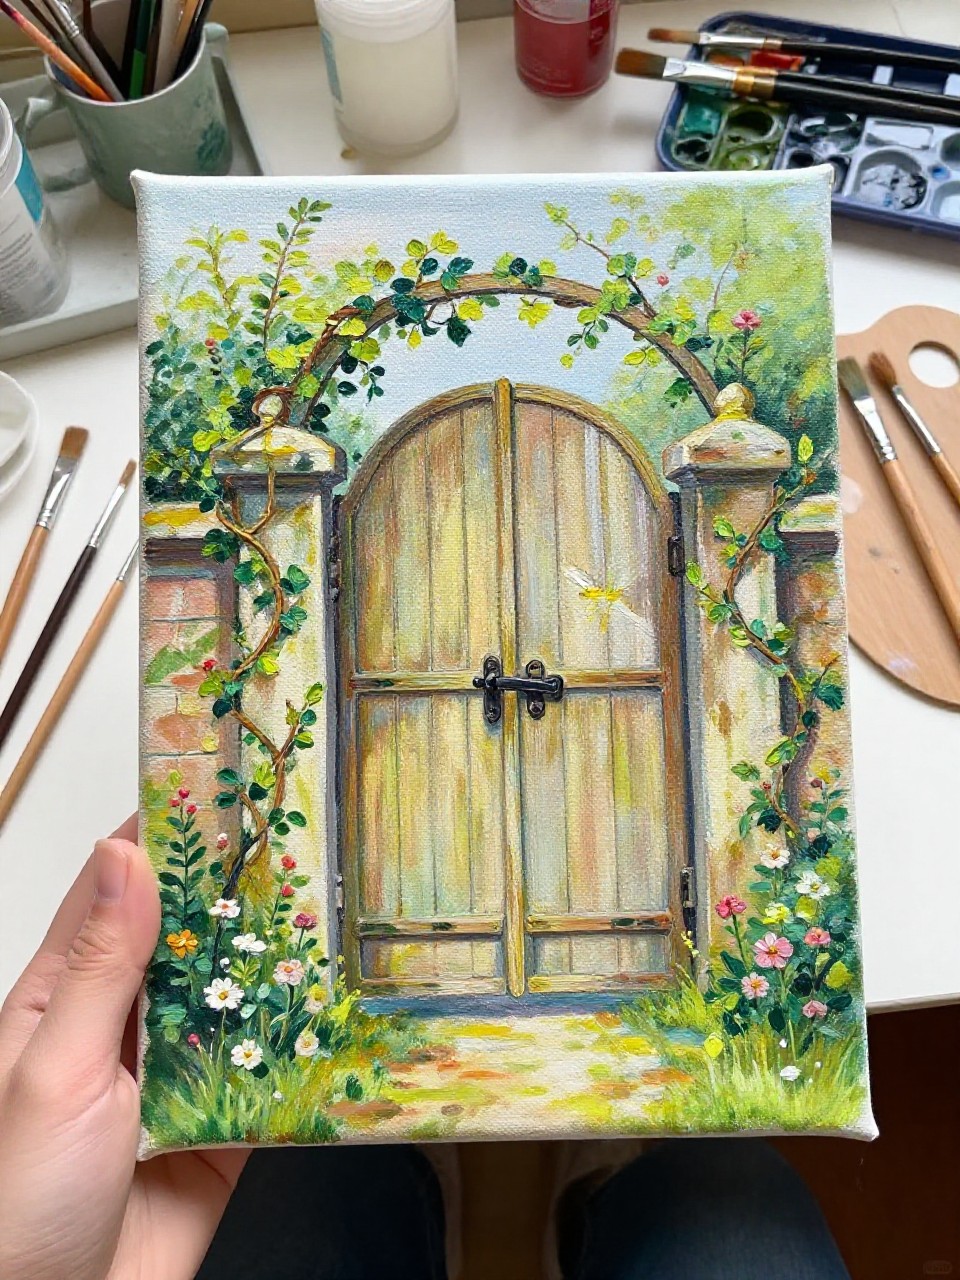
A tiny garden gate sits under climbing vines, and a fairy hovers nearby like she’s welcoming you in. This is perfect if you want something storybook-style for home decor, and it’s beginner-friendly because the gate and vines are built from simple lines and layered greens.
Materials Needed:
- Stretched canvas
- Acrylic paint
- Paintbrushes in multiple sizes
- Palette or paint tray
- Optional sealer or varnish
Steps to Make:
- Paint a soft garden background with greens and a hint of sky, then dry.
- Block in a small gate using light gray or warm wood tones, adding quick shadow lines.
- Paint vines curling around the gate with layered greens and small leaf strokes.
- Add the fairy hovering near the latch and paint tiny flowers for extra charm.
- Dry fully, seal, and display near an entryway or hallway gallery wall.