

Table of Contents Show
Preschoolers love animals, but parents and teachers often need quick crafts that don’t turn into a gluey mess. These pet crafts are simple to set up, easy to clean, and still look like “wow” projects kids will be proud to show off.
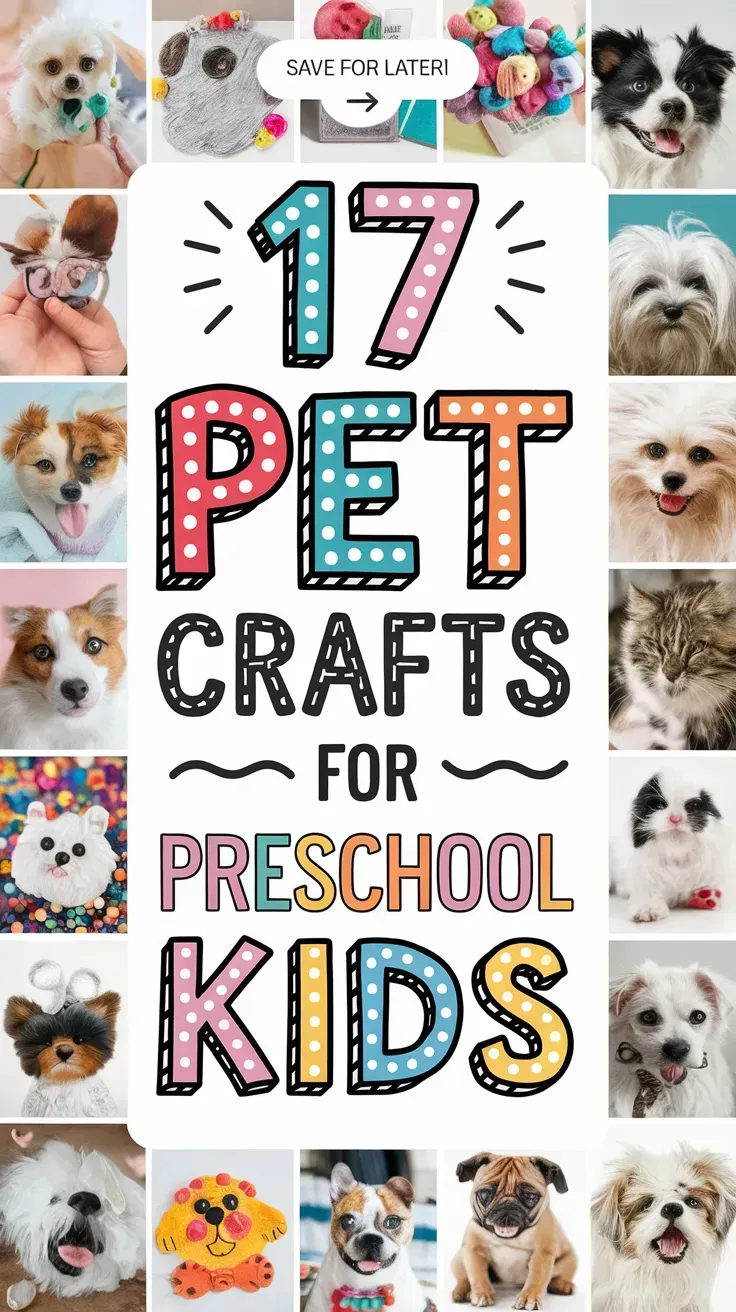
Most use basic supplies you already have at home or in the classroom.
Each one builds fine motor skills and imagination, but keeps the process calm, colorful, and beginner-friendly.
1. Pom-Pom Goldfish Bowl Collage
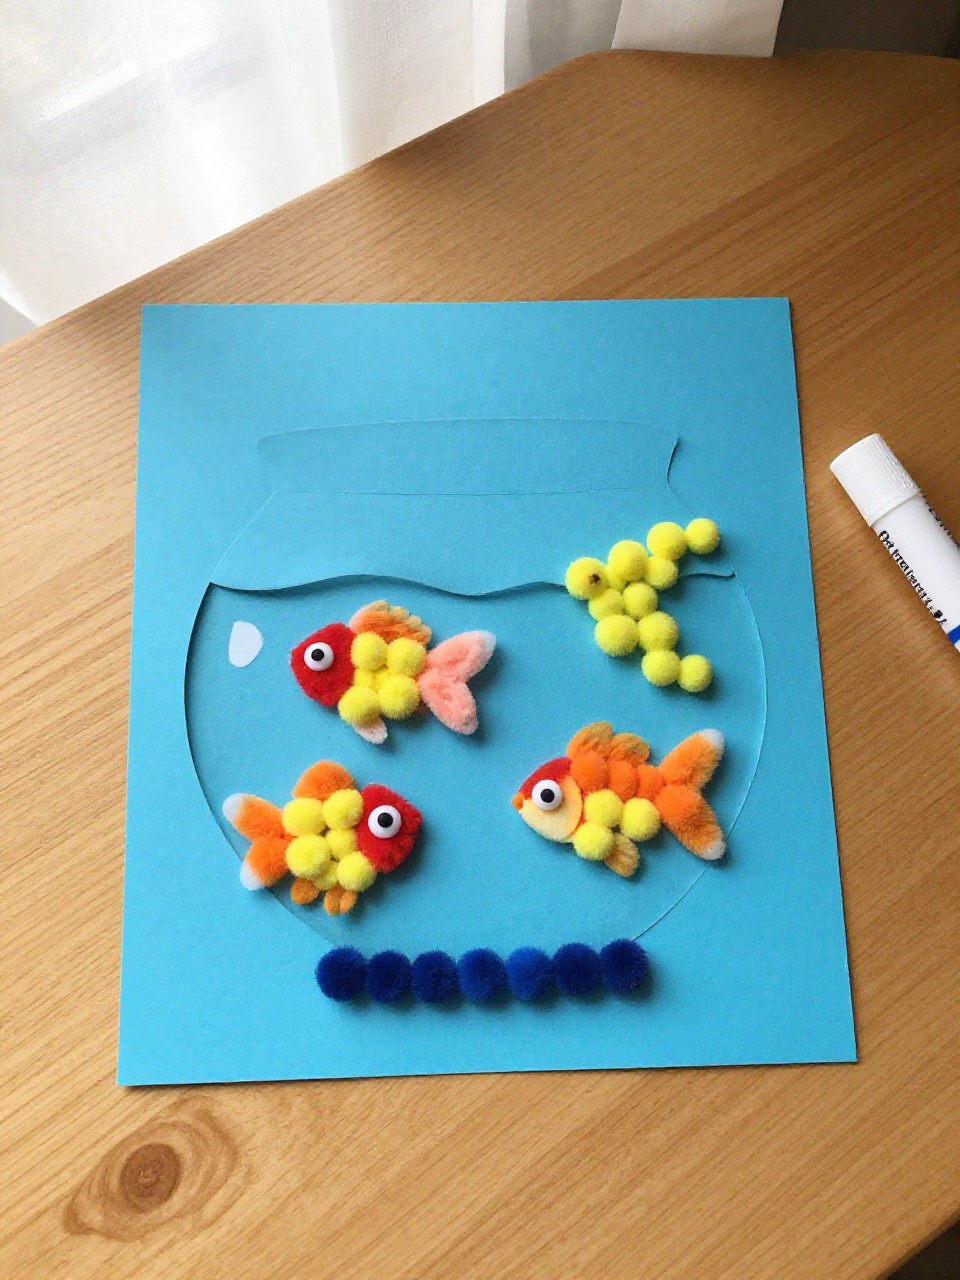
A bubbly, bright “aquarium” kids can make in minutes. Fluffy pom-poms look like chubby goldfish, and the blue paper background gives it that under-the-sea calm.
Materials Needed:
For People Who Love to Make Things ✂️
- Blue cardstock
- Assorted orange/yellow pom-poms
- School glue
How to make it:
- 1. Draw a simple fishbowl outline on blue cardstock.
- 2. Glue 2–3 pom-poms inside the bowl as fish bodies.
- 3. Add tiny pom-poms or dots for bubbles.
- 4. Use a marker to add eyes, fins, and seaweed squiggles.
2. Paper Plate Puppy Mask

Turn a plain plate into a sweet puppy face with floppy ears. The mask looks store-bought, but it’s just clever cutting and simple shapes.
Materials Needed:
- Paper plate
- Construction paper (brown/black)
- Glue stick
How to make it:
- 1. Cut two ear shapes from brown paper and glue to the top sides of the plate.
- 2. Cut a round nose and oval spots; glue onto the plate.
- 3. Draw eyes and mouth with a marker.
- 4. Tape a craft stick to the bottom as a handle.
3. Sock Cat Beanbag

A tiny, squishy cat that sits on a shelf or becomes a gentle toss toy. The knot tail and simple face make it charming without sewing.
Materials Needed:
- Small child’s sock
- Rice or dried beans
- Rubber band
How to make it:
- 1. Fill the sock halfway with rice.
- 2. Secure the opening tightly with a rubber band.
- 3. Tie a second rubber band near the tip to make little ears.
- 4. Draw eyes, whiskers, and a nose with a fabric or permanent marker.
4. Bubble-Wrap Tortoise Print
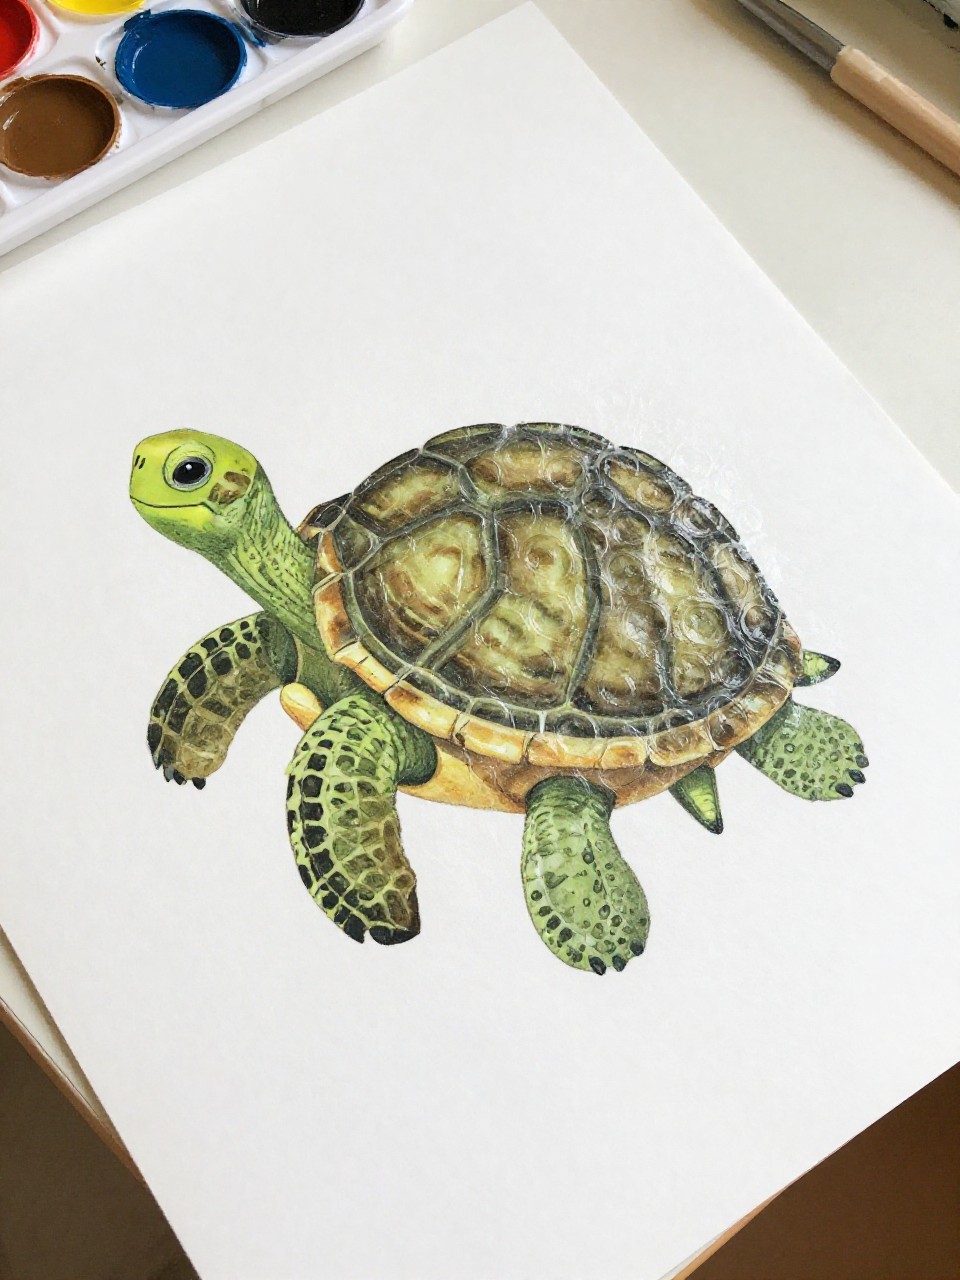
Kids love the dotty shell texture made by bubble wrap. The finished tortoise looks artsy and patterned, like a stamped illustration.
Materials Needed:
- Green paint
- Bubble wrap piece
- White paper
How to make it:
- 1. Paint the bumpy side of bubble wrap with green paint.
- 2. Press it onto white paper to make a shell print.
- 3. Draw a head, legs, and tail coming off the shell.
- 4. Add a smile and a tiny eye with marker.
5. Yarn-Wrapped Hamster Tube

Simple wrapping turns a cardboard tube into a cozy “hamster home” prop with a cute face. The textured yarn looks like a warm sweater.
Materials Needed:
- Cardboard tube
- Chunky yarn
- Googly eyes
How to make it:
- 1. Tape one end of the yarn inside the tube to anchor it.
- 2. Wrap yarn tightly around the tube until it’s fully covered.
- 3. Glue on googly eyes and draw a tiny nose and whiskers.
- 4. Add two small paper ears to the rim.
6. Handprint Parrot Perch
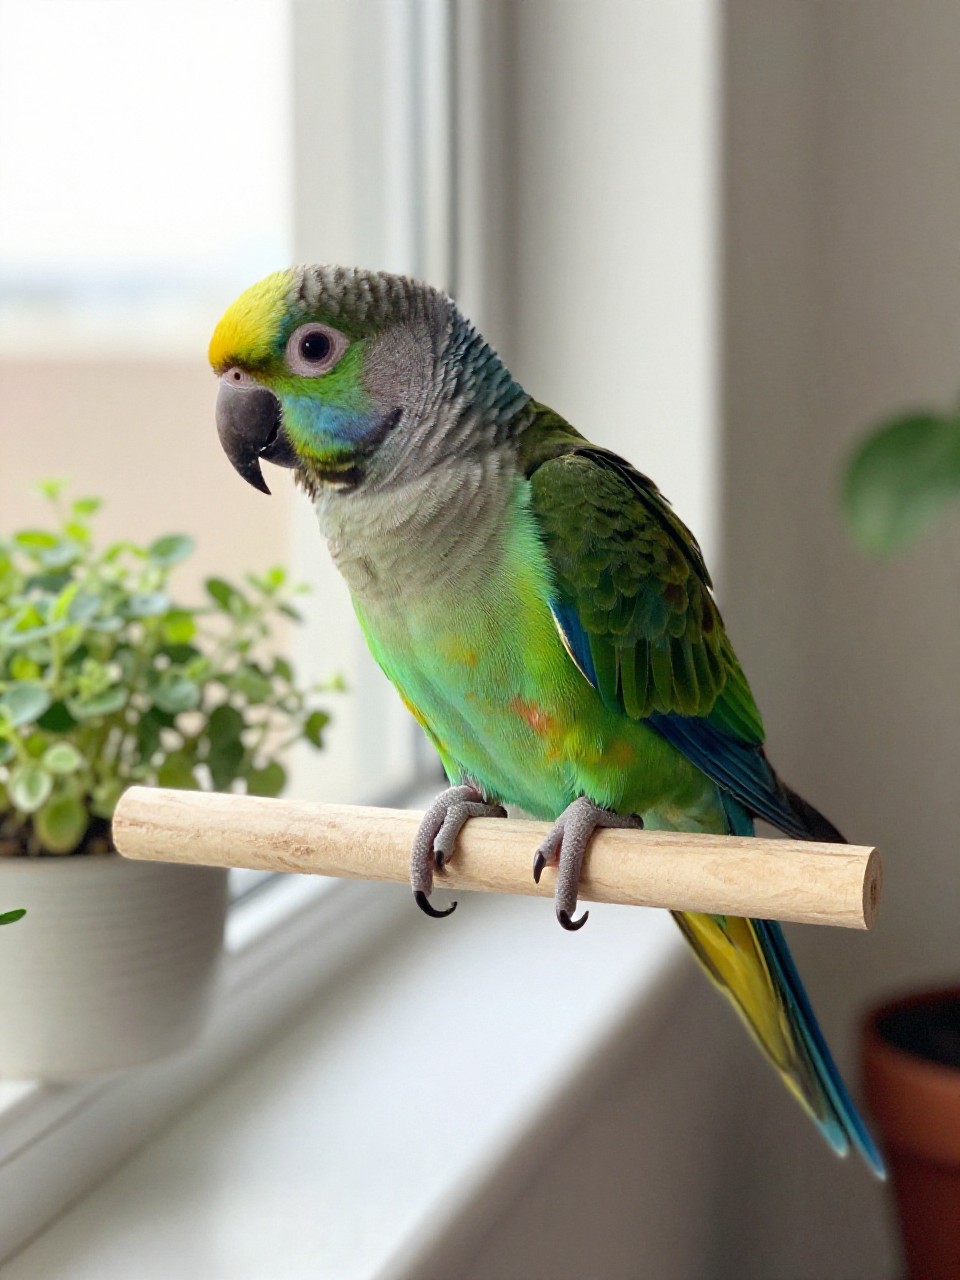
A rainbow handprint becomes bright parrot feathers. Clip it to a stick, and you’ve got a cheerful bird ready to “squawk.”
Materials Needed:
- Multicolor construction paper
- Clothespin
- Craft stick
How to make it:
- 1. Trace and cut a handprint from colorful paper.
- 2. Glue a simple oval head on top and draw a beak and eye.
- 3. Clip the parrot body to a craft stick with a clothespin (the clothespin is the body).
- 4. Add tail strips from paper for flair.
7. Felt Fish Magnet
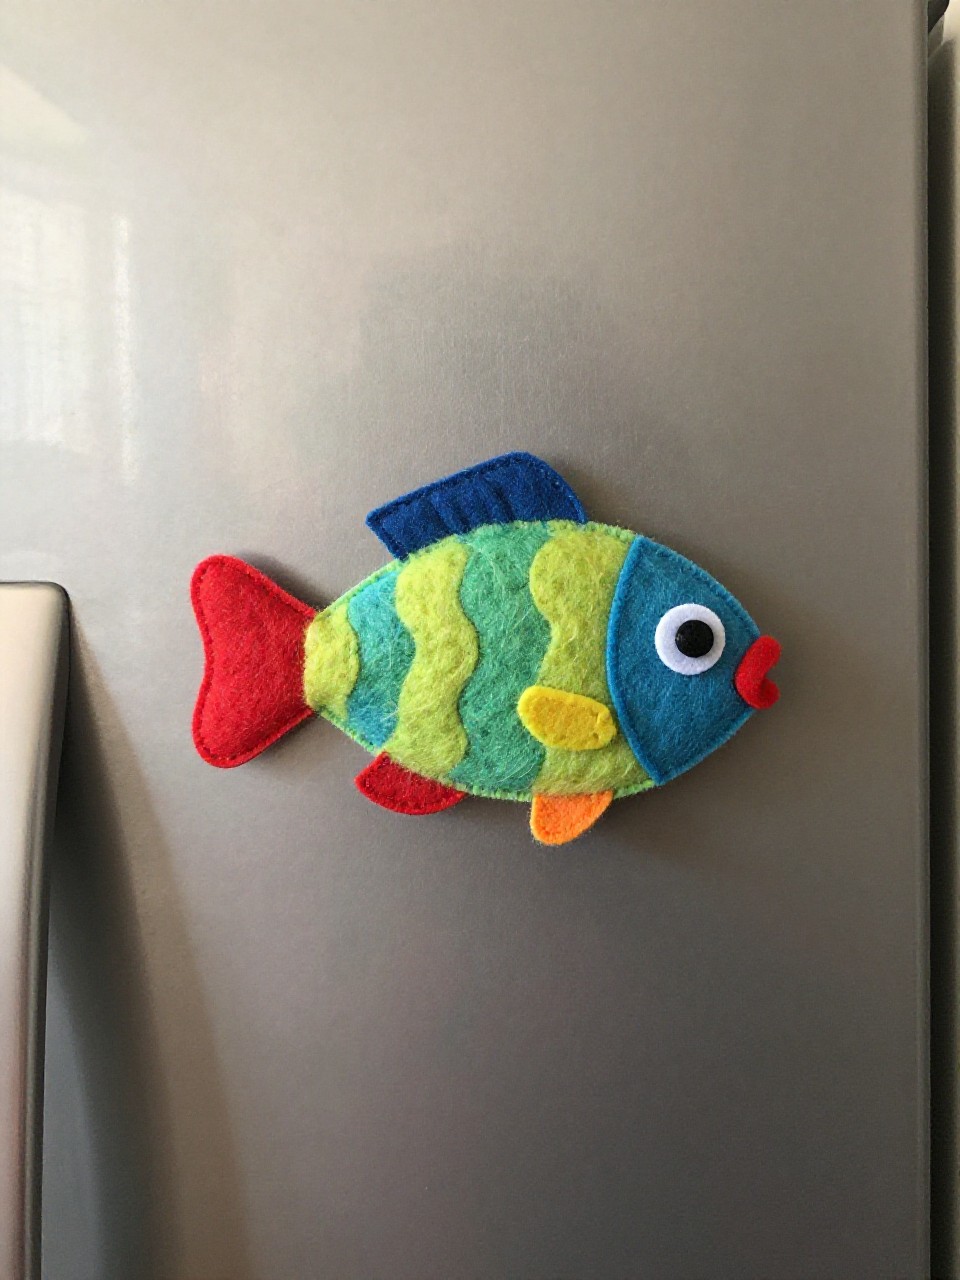
A soft, flat fish that sticks to the fridge. The layered felt looks polished, but it’s just cut-and-glue.
Materials Needed:
- Craft felt sheets
- Small magnet
- Tacky glue
How to make it:
- 1. Cut two simple fish shapes from felt.
- 2. Glue a fin or stripe detail onto one fish.
- 3. Sandwich the magnet between the two fish pieces with glue.
- 4. Press flat until dry.
8. Pasta Poodle Picture
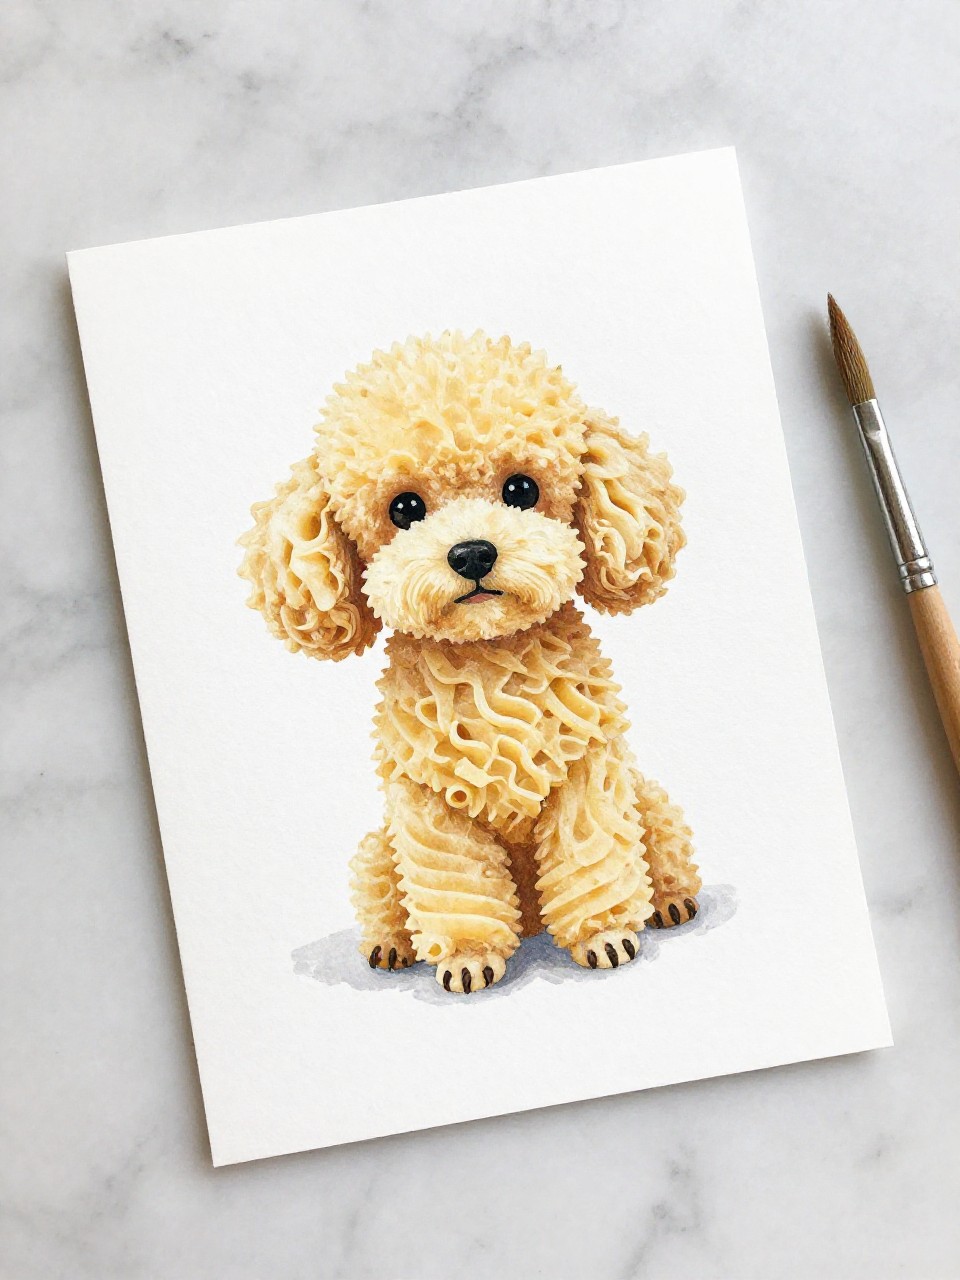
Curly pasta becomes a fluffy poodle coat. It’s tactile, silly, and ends up looking like a vintage greeting card.
Materials Needed:
- White cardstock
- Spiral pasta or mini shells
- White paint
How to make it:
- 1. Draw a simple poodle outline on cardstock.
- 2. Paint pasta pieces white and let them get tacky.
- 3. Glue pasta onto the body and head for fluff.
- 4. Add a bow drawn with marker or glued ribbon.
9. Cupcake Liner Turtle
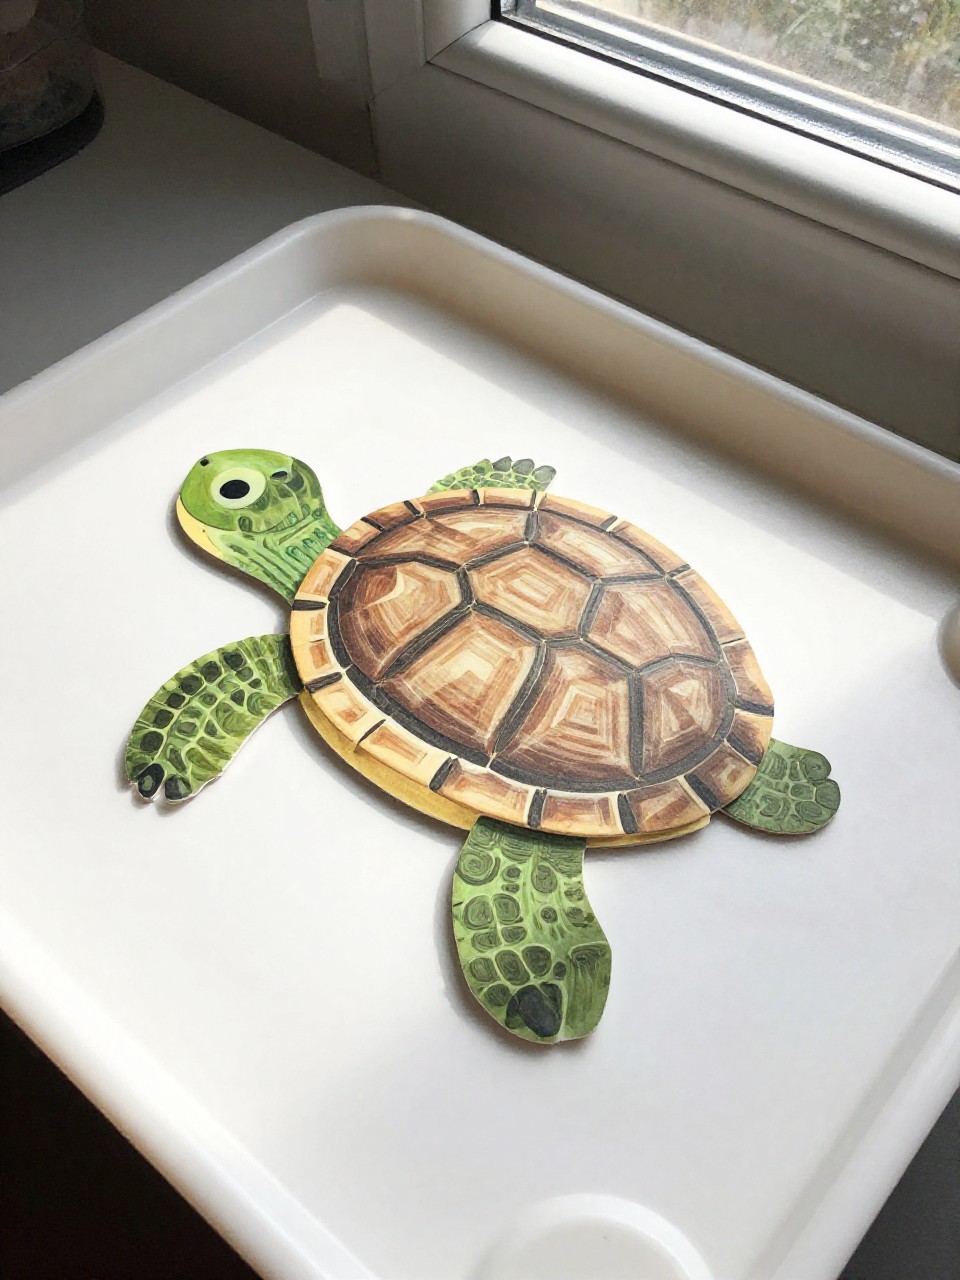
Flattened cupcake liners make perfect patterned shells. The mix of prints gives each turtle a different personality.
Materials Needed:
- Cupcake liners (patterned)
- Green construction paper
- Glue stick
How to make it:
- 1. Flatten a cupcake liner and glue it to paper as the shell.
- 2. Cut and glue a green head, legs, and tail around the shell.
- 3. Draw an eye and smile.
- 4. Add little dots or lines for shell detail.
10. Paper Chain Dachshund
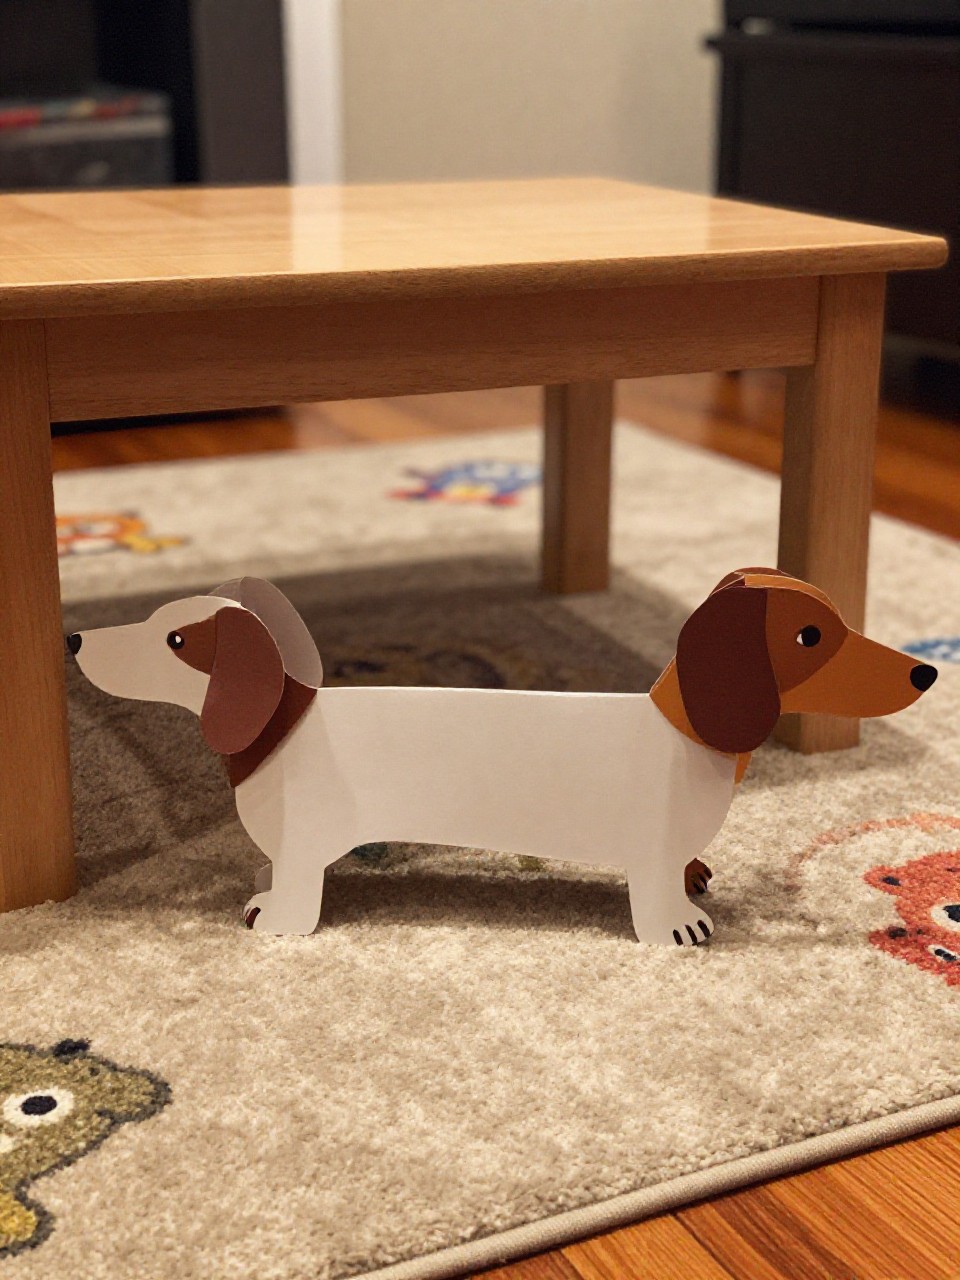
A long paper chain becomes a silly sausage dog. It looks complex, but kids only need to loop and glue.
Materials Needed:
- Brown construction paper strips
- Glue stick
- Black marker
How to make it:
- 1. Make a paper chain of 5–7 brown loops for the body.
- 2. Cut a simple head and tail; glue to each end of the chain.
- 3. Add drawn eyes, nose, and ear lines.
- 4. Draw tiny legs under a few loops.
11. Seashell Snail Fridge Clip
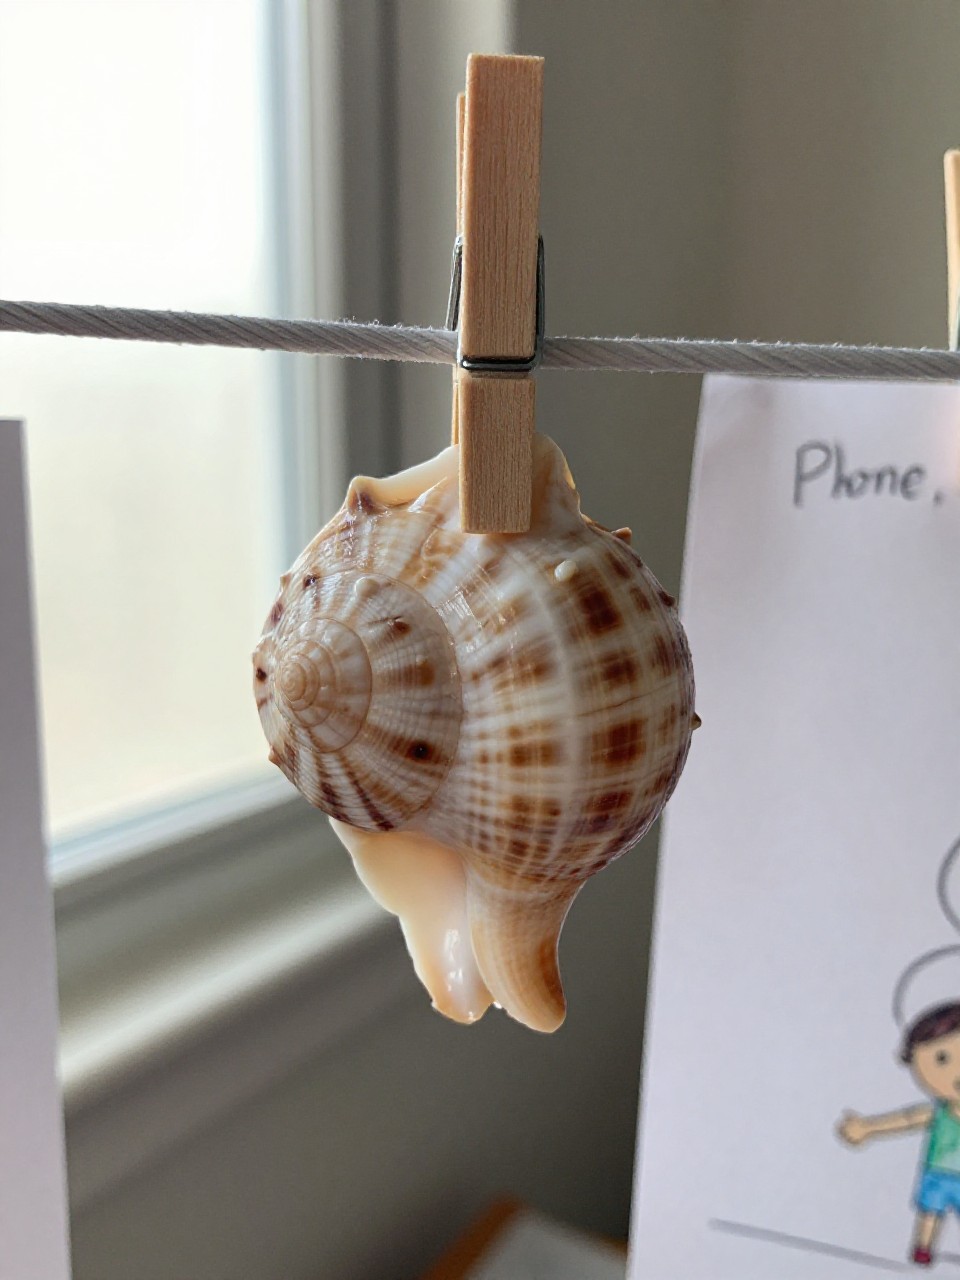
A real shell becomes a swirly snail house. Clipped to a note, it looks like a tiny pet guarding messages.
Materials Needed:
- Medium seashell
- Wooden clothespin
- Hot glue (adult help)
How to make it:
- 1. Glue the shell to one side of the clothespin.
- 2. Cut a small paper head with antennae and glue to the shell’s front.
- 3. Draw eyes and a smile.
- 4. Clip it onto artwork or the fridge handle.
12. Fingerprint Aquarium Bag

A clear zipper bag turns into a mini “aquarium” scene. Little fingerprints become fish, making a fast, colorful craft.
Materials Needed:
- Clear zipper bag
- Washable paint
- Permanent marker
How to make it:
- 1. Squeeze a pea-sized blob of blue paint into the bag and smear thinly as “water.”
- 2. Press painted fingertips on the outside to make fish shapes.
- 3. Use marker to add eyes, fins, and bubbles.
- 4. Seal and tape to a window for a light-catching effect.
13. Egg Carton Hedgehog

Pointy carton cups become a friendly, spiky hedgehog. It’s earthy and adorable on a bookshelf.
Materials Needed:
- Cardboard egg carton
- Brown paint
- Googly eyes
How to make it:
- 1. Cut out one egg cup and paint it brown.
- 2. Snip tiny spikes around the rim with scissors.
- 3. Glue on googly eyes and draw a nose.
- 4. Add a small paper leaf for cozy vibes.
14. Ribbon Jellyfish Sun-Catcher

Shiny ribbons turn into flowing tentacles under a see-through dome. It shimmers in the window like a sea pet.
Materials Needed:
- Transparent plastic lid
- Assorted ribbons
- Clear tape
How to make it:
- 1. Tape ribbon lengths to the inside rim of the clear lid.
- 2. Add a paper strip smile and two eyes inside the dome.
- 3. Tape a loop of ribbon on top for hanging.
- 4. Hang in a sunny spot for sparkle.
15. Pebble Penguin Family

Smooth stones painted black and white become a cozy penguin trio. The simple shapes feel modern and sculptural.
Materials Needed:
- Smooth pebbles
- Acrylic paint (black/white/orange)
- Paintbrush
How to make it:
- 1. Paint pebbles black and let dry.
- 2. Add white bellies and orange beaks/feet.
- 3. Dot tiny eyes with the tip of a brush.
- 4. Arrange in a small “ice” tray or cotton snow.
16. Tissue Box Kitty Condo

An empty tissue box becomes a tiny cat house with a peeking pet. It’s a cute diorama kids can decorate for hours.
Materials Needed:
- Empty tissue box
- Construction paper
- Stickers
How to make it:
- 1. Cover the tissue box with colored paper.
- 2. Cut a door shape on one side (use the existing opening as a window).
- 3. Make a simple paper cat and glue it inside peeking out.
- 4. Add stickers, a paper rug, and a flag on top.
17. Paper Cup Parakeet Shaker

A musical pet that chirps when you shake it. The cup shape gives the bird a round belly and perky tail.
Materials Needed:
- Paper cup
- A few dried beans
- Feathers or paper strips
How to make it:
- 1. Put beans in the cup and tape a circle of paper over the top to seal.
- 2. Glue on feathers or paper strips as wings and tail.
- 3. Add a triangle beak and draw eyes.
- 4. Decorate with dots or stripes, then shake for “tweets.”