
Table of Contents Show
Many preschoolers love turtles, but crafts can get messy fast—and little hands lose interest if a project drags on. This list gathers quick wins: clever turtle ideas that look “wow” on the fridge but are easy enough for a short attention span.

You’ll use simple supplies you already have, and each project sneaks in fine-motor practice without feeling like work.
Pick one, set out a few materials, and enjoy a calm, creative 20 minutes together.
1. Bubble Wrap Shell Turtle

Kids press painted bubble wrap to make bumpy, shiny shells that look like real turtle scales. The pop-dot texture is irresistible, and the results always feel magical.
Materials Needed:
- Bubble wrap
- Green and turquoise paint
- Cardstock
- Glue
How to make it:
- 1. Paint the bumpy side of bubble wrap with greens and a little turquoise.
- 2. Press a sheet of cardstock on top to make a shell print; lift and let dry.
- 3. Cut a circle for the shell, then cut a head, legs, and tail from green cardstock.
- 4. Glue the body parts behind the shell; draw eyes and a smile.
2. Paper Bowl Turtle

An upside-down paper bowl becomes a perfect domed shell. With chunky paint strokes and simple cutouts, it looks like a sculpture without any tricky steps.
Materials Needed:
- Paper bowl
- Green paint
- Construction paper
- Glue stick
How to make it:
- 1. Paint the outside of the bowl green; let it dry.
- 2. Cut a head, four legs, and a small tail from green paper.
- 3. Glue the body parts under the rim of the bowl.
- 4. Add paper eyes or draw them on; dot shell spots with a marker.
3. Leaf Shell Turtle

Real leaves make gorgeous, natural shells with no painting needed. Each turtle looks different, and kids love choosing “the perfect” leaf.
Materials Needed:
- Large flat leaf
- Green construction paper
- Glue
- Black marker
How to make it:
- 1. Cut a turtle head, legs, and tail from green paper.
- 2. Glue the leaf on top as the shell.
- 3. Add eyes and a smile with the marker.
- 4. Draw tiny nails or shell lines if you like.
4. CD Shimmer Turtle

Old CDs sparkle like water and make turtles that catch the light beautifully. It’s a great way to upcycle and make something display-worthy.
Materials Needed:
- Old CD or DVD
- Green foam sheet
- Googly eyes
- Glue
How to make it:
- 1. Trace and cut a head, legs, and tail from foam.
- 2. Glue the CD on top as the shell (shiny side up).
- 3. Attach the head and tail under the CD edge.
- 4. Stick on googly eyes and draw a smile.
5. Egg Carton Baby Turtles

Little egg-carton cups become tiny hatchlings with big personalities. Their chunky shapes are easy for small hands to decorate.
Materials Needed:
- Cardboard egg carton
- Green paint
- Pipe cleaners
- Glue
How to make it:
- 1. Cut individual egg cups and paint them green.
- 2. Poke small holes for legs; insert short pipe cleaner pieces.
- 3. Glue a small circle of paper for the head.
- 4. Add eyes and dots with a marker.
6. Coffee Filter Watercolor Turtle

Coffee filters bloom with color to make dreamy, tie-dye shells. The soft edges look like watercolor art with almost no effort.
Materials Needed:
- Coffee filter
- Washable markers
- Spray bottle with water
- Green paper
How to make it:
- 1. Flatten the coffee filter and color random patches with markers.
- 2. Lightly mist with water to blend; let dry.
- 3. Cut a head, legs, and tail from green paper.
- 4. Glue the dried filter on top as the shell; add eyes.
7. Spool-Stamp Shell Turtle

Kids stamp perfect hexagon-like spots using the end of a thread spool or bottle cap. The pattern looks fancy but takes seconds.
Materials Needed:
- Green paint
- Empty thread spool or bottle cap
- Cardstock
- Black marker
How to make it:
- 1. Draw a simple turtle outline on cardstock.
- 2. Dip the spool end in paint and stamp spots inside the shell.
- 3. Add a few dots or lines for texture.
- 4. Outline and add a smiling face with the marker.
8. Sock Pom Turtle

A quick no-sew pom-pom body turns a cuddly turtle friend. Soft textures make this a sensory win for little makers.
Materials Needed:
- Green sock (clean)
- Polyfill or scrap fabric
- Felt
- Rubber band
How to make it:
- 1. Stuff the sock toe with filling to make a round “shell.”
- 2. Wrap a rubber band to secure; trim the extra sock.
- 3. Cut felt head, legs, and tail; glue to the stuffed ball.
- 4. Add felt eyes or draw them on.
9. Paper Plate Mosaic Turtle

Torn paper squares make a bright mosaic shell that looks like stained glass. It’s simple tearing and gluing—perfect for little fingers.
Materials Needed:
- Small paper plate
- Colored paper scraps
- Glue stick
- Green paper
How to make it:
- 1. Cut the plate into a circle (trim rim if needed).
- 2. Tear colored paper into small squares and glue to cover the plate.
- 3. Cut and glue a head, legs, and tail under the plate.
- 4. Add eyes and a smile.
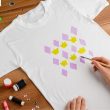
10. Handprint Turtle Family

Turn each child’s handprints into a whole turtle family portrait. The overlapping shapes feel playful and make a sweet keepsake.
Materials Needed:
- Washable paint
- White cardstock
- Black marker
- Baby wipes
How to make it:
- 1. Paint the palm green and stamp it as the shell (fingers pointing down).
- 2. Use a fingertip to stamp head, legs, and tail.
- 3. Repeat with different hand sizes for a “family.”
- 4. Add eyes, smiles, and names with the marker.
11. Acorn Cap Tiny Turtle

Acorn caps become shiny mini shells for pocket-sized turtles. These cute minis look detailed but take just a dab of glue.
Materials Needed:
- Acorn caps
- Green modeling clay or playdough
- Black marker
- Glue
How to make it:
- 1. Roll a small clay ball and press an acorn cap on top.
- 2. Pinch four tiny legs and a head from clay and attach.
- 3. Draw tiny eyes or press seed beads if available.
- 4. Let dry if air-dry clay is used.
12. Finger-Puppet Turtle

A simple paper ring turns any drawing into a puppet that wiggles along. Kids can make a whole cast and put on a show.
Materials Needed:
- Cardstock
- Markers
- Tape
- Scissors
How to make it:
- 1. Draw and cut a small turtle with a wide shell.
- 2. Cut a strip of cardstock and tape it into a ring to fit a child’s finger.
- 3. Tape the ring to the back of the shell.
- 4. Decorate the shell with dots or patterns.
13. Pasta-Shell Turtle

Actual pasta “shells” make the cutest 3D turtle backs. A quick dab of paint turns pantry staples into art.
Materials Needed:
- Large shell pasta
- Green paint
- Cardstock
- Glue
How to make it:
- 1. Paint the pasta shell green; let dry.
- 2. Draw and cut a simple flat turtle body from cardstock.
- 3. Glue the pasta shell on top as the 3D shell.
- 4. Add eyes and spots with a marker.
14. Yarn-Weave Shell Turtle

Kids weave chunky yarn through holes to make a cozy, textured shell. It looks intricate, but the big holes keep it easy.
Materials Needed:
- Cardboard
- Hole punch
- Yarn
- Tape
How to make it:
- 1. Cut a turtle shape from cardboard and punch holes around the shell.
- 2. Tape yarn to the back as a starter.
- 3. Weave yarn in and out of the holes until the shell fills.
- 4. Tie off on the back; add marker eyes.
15. Tissue Paper Stained-Glass Turtle

A clear shell glows in the window like stained glass. The overlapping tissue colors feel magical when the sun shines through.
Materials Needed:
- Clear contact paper
- Tissue paper squares
- Black construction paper
- Scissors
How to make it:
- 1. Cut a turtle outline from black paper; keep the shell area open.
- 2. Stick the outline onto sticky contact paper.
- 3. Fill the shell space with tissue squares.
- 4. Seal with a second contact sheet and trim.
16. Rock Garden Turtle

Smooth pebbles and paint make sturdy, outdoor-friendly turtles. They’re satisfying to hold and perfect for a porch or potted plant.
Materials Needed:
- Smooth rock
- Acrylic paint or paint pens
- Green foam or felt
- Glue
How to make it:
- 1. Paint the rock green and add shell patterns; let dry.
- 2. Cut a head, feet, and tail from foam or felt.
- 3. Glue them under the rock so they peek out.
- 4. Draw eyes and a smile.
17. Cupcake Liner Peekaboo Turtle

A folded cupcake liner becomes a lift-the-flap shell. Preschoolers love flipping it open to “peek” at the turtle underneath.
Materials Needed:
- Cupcake liner
- Cardstock
- Glue stick
- Markers
How to make it:
- 1. Fold a cupcake liner in half to make a shell flap.
- 2. Draw a simple turtle body on cardstock.
- 3. Glue the folded liner on top as a hinged shell.
- 4. Add eyes and patterns; write “peekaboo!” if you like.