
Table of Contents Show
Spring sneaks in with muddy shoes and curious little hands. If you’ve ever searched for crafts that look “wow” but won’t turn your kitchen into a chaos zone, this is for you. These projects are beginner-friendly, use simple supplies, and still feel special—like the kind of keepsakes you’ll want on the fridge all season.
Try one during a rainy afternoon or set up a mini “spring studio” for a weekend—each idea is easy to prep, fast to clean, and adorable to display.
1. Raindrop Suncatcher Chains

Shimmering “raindrops” hang from a twig, scattering color across the room when the sun hits. It looks fancy but is just layered tissue and contact paper. Kids love choosing the colors and watching light dance on the wall.
Materials Needed:
- Clear contact paper
- Tissue paper (blues, purples, silver)
- String or yarn
How to make it:
- 1. Cut raindrop shapes from contact paper (two per drop).
- 2. Stick tissue paper bits onto the sticky side, then seal with a second raindrop layer.
- 3. Punch a small hole at the top of each drop and tie on strings.
- 4. Knot strings to a small twig or dowel and hang in a sunny window.
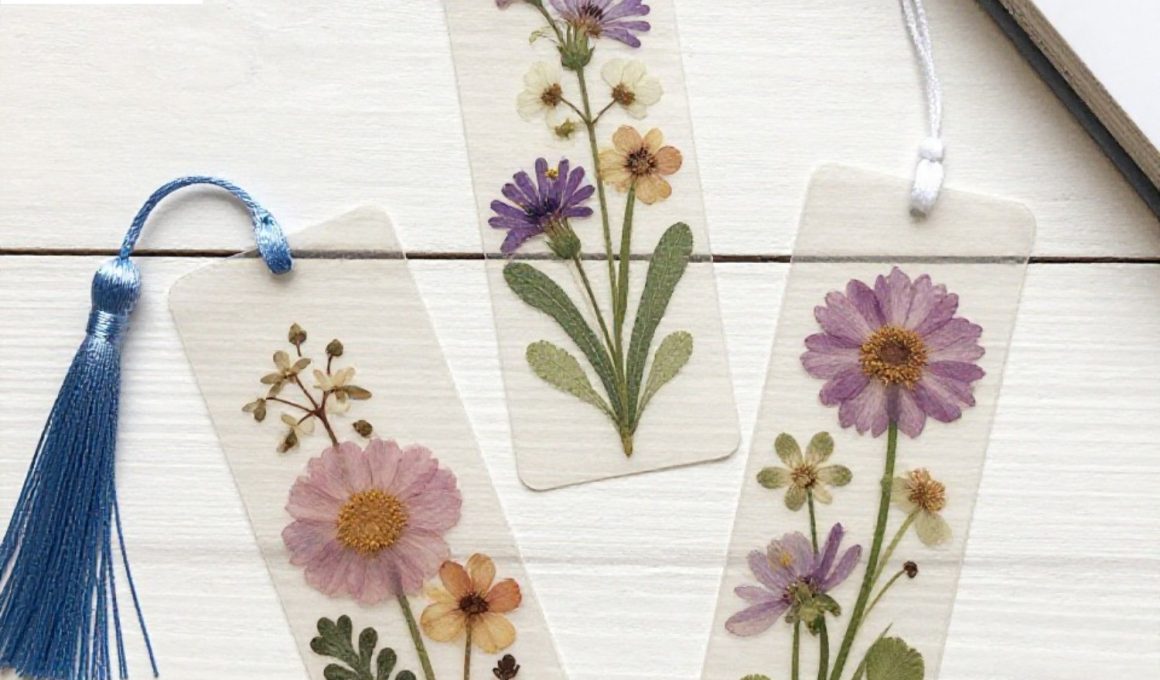
2. Pressed-Flower Peekaboo Bookmarks
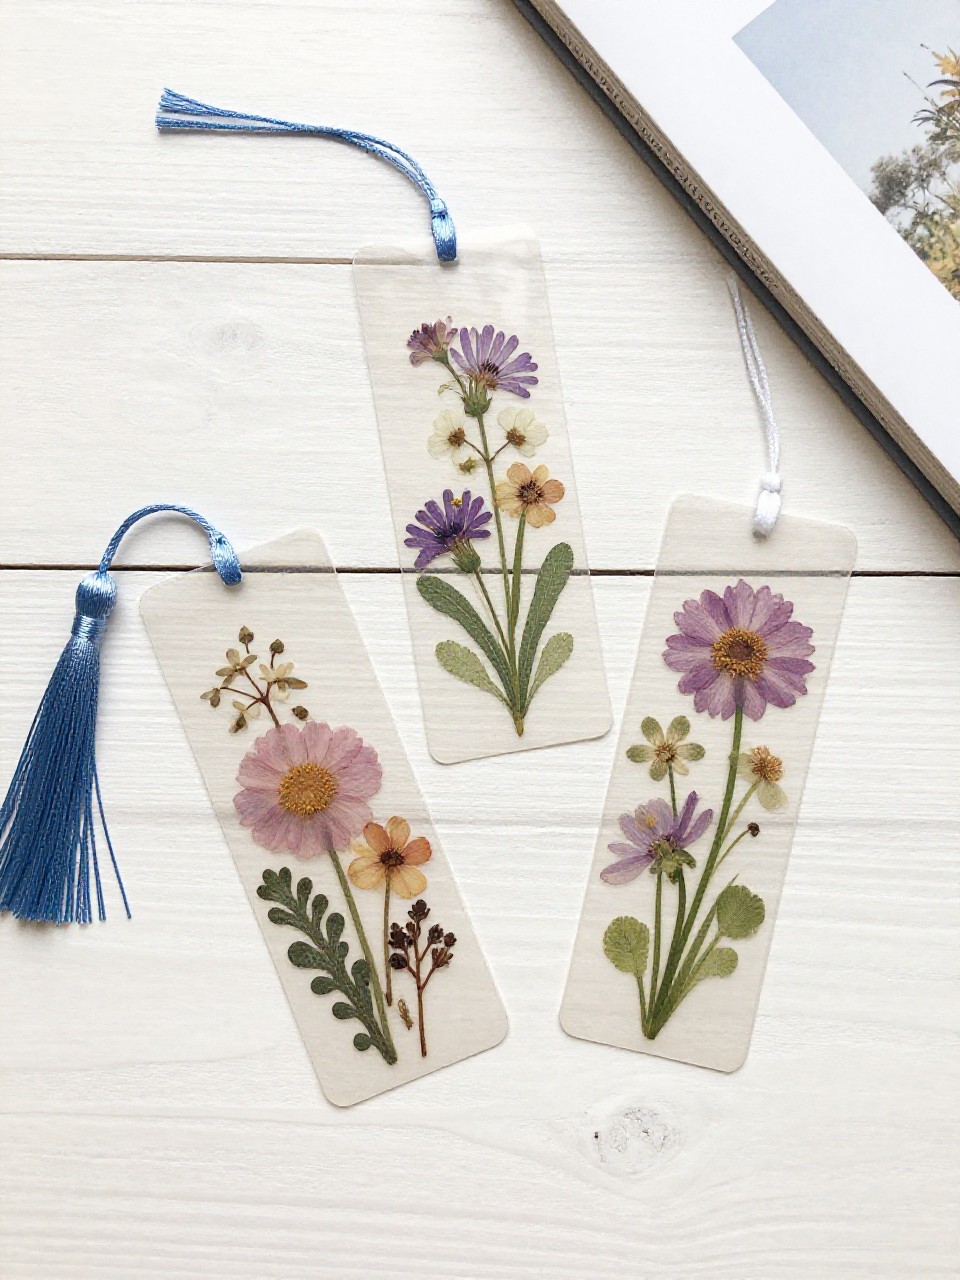
A clear window shows off tiny pressed blossoms like a mini garden you can hold. These look store-bought but take minutes. Perfect for gifting to teachers or tucking into bedtime books.
Materials Needed:
- Laminating sheets (self-adhesive) or clear packing tape
- Small flowers/leaves (pre-pressed)
- Ribbon or yarn
How to make it:
- 1. Arrange pressed flowers on one laminating sheet.
- 2. Place a second sheet on top and smooth out bubbles.
- 3. Trim into bookmark rectangles; punch a hole at the top.
- 4. Tie a short ribbon for a tassel.
3. Bumblebee Finger-Puppet Rings

Chunky little bees buzz right on kids’ fingers, made from soft pipe cleaners. The stripes and tiny wings make them look intricate, but it’s mostly wrapping and a dab of glue.
Materials Needed:
- Yellow and black pipe cleaners
- Small white felt or paper for wings
- Glue stick or tacky glue
How to make it:
- 1. Wrap a yellow pipe cleaner around a child’s finger to form a ring base.
- 2. Coil black and yellow pipe cleaners together to make a small striped “bee body.”
- 3. Glue two small wing shapes to the top.
- 4. Let dry, then glue the body onto the ring base.
4. Watercolor Coffee-Filter Butterflies

These butterflies bloom with soft, dreamy colors that blend like magic. A clothespin body clips onto curtains or plants for an instant spring vibe.
Materials Needed:
- White coffee filters
- Washable markers
- Wooden clothespins
How to make it:
- 1. Flatten coffee filters and color patterns with washable markers.
- 2. Lightly mist with water to let colors blend; dry flat.
- 3. Pinch the center and clip with a clothespin to form wings.
- 4. Draw eyes and antennae on the clothespin.
5. Rainbow Garden Bead Stakes
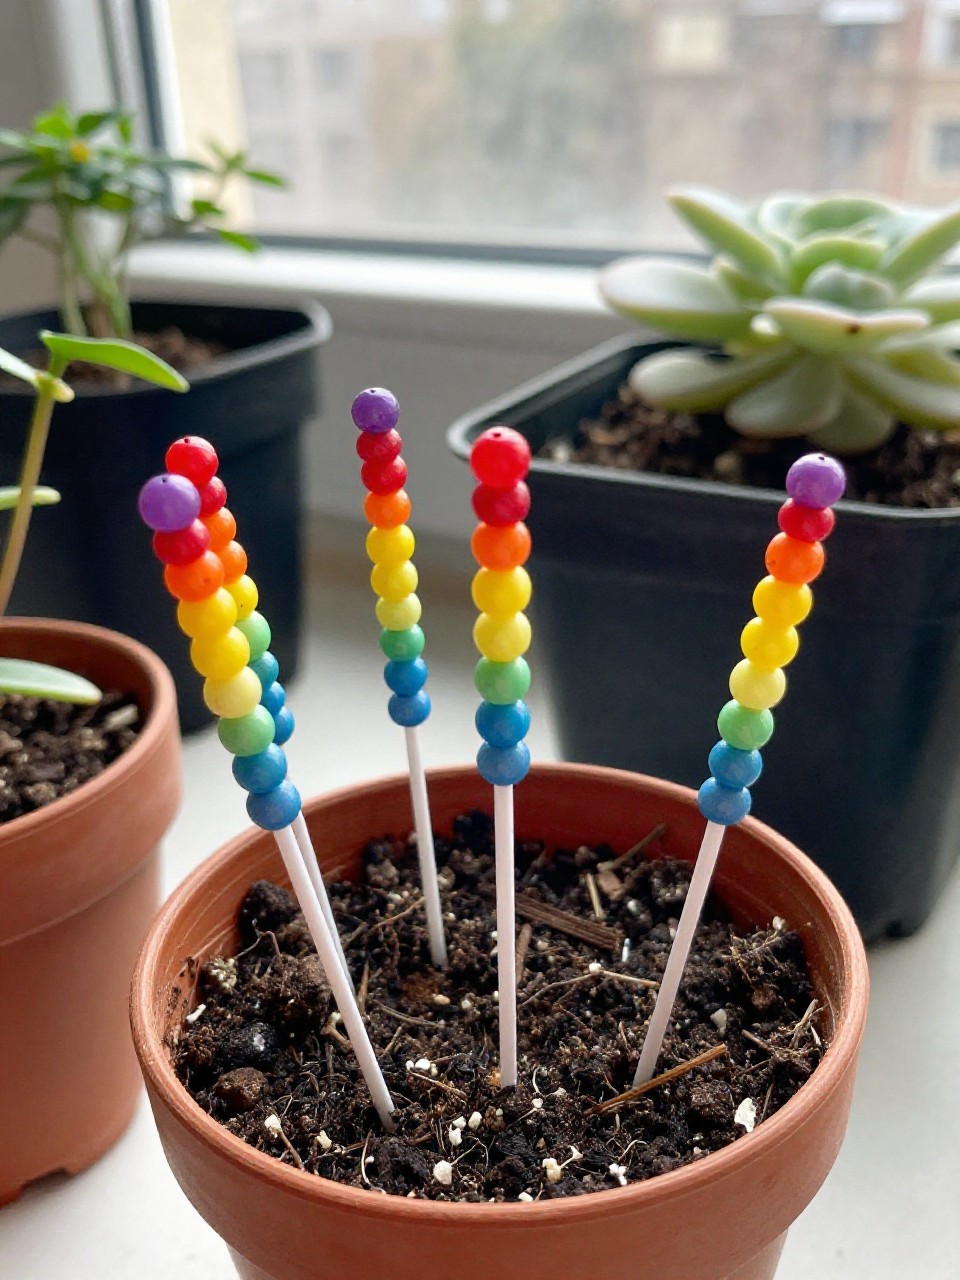
Sparkly beaded sticks turn potted plants into tiny celebrations. Kids practice patterns while making garden jewelry that catches sunlight.
Materials Needed:
- Wooden skewers or craft sticks
- Large pony beads
- Washi tape or paint (optional)
How to make it:
- 1. If using sticks, wrap the top with washi tape or add paint accents; let dry.
- 2. Slide pony beads onto skewers in rainbow patterns.
- 3. Leave the bottom bead-free to push into soil.
- 4. Arrange in pots or a small tray of pebbles.
6. Sparkle Nest Collage
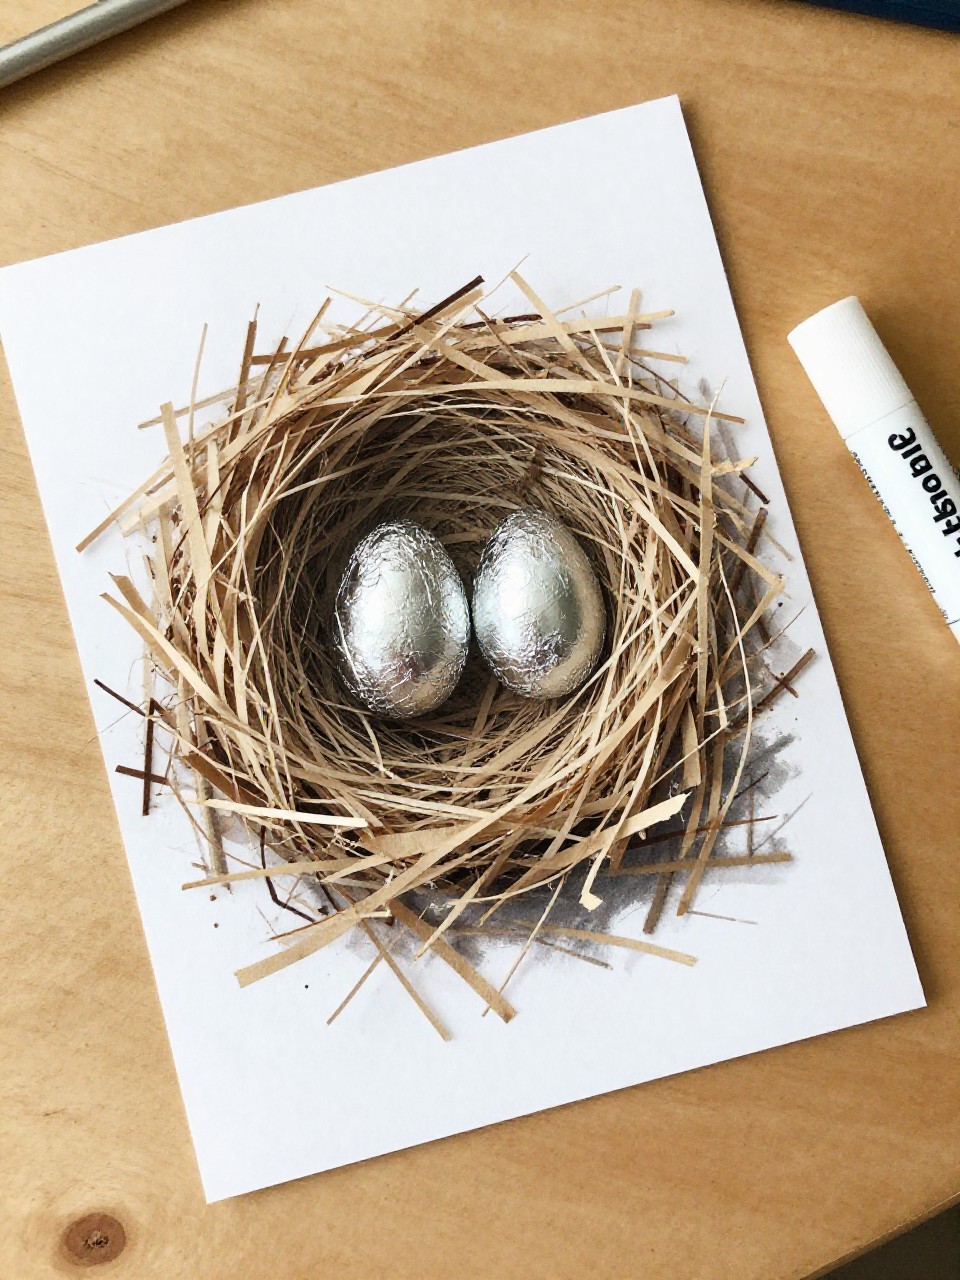
A soft, cozy bird nest with gleaming “eggs” looks like a storybook picture. It’s a textured, touchable craft that’s secretly a fine-motor workout.
Materials Needed:
- Brown paper bag strips or shredded paper
- Glue stick
- Foil-wrapped chocolate eggs or painted pebbles
How to make it:
- 1. Draw a simple circle on cardstock as a nest guide.
- 2. Glue down paper strips in a swirl to build a nest.
- 3. Place 2–3 “eggs” in the center with glue dots.
- 4. Add a few small leaf shapes around the edge.
7. Bubble-Print Rain Boots
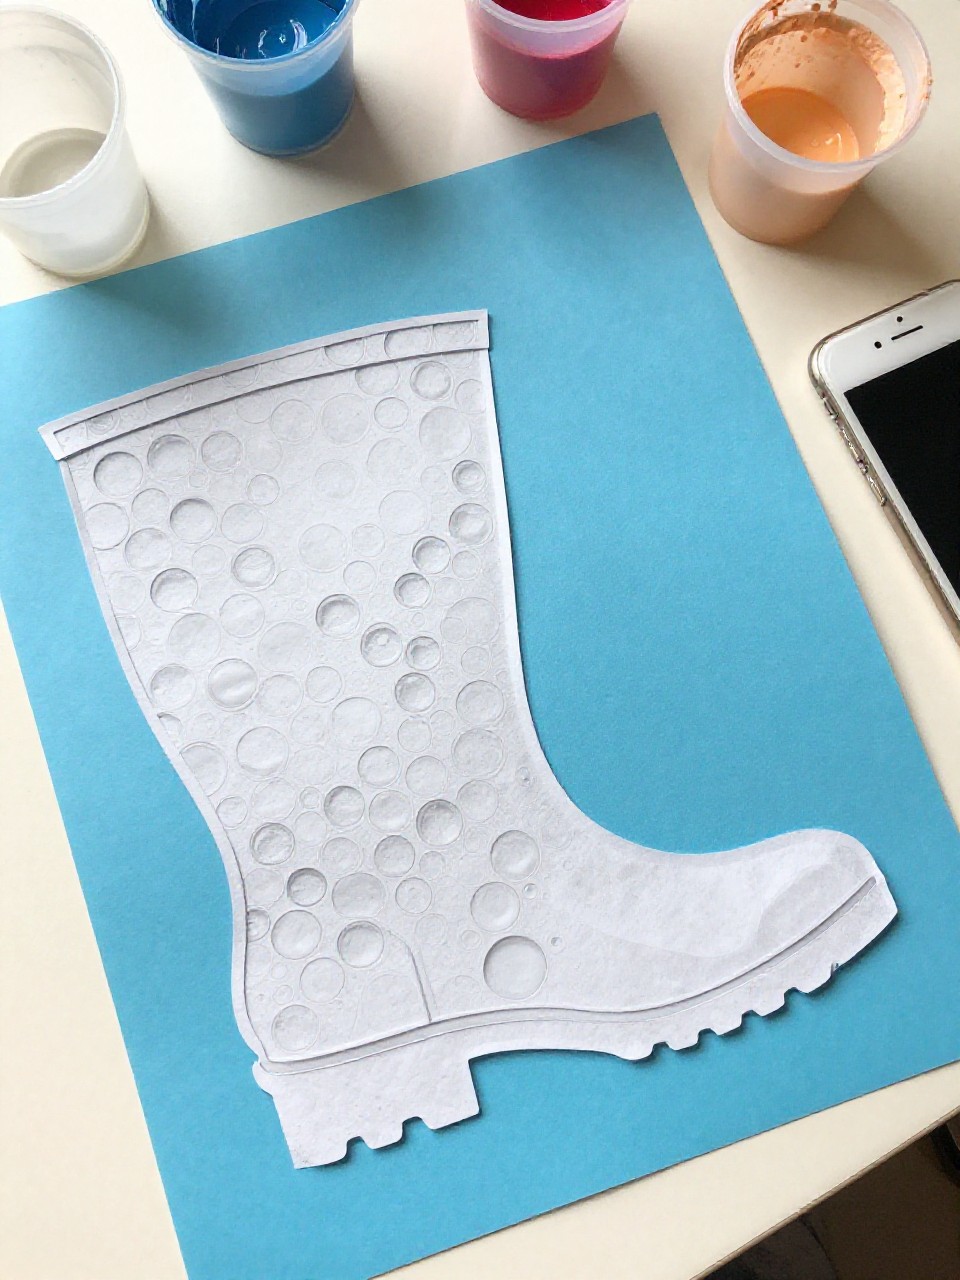
Stamp bright, patterned “boots” that look like pop art. Kids blow colorful bubbles onto paper and cut boot shapes from the bubbly prints.
Materials Needed:
- Dish soap, water, washable paint
- Straws and cups
- White cardstock
How to make it:
- 1. Mix water, a squirt of dish soap, and a little washable paint in cups.
- 2. Blow into the mixture with a straw to mound bubbles over the rim.
- 3. Press cardstock onto the bubbles to capture prints; dry.
- 4. Cut out boot shapes and glue to a background with puddle doodles.
8. Spring Storm Light-in-a-Jar
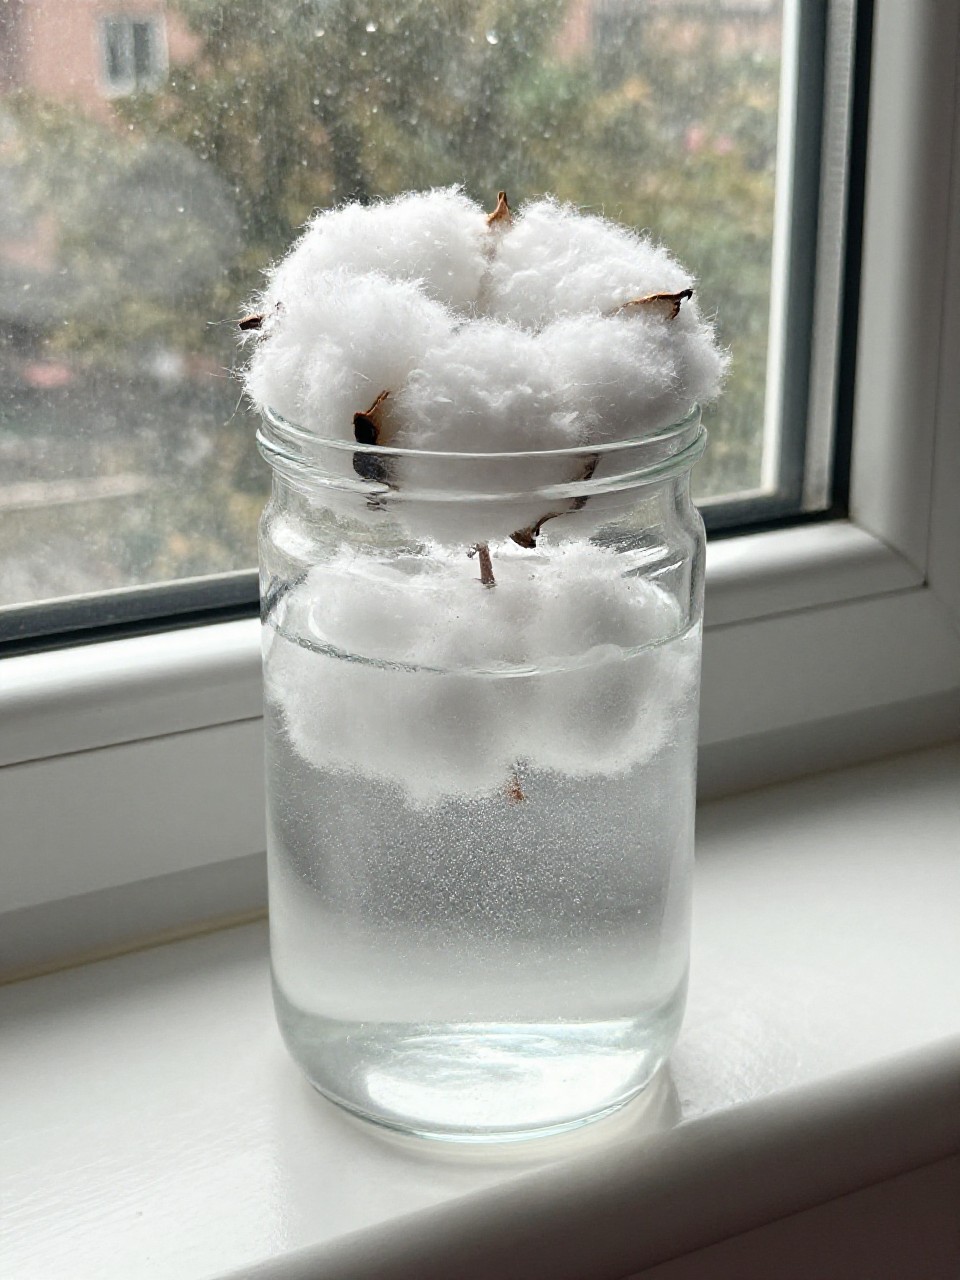
A gentle “storm” swirls when the jar is shaken—glitter like raindrops and cotton like clouds. It’s calm, pretty, and easy for little hands to assemble.
Materials Needed:
- Clear jar with lid
- Water and a pinch of glitter
- Cotton balls
How to make it:
- 1. Fill jar mostly with water; add a small pinch of glitter.
- 2. Stretch cotton balls lightly and press them against the inner sides near the top.
- 3. Close the lid tightly; add washi tape around the rim if desired.
- 4. Shake and watch the sparkles rain around the “clouds.”
9. Veggie-Stamp Wildflower Meadow

Cut veggies turn into instant flower stamps—celery roses and okra stars. The results look like a real meadow painting with zero brush skills needed.
Materials Needed:
- Washable paint
- Celery base, okra, or potato halves
- Paper plates and cardstock
How to make it:
- 1. Pour small puddles of paint onto plates.
- 2. Dip cut veggie ends into paint and stamp blossoms onto cardstock.
- 3. Use a finger or a cotton swab to dot centers and add leaves.
- 4. Let dry, then add a paper sun or drawn sky.
10. Whisper-Wind Pinwheels
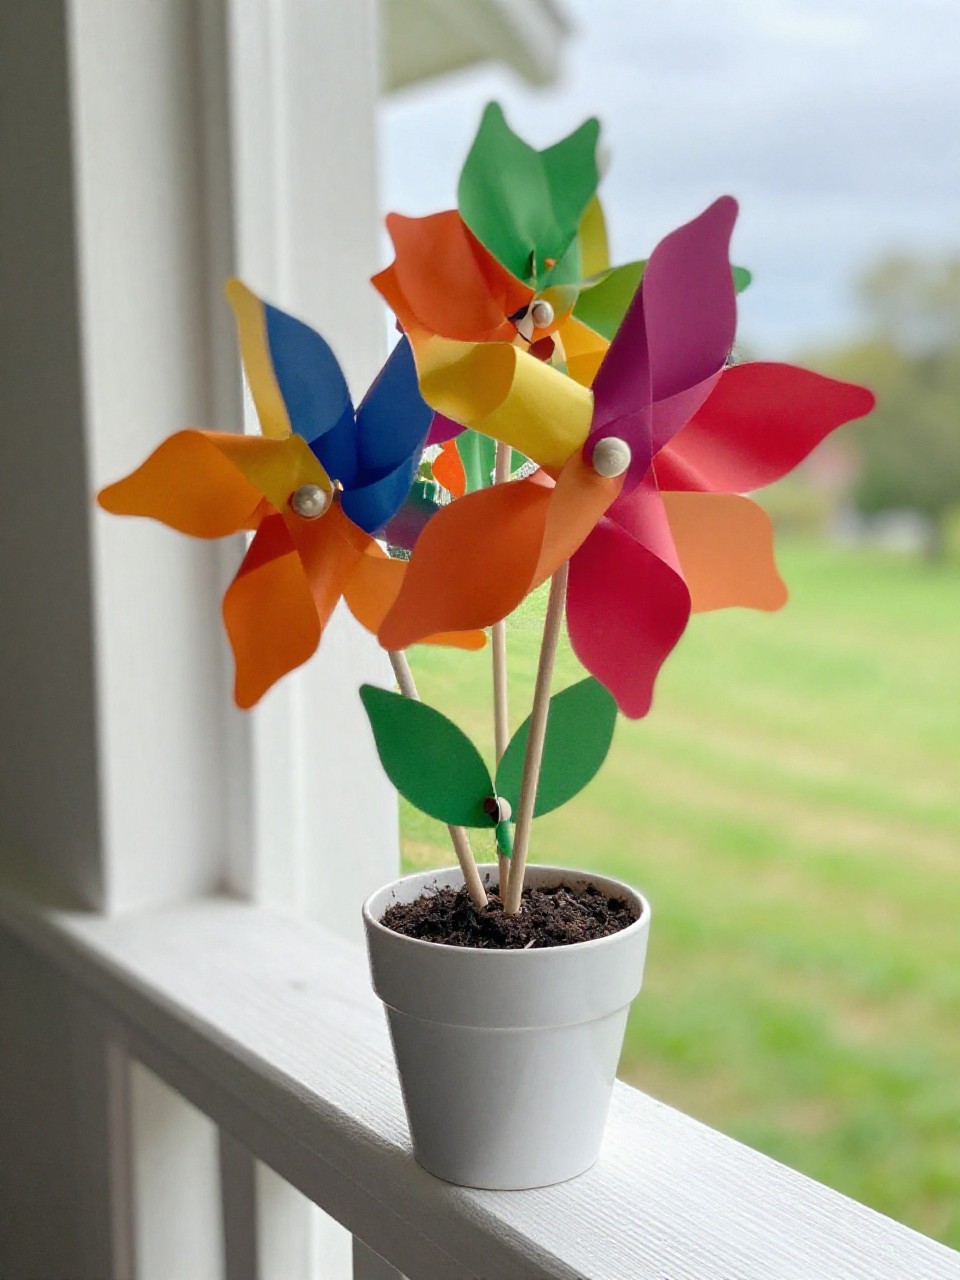
These pinwheels spin with the lightest breeze and look like candy pops in a planter. The folded shape seems advanced, but it’s just snips and a pushpin.
Materials Needed:
- Square paper (double-sided if possible)
- Pushpin or paper fastener
- Straw or pencil with eraser
How to make it:
- 1. Draw diagonal lines corner to corner; snip each line toward the center, stopping short.
- 2. Fold every other corner into the center.
- 3. Push a pin through all folded tips and the center.
- 4. Pin into a pencil eraser or straw cap; blow to spin.
11. Ladybug Story Stones
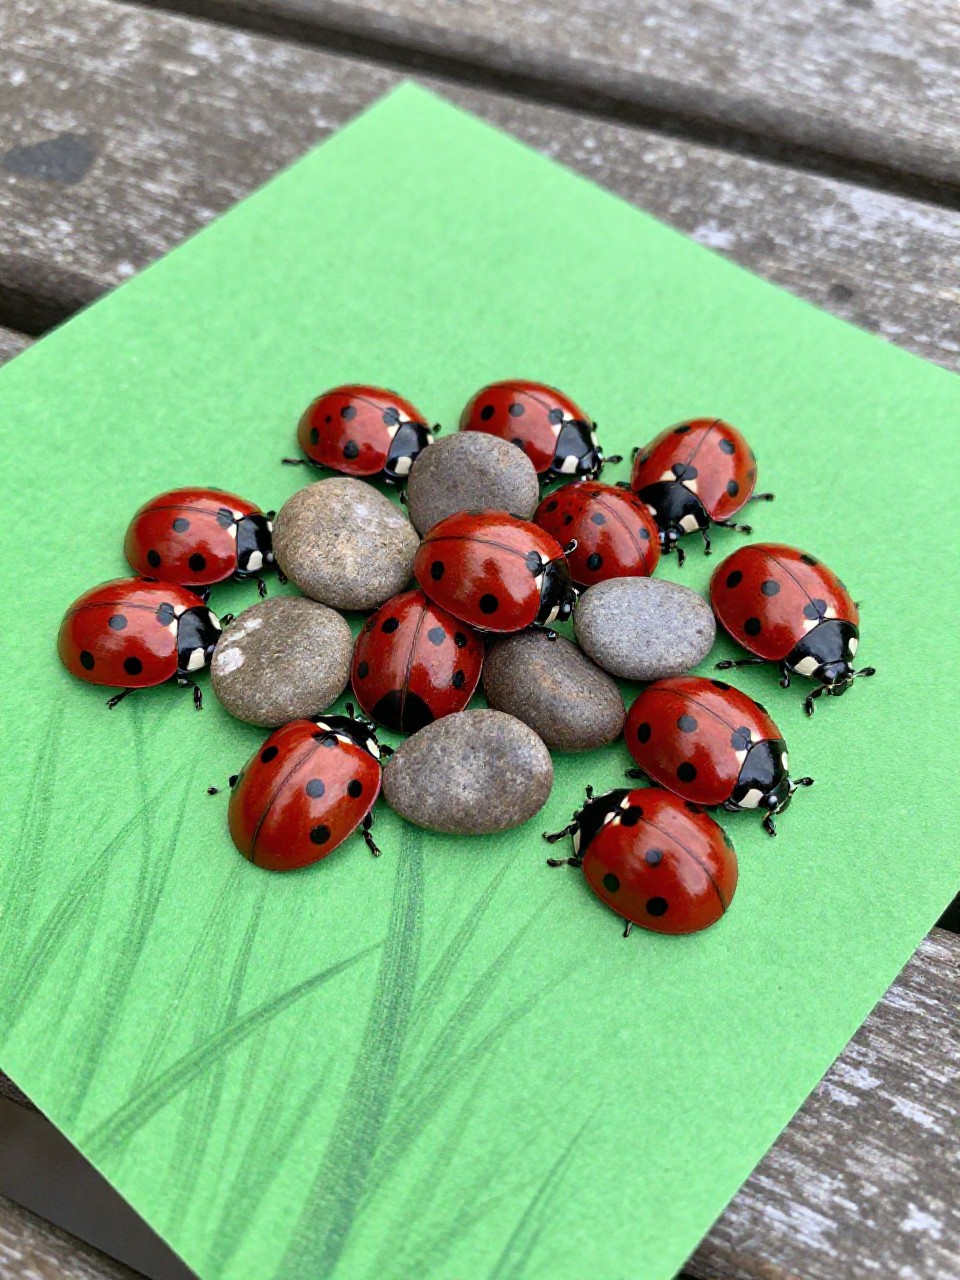
Tiny red beetles with dotted shells become characters for make-believe play. Smooth stones make them feel weighty and real, but painting is quick and forgiving.
Materials Needed:
- Smooth pebbles
- Red and black washable paint or paint pens
- White paint pen (optional)
How to make it:
- 1. Paint stones red and let dry.
- 2. Add a black head, a line down the middle, and dots.
- 3. Use a white pen for tiny eye highlights.
- 4. Dry fully, then store in a small pouch.
12. Window Box Tissue Tulips
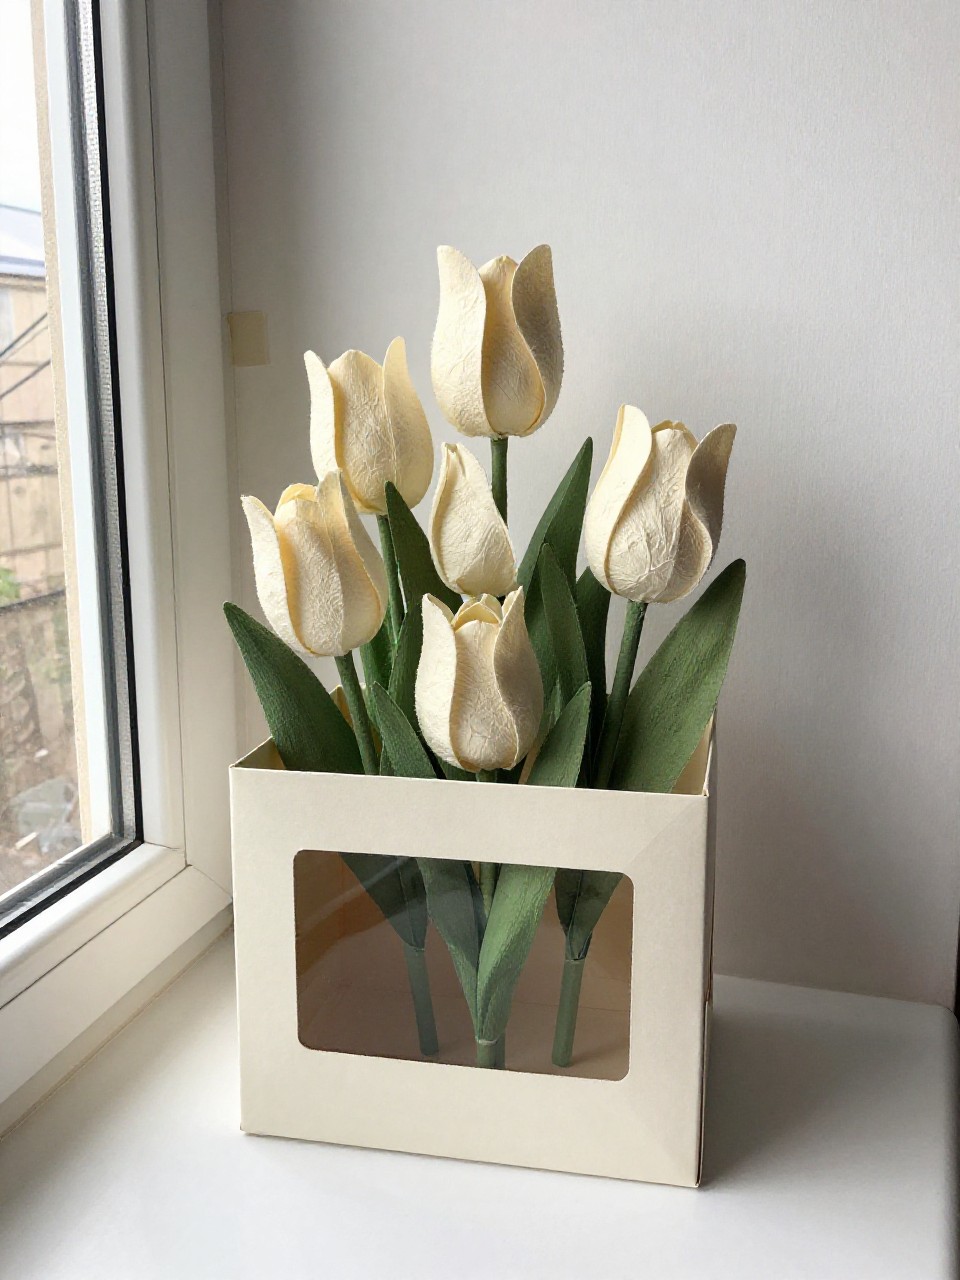
Bold, puffy tulips pop from a simple paper “window box.” Kids crumple tissue petals for instant 3D flowers that look gallery-ready.
Materials Needed:
- Colored tissue paper
- Construction paper
- Glue stick
How to make it:
- 1. Cut a rectangle “window box” and glue it along the bottom of a sheet.
- 2. Twist green stems and leaves from tissue; glue above the box.
- 3. Crumple small tissue squares into petals and glue as tulip tops.
- 4. Add paper window panes or a sun if you like.
13. Feather-Float Kites
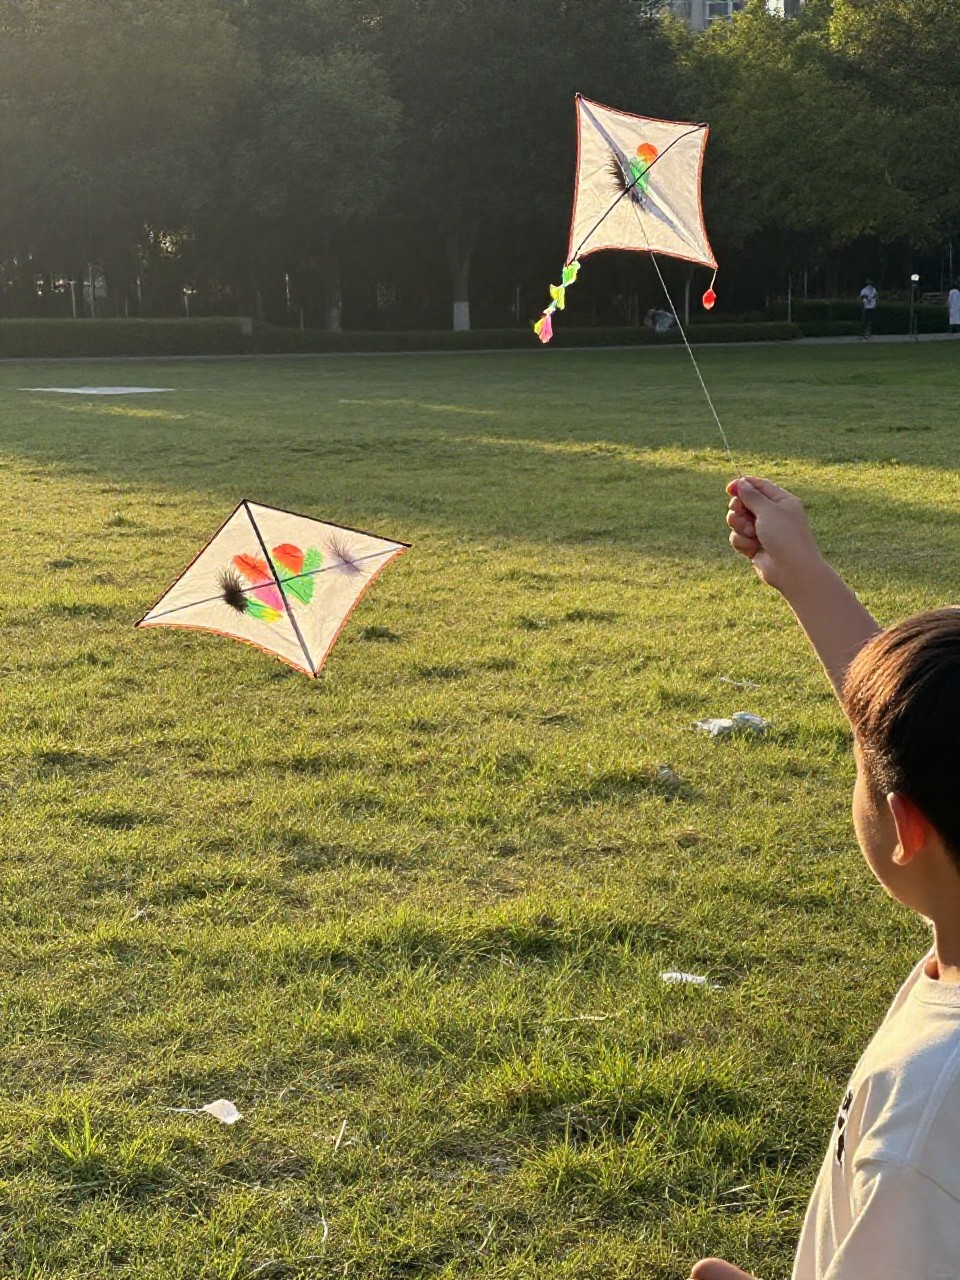
Mini kites that really soar on a short string, decorated with light-as-air feathers. They look delicate but are sturdy enough for a breezy walk.
Materials Needed:
- Lightweight cardstock
- Feathers
- String or yarn
How to make it:
- 1. Cut a small diamond kite shape from cardstock.
- 2. Glue feathers along the edges and a tail of yarn at the bottom.
- 3. Tape one end of a long string to the center front.
- 4. Hold the string and run—watch it lift and flutter.
14. Seed Surprise Paper Hearts
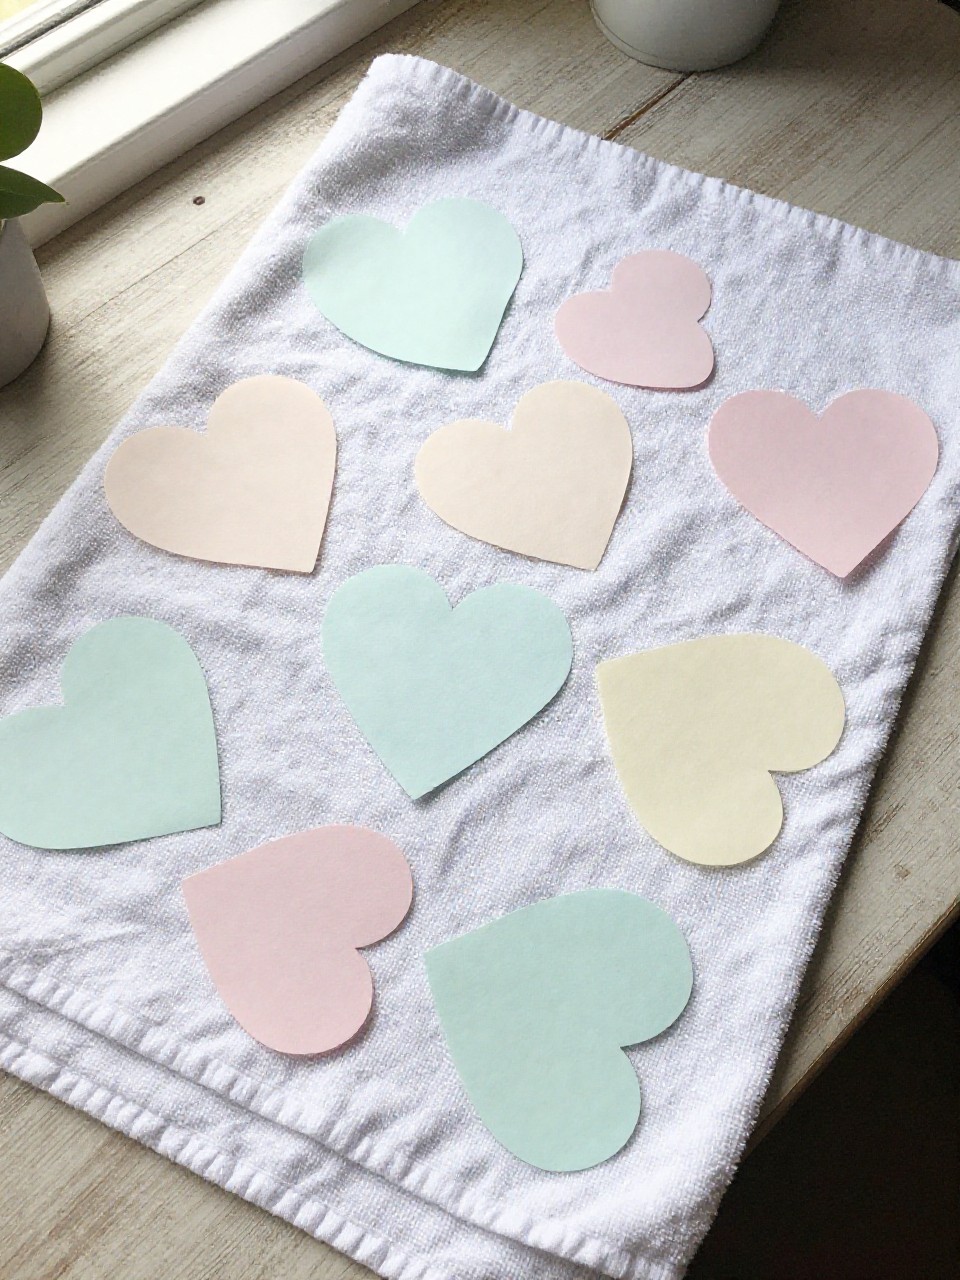
Plantable paper hearts hide tiny wildflower seeds. They look like candy pastels and turn into real blooms later.
Materials Needed:
- Scrap paper (torn) and water
- Wildflower seeds
- Heart-shaped cookie cutter
How to make it:
- 1. Soak torn paper in water, then blend or mash into pulp.
- 2. Stir seeds into the pulp gently.
- 3. Press pulp into a heart cookie cutter on a towel; flatten and blot.
- 4. Dry overnight; gift with a “plant me” note.
15. Pom-Pom Caterpillar Parade
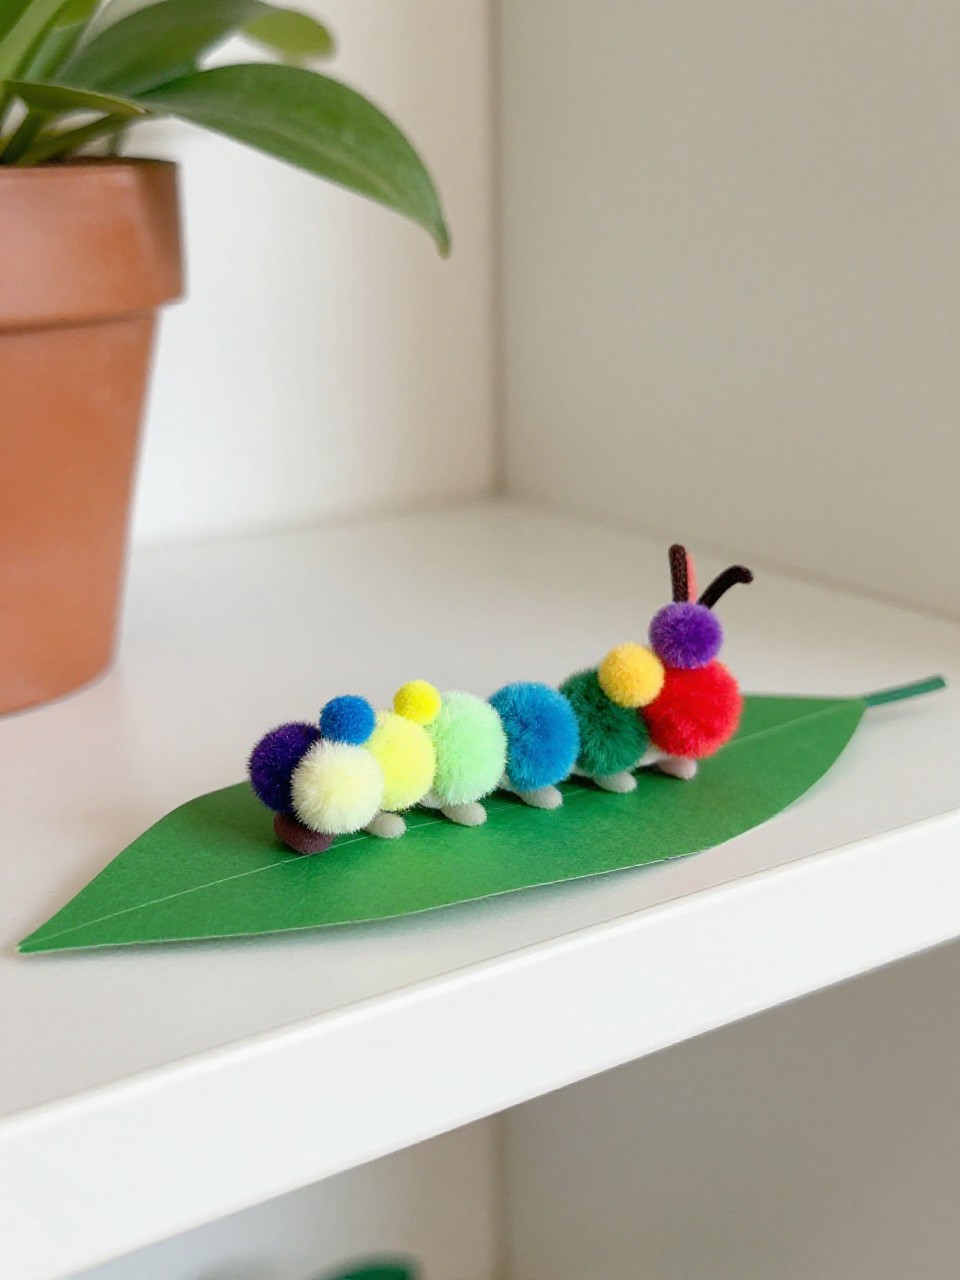
A sweet, wiggly line of pom-poms climbs a leaf like a tiny parade. Big eyes and bright colors make them irresistible and photo-ready.
Materials Needed:
- Pom-poms in various colors
- Googly eyes
- Craft sticks or large paper leaves
How to make it:
- 1. Glue pom-poms in a row onto a craft stick or paper leaf.
- 2. Add two googly eyes to the front pom-pom.
- 3. Draw or glue tiny paper antennae.
- 4. Display on a bookshelf or plant pot edge.