

Table of Contents Show
Painting a skateboard deck is such a fun way to relax, but it can feel hard to choose a design that won’t look messy or boring. If you’re new to painting, you want something that’s simple, but still looks like real art when it’s done.

This list is packed with beginner-friendly skateboard painting ideas that stand out and feel good to make.
Grab a deck and some paint, and let’s get into the ideas.
1. Sunset Gradient Skateboard Deck
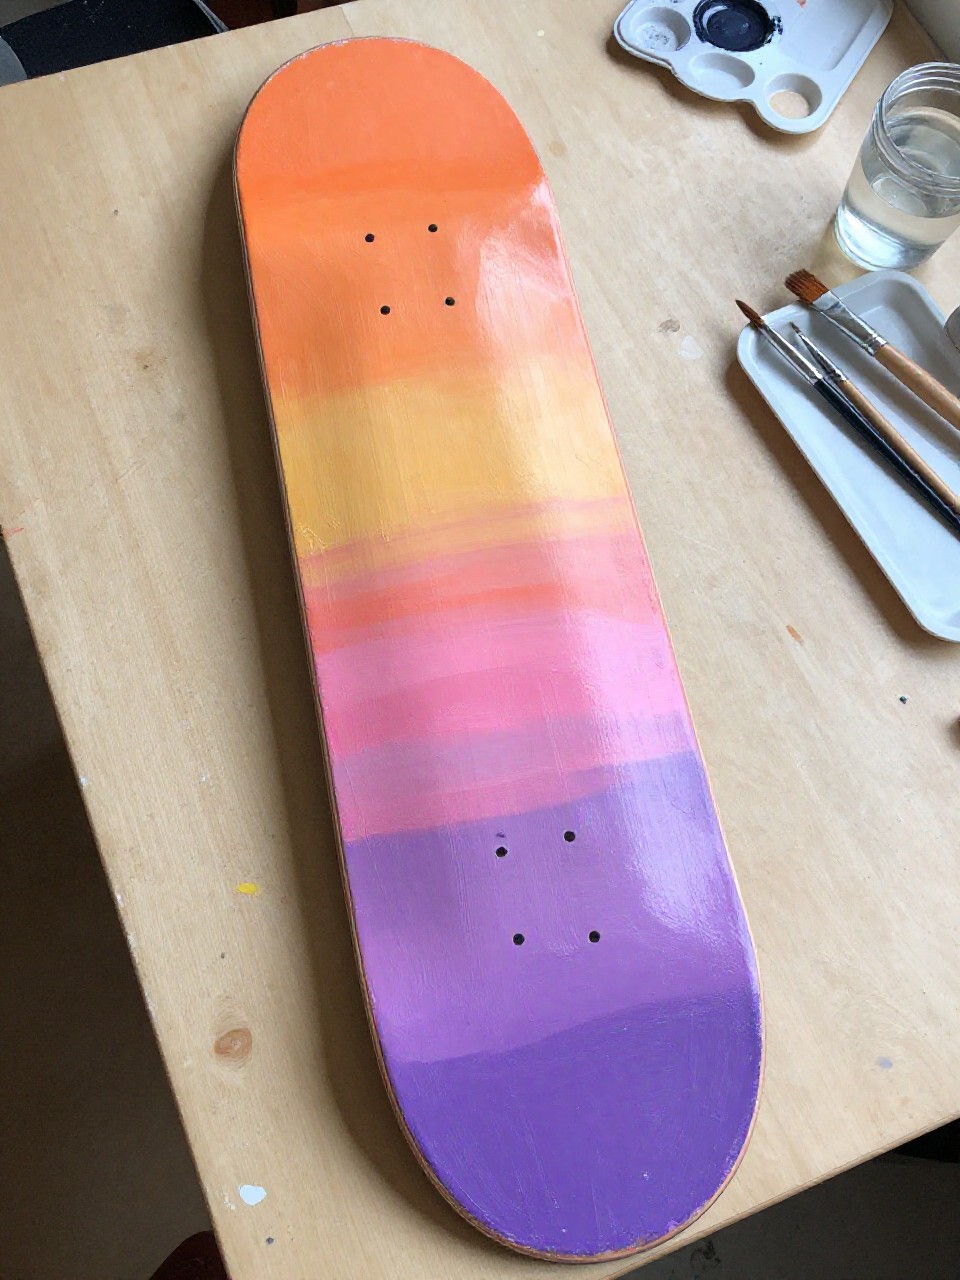
The finished deck fades from warm orange to pink to deep purple, with soft blended stripes that look like a summer sky. This one is calming to paint because you’re mostly blending color, and it looks impressive even if your lines aren’t perfect.
Materials Needed:
- Skateboard deck
- Acrylic paint
- Paintbrushes in multiple sizes
- Palette or paint tray
- Painter’s tape
- Optional sealer or varnish
Steps to Make:
- Wipe the deck clean and tape off the edges if you want crisp borders.
- Paint wide horizontal bands of your sunset colors from one end to the other.
- While the paint is still damp, blend where the colors meet with a clean brush.
- Add a darker band near one end for depth, then soften it with light strokes.
- Let it dry fully, then seal the deck for a durable finish.
2. Bold Checkerboard Skateboard Painting
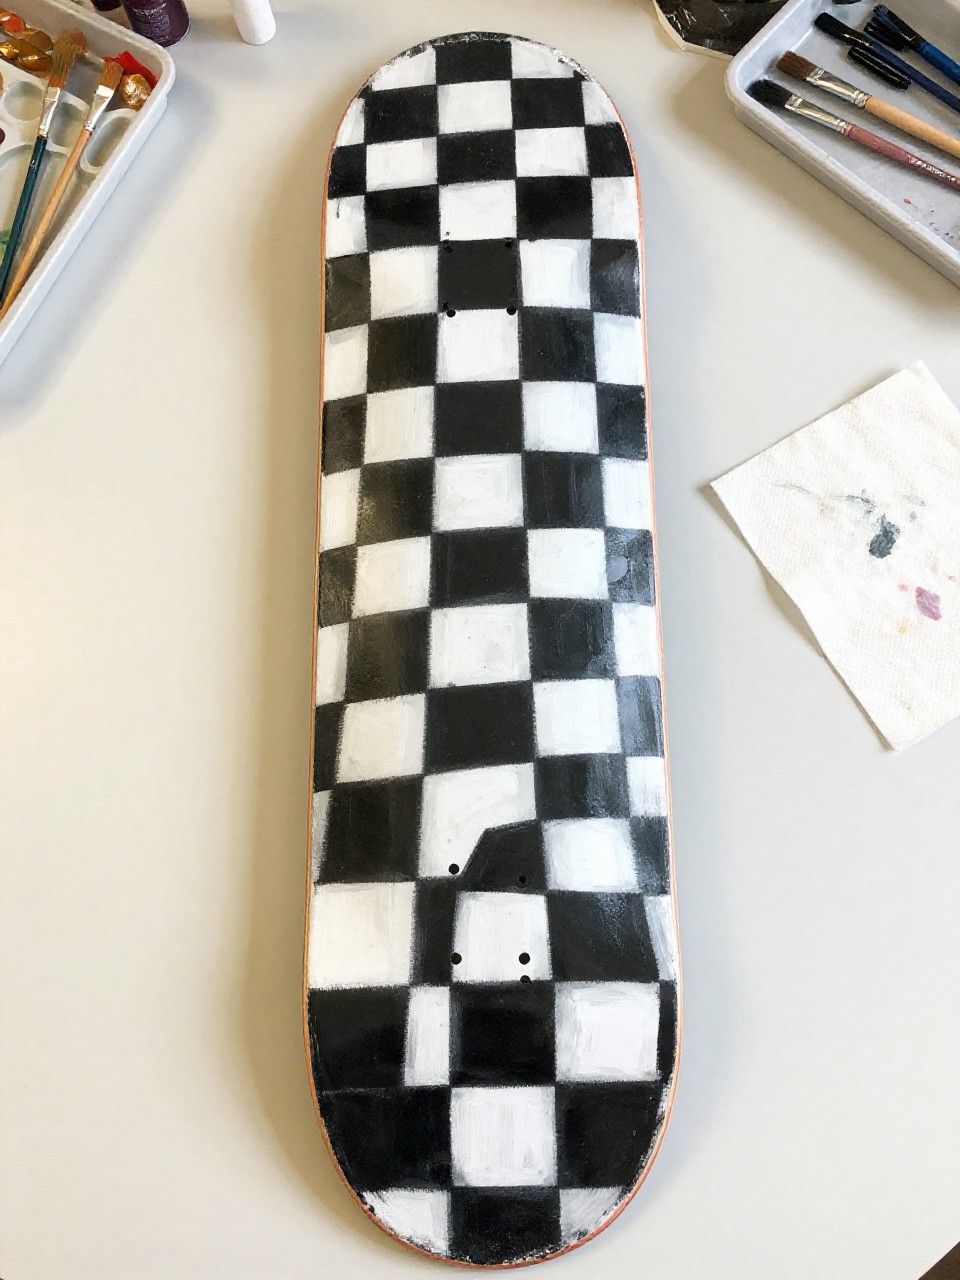
This deck has big black-and-white squares that curve slightly with the deck shape, like a classic skate style. It’s great for beginners because you can use tape to guide you, and small wobbles just make it feel more handmade.
Materials Needed:
- Skateboard deck
- Acrylic paint
- Paintbrushes in multiple sizes
- Palette or paint tray
- Painter’s tape
- Optional sealer or varnish
Steps to Make:
- Lightly sketch a grid of squares across the deck with pencil.
- Use painter’s tape to mask off every other square for cleaner edges.
- Paint the open squares with black (or any bold color), then peel tape after drying.
- Touch up edges with a small brush and add tiny scuffs or shading if you like.
- Seal once everything is fully dry so the pattern lasts.
3. Wildflower Meadow Skateboard Deck Art
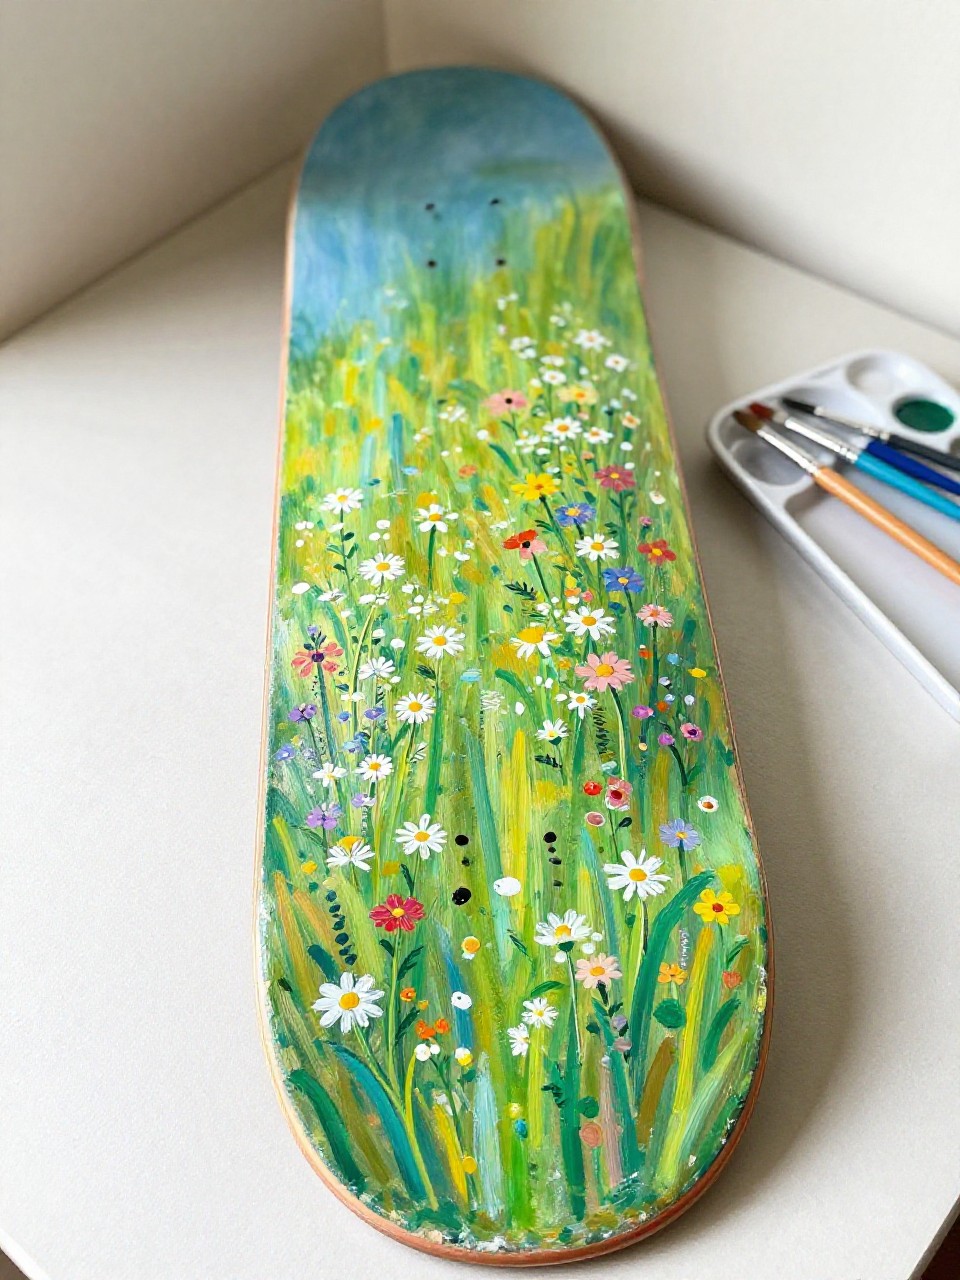
The finished deck is covered with small, loose flowers and green stems, like a tiny meadow painted onto wood. This project is relaxing because you can build it slowly, adding flowers one by one, and it’s perfect if you like soft, nature-inspired decor.
Materials Needed:
- Skateboard deck
- Acrylic paint
- Paintbrushes in multiple sizes
- Palette or paint tray
- Pencil
- Optional sealer or varnish
Steps to Make:
- Paint a light background color, like sky blue or warm cream, and let it dry.
- Sketch a few gentle stem lines flowing from one end of the deck to the other.
- Paint simple flower dots and petal shapes in mixed colors along the stems.
- Add darker green leaves and tiny highlights to make the flowers pop.
- Let it dry, then seal to protect the details.
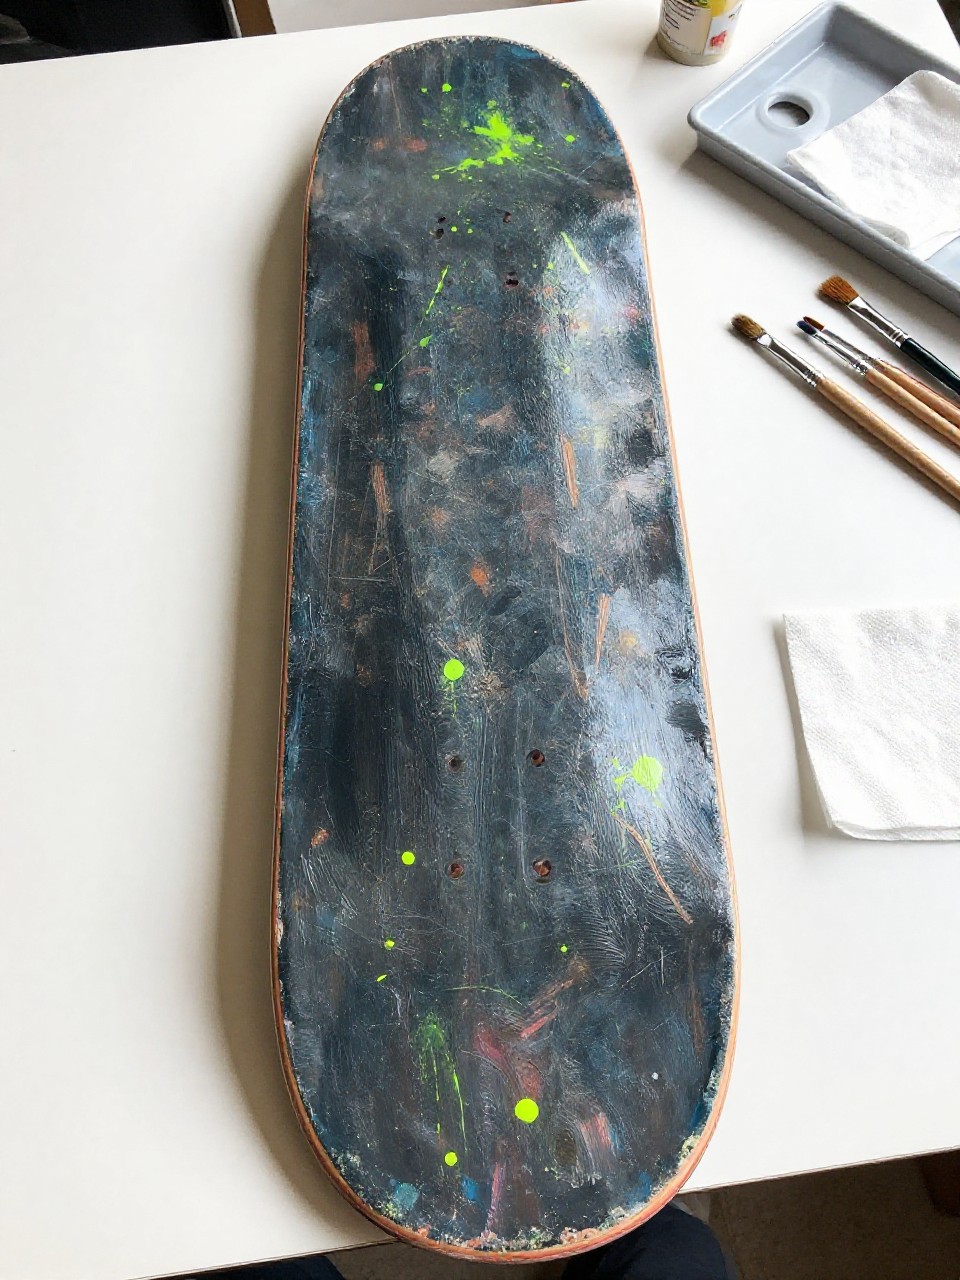
4. Cosmic Galaxy Skateboard Painting
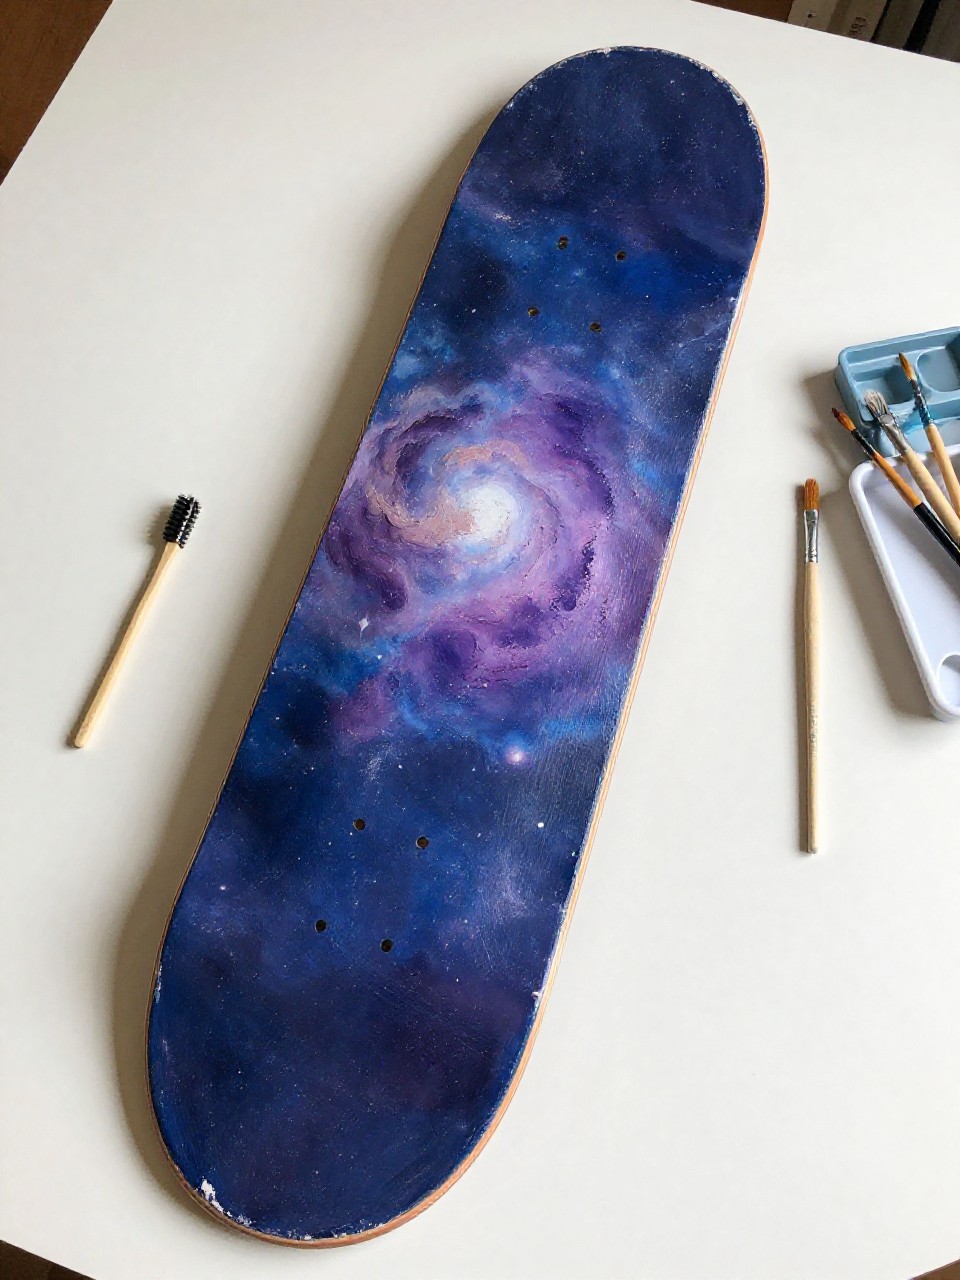
This deck looks like a night sky with deep blues, purples, and white star splatter scattered across the surface. It’s satisfying because you don’t need perfect shapes—blending and splattering are the whole point—and beginners can get a dramatic look fast.
Materials Needed:
- Skateboard deck
- Acrylic paint
- Paintbrushes in multiple sizes
- Palette or paint tray
- Old toothbrush (for star splatter)
- Optional sealer or varnish
Steps to Make:
- Paint the deck a dark base color like navy or black and let it dry.
- Sponge or dry-brush purple and blue clouds in soft patches across the deck.
- Add brighter color near the center to create a “glow” area.
- Dip a toothbrush in thin white paint and flick tiny stars over the surface.
- Dry completely, then seal for a glossy, space-like finish.
5. Koi Fish Pond Skateboard Deck Design
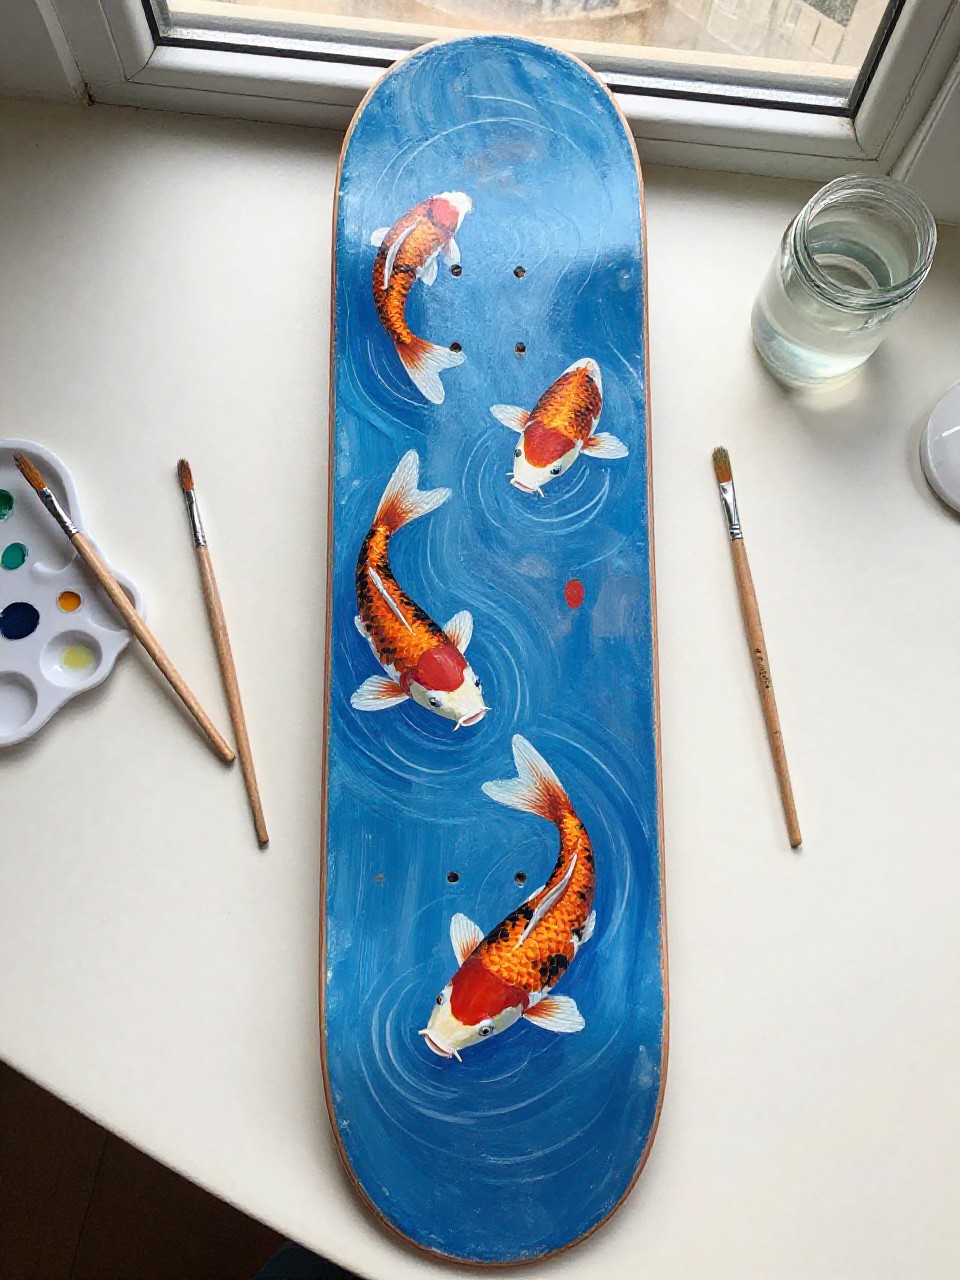
The finished deck shows two or three koi fish swimming through blue water, with curved ripples that follow the deck shape. This is great if you want a peaceful, slower project, and you can keep the fish simple with just a few bold color blocks.
Materials Needed:
- Skateboard deck
- Acrylic paint
- Paintbrushes in multiple sizes
- Palette or paint tray
- Pencil
- Optional sealer or varnish
Steps to Make:
- Paint the deck in a watery blue base with lighter swirls and let it dry.
- Lightly sketch koi fish shapes with simple oval bodies and flowing tails.
- Block in orange, white, and black patches on each fish with mid-size brushes.
- Add curved ripple lines and a few bright highlights on the fish backs.
- Let dry fully and seal to protect the smooth water effect.
6. Minimal Mountains and Moon Skateboard Art
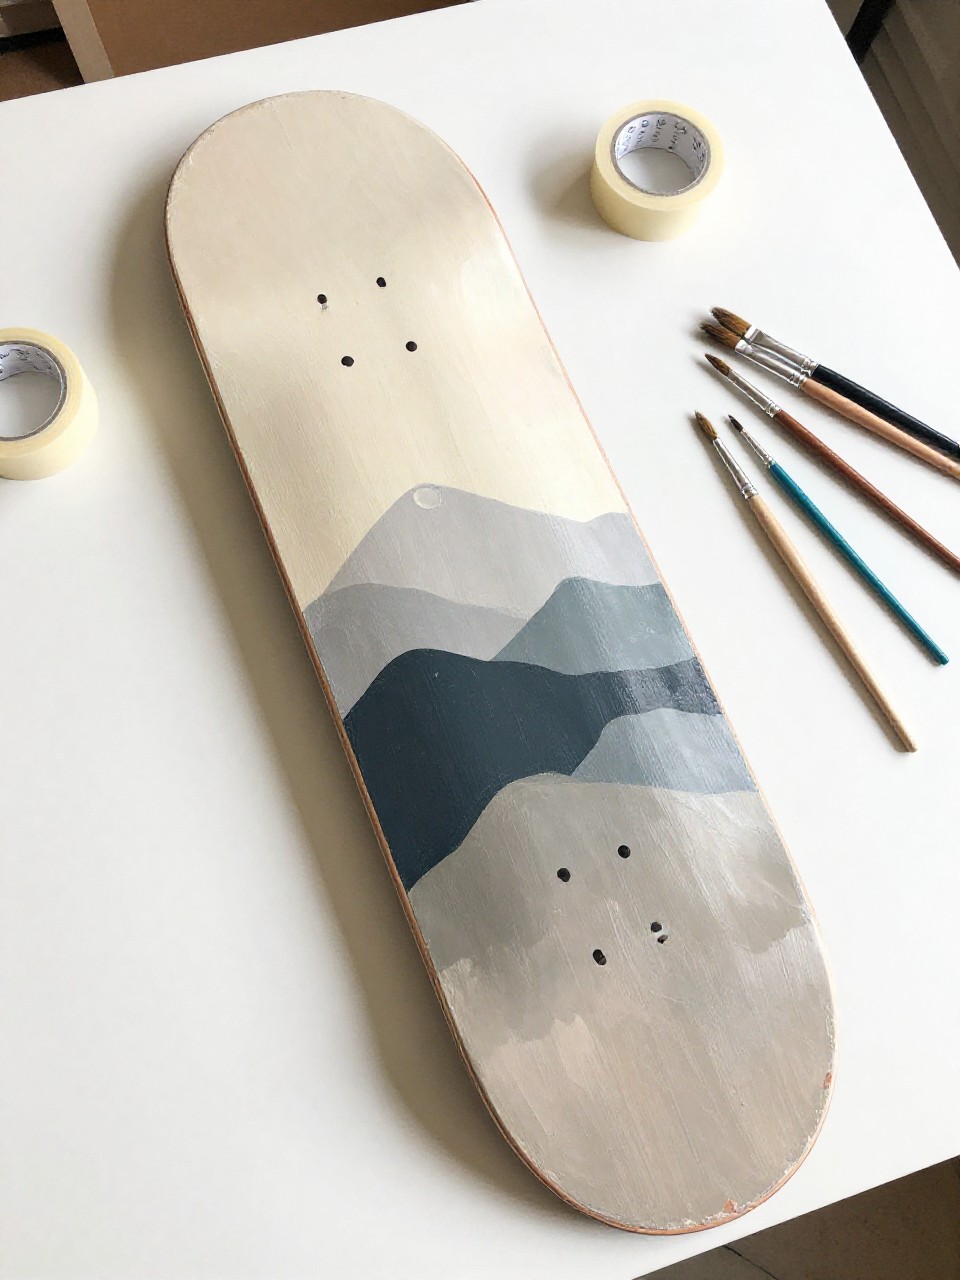
This deck has simple layered mountains in two or three colors with a clean moon above them. It’s perfect for beginners who like tidy designs, and it looks great as wall decor too because the shapes are bold and easy to read from far away.
Materials Needed:
- Skateboard deck
- Acrylic paint
- Paintbrushes in multiple sizes
- Palette or paint tray
- Painter’s tape
- Optional sealer or varnish
Steps to Make:
- Paint a solid sky background and let it dry completely.
- Tape off triangle mountain shapes in layers, starting with the farthest range.
- Paint each mountain layer a different shade, then peel tape carefully.
- Add a moon circle with a small brush and a few tiny stars if you want.
- Dry and seal for a clean, finished look.
7. Dripping Paint Illusion Skateboard Deck
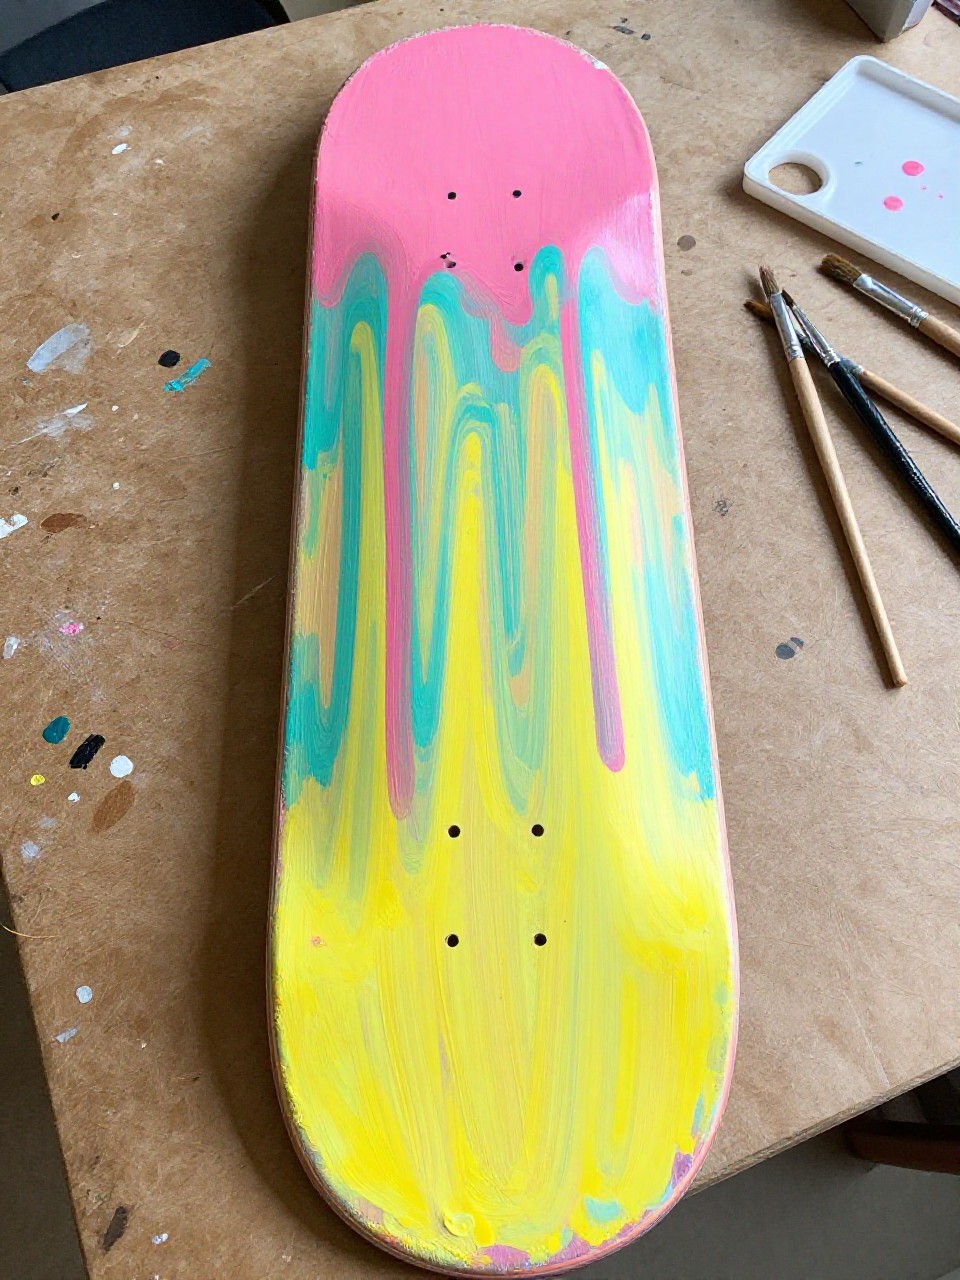
The finished deck looks like thick paint is dripping down from the top in bright, candy-like colors. This is a fun one for beginners because the drips don’t have to match, and the bold shapes cover mistakes easily while still looking playful.
Materials Needed:
- Skateboard deck
- Acrylic paint
- Paintbrushes in multiple sizes
- Palette or paint tray
- Pencil
- Optional sealer or varnish
Steps to Make:
- Paint a base color (white works well) and let it dry.
- Draw a wavy “drip edge” line near one end of the deck.
- Fill the top area with one bold color, then pull paint downward into drips.
- Add a second and third drip color beside it, overlapping slightly for depth.
- Dry fully, then seal to keep the drips bright and protected.
8. Retro Rainbow Stripe Skateboard Painting
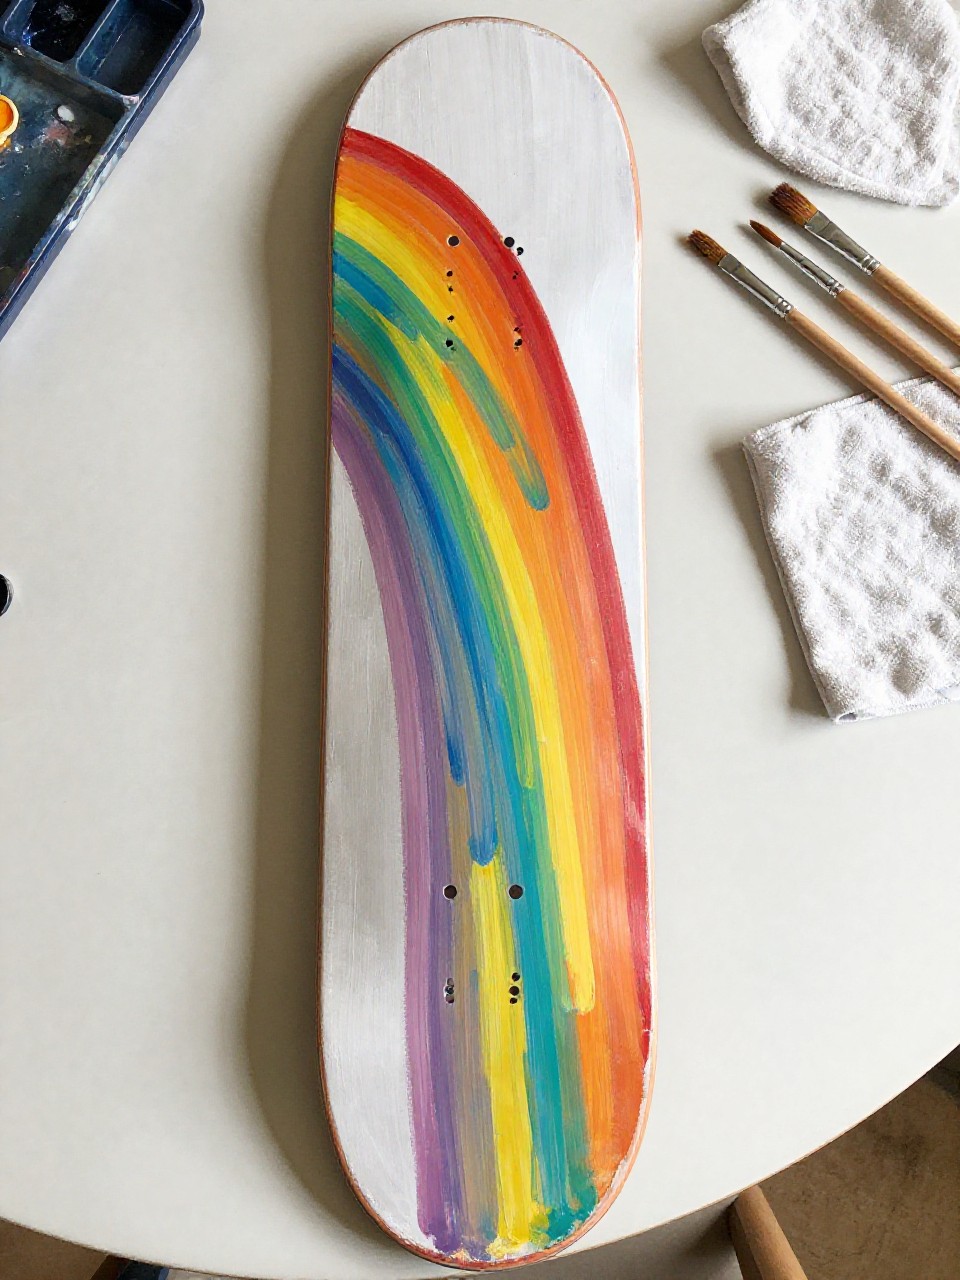
This deck has curved rainbow stripes that sweep across the board like a vintage poster. It’s relaxing because you paint one stripe at a time, and it’s easy to customize with your favorite colors while keeping the design clean and bold.
Materials Needed:
- Skateboard deck
- Acrylic paint
- Paintbrushes in multiple sizes
- Palette or paint tray
- Painter’s tape (optional for crisp lines)
- Optional sealer or varnish
Steps to Make:
- Paint a simple background color and let it dry.
- Lightly sketch curved stripe lines that arc across the deck.
- Paint the widest stripe first, then work outward with thinner stripes.
- Add small touch-ups where colors meet and soften edges if you like a vintage feel.
- Let dry, then seal for a smooth, lasting finish.
9. Cute Sushi Characters Skateboard Deck
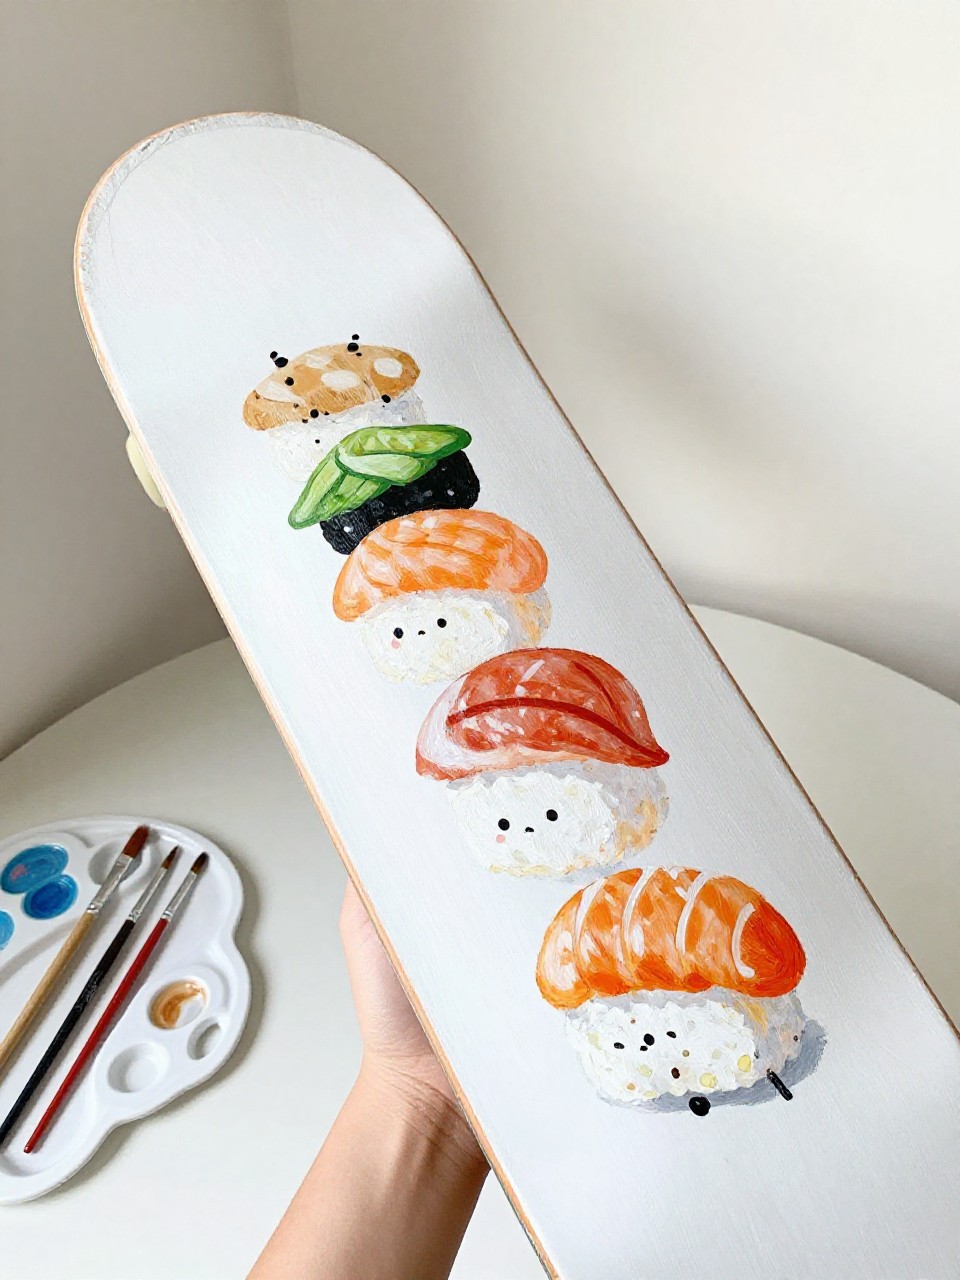
The finished deck shows a few simple sushi pieces with faces—like a smiling nigiri and a happy maki roll—painted in a neat row. It’s great for beginners because each character is made from basic shapes, and it’s a cheerful design that always gets noticed.
Materials Needed:
- Skateboard deck
- Acrylic paint
- Paintbrushes in multiple sizes
- Palette or paint tray
- Pencil
- Optional sealer or varnish
Steps to Make:
- Paint a light background and let it dry so the characters stand out.
- Sketch 3–5 sushi shapes spaced evenly across the deck.
- Fill in the rice, seaweed, and toppings with simple color blocks.
- Add tiny eyes, blush dots, and outlines with a small brush for expression.
- Dry fully and seal so the cute details don’t chip.
10. Blue Porcelain-Inspired Floral Skateboard Art

This deck looks like classic blue-and-white pottery, with swirling flowers and vines painted across the board. It’s soothing to make because you repeat simple leaf and petal strokes, and the limited color palette helps beginners keep it looking clean.
Materials Needed:
- Skateboard deck
- Acrylic paint
- Paintbrushes in multiple sizes
- Palette or paint tray
- Pencil
- Optional sealer or varnish
Steps to Make:
- Paint the deck white or cream and let it dry completely.
- Lightly sketch a few main flower clusters and vine paths.
- Paint the flowers in one or two blues, using lighter and darker shades for depth.
- Add tiny dots, curls, and leaf veins with a thin brush for a porcelain feel.
- Dry and seal to protect the delicate lines.
11. Neon Splatter Skateboard Deck Painting
The finished deck bursts with neon paint splatters over a dark base, with drips and specks that feel energetic and messy in a good way. This is perfect if you want a low-pressure project, because the random splatter hides imperfections and looks bold fast.
Materials Needed:
- Skateboard deck
- Acrylic paint (including neon colors)
- Paintbrushes in multiple sizes
- Palette or paint tray
- Old toothbrush or stiff brush
- Optional sealer or varnish
Steps to Make:
- Paint the deck black or deep navy and let it dry fully.
- Thin neon paint slightly so it splatters easily without clumping.
- Flick splatters across the deck using a toothbrush or stiff brush.
- Add a few intentional drips or streaks with a brush for extra movement.
- Dry completely, then seal to lock in the bright colors.
12. Ocean Wave Curl Skateboard Painting
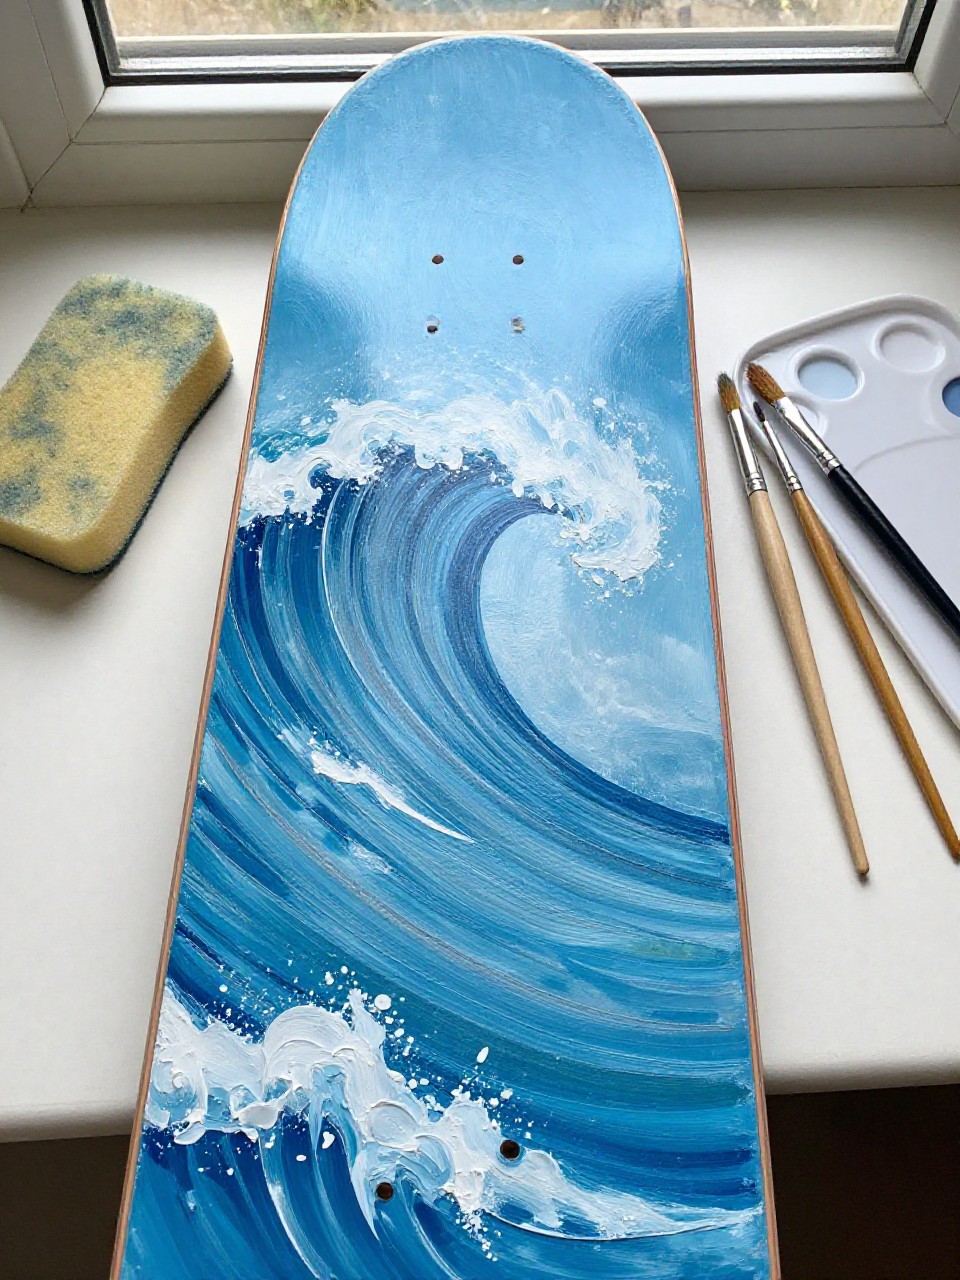
This deck shows a curling ocean wave with foamy white edges and deep blue shadows that follow the deck’s long shape. It’s satisfying because you build it in layers, and beginners can keep the wave simple while still getting that classic ocean look.
Materials Needed:
- Skateboard deck
- Acrylic paint
- Paintbrushes in multiple sizes
- Palette or paint tray
- Sponge (optional for foam texture)
- Optional sealer or varnish
Steps to Make:
- Paint a light sky-to-water background blend and let it dry.
- Sketch a big curling wave shape across the center of the deck.
- Paint the wave in blues and teals, leaving space for foam at the edge.
- Dab white foam with a sponge and add thin streaks for splash details.
- Let dry fully and seal for a glossy, water-like finish.
13. Comic Pop Art Skateboard Deck

The finished deck looks like a comic panel with bold outlines, bright blocks of color, and a simple speech bubble like “WOW!” or “SKATE!”. This is great for beginners because clean shapes and thick lines are forgiving, and the final result looks loud and fun.
Materials Needed:
- Skateboard deck
- Acrylic paint
- Paintbrushes in multiple sizes
- Palette or paint tray
- Black paint marker or thin brush for outlines
- Optional sealer or varnish
Steps to Make:
- Paint a bright base color and let it dry fully.
- Sketch a speech bubble and a few big shapes like dots, bursts, or panels.
- Fill in each section with solid comic-style colors.
- Outline everything in black and add small highlight dots for extra pop.
- Dry completely, then seal to protect the bold outlines.
14. Pastel Clouds and Sparkle Stars Skateboard Art
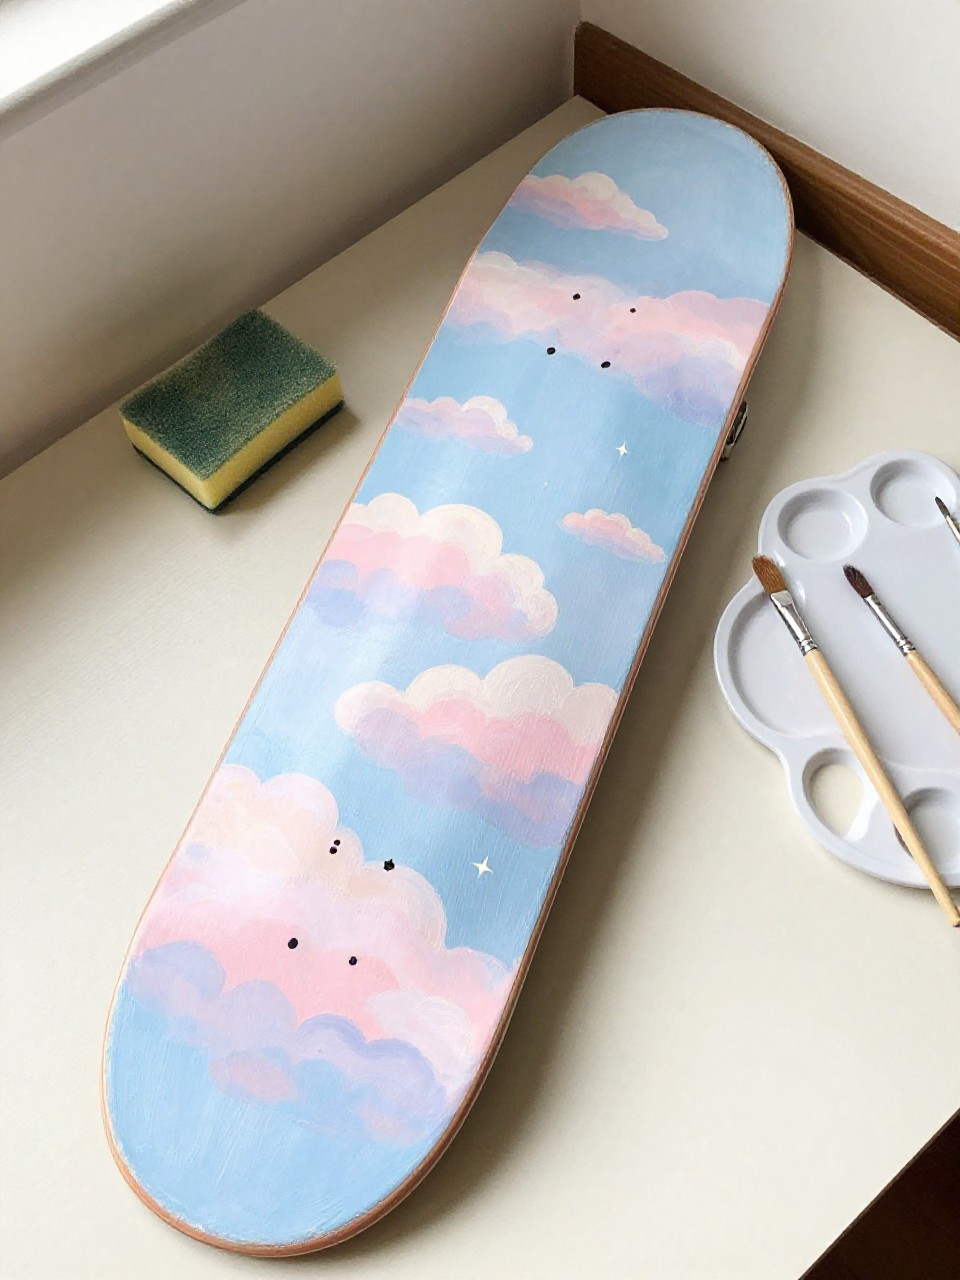
This deck has soft pastel clouds floating across it with tiny painted stars sprinkled in between. It’s a gentle, relaxing project that’s great for beginners because the clouds can be loose and fluffy, and the small stars are quick, satisfying details.
Materials Needed:
- Skateboard deck
- Acrylic paint
- Paintbrushes in multiple sizes
- Palette or paint tray
- Sponge (optional for soft clouds)
- Optional sealer or varnish
Steps to Make:
- Paint a pale sky background and let it dry.
- Use a sponge or dry brush to dab cloud shapes in white and pastel tones.
- Blend the cloud edges lightly so they look soft, not sharply cut.
- Add tiny stars and sparkles with a small brush and slightly thicker paint.
- Dry fully and seal so the pastel colors stay fresh.
15. Japanese Wave Pattern Skateboard Deck
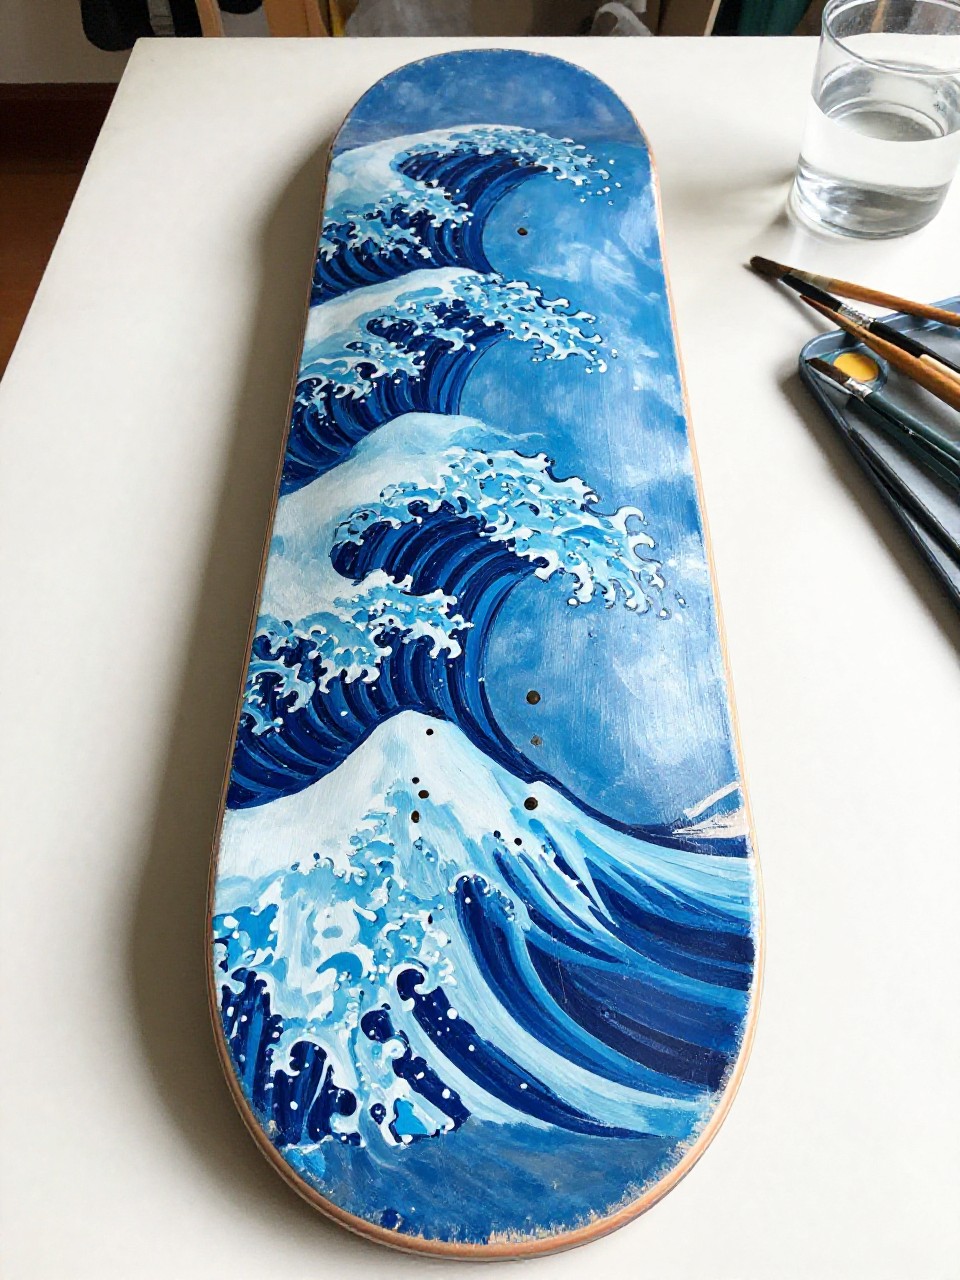
The finished deck is covered in repeating wave shapes with dark outlines and lighter blue fills, wrapping naturally along the long board. This is a nice pattern for beginners because you repeat the same simple curve again and again, and it looks clean even with small variations.
Materials Needed:
- Skateboard deck
- Acrylic paint
- Paintbrushes in multiple sizes
- Palette or paint tray
- Pencil
- Optional sealer or varnish
Steps to Make:
- Paint a light base color and let it dry completely.
- Sketch repeating wave arcs across the deck, keeping spacing fairly even.
- Paint the wave sections in two shades of blue to create depth.
- Add dark outlines and small foam curls with a thin brush.
- Dry fully, then seal to protect the repeating pattern.
16. Monochrome Line Art Face Skateboard Painting
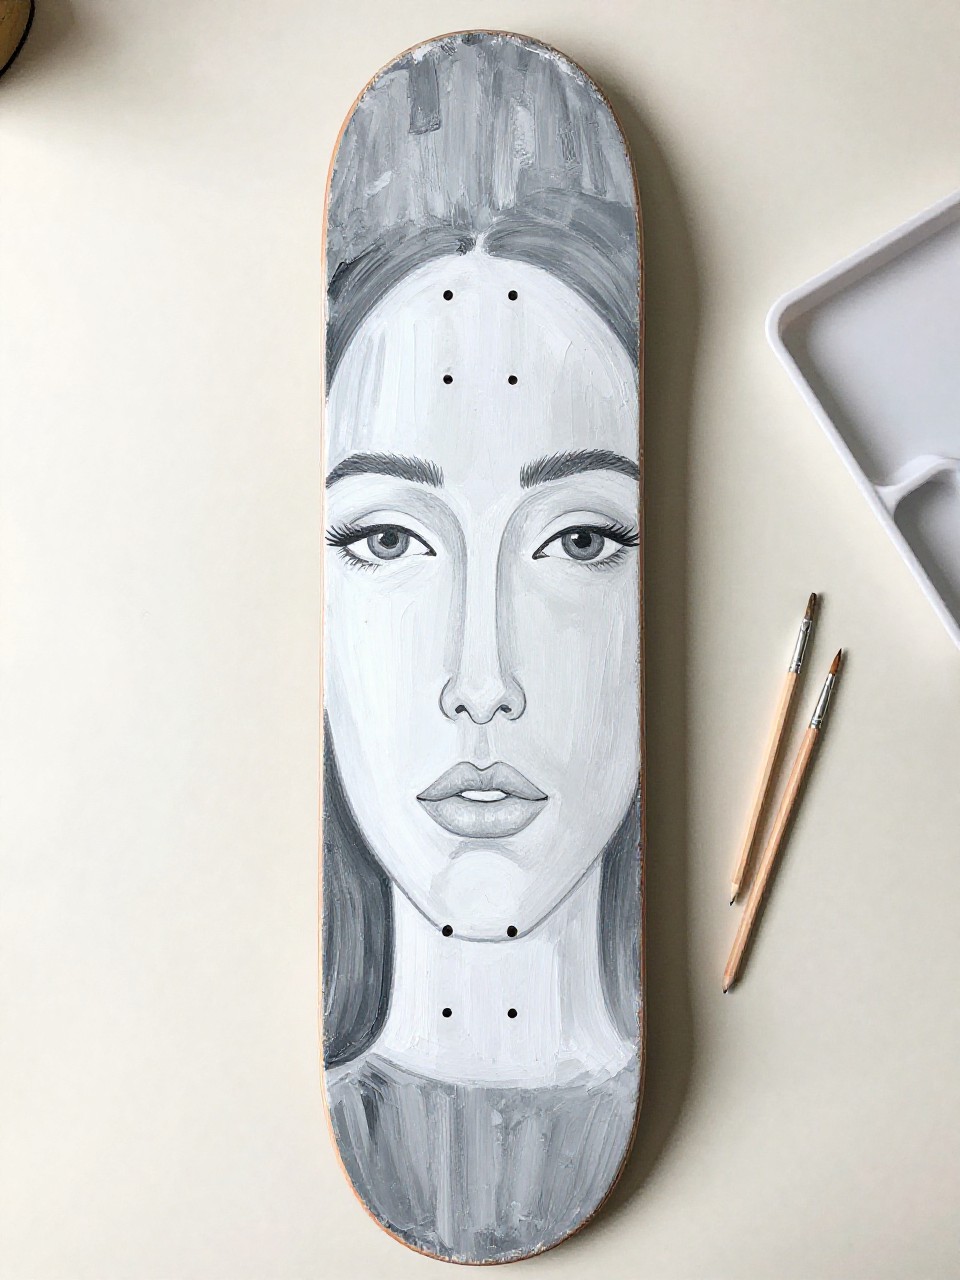
This deck features a simple one-line face drawing in black over a white or neutral background, with a few painted shadows for depth. It’s great for beginners who want something modern, because you can keep it minimal and still end up with a deck that looks like gallery art.
Materials Needed:
- Skateboard deck
- Acrylic paint
- Paintbrushes in multiple sizes
- Palette or paint tray
- Pencil
- Optional sealer or varnish
Steps to Make:
- Paint the deck a solid light color and let it dry fully.
- Lightly sketch a single-line face design so it fits the deck length.
- Paint the line art with a small brush, keeping strokes confident and smooth.
- Add one or two soft shadow shapes in gray or beige for a calm, modern look.
- Dry completely, then seal to keep the lines crisp.
17. Patchwork Sticker-Style Icons Skateboard Deck

The finished deck looks like a patchwork of hand-painted “stickers” such as a heart, lightning bolt, smiley, mushroom, and tiny skateboard, each with a bold outline. This is perfect for beginners because you can paint one icon at a time, and the deck still looks great even if each one is a little different.
Materials Needed:
- Skateboard deck
- Acrylic paint
- Paintbrushes in multiple sizes
- Palette or paint tray
- Pencil
- Optional sealer or varnish
Steps to Make:
- Paint a simple background color and let it dry fully.
- Sketch several icon shapes across the deck, leaving small gaps like a sticker collage.
- Paint each icon with solid colors, letting some edges overlap for a patchwork feel.
- Add thick outlines and tiny highlights to make the icons look “stuck on.”
- Dry completely, then seal the whole deck for a finished, durable surface.