
Table of Contents Show
Keeping kids busy can be tough, especially when you want something simple, screen-free, and still fun. If you’re looking for easy projects for home or the classroom, these letter C crafts are perfect for learning and play.

Each idea turns the shape or sound of “C” into a cute, hands-on activity that builds fine motor skills and creativity.
Let’s jump into fifteen cheerful, beginner-friendly crafts that celebrate the letter C from start to finish.
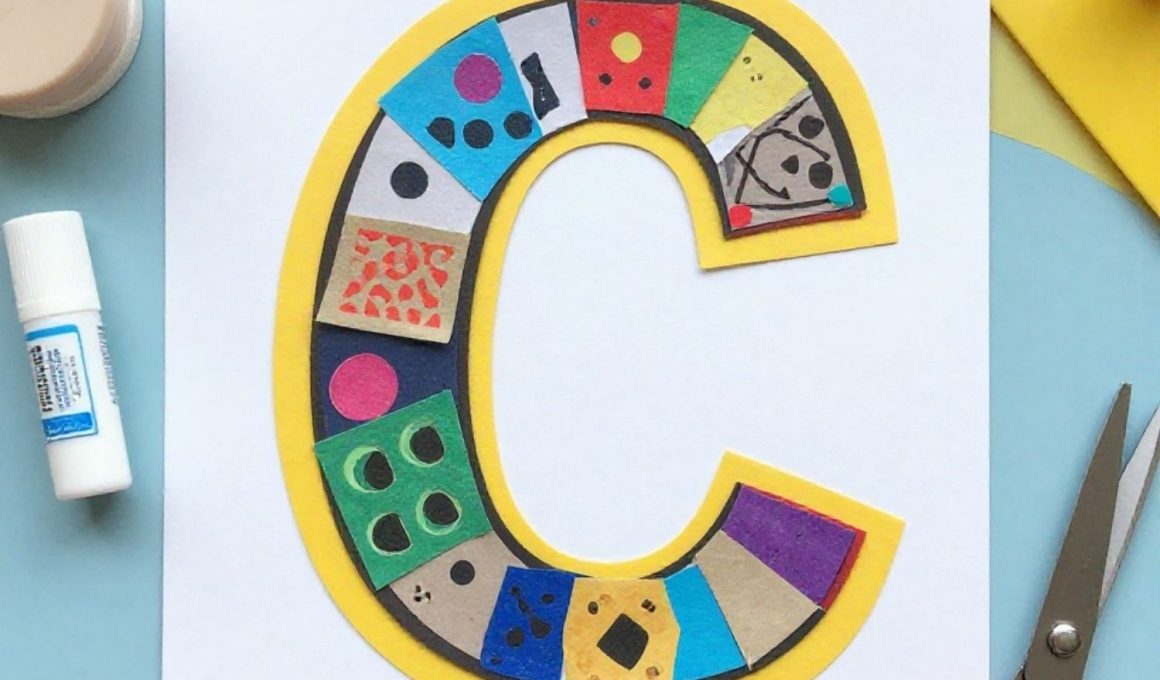
1. Construction Paper Letter C Collage
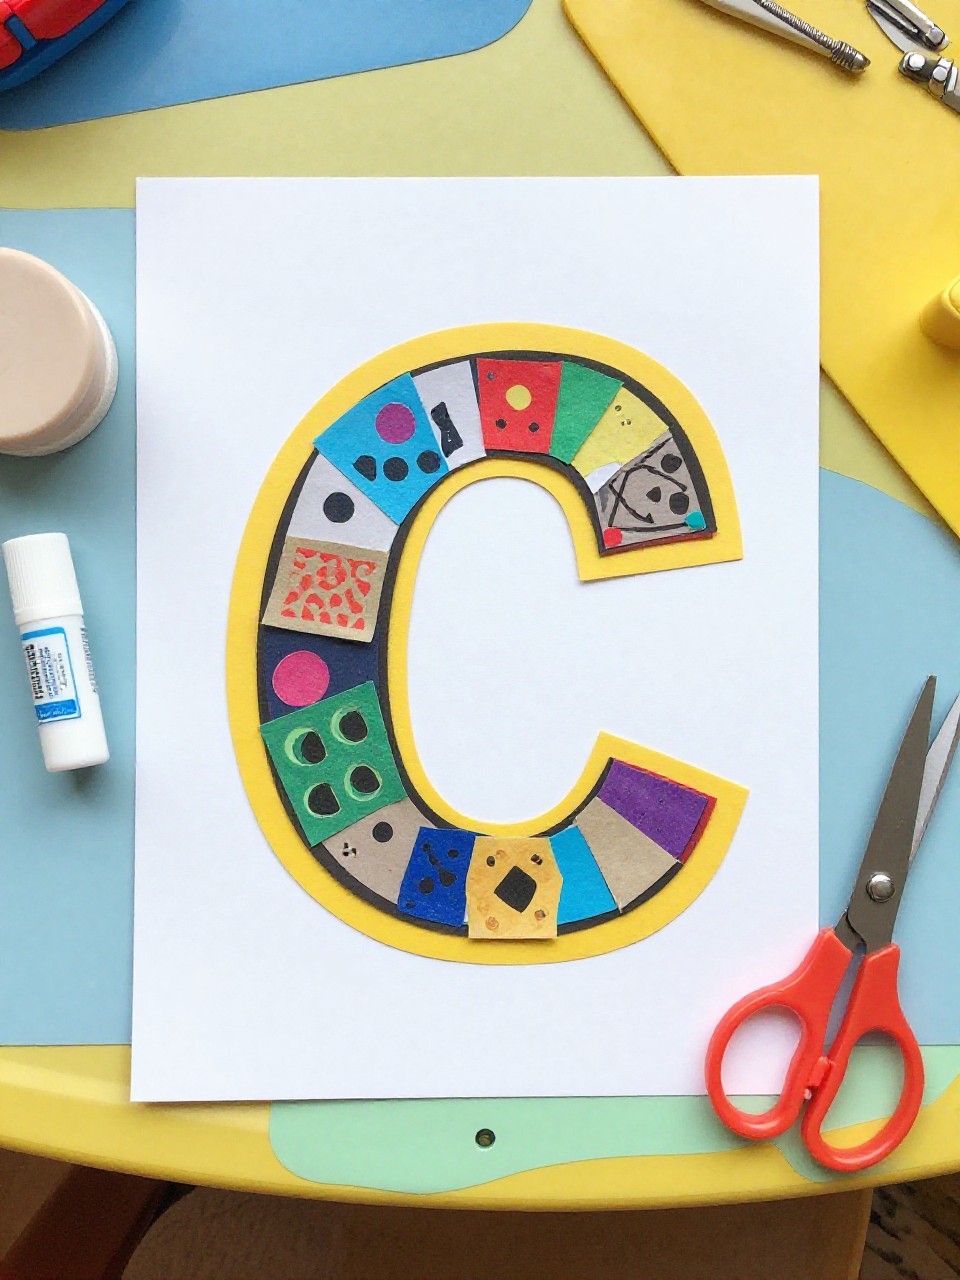
This craft makes a bold, cut-out capital C covered in mini paper shapes and textures. Kids love choosing colors and sticking pieces down, and it’s an easy way to practice scissor skills and letter recognition.
Materials Needed:
- Bright construction paper sheets
- Pencil and scissors
- Glue stick
- Googly eyes (optional)
- Stickers or foam shapes (optional)
How to make it:
- 1. Draw a large block letter C on sturdy paper and cut it out.
- 2. Cut small squares, circles, and strips from colorful paper.
- 3. Glue shapes all over the C, leaving the outline visible.
- 4. Let dry and hang on a wall or fridge to show off the letter.
2. Cotton Ball Cloud C
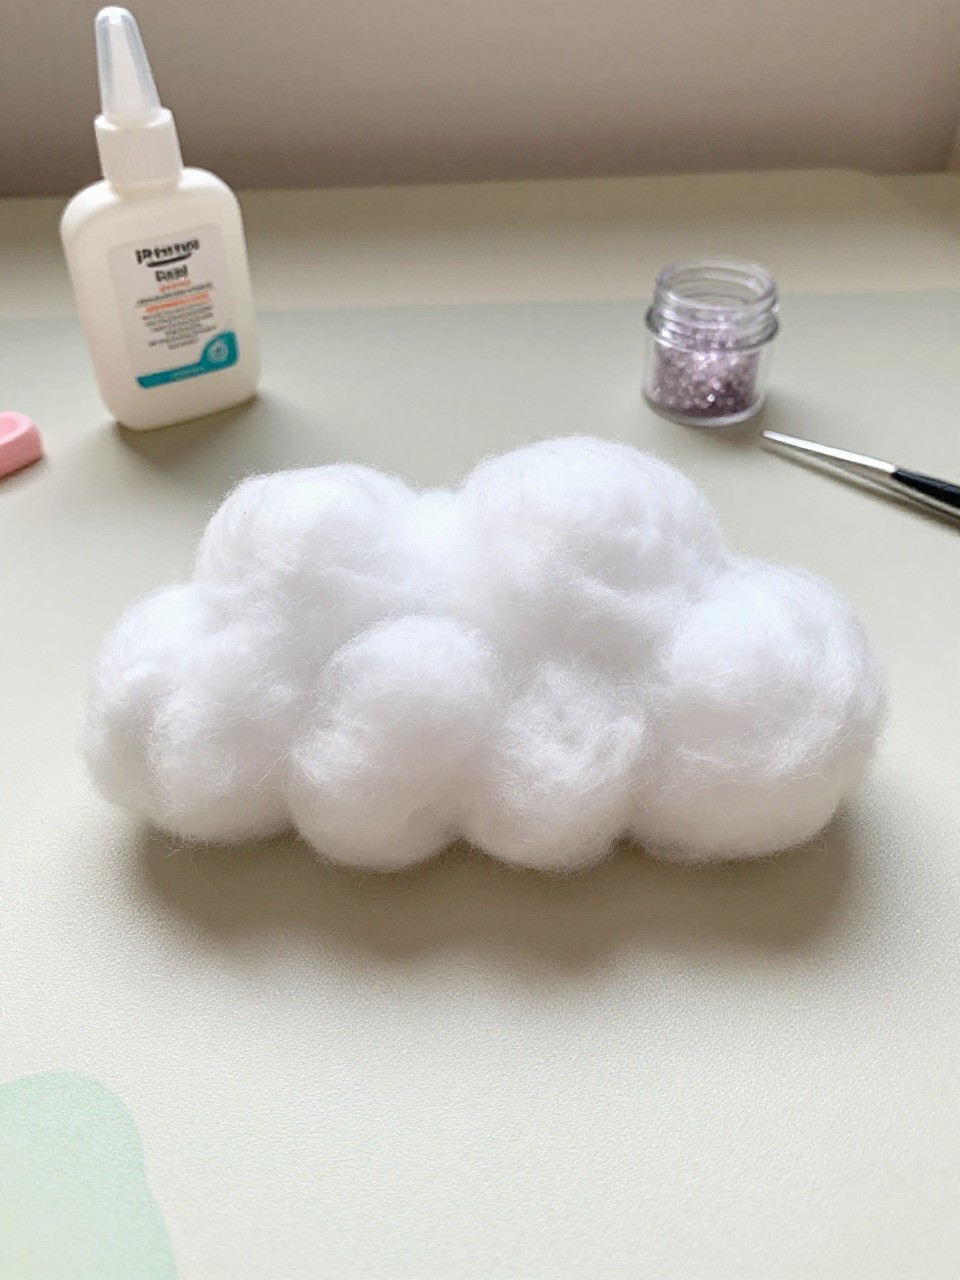
This soft craft features a fluffy white letter C that looks like a cloud in the sky. Kids enjoy the sensory feel of pulling apart cotton and sticking it down, making it perfect for little hands.
Materials Needed:
- Blue cardstock
- Cotton balls
- White glue
- Pencil
- Silver glitter (optional)
How to make it:
- 1. Draw a big C on blue cardstock.
- 2. Stretch cotton balls slightly to make them fluffy.
- 3. Glue cotton along the C outline until it’s puffy and full.
- 4. Sprinkle a touch of glitter for sparkle, then let it dry flat.
3. Cupcake Liner Caterpillar C
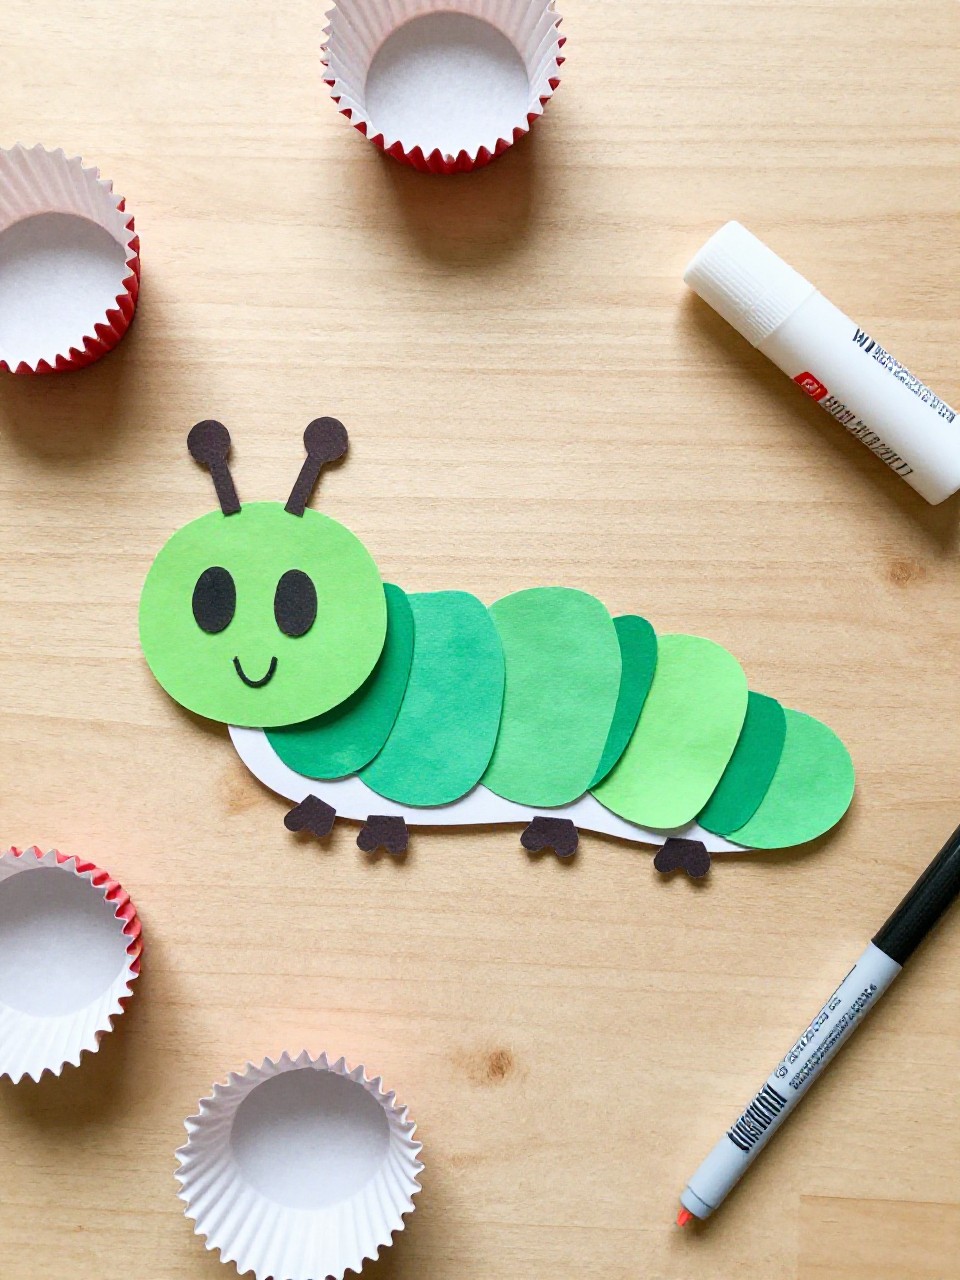
A cute caterpillar bends into the shape of the letter C using colorful cupcake liners. Kids love choosing liner colors and adding a sweet face, and the folding is easy and satisfying.
Materials Needed:
- Colorful cupcake liners
- White cardstock
- Glue stick
- Black marker
- Googly eyes (optional)
How to make it:
- 1. Draw a large C on cardstock as a guide.
- 2. Flatten and fold cupcake liners in half, then glue them along the C curve.
- 3. Add a head liner at the top, draw a smile, and stick on eyes.
- 4. Let dry and display the cheerful caterpillar C.
4. Paper Plate Crab C
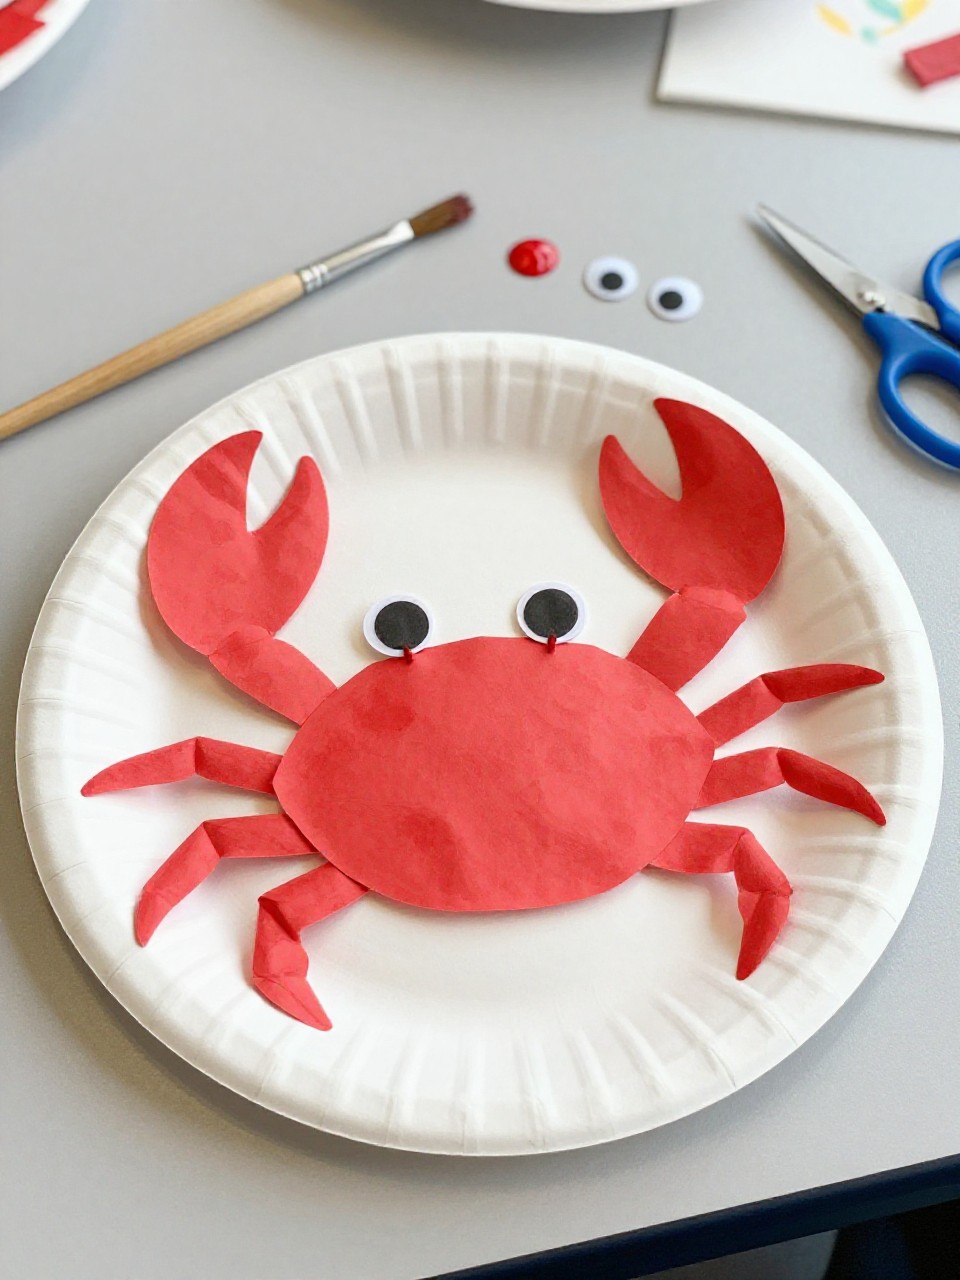
This project turns a paper plate into a smiling crab shaped like the letter C. Kids enjoy painting the plate red and clipping on claws for a beachy, summer vibe.
Materials Needed:
- Paper plate
- Red paint and brush
- Red construction paper
- Googly eyes
- Glue and scissors
How to make it:
- 1. Cut a wedge from the plate to make a C shape and paint it red.
- 2. Cut two claw shapes and four leg strips from red paper.
- 3. Glue legs and claws to the sides and add googly eyes on top.
- 4. Let paint and glue dry, then prop it up for a sea-themed display.
5. Cardboard Crown C

A small cardboard C becomes a royal crown decorated with gems and stars. Kids love the sparkle and the pretend-play moment when they “crown” their letter.
Materials Needed:
- Corrugated cardboard or cereal box
- Gold paint or yellow paper
- Self-adhesive gems or stickers
- Glue
- Pencil and scissors
How to make it:
- 1. Cut a large C from cardboard and paint it gold (or cover with yellow paper).
- 2. Cut tiny triangle points and glue them along the top curve.
- 3. Add gem stickers and stars to decorate.
- 4. Let dry and stand it up like a mini royal display.
6. Car Track Letter C Road

This turns the letter C into a mini road with dashed lines and tiny cars. Kids love driving toy cars along the curve while learning the letter shape.
Materials Needed:
- Black cardstock
- White paint pen or chalk marker
- Mini car stickers or tiny toy car
- Glue stick (if using stickers on foam base)
- Foam board (optional base)
How to make it:
- 1. Cut a thick C from black cardstock to make a road.
- 2. Draw dashed center lines with a white paint pen.
- 3. Add car stickers or place a tiny car at the start.
- 4. Mount on foam board if desired and “drive” along the C.
7. Crepe Paper Coral Reef C
A wavy C is covered in scrunched crepe paper to look like colorful coral. Kids enjoy the easy tearing and scrunching, and the texture makes the craft pop.
Materials Needed:
- Sturdy cardstock
- Crepe paper streamers in coral colors
- White glue
- Scissors
- Small fish stickers (optional)
How to make it:
- 1. Cut out a big C from cardstock.
- 2. Tear small crepe paper pieces and scrunch into little puffs.
- 3. Glue puffs all over the C, mixing colors like pink, orange, and purple.
- 4. Add tiny fish stickers and let dry completely.
8. Cozy Cotton Candy C
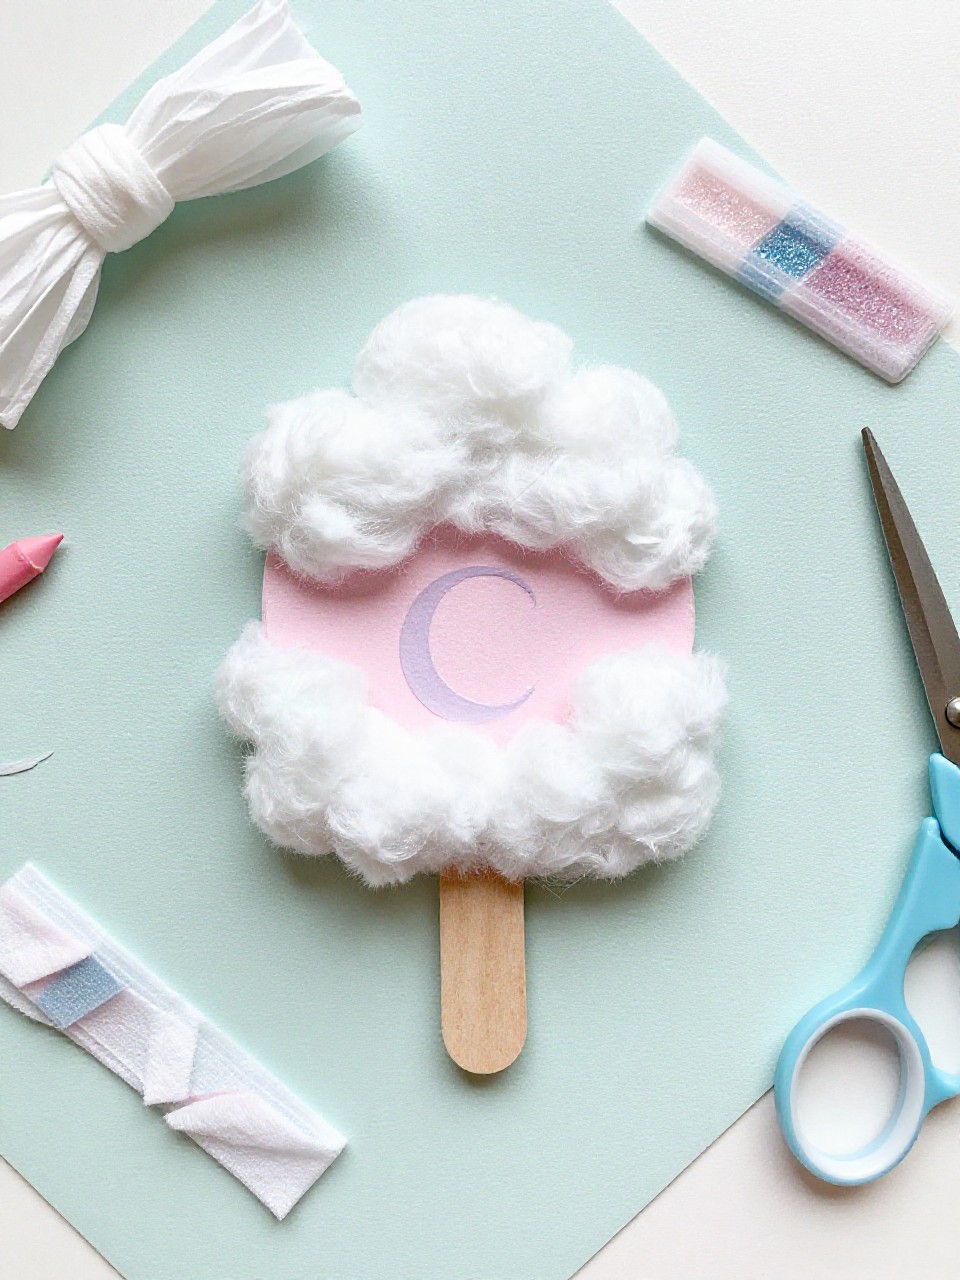
This pastel craft looks like a fluffy cotton candy swirl shaped as a C. Kids love blending pinks and blues and adding a simple paper cone.
Materials Needed:
- Light pink and blue tissue paper
- White cardstock
- Glue stick
- Brown paper for the cone
- Glitter glue (optional)
How to make it:
- 1. Cut a large C from white cardstock.
- 2. Twist and crumple tissue paper into soft puffs.
- 3. Glue puffs along the C, mixing pink and blue, then add a small cone glued near the bottom.
- 4. Add a touch of glitter glue and let dry.
9. Cork-Stamped C Circles Art

This simple painting craft uses a cork to stamp colorful circles inside and around a big C. Kids like the rhythmic stamping and seeing patterns build quickly.
Materials Needed:
- White drawing paper
- Acrylic or tempera paint in several colors
- A clean cork or bottle cap
- Pencil
- Paint tray
How to make it:
- 1. Lightly draw a large C on the paper.
- 2. Dip the cork in paint and stamp circles along the C line.
- 3. Fill the inside with more circles in different colors.
- 4. Let dry flat and admire the dotty letter.
10. Craft Stick Cat C
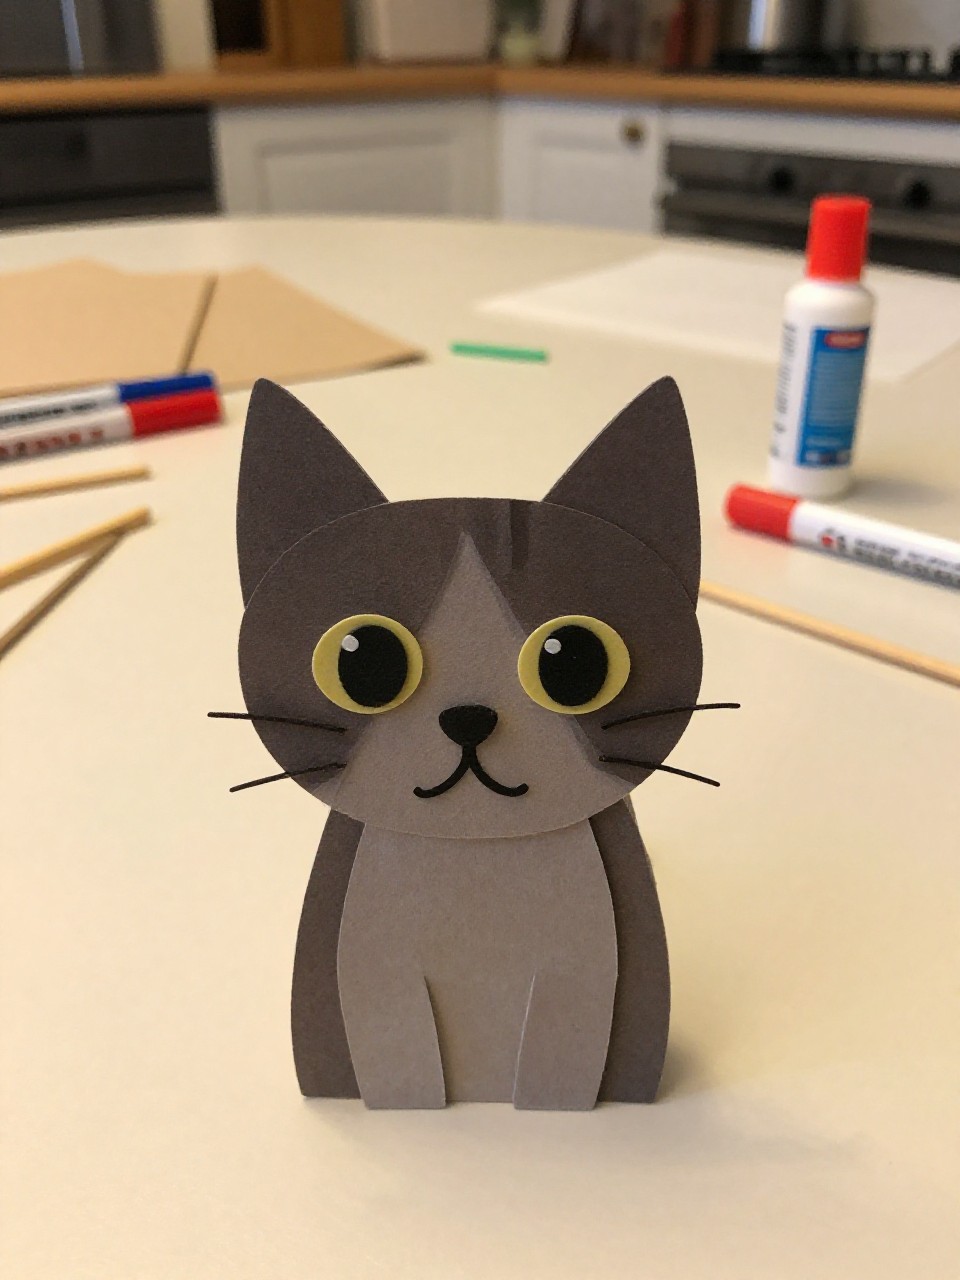
A sweet cat forms the letter C with a curved paper base and craft stick accents for whiskers and ears. Kids enjoy giving their kitty personality with stripes and a cute nose.
Materials Needed:
- Colored cardstock
- Mini craft sticks
- Marker set
- Glue
- Googly eyes (optional)
How to make it:
- 1. Cut a chunky C from cardstock and small triangles for ears.
- 2. Glue ears to the top and add two mini sticks across for whiskers.
- 3. Draw a nose, mouth, and stripes; add eyes.
- 4. Let dry and place on a shelf for a friendly feline C.
11. Coffee Filter Rainbow C
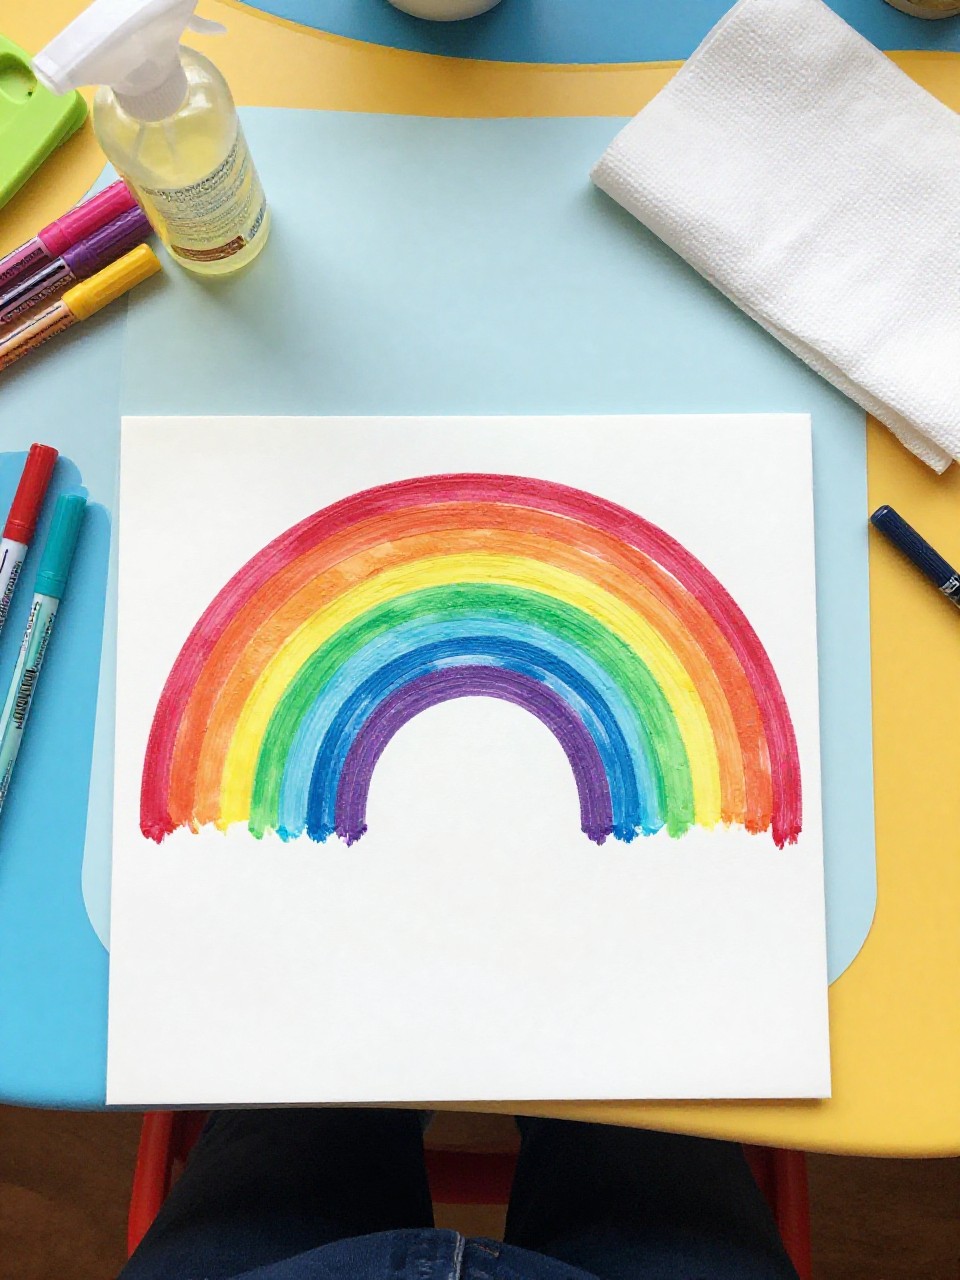
This craft makes a soft, rainbow-tinted C using a colored coffee filter. Kids love watching the markers blend with water into a dreamy effect.
Materials Needed:
- White coffee filter
- Washable markers
- Spray bottle or cup of water
- White cardstock
- Glue stick
How to make it:
- 1. Flatten the coffee filter and color sections with markers.
- 2. Mist lightly with water to blend, then let it dry.
- 3. Cut a large C from the dry filter and glue onto cardstock.
- 4. Smooth gently and display the rainbow letter.
12. Button Covered C
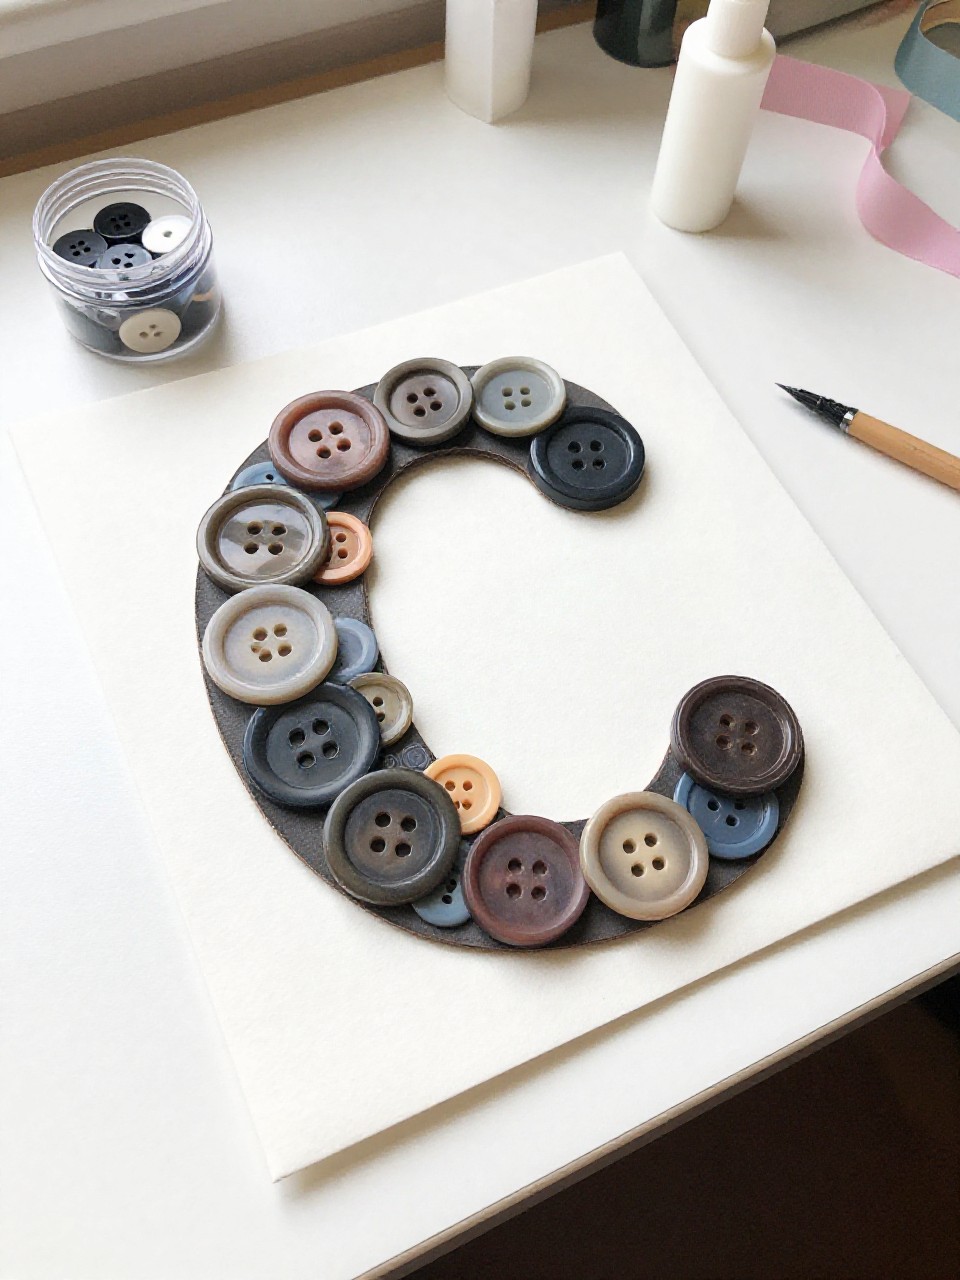
A chunky C covered in mixed buttons becomes a bright, tactile letter. Kids enjoy sorting colors and sizes, and the finished piece feels sturdy and special.
Materials Needed:
- Cardboard C cutout
- Assorted buttons
- Craft glue
- Acrylic paint (optional base coat)
- Ribbon for hanging (optional)
How to make it:
- 1. Cut a thick C from cardboard and paint it if desired.
- 2. Arrange buttons across the C to plan the layout.
- 3. Glue buttons down, filling gaps with small ones.
- 4. Let dry fully and add ribbon to hang.
13. Celery Stamp Cucumber Prints
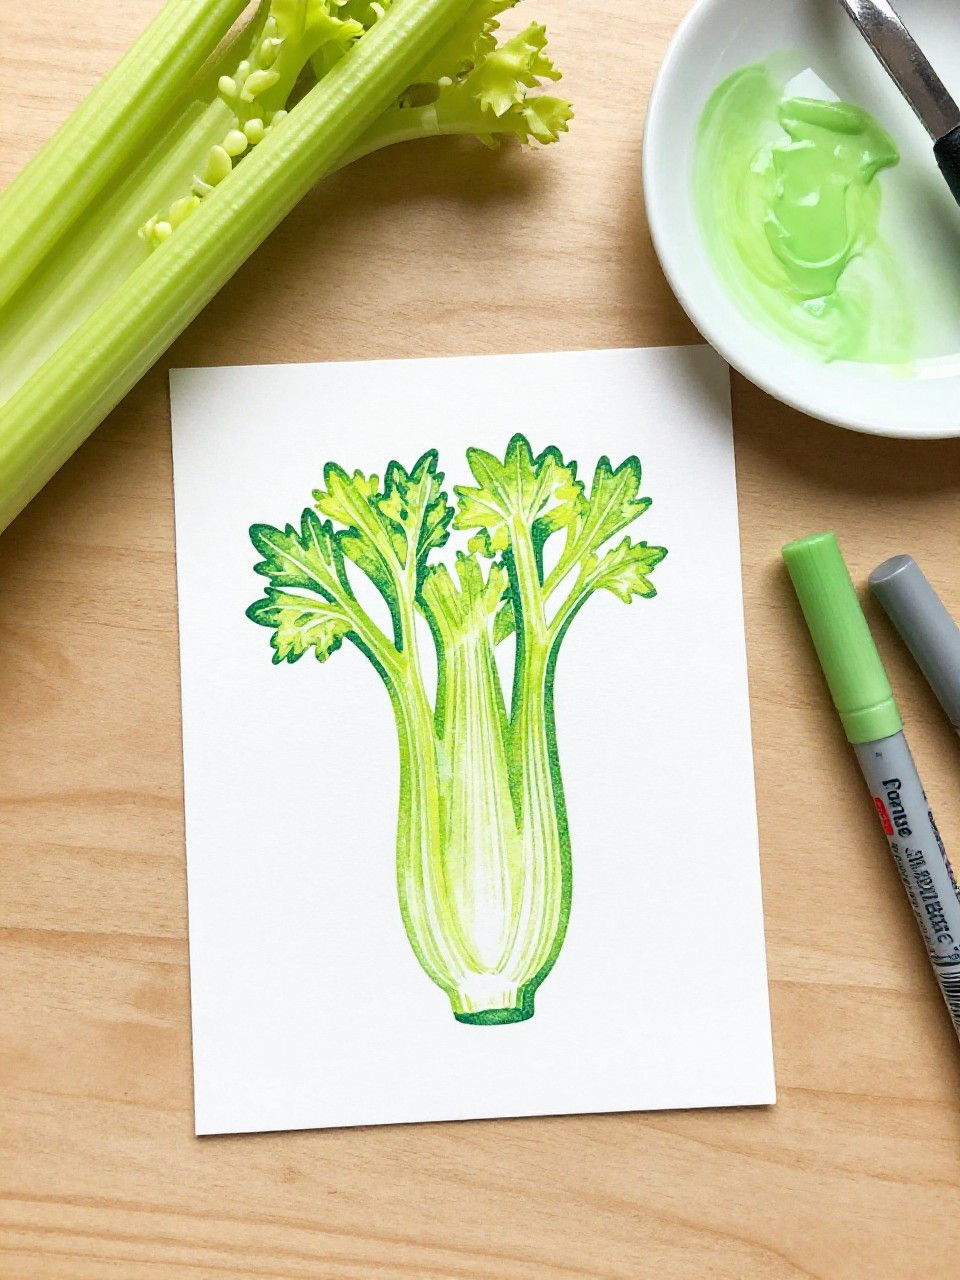
This playful printmaking craft stamps cucumber coins around a big C using cut celery. Kids love the crisp ring shapes and veggie theme tied to the C sound.
Materials Needed:
- White paper or light green cardstock
- Celery stalk cut flat
- Green paint
- Pencil
- Paper plate palette
How to make it:
- 1. Draw a large C on your paper.
- 2. Dip the flat-cut end of celery into green paint.
- 3. Stamp crisp circles along and around the C line.
- 4. Let dry and add tiny seeds or vines with a marker.
14. Cardboard Tube Caterpillar C

A row of painted tube segments curves into a chunky caterpillar C. Kids enjoy painting the pieces and arranging them into the letter shape.
Materials Needed:
- Toilet paper or paper towel tubes
- Tempera paint and brush
- Googly eyes
- Pipe cleaner for antennae
- Glue and scissors
How to make it:
- 1. Cut tubes into rings and paint them in bright colors.
- 2. Glue rings edge-to-edge to form a curved C.
- 3. Add eyes to the front ring and poke in pipe cleaner antennae.
- 4. Let dry and stand it up for 3D letter fun.
15. Confetti Sprinkles C
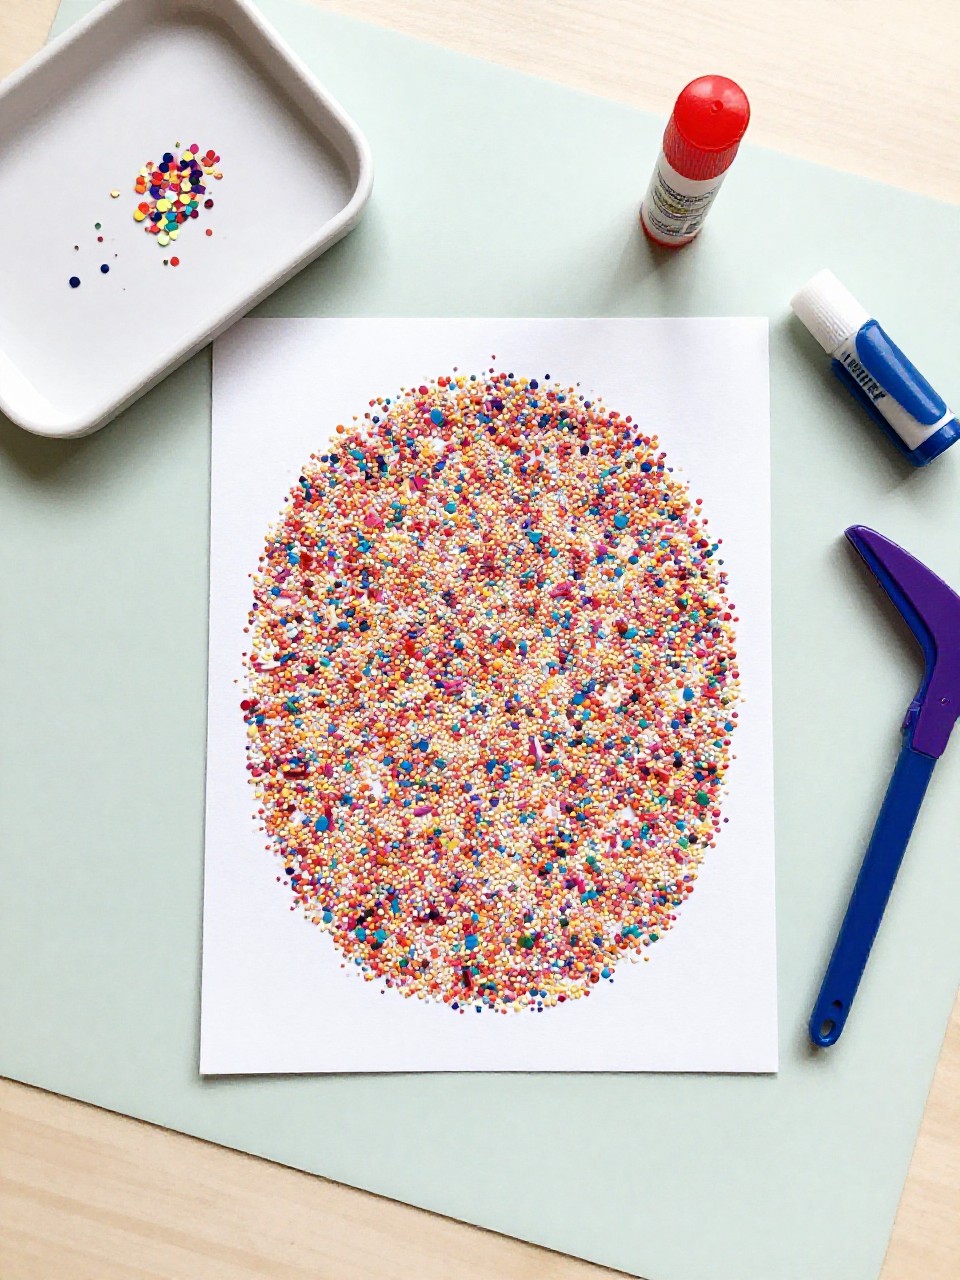
This festive C sparkles with homemade paper confetti like a party letter. Kids love sprinkling and pressing the colors down, and cleanup is simple with a tray.
Materials Needed:
- Cardstock letter C
- Hole-punched paper confetti or shredded tissue
- Glue stick
- Small tray or baking sheet
- Glitter (optional)
How to make it:
- 1. Place the cardstock C on a tray to catch extra pieces.
- 2. Rub glue over the whole surface.
- 3. Sprinkle confetti generously and press lightly to stick.
- 4. Shake off extra, add a little glitter if you want, and let dry.


