
Table of Contents Show
When Easter crafts feel either too messy or too complicated, it’s easy to skip them altogether. But preschoolers love making beautiful things they can actually finish—and you’ll love projects that don’t take all day or cost a fortune.
The list below is packed with creative, unique ideas that look wow-worthy but are secretly simple. Think bold color, soft textures, and playful shapes—plus quick setup and easy cleanup.
Let’s make Easter art that’s calm, joyful, and proudly fridge-worthy.
1. Tissue Paper Stained-Glass Eggs
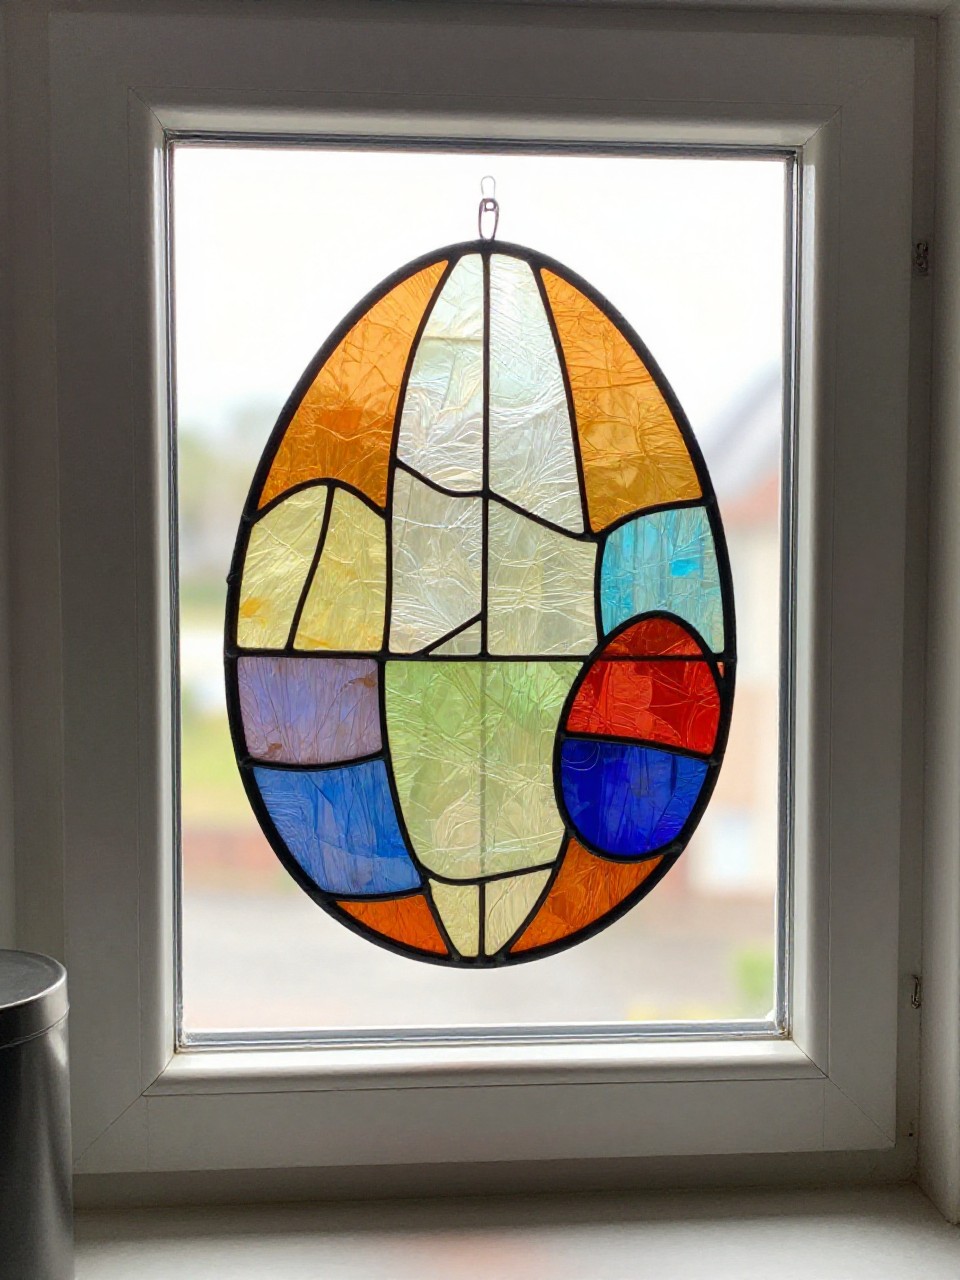
These window eggs glow like candy when the sun shines through. Kids love layering colors and seeing them blend, and the final look feels magical with almost zero mess.
Materials Needed:
- Contact paper
- Tissue paper squares
- Scissors
How to make it:
- 1. Cut two egg shapes from contact paper.
- 2. Peel one side and stick tissue squares all over, overlapping colors.
- 3. Seal with the second contact-paper egg.
- 4. Trim edges and press onto a sunny window.
2. Fuzzy Pom-Pom Bunny Collage
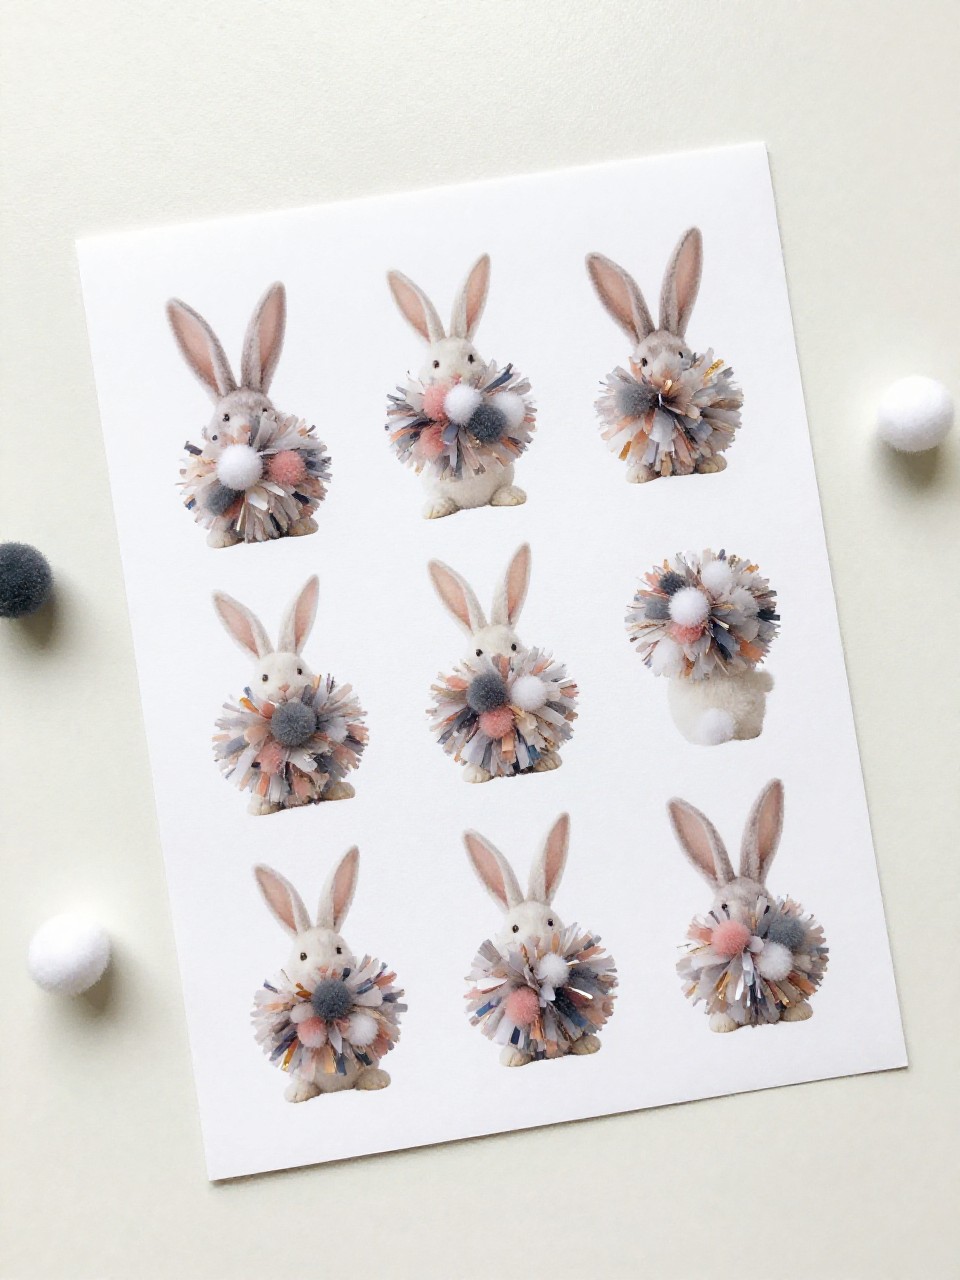
A fluffy, tactile bunny that invites tiny hands to touch. The soft pom-poms make a plush, cheerful piece that looks store-bought on the wall.
Materials Needed:
- Pom-poms (assorted sizes)
- Cardstock or canvas board
- White glue
How to make it:
- 1. Draw or print a simple bunny outline on cardstock.
- 2. Fill the body with white pom-poms and the ears with pink and white.
- 3. Add a small colored pom-pom for the nose and a bigger one for the tail.
- 4. Let dry flat before hanging.
3. Painted Bubble Wrap Carrot Prints
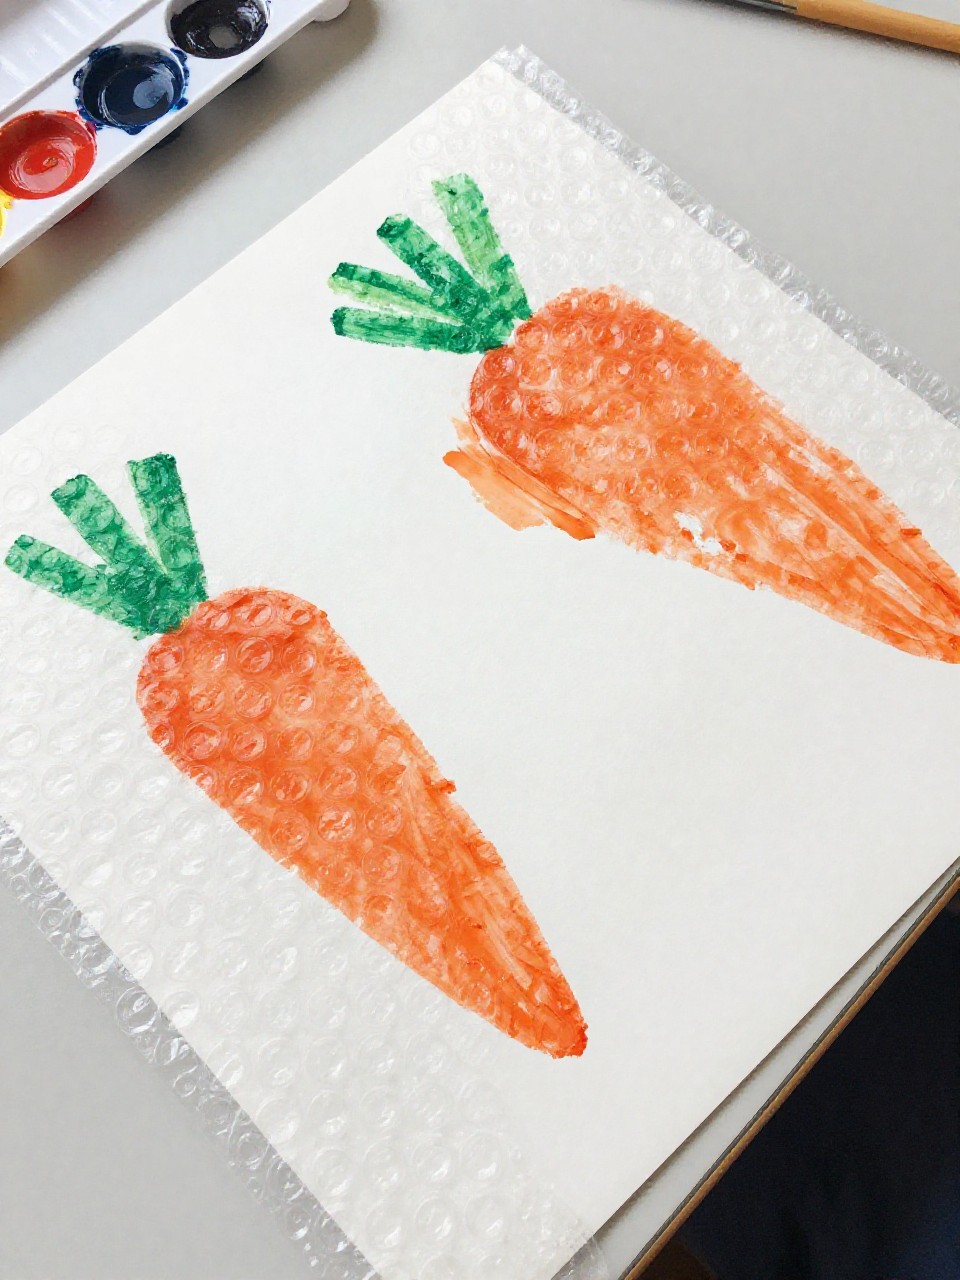
Crispy, dotted carrots made from bubble wrap stamping. The texture looks surprisingly professional, but it’s just stamp-and-lift fun.
Materials Needed:
- Bubble wrap
- Orange and green washable paint
- Paper
How to make it:
- 1. Cut bubble wrap into long triangles (carrot) and leaf shapes.
- 2. Paint orange onto the triangle, press onto paper, and lift.
- 3. Paint green onto the leaf shape and stamp at the top.
- 4. Repeat to make a patch of carrots.
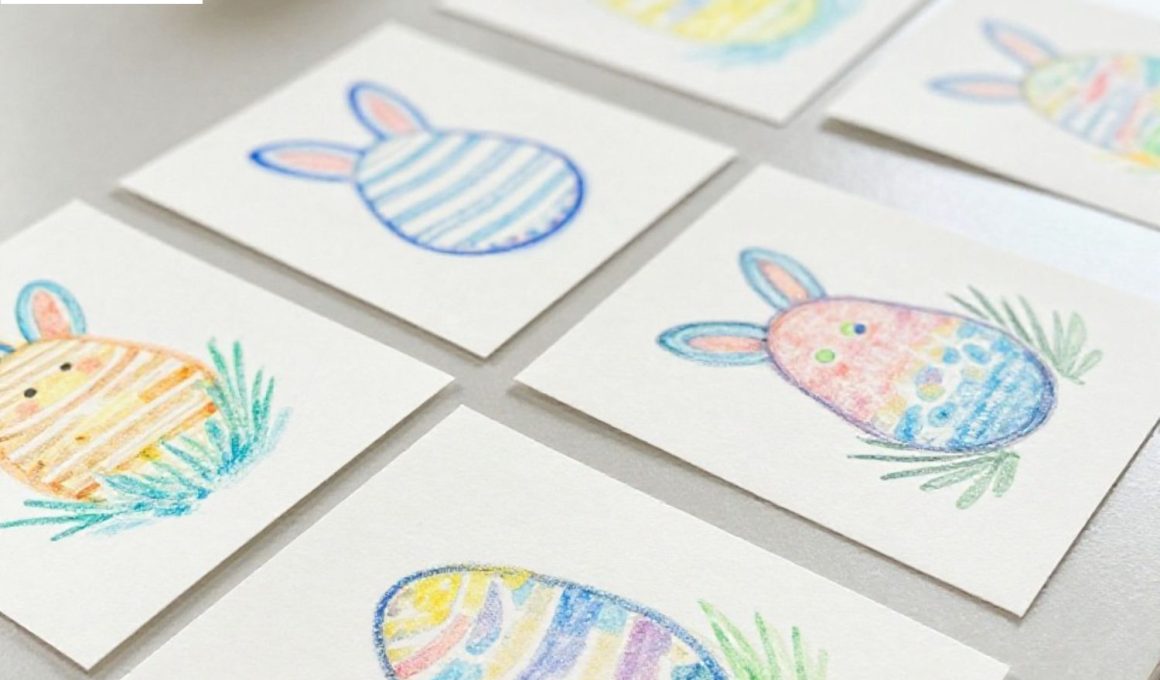
4. Magic Crayon-Resist Easter Cards
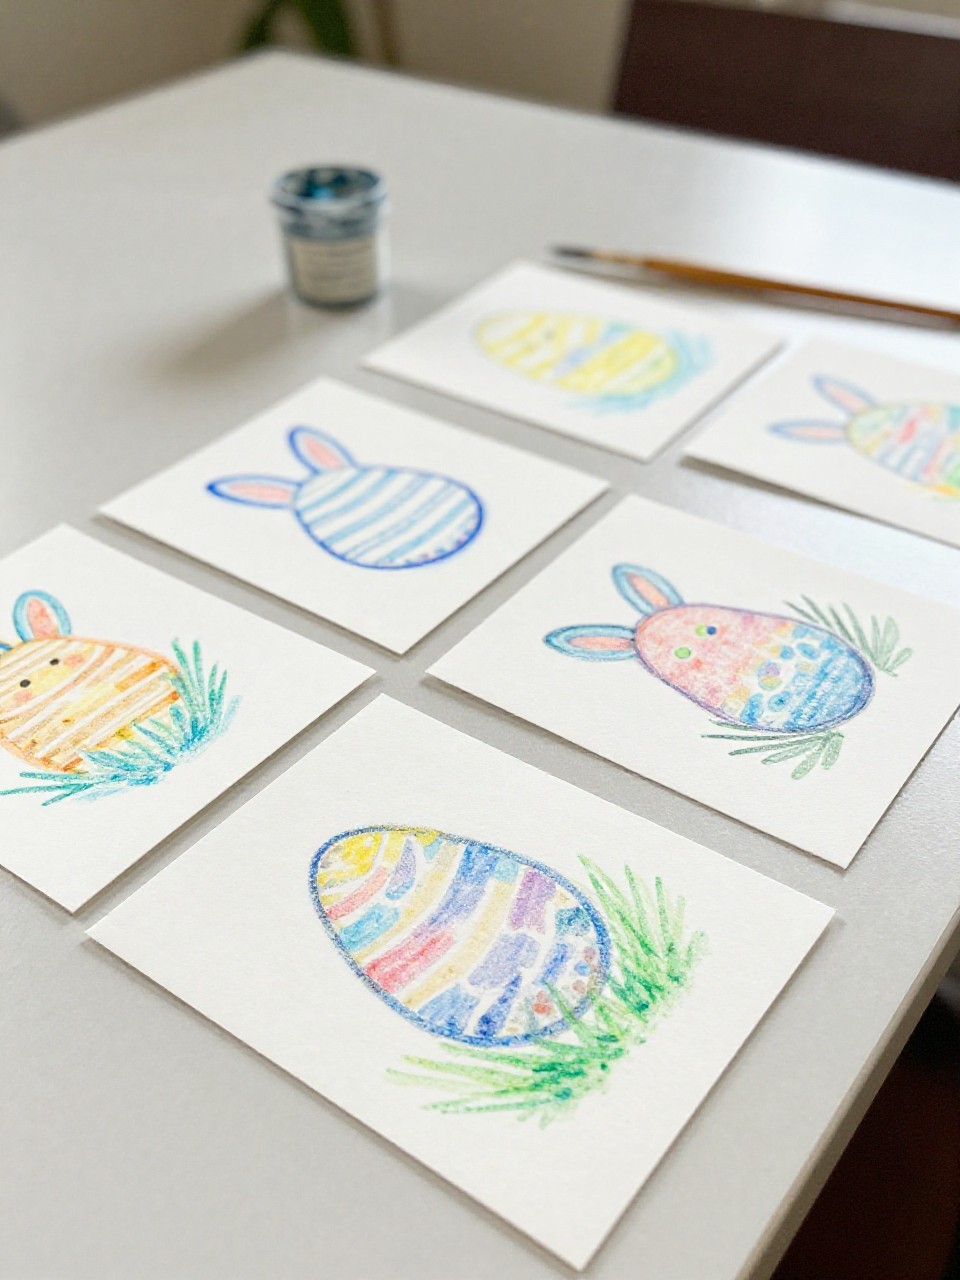
Wax drawings reveal themselves under swirls of watercolor like a secret message. Each card feels dreamy, with soft washes and bold white lines.
Materials Needed:
- White crayon
- Watercolor paints and brush
- Folded watercolor paper cards
How to make it:
- 1. Draw eggs, bunnies, or messages with the white crayon on the card.
- 2. Paint gentle watercolor washes over the drawing.
- 3. Watch the design pop through the paint.
- 4. Let dry and add a simple message inside.
5. Sock Scrap Chick Puffs
Adorable, squishy chicks made from lonely socks—zero sewing required. They sit like little marshmallows and look charming in a basket.
Materials Needed:
- Clean sock (yellow or white)
- Polyfill or cotton stuffing
- Glue-on eyes or stickers
How to make it:
- 1. Stuff the sock toe with filling to form a round puff.
- 2. Twist and secure the back with a small rubber band.
- 3. Glue on eyes and a tiny paper triangle beak.
- 4. Fluff and gently shape into a chick.
6. Washi-Tape Easter Egg Garland
Crisp, modern eggs with patterns that look fancy but take minutes. The repeat of stripes and dots makes an instant party across a mantle or doorway.
Materials Needed:
- Colored washi tape
- Cardstock
- String or ribbon
How to make it:
- 1. Cut several egg shapes from cardstock.
- 2. Cover each egg with washi tape stripes or patterns.
- 3. Trim tape edges for a clean outline.
- 4. Punch holes and thread onto string to hang.
7. Salt Dough Mini Nest Ornaments
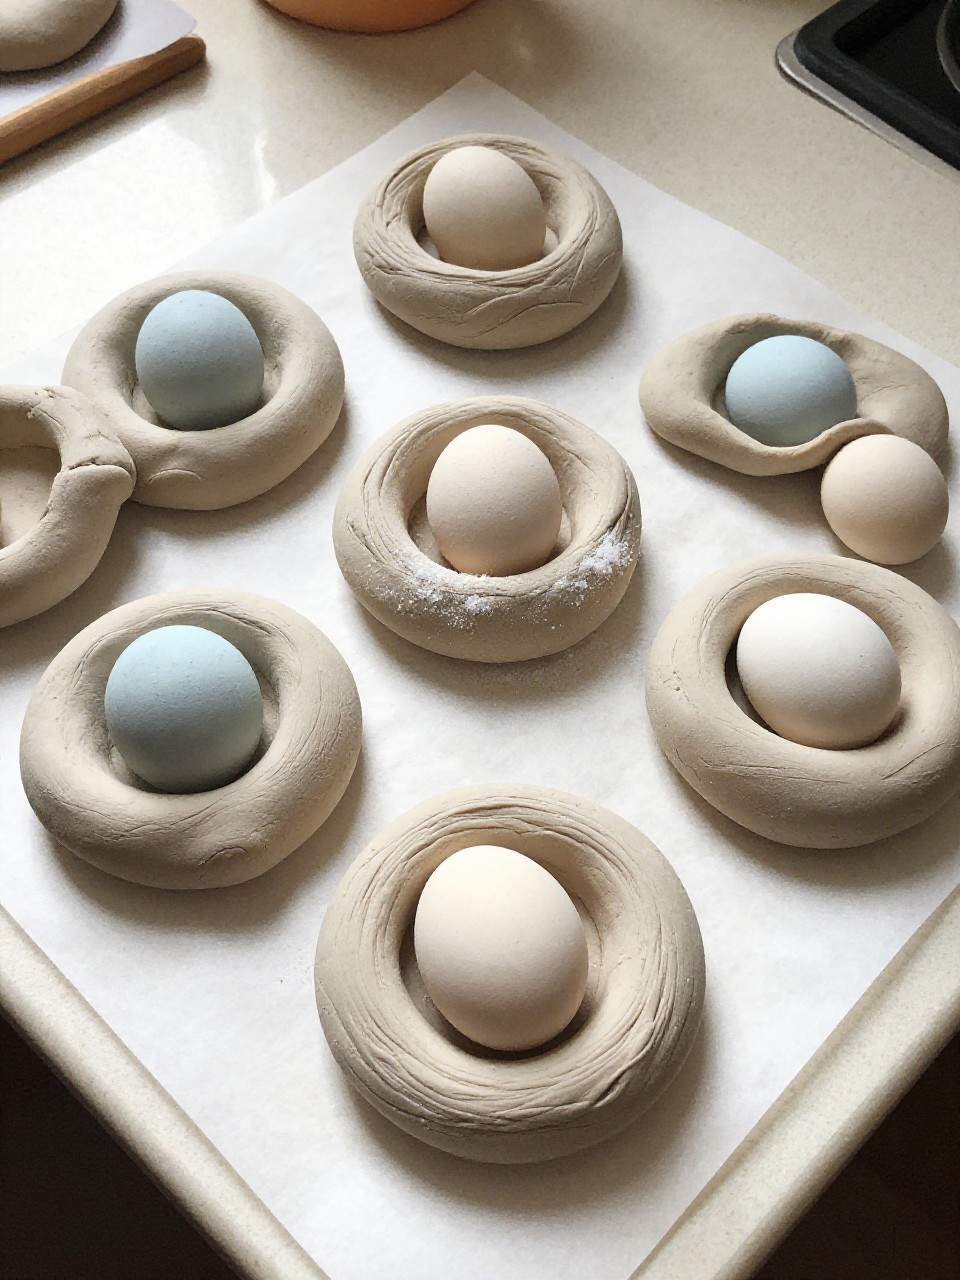
Earthy little nests that harden into keepsakes. The rough texture and soft pastel eggs feel like spring found on a forest walk.
Materials Needed:
- Flour, salt, and water (salt dough)
- Acrylic paint (pastels)
- Twine (optional)
How to make it:
- 1. Mix 2 parts flour, 1 part salt, and water to form dough.
- 2. Roll small snakes and coil into nest shapes; pinch edges.
- 3. Form tiny egg ovals; place in nests.
- 4. Bake low (200°F/95°C) until hard; paint and add twine if hanging.
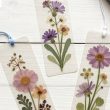
8. Nature-Pressed Bunny Silhouettes
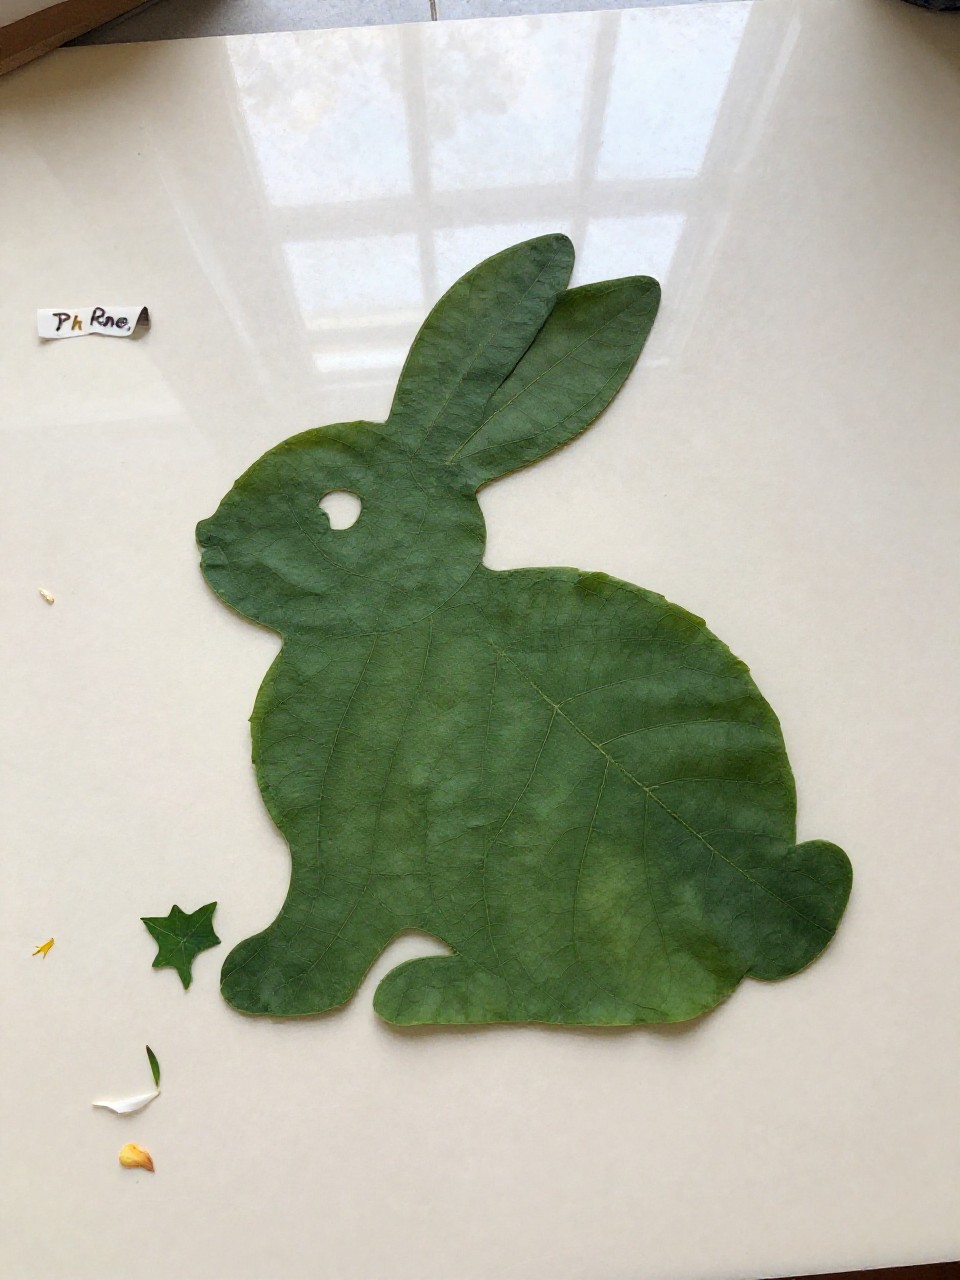
Delicate leaves and petals framed inside a bold bunny shape. It’s a simple nature walk turned into elegant wall art.
Materials Needed:
- Leaves/flowers (pressed or fresh)
- Contact paper or clear packing tape
- Construction paper
How to make it:
- 1. Cut a bunny silhouette from construction paper and remove the inside to make a frame.
- 2. Stick contact paper behind the frame, sticky side facing forward.
- 3. Arrange leaves and petals inside the bunny area.
- 4. Seal with another layer of contact paper and trim.
9. Bubble Foam Egg Prints
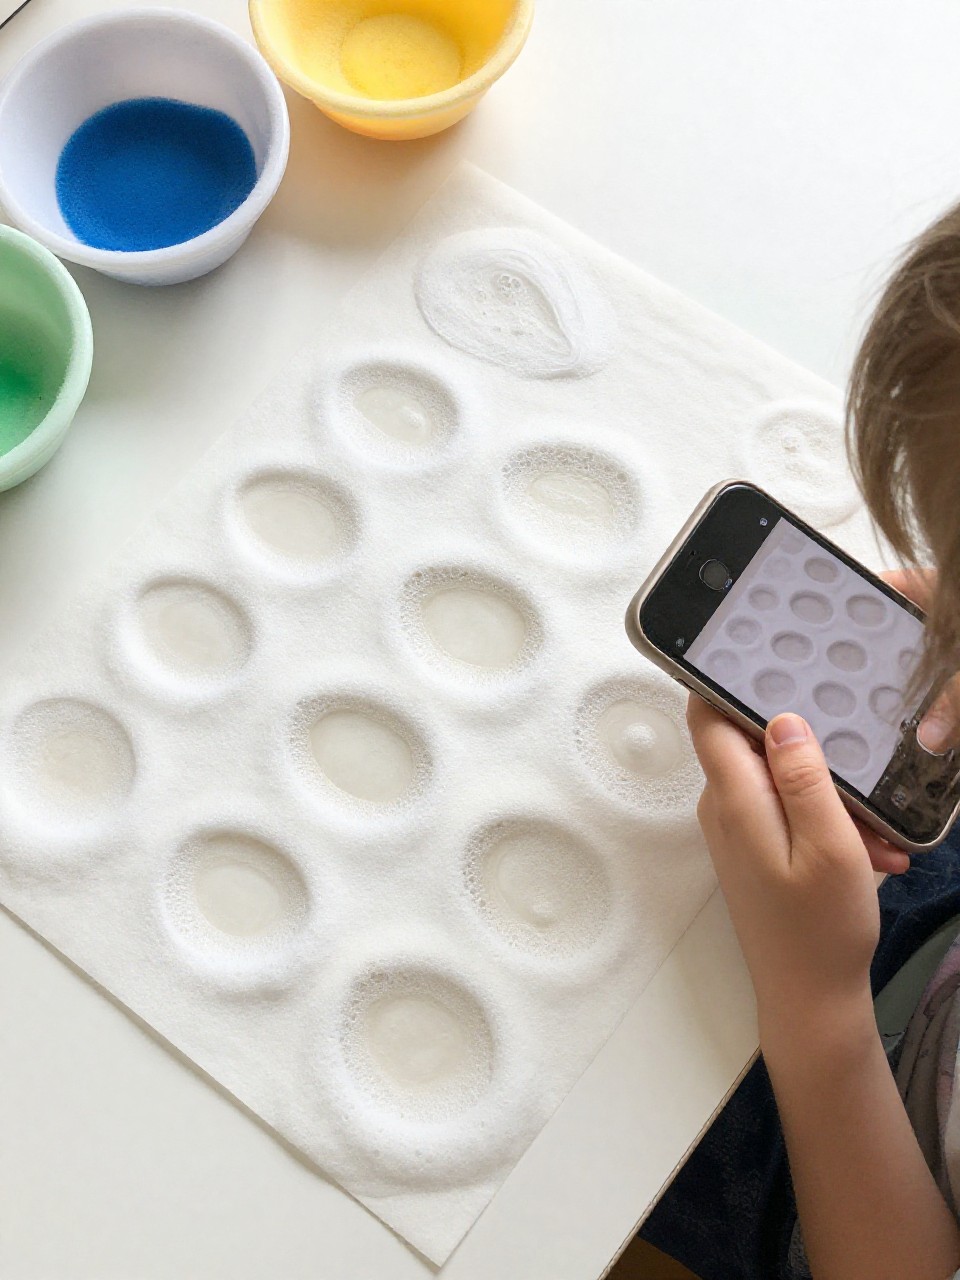
Cloudy, marbled eggs from foamy, bubbly paint. Kids get the thrill of bubbles, and you get dreamy patterns without the mess of shaving cream.
Materials Needed:
- Dish soap and water
- Washable paint
- Paper and a straw or whisk
How to make it:
- 1. Mix a little paint, a squirt of dish soap, and water; whisk until foamy.
- 2. Spoon foam onto paper and spread gently.
- 3. Press an egg-shaped paper on top to pick up the pattern.
- 4. Lift, let dry, and cut out the egg to display.
10. Yarn-Wrapped Carrot Cones
Chunky, cozy carrots that look like decor from a boutique. The wrapping rhythm is soothing, and the finished texture is so satisfying.
Materials Needed:
- Orange yarn
- Paper cone (or roll paper into a cone)
- Green tissue paper
How to make it:
- 1. Glue the yarn end to the cone tip.
- 2. Wrap yarn tightly around the cone, dotting glue as you go.
- 3. Twist green tissue into a tuft and glue into the wide end.
- 4. Trim and fluff the greens.
11. Sticker Mosaic Cross or Egg
A bold, graphic piece with tiny squares kids can place independently. The final look is neat and geometric—like stained glass with stickers.
Materials Needed:
- Foam or paper stickers (small squares)
- Cardstock
- Pencil (optional)
How to make it:
- 1. Lightly sketch a big egg or cross outline.
- 2. Fill the shape with stickers, edge to edge.
- 3. Use color rows or random rainbow patterns.
- 4. Mount on a contrasting paper for a frame.
12. Coffee Filter Tie-Dye Butterflies

Soft, fluttery wings with easy color magic. The gentle blend of markers and water makes every butterfly look dreamy and unique.
Materials Needed:
- Coffee filters
- Washable markers
- Clothespins
How to make it:
- 1. Flatten coffee filters and color with markers.
- 2. Mist lightly with water to blend; let dry.
- 3. Pinch the center and clip with a clothespin for the body.
- 4. Add marker eyes and a smile on the clothespin.
13. Glitter-Free Sparkle Eggs with Foil
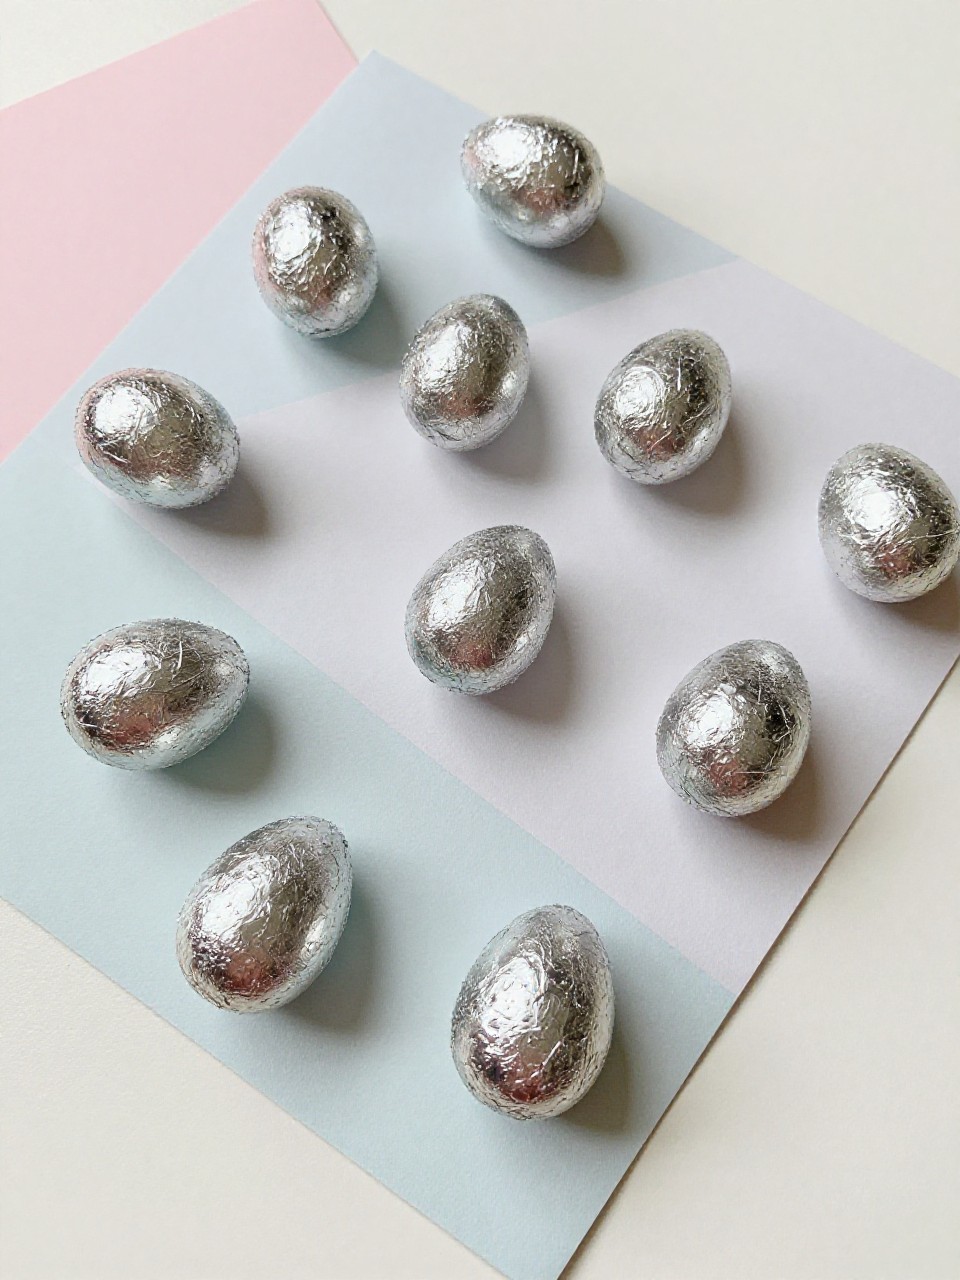
Shiny, textured eggs without the glitter mess. Crinkled foil catches the light and looks luxe with almost no effort.
Materials Needed:
- Aluminum foil
- Glue stick
- Cardstock egg shapes
How to make it:
- 1. Crumple small foil pieces and flatten slightly.
- 2. Glue foil onto the egg shape, overlapping for texture.
- 3. Press firmly to smooth edges.
- 4. Add a ribbon loop or mount on colored paper.
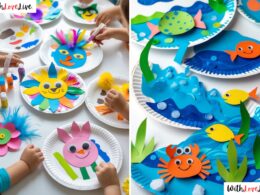
14. Paper Plate Peekaboo Bunny Mask
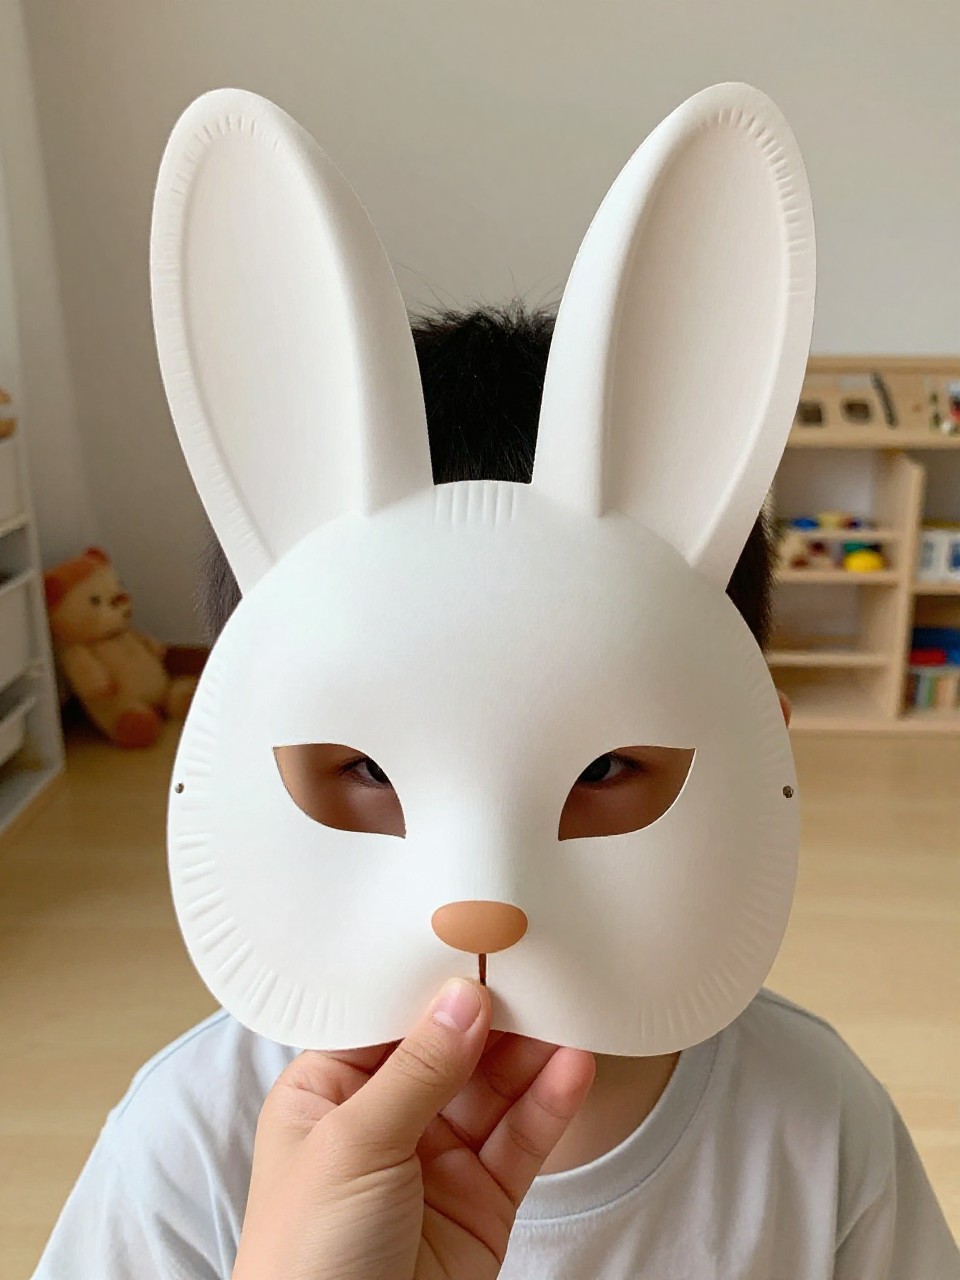
A playful mask with floppy ears and a sweet peekaboo nose. It’s photo-ready in minutes and perfect for pretend play.
Materials Needed:
- Paper plate
- Craft stick
- Construction paper
How to make it:
- 1. Cut eye holes in the paper plate.
- 2. Glue on long paper ears and a small heart nose.
- 3. Draw whiskers and add rosy cheeks with crayon.
- 4. Tape a craft stick to the bottom as a handle.
15. Egg Carton Garden Chicks
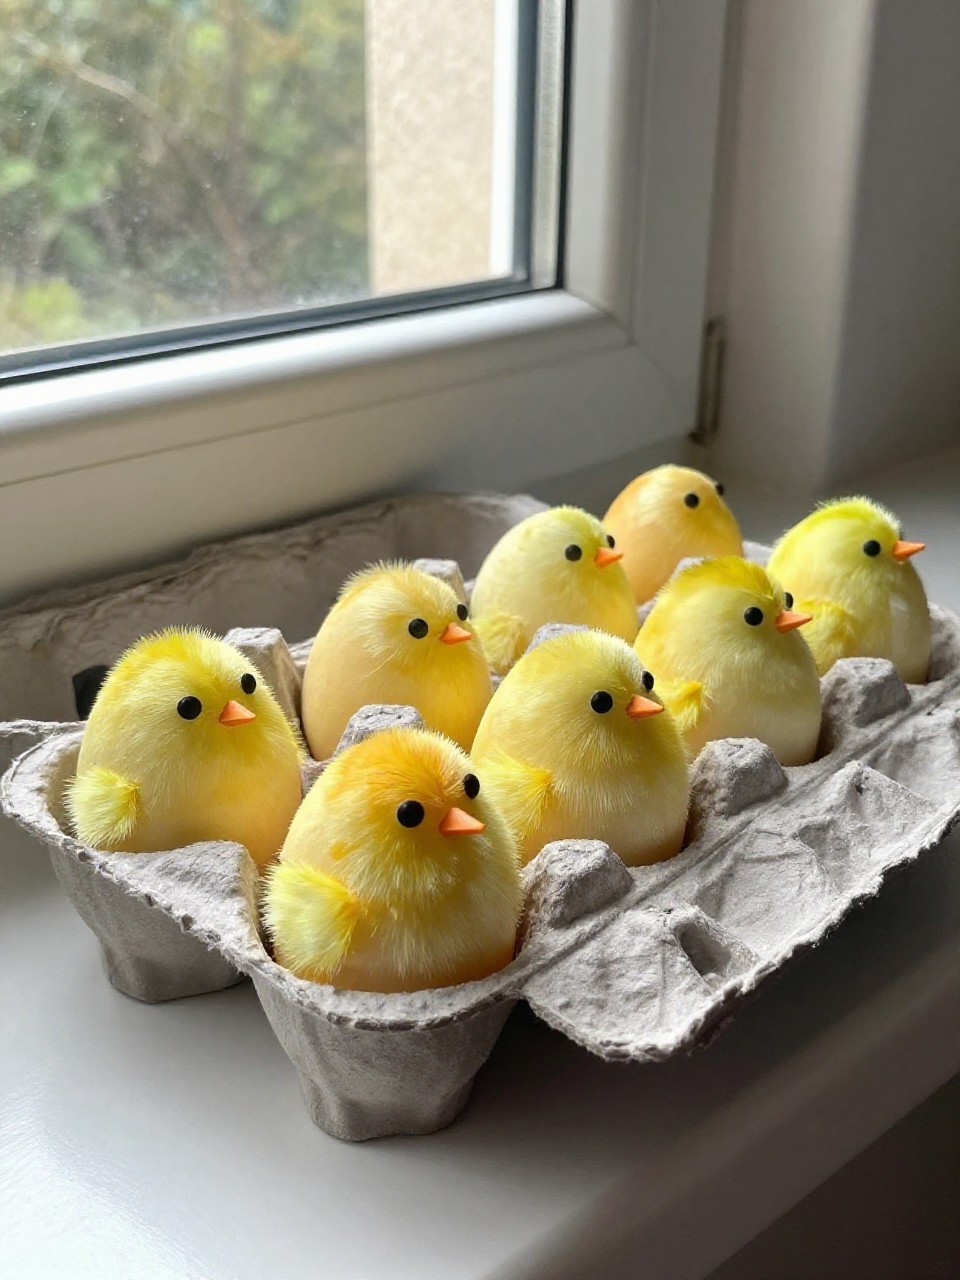
Tiny chicks peeking from “nests” feel like a miniature world. The carton cups create a cozy scene that kids love arranging and gifting.
Materials Needed:
- Egg carton cups
- Yellow paint
- Googly eyes
How to make it:
- 1. Cut carton into individual cups; paint yellow.
- 2. Glue on eyes and a small orange paper beak.
- 3. Add a paper wing or tuft if you like.
- 4. Set chicks back into a carton “nest” to display.