


Table of Contents Show
If you’ve ever wanted to paint something cute but got stuck on what to make, cupcake art is a sweet place to start. Cupcakes are simple shapes, so they’re beginner-friendly, but they still look impressive once you add frosting swirls and sprinkles.

These ideas can help you relax, practice color blending, and make wall art that feels happy in any room.
Let’s jump into 17 cupcake painting ideas that look good enough to eat.
1. Classic Vanilla Cupcake Canvas Painting
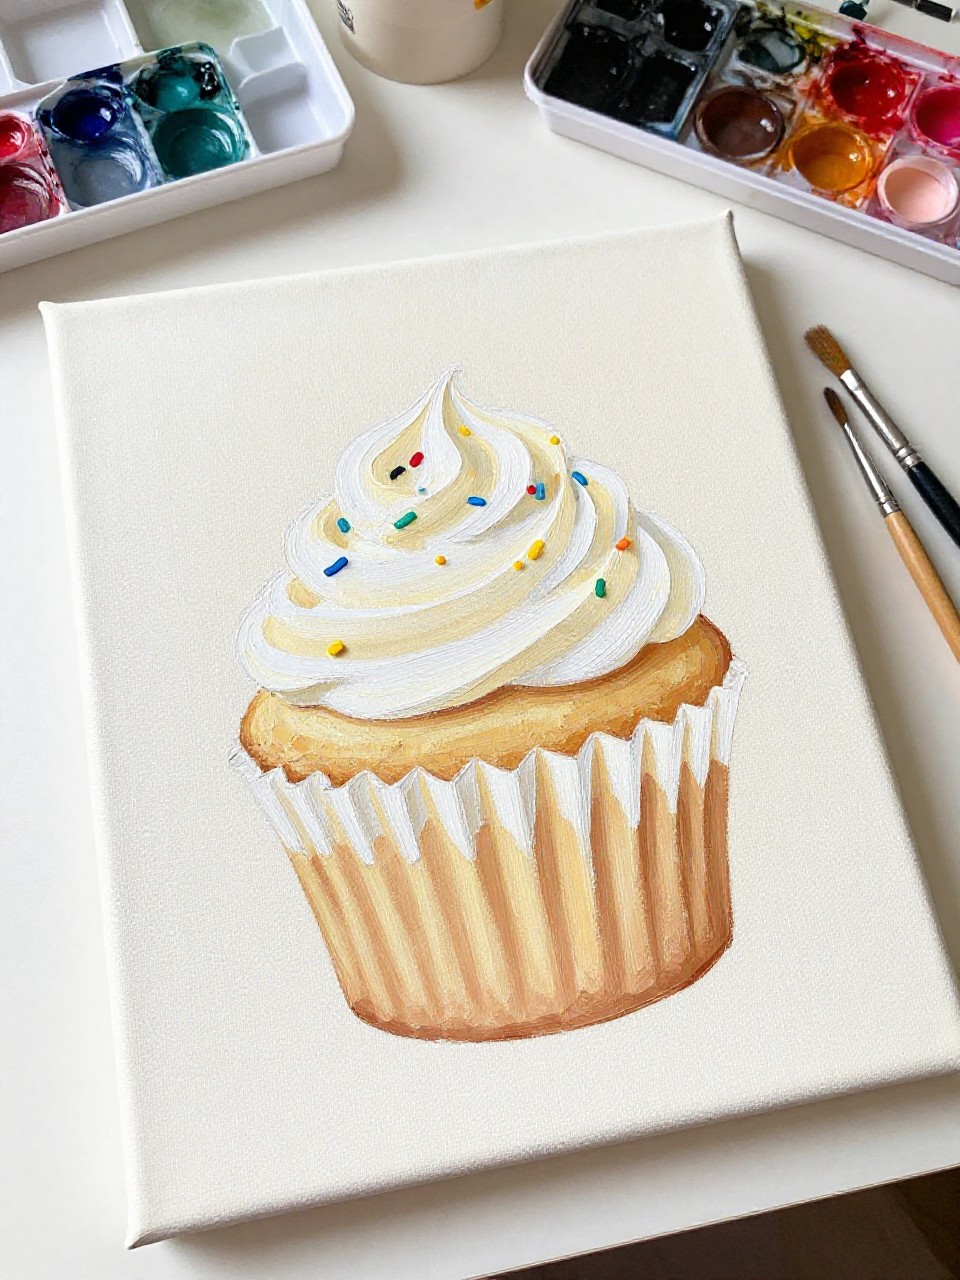
A fluffy vanilla cupcake sits in a striped wrapper with a tall swirl of white frosting and a few rainbow sprinkles on top. It’s satisfying because you can keep the shapes simple and focus on blending soft highlights in the frosting, which makes it look real without being hard.
Materials Needed:
- Stretched canvas
- Acrylic paint set
- Paintbrushes in multiple sizes
- Palette or paint tray
- Cup of water + paper towels
Steps to Make:
- Lightly sketch a cupcake oval and wrapper lines in pencil on the canvas.
- Block in the wrapper base color and add darker stripes following the curve.
- Paint the frosting swirl in off-white, leaving a few canvas gaps for shine.
- Add sprinkles with a small brush and tiny shadow dabs beneath them.
- Let it dry fully and display it on a shelf or small wall hook.
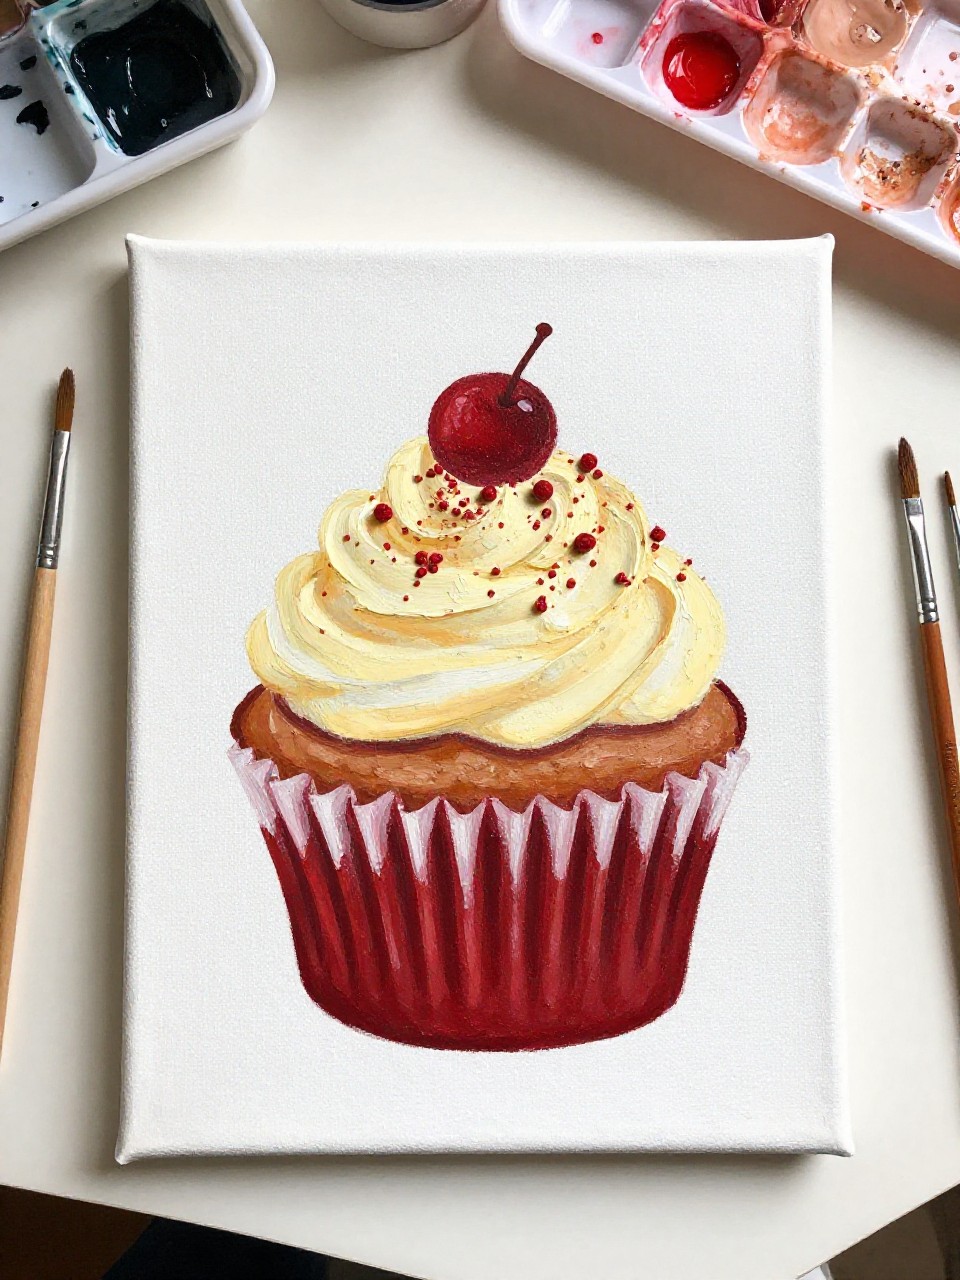
2. Strawberry Frosting Drip Cupcake Canvas Art
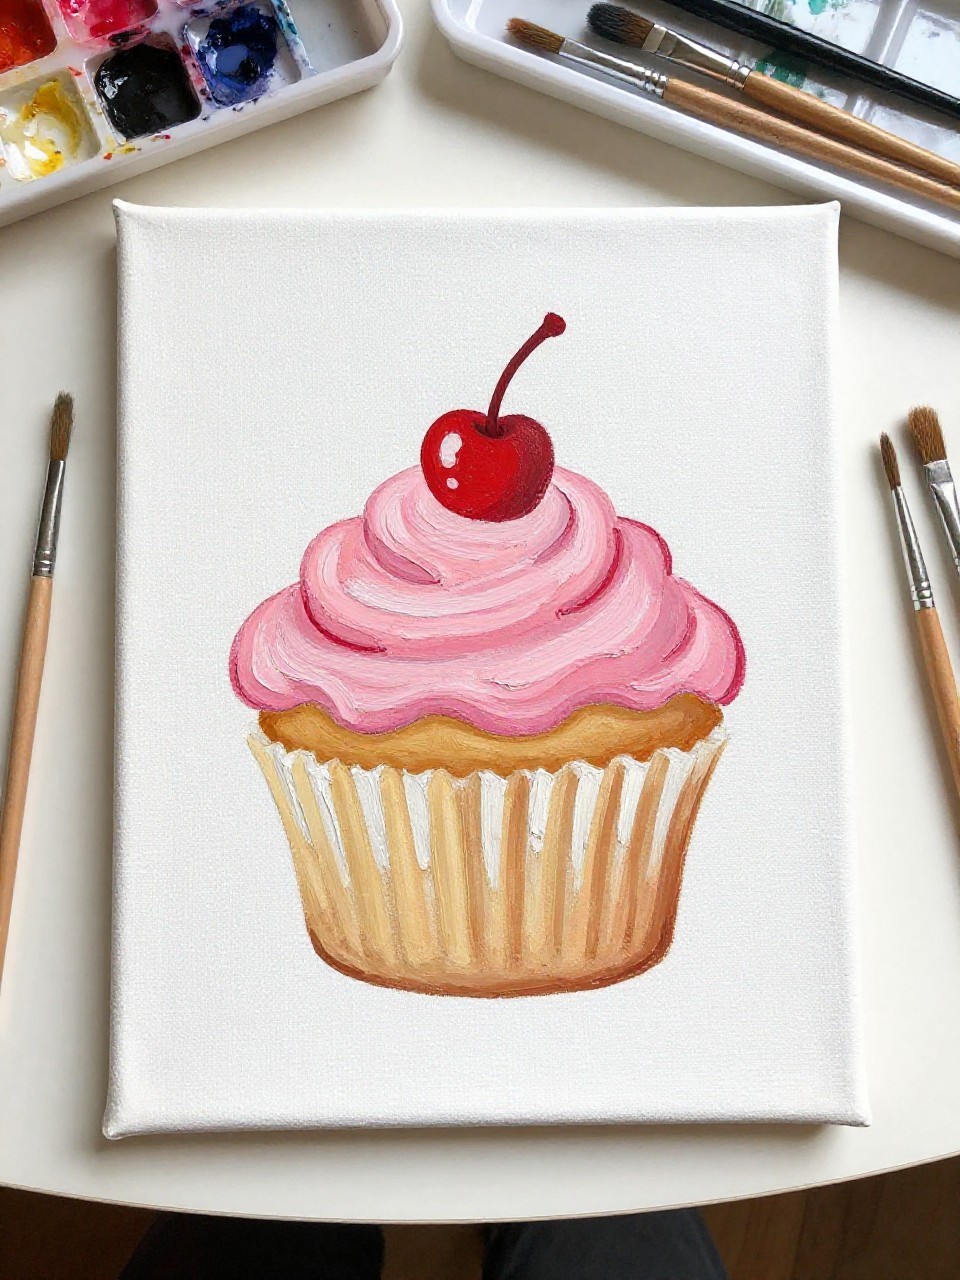
This painting shows a cupcake with pink strawberry frosting that drips slightly over the edge, with a glossy look and a cute cherry on top. It’s great for beginners because the drip shapes are forgiving, and you can practice making paint look shiny with simple highlights.
Materials Needed:
- Stretched canvas
- Acrylic paint set (pink, red, white, brown)
- Paintbrushes in multiple sizes
- Palette or paint tray
- Optional sealer or varnish
Steps to Make:
- Sketch the cupcake and mark where the frosting drip will hang over the edge.
- Paint the cake base in warm browns and blend a darker shadow along one side.
- Lay in the pink frosting, then pull small rounded drips downward with a medium brush.
- Add thin white highlight lines on the frosting and a bright red cherry circle on top.
- Dry completely, then add a light varnish coat for extra shine.
3. Chocolate Ganache Swirl Cupcake Canvas Painting
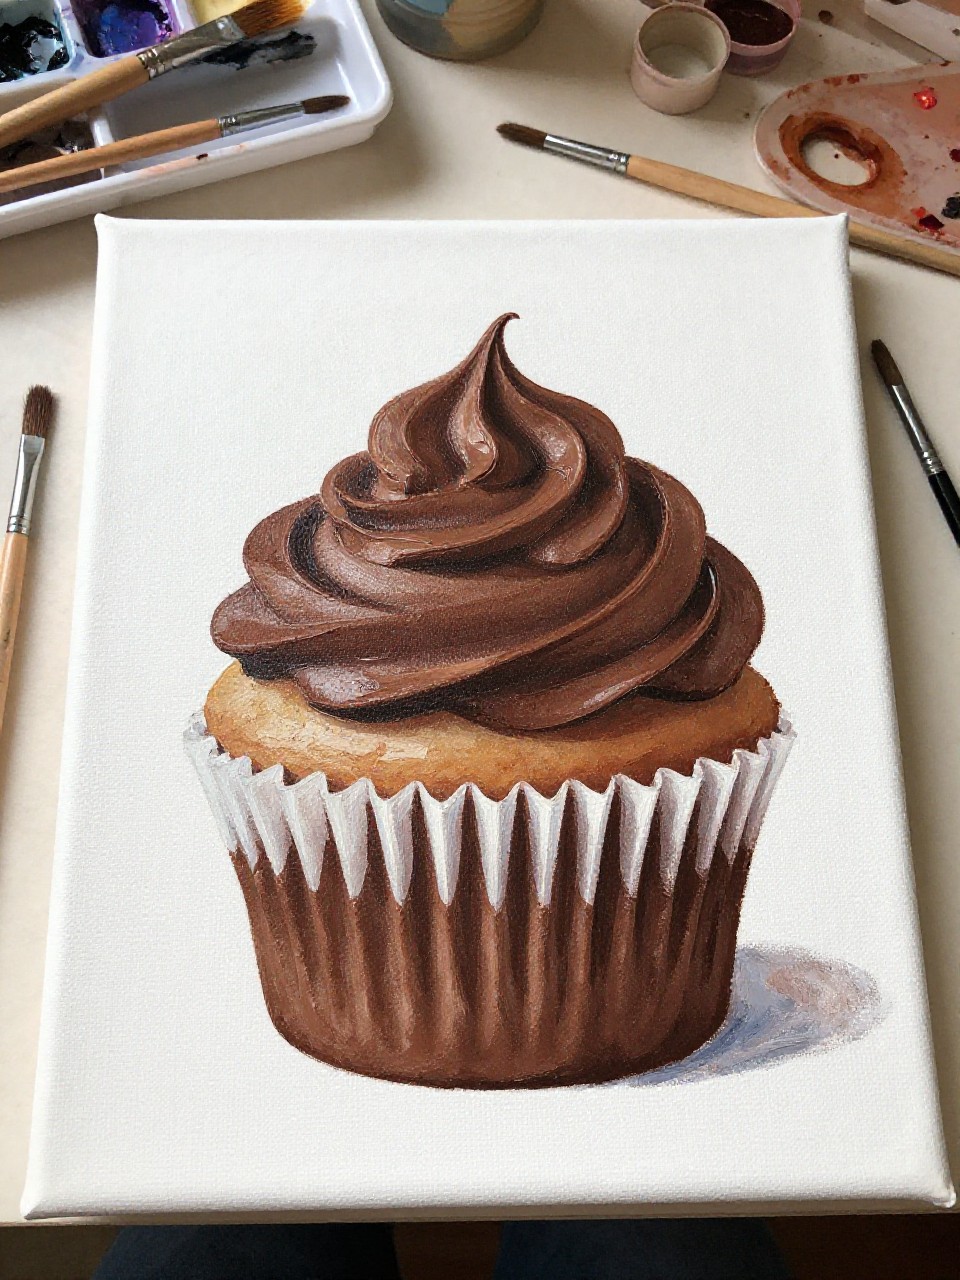
A rich chocolate cupcake is topped with a deep brown frosting swirl that looks thick, with a few lighter streaks like real ganache. This one feels relaxing because you can use slow, curved brush strokes to build the swirl, and the dark colors hide tiny mistakes.
Materials Needed:
- Stretched canvas
- Acrylic paint set (browns, cream, black)
- Paintbrushes in multiple sizes
- Palette or paint tray
- Cup of water + rag
Steps to Make:
- Draw a simple cupcake outline and a large spiral guide for the frosting.
- Paint the cake base and wrapper first, keeping the wrapper lighter for contrast.
- Build the frosting swirl in dark brown layers, following your spiral guide.
- Dry-brush lighter brown streaks on top to create a glossy, thick look.
- Let it dry and prop it on a desk or kitchen shelf for cozy decor.
4. Lemon Cupcake with Zest Canvas Painting
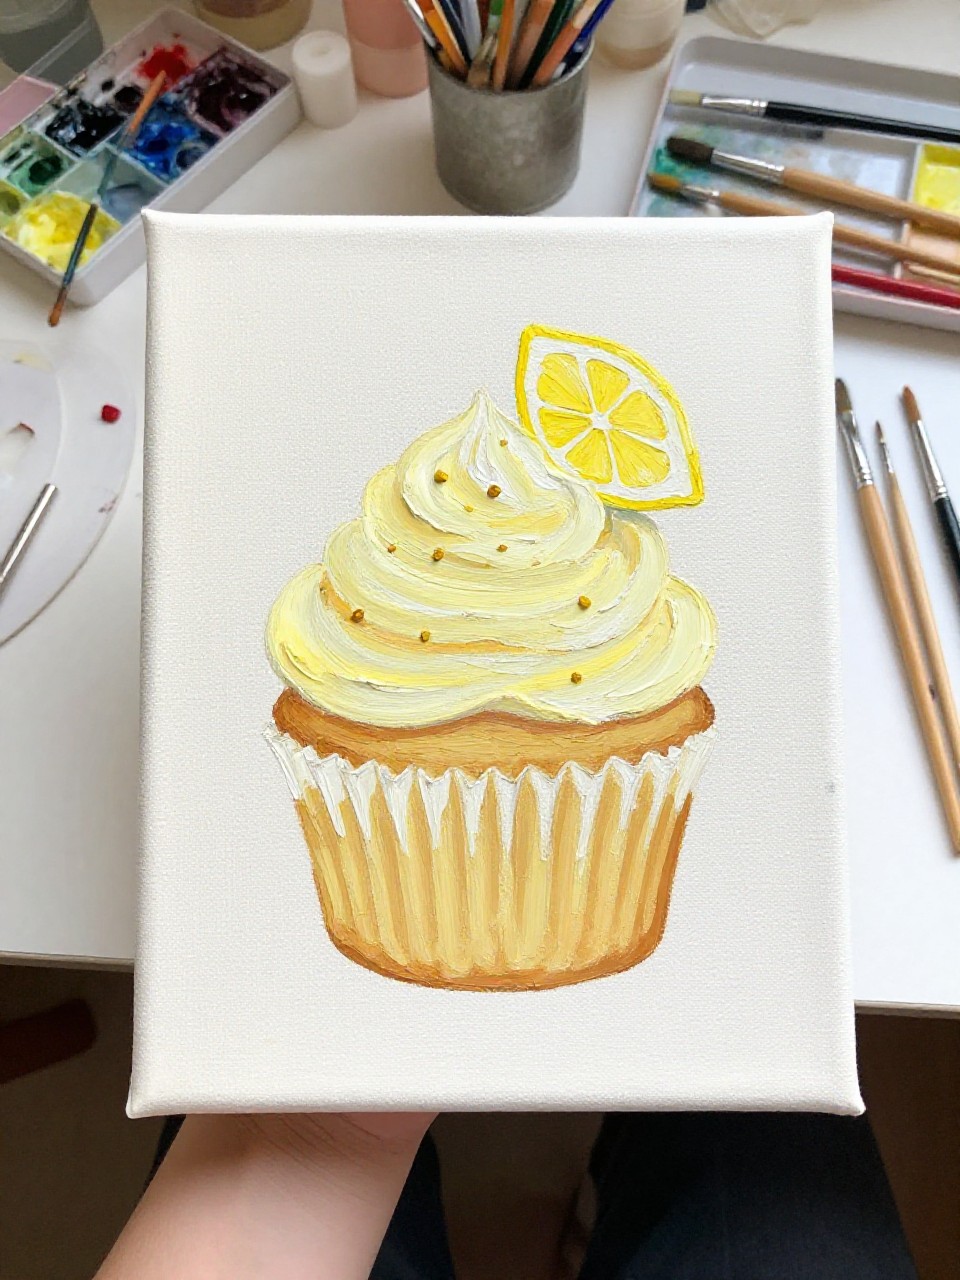
This bright cupcake has pale yellow frosting, a little lemon slice, and tiny zest dots scattered on top. It’s perfect if you want a cheerful painting that isn’t too detailed, and it teaches you how to make light colors pop using darker shadows underneath.
Materials Needed:
- Stretched canvas
- Acrylic paint set (yellow, white, tan, green)
- Paintbrushes in multiple sizes
- Palette or paint tray
- Optional sealer or varnish
Steps to Make:
- Sketch the cupcake and leave space for a small lemon slice on the frosting.
- Paint the wrapper in a soft neutral color, then add curved shadow lines.
- Blend pale yellow frosting, adding slightly darker yellow at the base of the swirl.
- Paint a lemon slice with thin wedge lines and dot in zest with a tiny brush.
- Dry fully and seal if you want a cleaner, brighter finish.
5. Mint Chocolate Chip Cupcake Canvas Art
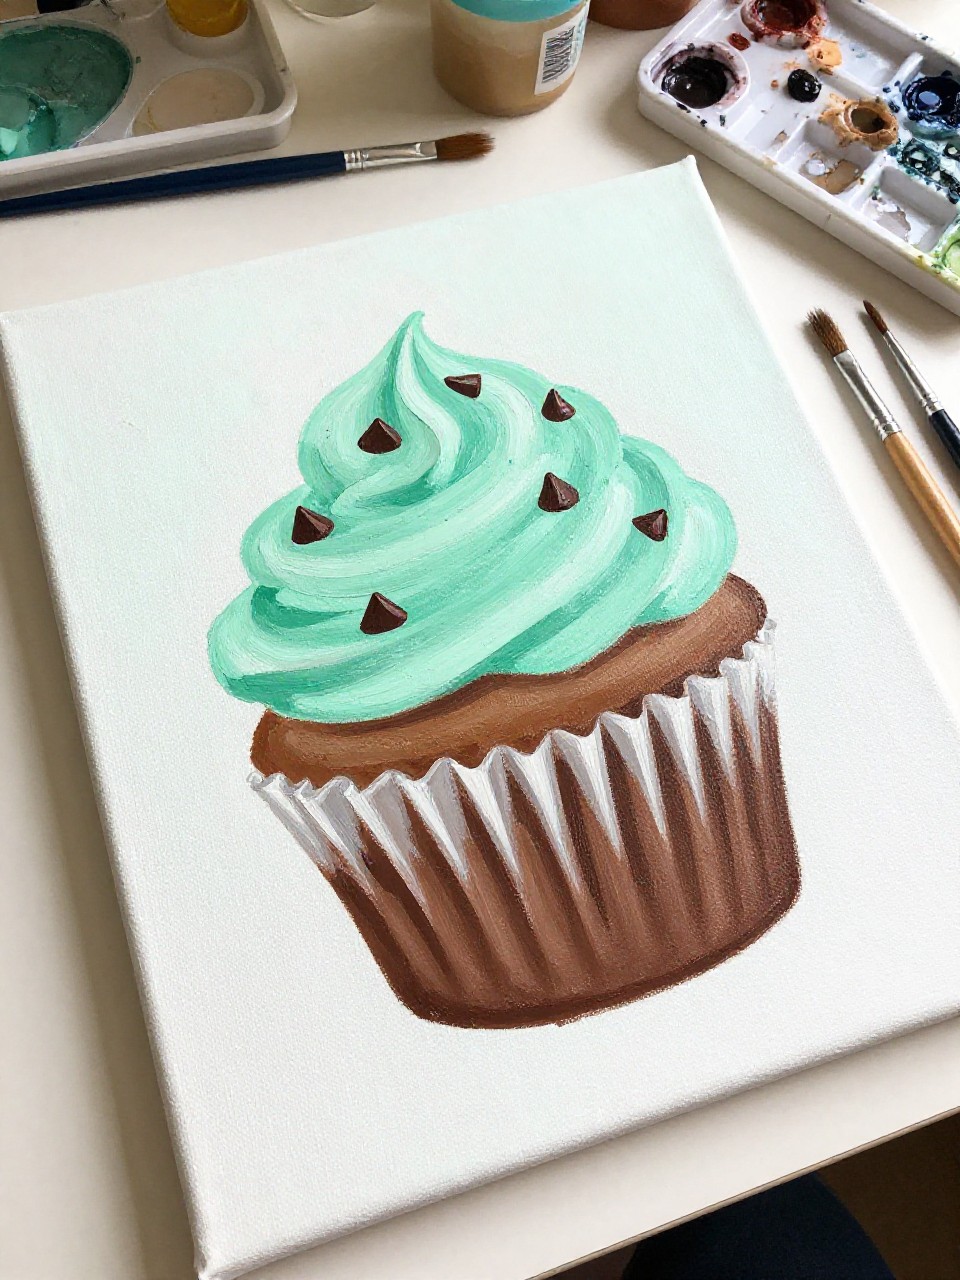
A mint-green frosting swirl is covered in little chocolate chip marks, sitting on a cocoa cupcake base. It’s a fun beginner project because the “chips” are just quick brush dabs, and the mint color looks amazing even if your blending is not perfect.
Materials Needed:
- Stretched canvas
- Acrylic paint set (mint/green, brown, black, white)
- Paintbrushes in multiple sizes
- Palette or paint tray
- Paper towel for blotting
Steps to Make:
- Draw the cupcake shape and lightly mark the frosting spiral with a curved line.
- Paint the base cupcake in brown tones, blending a darker edge for depth.
- Add mint frosting in two layers, leaving thicker paint ridges for texture.
- Dot chocolate chips with a small brush, then add tiny white highlights on frosting peaks.
- Let dry and hang it where it catches daylight for extra color pop.
6. Red Velvet Cupcake with Cream Cheese Frosting Canvas Painting
This painting shows a deep red cupcake with smooth, off-white frosting and a few red crumbs sprinkled on top. It’s great for home decor because the colors feel classic and cozy, and it’s easy for beginners since the frosting can be painted in simple rounded layers.
Materials Needed:
- Stretched canvas
- Acrylic paint set (red, white, tan, brown)
- Paintbrushes in multiple sizes
- Palette or paint tray
- Optional sealer or varnish
Steps to Make:
- Sketch the cupcake and wrapper pleats with light pencil lines.
- Paint the cupcake top in dark red, then blend in deeper maroon shadows.
- Paint the frosting with creamy off-white and add a soft shadow under the swirl.
- Flick tiny red crumb dots using a small brush near the frosting peak.
- Dry completely and add a thin varnish coat if you want richer reds.
7. Blueberry Cupcake with Purple Glaze Canvas Art
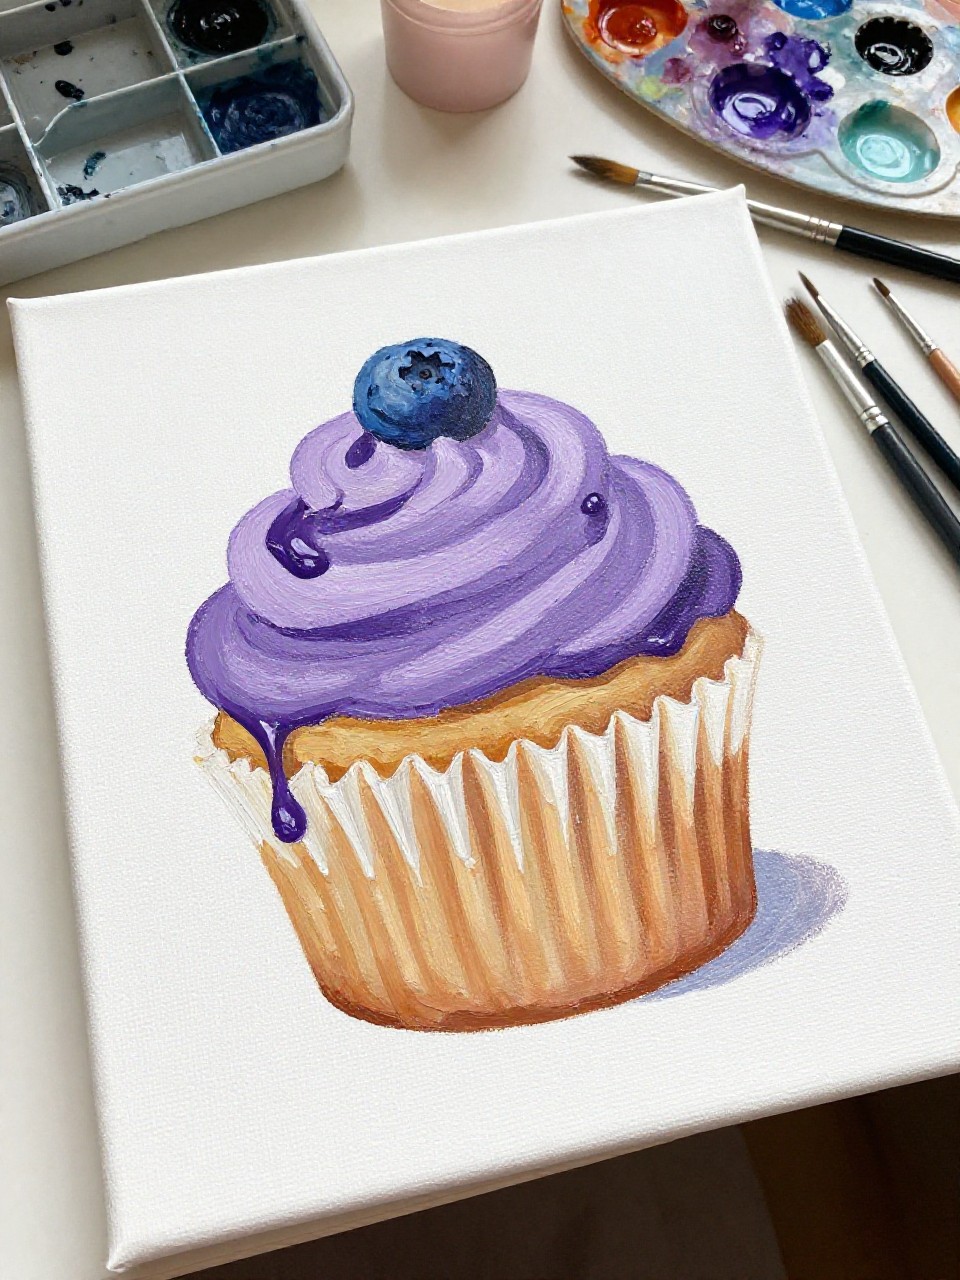
A blueberry cupcake is topped with pale lavender frosting and a shiny purple glaze that drips down one side. This one is calming to paint because the cool colors blend softly, and beginners can keep the blueberry shapes simple by using small circles with tiny highlights.
Materials Needed:
- Stretched canvas
- Acrylic paint set (lavender, purple, blue, white)
- Paintbrushes in multiple sizes
- Palette or paint tray
- Cup of water
Steps to Make:
- Sketch the cupcake and choose one side where the glaze will drip.
- Paint the wrapper and cake base in light neutrals so the purples stand out.
- Blend lavender frosting in curved strokes, building the swirl from bottom to top.
- Add purple glaze drips and dot blueberries with small circles plus white highlight specks.
- Let dry and display near a window for a fresh, cool look.
8. Funfetti Cupcake Burst Canvas Painting
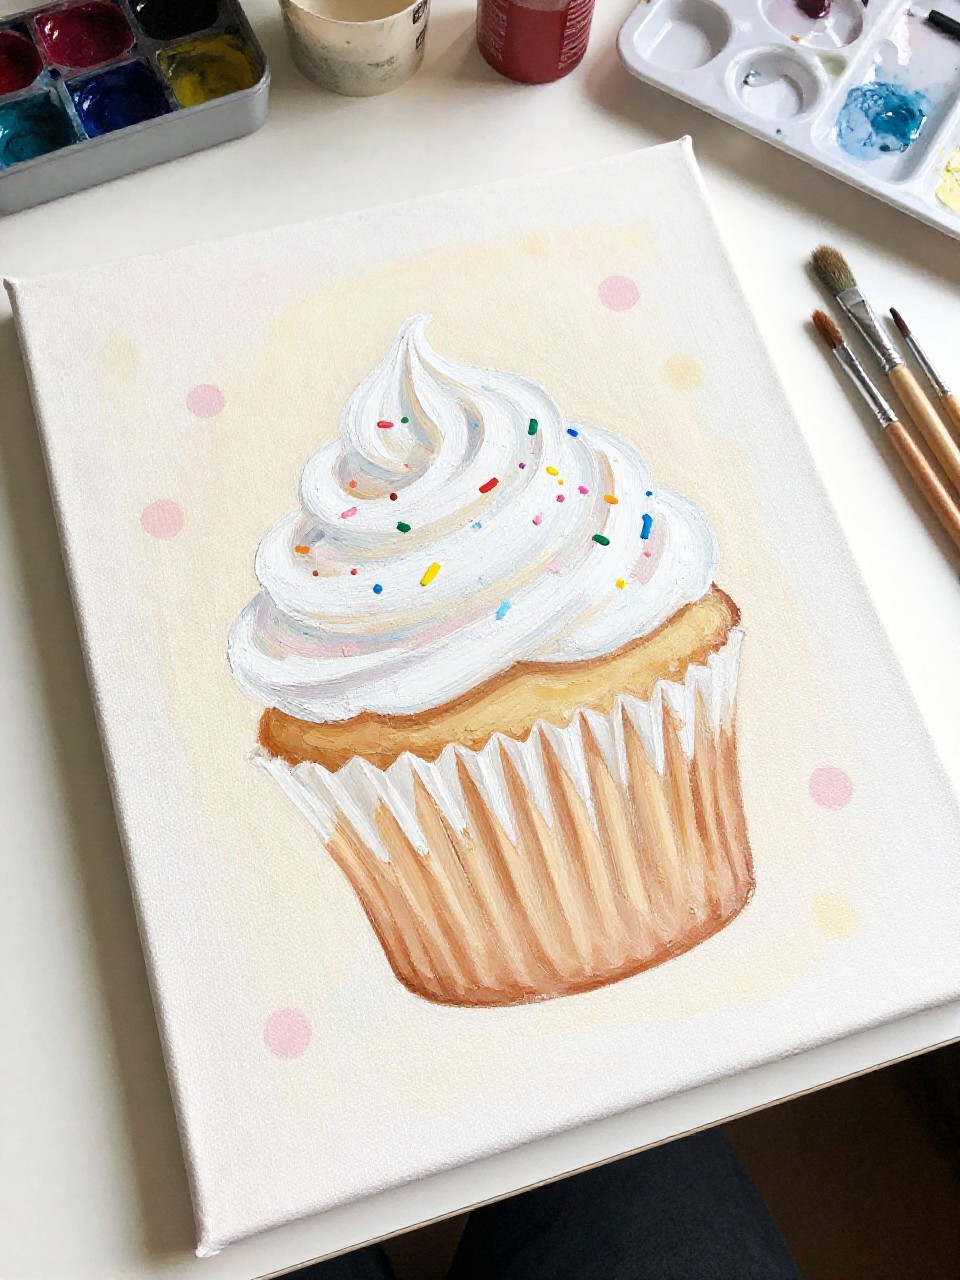
This cupcake has bright white frosting with a burst of colorful confetti sprinkles, plus a playful background of soft pastel dots. It’s perfect for beginners because you can paint the cupcake first, then relax and add sprinkles in any order without worrying about exact placement.
Materials Needed:
- Stretched canvas
- Acrylic paint set (white + assorted bright colors)
- Paintbrushes in multiple sizes
- Palette or paint tray
- Paper towel with paint stains
Steps to Make:
- Sketch a large cupcake centered on the canvas, leaving a simple background space.
- Paint the wrapper in a light color and add curved shading between pleats.
- Paint thick white frosting and leave raised brush strokes for a whipped look.
- Add sprinkles as short lines and dots, then dab pastel background dots around the cupcake.
- Dry fully and frame it for a cheerful craft-room print vibe.
9. Caramel Drizzle Cupcake Canvas Painting
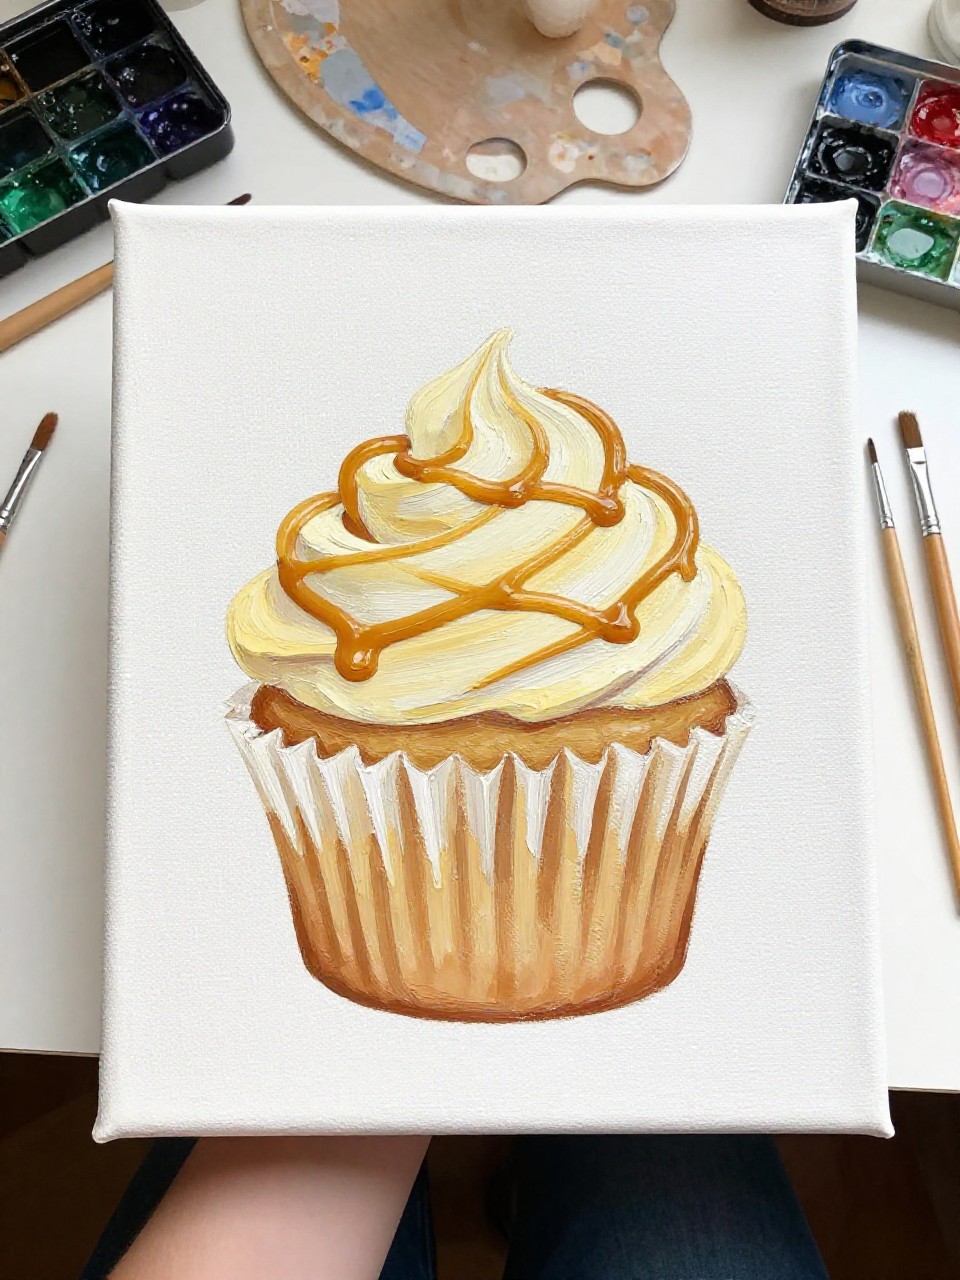
A golden caramel drizzle zigzags across vanilla frosting, with warm brown shadows that make the sauce look sticky and real. It’s a relaxing project for beginners because the drizzle can be wavy and imperfect, and those little “oops” lines actually make it look more handmade.
Materials Needed:
- Stretched canvas
- Acrylic paint set (tan, brown, white, yellow)
- Paintbrushes in multiple sizes
- Palette or paint tray
- Optional sealer or varnish
Steps to Make:
- Sketch the cupcake and lightly draw the drizzle path as a loose zigzag.
- Paint the frosting and wrapper first, keeping the frosting bright and simple.
- Mix caramel tones (tan + brown) and paint the drizzle with a small round brush.
- Add darker caramel underlines on one side to create a raised, syrupy look.
- Let it dry, then seal lightly if you want the drizzle to stand out more.
10. Rainbow Frosting Cupcake Canvas Art
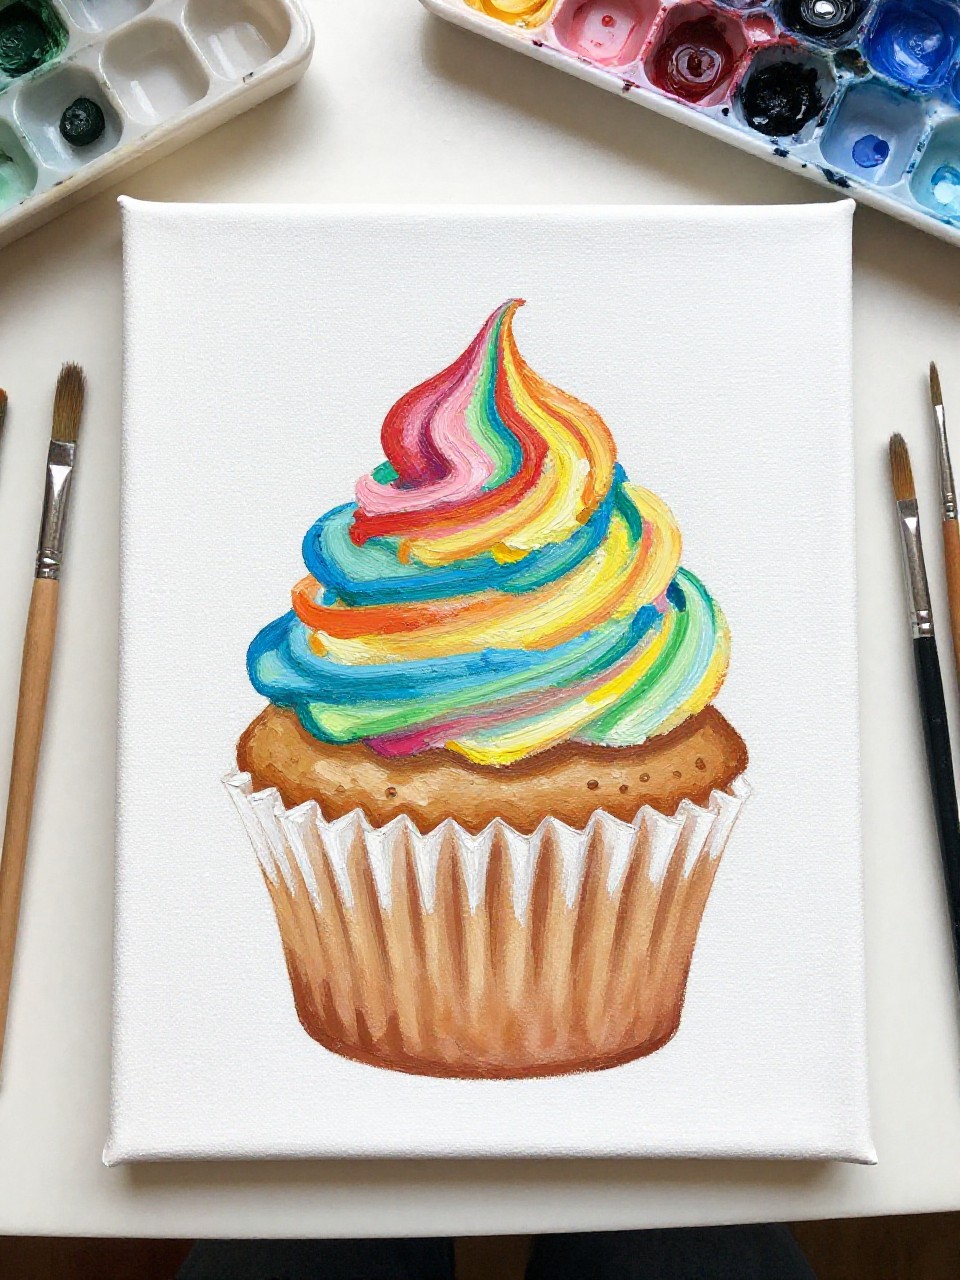
This cupcake has a tall frosting swirl painted in rainbow bands that blend softly where the colors meet. It’s great for practicing simple blending without pressure, and it looks bold and happy even if your lines aren’t perfectly smooth.
Materials Needed:
- Stretched canvas
- Acrylic paint set (red, orange, yellow, green, blue, purple, white)
- Paintbrushes in multiple sizes
- Palette or paint tray
- Cup of water + paper towels
Steps to Make:
- Sketch a cupcake with an extra-tall frosting swirl to fit the rainbow stripes.
- Paint the wrapper in a neutral tone so the frosting becomes the main focus.
- Lay down rainbow color bands along the swirl, following the curve of the frosting.
- Blend gently where colors touch using a clean damp brush, then add white highlights on peaks.
- Dry fully and hang it as bright, playful wall art.
11. Galaxy Cupcake Canvas Painting
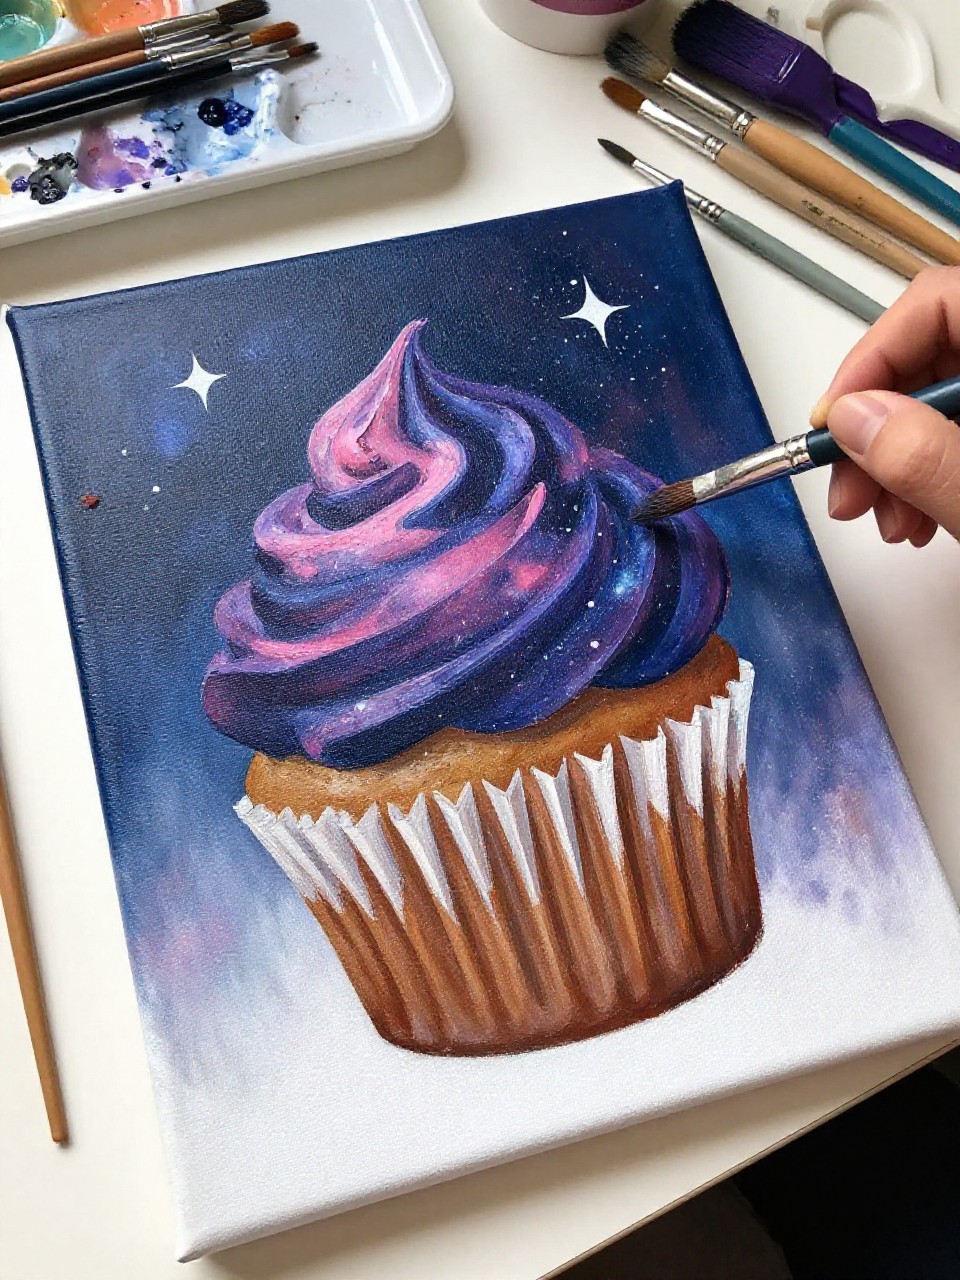
A dark, dreamy cupcake has frosting painted like a night sky, with tiny stars and soft nebula-like swirls. It’s a fun beginner project because the galaxy effect looks better with loose blending, and splattering tiny stars is quick and satisfying.
Materials Needed:
- Stretched canvas
- Acrylic paint set (black, navy, purple, pink, white)
- Paintbrushes in multiple sizes
- Palette or paint tray
- Old toothbrush or stiff brush for splatter
Steps to Make:
- Sketch the cupcake and paint the base in a simple dark chocolate tone.
- Paint the frosting in navy and purple, blending while the paint is still wet.
- Add pink swirls and darker pockets to create depth like a cloudy sky.
- Splatter tiny white stars, then add a few larger star dots with a small brush.
- Dry fully and display it in a bedroom or cozy reading corner.
12. Watercolor-Style Cupcake Canvas Art
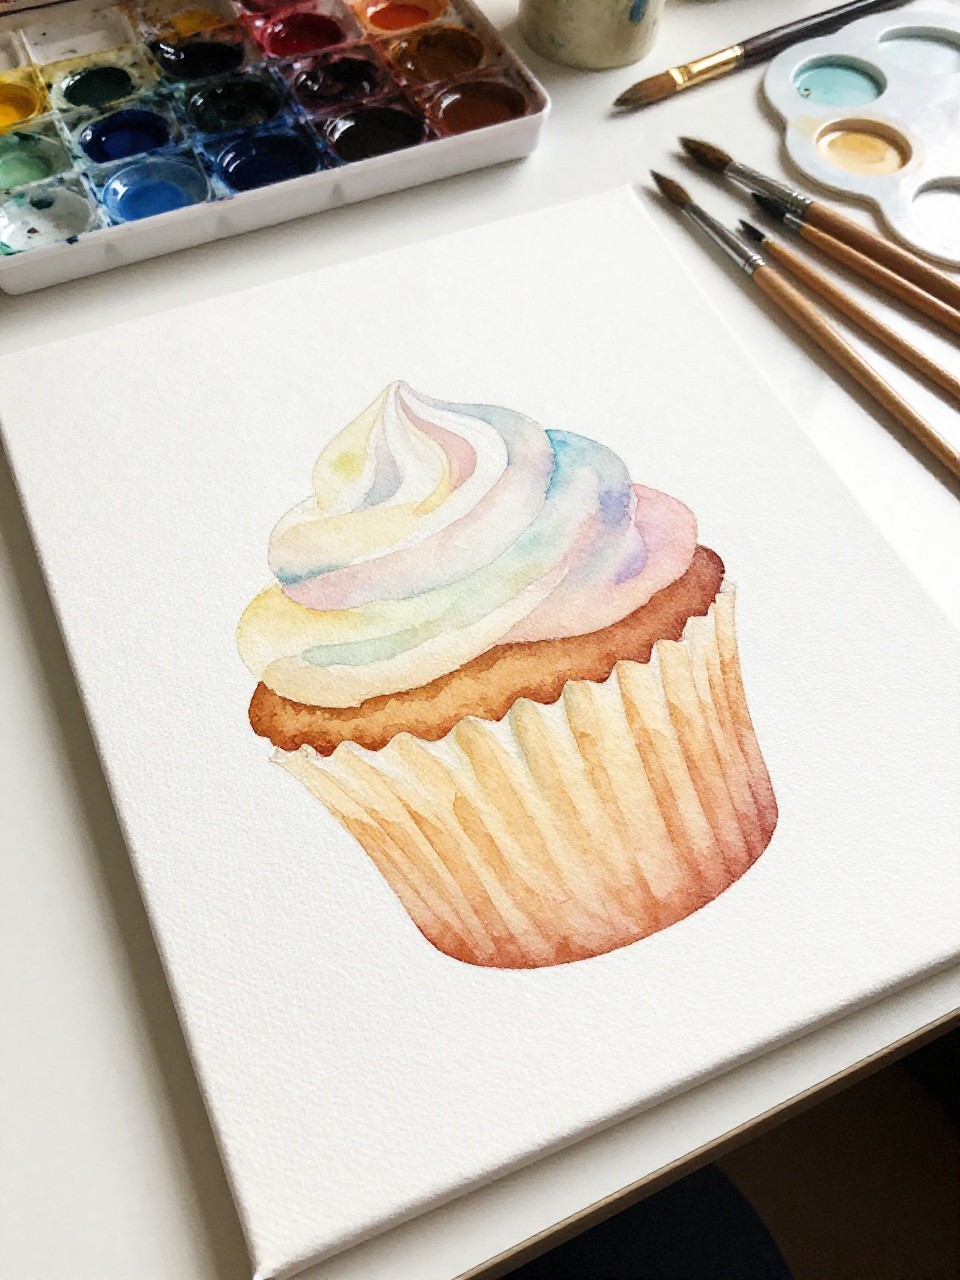
This cupcake looks light and airy, with soft, see-through layers of color and gentle edges, almost like a watercolor illustration. It’s soothing to paint because you use thin acrylic washes and let colors blend naturally, so you don’t have to worry about sharp lines.
Materials Needed:
- Stretched canvas
- Acrylic paint set (mixed colors + lots of white)
- Paintbrushes in multiple sizes
- Palette or paint tray
- Cup of water (for thinning paint)
Steps to Make:
- Lightly sketch the cupcake, keeping details minimal and open.
- Thin your paint with water and lay down a pale base wash for the wrapper and cake.
- Add soft frosting color in loose curved strokes, letting layers show through.
- Drop in slightly darker washes at the bottom edges for gentle shadow.
- Let dry flat and keep it unvarnished for a soft, matte look.
13. Black-and-White Cupcake Sketch Canvas Painting
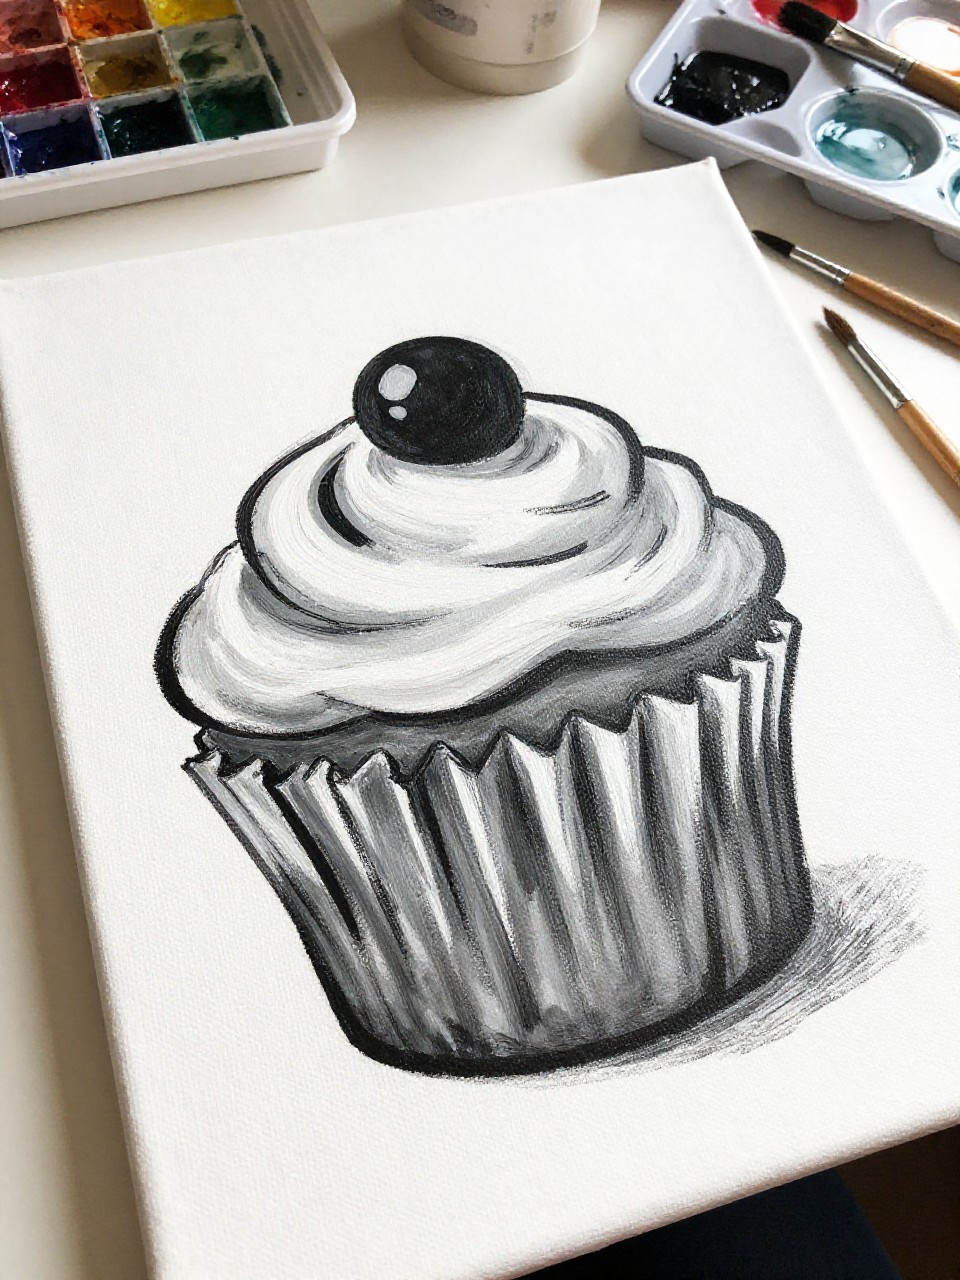
This cupcake is painted in grayscale with strong shadows, like a cafe menu drawing that came to life. It’s beginner-friendly because you only focus on value (light to dark), and it helps you learn how to create depth with a few careful shadow shapes.
Materials Needed:
- Stretched canvas
- Acrylic paint set (black, white, gray)
- Paintbrushes in multiple sizes
- Palette or paint tray
- Sketch pencil + eraser
Steps to Make:
- Sketch the cupcake with clear frosting ridges and wrapper pleats.
- Paint a light gray base over the cupcake, leaving the background mostly white.
- Build darker shadows under the frosting and between wrapper folds.
- Add thin black line accents and small white highlight strokes on the frosting peaks.
- Dry fully and display it with other monochrome art for a clean look.
14. Pastel Ombre Frosting Cupcake Canvas Painting

This cupcake has frosting that shifts from one pastel color to another, like pink fading into peach and then into pale yellow. It’s a relaxing piece to make because you can blend slowly and enjoy the smooth gradient, and beginners love it since it looks fancy without extra details.
Materials Needed:
- Stretched canvas
- Acrylic paint set (pastel pink, peach, yellow, white)
- Paintbrushes in multiple sizes
- Palette or paint tray
- Cup of water + paper towels
Steps to Make:
- Sketch a cupcake with a wide frosting swirl to give room for the gradient.
- Paint the wrapper in a simple pale color and add one soft shadow edge.
- Lay down pastel pink at the top, peach in the middle, and yellow near the bottom.
- Blend where the colors meet using short curved strokes that follow the swirl.
- Let dry and hang it in a nursery, craft corner, or bright hallway.
15. Holiday Sprinkle Cupcake Canvas Art
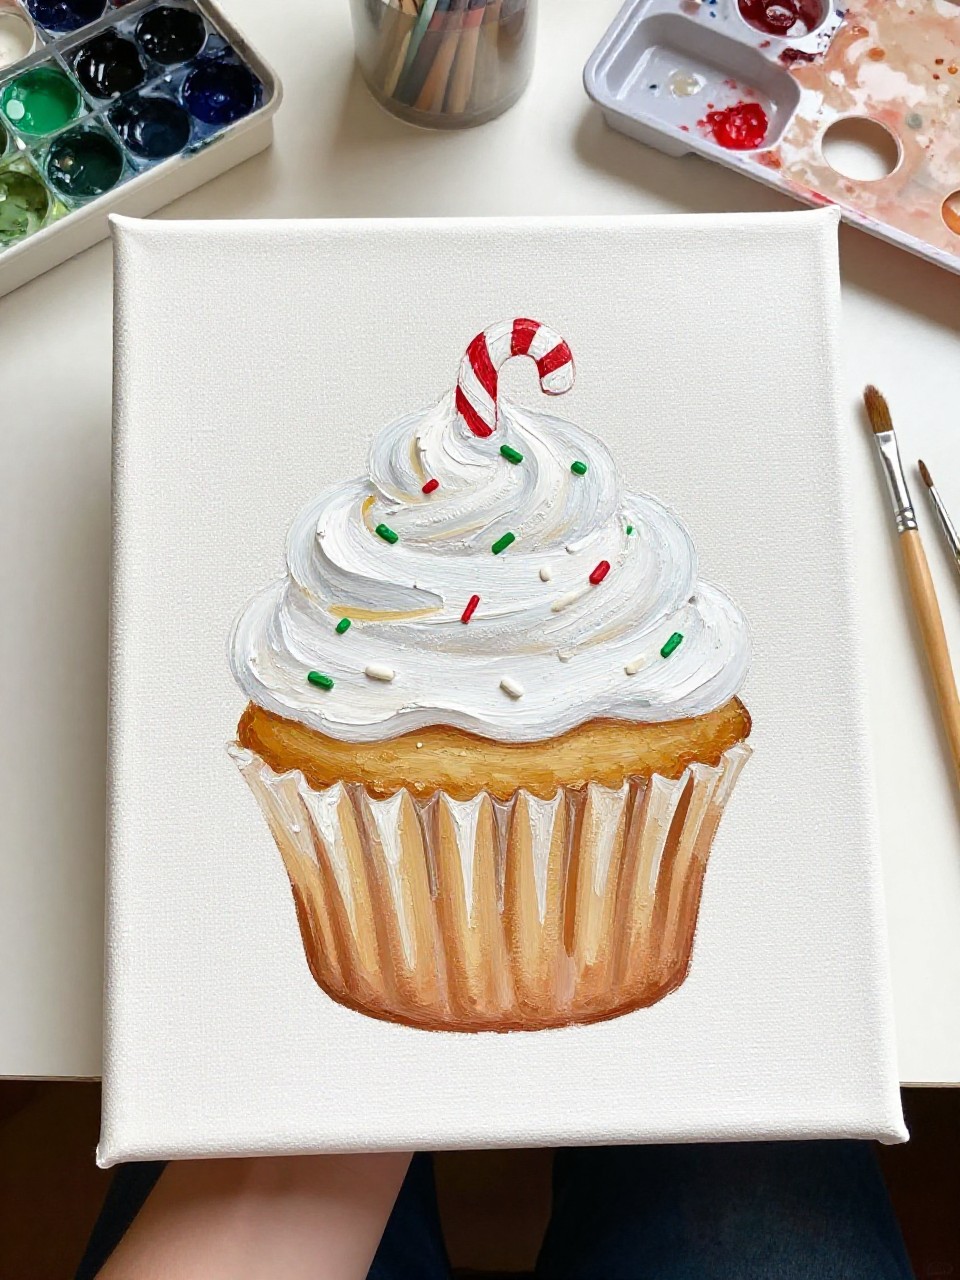
A cozy cupcake is topped with frosting and holiday sprinkles in red, green, and white, with a tiny candy cane detail. It’s a simple seasonal painting you can pull out each year, and it’s great for beginners because the festive look comes mostly from easy dot-and-dash sprinkles.
Materials Needed:
- Stretched canvas
- Acrylic paint set (red, green, white, brown)
- Paintbrushes in multiple sizes
- Palette or paint tray
- Optional sealer or varnish
Steps to Make:
- Sketch the cupcake and a small candy cane shape leaning into the frosting.
- Paint the cake and wrapper in warm tones, adding deeper brown shadow under the frosting.
- Paint the frosting in white with a slightly gray shadow to keep it from looking flat.
- Add red and green sprinkles, then paint candy cane stripes that follow its curve.
- Dry fully and seal lightly so it stays fresh through the season.
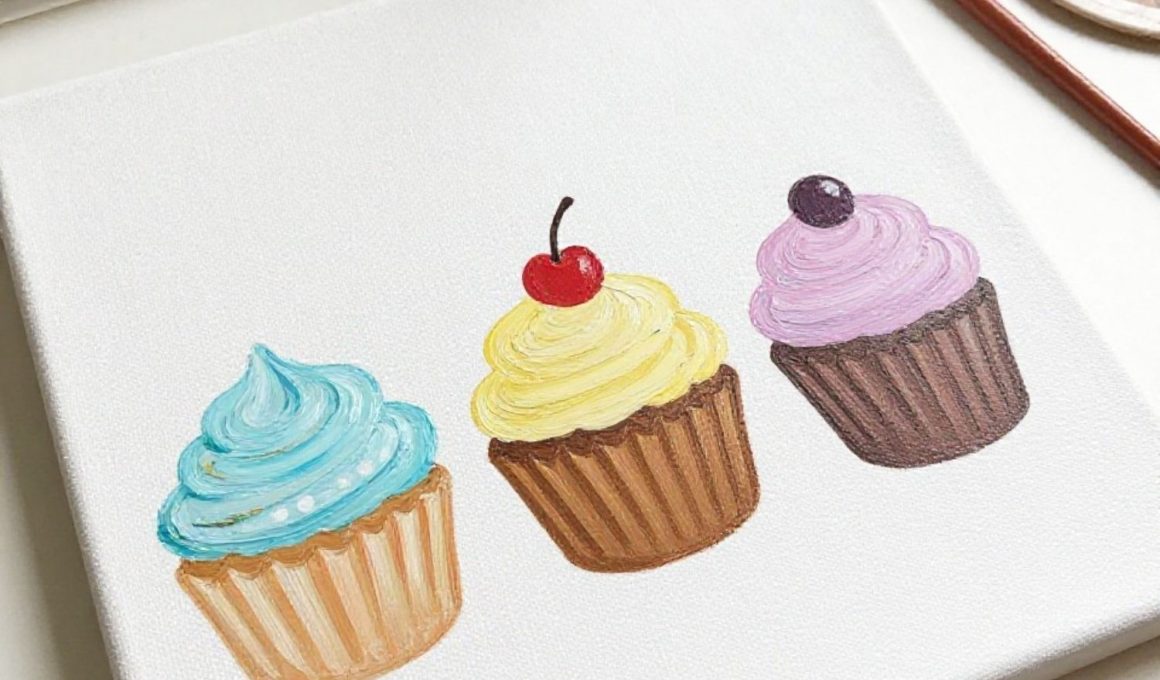
16. Mini Cupcake Trio Canvas Painting
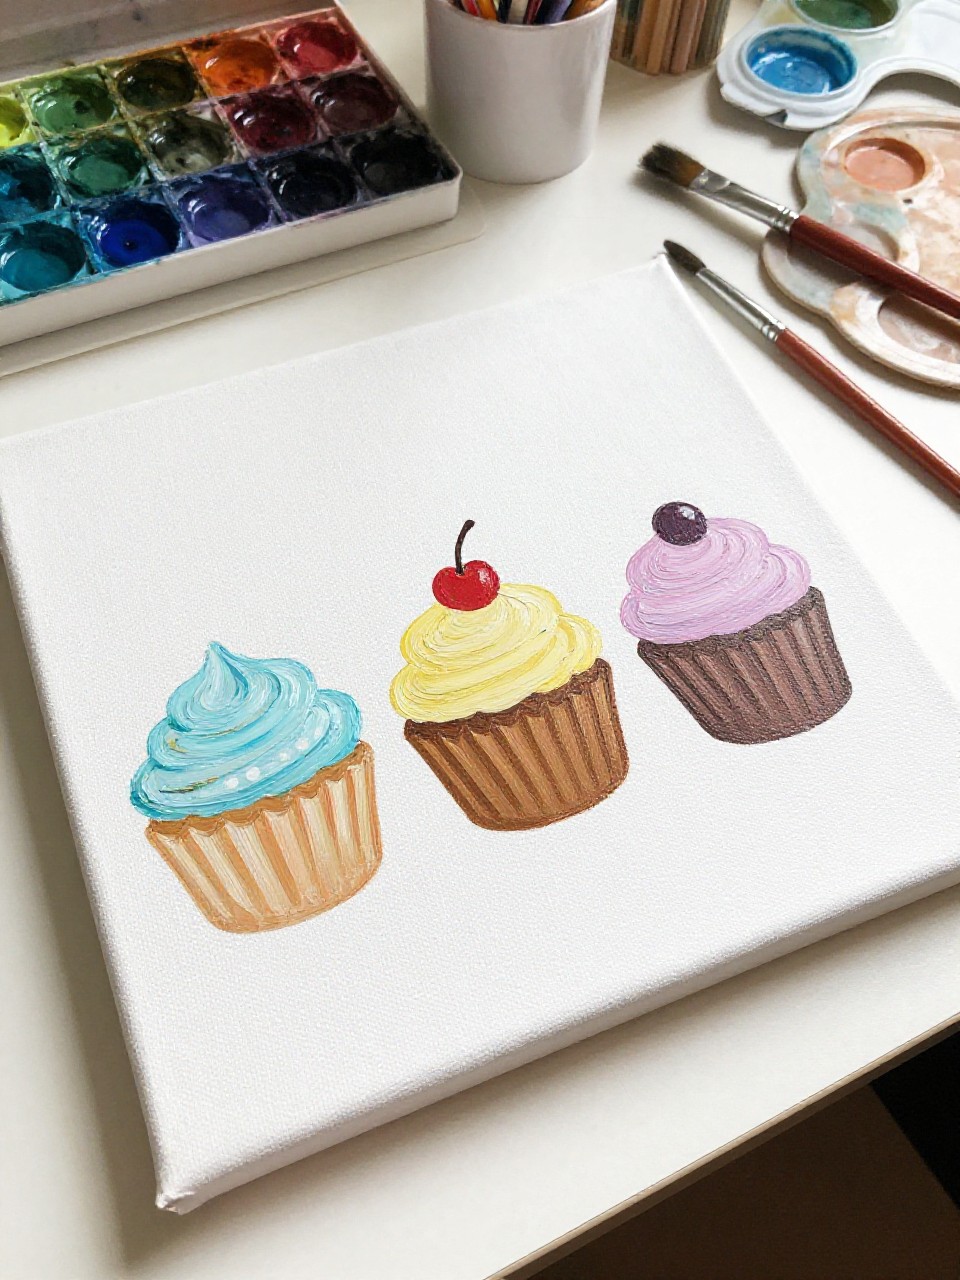
This canvas shows three small cupcakes in a row, each with different frosting colors and simple toppings, like a cute bakery sampler. It’s great for beginners because each cupcake is a tiny practice round, and if one looks a little off, the set still looks charming together.
Materials Needed:
- Stretched canvas
- Acrylic paint set (assorted colors)
- Paintbrushes in multiple sizes
- Palette or paint tray
- Sketch pencil + eraser
Steps to Make:
- Lightly draw three cupcake shapes spaced evenly across the canvas.
- Paint the wrappers first, changing patterns like stripes, dots, and a solid color.
- Add frosting swirls in three different colors, using thicker paint for texture.
- Paint simple toppings like a cherry, a few sprinkles, and a chocolate drizzle.
- Let dry and display it in a kitchen nook or above a coffee station.
17. Close-Up Frosting Swirl Cupcake Canvas Art
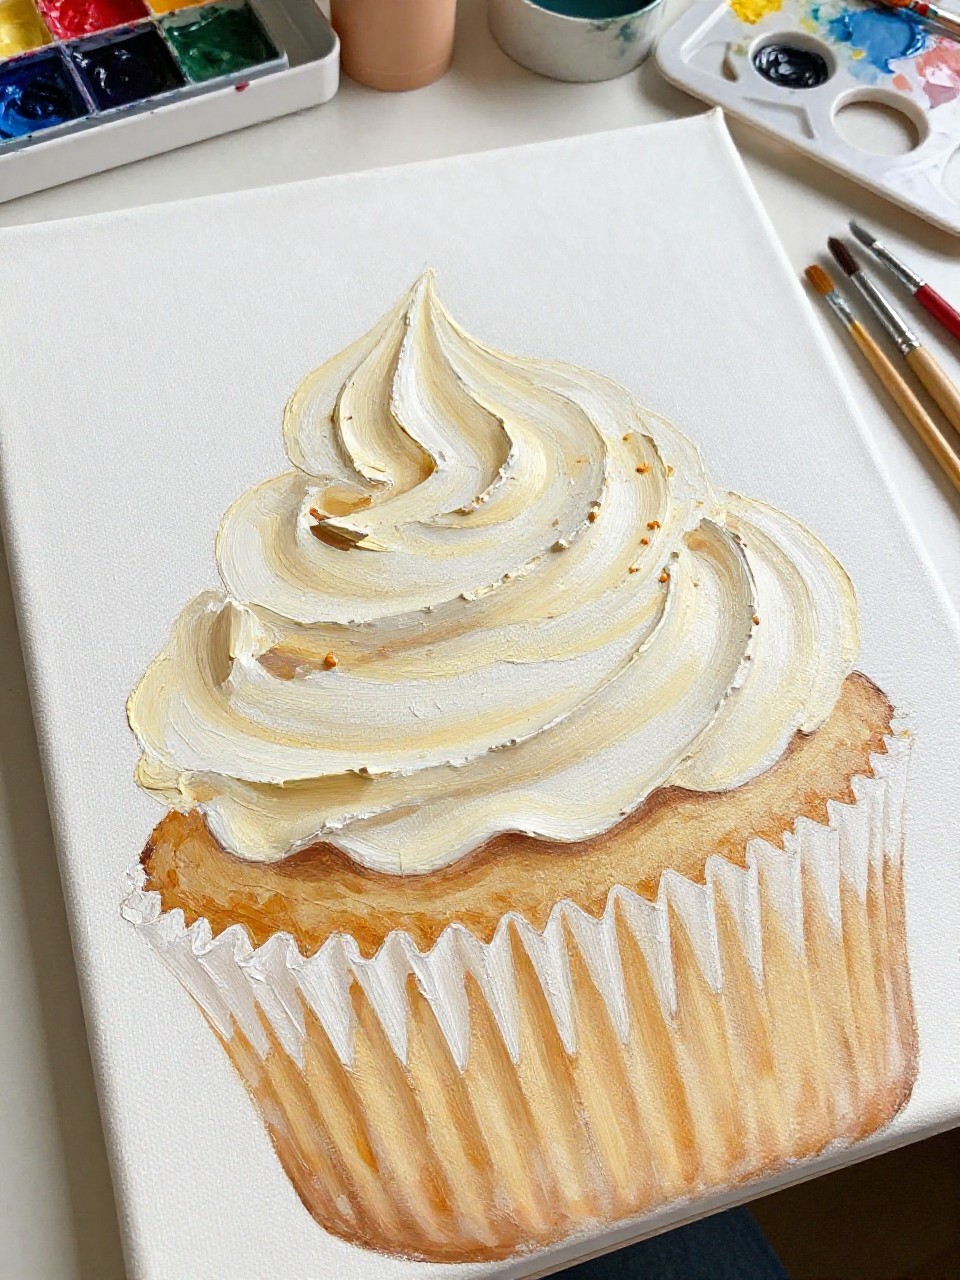
This painting zooms in on the frosting so it fills most of the canvas, showing thick swirls, bright highlights, and tiny sprinkle details up close. It’s perfect for beginners who want something impressive, because you don’t have to draw the whole cupcake—just focus on bold brush strokes and texture.
Materials Needed:
- Stretched canvas
- Acrylic paint set (choose 2–3 frosting colors + white)
- Paintbrushes in multiple sizes
- Palette or paint tray
- Optional sealer or varnish
Steps to Make:
- Sketch a large spiral that takes up most of the canvas, like a frosting close-up.
- Paint the base frosting color in thick curved strokes that follow the spiral.
- Layer darker tones into the grooves to create depth and shadow between ridges.
- Add bright white highlights on the highest peaks and sprinkle shapes near the top edge.
- Dry fully and varnish if you want the thick texture to stand out more.


