


Table of Contents Show
A good summer necklace can make a simple outfit feel more finished, especially when you are wearing linen tops, sundresses, tank tops, swimsuits, or easy vacation pieces. The nice thing about making your own is that you can choose the exact colors, beads, charms, and length that suit your style.
These DIY summer necklaces are designed to look polished, not overly crafty. They use simple techniques, but the final pieces feel stylish enough for beach dinners, garden parties, weekend outfits, travel looks, or handmade gifts that do not look rushed.
1. Freshwater Pearl and Shell Necklace
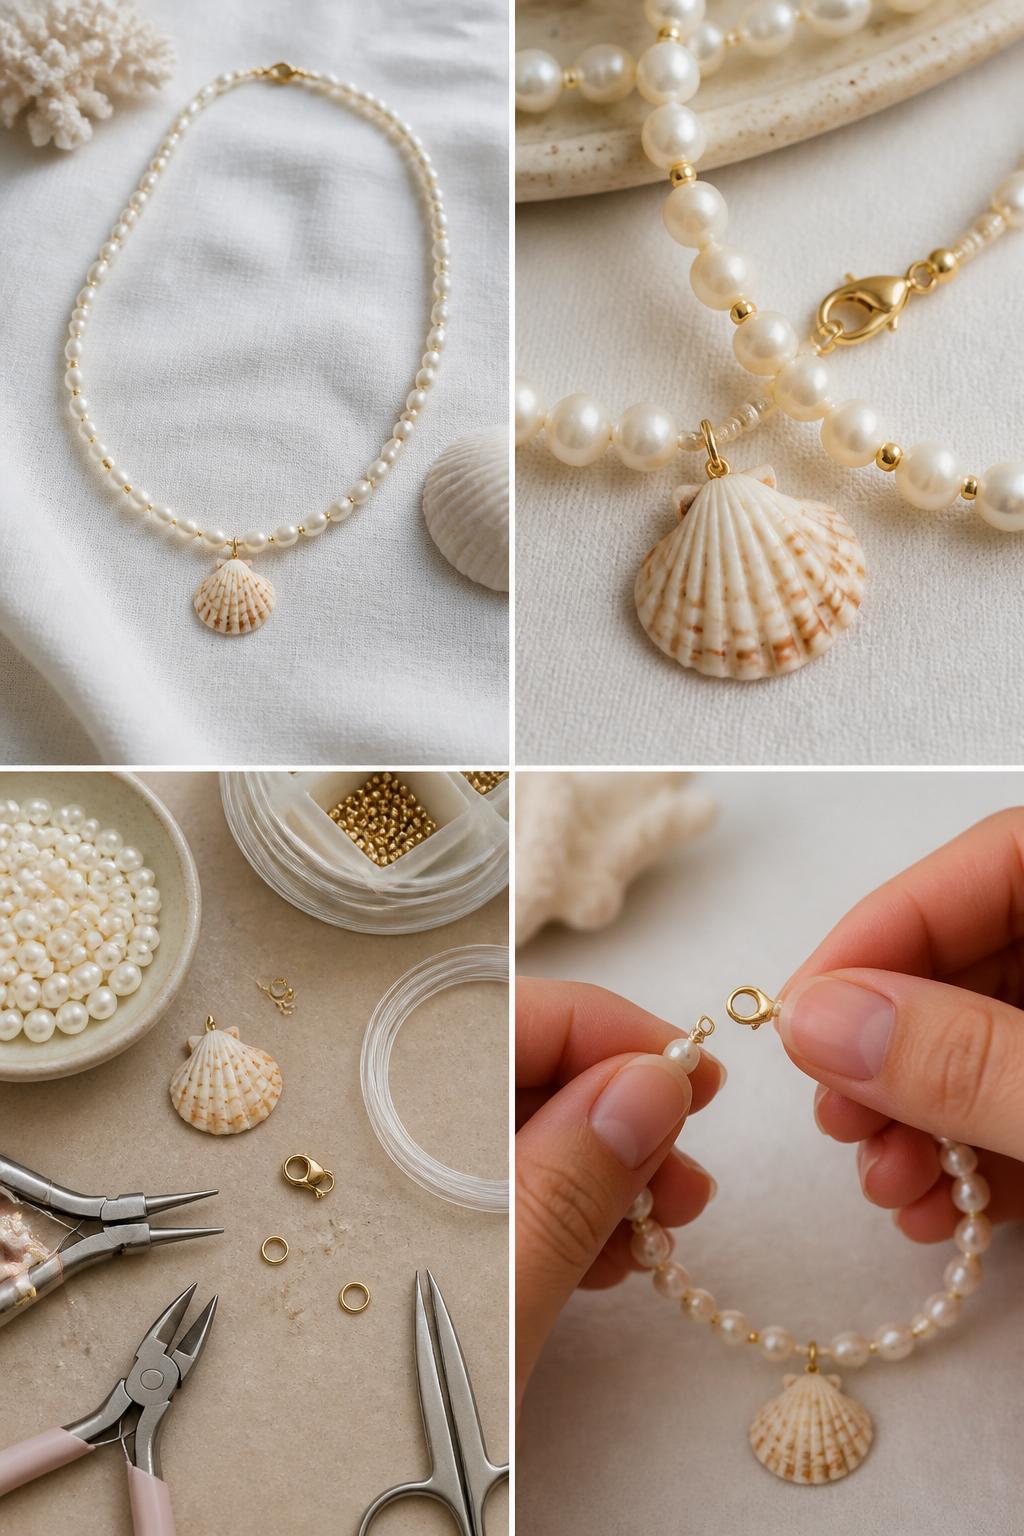
Freshwater pearls instantly make a DIY necklace look more polished. When paired with one small shell charm, the necklace still feels beachy, but in a soft and elegant way.
This is a great piece for summer dinners, vacation outfits, or bridal shower looks. Keep the pearls small and the shell pendant simple so the necklace looks delicate instead of bulky.
Materials Needed:
For People Who Love to Make Things ✂️
- Small freshwater pearls
- Small shell charm
- Beading wire
- Clasp
- Crimp beads
- Jewelry pliers
- Scissors
Steps To Make:
- Cut the beading wire slightly longer than your desired necklace length.
- String the freshwater pearls onto the wire.
- Add the shell charm in the center of the necklace.
- Attach the clasp using crimp beads and jewelry pliers.
- Trim the extra wire and check that the clasp is secure.
2. Gold Chain Charm Necklace

A gold chain charm necklace is simple to make but can look boutique-worthy when the charms are small and well spaced. A sun, pearl, shell, or tiny heart charm gives it a summer feel without making it look too busy.
This project is perfect if you want a quick DIY that still looks expensive. Use a delicate chain and stick with two or three charms for the cleanest finish.
Materials Needed:
- Fine gold chain
- Small summer charms
- Jump rings
- Clasp, if needed
- Jewelry pliers
- Wire cutters, optional
Steps To Make:
- Lay the chain flat and decide where each charm will sit.
- Open a jump ring with jewelry pliers.
- Slide one charm onto the jump ring.
- Attach the charm to the chain and close the jump ring tightly.
- Repeat with the other charms, keeping the spacing balanced.
3. Minimal Baroque Pearl Cord Necklace
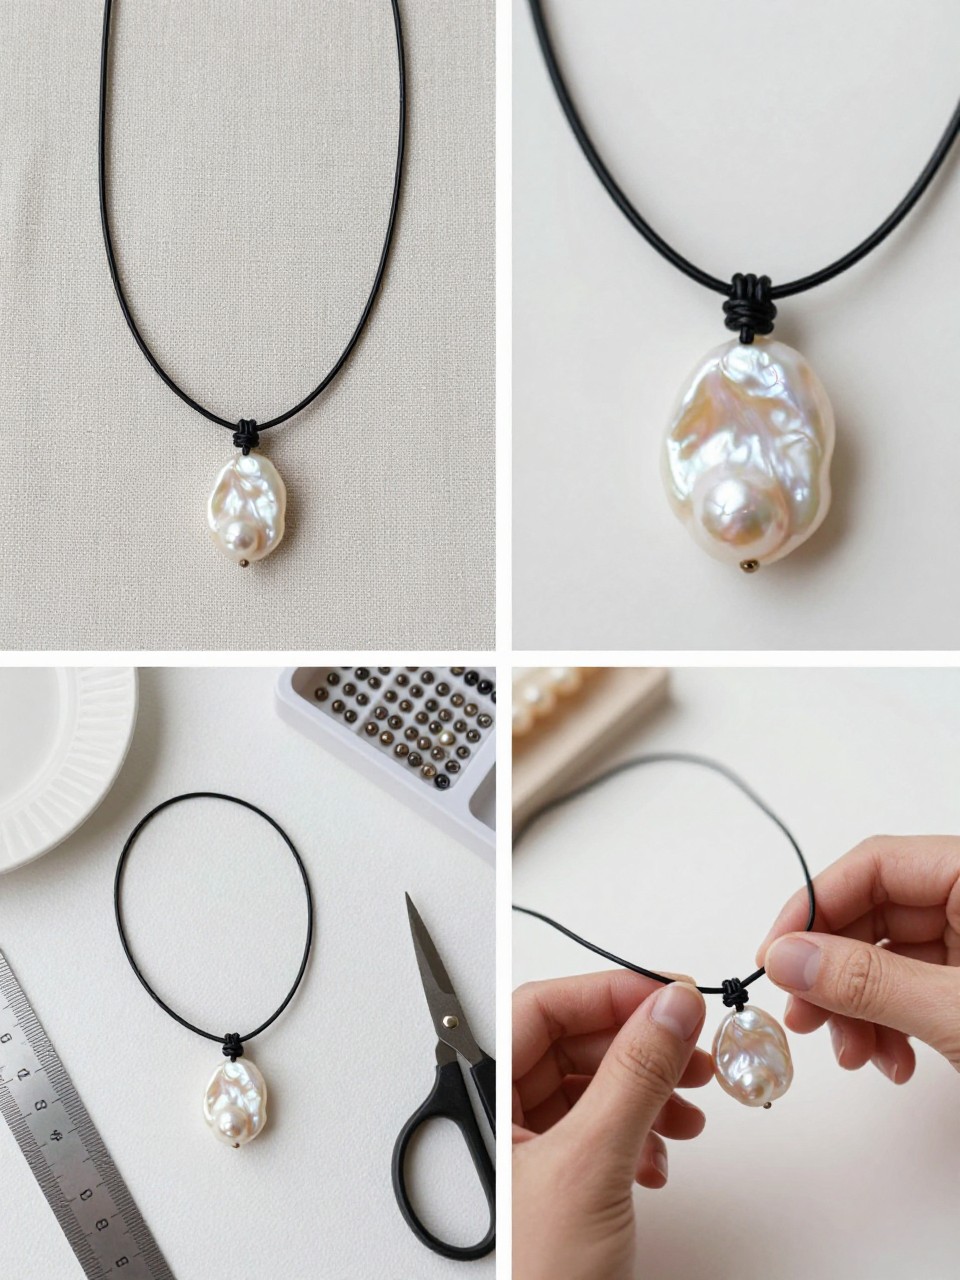
A single baroque pearl on cord looks simple, modern, and stylish. The irregular pearl shape makes the necklace feel more special than a basic bead pendant.
This is one of the easiest ways to make a summer necklace that looks store-bought. Use black, cream, tan, or chocolate cord depending on the look you want.
Materials Needed:
- One baroque pearl bead with a hole
- Thin waxed cord
- Scissors
- Ruler
- Clear jewelry glue, optional
Steps To Make:
- Cut the cord to your preferred necklace length.
- Slide the baroque pearl onto the center of the cord.
- Tie a small knot on each side of the pearl to hold it in place.
- Create sliding knots at the ends for an adjustable closure.
- Trim the cord ends neatly and secure with a tiny dot of glue if needed.
4. Tiny Gemstone Bead Necklace
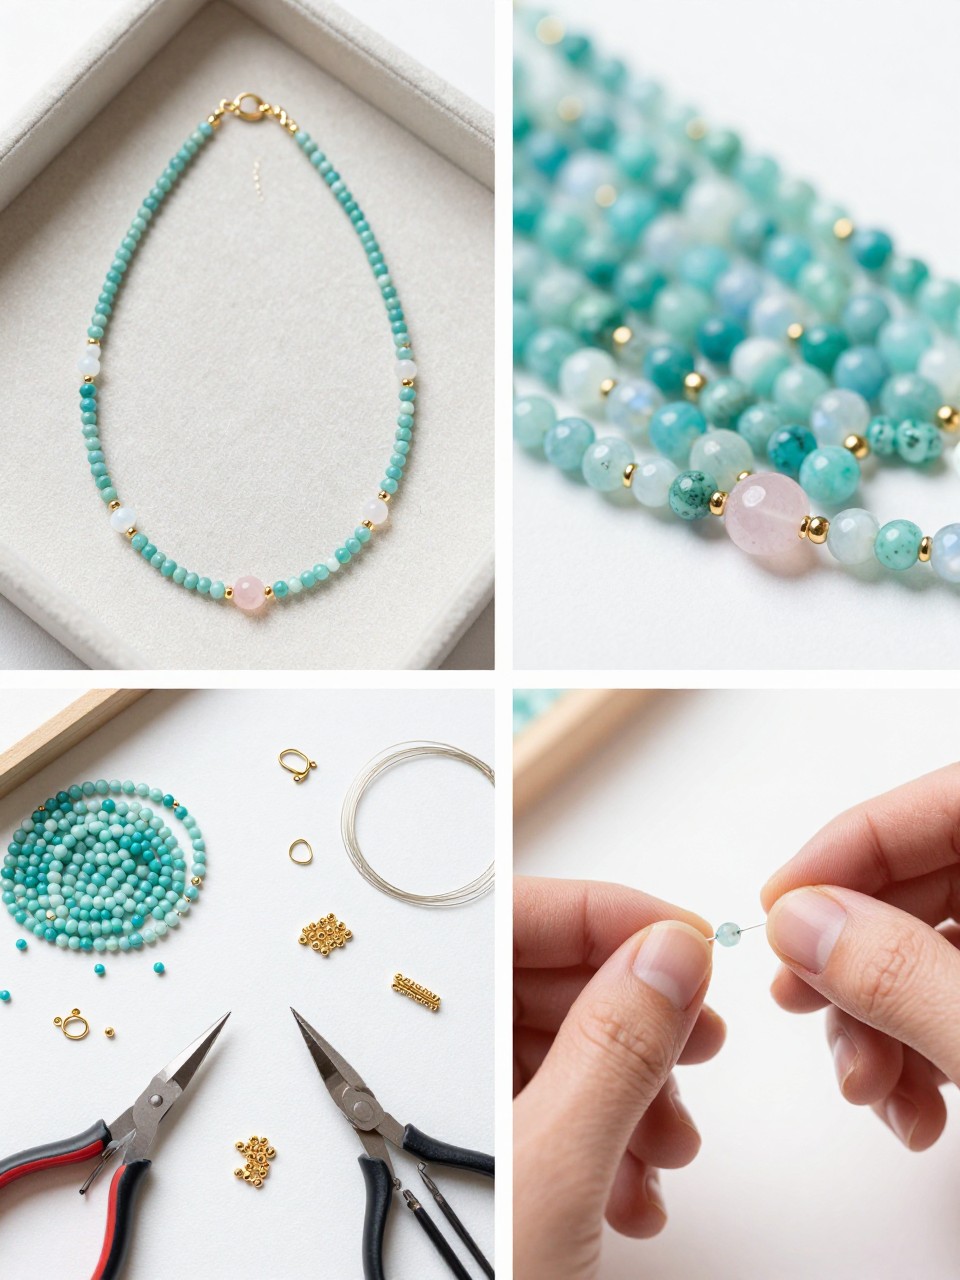
Tiny gemstone beads can make a handmade necklace feel refined and grown-up. Turquoise, moonstone, rose quartz, amazonite, or citrine all work well for summer because they add color without feeling too heavy.
This necklace looks best when the beads are small and evenly spaced. Add a few gold spacer beads for shine and a more finished look.
Materials Needed:
- Tiny gemstone beads
- Gold spacer beads
- Beading wire
- Clasp
- Crimp beads
- Jewelry pliers
- Scissors
Steps To Make:
- Cut beading wire slightly longer than the necklace length you want.
- Lay out your gemstone beads and gold spacers in a simple pattern.
- String the beads onto the wire.
- Attach the clasp with crimp beads and pliers.
- Trim extra wire and test the necklace closure.
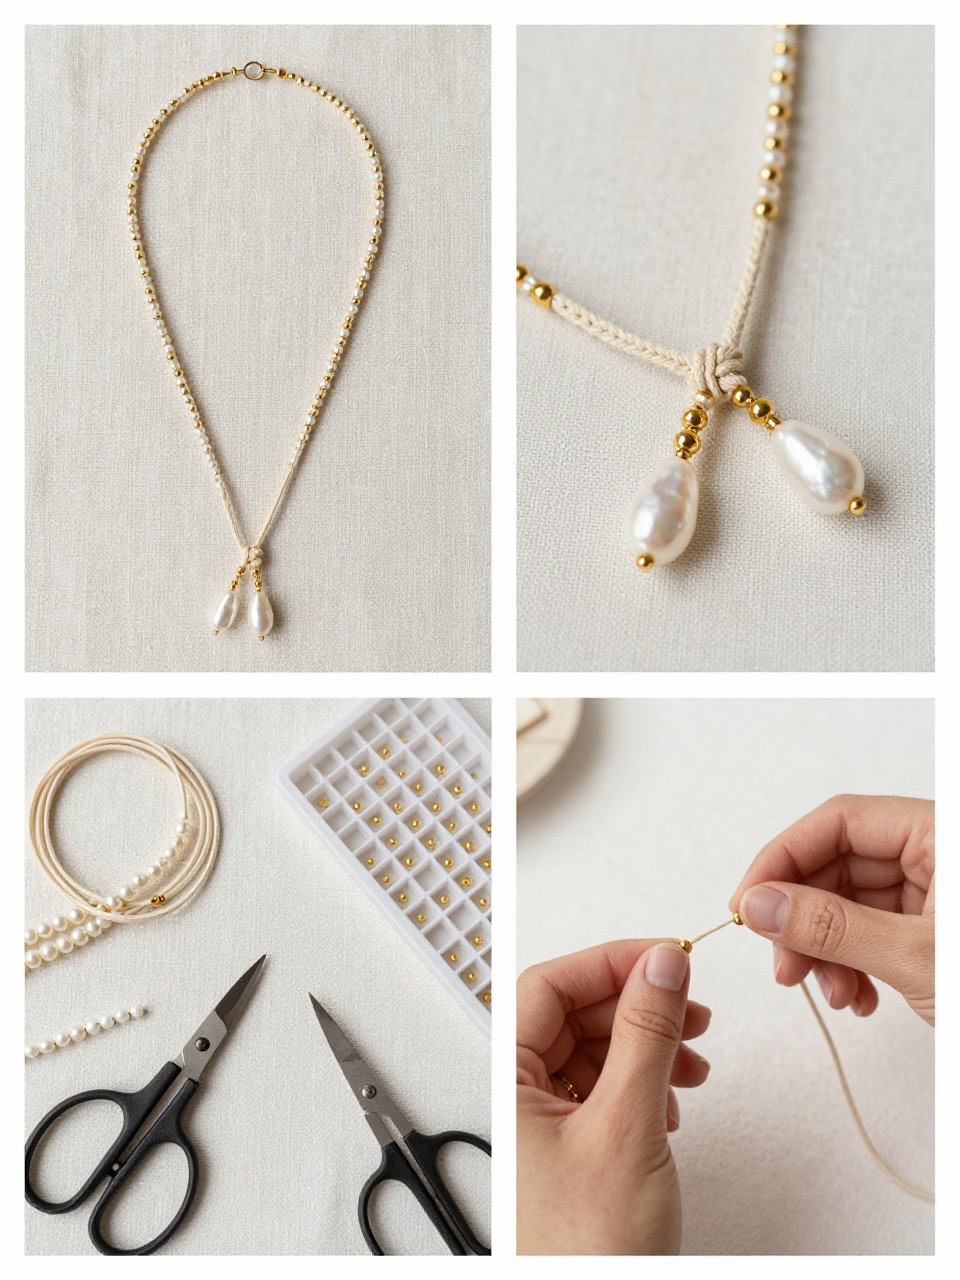
5. Ribbon and Pearl Tie Necklace
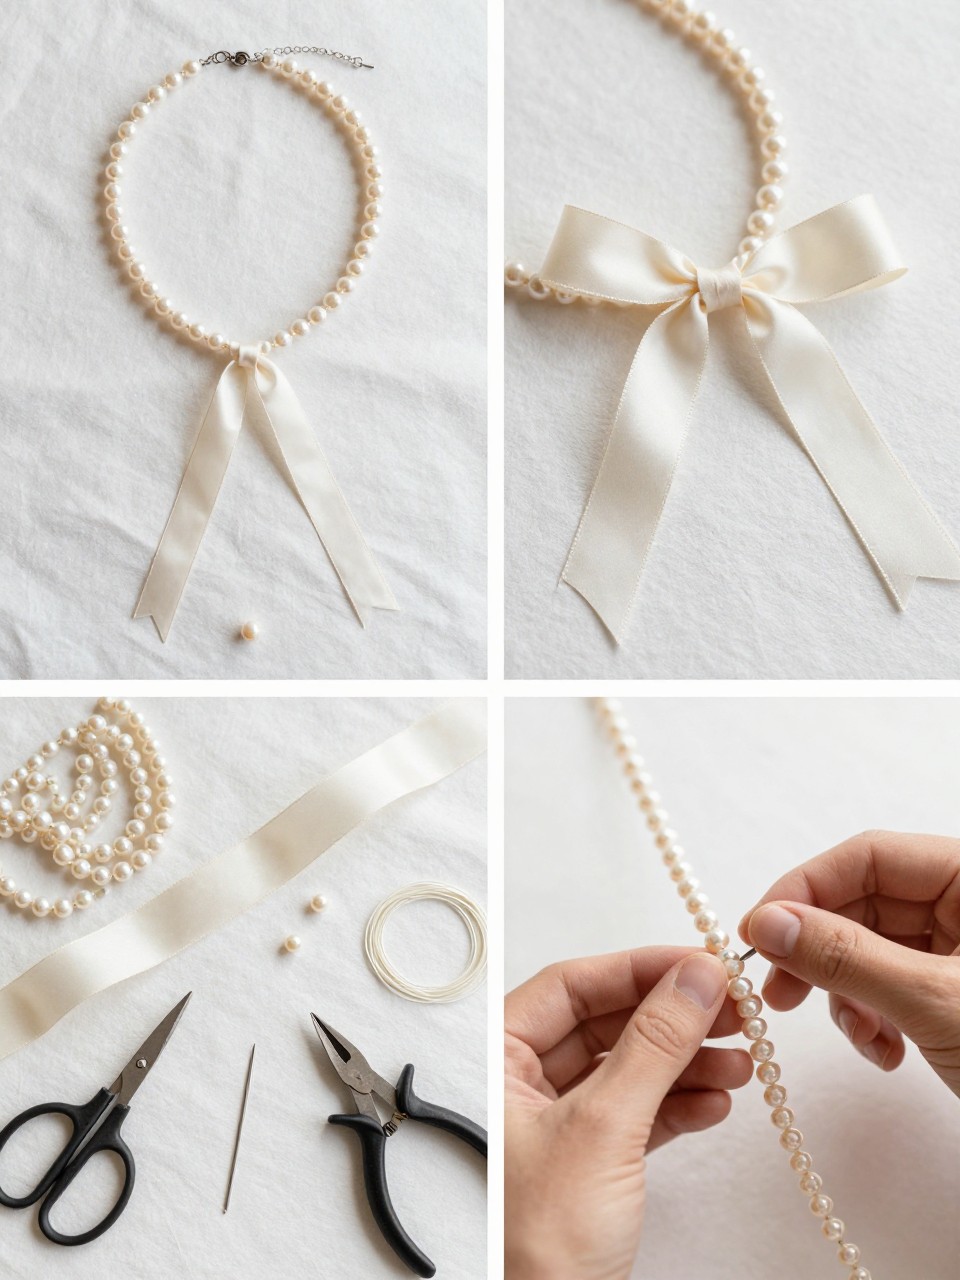
A ribbon and pearl necklace feels soft, pretty, and much more polished than a basic craft project. The ribbon tie gives it a romantic summer look, while the pearls keep it classic.
This is a lovely necklace for sundresses, garden parties, bridal events, or handmade gifts. Use ivory, blush, pale blue, or butter yellow ribbon for a seasonal finish.
Materials Needed:
- Small pearl beads
- Satin ribbon
- Beading wire or strong thread
- Needle, optional
- Scissors
- Jewelry pliers, optional
Steps To Make:
- Cut a short piece of beading wire or strong thread for the pearl section.
- String the pearls until the front section is long enough.
- Tie or secure satin ribbon to both ends of the pearl strand.
- Knot the ribbon tightly so the pearls stay in place.
- Trim the ribbon ends at an angle for a clean finish.
6. Layered Shell and Chain Necklace
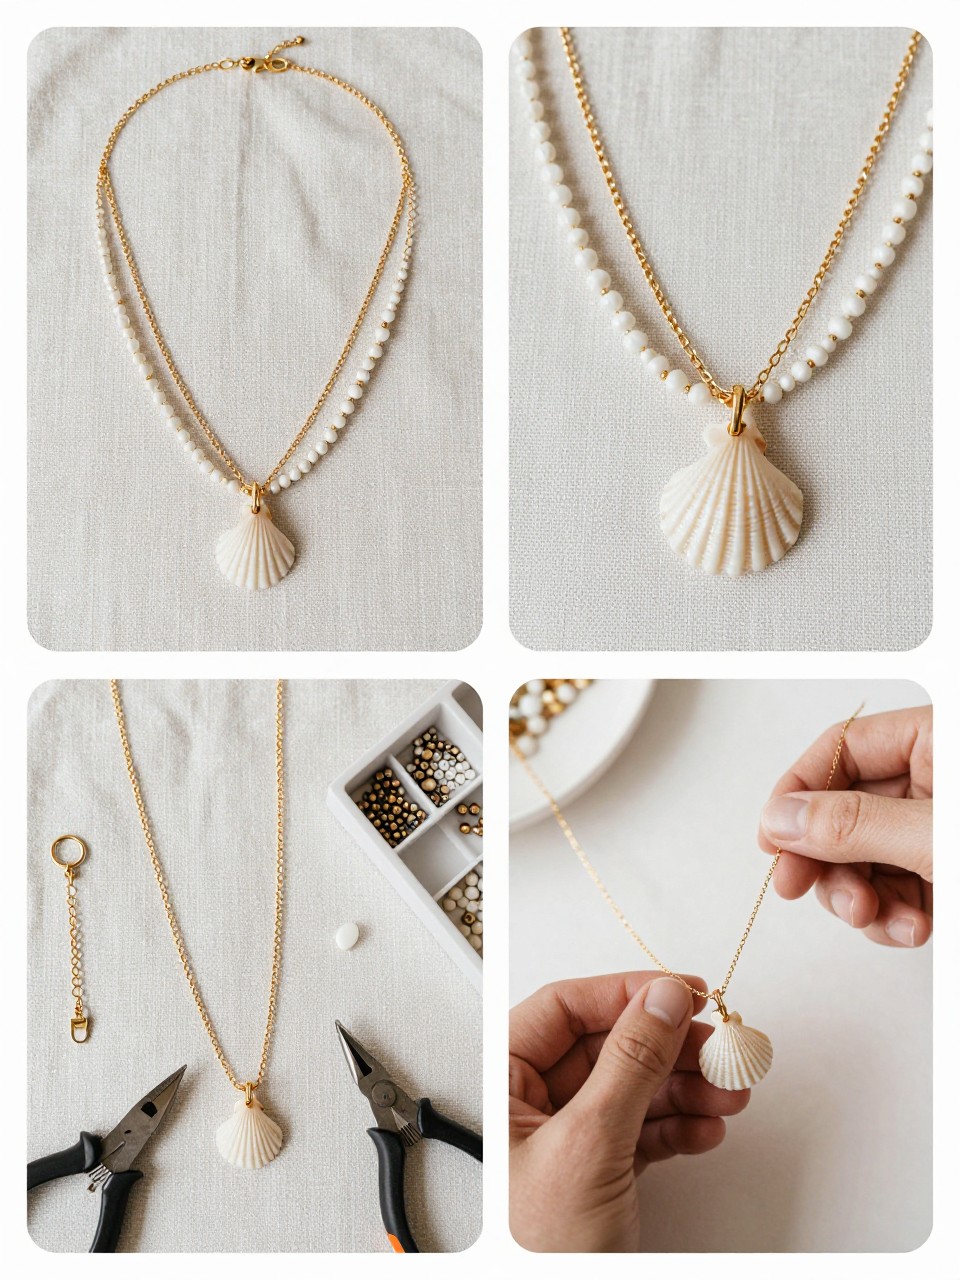
Layered necklaces always look more styled, and this shell and chain version is perfect for summer. One plain chain and one shell pendant strand create a look that feels intentional but still easy to make.
This is a great DIY if you already have spare chains or charms. Keep the two layers at different lengths so they sit nicely without tangling too much.
Materials Needed:
- Two necklace chains in different lengths
- Small shell pendant
- Jump rings
- Clasp, if needed
- Jewelry pliers
- Bead tray
Steps To Make:
- Choose two chains that sit at different lengths.
- Attach the shell pendant to the shorter or longer chain with a jump ring.
- Check both clasps and replace any weak findings if needed.
- Try the layers together to make sure they sit well.
- Adjust the charm position so it hangs in the center.
7. Seed Bead Flower Necklace
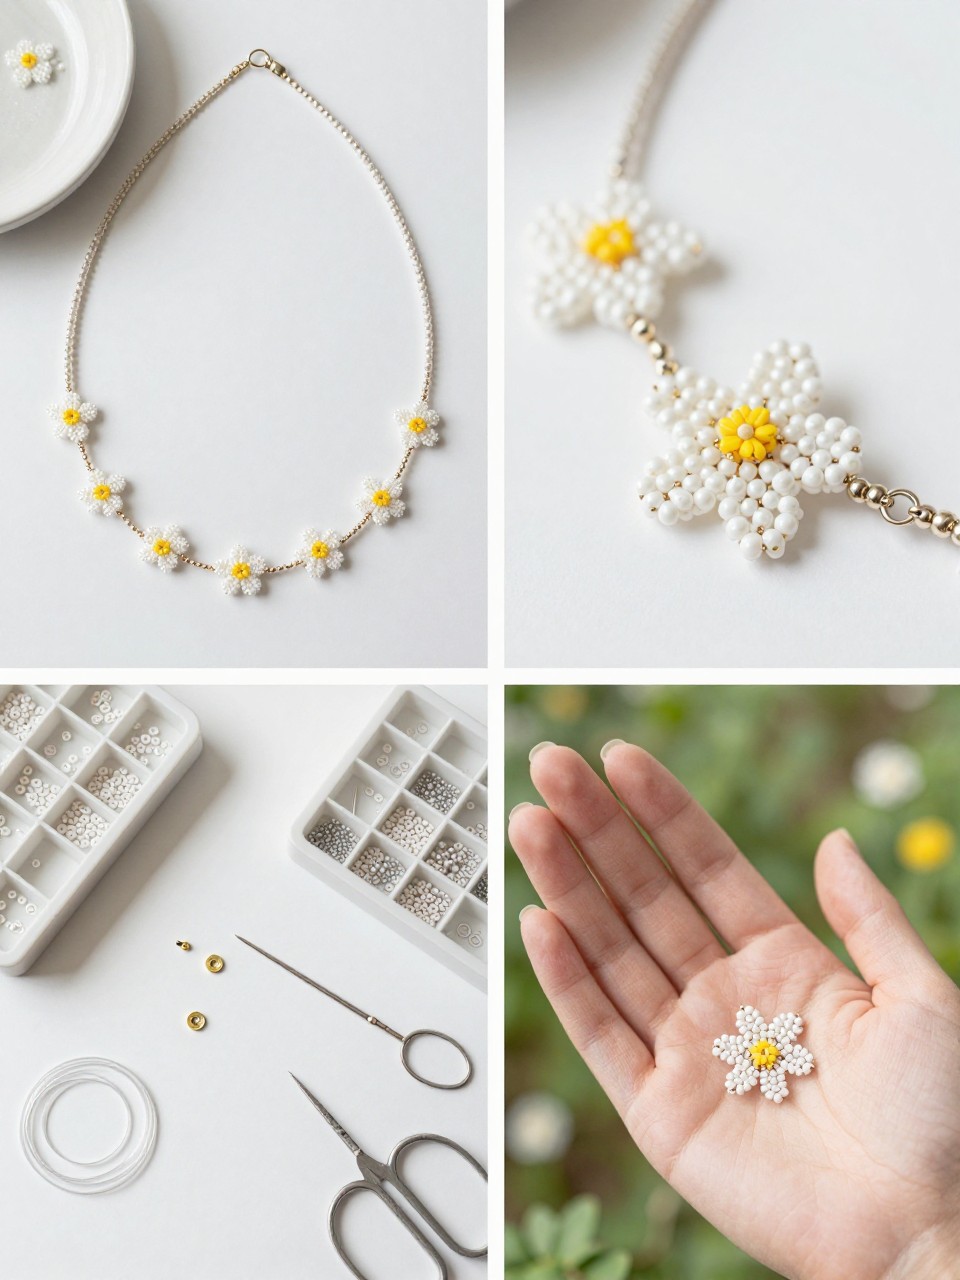
A seed bead flower necklace can look delicate and handmade in a stylish way when the beads are tiny and the colors are simple. White flowers with yellow centers are classic, but soft pink, blue, or lavender petals also work well.
This necklace takes a little patience, but the result feels sweet and wearable. Use small spacer beads between flowers so the design looks light and not crowded.
Materials Needed:
- Seed beads
- Beading thread or clear cord
- Beading needle
- Clasp
- Scissors
- Bead tray
Steps To Make:
- Cut your beading thread longer than the finished necklace length.
- Make small flower shapes with petal beads and center beads.
- Add clear, white, or green spacer beads between each flower.
- Continue until the necklace reaches your desired length.
- Attach the clasp and secure the ends with tight knots.
8. Painted Ceramic Bead Necklace
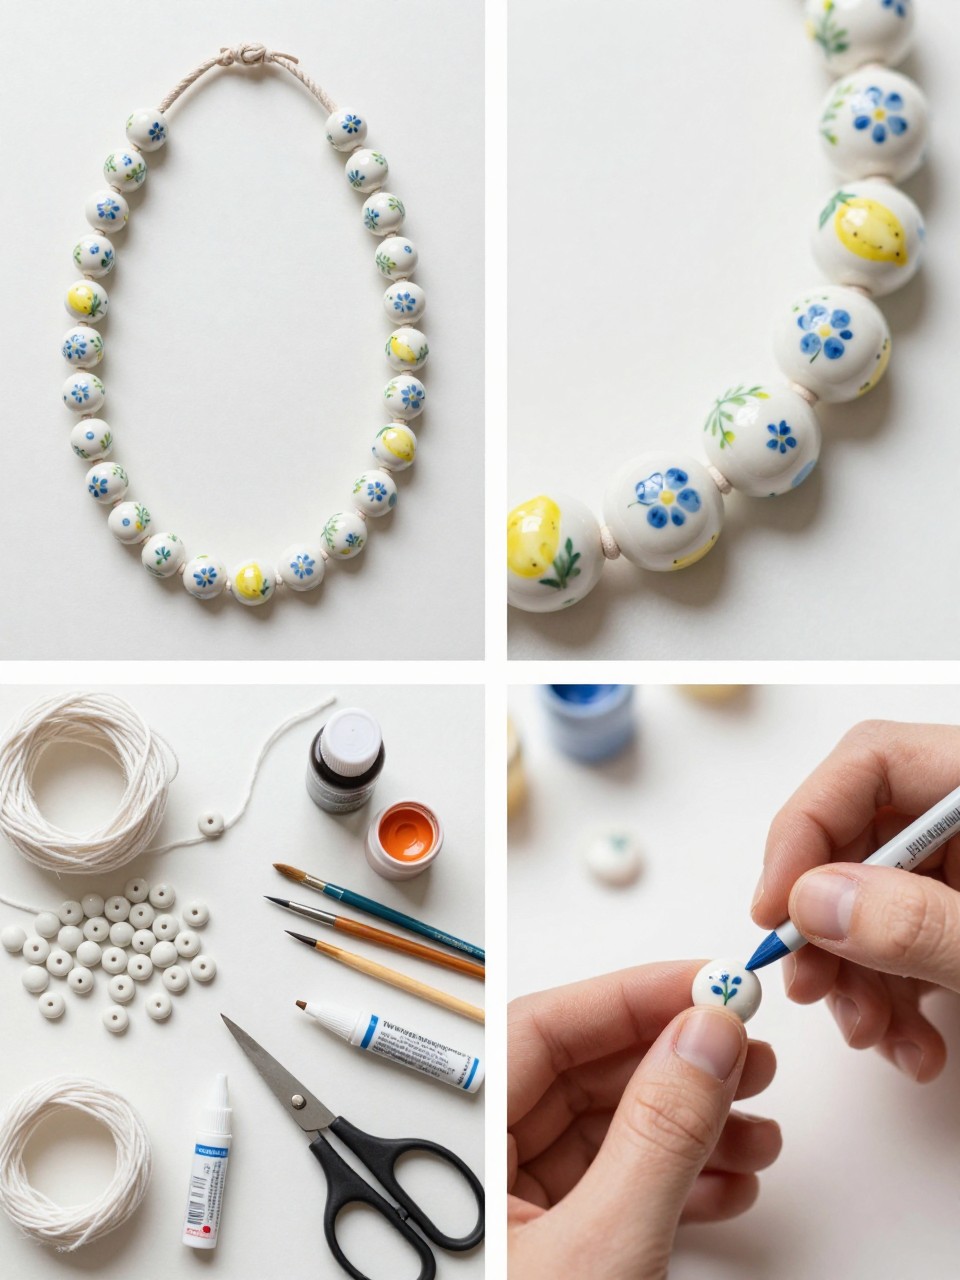
Painted ceramic beads can make a DIY necklace look custom and expensive. Tiny blue flowers, lemon dots, or simple brush marks can turn plain white beads into something special.
This project is great if you enjoy painting small details. Seal the beads after painting so the design lasts longer and looks more finished.
Materials Needed:
- Plain ceramic beads
- Acrylic paint or paint pens
- Small detail brushes
- Clear sealant
- Cotton cord
- Scissors
Steps To Make:
- Paint small patterns onto the ceramic beads.
- Let the beads dry completely.
- Add a thin coat of clear sealant if needed.
- String the beads onto cotton cord.
- Tie the ends or add a clasp for a neater finish.
9. Sleek Cowrie Shell Choker
A cowrie shell choker can look very polished when the shells are evenly spaced and the cord is kept simple. It feels beachy, but still stylish enough for summer outfits.
This design works best with small cowrie shells and thin cord. Knotting between each shell helps keep everything in place and gives the necklace a neat finish.
Materials Needed:
- Small cowrie shells
- Thin waxed cord
- Scissors
- Ruler
- Clear jewelry glue, optional
Steps To Make:
- Cut the cord to choker length with extra room for tying.
- Add one cowrie shell to the center of the cord.
- Tie a knot on each side to hold the shell in place.
- Add more shells evenly across the front section.
- Finish with sliding knots or a simple tied closure.
10. Gold Spacer Clay Bead Necklace
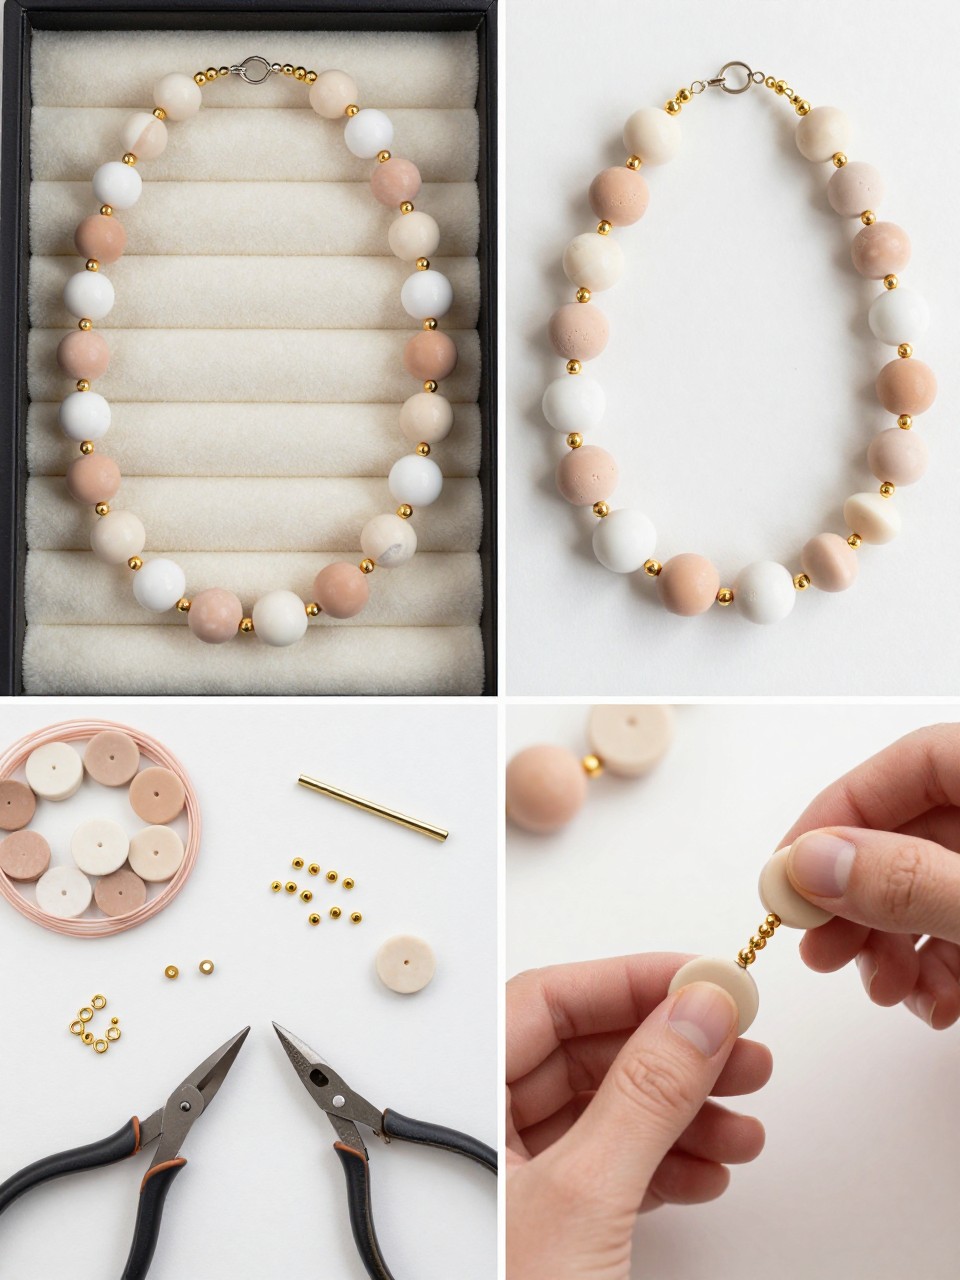
Clay bead necklaces can look much more polished when the colors are soft and the spacers are metal. Cream, blush, sand, and white beads with gold accents feel summery without looking too playful.
This is a great design for beginners who want a necklace that looks clean and wearable. Keep the pattern simple and avoid too many colors for a more expensive look.
Materials Needed:
- Clay disc beads
- Gold spacer beads
- Beading wire
- Clasp
- Crimp beads
- Jewelry pliers
- Scissors
Steps To Make:
- Cut the beading wire to your preferred necklace length.
- Arrange the clay beads in a soft repeating pattern.
- Add gold spacer beads between small groups of clay beads.
- String the beads onto the wire.
- Attach the clasp with crimp beads and trim the extra wire.
11. Dainty Initial Pendant Necklace
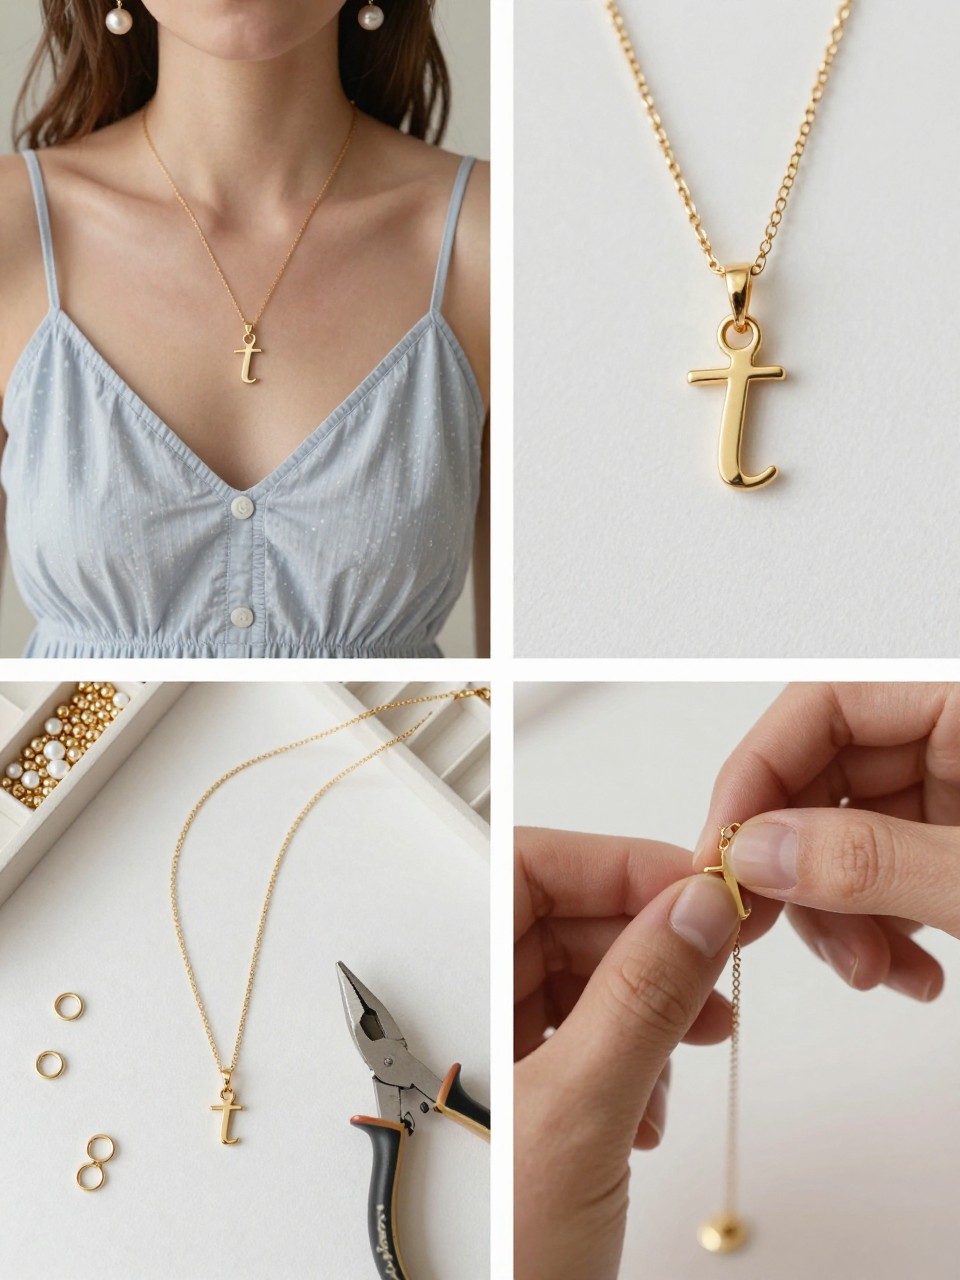
An initial pendant necklace feels personal but still simple and stylish. Using a small gold or silver initial charm makes the necklace look polished rather than crafty.
This is also a lovely gift idea because it feels thoughtful without being hard to make. Keep the chain delicate and the charm small for the prettiest result.
Materials Needed:
- Fine necklace chain
- Initial charm
- Jump ring
- Jewelry pliers
- Clasp, if needed
Steps To Make:
- Lay the chain flat and find the center point.
- Open a jump ring with pliers.
- Slide the initial charm onto the jump ring.
- Attach the jump ring to the center of the chain.
- Close the jump ring tightly and check that the charm hangs straight.
12. Beaded Lariat Summer Necklace
A beaded lariat necklace looks stylish because it does not need a traditional clasp. The long cord ties or loops in front, with pretty bead details at the ends.
This design is great for summer dresses and open-neck tops. Pearl drops, gold beads, or tiny shells at the ends make the necklace feel more finished.
Materials Needed:
- Thin cord
- Pearl beads or drop beads
- Gold beads
- Scissors
- Jewelry glue, optional
- Bead tray
Steps To Make:
- Cut a long piece of cord for the lariat necklace.
- Add a gold bead and pearl bead to one end.
- Tie a small secure knot under the beads.
- Repeat on the other end of the cord.
- Trim extra cord and add a tiny dot of glue to the knots if needed.
13. Monochrome White Bead Necklace
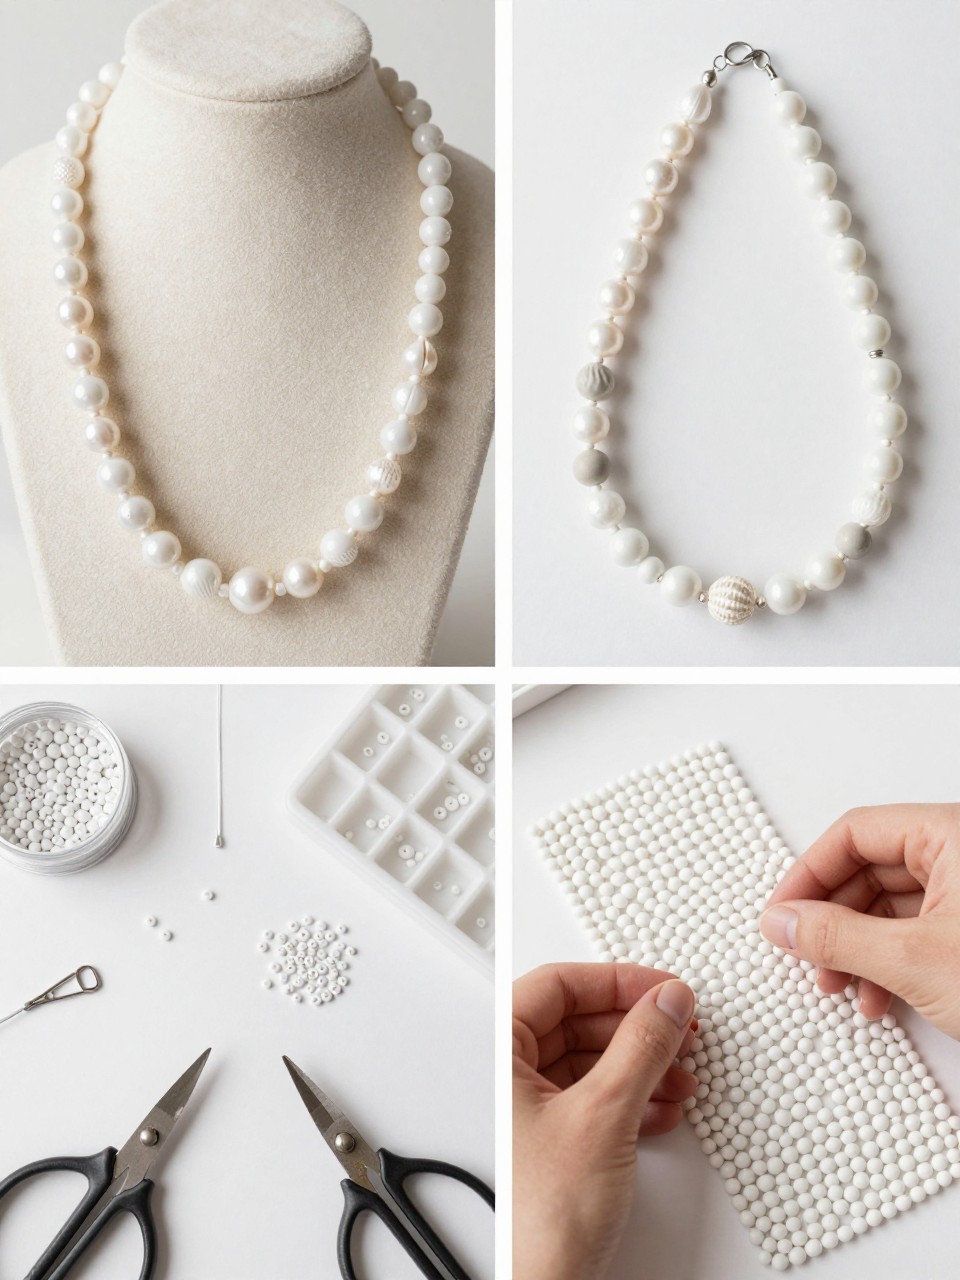
A monochrome white bead necklace looks clean, bright, and perfect for summer. The trick is to mix textures, such as pearl, shell, glass, and clay, so the necklace does not look flat.
This is a beautiful piece for linen outfits, beach dinners, and simple everyday looks. Keeping everything white makes it easy to wear with almost any color.
Materials Needed:
- Mixed white beads
- Beading wire
- Clasp
- Crimp beads
- Jewelry pliers
- Scissors
Steps To Make:
- Choose white beads in different shapes and textures.
- Arrange the beads in a balanced pattern.
- String the beads onto beading wire.
- Attach the clasp with crimp beads.
- Trim the extra wire and check that the necklace closes securely.
14. Tiny Pendant Necklace Stack
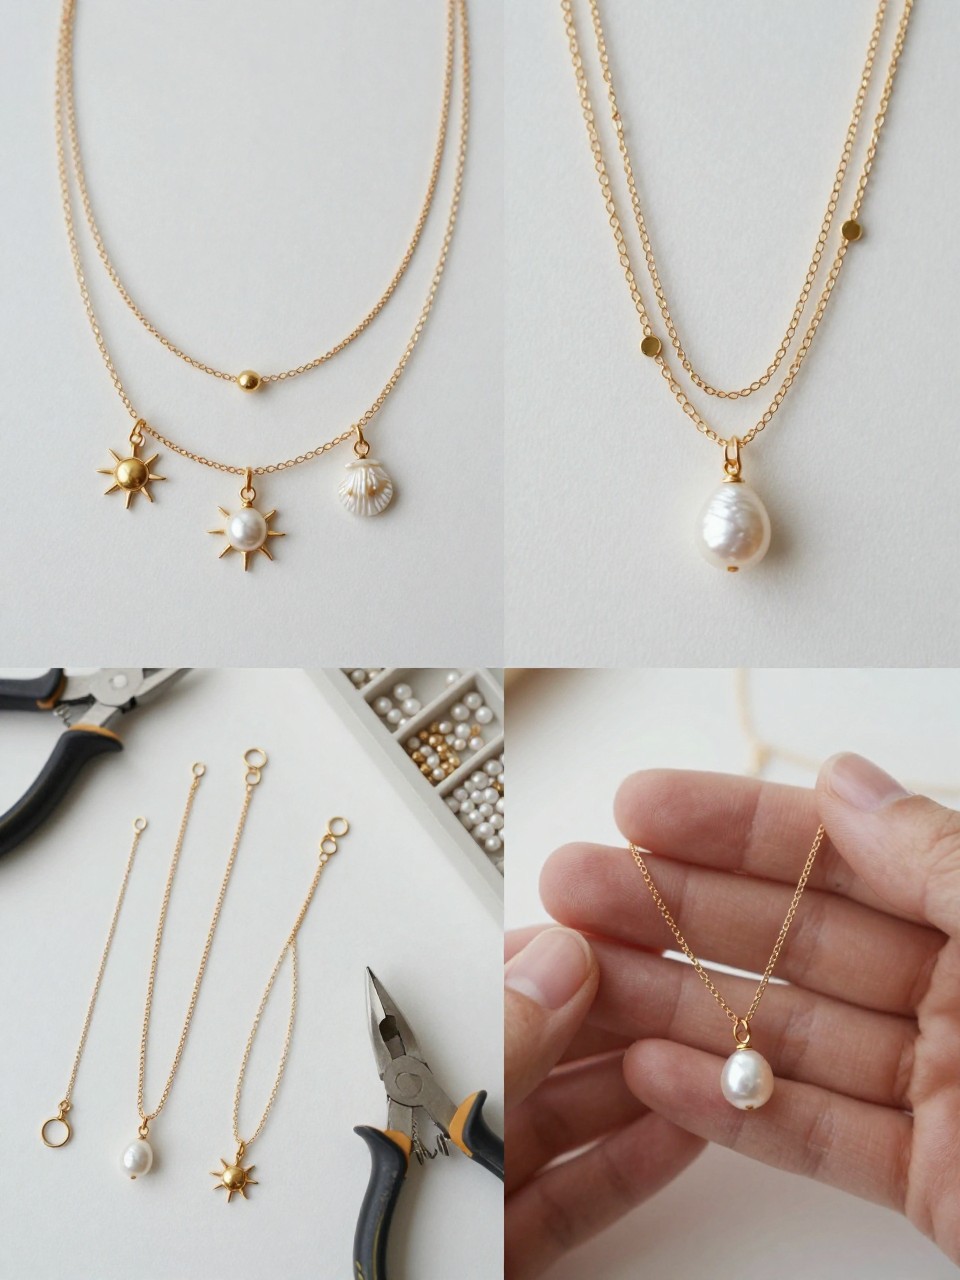
A tiny pendant necklace stack gives you a layered summer look without needing a lot of materials. One sun pendant, one pearl pendant, and one shell pendant can create a pretty set that feels styled.
This project works best when each chain has a different length. That way, the pendants sit separately and the layers look neat.
Materials Needed:
- Three fine chains in different lengths
- Tiny pendants or charms
- Jump rings
- Clasps, if needed
- Jewelry pliers
Steps To Make:
- Choose three chains that sit at different lengths.
- Add one pendant to each chain using a jump ring.
- Close each jump ring tightly with pliers.
- Try the necklaces on together to check the spacing.
- Adjust charm placement or chain length if needed.
15. Woven Cord and Gold Bead Necklace
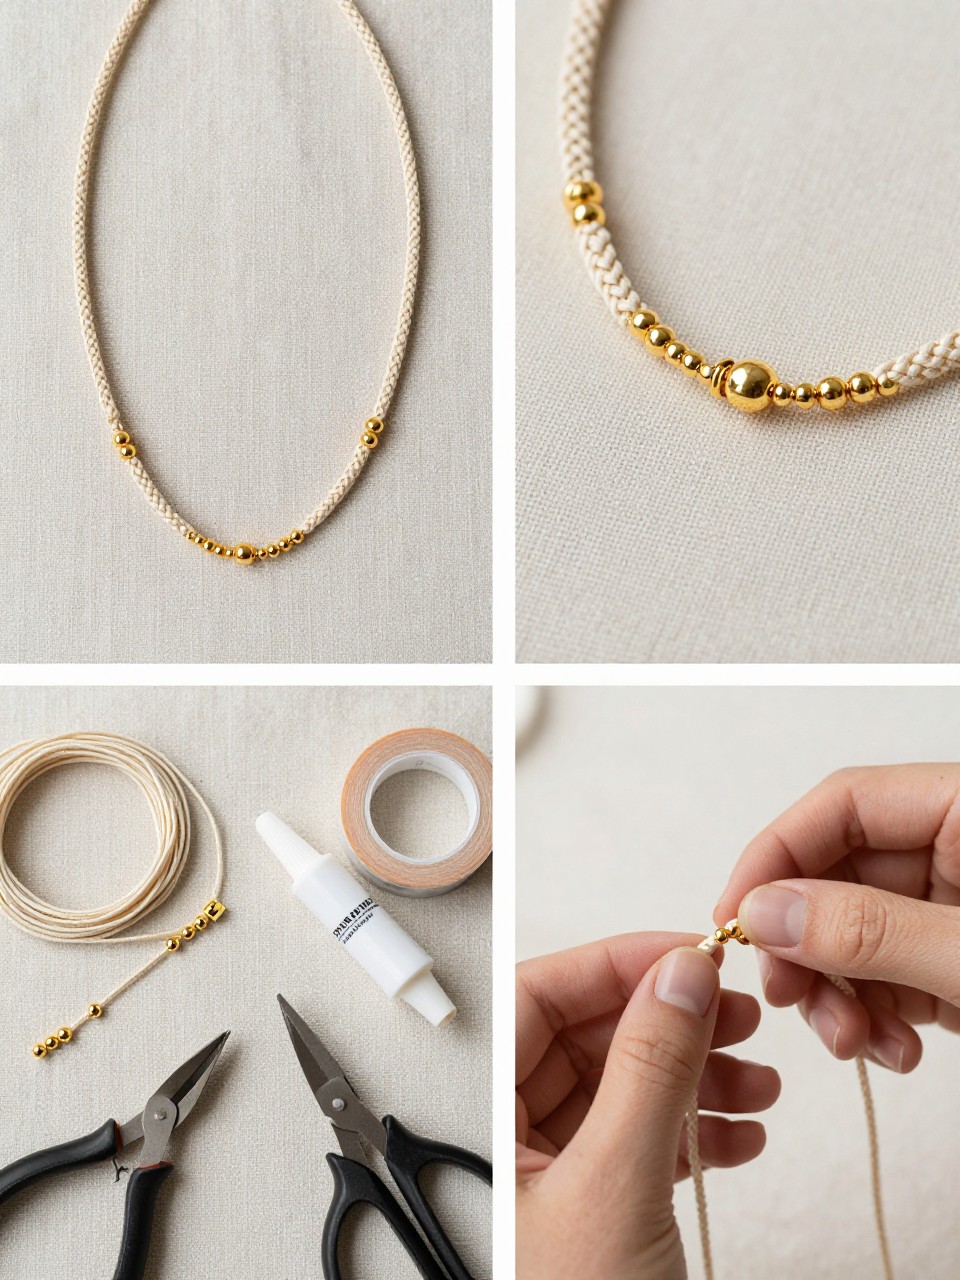
A woven cord necklace looks handmade in a polished way, especially when paired with small gold beads. The cord gives it texture, while the metal beads make it feel more finished.
This is a great summer necklace for neutral outfits, beach dinners, or casual weekend looks. Keep the braid neat and the bead placement simple so the necklace looks clean.
Materials Needed:
- Cotton or waxed cord
- Tiny gold beads
- Clasp ends
- Jewelry glue
- Jewelry pliers
- Scissors
- Tape
Steps To Make:
- Cut three equal lengths of cord.
- Tape the top ends to your work surface.
- Braid the cord, adding gold beads into the braid as you go.
- Trim the ends evenly when the necklace reaches the right length.
- Attach clasp ends with jewelry glue and pliers.