

Table of Contents Show
Want a calm painting idea but not sure what to make? Angel paintings are gentle, forgiving, and easy to personalize, even if you’re a beginner. You can keep them simple with soft shapes or add tiny details like wings, stars, and gold highlights.
Here are 16 light, beautiful angel painting projects to help you relax and create something you’ll be proud to display or gift.
1. Soft Halo Angel Canvas Painting
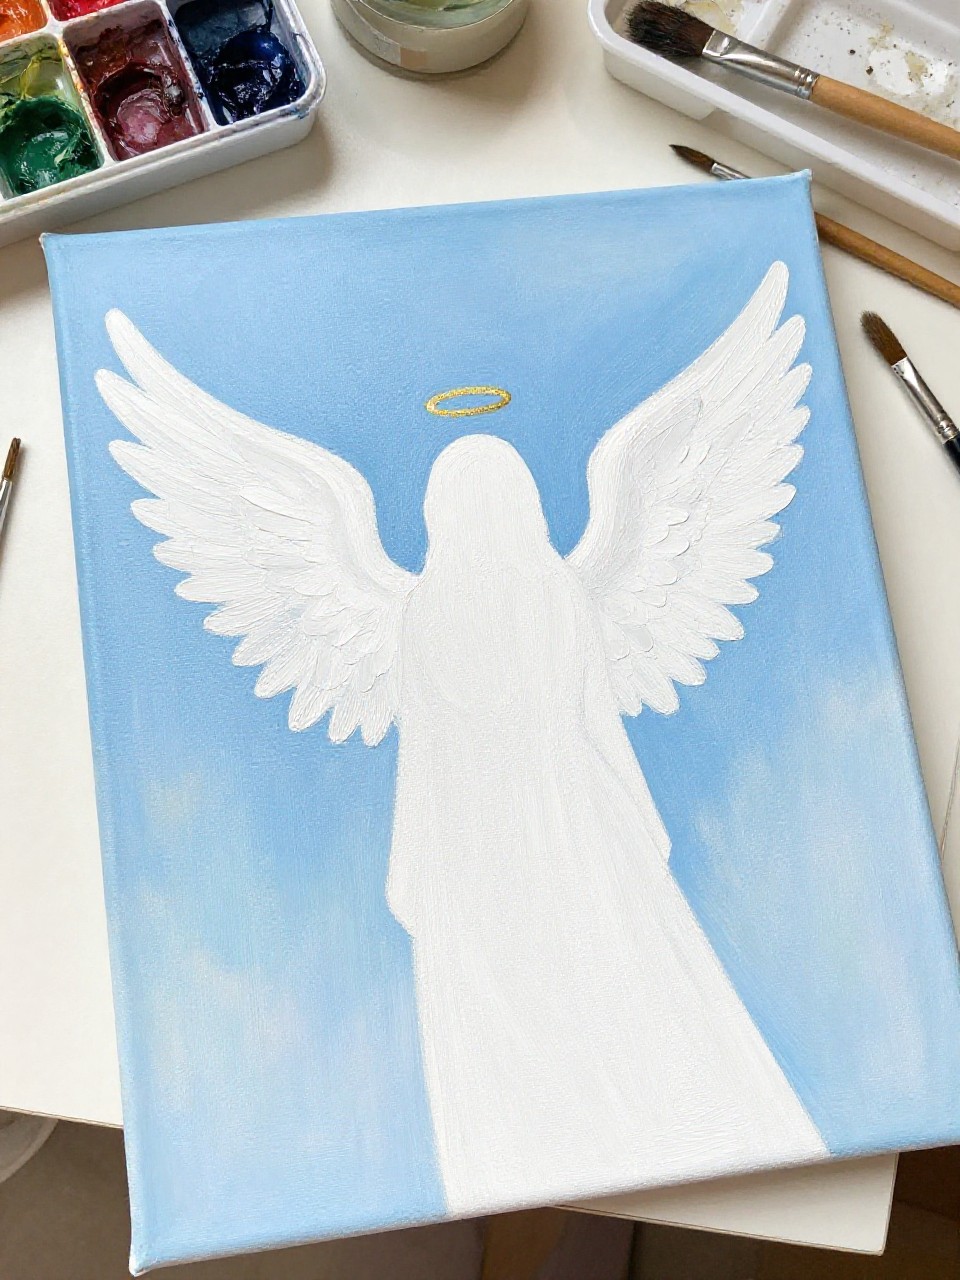
A simple angel silhouette floats on a pale sky background, with a glowing halo and loose, feathery wings. This one is soothing because you can blend slowly and let the brush strokes show, so it’s great for beginners who want peaceful wall art without pressure.
Materials Needed:
- Stretched canvas
- Acrylic paint (white, beige, light blue, gold)
- Paintbrushes in multiple sizes
- Palette or paint tray
- Optional sealer or varnish
Steps to Make:
- Lightly sketch an oval head and simple robe shape on the canvas.
- Paint a soft sky wash and let it dry with visible blended strokes.
- Block in the angel silhouette with warm white and pale beige layers.
- Add wings with quick, curved strokes and dab on a gold halo.
- Let dry fully, seal if desired, and hang where light can hit the halo.
2. Watercolor Guardian Angel on Cold-Press Paper
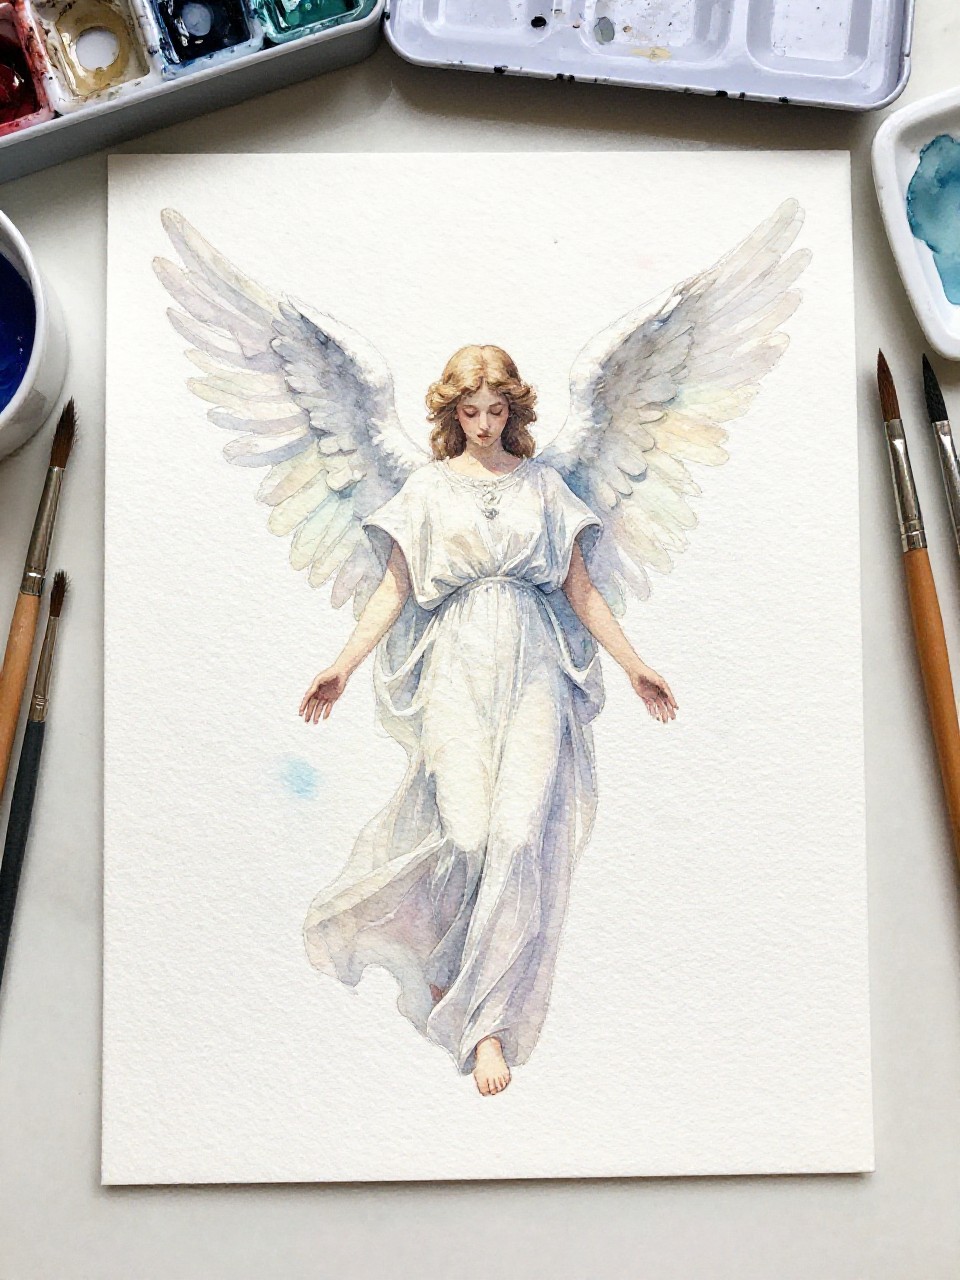
A gentle guardian angel appears in light washes, with flowing robes and wings that fade softly into the paper texture. Watercolor is relaxing here because you don’t need perfect lines—just slow layers and a little water control, which makes it beginner-friendly and calming.
Materials Needed:
- Cold-press watercolor paper
- Watercolor paint set
- Paintbrushes in multiple sizes
- Palette or paint tray
- Optional clear spray varnish
Steps to Make:
- Tape down your paper and lightly pencil the angel’s pose and wings.
- Wet the background and drop in pale color so it blooms softly.
- Paint the robe in light layers, letting each wash dry between passes.
- Add wing feathers with quick strokes and a slightly darker shadow tone.
- Remove tape, let dry flat, and optionally spray-seal for protection.
3. Angel Wings Crescent Moon Canvas Art
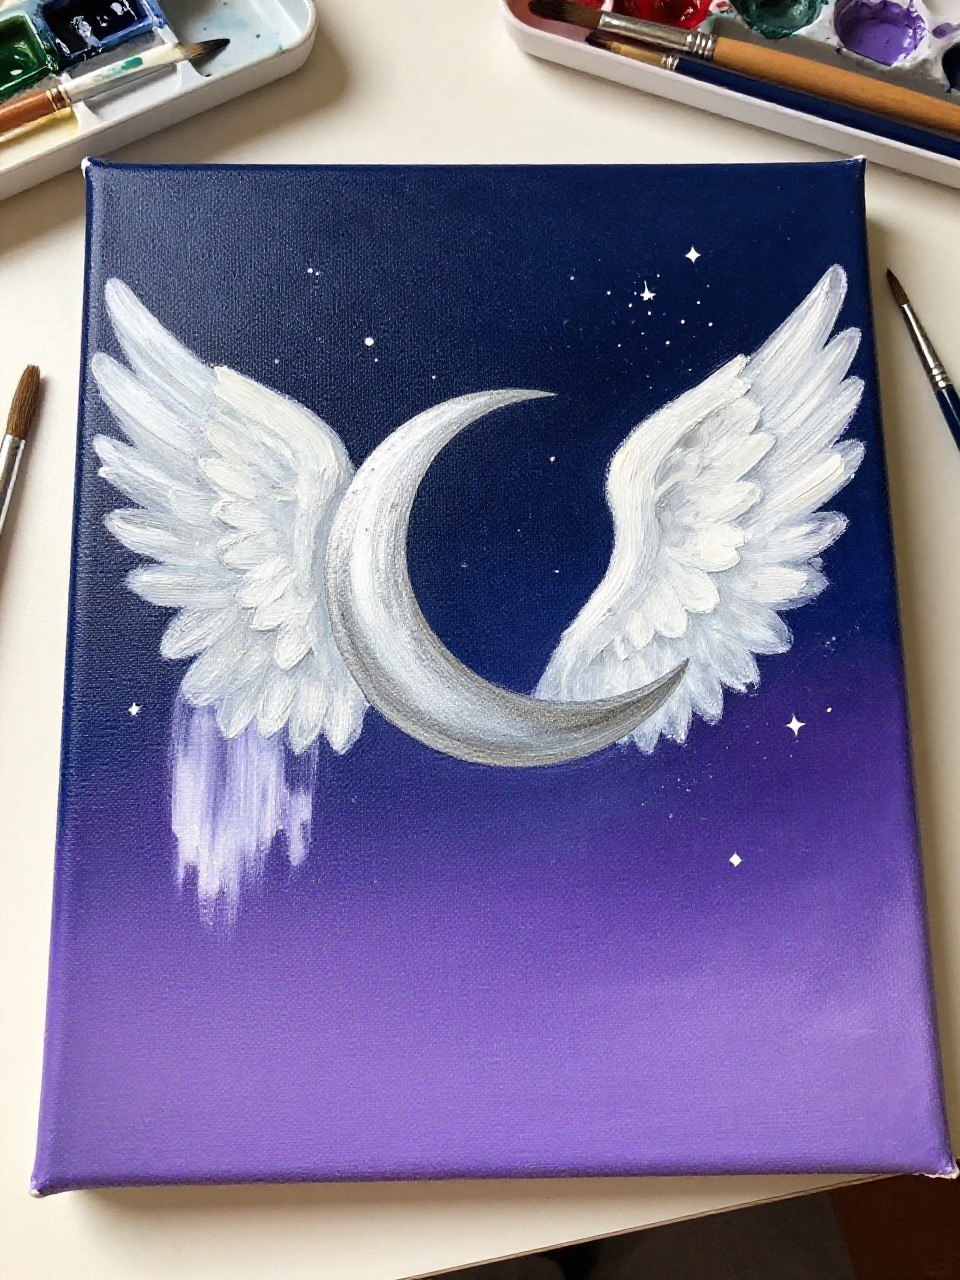
This painting shows angel wings wrapping around a crescent moon, with tiny stars scattered across a night-sky gradient. It’s satisfying because the wing strokes can be loose and textured, and the simple moon shape keeps it doable for beginners who want pretty bedroom or nursery decor.
Materials Needed:
- Stretched canvas
- Acrylic paint (navy, purple, white, silver)
- Paintbrushes in multiple sizes
- Palette or paint tray
- Optional sealer or varnish
Steps to Make:
- Paint a dark-to-light night gradient background and let it dry.
- Sketch a crescent moon in the center with a light pencil line.
- Paint the moon with layered white and a touch of gray for depth.
- Build wings around it using short, curved strokes and brighter highlights.
- Dot in stars, let dry, and seal for a slight glow-like finish.
4. Minimal Line Angel on Wood Panel
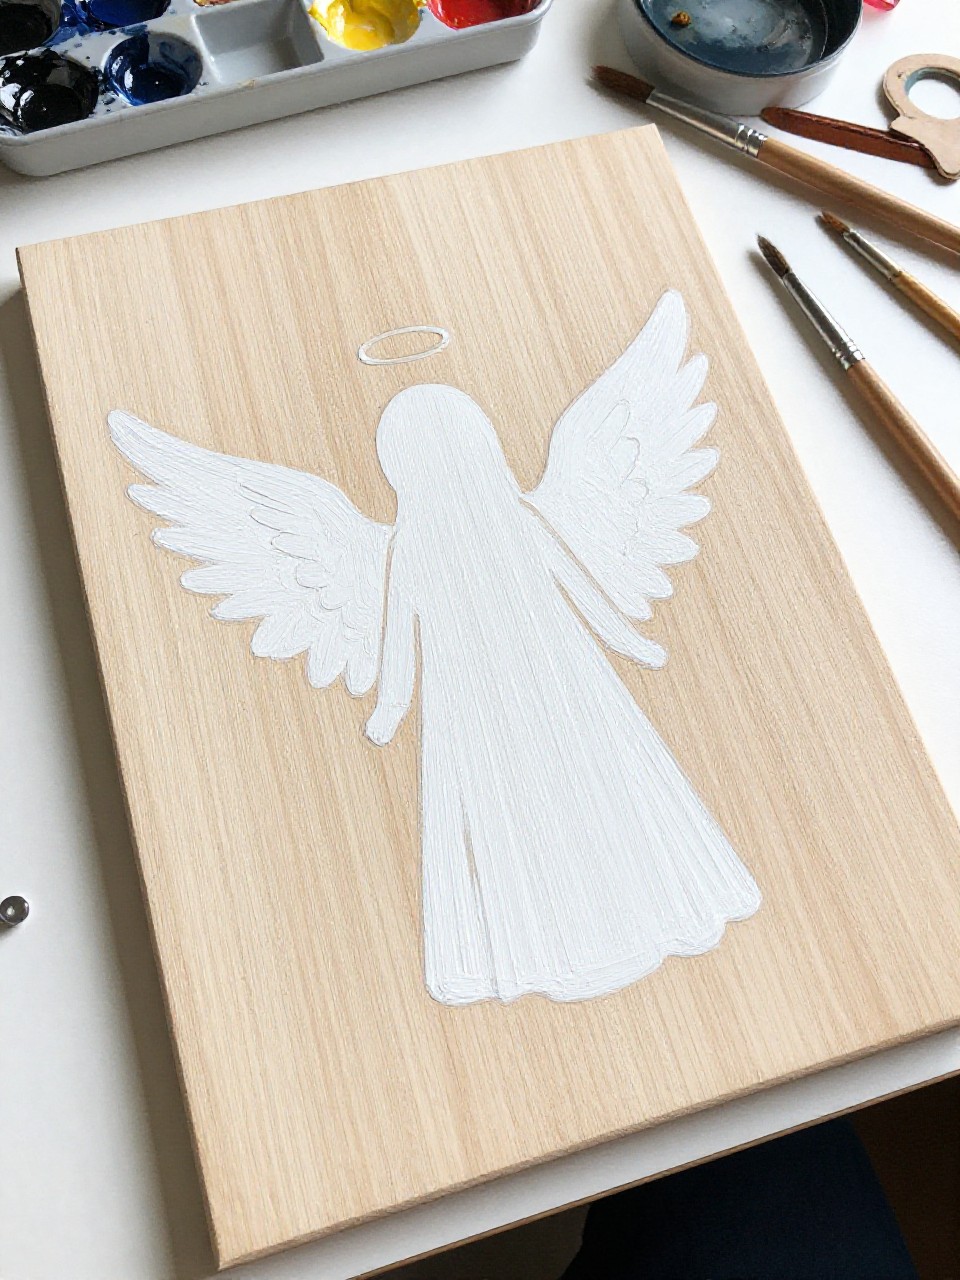
A calm angel figure is painted in simple lines on a warm wood panel, with just a few soft shadows and a small halo. This project feels peaceful because you can keep the design minimal, and the wood grain adds beauty even if your lines wobble a little.
Materials Needed:
- Wood painting panel
- Acrylic paint (white, black, warm gray)
- Paintbrushes in multiple sizes
- Palette or paint tray
- Optional matte varnish
Steps to Make:
- Wipe the wood panel clean and decide if you want the grain visible.
- Sketch a basic angel outline with a pencil—head, robe, and wings.
- Paint the main lines slowly with a small brush and slightly thinned paint.
- Add a soft shadow wash under wings and around the robe folds.
- Let dry, varnish lightly, and lean it on a shelf for a cozy look.
5. Cherub Face Mini Canvas
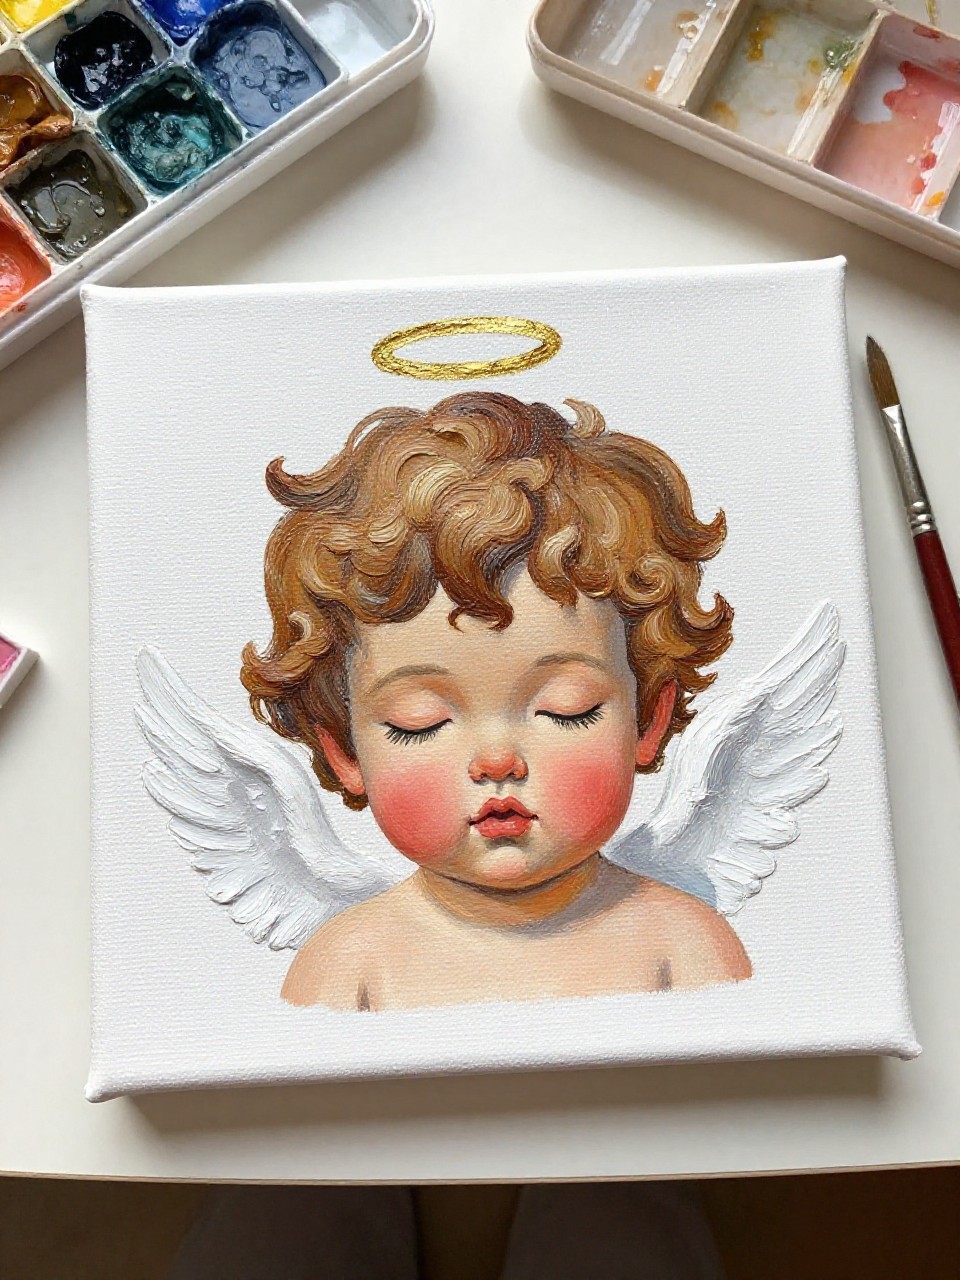
A small mini canvas shows a sweet cherub face with rosy cheeks, curly hair, and tiny wings tucked behind the head. It’s a fun practice piece for beginners because the small size keeps it quick, and you can learn simple blending for skin tones without feeling overwhelmed.
Materials Needed:
- Mini stretched canvas
- Acrylic paint (peach, white, pink, brown, gold)
- Paintbrushes in multiple sizes
- Palette or paint tray
- Optional sealer or varnish
Steps to Make:
- Lightly sketch a round face, curls, and tiny wings on the mini canvas.
- Paint a base skin tone and softly blend lighter highlights while wet.
- Add curls in short strokes, layering darker and lighter browns.
- Paint the wings with feathery white strokes and a tiny gold halo.
- Let dry fully, seal, and display it on a small easel or shelf.
6. Starry Night Angel Silhouette Canvas
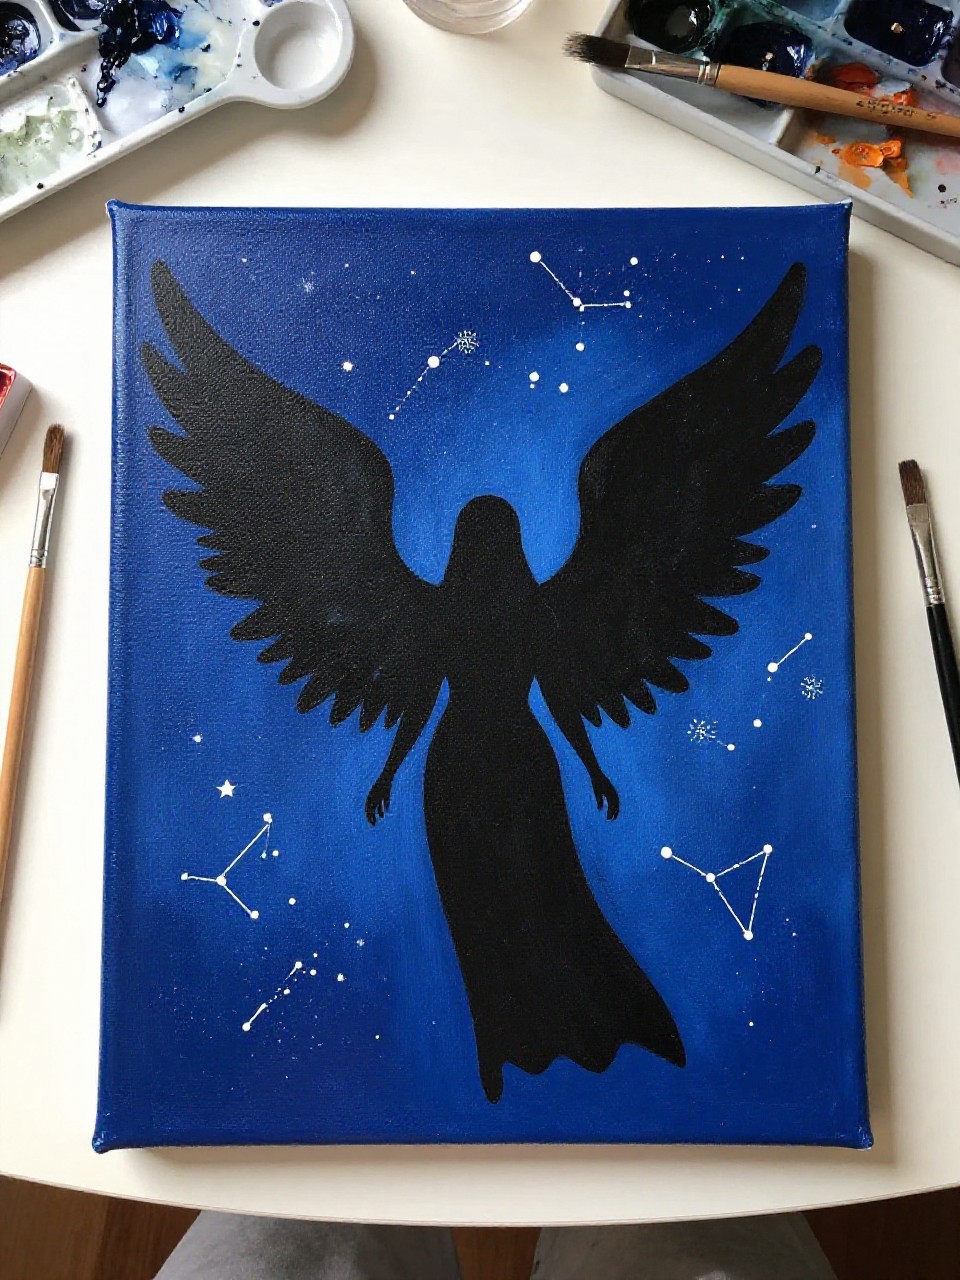
A dark angel silhouette stands against a starry night, with scattered constellations and a soft glow behind the wings. This is great for beginners because silhouettes are forgiving, and dotting stars is relaxing and repetitive in the best way.
Materials Needed:
- Stretched canvas
- Acrylic paint (black, indigo, white, pale yellow)
- Paintbrushes in multiple sizes
- Palette or paint tray
- Optional sealer or varnish
Steps to Make:
- Paint a deep night background with indigo and black, blending loosely.
- Add a pale glow circle where the angel will be, then let it dry.
- Paint the angel silhouette shape in dark paint with a medium brush.
- Dot stars and connect a few into simple constellations with thin lines.
- Dry completely, seal, and hang it where the contrast stands out.
7. Pastel Angel Wings on Ceramic Mug
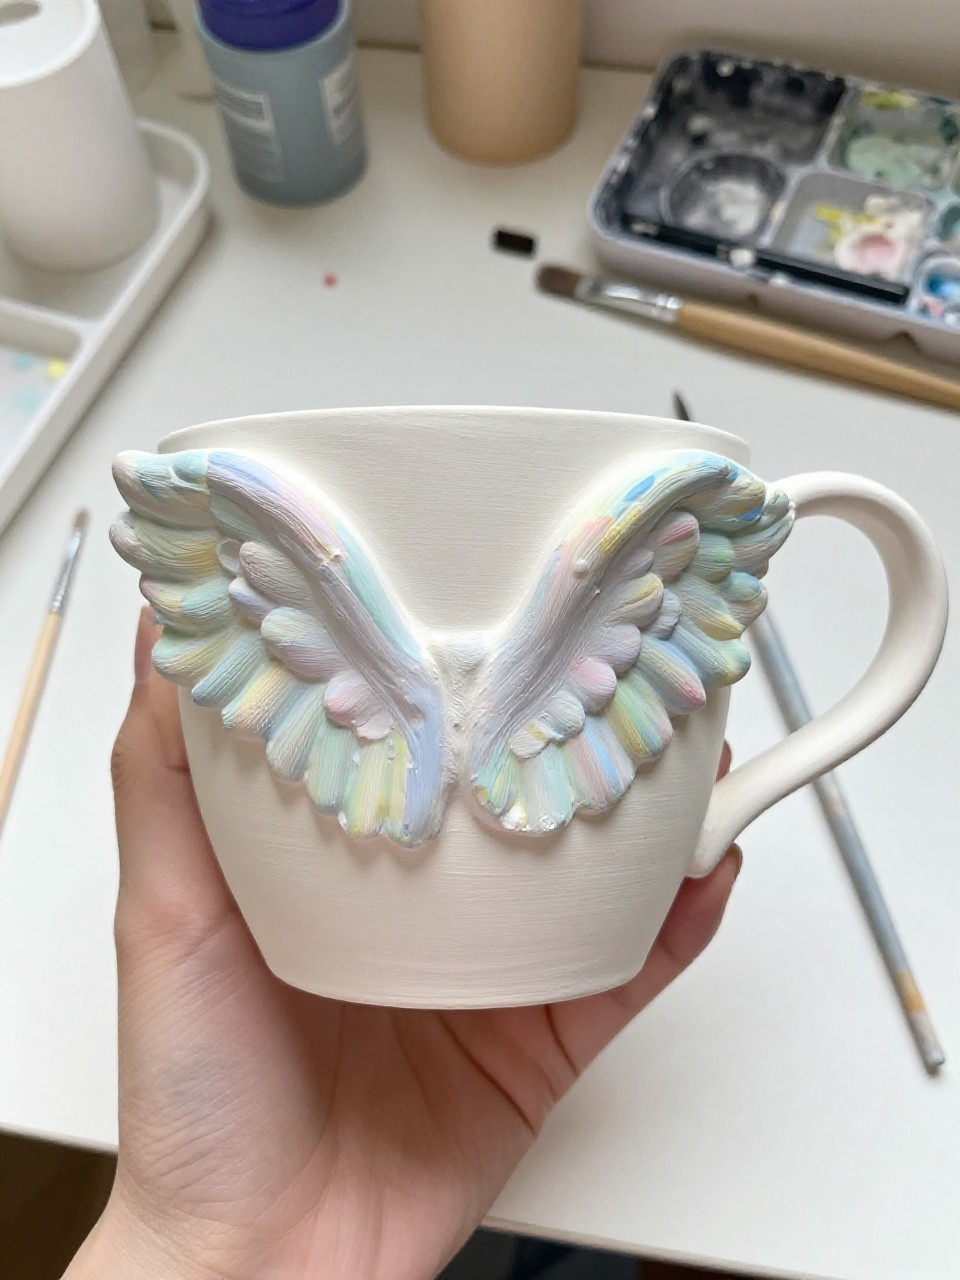
A white ceramic mug has pastel angel wings painted to wrap around the sides, meeting near the handle like a gentle hug. It’s a sweet beginner project because the wing shapes are simple, and every brush stroke looks charming on a mug you can gift or display.
Materials Needed:
- Plain ceramic mug
- Porcelain paint (or oil-based paint markers)
- Paintbrushes in multiple sizes
- Palette or paint tray
- Optional dishwasher-safe sealer
Steps to Make:
- Clean the mug with rubbing alcohol and let it dry completely.
- Lightly pencil the wing placement so it wraps evenly around the curve.
- Paint the wing base shapes in pastel layers, following the mug’s curve.
- Add feather lines and small highlights with a thin brush or paint marker.
- Let cure as directed, then seal or bake if your paint brand requires it.
8. Sleeping Angel on Round Wood Slice

A small sleeping angel is painted on a round wood slice, with closed eyes, soft hair, and wings curled around like a blanket. This feels cozy to make because the wood slice shape is already cute, and you can keep details simple while still getting a warm, handmade ornament.
Materials Needed:
- Round wood slice (sealed or sanded)
- Acrylic paint (white, beige, brown, pale pink)
- Paintbrushes in multiple sizes
- Palette or paint tray
- Optional clear varnish
Steps to Make:
- Sand the wood slice lightly and wipe away dust.
- Sketch a simple face and wing wrap shape in the center.
- Paint the angel’s robe and wings with creamy white in two layers.
- Add tiny facial details and soft blush with a small brush.
- Dry, varnish, and add twine for hanging if you want it as decor.
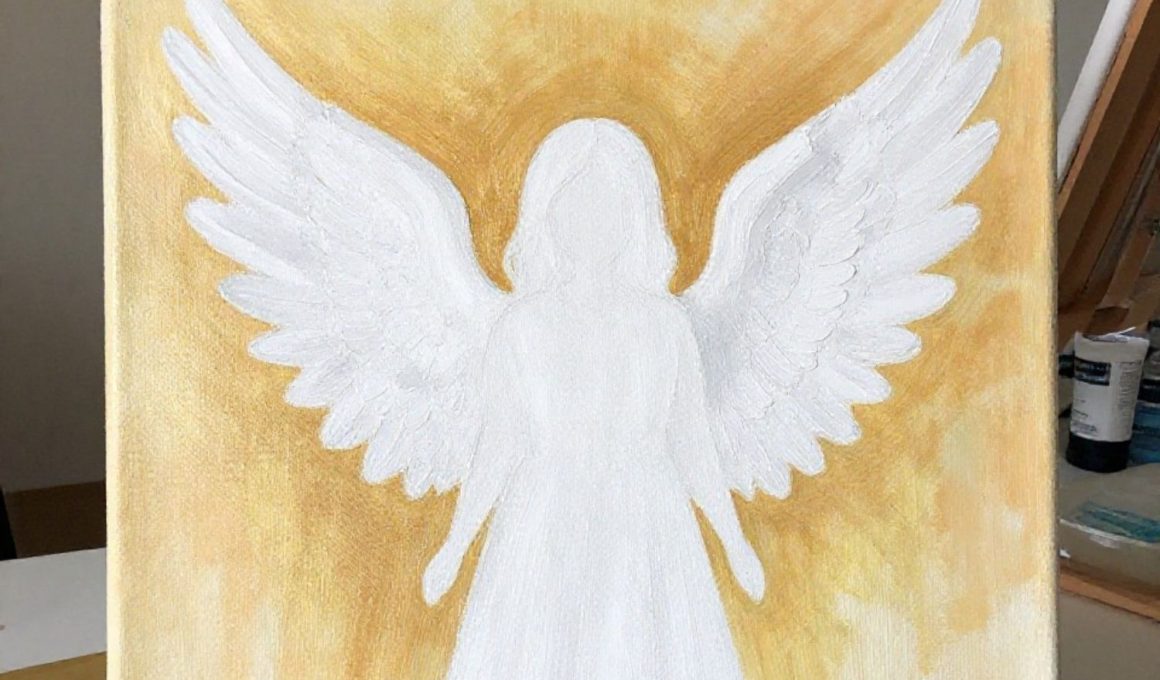
9. Golden Light Angel on Canvas Board
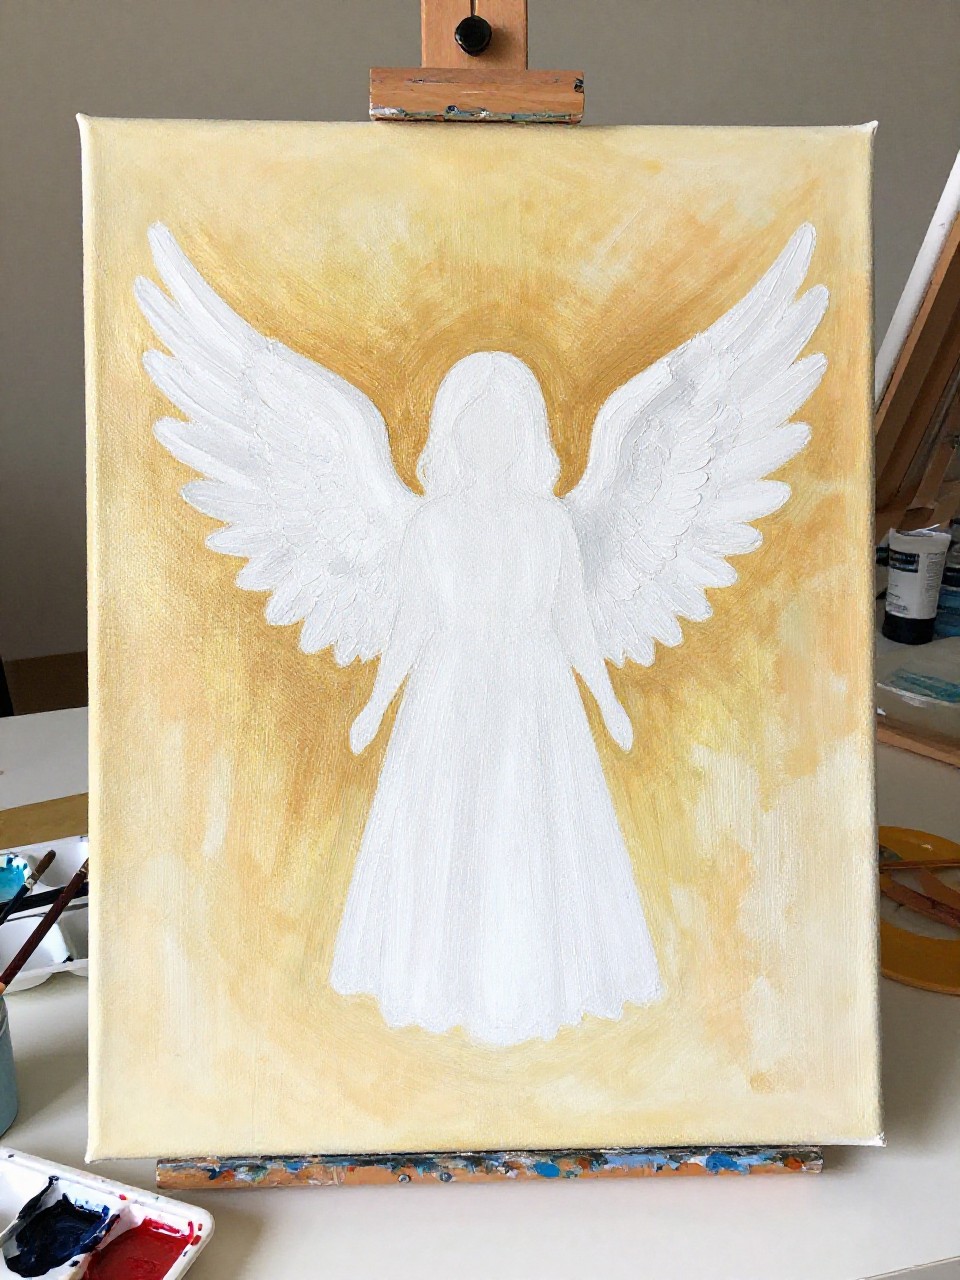
A glowing angel is painted with warm golden light behind it, fading into soft cream and peach tones around the edges. This project is satisfying because the background blending does most of the work, and beginners can keep the angel shape simple while still getting a bright, uplifting finished piece.
Materials Needed:
- Canvas board
- Acrylic paint (cream, peach, yellow, white, gold)
- Paintbrushes in multiple sizes
- Palette or paint tray
- Optional sealer or varnish
Steps to Make:
- Paint a warm gradient background from gold to cream and let it dry.
- Sketch a simple angel outline with a robe and wings in the center.
- Fill the angel with soft white and add gentle shadows along one side.
- Dry-brush lighter highlights on wings so strokes look feathery and real.
- Let dry, seal, and frame it for an easy “finished” look.
10. Angel Feather Study on Watercolor Paper
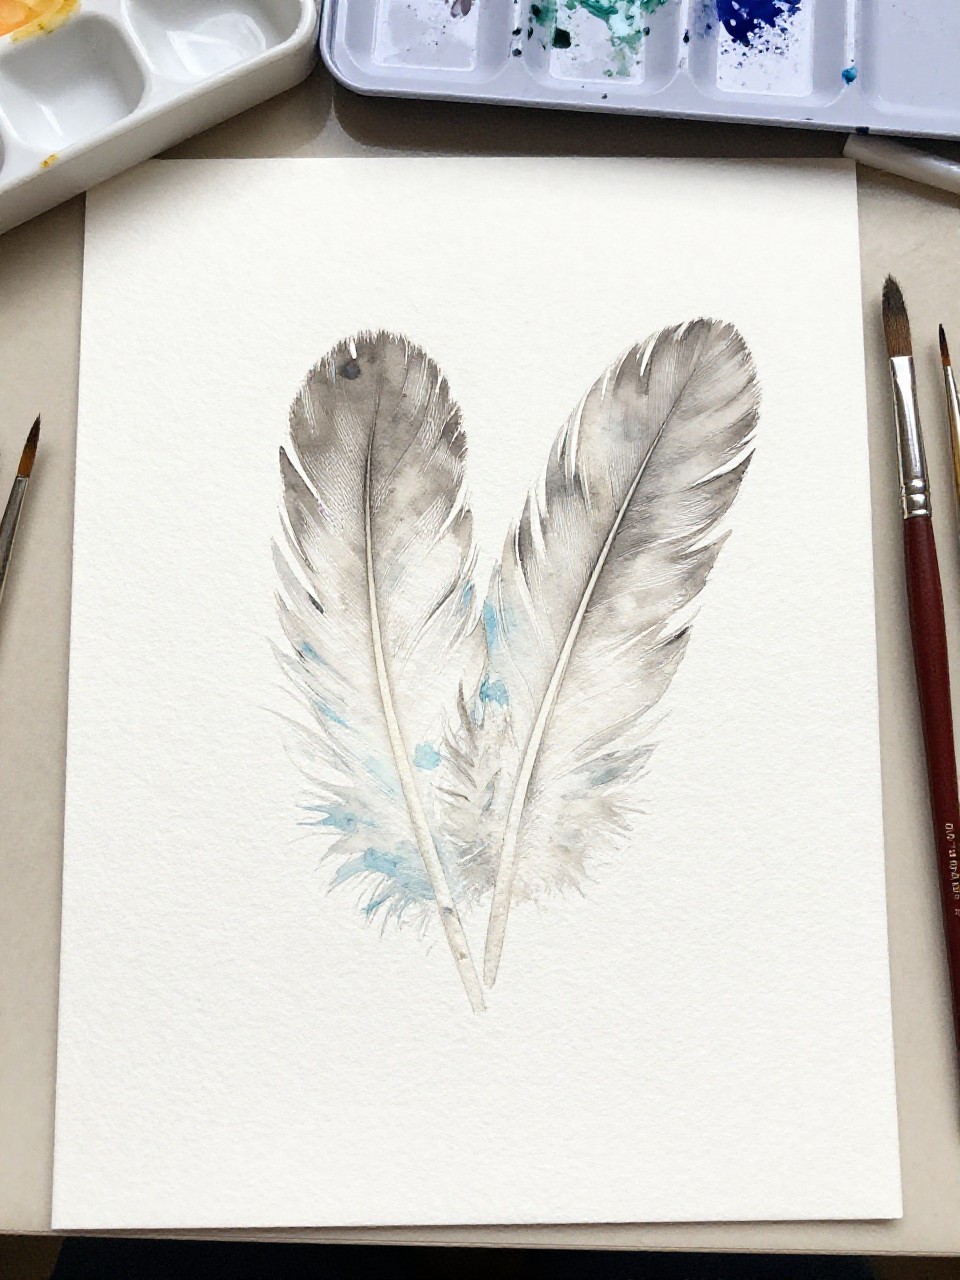
This piece shows a cluster of angel feathers in soft whites, grays, and pale blues, with each feather overlapping the next. It’s relaxing because you can paint one feather at a time, and beginners can practice gentle shading without needing to draw a full figure.
Materials Needed:
- Watercolor paper
- Gouache paint (white, gray, pale blue)
- Paintbrushes in multiple sizes
- Palette or paint tray
- Optional fixative spray
Steps to Make:
- Lightly pencil several feather shapes that overlap in the center.
- Paint a thin mid-tone base for each feather, leaving gaps for highlights.
- Layer opaque white gouache on top to create soft, textured edges.
- Add fine lines down the feather shafts with a small brush.
- Dry flat and optionally spray-fix so the surface doesn’t smudge later.
11. Tiny Angel Pattern on Ceramic Plate
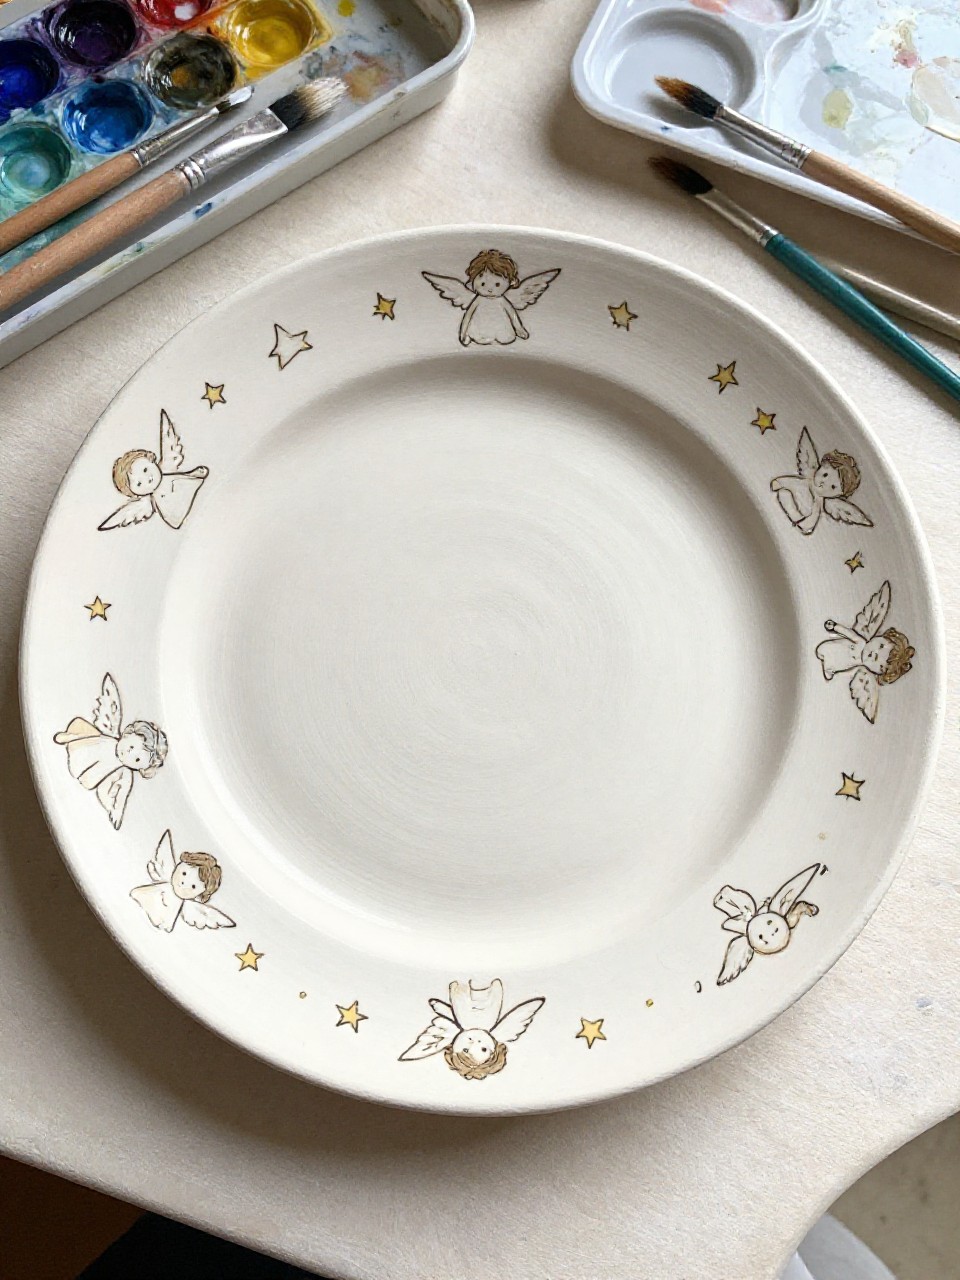
A ceramic plate features a ring of tiny angels around the rim, each one slightly different, with small stars in between. This is great for beginners because you can repeat the same simple shape, and the plate becomes a charming display piece for a shelf or wall stand.
Materials Needed:
- Plain ceramic plate
- Porcelain paint (or paint pens)
- Paintbrushes in multiple sizes
- Palette or paint tray
- Optional dishwasher-safe sealer
Steps to Make:
- Clean the plate well and plan a light pencil guide around the rim.
- Paint small angel shapes evenly spaced, following the plate’s curve.
- Add wings and halos with simple strokes, keeping details minimal.
- Dot in tiny stars and add a thin border line to tie it together.
- Cure or bake per paint instructions, then display on a plate stand.
12. Angel Over Clouds Canvas Painting
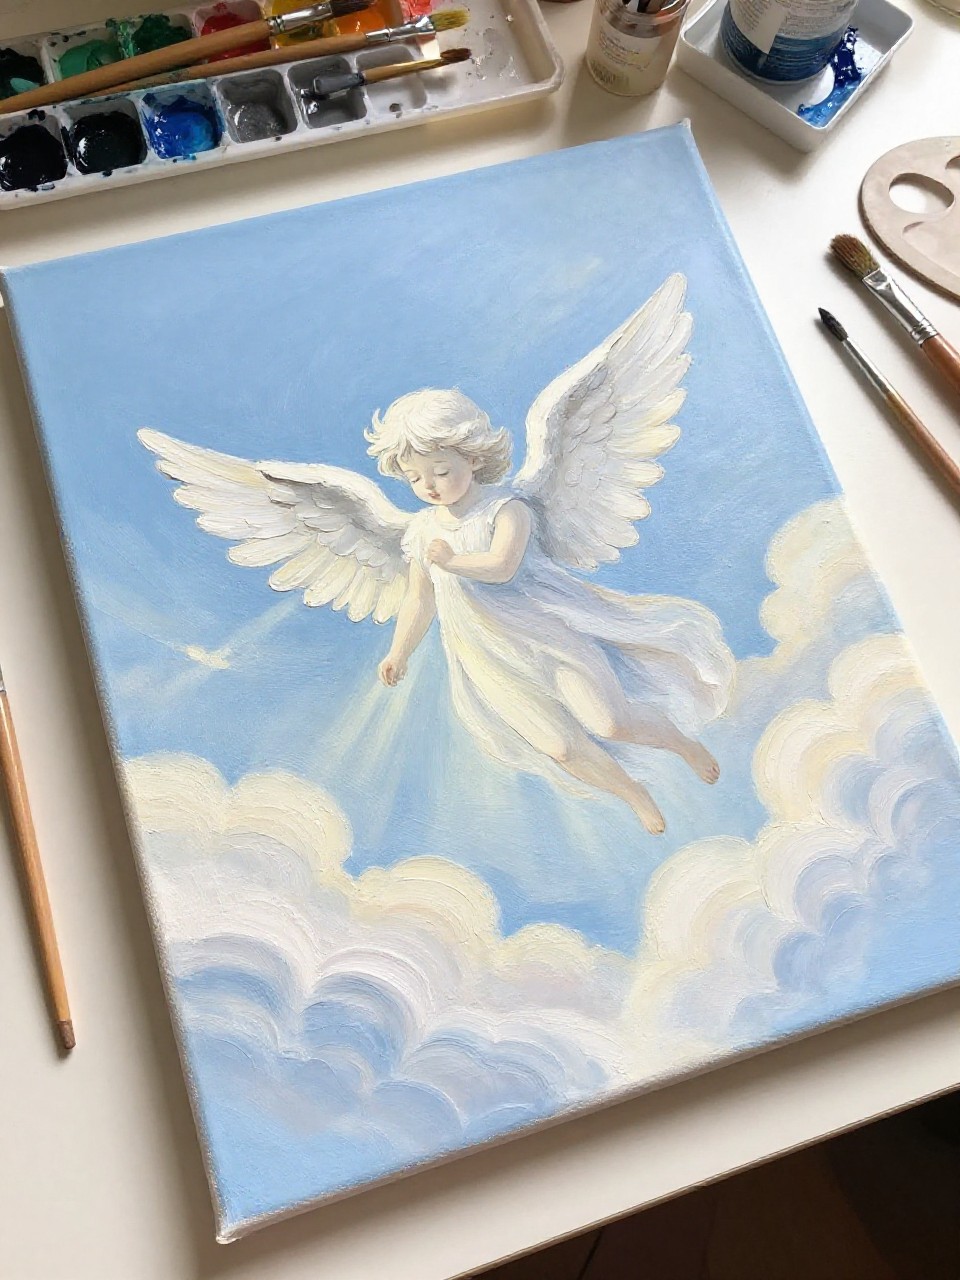
A gentle angel floats above fluffy clouds, with soft light breaking through in the background like morning sun. This one is perfect for a slow weekend paint because clouds are forgiving, and beginners can build them with simple dabbing and layering without needing exact shapes.
Materials Needed:
- Stretched canvas
- Acrylic paint (white, light gray, pale blue, soft yellow)
- Paintbrushes in multiple sizes
- Palette or paint tray
- Optional sealer or varnish
Steps to Make:
- Paint a pale blue sky and blend in a little warm light near the center.
- Sketch the angel shape lightly where the brightest area will be.
- Dab clouds with a round brush, layering white over light gray for depth.
- Paint the angel in soft whites and add wing texture with quick strokes.
- Let dry, seal, and hang it where it feels airy and open.
13. Folk Art Angel on Canvas Panel
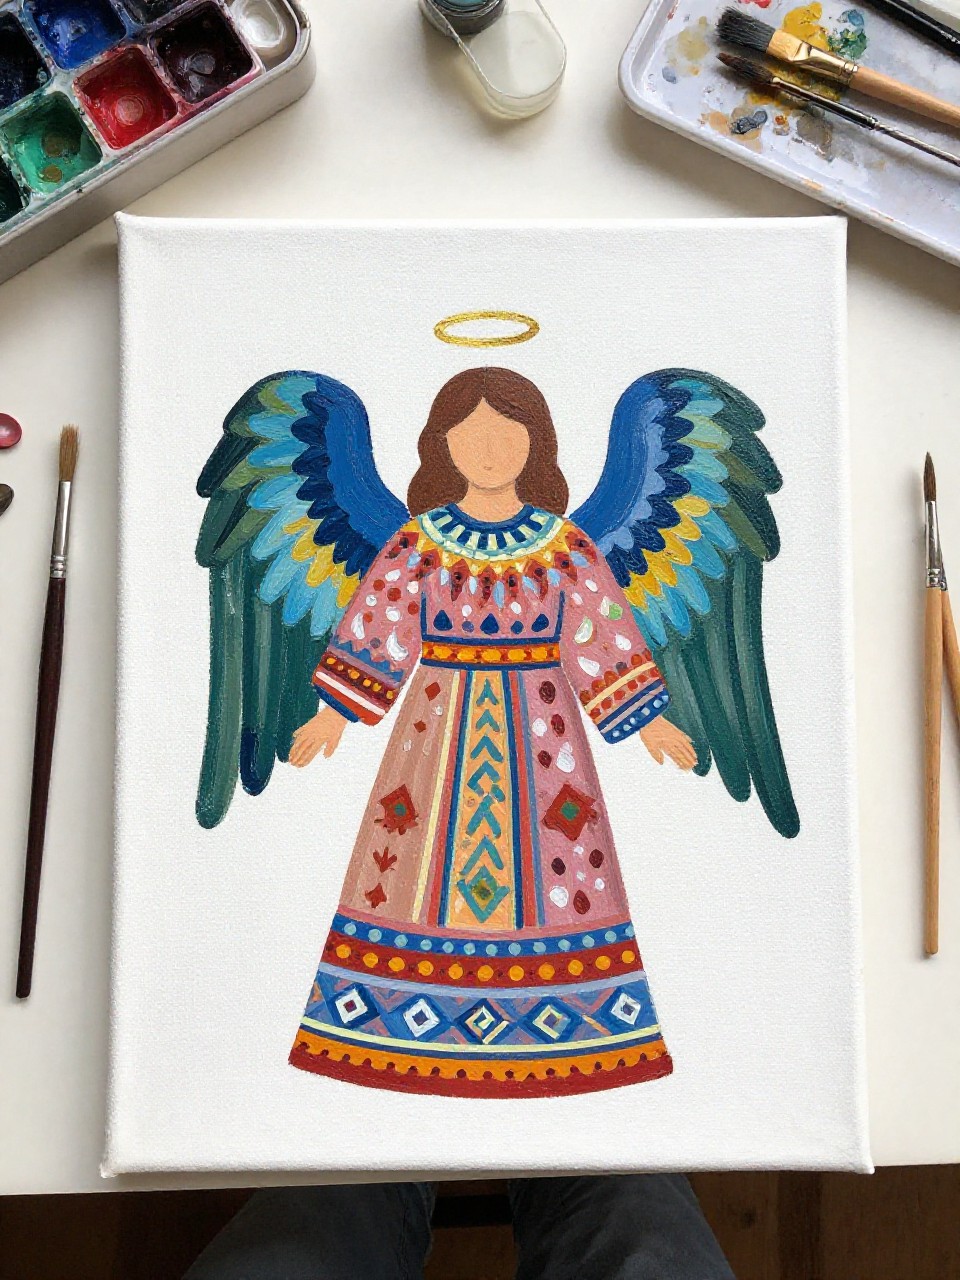
A folk art angel with a simple face, patterned robe, and bold wings stands centered with a cozy, handmade look. It’s satisfying because the shapes are clear and easy, and beginners can play with dots and stripes for the patterns without worrying about realism.
Materials Needed:
- Canvas panel
- Acrylic paint (red, blue, cream, white, gold)
- Paintbrushes in multiple sizes
- Palette or paint tray
- Optional matte varnish
Steps to Make:
- Sketch a simple angel body with big wing shapes and a round face.
- Paint the robe and wings in solid color blocks and let them dry.
- Add folk patterns like dots, stripes, and small flowers with a thin brush.
- Paint a tiny halo and outline a few edges for contrast and clarity.
- Dry, varnish, and prop it on a desk or entryway table.
14. Angel Wing Quote on Painted Wood Sign
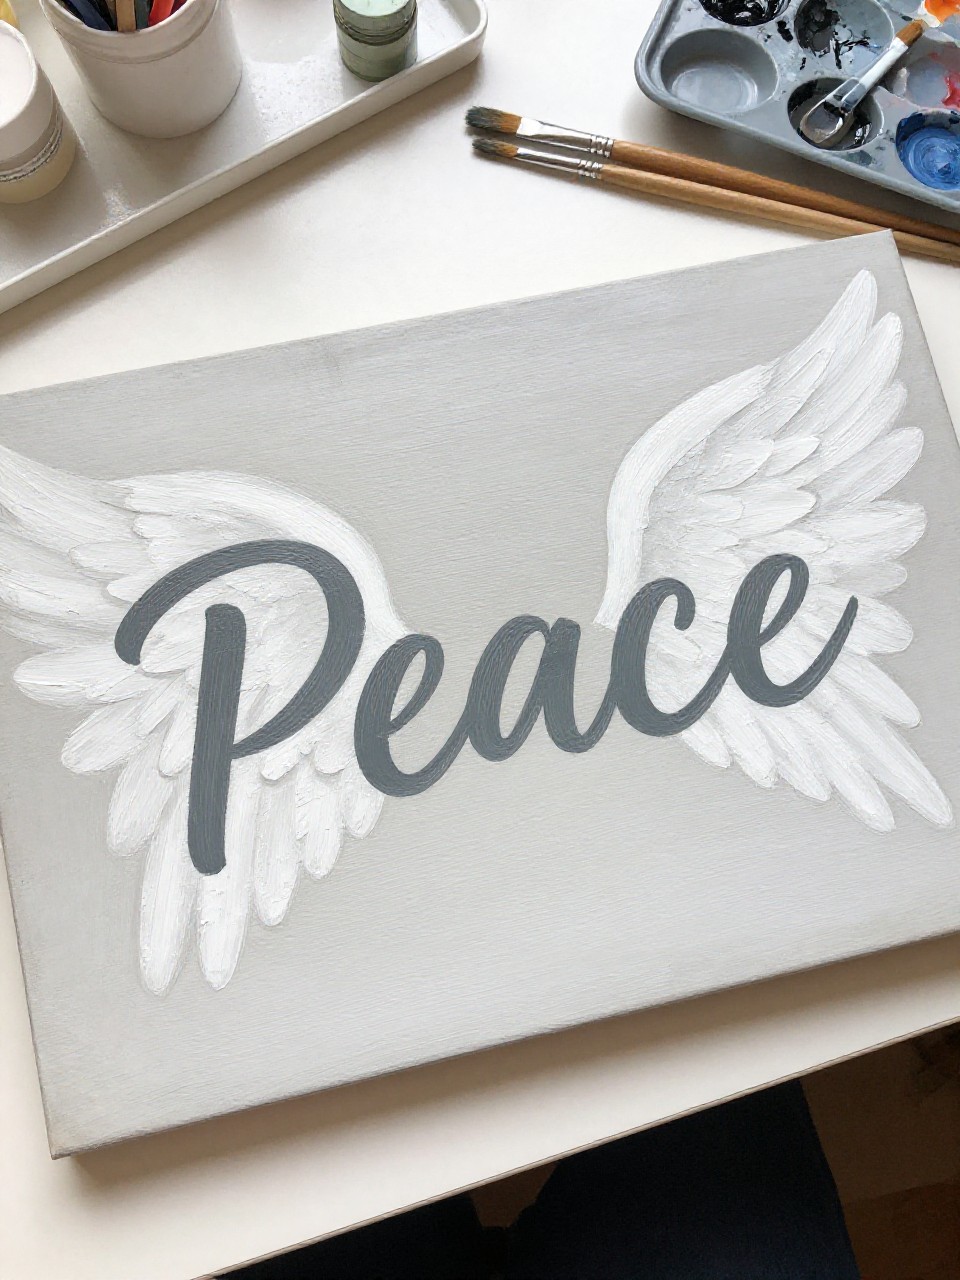
A rustic wood sign shows two angel wings framing a short word like “Peace” or “Hope,” painted in soft tones with a slightly weathered look. This project is relaxing because the lettering can be simple, and the wings don’t need perfect symmetry to look beautiful.
Materials Needed:
- Wood sign board
- Acrylic paint (white, gray, beige, black)
- Paintbrushes in multiple sizes
- Palette or paint tray
- Optional clear varnish
Steps to Make:
- Paint the board a light base coat and dry-brush a little gray for texture.
- Lightly pencil the word in the center and wing shapes on both sides.
- Paint the wings with layered strokes, following the direction of feathers.
- Fill in the word with black or dark gray and add small highlight lines.
- Let dry, varnish, and hang with simple twine or sawtooth hardware.
15. Angel Wings on Terracotta Pot Planter
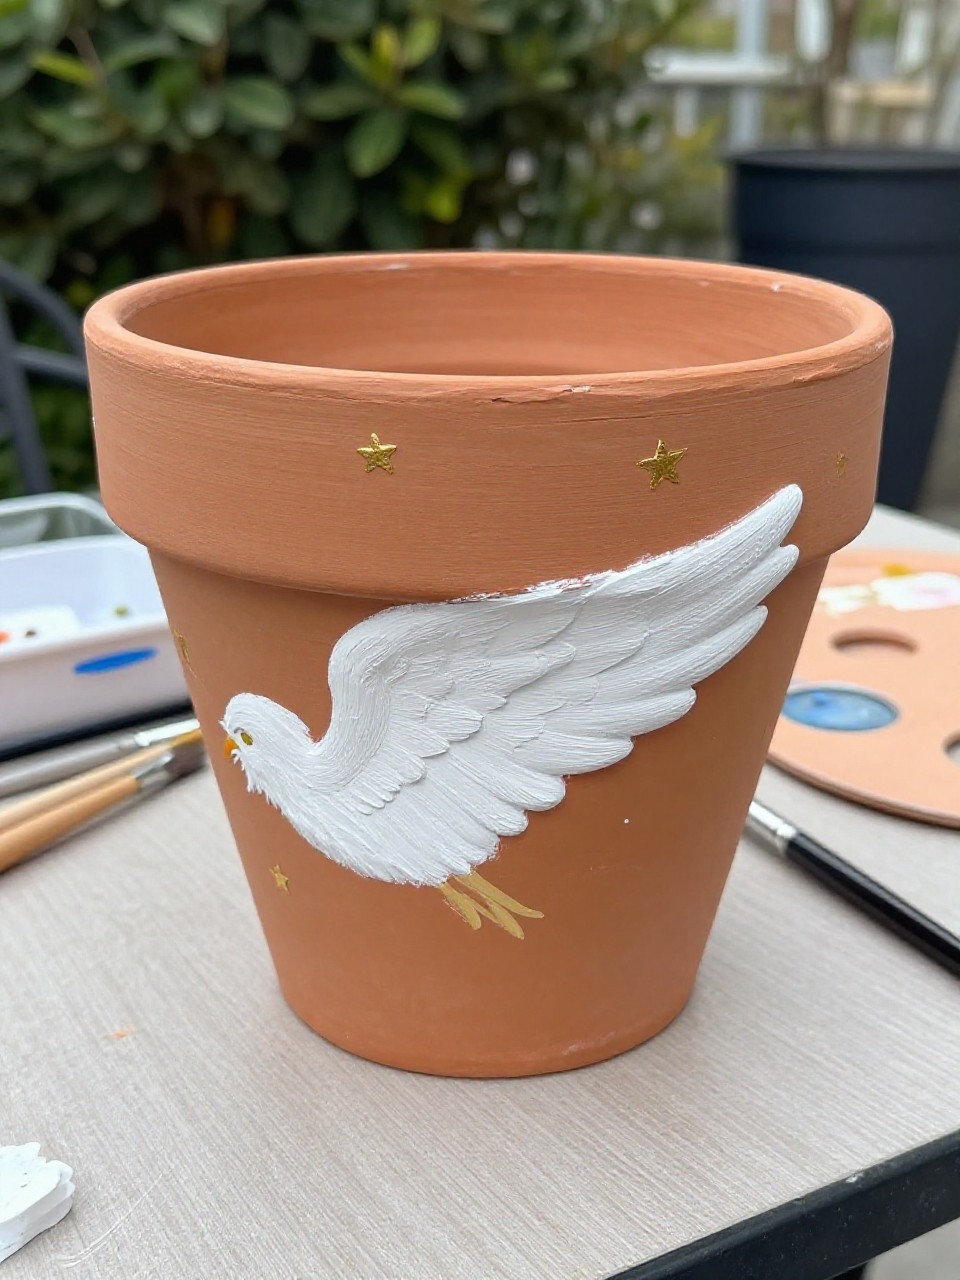
A terracotta pot has white angel wings painted on the front, curving naturally with the pot’s rounded shape, plus tiny stars near the rim. It’s a cheerful beginner project because terracotta is forgiving, and the planter looks sweet on a sunny windowsill with a small plant.
Materials Needed:
- Terracotta pot
- Acrylic paint (white, cream, gold)
- Paintbrushes in multiple sizes
- Palette or paint tray
- Optional outdoor sealer
Steps to Make:
- Wipe the pot clean and paint a thin base coat if you want a lighter surface.
- Lightly sketch wing placement so it curves with the pot’s front.
- Paint wing shapes in white, building opacity with two to three layers.
- Add feather strokes and small gold star dots around the top area.
- Dry completely, seal inside and out if needed, and plant something small.
16. Angel Reflection in a Puddle Canvas Painting
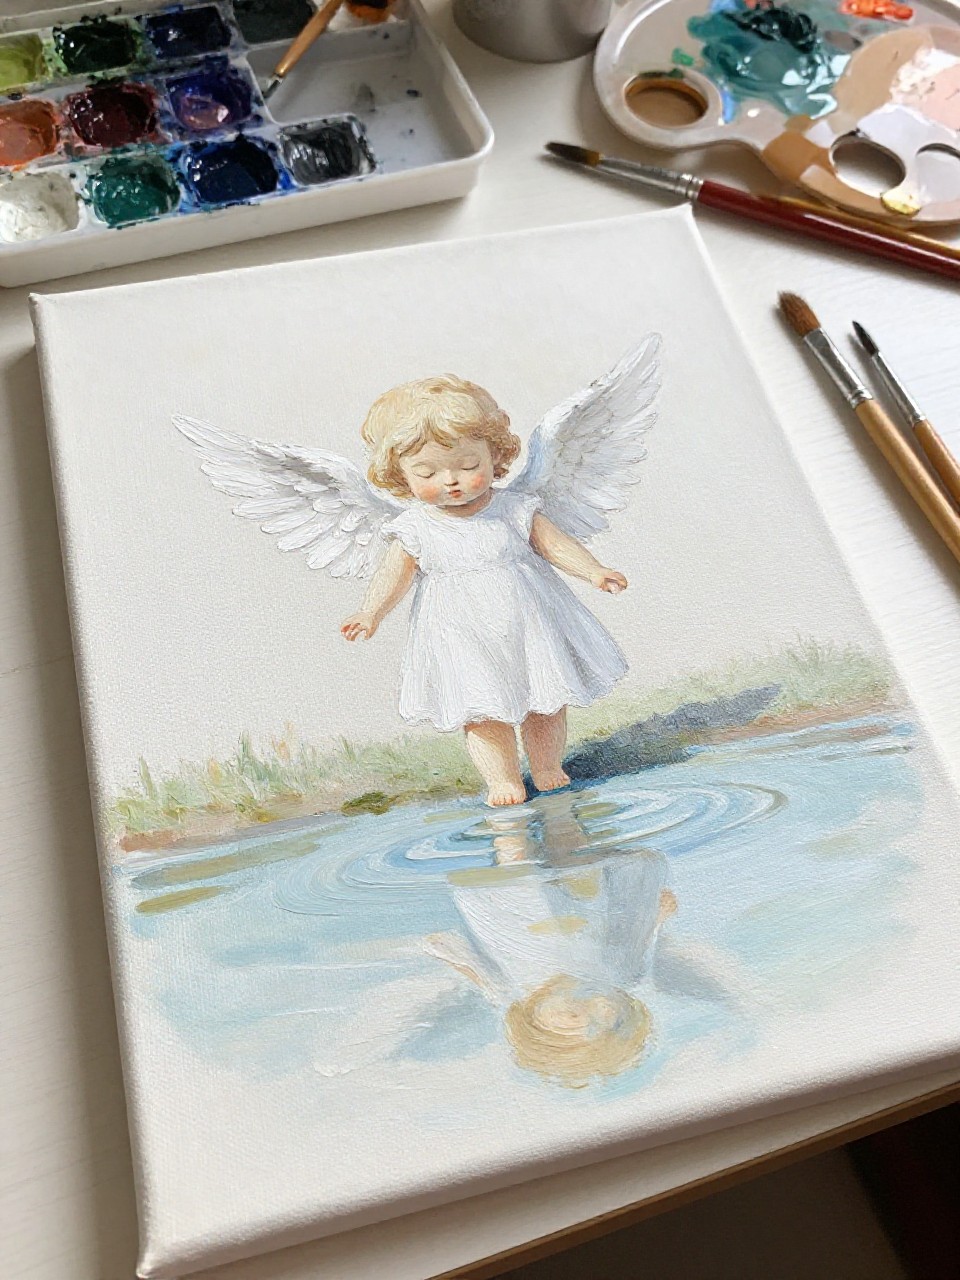
A calm scene shows an angel standing near a puddle, with the angel’s reflection painted softly in the water below. This feels special to make because reflections don’t need perfect detail—just gentle shapes and blended edges—so beginners can create a “wow” effect with simple brushwork.
Materials Needed:
- Stretched canvas
- Acrylic paint (gray-blue, white, brown, pale yellow)
- Paintbrushes in multiple sizes
- Palette or paint tray
- Optional sealer or varnish
Steps to Make:
- Paint a simple ground and sky background with muted, blended colors.
- Sketch a small angel figure and a puddle shape beneath it.
- Paint the angel with soft whites and muted shadows to keep it dreamy.
- Mirror the shape in the puddle with thinner paint and blur edges slightly.
- Let dry, add a few light highlights, seal, and display in a quiet corner.