


Table of Contents Show
If your preschooler points out every tree on your walk or brings home pockets full of leaves, these crafts are for you. Little hands love big shapes and sensory surprises—and trees are perfect for that. The projects below look wow-worthy but stay simple, calm, and mess-manageable.
Gather a few basics, set out a tray, and let your kiddo explore textures, colors, and nature stories while making art you’ll be proud to display.
1. Puffy Tissue Blossom Tree
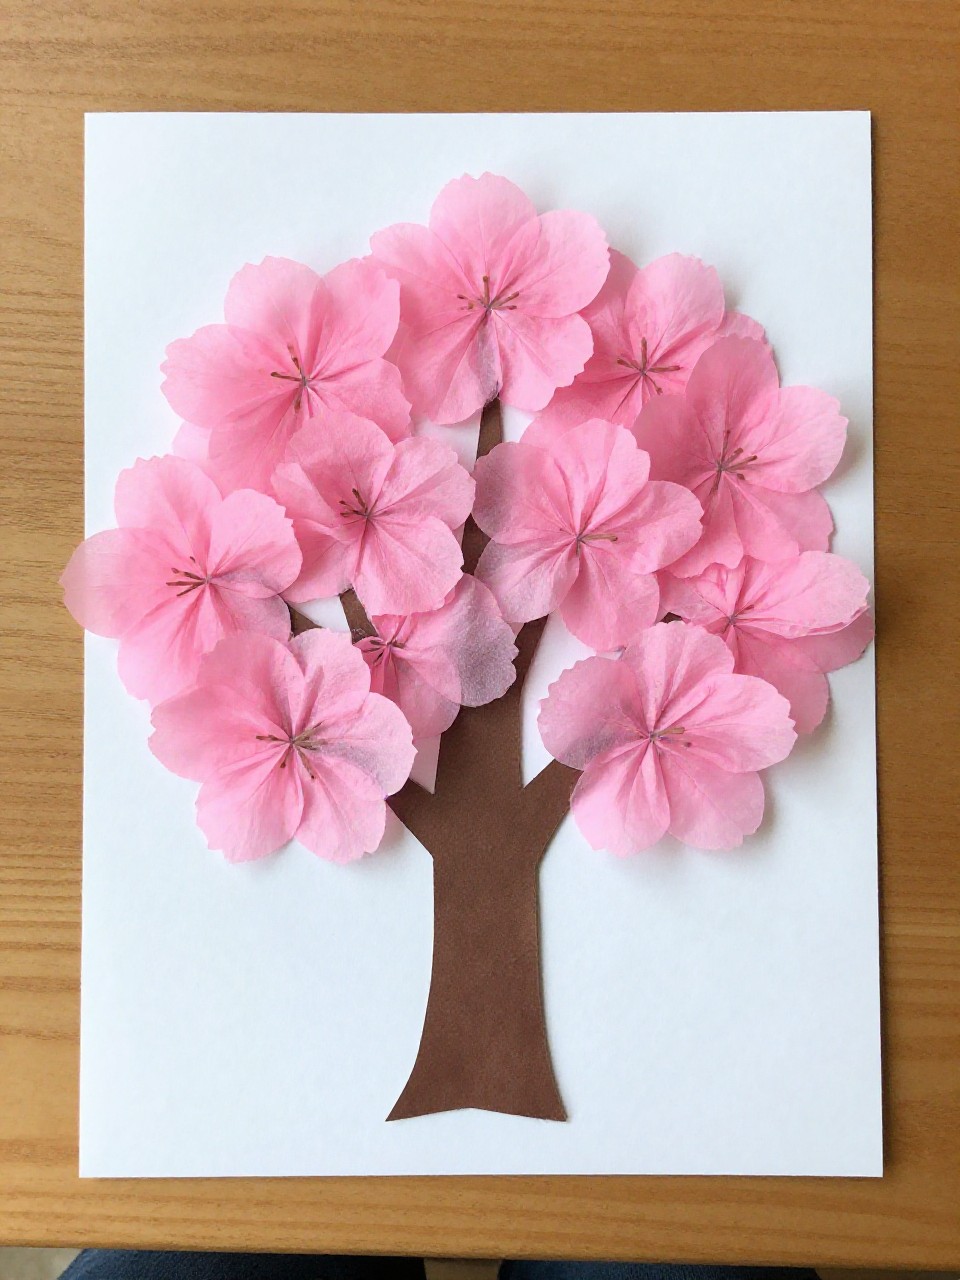
Soft, squishy tissue blossoms pop off the page like spring flowers. Kids get instant satisfaction crumpling tiny tissue squares and gluing them onto branches they drew themselves.
Materials Needed:
- Brown marker or crayon
- Tissue paper squares (pink/white)
- Glue stick
How to make it:
For People Who Love to Make Things ✂️
- 1. Draw a simple tree trunk with branches on cardstock using the brown marker.
- 2. Pinch and crumple tissue squares into tiny blossoms.
- 3. Dab glue along branches and press on blossoms.
- 4. Add a few fallen blossoms along the “ground” for a sweet finish.
2. Bubble Wrap Evergreen Prints
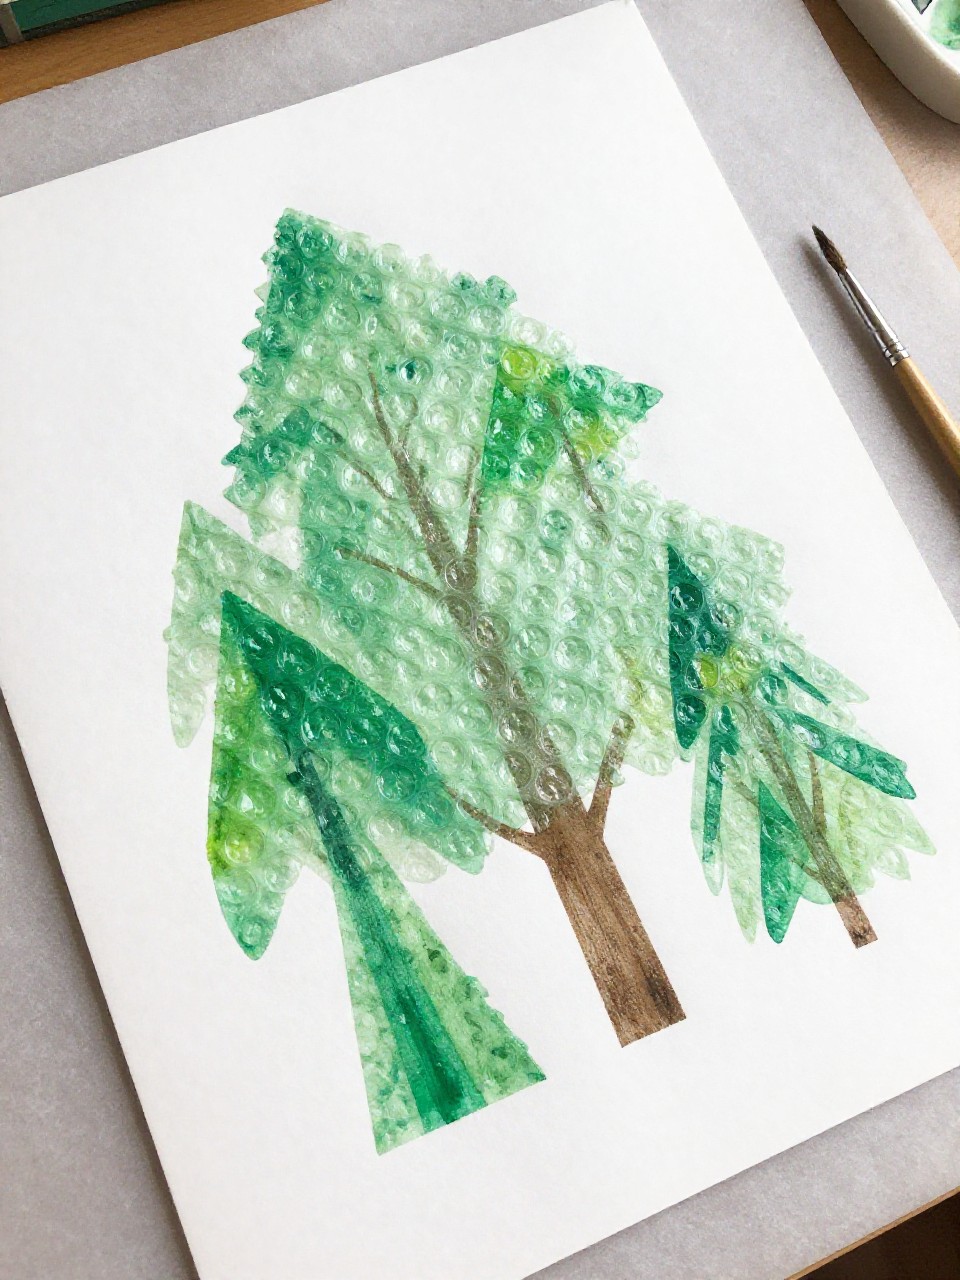
Bubble wrap makes perfect tiny pine needles for bold, graphic trees. The popping texture turns a simple print into a forest of cheerful evergreens.
Materials Needed:
- Bubble wrap
- Green paint
- Cardstock
How to make it:
- 1. Cut bubble wrap into simple triangle shapes.
- 2. Paint the bumpy side green with a brush.
- 3. Press the painted bubble wrap onto cardstock to print a tree.
- 4. Repeat with different sizes to make a forest; add a brown rectangle trunk if you like.
3. Yarn-Wrapped Branch Tree
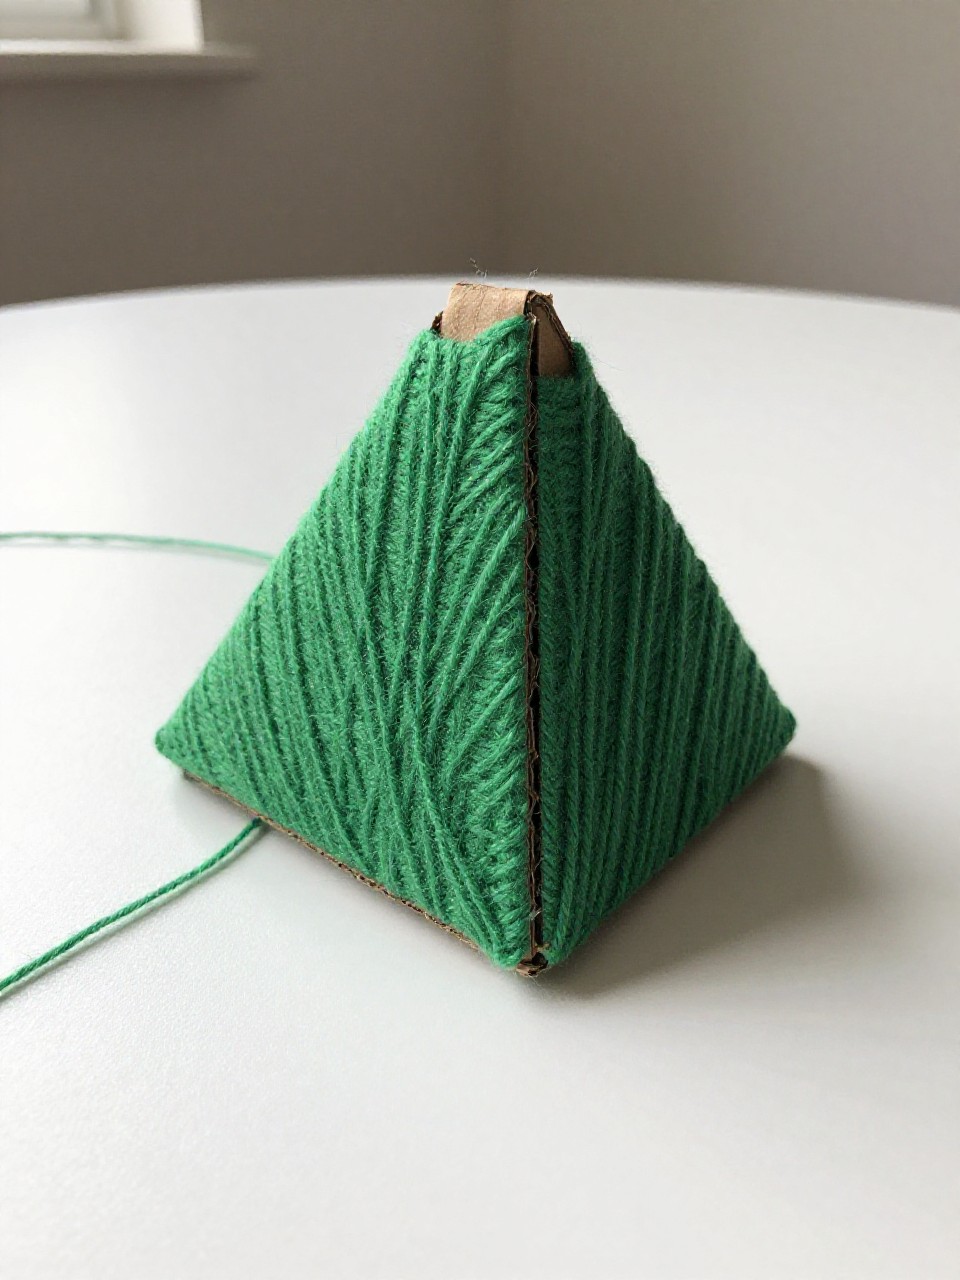
Chunky yarn turns a cardboard triangle into a cozy, modern tree. The wrap is soothing and builds fine-motor strength with a stunning result.
Materials Needed:
- Cardboard triangle
- Green yarn
- Tape
How to make it:
- 1. Cut a cardboard triangle and tape the yarn end to the back.
- 2. Wrap yarn around and around, crisscrossing until the triangle is covered.
- 3. Tuck or tape the yarn end to the back.
- 4. Add a tiny cardboard rectangle for a trunk if desired.
4. Sticker Dot Leaf Canopy
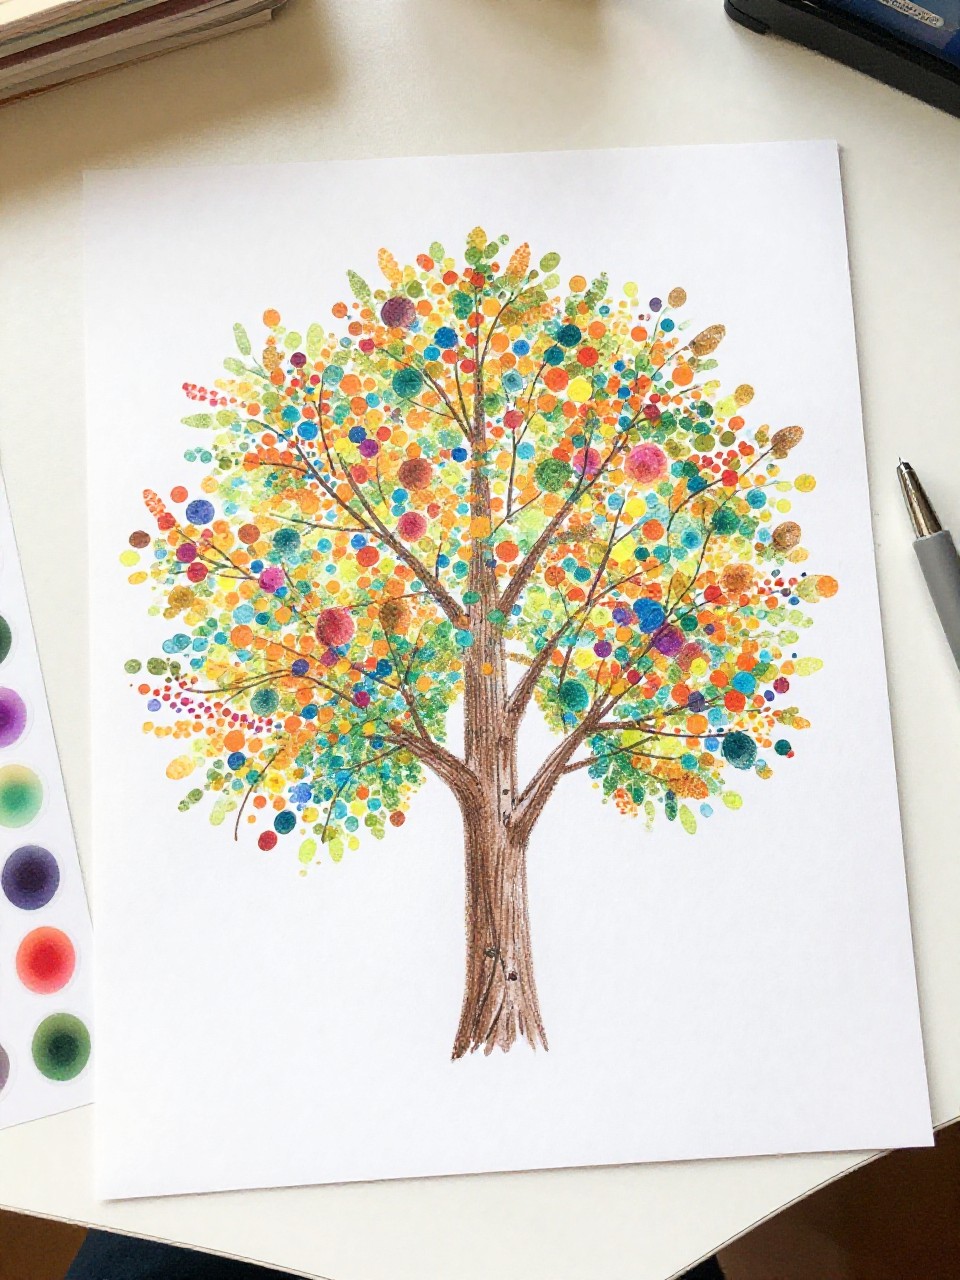
Dot stickers become a bright canopy that kids can place with satisfying peel-and-stick focus. The rainbow of dots looks like sunlight through leaves.
Materials Needed:
- Dot stickers (various colors)
- Brown marker
- Cardstock
How to make it:
- 1. Draw a simple trunk and branching lines on cardstock.
- 2. Invite kids to fill the canopy area with colorful dot stickers.
- 3. Layer stickers for a full, leafy look.
- 4. Add a few dots “falling” beside the tree.
5. Nature Collage Bark Tree

Real textures make this tree feel like a forest floor in artwork form. The found materials add earthy color shifts and a sensory story.
Materials Needed:
- Cardboard
- White glue
- Collected nature bits (bark crumbs, seeds, tiny leaves)
How to make it:
- 1. Cut a simple tree silhouette from cardboard.
- 2. Brush glue on the trunk area and press on bark bits or seeds.
- 3. Glue small leaves to the canopy area.
- 4. Let it dry, then gently shake off loose pieces.
6. Watercolor Resist Night Tree
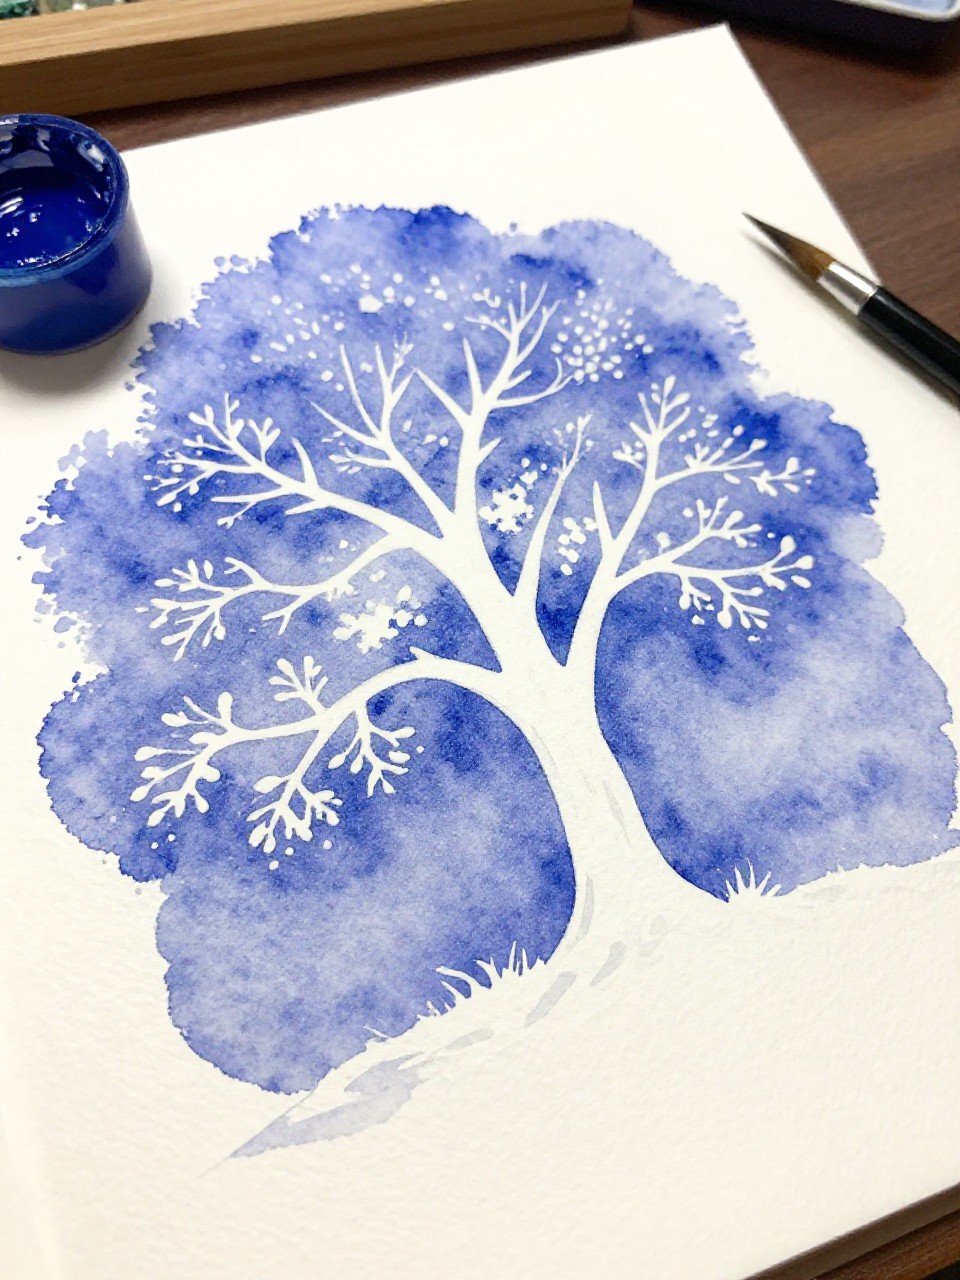
Crayon lines stand strong under dreamy watercolor skies. The high-contrast silhouette makes the tree glow like moonlight art.
Materials Needed:
- White crayon or oil pastel
- Watercolor paints
- Watercolor paper
How to make it:
- 1. Draw a tree trunk and branches with white crayon, pressing firmly.
- 2. Paint the whole page with deep blues and purples.
- 3. Watch the resist reveal your hidden tree.
- 4. Dab in a yellow moon if desired.
7. Cork-Stamped Autumn Grove
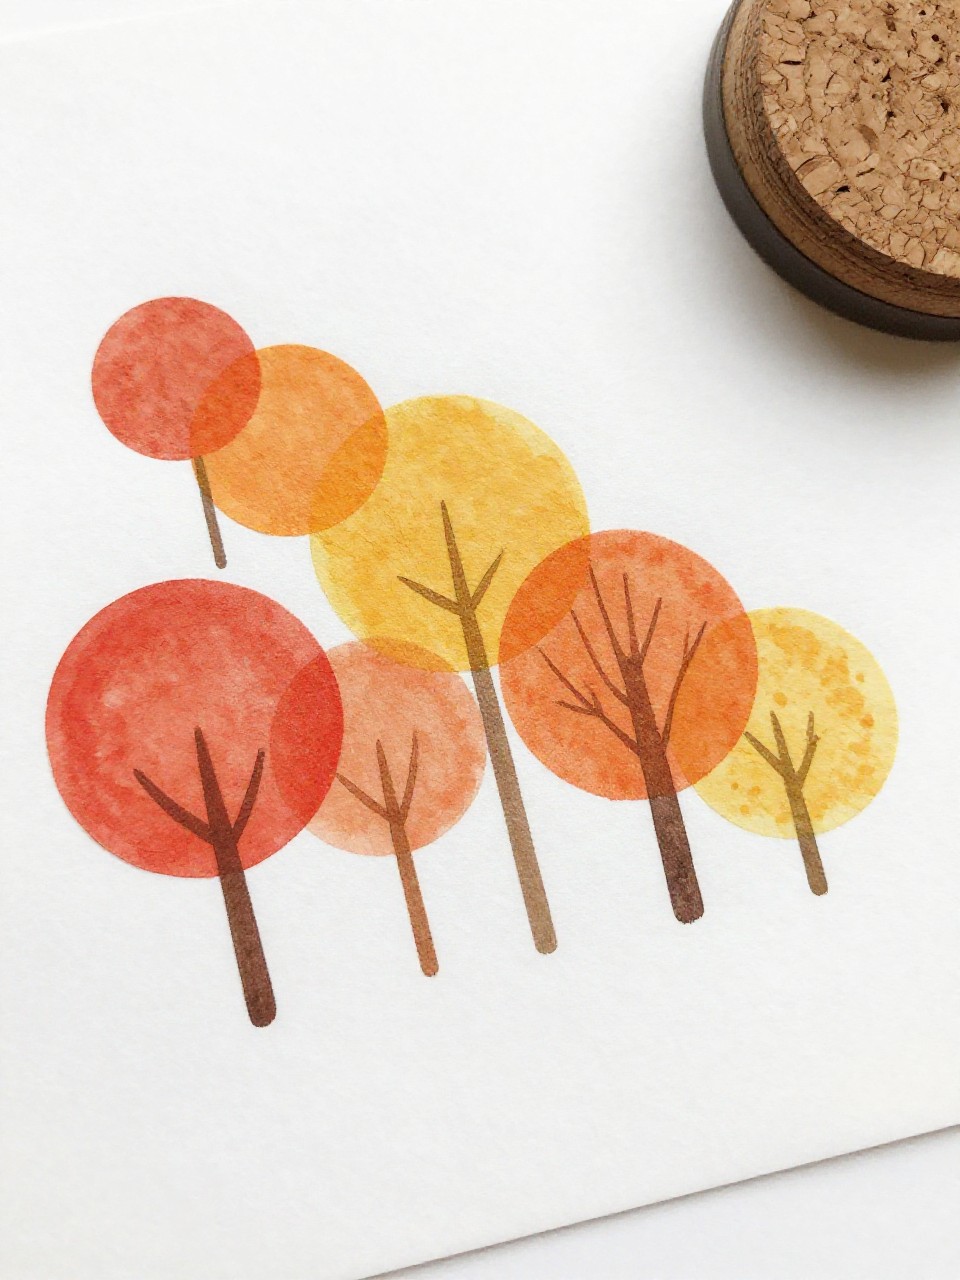
A cork makes perfectly round, crisp leaf prints with easy hand grips for kids. The overlapping circles feel like crunchy fall vibes.
Materials Needed:
- Wine cork or bottle cork
- Paints (red, orange, yellow)
- Paper
How to make it:
- 1. Draw a few simple trunks with a brown marker.
- 2. Dip the cork in paint and stamp circles above each trunk.
- 3. Layer warm colors to build a canopy.
- 4. Add a few stamps at the base for fallen leaves.
8. Paper Strip Weaving Tree

Kids love the over-under rhythm that turns scraps into plaid-style leaves. The woven canopy looks fancy but is totally kid-made.
Materials Needed:
- Paper strips (greens)
- Cardstock
- Glue stick
How to make it:
- 1. Glue several green strips vertically on cardstock, leaving gaps.
- 2. Weave other strips horizontally over-under across them.
- 3. Glue ends to secure; trim edges into a soft canopy shape.
- 4. Draw or glue a brown trunk under the weave.
9. Salt Paint Winter Tree
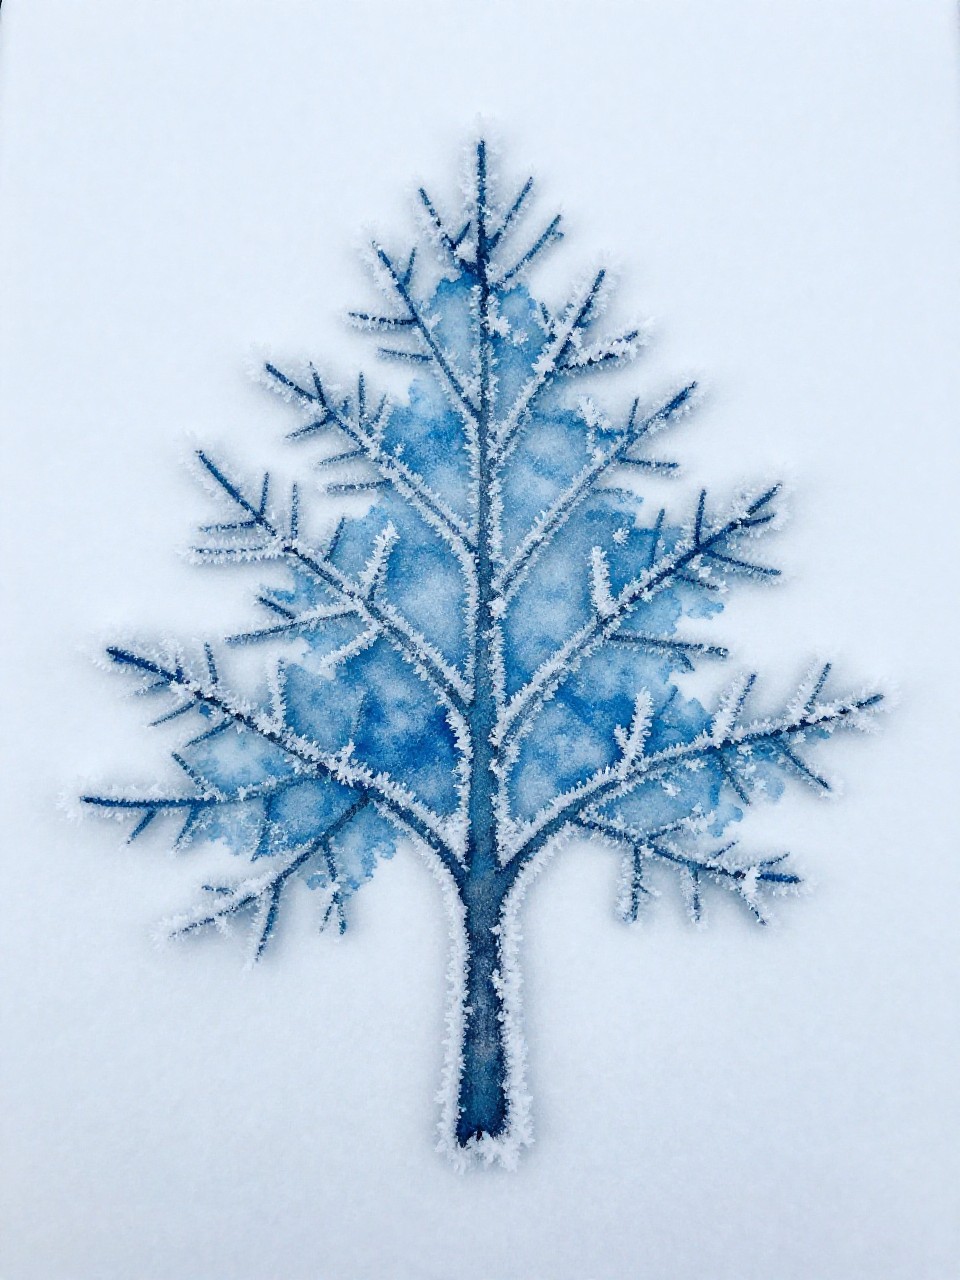
Salt turns wet paint into frosty crystals for a sparkly winter look. It’s science-meets-art with a cool texture payoff.
Materials Needed:
- White glue
- Table salt
- Watercolors or liquid watercolors
How to make it:
- 1. Draw a bare tree with white glue on thick paper.
- 2. Sprinkle salt over the glue lines; shake off extra.
- 3. Touch watercolor to the salty lines and watch color spread.
- 4. Let it dry completely before moving.
10. Leaf Punch Shadow Tree
Paper punches make tiny leaves that kids can glue like confetti. Shadows appear when you layer light and dark greens—simple and striking.
Materials Needed:
- Craft leaf punch (or circle punch)
- Green paper scraps
- Glue stick
How to make it:
- 1. Punch a pile of small leaf shapes from various greens.
- 2. Draw a brown trunk on cardstock.
- 3. Glue darker leaves first, then lighter ones on top.
- 4. Sprinkle a few around the base for depth.
11. Torn-Paper Bark Rubbings
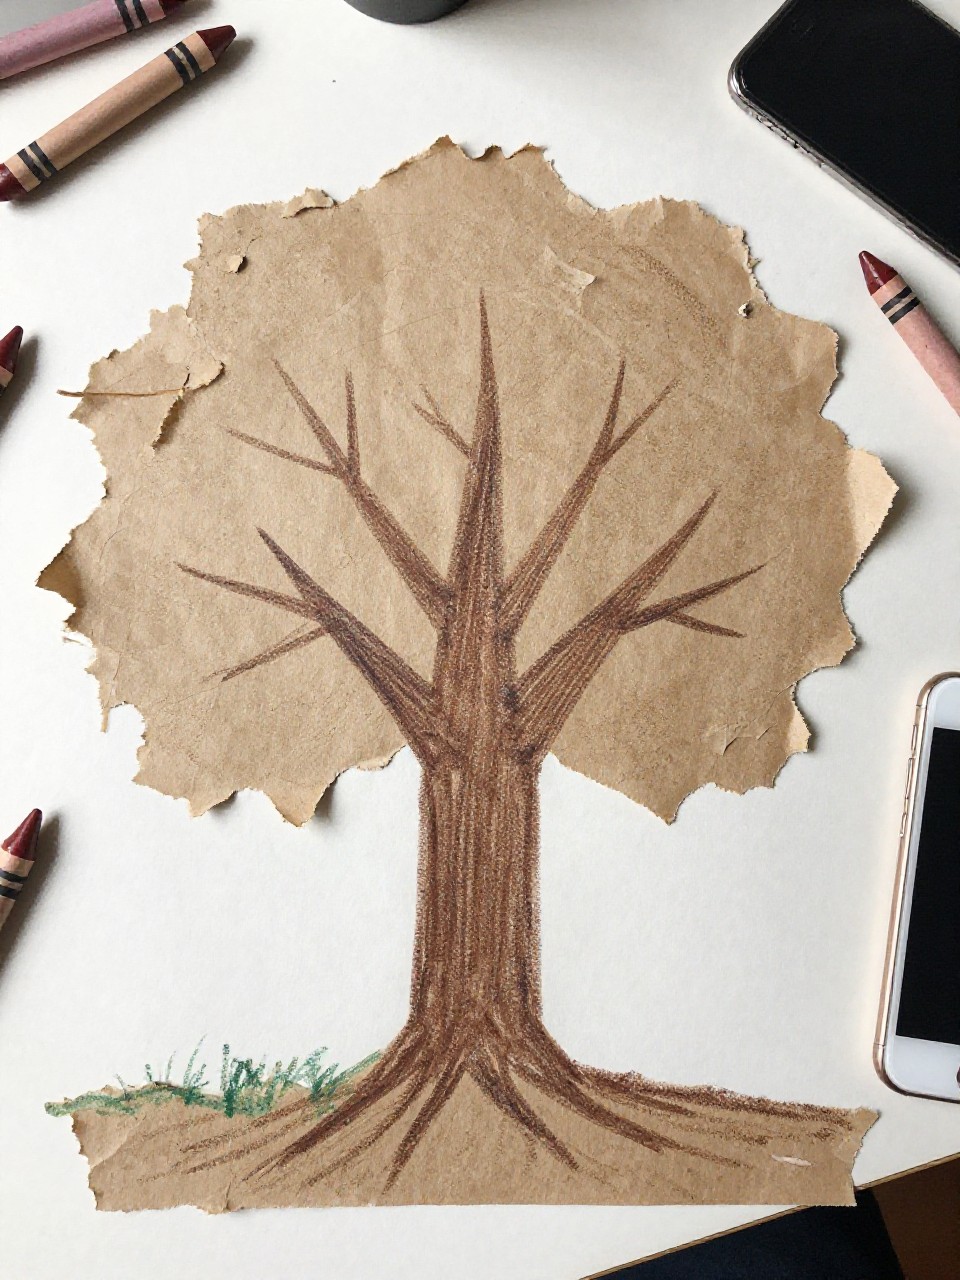
Ripping paper and rubbing crayons reveal surprise textures. The torn edges feel like real bark and give the tree wild character.
Materials Needed:
- Brown paper (grocery bag)
- Crayons (peel paper off)
- White paper
How to make it:
- 1. Tear brown paper into a trunk and branch shapes; glue onto white paper.
- 2. Place another sheet of white paper over a textured board or leaf.
- 3. Rub sideways with crayon to make a bark texture sheet.
- 4. Cut bits of the rubbing and glue onto the trunk for detail.
12. Button Orchard Tree
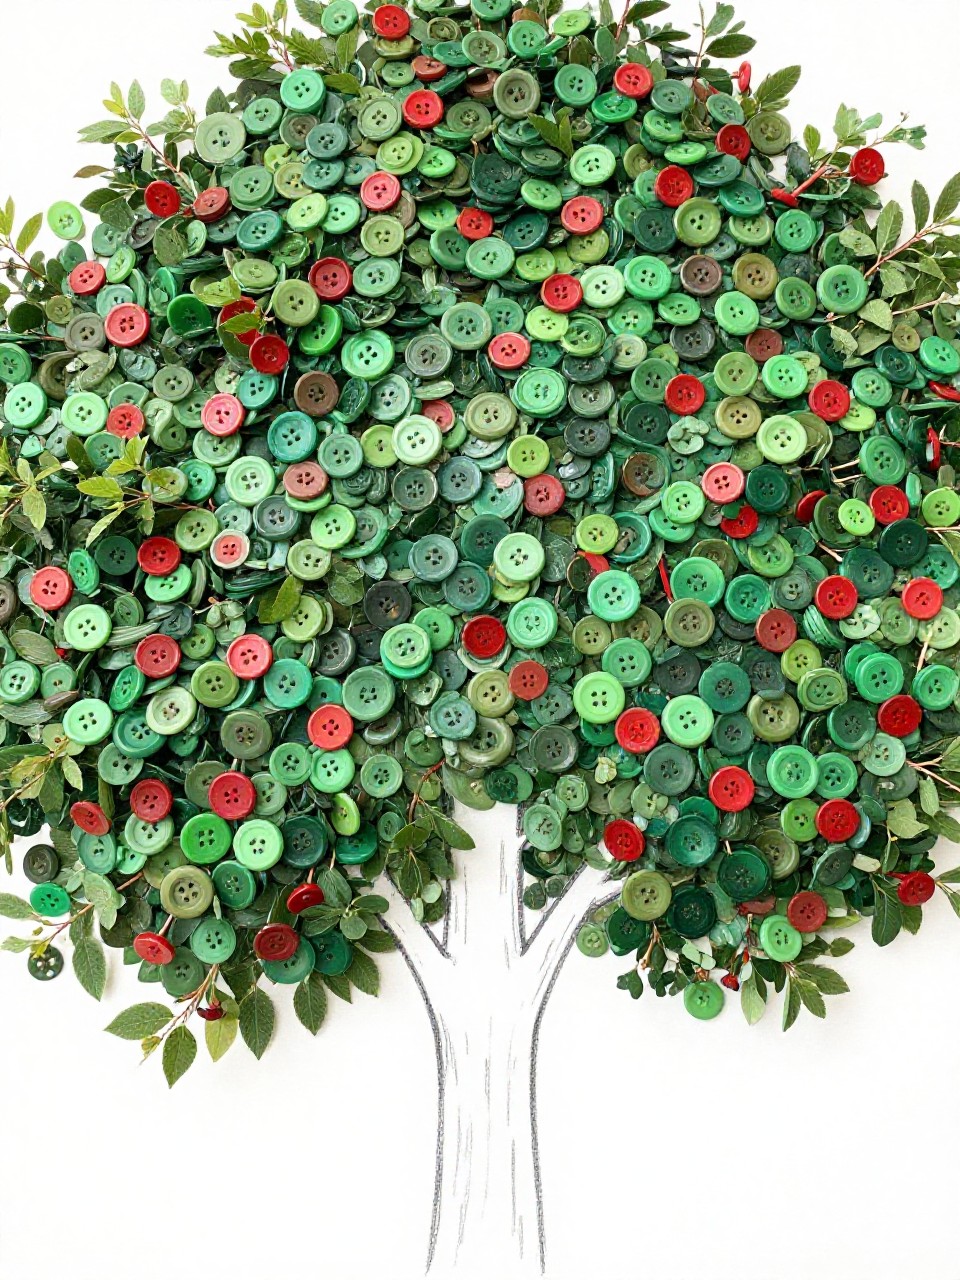
Buttons turn into plump apples or cherries with instant charm. The mix of sizes creates a playful, tactile canopy.
Materials Needed:
- Assorted buttons (reds/greens)
- Cardstock
- White glue
How to make it:
- 1. Draw a trunk and round canopy shape on cardstock.
- 2. Dot glue within the canopy and press on buttons.
- 3. Fill gaps with smaller buttons or draw tiny leaves.
- 4. Let it dry flat so buttons set.
13. Coffee Filter Rainbow Tree
Markers and water transform coffee filters into dreamy watercolor leaves. The soft blend feels magical and light.
Materials Needed:
- Coffee filters
- Washable markers
- Spray bottle or brush with water
How to make it:
- 1. Flatten coffee filters and color patches with markers.
- 2. Lightly mist with water to let colors spread; let dry.
- 3. Cut the filters into leaf clusters.
- 4. Glue clusters above a drawn trunk.
14. Clay Impression Bark Tile
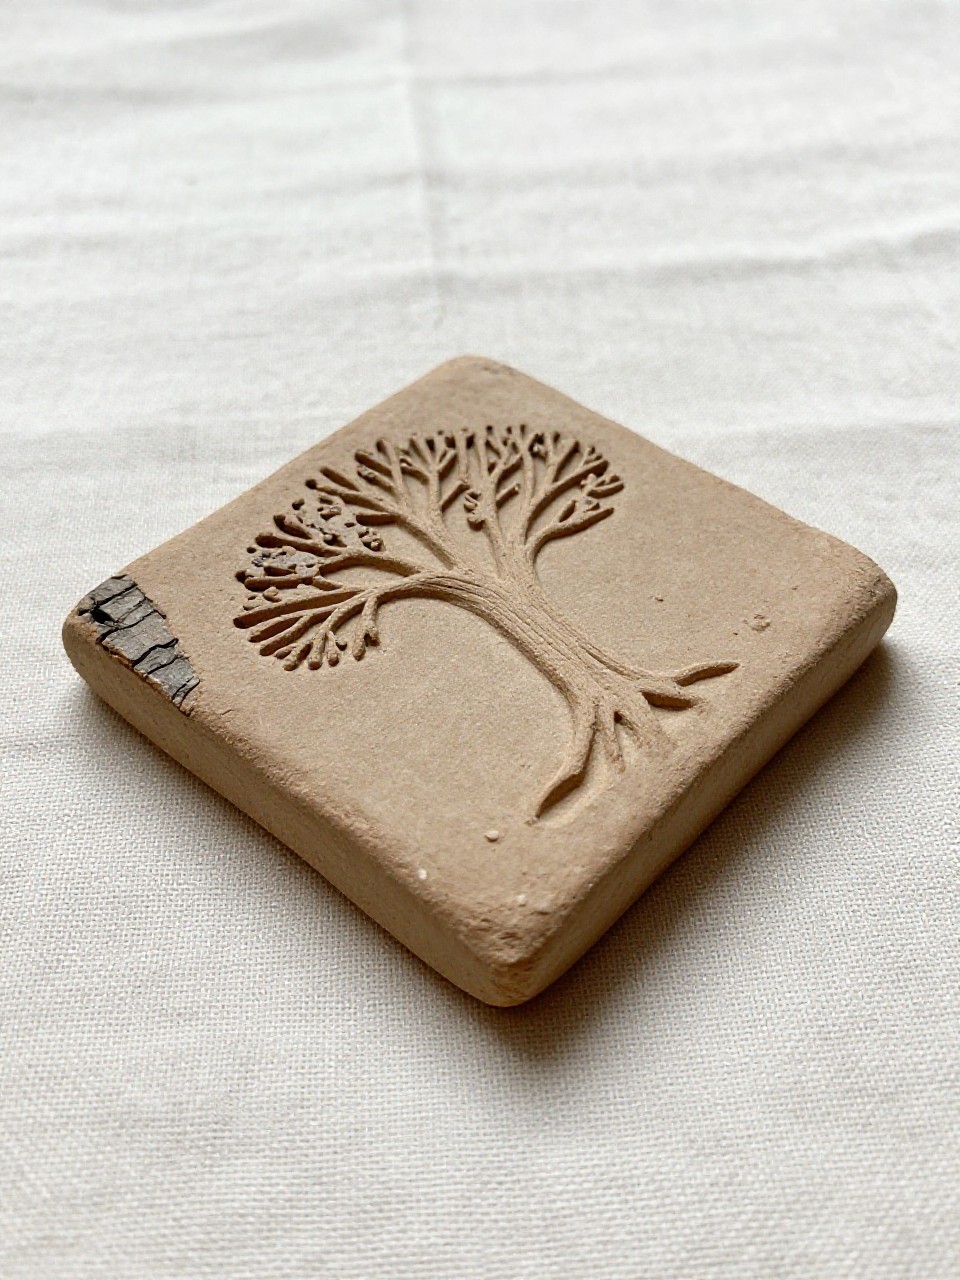
Pressing nature into clay captures real bark patterns forever. The finished tile looks like a tiny fossil from the forest.
Materials Needed:
- Air-dry clay
- Small bark piece or pinecone
- Craft stick
How to make it:
- 1. Flatten a small clay slab with your palm.
- 2. Press bark or pinecone firmly to make texture.
- 3. Use the craft stick to carve a simple trunk-and-branch outline.
- 4. Let dry; optionally rub with watered-down brown paint and wipe off.
15. Paint Scrape Evergreen Cards
Scraping paint makes crisp, modern triangles that look like designer cards. It’s quick, dramatic, and super fun to pull.
Materials Needed:
- Thick paper or blank cards
- Green paint
- Old gift card or scraper
How to make it:
- 1. Place a pea of green paint near the top center of the card.
- 2. Hold the scraper at an angle and pull paint downward into a triangle.
- 3. Repeat to make a cluster of trees in different sizes.
- 4. Add tiny star or snow dots with a white pen.
16. Fingerprint Family Tree
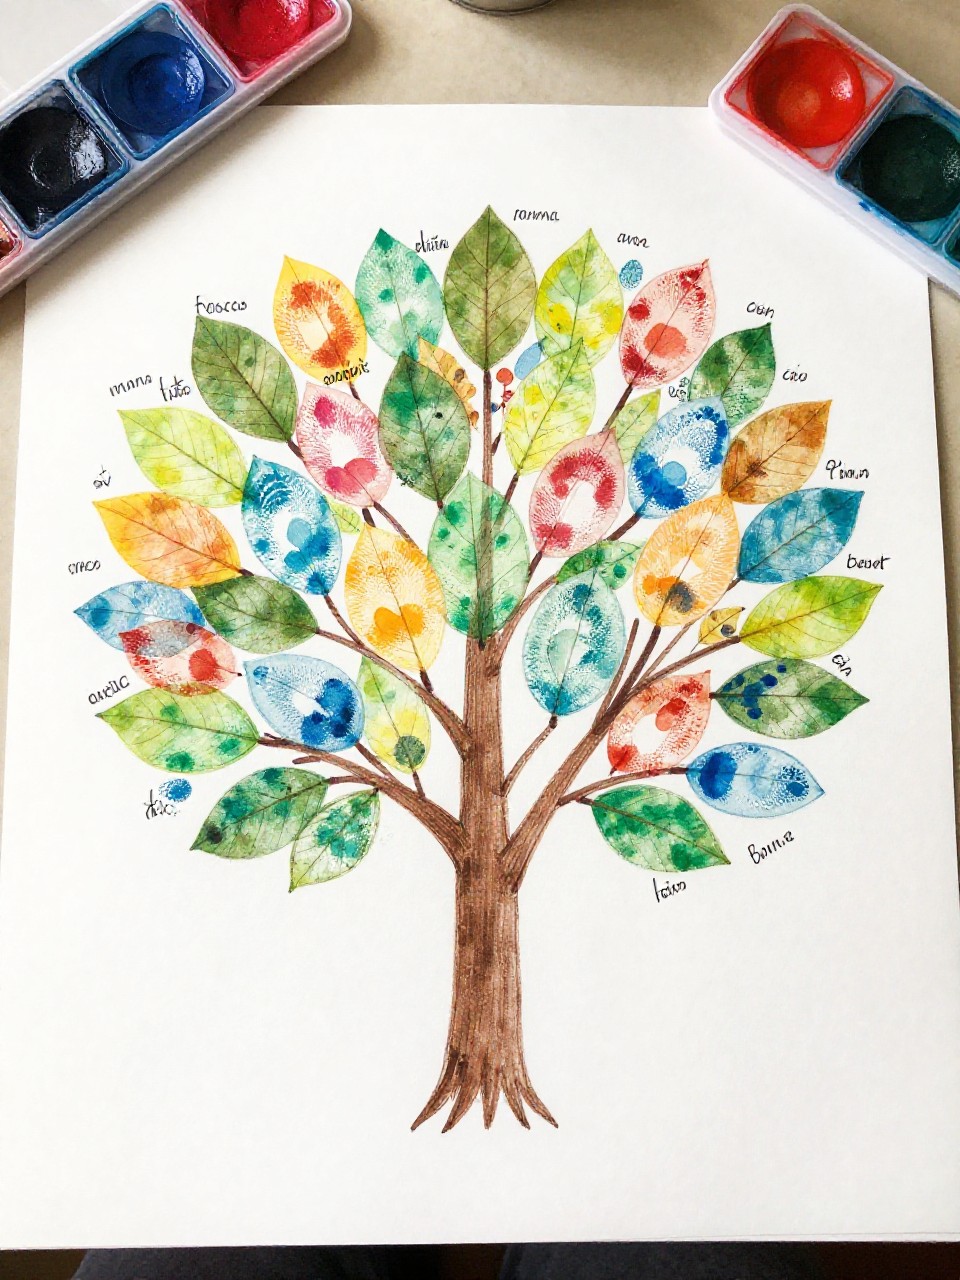
Tiny fingerprints become leaves, fruits, or hearts marking each family member. It’s sweet, personal, and fridge-worthy.
Materials Needed:
- Washable ink pads or paints
- White cardstock
- Black or brown pen
How to make it:
- 1. Draw a simple trunk and branches with the pen.
- 2. Press fingertips in ink/paint and dab onto branches as leaves.
- 3. Add names beside prints if you like.
- 4. Stamp a few prints around the base for fallen leaves.
17. Shaped Sponge Grove Stamps
Cut sponges stamp bold tree shapes with soft, fuzzy edges. Repeating patterns make a cheerful grove that kids can build fast.
Materials Needed:
- Kitchen sponge
- Scissors
- Tempera paint (greens/browns)
How to make it:
- 1. Cut sponge into a triangle or lollipop-tree shape.
- 2. Brush paint onto the sponge for even coverage.
- 3. Stamp onto paper, adding trunks with a brush or finger.
- 4. Layer lighter and darker greens for depth.